Sunbeam HC2900 User manual

Please read these instructions carefully
and retain for future reference.
Hair Cutting Set
Instruction Booklet
HC2900

Sunbeam’s Safety Precautions 1
Features of your Hair Cutting Set 2
Before using your Hair Cutting Set 4
Cutting Hair 4
Care and Cleaning of your Hair Cutting Set 7
Contents

1
Sunbeam is very safety conscious when
designing and manufacturing consumer products,
but it is essential that the product user also
exercise care when using an electrical appliance.
Listed below are precautions which are essential
for the safe use of an electrical appliance:
• Read carefully and save all the instructions
provided with an appliance.
• Always turn the power off at the power outlet
before you insert or remove a plug. Remove
by grasping the plug - do not pull on the cord.
• Turn the power off and remove the plug
when the appliance is not in use and
before cleaning.
• Do not use your appliance with an extension
cord unless this cord has been checked
and tested by a qualified technician or
service person.
• Always use your appliance from a power
outlet of the voltage (A.C. only) marked
on the appliance.
• Close supervision is necessary when your
appliance is being used by children or infirm
persons.
• Young children should be supervised to ensure
that they do not play with the appliance.
• Never leave an appliance unattended while
in use.
• Do not use an appliance for any purpose
other than its intended use.
• Do not place an appliance on or near a hot gas
flame, electric element or on a heated oven.
Do not place on top of any other appliance.
• Do not let the power cord of an appliance hang
over the edge of a table or bench top or touch
any hot surface.
• Do not operate any electrical appliance with
a damaged cord or after the appliance has
been damaged in any manner. If damage is
suspected, return the appliance to the nearest
Sunbeam Appointed Service Centre
for examination, repair or adjustment.
• For additional protection, Sunbeam
recommend the use of a residual current
device (RCD) with a tripping current not
exceeding 30mA in the electrical circuit
supplying power to your appliances.
• Do not immerse the appliance in water
or any other liquid unless recommended.
• Appliances are not intended to be operated
by means of an external timer or separate
remote control system.
If you have any concerns regarding the performance and use of your appliance,
please visit www.sunbeam.com.au or contact the Sunbeam Consumer Service Line.
Ensure the above safety precautions are understood.
Sunbeam’s Safety Precautions
SAFETY PRECAUTIONS FOR YOUR
HAIR CUTTING SET.
• For household use only.
• Never touch the power plug with wet hands
when unplugging it or plugging it in.
• Always keep the hair cutter out of reach of
children.
• If the appliance is used with an extension
cord or electrical portable outlet device they
should be positioned so they are not subject to
splashing or moisture.
• Do not use this appliance continuously for
more than 20 minutes. Allow the appliance to
cool for 5 minutes between each use if being
used for extended periods.
• Do not place the blades in water or any other
liquid white the unit is plugged into the power
outlet.
• Do not use the hair cutter with a broken or
damaged trim guide.
• Do not attempt to sharpen the hair cutter
blades.
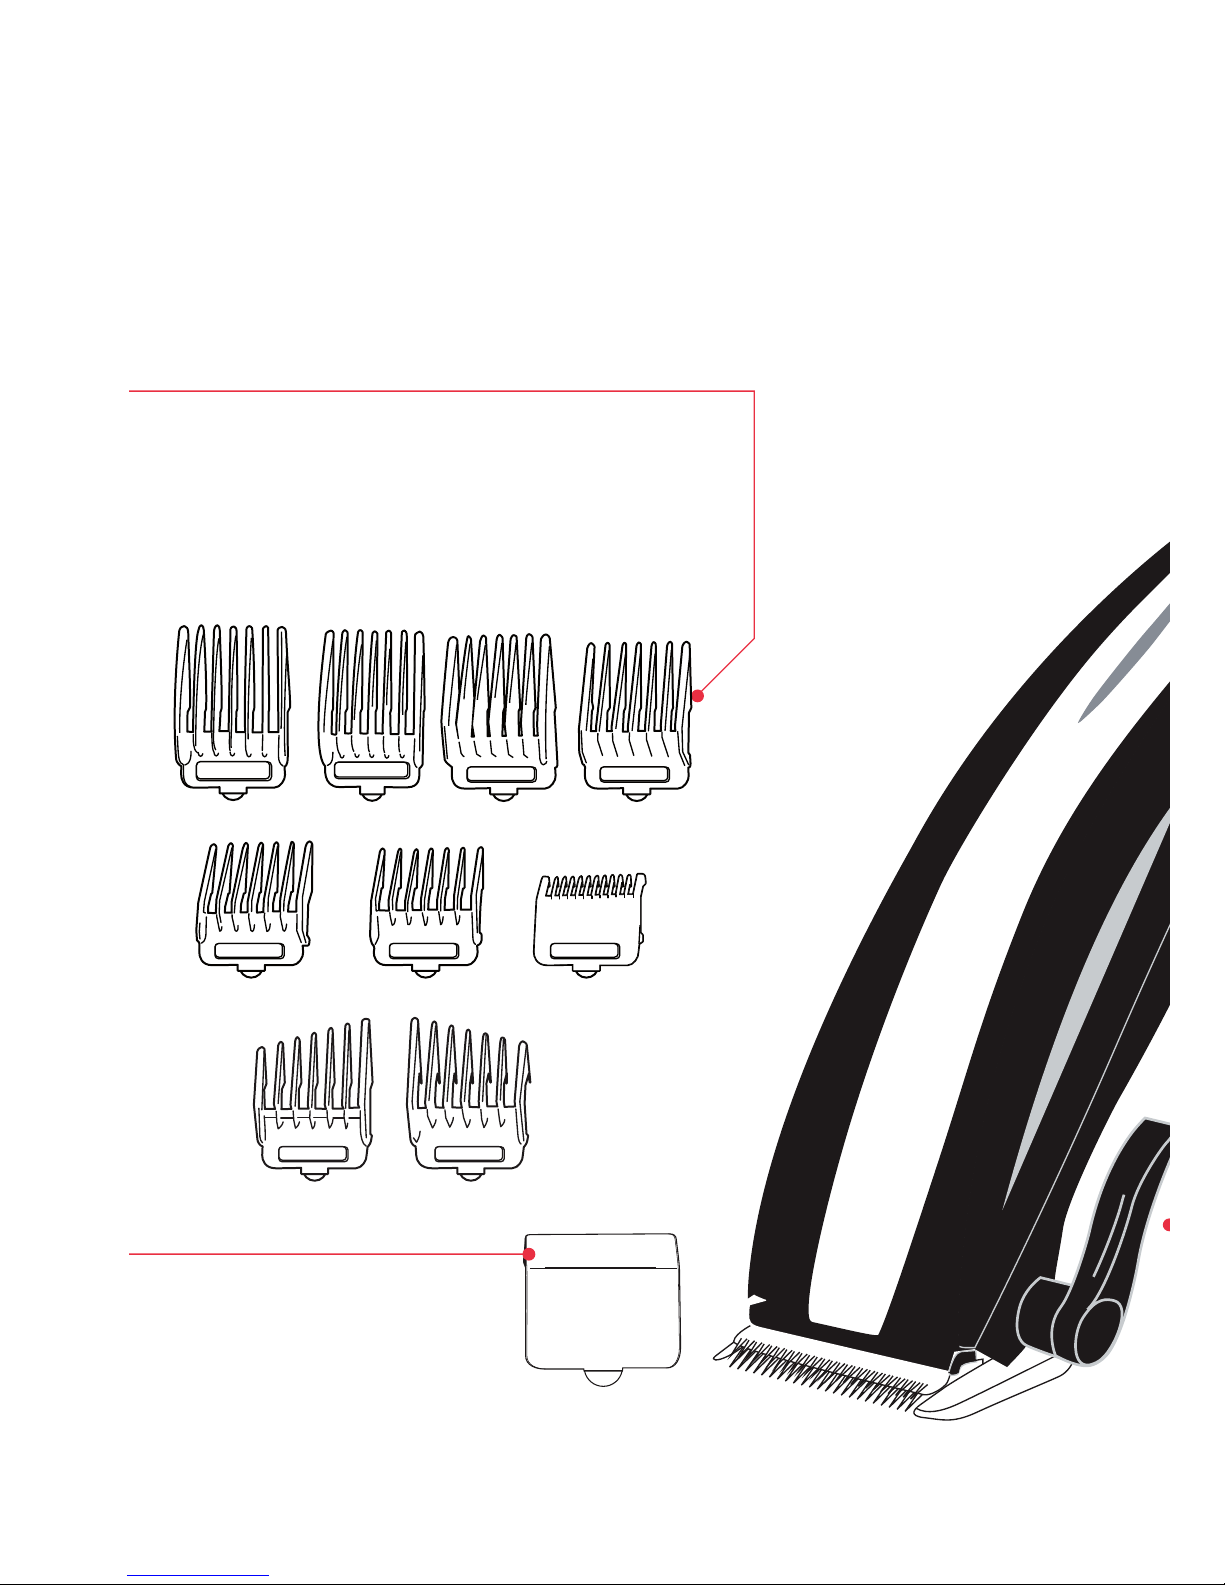
Nine Comb Guides
Allows you to select the desired length for
your hair cut from 3mm to 25mm.
Blade Guard
Protects the blade when in transit
and when in storage.
2
Features of your Hair Cutting Set
#7 – 25mm #6 – 20mm #5 – 16mm
#3 – 9mm #2 – 6mm #1 – 3mm
#4 – 12mm
Right taper Left taper
3
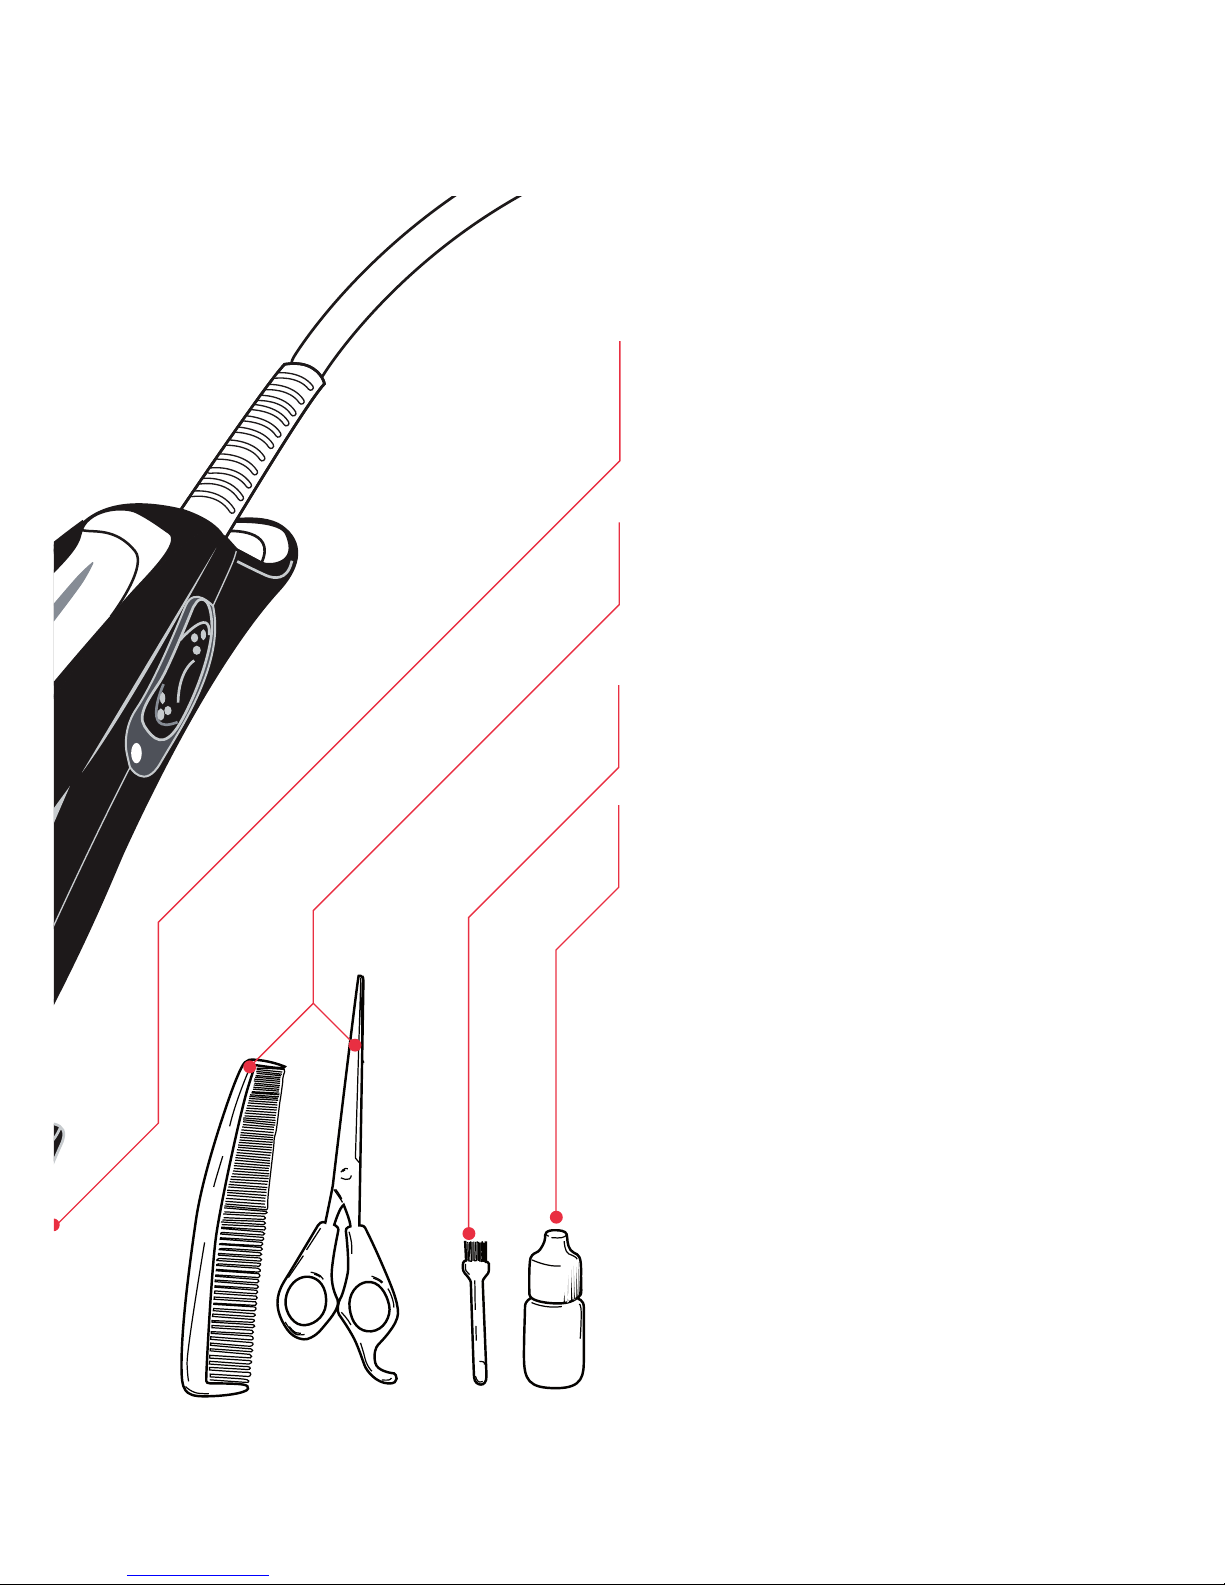
Taper Lever
Allows fine adjustment to finished hair
length without changing to a finer
comb guide
Barber's Comb and Scissors
Allow you to have a professional hair cut
at home.
Cleaning Brush
To remove hair clippings from the blades.
Lubricating Oil
Protects and prolongs the life of the
blades.

The blades of your Hair Cutter should be
oiled before each use. Place a few drops of
oil on the teeth of blades. Only use the oil
supplied with your Sunbeam Hair Cutter.
If the blades are not cleaned and oiled
regularly, or if you do not use sufficient oil,
the blades will begin to wear and become
blunt. This may result in hair catching
between the blades, which may cause
discomfort.
The blades of your Hair Cutter are carefully
aligned at the time of manufacture.
However, should the blades be bumped
during transit or removed for cleaning, they
will need to be realigned. To realign the
blades, see the instructions under Care and
Cleaning.
4
Before using your Hair Cutter
The first time you use your Hair Cutter,
cut a small section of hair to familiarise
yourself with the cutting length of each
comb guide. The comb guides are clearly
numbered and marked with a measurement
which indicates the length of hair
remaining when cutting with each guide.
Sunbeam recommends that you start with
the # 7 comb, then change to the # 6
comb and so on, until you achieve the
desired hair length.
1.Ensure that the cutter is clean and there is
no hair in the blades.
2.Place the person whose hair is about to be
cut so that the top of their head is at eye
level.
3.Comb hair free of tangles. Do not dampen
hair. If hair is longer than 10cm, it might
be easier to cut the hair to a manageable
length using the barber’s comb and scissors
provided before using the cutter. Use the
hair clips to section hair if required.
4.Select the comb guide for the desired
length. To attach the comb guide, hold the
cutter with the top side facing towards you
and the blades pointing upward. Remove
the blade cover and snap the comb guide
into position underneath the blades.
5.Insert the plug into a 230-240V power
outlet and turn the power on.
6.Turn the switch on the side of the cutter to
the on (I) position.
Cutting Hair

5
Cutting hair to one length all over
Starting at the back of the neck with the
blades pointing upwards, gently guide the
cutter up through the hair towards the
top of the head. Do not force the cutter
through the hair quickly, as this may pull
the hair strands and cause discomfort.
Repeat this action on the sides of the
head. To cut the hair on the top of the
head, start at the front and gently guide
the cutter through the hair to the back
of the head. Repeat until all the hair has
been cut.
Shake the cutter regularly over a waste
container during use to remove clippings that
accumulate on the top of the comb guide.
If an excessive amount of hair accumulates
during cutting, switch the cutter off, remove
the comb guide and brush hair from blades
with cleaning brush provided.
If the cutter slows during use, the blades
may need cleaning. To clean, follow the
instructions under Care and Cleaning.
Cutting hair to varying lengths
The Neck
To cut the hair at the back of the neck,
first select the comb guide for the desired
hair length. Starting in the centre, rest
the cutter against the head with the teeth
facing upwards. Guide the cutter upwards,
cutting a little at a time. As you cut, lift
the top of the cutter up towards you.
The Back
To cut the hair at the back of the head,
select the comb guide for the desired hair
length.
The Top
Select the comb guide for the desired hair
length, remembering that the #7 comb will
provide the longest hair length. Starting
at the front of the head and working back
towards the crown, gently guide the cutter
through the hair. Repeat until all hair on
top of the head is cut.
The Sides
For straight lines around the ears, remove
the comb guide from the cutter. Hold the
cutter at right angles to the head with the
top side facing down. With the blades in
contact with the skin, move the cutter
downward. Repeat until a neat line is
achieved.
The Finishing Touch
Attach the #7 comb and run the cutter
over the entire head to ensure that no
strands of hair have been missed.
Using the Taper Comb Guides
The taper guides are used to blend the hair
on the sides and back of the head when
different comb guides are used. Attach the
left taper guide to the cutter and guide the
cutter along the left side of the head along
the line where the different length comb
guides have been used. Attach the right
taper guide and do the same on the right
side of the head so that the hair on the top
of the head blends evenly with that on the
sides.
Cutting Hair (continued)

Trimming Beards and Moustaches
Select the comb guide for the desired
hair length. Start below the chin and
gently guide the cutter upward and toward
your ear. Using the comb and scissors,
comb the moustache downward and trim
carefully along the lip line.
Using the Taper Lever
The taper lever allows for fine adjustment
to finished hair length without the need
to change to a finer comb guide. Use of
the taper lever will prolong the life of your
blades as a different cutting edge is used
in each position. Should hair get caught
between the blades during use, it can be
easily removed by moving the taper lever
up and down while the cutter is turned on.
When used without the comb guides,
positioning the taper lever in the top
position will give a very close cut. As the
lever is moved down, the hair is left longer.
In the lowest position, the length of the cut
is the same as the length achieved with the
#1 comb.
When used with the comb guides, the taper
lever provides a cut between two guides.
For example, when using the #1 comb,
pushing the taper lever up will give a close
cut, resulting in shorter hair. Positioning
the lever down will lengthen the cut,
resulting in slightly longer hair.
TO CUT A COMB GUIDE’S NUMBERED
LENGTH, SET THE TAPER LEVER TO THE
LOWEST POSITION.
6
Cutting Hair (continued)

7
Oiling the Blades
The blades of your Hair Cutter should be
oiled before and after each use. Place a
few drops of oil on the teeth of the blades.
Only use the oil supplied with your Hair
Cutter. If the blades are not cleaned
and oiled regularly, or if you do not use
sufficient oil, the blades will begin to wear
and become blunt. This may result in hair
catching between the blades, which may
cause discomfort.
Make sure that the cutter is switched
off and unplugged from the power outlet
before cleaning.
Use the cleaning brush to remove hair and
clippings from the comb guides, scissors
and blades.
To Clean the Blades
To thoroughly clean the blades, remove the
screws and remove the blades from the
cutter. Wipe them over and replace on the
unit.
To realign blades:
1.Place a few drops of oil on the blades, plug
the cutter in and turn the power on. Turn
the cutter on for a few seconds.
2.Unplug the cutter and slightly loosen the
screws on the base of the blade.
3.Slide the blades back and forth until the
tips of both blades are aligned, tighten the
screws.
To Clean the Cutter
Wipe the outside of the cutter with a soft
dry cloth.
DO NOT IMMERSE ANY PART OF THIS
APPLIANCE IN WATER OR ANY OTHER
LIQUID.
Care and Cleaning
Help Line
If you have any additional questions about using your Hair Cutting Set, please call the Sunbeam
help line in Australia on 1300 881 861. In New Zealand please call 0800 786 232.

Notes

We are so confident of the quality of our product, should this
appliance develop any malfunction within 2 years of purchase
(3 months commercial use) due to faulty materials
or manufacture, we will replace it for you absolutely free.
2 Year Replacement Guarantee
Should you experience any difficulties
with your appliance, please phone our
customer service line for advice on
1300 881 861 in Australia,
or 0800 786 232 in New Zealand.
Alternatively, simply return the faulty
appliance to your place of purchase,
along with your purchase receipt.
Your Sunbeam 2 Year Replacement
Guarantee naturally does not cover misuse
or negligent handling, and excludes
breakables such as glass or ceramic items,
and normal wear and tear.
Similarly, your 2 Year Replacement
Guarantee does not cover damage to
household surfaces as a result of water
or other substances leaking from your
appliance, nor does it cover freight costs.
In Australia, this guarantee is additional
to the conditions and guarantees which
are mandatory as implied under the
Trade Practices Act 1974 and State
and Territory legislation.
Sunbeam Service Centres
Sunbeam has established a network
of authorised service centres throughout
Australia and New Zealand to provide
quick, convenient service for our
customers.
Should your appliance require repair
or service, either during or after the
guarantee period, contact your nearest
service centre.
For a complete list of Sunbeam’s
authorised service centres:
Australia
www.sunbeam.com.au/service centres
1300 881 861
New Zealand
www.sunbeam.co.nz/service centres
0800 786 232

Consumer Hotline
In Australia
Visit www.sunbeam.com.au
Or Call 1300 881 861
In New Zealand
Visit www.sunbeam.co.nz
Or call 0800 786 232
‘Sunbeam’ is a trademark of Sunbeam Corporation.
Made in China.
Due to minor changes in design or otherwise,
the product may differ from the one shown in this leaflet.
© Copyright. Sunbeam Corporation Limited 2008.
ABN 45 000 006 771
Sunbeam Corporation is a division of GUD Holdings Ltd.
Is a registered trademark of Sunbeam.
07/08
Table of contents
Other Sunbeam Electric Shaver manuals


