manuals.online logo
Brands
  1. Home
  2. •
  3. Brands
  4. •
  5. Sundance Spas
  6. •
  7. Plumbing Product
  8. •
  9. Sundance Spas A17 User manual

Sundance Spas A17 User manual

Popular Plumbing Product manuals by other brands

Moen SANI-STREAM 8797 manual

Moen

Moen SANI-STREAM 8797 manual

Grohe Allure Brilliant 19 784 manual

Grohe

Grohe Allure Brilliant 19 784 manual

Cistermiser Easyflush EVO 1.5 manual

Cistermiser

Cistermiser Easyflush EVO 1.5 manual

Kohler Triton Rite-Temp K-T6910-2A installation guide

Kohler

Kohler Triton Rite-Temp K-T6910-2A installation guide

BEMIS FNOTAB100 Installation instruction

BEMIS

BEMIS FNOTAB100 Installation instruction

Hans Grohe ShowerTablet Select 700 13184000 Instructions for use/assembly instructions

Hans Grohe

Hans Grohe ShowerTablet Select 700 13184000 Instructions for use/assembly instructions

Akw Stone Wash Basin Installation instructions manual

Akw

Akw Stone Wash Basin Installation instructions manual

Enlighten Sauna Rustic-4 user manual

Enlighten Sauna

Enlighten Sauna Rustic-4 user manual

Moen ShowHouse S244 Series quick start guide

Moen

Moen ShowHouse S244 Series quick start guide

Sanela SLWN 08 Mounting instructions

Sanela

Sanela SLWN 08 Mounting instructions

Franke 7612982239618 operating instructions

Franke

Franke 7612982239618 operating instructions

Heritage Bathrooms Granley Deco PGDW02 Fitting Instructions & Contents List

Heritage Bathrooms

Heritage Bathrooms Granley Deco PGDW02 Fitting Instructions & Contents List

Tres TOUCH-TRES 1.61.445 instructions

Tres

Tres TOUCH-TRES 1.61.445 instructions

STIEBEL ELTRON WS-1 Operation and installation

STIEBEL ELTRON

STIEBEL ELTRON WS-1 Operation and installation

Miomare HG00383A manual

Miomare

Miomare HG00383A manual

BELLOSTA revivre 6521/CR1 quick start guide

BELLOSTA

BELLOSTA revivre 6521/CR1 quick start guide

American Standard Heritage Amarilis 7298.229 parts list

American Standard

American Standard Heritage Amarilis 7298.229 parts list

BorMann Elite BTW5024 quick start guide

BorMann

BorMann Elite BTW5024 quick start guide

manuals.online logo
manuals.online logoBrands
  • About & Mission
  • Contact us
  • Privacy Policy
  • Terms and Conditions

Copyright 2025 Manuals.Online. All Rights Reserved.

Sundance infrared sauna
INSTALLATION GUIDE
EN
Sundance
Model
Cabin material
Length
Width(depth)
Height
Voltage
2/12
PREFACE
Thank you very much for purchasing our product.
Please read this manual carefully before assembling and save it afterwards. Please write down the control
box serial number of the cabin as this number will be required in case of repair or order of spare parts.
ATTENTION
Installation and repair should only be done by a qualified electrician!
Check power supply rating and make sure the grounded outlet is correctly connected before installation.
Use original parts only. Do not share the outlet with any other appliances.
When not in use, turn off the cabin's power unit.
Locate your cabin indoors and on a flat, level and dry surface.
DANGER
Heaters shall not be subjected to water spray; shower heads shall not be installed within the infrared cabin.
Covering the radiator causes a fire hazard due to overheating. Do not cover the heaters !
Keep flammable or easily combustible materials/objects (eg.towels) away from the radiator at all times.
Do not touch the radiator during and shortly after use as a burning hazard exists due to hot parts.
The light bulb heats in use. If the bulb needs to be changed, unplug the cabin and let the bulb cool down
before changing it.
Should the electrical connection get damaged, it must be replaced-either by the manufacturer or by a
licensed electrician!
WARNING
If you suffer from illness or other health-related problems, especially heart conditions or circulatory
disturbances or if you take medication, you should consult a doctor before using the infrared cabin.
Children and frail persons should never be in the cabin without supervision.
If you feel uncomfortable while using the infrared cabin, stop immediately and consult with your doctor.
Never go to a hot infrared cabin if you have taken alcohol, strong medicines or narcotics.
Technical data
Sundance-A17
Regular hemlock
1594 mm
993 mm
1940 mm
230volt 50Hz
Radiators Type
Total output
Back panel
Front
Calves
Ruby halogen tube radiator & Carbon fiber tube radiator
2350W 10.2A
350W x 3
400W x 2
500W x 1
2
3/12
PARTS LIST
Cabin Individual parts (variations possible)
NO NAME Q'TY
1
3
4
6
8
10
1
1
1
1
1
1
11 1
12
1
13
1
Box No
3
2
2
2
4
3
1
1
2 1 1
5 2 4
914
1
14
1
712
1
Floor panel(1594*993*65mm)
Back panel (1860*1526*43.5mm)
Side panel 2 (1860*595*48mm)
Side panel 1 (1860*595*48mm)
Side glass 1830(*294*6)
Upright column 1(left,1860*96*96mm)
Upright column 2(right,1860*96*96mm)
Top panel (1594*993*65mm)
Bench support panel (1468*90*40mm)
Calves guardrail (670*250*43mm)
Bench surface panel (1468*450*33mm)
1
2
3
4
5
7
6
8
9
10
11
12
13
14
15
16
17
Back guardrail (1468*728*43mm)
Front glass 1(1830*408*6mm)
Front glass 2(with hole,1830*408*6mm)
3
4/12
ASSEMBLE INSTRUCTIONS
Assemble tips
Tools
Spiral drill (kit)
Screwdriver (kit)
Allen Wrench (kit)
Spirit level
Tape measure Electric drill
Cutter
Pencil
Hammer
Stepladder
Hardware parts (variations possible)
Please remove transport packaging and inspect that your infrared cabin has been delivered complete and
intact before beginning assemble.
A least 2 persons are required for assemble of the cabin
Please check the countersink and hole diameter of the drill holes to avoid damaging the wood..
The minimum room height required for installation is 2065mm
21x
Φ4*40
2x
Φ6*60
Rubber strip
17m 16x
Φ4*50
15
16
17
4
1
3
1
2
1
MDF cover (1568*967*3mm)
NO NAME Q'TY Box No
Door handle (outside,180*40*45mm & inside,120*40*45mm)
Glass door (1798*572*6mm)
Glass clip
1x
4
5/12
ASSEMBLE INSTRUCTIONS
Assemble steps
1
2
3
4
8-Φ4*40
5X2
(A)
(B)
(1)
(3)
(2)
(4)
Note: connect front
heater cable
5
6/12
ASSEMBLE INSTRUCTIONS
Assemble steps
6
7
8
9
2-Φ4*40
(1)
(2)
11-Φ4*40
10
Make sure the temperature sensor should be out about
2cm from the silicon
pipe
(pipe/3cm+sensor/2cm=5cm away from ceiling).
(6)
(5)
Note: connect front
heater cable
6
7/12
ASSEMBLE INSTRUCTIONS
Assemble steps
(9) (10)
11
4-Φ4*50
8-Φ4*50
14
12
4-Φ4*50
Front
Back
13
(7) (8)
7
8/12
ASSEMBLE INSTRUCTIONS
Assemble steps
EN
Note: connect all cables on the roof of the cabin
Rubber
Strip
15
17
16
(11)
Handle
Glass door
Handle
2-Φ6*60
Wood cover
Hinge surface
Rubber fitting
Glass door
Hinge bottom
Rubber fitting
Hex screw
Glass clip
8
9/12
To Heater
AC230V/15A
MAX:10A/1PCS
Power box
Temperature
Sensor
Mp3
Antenna Speaker
4Ω/3W
4Ω/3W
OUTPUT DC12V/3A
INPUT AC230V
Color light
DC12V/8W
105°C
Temperature Control
AC230V/500W
FKF-603
Input Voltage
Power Rating
Current Rating
Safety Grade
Model
I
10.2A
2350W
AC230V/50HZ
CIRCUIT DIAGRAM
AC230V/350W
AC230V/350W
AC230V/350W
AC230V/400W
AC230V/400W
9
OPERATING INSTRUCTIONS
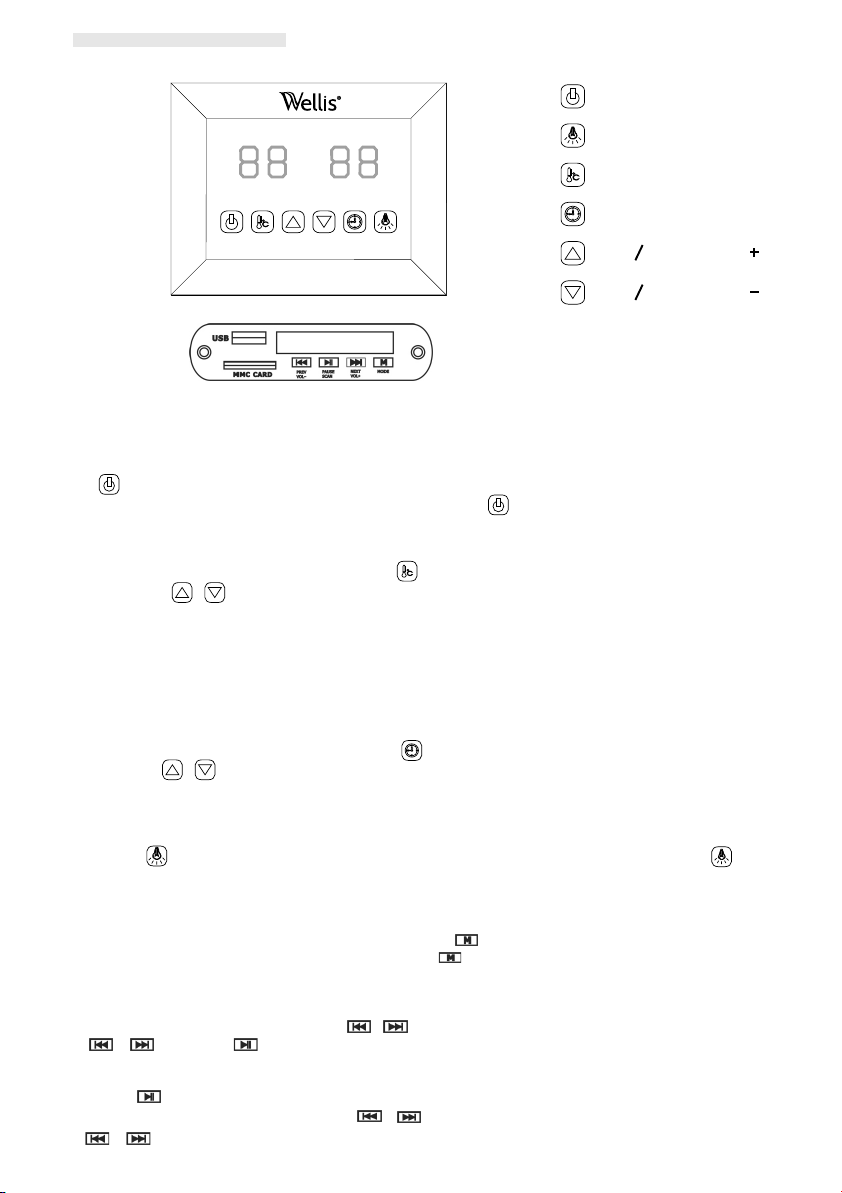
4)Color light
Short press ,you can set the desired color(7 color totally)and close the light; Long press to go
into an automatically cycling mode,changing 7 colors every 5 seconds.
Connect the power unit to wall outlet, the LED indicator will start to blink on the display.
Now it is possible to switch on the infrared heaters, the light and the music function.
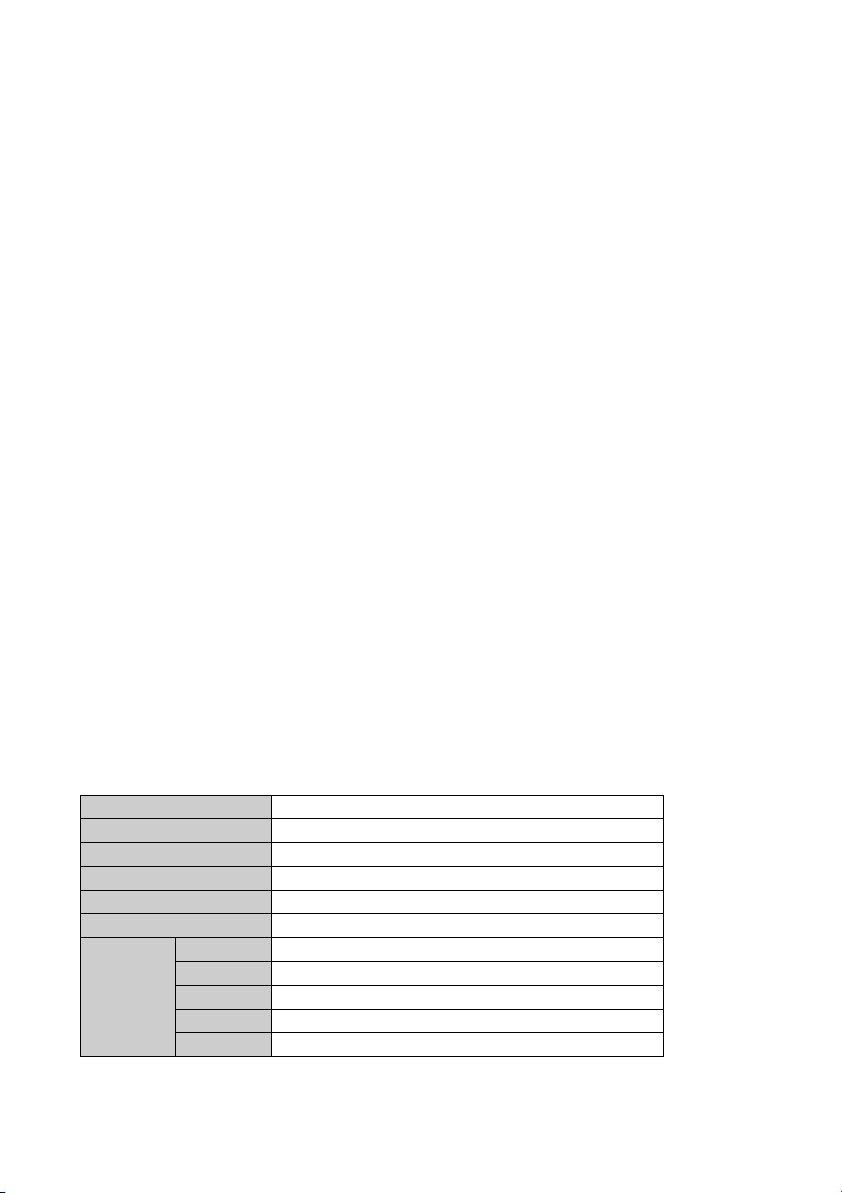
Color light
Time setting
Temperature setting
Time/Temperature+
Time/Temperature-
ON/OFF
1)Startup
Press to switch on the display and heaters start to work, the length of time is automatically set to 99 minutes
and the air temperature inside the cabin will be presented. Press again could switch off the heaters.
2)Temperature settings
The left display refers to the air temperature. Press , you can set the desired temperature from 35℃ to 60℃
by pressing the / keys,Interval=1℃; The setting number blinks 10 seconds then automatically presents
the air temperature; When at this temperature, the heaters will stop working automatically; When it fall 2℃
below this temperature, the cabin will start up automatically.
Please note: The maximum air temperature reachable in the cabin may be lower than the desired
temperature. This is dependent on the temperature outside the cabin. Default temperature=40℃
3)Time settings
The right display refers to the length of time. Press , you can set the desired time from 5mins to 99mins
by pressing the / keys; Interval=1mins; When count down to 00, the heaters will shut off automatically.
Default time=99minutes.
5)Mp3 player
USB/SD or Bluetooth mode:
You can select songs by short pressing the / keys and adjust the volume (0-32) by long pressing
the / keys. The key for pause.
FM radio mode:
Long press to search stations (87.5MHZ-108MHZ) automatically, the system will save all of them;
You can select stations by short pressing the / keys and adjust the volume (0-32) by long pressing
the / keys. 10/12
EN
Activate the MP3 player by pressing and holding the " ” button on the MP3 player.  Select the
preferred mode with brief repeated presses of the " "button on the MP3 player.(USB, MMC CARD,
Bluetooth,FM radio)
10