Sundirect LM600-Pro Installation instructions

LM600-Pro
Smart lighting infrared mirror heater
Installation & Operation Instructions
Version: SDUM-2201

2
EN
Table of Contents
1. Notice to purchaser
. General Introduction
3. Safety Instructions
3.1
Product related safety arnings
3.2
Dangers for children and persons ith limited abilities
3.3
Electric safety directions
3.4
Waterproof
4. How to care for your heater
4.1
Cleaning
4.2
Using/Working
4.3 Repair
4.4 Disposal
5. Installation
5.1
Mounting installation
5.2
Electric po er connections
6. Operation
6.1
General introduction of the smart control system
6.2
Control box description
6.3
Manual control
6.4
Wi-Fi and APP operation
6.4.1
Ho to do nload the Sundirect Smart App
6.4.2
Connect to WiFi via EZ mode
6.4.3
Connect to WiFi via AP mode
6.4.4
Ho to disconnect the Wi-Fi
6.4.5
Wi-Fi function on/off
7. Technical Specifications
8. Warranty

3
1. Notice to Purchaser
Thanks for purchasing this Sundirect infrared heater. We hope you enjoy this innovative
technology and that this product ill bring a pleasant atmosphere to your home.
Please read these instructions carefully and keep safe for future use. Failure to comply ith these
instructions ill void your arranty. Do not disassemble or tamper ith the product at any time!
Please pay special attention to the safety instructions and use the heater according to these
instructions. Sundirect Technology Ltd. shall not be liable for any damage or loss occurred
resulting from failure to follo these instructions.
. General Introduction
Sundirect Infrared heaters heat objects instead of the air, making this heater much more efficient
than traditional convection heaters.
The LM600-Pro represents a ne generation of infrared bathroom heaters, equipped ith our
“Smart Easy” Wi-Fi enabled touchscreen control box on the backside of the mirror heater.
With “Sundirect Smart” APP, you have advanced room temperature control including
-
Manual mode: simple temperature control and timer function
-
Smart mode: 7days program, 4 time zones per day
-
Holiday mode: set up a fixed temperature during your absence and automatically s itch back
to normal settings after your holiday
The set up process is very simple and can be finished ithin fe minutes. Even if your
WIFI is disabled, the heaters can still be controlled manually.
The LM600-Pro is also equipped ith t o lighting bars, hich can be easily operated via the
touch screen on the mirror surface.

4
Read the installation and operating instructions completely before
starting any installation works and save the instructions for later use.
3. Safety instructions
TO REDUCE THE RISK OF FIRE, ELECTRIC SHOCK OR INJURY:
3. 1 Product related safety warnings
•
Sundirect infrared heaters operate at a surface temperature of around 85-95°C hen mounted.
Do NOT touch the heater hen s itched on.
•
Prolonged contact may cause injuries or burns.
•
Do NOT cover the heater ith anything. Covering may cause overheating and can result in fire.
•
This heater is designed to be all mounting, please don’t mount them on the ceiling.
•
This can be easily operated using your smartphone, via the same WLAN, via a different WLAN,
or via a 3G or 4G mobile net ork. This makes it possible to operate your heater remotely,
ithout your direct supervision. Ho ever, please make sure that all safety precautions stated in
this manual must be taken even ith remote operation.
3. Dangers for children and persons with limited abilities
•
Children or persons ith limited physical, mental or sensory abilities shall not be operating,
s itching on, plugging in, regulating or cleaning the heater.
•
Small children should be kept a ay from the heater unless constantly supervised.
•
Do NOT operate the heater in small rooms hen occupied by people not capable of leaving the
room by themselves. The surface of the heater can reach a surface temperature of up to 95°C,
keep out of reach of children and disabled persons.
•
Keep a ay babies and children from all packaging material such as plastic bags to avoid
danger of suffocation.
3.3 Electric safety directions
•
When installing, repairing or servicing the heater it must be turned off and disconnected from
po er. Before installation please check if the heater is free of damages.

5
•
If the heater or the po er cord is damaged in any form do NOT use the heater and contact your
Sundirect dealer for repair or replacement. Repairs, maintenance or any changes must be
carried out by an authorized Sundirect dealer.
•
Do NOT attempt to repair the heater by yourself, this ill void your arranty.
•
If the heater has been dropped do NOT operate it and contact your Sundirect dealer to make
sure it is free of any damages.
•
If the safety glass is damaged in any ay please dismount the heater as soon as possible to
avoid any injuries from possible impact of the falling glass.
•
Sundirect heaters are designed to operate at 230V, 50Hz AC. If your supply mains do not
comply ith this, do NOT use the heater.
3.4 Water Proof
This heater is IP44 rated, meaning you are safe to use them in the bathroom.
Ho ever, hen installing the heater in humid rooms it must be secured in such ay that there is
no risk of the heater falling into any ater container. Never pour ater on the device or put it in a
ater container.
Sundirect shall not be liable for any injuries or damages resulting from inadequate mounting or
incorrect positioning close to ater sources.
4. How to care for your Sundirect heater
4. 1 Cleaning
Al ays unplug your heater and let it cool do n completely before cleaning. Never dip into ater
and never splash ater on it. Clean the heater ith a soft damp cloth. Do not use any abrasive
materials, solvents or harsh cleaning sponges as this could cause scratches or other irreparable
damage.
4. Using/Working
If you notice any noise, smells, visible changes or exceptionally high temperatures please
discontinue use and contact an authorised Sundirect dealer.
4.3 Repair
Repairs must be carried out by authorised Sundirect dealers or by Sundirect directly. If you
attempt to alter the product or to proceed ith any repairs yourself it ill void your arranty.
4.4 Disposal
Sundirect infrared heaters are electric appliances and therefore electric aste. At the
end of its orking life please dispose the heater in accordance ith local regulations
concerning electric aste.

6
5. Installation
5.1 Mounting installation instruction
Note: The kit supplied in the package is designed for mounting horizontally on a solid all. If
mounted onto other types of alls, you ill need appropriate fixings (not supplied). Please make
sure the all is safe to mount. We highly recommend to have the panel installed by a qualified
electrician or installer authorized by Sundirect.
Step 1. Use the supplied
mounting bracket to mark
the position of the holes
on the wall.For vertical
wall mounting “A” signal
will be the top of the
mounting bracket. For
horizontal wall
mounting “B” signal will
be the top of the
mounting bracket.
Step . Drill holes using a
8mm drill.
Step 3. Insert the dowels
into the holes.
Step 4. Screw the screws
into the dowels through
the holes on the
mounting bracket.
Step 5. Mount the panel
on the mounting bracket.
Step 6. Move the panel
into two directions, tight
the 4 spacers on the
back side of mirror to
make sure the panel is
secured.
1
WALL
2
WALL
3
WALL
4
WALL
5
WALL
6
WALL

7
5. Electric power connection
Installation and electric connection should only be carried out by qualified personnel such as an
electrician. National electric safety standards must be considered hen iring this panel.
Make sure the mains po er is s itched off before you start the installation hen hard iring. Any
fixed iring outside the heater coming into contact ith the heater must have a protection
sleeving that is heat resistant of at least 90°C. Make sure that cables are not coiling and that
there is no excess cable behind the heater. The length of the cable should be measured exactly
to the length needed. Do not connect a heater that is damaged in any ay to the po er net ork.
Before installation make sure that the heater, cable and plug are completely free from damages.
When in doubt contact your local Sundirect dealer for assistance.

8
6. Operation:
6.1 General introduction of the smart control
The LM600-Pro has an integrated WiFi touchscreen control box, meaning there is no other
additional thermostat needed to control the heater. The panel can either be controlled manually
using the manual control touch screen on the bottom of the glass surface or be operated via a
smartphone. Once the heater has been connected to the APP, the smart phone ill take the
control together ith the control box. If your home internet is not orking, it is still possible to
operate the heater via touchscreen, just po er off the heater and po er on again after a fe
seconds, once the heater is re-connected to the WiFi, the heater ill reconnect to the smart
phone automatically. The lighting system can be easily operated via the touch button on the
screen of the mirror.
6. Touch screen description:
1. Lighting system
2. Temperature display
3. + button
4. - button
5. Light button
6. Wi-Fi signal
6.3 Manual control:
Activate the Power switch, the screen ill no sho the current room temperature reading,
adjust your desired room temperature by pressing the “-” or “+” button.
To turn on/off the lighting, please press the “Light” button.
To turn on/off the heater, please long press the “+” button for 3 seconds.

9
6.4 Wi-Fi and APP operation:
6.4.1 How to download the Sundirect Smart APP
Scan the QR code bello to start the procedure to do nload the APP, or you can do nload the
APP “Sundirect Smart” on APP Store or Google play, open the APP and register ith your phone
number or Email address.
6.4. Connect to WiFi via EZ mode:
Step1: Activate the Po er s itch,
the Wi-Fi indicator ill start to flash
rapidly, open the APP on your smart
phone and add your device.
Step2: Enter the Wi-Fi pass ord of
your home net ork. Please make
sure your home
Wi-Fi is orking as ell as keep the
heater and smartphone as close as
possible to the WLAN router.
Notice: The APP is only works with
2.4GHz Wifi channel.
Step3: Waiting till the connecting
status sho s 100% to finish the
process.
If the connection fails for any
reason, please repeat the
procedure and try again.
Sometimes failures are caused by
net ork errors or packet losses
using a Wifi system.
We ill suggest to connect via EZ mode as a first option, if you still fail to establish a connection
via EZ mode, Please try to connect via the AP mode.

1
0
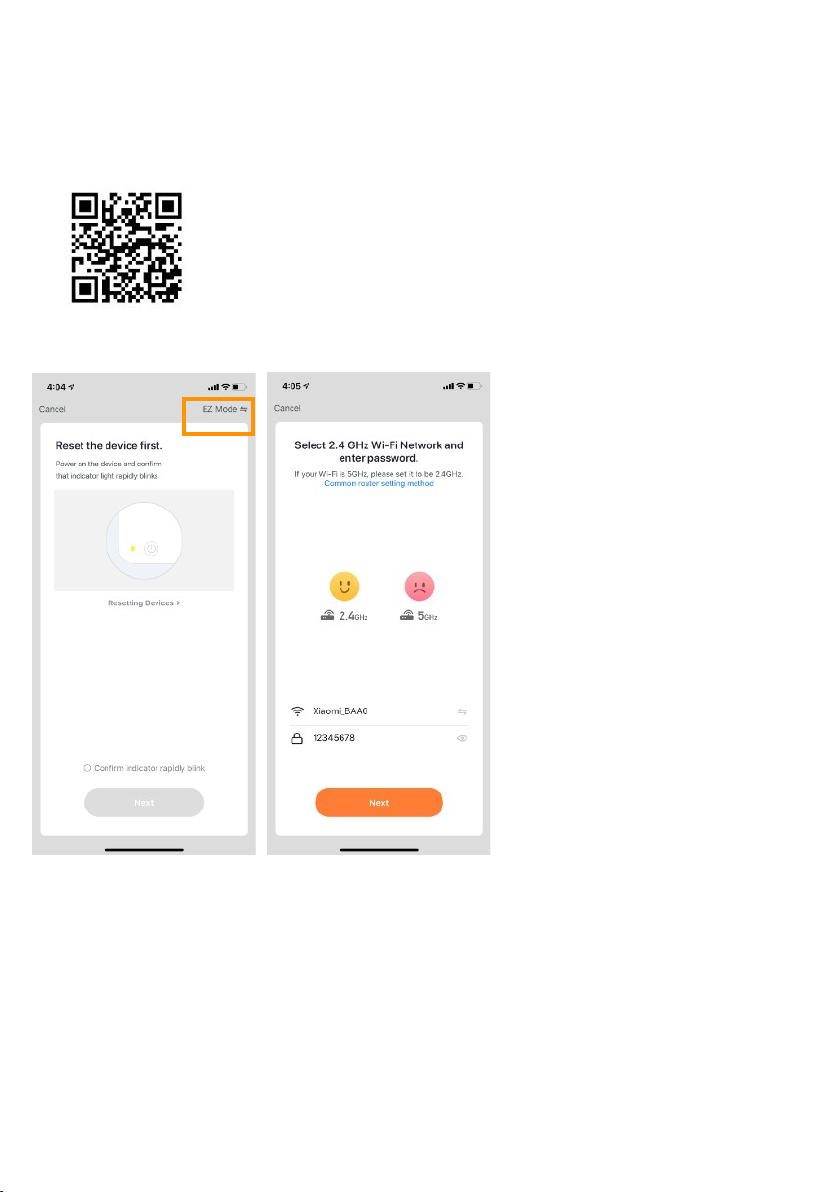
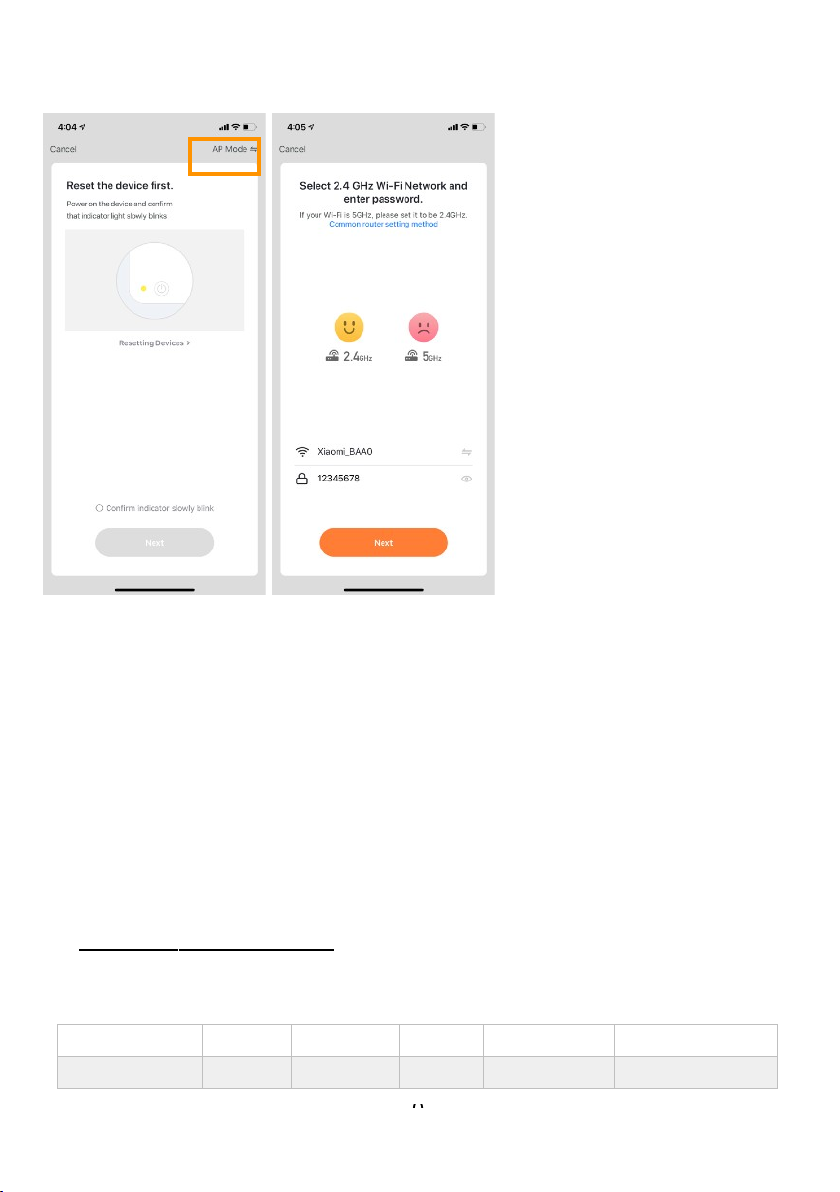
6.4.3 Connect to WiFi via AP mode:
Step1: Activate the Po er s itch,
long press the “-” button for 5
seconds until the Wi-Fi signal
indicator flashes slo ly. Open the
APP on your smart phone and add
your device, choose the AP mode.
Step2: Enter the Wi-Fi pass ord of
your 2.4GHz Wi-Fi channel
net ork. Please make sure your
home Wi-Fi is orking as ell as
keep the heater and smartphone
as close as possible to the Wi-Fi
router.
Step3: Follo the instruction inside
the APP and connect your mobile
phone to the device’s hotspot and
go back to the APP.
Step4: Wait till the connecting
status sho s 100% to finish
the process.
If the connection fails for any reason, please repeat the procedure and try again. Sometimes
failures are caused by net ork errors or packet losses using a Wi-Fi system.
6.4.4 Disconnect the Wi-Fi
If you ould like to disconnect the Wi-Fi of your current heater, long press the “-” button on the
touchscreen for 5 seconds until the Wi-Fi indicator start to flash again. No the heater is
operating manually ithout Wi-Fi.
6.4.5 Wi-Fi function on/off
Long press “-” button for 10 seconds you are able to turn off the Wifi function of this heater and
the ifi signal on the screen ill disappear, long press “-” button again to turn it on.
7. Technical Specifications
Panels covered by these instructions are listed in the table belo .
Model Power Size Weight Mounting IP Protection
LM600-Pro 600W 65*110cm 15Kg Wall mounting IP44

1
1
8. Warranty
Sundirect offers a 3-year manufacturing arranty on LM600-Pro.
You can find the serial number on the back side of the heater as ell as the last page of this user
manual. Please al ays keep this manual in case of future arranty claims.
Within the arranty period from date of purchase, Sundirect ill repair or replace your heater
here the fault is due to defects in orkmanship or materials. Please contact your local Sundirect
dealer in the event of a arranty claim and return the heater together ith proof of purchase.
The arranty covers the repair or replacement of the heater only and Sundirect shall not be liable
for any other occurring costs such as installation cost or any other consequential losses ho ever
incurred. Please note that tampering ith or opening the heater in any ay ill void your arranty.
The removal of the serial number on the back of the heater ill also void this arranty. All labels
on the back of the heater shall not be removed.
Any damages to the heater caused by the user are not covered by this arranty. This includes
scratches on the surface. Sundirect is not responsible for any damages, losses or injuries due to
ingress of ater or moisture, accidental damage, mishandling, external impact, repairs or
adjustment by unauthorized persons or failure to follo the correct safety, maintenance and
installation precautions stated in this manual.

1
2
NL
Inhoudsopgave
1. Kennisgeving aan de koper
. Algemene inleiding
3. Veiligheidsinstructies
3.1
Productgerelateerde veiligheidsinstructies
3.2
Gevaren voor kinderen en personen met beperkte mogelijkheden
3.3 Elektrische veiligheidsinstructies
3.4
Waterdichtheid
4. Hoe onderhoud je je kachel?
4.1
Reiniging
4.2
Gebruik/Bediening
4.3 Reparatie
4.4
Ver ijdering
5. Installatie
5.1
Montage
5.2 Stroomaansluitingen
6. Bediening
6.1
Algemene inleiding tot het Smart Control Systeem
6.2
Beschrijving van de schakelkast
6.3
Handmatige bediening
6.4
WLAN- en APP-bediening
6.4.1
Sundirect Smart-APP do nloaden
6.4.2
WiFi-verbinding EZ-modus
6.4.3
WiFi-verbinding AP-modus
6.4.4
WLAN-verbinding verbroken
6.4.5
WLAN-functie aan/uit
7. Technische specificaties
8. Garantie

1
3
1. Kennisgeving aan de koper
Dank u voor u keuze voor deze Sundirect infraroodstraler. We hopen dat u zult genieten van
deze innovatieve technologie en dat dit product een aangename sfeer in u huis zal brengen.
Lees deze instructies aandachtig door en be aar ze voor toekomstig gebruik. Als u deze instructies niet
opvolgt, vervalt u garantie. Demonteer of manipuleer het product nooit! Neem de veiligheidsinstructies
in acht en gebruik de heater in overeenstemming met deze instructies. Sundirect Technology Ltd. is niet
verant oordelijk voor enige schade of verlies als gevolg van het niet opvolgen van deze instructies.
. Allgemene inleiding
Sundirect infraroodstralers ver armen objecten direct in plaats van de lucht te ver armen, aardoor
deze vorm van ver arming efficiënter is dan traditionele convectieapparaten.
De LM600-Pro vertegen oordigt een nieu e generatie infrarood badkamerver armingen, uitgerust met
onze WiFi-compatibele "Smart Easy" touchscreen-bedieningskast aan de achterkant van de
spiegelver armingen.
Met de Sundirect Smart app heb je volledige controle over de kamertemperatuur, inclusief:
- Handmatige modus: eenvoudige temperatuurregeling en timerfunctie
- Slimme modus: 7-daags programma, 4 tijdzones per dag
- Vakantiemodus: stel een vaste temperatuur in als je eg bent en schakel automatisch terug naar
normale instellingen als je eg bent.
Het installatieproces is heel eenvoudig en kan binnen enkele minuten orden voltooid. Ook als je ifi is
uitgeschakeld, is de ver arming handmatig te regelen.
De LM600-Pro is tevens voorzien van t ee lichtbalken die eenvoudig te bedienen zijn via het
touchscreen op het spiegeloppervlak.

1
4
Lees de installatie- en bedieningsinstructies volledig door voordat
u met de installatiewerkzaamheden begint en bewaar de instructies
voor toekomstig gebruik.
3. Veiligheidsinstructies
Om het risico op brand, elektrische schokken of letsel te verminderen:
3.1 Productgerelateerde veiligheidsinstructies
· Sundirect infraroodstralers bereiken tijdens bedrijf een oppervlaktetemperatuur van 85-95°C. Raak de
ver arming NIET aan als deze aan staat.
· Langdurig contact kan letsel of brand onden veroorzaken.
· Dek de kachel NIET af. Afdekken kan oververhitting of brand veroorzaken.
· Deze heater moet aan de muur orden gemonteerd. Monteer ze niet aan het plafond.
· Deze heater is eenvoudig te bedienen met je smartphone, op dezelfde ifi, op een andere ifi of op een
3G of 4G mobiel net erk. Hierdoor kunt u u ver arming op afstand bedienen zonder u directe
toezicht. Zorg er echter voor dat alle veiligheidsmaatregelen die in deze handleiding orden beschreven,
ook met de afstandsbediening moeten orden genomen.
3. Gevaren voor
kinderen en personen met beperkte mogelijkheden
· Kinderen of personen met lichamelijke, geestelijke of zintuiglijke beperkingen mogen de kachel niet
bedienen, inschakelen, aansluiten, regelen of reinigen.
· Houd kleine kinderen uit de buurt van de kachel, tenzij ze constant onder toezicht staan.
· Gebruik de kachel NIET in kleine kamers als er mensen in zijn die de kamer niet alleen kunnen verlaten.
Het oppervlak van de heater kan een oppervlaktetemperatuur van maximaal 95°C bereiken en moet
buiten het bereik van kinderen en gehandicapten orden geïnstalleerd.
· Houd baby's en kinderen uit de buurt van verpakkingsmateriaal, zoals plastic zakken, om
verstikkingsgevaar te voorkomen.
3.3 Elektrische veiligheidsinstructies
· Bij het installeren, repareren of onderhouden van de heater moet deze zijn uitgeschakeld en de stekker
uit het stopcontact zijn gehaald. Controleer voor installatie of de heater vrij is van schade.
· Als de ver arming of het netsnoer op enigerlei ijze is beschadigd, gebruik de ver arming dan NIET en
neem contact op met u Sundirect-dealer voor reparatie of vervanging. Reparaties, onderhoud of
modificaties moeten orden uitgevoerd door een geautoriseerde Sundirect-dealer.
· Probeer NIET zelf de kachel te repareren. Hierdoor vervalt u garantie.
· Als de kachel is gevallen, gebruik hem dan NIET en neem contact op met u Sundirect-dealer om te
controleren of hij niet beschadigd is.

1
5
· Als het veiligheidsglas op enigerlei ijze is beschadigd, ver ijder dan de ver arming zo snel mogelijk
om letsel door mogelijke impact van vallend glas te voorkomen.
· Sundirect-ver armers zijn ont orpen om te erken op 230V, 50Hz isselstroom. Voldoet u
voedingsnet hier niet aan, gebruik de heater dan NIET.
3.4 Waterdichtheid
Deze heater heeft een IP44 rating, at betekent dat je hem veilig in de badkamer gebruikt.
Als de heater echter in vochtige ruimtes ordt geïnstalleerd, moet hij zodanig orden vastgezet dat er
geen risico bestaat dat de heater in een atertank valt. Giet nooit ater rechtstreeks op het apparaat en
plaats het nooit in een aterbak. Sundirect kan niet verant oordelijk orden gehouden voor enig letsel of
schade als gevolg van onjuiste installatie of onjuiste plaatsing in de buurt van aterbronnen.
4. Hoe onderhoud je je kachel?
4.1 Reiniging
Haal altijd de stekker uit het stopcontact en laat het volledig afkoelen voordat u het schoonmaakt. Dompel het
nooit onder in ater en spetter er nooit ater op. Reinig de kachel met een zachte, vochtige doek. Gebruik
geen schurende materialen, oplosmiddelen of harde schoonmaaksponzen, aangezien dit krassen of andere
onherstelbare schade kan veroorzaken.
4. Gebruik/Bediening
Als u enig geluid, geur, visuele veranderingen of abnormaal hoge temperatuur opmerkt, stop dan met het
gebruik en neem contact op met een geautoriseerde Sundirect-dealer.
4.3 Reparatie
Reparaties moeten orden uitgevoerd door geautoriseerde Sundirect-dealers of rechtstreeks door
Sundirect. Pogingen om het product aan te passen of zelf reparaties uit te voeren, maken u garantie
ongeldig.
4.4 Verwijdering
Sundirect infraroodstralers zijn elektronische apparaten en dus elektronisch afval. Gooi de
heater aan het einde van zijn levensduur eg in overeenstemming met de plaatselijke
voorschriften voor e- aste.

1
6
5.
Installatie
5.1 Montage
Opmerking: De bijgeleverde set is ont orpen voor horizontale montage op een stevige muur. Bij
montage aan andere andtypes heeft u geschikte bevestigingsmiddelen nodig (niet inbegrepen).
Zorg ervoor dat de muur geschikt is voor montage. We raden ten zeerste aan om het paneel te
laten installeren door een gek alificeerde elektricien of loodgieter.
Stap 1: Markeer met
de montagerail de
boorgaten op de muur.
"A" voor
verticale montage, "B"
omhoog voor
horizontale montage.
Stap : Boor de gaten
met een boor van 8 mm.
Stap 3: Bevestig nu de
pluggen.
Stap 4: Schroef de
montagerail vast.
Stap 5: Hang het
paneel aan de
montagerail.
Stap 6: Schuif het
paneel langs het
armatuur totdat het
stevig op zijn plaats
klikt.
1
WALL
2
WALL
3
WALL
4
WALL
5
WALL
6
WALL

1
7
5. Stroomaansluitingen
Installatie en elektrische aansluiting mogen alleen orden uitgevoerd door gek alificeerd personeel,
zoals een elektricien. Bij de bedrading van dit paneel moet rekening orden gehouden met de nationale
veiligheidsnormen voor elektriciteit.
Zorg ervoor dat de hoofdstroom is uitgeschakeld voordat u met de installatie of directe bedrading begint.
Alle vaste kabels buiten de heater die in contact komen met de heater moeten zijn voorzien van een
hittebestendige beschermmantel van minimaal 90 °C. Zorg ervoor dat de snoeren niet in de ar raken en
dat er geen overtollig snoer achter de kachel zit. De lengte van de kabel moet precies op de ge enste
lengte orden gemeten. Sluit een ver armer die op enigerlei ijze beschadigd is NIET aan op het
elektriciteitsnet. Zorg er voor de installatie voor dat de heater, het snoer en de stekker volledig
onbeschadigd zijn. Neem bij t ijfel contact op met u Sundirect-dealer.

1
8
6.
Bediening:
6.1
Algemene inleiding tot het Smart Control Systeem
De LM600-Pro is voorzien van een geïntegreerde WiFi-touchscreen-bedieningskast, aardoor er geen
extra thermostaat nodig is voor de bediening. Het paneel kan handmatig orden bediend via het
touchscreen met handmatige bediening aan de onderzijde van het glasoppervlak of orden bediend via
een smartphone. Zodra de heater is aangesloten op de APP, neemt de smartphone samen met de
control box de besturing over. Als je internet het niet doet, bedien je de kachel toch via het touchscreen.
Zet de ver arming ge oon uit en na een paar seconden eer aan. Zodra de ver arming eer met het
WLAN is verbonden, ordt de ver arming automatisch met de smartphone verbonden. Het
verlichtingssysteem is eenvoudig te bedienen met de touch-knop op het scherm van de spiegel.
6.
Beschrijving van de schakelkast:
1: Verlichtingssysteem
: Temperatuur weergave
3: + Knop
4: - Knop
5: Lichtknop
6: WLAN Symbool
6.3 Handmatige bediening:
Activeer de stroomschakelaar. De huidige kamertemperatuur ordt nu eergegeven op het scherm. Stel
de ge enste kamertemperatuur in door op de knop "-" of "+" te drukken.
Om de verlichting in of uit te schakelen, drukt u op de knop "Licht".
Om de heater aan en uit te zetten drukt u 3 seconden op de “+” knop.

1
9
6.4 WLAN- en APP-bediening:
6.4.1 Download de Sundirect Smart APP
Scan de volgende QR-code om het do nloaden van de APP te starten, of do nload ge oon de
"Sundirect Smart" APP rechtstreeks vanuit de APP Store of Google Play, open de APP en registreer
u met u telefoonnummer of e-mailadres.
6.4. WiFi Verbinding EZ Modus:
Stap
1: Zet de aan/uit-knop aan.
De ifi-indicator begint snel te
knipperen. Open de app op je
smartphone en voeg je toestel toe.
Stap 2: Voer het ifi- acht oord
van u thuisnet erk in. Zorg
ervoor dat je ifi erkt, plaats de
ver arming en smartphone zo
dicht mogelijk bij de router.
Let op: De APP erkt alleen met
een 2,4 GHz ifi-kanaal..
Stap 3: Wacht tot de
verbindingsstatus 100%
aangeeft om het proces te
voltooien.
Als de verbinding om de een of andere reden mislukt, herhaalt u het proces en probeert u het opnieu .
Soms orden fouten veroorzaakt door net erkfouten of pakketverlies.
We raden aan om als eerste optie verbinding te maken via EZ-modus. Als je geen verbinding kunt maken
via EZ-modus, probeer dan verbinding te maken via AP-modus.

2
0
6.4.3 WiFi Verbinding AP Modus:
Stap 1: Zet de aan/uit-knop aan en
druk 5 seconden op de "-"-knop
totdat de WiFi-signaalindicator
langzaam knippert. Open de APP op
u smartphone en voeg u apparaat
toe. Kies AP-modus.
Stap 2: Voer het ifi- acht oord
voor u thuisnet erk in. Zorg ervoor
dat je ifi erkt, plaats de
ver arming en smartphone zo dicht
mogelijk bij de router.
Stap 3: Volg de instructies in de
APP, verbind je mobiele telefoon
met de hotspot van het apparaat en
keer terug naar de APP.
Stap 4: Wacht tot de
verbindingsstatus 100% aangeeft om
het proces te voltooien.
Als de verbinding om de een of andere reden mislukt, herhaalt u het proces en probeert u het opnieu .
Soms orden fouten veroorzaakt door net erkfouten of pakketverlies.
6.4.4 WiFi -verbinding verbroken
Als u de ifi van u huidige heater ilt loskoppelen, drukt u 5 seconden op de knop "-" op het
touchscreen totdat de ifi-indicator eer begint te knipperen. Nu erkt de heater handmatig zonder ifi.
6.4.5 WiFi functie aan/uit
Druk 10 seconden lang op de knop "-", nu kunt u de ifi-functie van deze ver arming uitschakelen en het
ifi-signaal op het scherm zal verd ijnen. Druk nogmaals op de knop "-" om hem in te schakelen.
Table of contents
Languages:
Popular Indoor Furnishing manuals by other brands

Jysk
Jysk MELLOW 5207290 quick start guide

Southern Enterprises
Southern Enterprises MS872600TX Assembly instruction

Seville Classics
Seville Classics airLIFT OFF65954B manual

DETAIL
DETAIL Metal Double DHS9105j manual

Coaster
Coaster 315985T Assembly instructions

Tennsco
Tennsco Capstone Shelving Units Assembly Instructions/Parts Manual

Kriptonite
Kriptonite KROSSING ROTANTE instructions

modway
modway EEI-2126 manual

BUSH FURNITURE
BUSH FURNITURE WC14365 Assembly instructions

Exclusive Heritage
Exclusive Heritage YK-10036S installation guide

Coaster
Coaster 801935 Assembly instructions

castorama
castorama Symbios 3663602991717 Assembly instructions