manuals.online logo
Brands
  1. Home
  2. •
  3. Brands
  4. •
  5. Sunline
  6. •
  7. Dryer
  8. •
  9. Sunline 4000 User manual

Sunline 4000 User manual

5/2017
Outdoor Parallel Dryer
4000|17135-1
©2017 HOUSEHOLD ESSENTIALS, LLC
Hazelwood, MO 63042
www.householdessential.com
Not happy?
Happy?
Thank you for your order!
Wonderful! We are very glad.
Please share your experience with
us and others. It helps us know
what you like best!
Please give our St. Louis
customer service a call at
1-800-922-5524.
We are here to help.
Customer Service
1-800-922-5524 | 1-314-428-5657
[email protected]
Open Mon-Fri at 8:30 am CT.
Closed all national holidays.
We appreciate your business. Additional information on your product
may be available on our website.
• Review this product at
www.householdessential.com.
Search the item # from the home
page to find the product. Leave your
review under the review tab on the
product’s page!
• Follow us on Facebook and
Instagram!
• Missing parts?
• Having trouble with assembly?
8"
20"
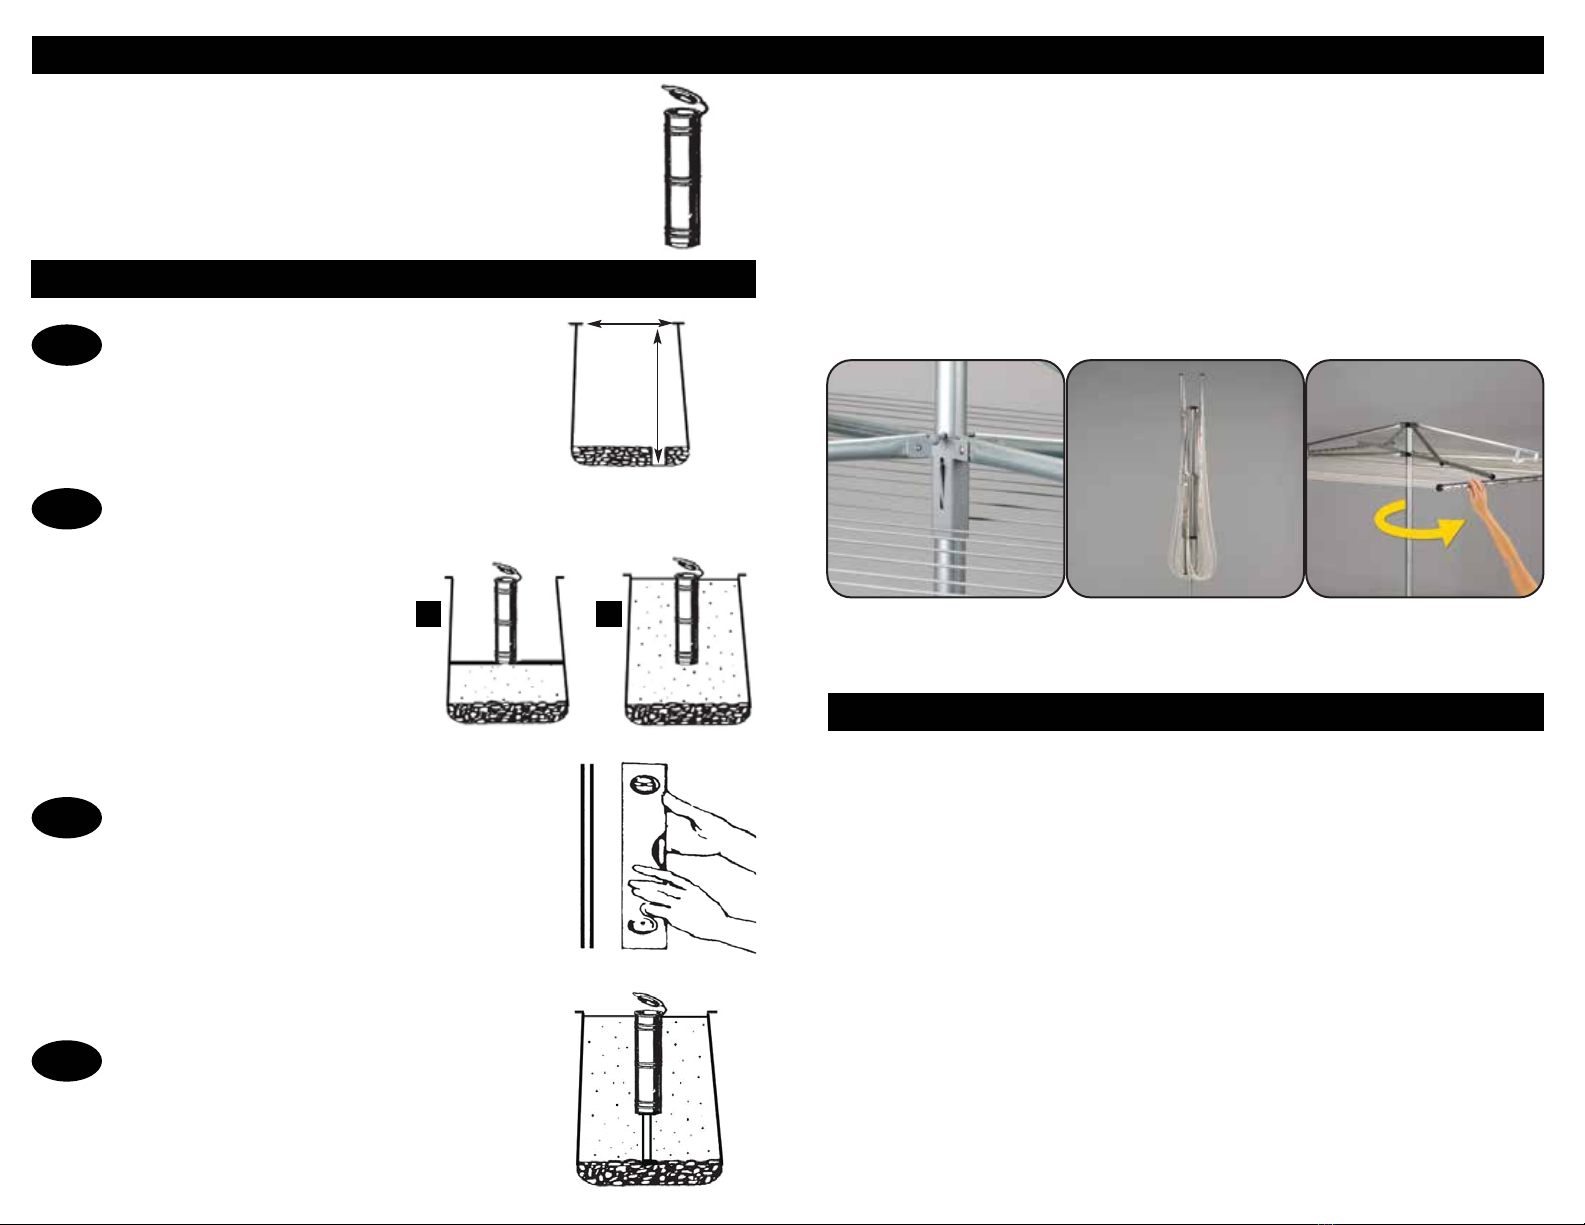
How to Use the Ground Sleeve
Installing Dryer with Ground Sleeve
Concrete the ground sleeve into the ground instead of the dryer’s post!
Dig a tapered hole (wider at the bottom than at the
top) that is 8”- 10” wide and approx. 20” deep.
Fill the bottom of the hole approx. 3” deep with
small-medium sized rocks.
STEP 4
STEP 3
STEP 2
STEP 1
(A) Fill the hole with approx. 6” of concrete, up to the
base of the ground sleeve. (Clothesline will be 6’ above
ground level. Adjust sleeve depth as needed.)
(B) Place the ground sleeve and
fill in around the ground sleeve
with concrete up to within 1” of
ground level (remaining space
can be filled with topsoil after
concrete sets).
Insert the dryer pole into the ground sleeve and use a
level to align the pole vertically.
Remove the pole carefully (WITHOUT shifting the
ground sleeve).
Run a small tube or stick down through the center of
the ground sleeve, through the concrete, and to the
rock base (to allow draining).
Remove tube/stick and allow concrete to set.
ALWAYS: Insert the dryer into the ground sleeve before opening. Remove the dryer from the
sleeve before inclement weather and when the dryer won’t be used.
OPEN: Grasp the upper
structure and push
upward.
The lever catch will pop
through when it is in the
correct position.
DO NOT FORCE DRYER OPEN: If the dryer does not open easily, inspect for tangled
clothesline or clothesline that is too tight.
DO TIGHTEN LINES AS NEEDED: Start with the section of line closest to the center
post, pull clothesline down and away from you. Work around the dryer and retie knot
with excess line.
DO NOT OVER TIGHTEN LINES: Some give it needed to open the dryer.
Overtightening can strain the dryer and damage it.
DO NOT ATTEMPT TO TAKE UP ALL THE SLACK WITH THE FIRST TIGHTENING:
The clothesline will stretch more when new. Be prepared to tighten the lines a
3-4 times in the first months of use. After, there should be minimal need to
tighten in a season.
DO TAKE DOWN DRYER DURING BAD WEATHER: The dryer is weather-resistant, but
it should be taken down during high winds, heavy precipitation, and extreme cold. The
less the dryer is exposed to the elements, the longer it will last.
CLOSE: Press the lever
catch in and lower the
upper structure.
Gather and tie lines on either
side of post to reduce
tangles.
ROTATE: Grasp the metal
edge of the dryer’s top
and turn gently.
The dryer will spin 360
degrees.
Dryer Care & Use
Tips for Happier Outdoor Drying!
AB
CLOTHESLINE HEIGHT: The clotheslines will be 6 feet above
ground level when installed as instructed. To lower lines, please
bury the ground sleeve deeper in the concrete during step 2A.

This manual suits for next models

1

Popular Dryer manuals by other brands

Bradley 2903-28 Service manual

Bradley

Bradley 2903-28 Service manual

Bosch WTG864L7SN Installation and operating instructions

Bosch

Bosch WTG864L7SN Installation and operating instructions

Kogan KAMHTDRY8PA user guide

Kogan

Kogan KAMHTDRY8PA user guide

Whirlpool LE6660XP Use & care guide

Whirlpool

Whirlpool LE6660XP Use & care guide

Creda HB37551 Instruction book

Creda

Creda HB37551 Instruction book

Electrolux EWMED70J IW Use and care guide

Electrolux

Electrolux EWMED70J IW Use and care guide

GE GTDS850GDWS Dimensions and installation information

GE

GE GTDS850GDWS Dimensions and installation information

Mitsubishi Electric JT-S1AP-W-NA installation manual

Mitsubishi Electric

Mitsubishi Electric JT-S1AP-W-NA installation manual

Grundig GTN 38267 GC user manual

Grundig

Grundig GTN 38267 GC user manual

LG WF-DT90TW owner's manual

LG

LG WF-DT90TW owner's manual

Whirlpool WED4910XQ installation guide

Whirlpool

Whirlpool WED4910XQ installation guide

Frigidaire GLGQ332CA Factory parts catalog

Frigidaire

Frigidaire GLGQ332CA Factory parts catalog

Asko T793 owner's manual

Asko

Asko T793 owner's manual

AEG T6DHE842B user manual

AEG

AEG T6DHE842B user manual

AEG T8DBE86W user manual

AEG

AEG T8DBE86W user manual

Siemens WT43H0L7DN Installation and operating instructions

Siemens

Siemens WT43H0L7DN Installation and operating instructions

Maytag MED5800TW1 parts list

Maytag

Maytag MED5800TW1 parts list

allgood Modric 2470 ORIGINAL FIXING INSTRUCTIONS

allgood

allgood Modric 2470 ORIGINAL FIXING INSTRUCTIONS

manuals.online logo
manuals.online logoBrands
  • About & Mission
  • Contact us
  • Privacy Policy
  • Terms and Conditions

Copyright 2025 Manuals.Online. All Rights Reserved.