Sunsky S-VR-0164 User manual

User s Manual
supporting one-button recording function, pressing the record button at any interface can recording.
You can store up to 999 audio file
the music mode / voice mode / system setting three modes can switch
32Kbps, 64Kbps 128Kbps, 192Kbps and 384Kbps five kinds of recording quality options in the

system setup for you select (defaults to 64Kbps quality).
clock function
Long recording time up to 40 hours (under 32Kbps bit rate mode).
●Compact, lightweight design, exquisite and unique design, comfortable feel
●The seven sound modes: natural, rock, pop, classical, soft, jazz, heavy bass
●Seven play modes: normal mode, single cycle, directory play, directory cycle, all cycle, random play,
browse playing
●Off Timer: You can set the sleep mode and power saving mode, use more conveniently.
Low Voltage Tips and recording file save functions.
Support MP3/WMA format player
Document Management: The machine comes with file deletion
choose A--B between two points in time, repeat play
Free driver U disk function, WIN98 above free driver USB2.0 universal interface, high-speed data
transmission.
support internal / external microphone (condenser) recording
support telephone recording, LINE recording and voice recording
with built-in high-quality speaker can play directly without headphones
Use computer USB port as a power supply for the machine work properly.
firmware upgrade function: to download the latest upgrade software on the website to realize
machine’s function expansion.
一:ew appearance and function name
1【 】: Previous track / rewind keys ⑩【ON / OFF】: Power switch
2【M】: menu option key 【Enter】: LINE / telephone recording /
External microphone jack
3【 】: Next track / fast forward button 【PHONE】: Headphone output jack
4【+】: Volume plus key 【 】: USB interface

5【-】: Volume down key :Built-in microphone
⑥【REC】: Record button / recording pause button :screen
8【 】: stop key / return key :Lanyard hole
⑧【 】: Play / confirmation key /Pause key :Built-in speakers
⑨[Music / Voice]:Music mode and voice mode switch
Power on / off
●Power supply: The machine uses an internal lithium battery-powered, you can use the USB cable
to connect a computer or charger (supplied by the Company) direct charging (or charging with
the charger supplied by the Company), and set the power switch to the "on" position when
charging.
Boot: push the power switch to the "On" position to enter the boot screen and enter the main menu,
standby mode; in sleep shutdown state, long press 【 】key to enter standby mode (as shown
below)
Shutdown: long press【 】key for five seconds to enter sleep shutdown state, or push the switch
to “off” position. If the machine is not in use for a long time, turn off the power switch to avoid the
battery runs out.
Switching:menu: push Music / voice key to the "music" to enter the music mode, push to “voice” to
enter the voice mode. In the main interface standby mode, short press【 】/【 】key to switch
between music mode / System Settings / Voice mode / system settings.
Music player
Push [music / voice recorder] switch to the "music" to enter the music mode:
●Download music:using USB data cable supplied by the company to connect the machine and the
computer can download.
●Play / pause / stop the music: In music mode, short press 【 】key to start playing music, and
then short press 【 】key music pause playback and in standby mode, short press 【 】
button to stop playing.
●Previous / next track selection and fast forward / rewind: in play or stop state, short press
【 】/【 】key, you can choose previous / next track, during playback, press【 】
/【 】 keys to fast forward / rewind operation.
●Volume plus or minus: Press 【+】/【-】 button to adjust volume increase or decrease.
●Cycle mode: Playing status, short press [M] key to enter the sub-menu, select the " cycle mode "
and again press [M] key to enter, select “normal mode, single cycle, directory player, directory
cycle, all cycle, random play, browse play ” seven repeat mode, short press [PLAY] key to fix and
exit.
Normal mode: after playing all files in all directories within the folder once, automatically
stop.
Single cycle: Only repeat playback of the selected file.

Directory play: Finish playing all music files within the selected directory folder once,
automatically stop.
Directory cycle: Repeat the music within the selected directory folder.
All cycle: Repeat all music files within all directory folder.
Random Play: Play this file in the folder randomly.
Browse play: browsing play all music files in the all directory folder 10 seconds before.
**Note: the removable disk root directory on the computer to create multiple directory file folder to
store songs, the song can be stored directly in the root directory.
●A-B repeat playback: Music playing, short press [REC] key to select point A, then short press
【REC】key to select point B, it will repeat play between A--B two point ; AB repeat playing,
short press 【REC】key to exit the AB repeat playback;
●Sound mode: In the play state, short press [M] key to select the sound modes: natural, rock, pop,
classical, soft, jazz, heavy bass other seven modes (set in the same way as repeat mode).
●Quickly find songs: in stop playing status, short press [M] key to pop-up sub-menu, select the "main
disk directory" short press [M] key to enter the main disk directory, short press 【 】/【 】
keys to quickly find and select songs, press 【M】button to confirm the position of the selected
songs.
●View lyrics: When the icon changes to the ,meaning the selected songs have lyrics,long
press the [MENU] key to display the lyrics in the playing status, press [+] / [-] keys view lyrics before and
after, short press [M] key cancel lyrics display.
Voice mode
●Push [Music / Voice] switch to the "voice" into voice mode:
1Recording mode
In any menu interface standby mode, short press recording shortcuts [REC] to enter the recording
mode state. Recording status as shown below:
2Microphone recording (built-in microphone and an external microphone):
** Select the recording source:Selected in the "System Settings" / "Record Source" the microphone
recording "recording mode, the recording icon is “ ” , factory value system default microphone
recording; Please reference system settings / recording source settings.
** Select the recording quality: Before recording, please select the quality of the recording, select in the
"System Settings" / "Record Type" the factory value system defaults to 64Kbps; please refer to system
settings / recording type setting.
** Start recording: In voice mode standby state, short press 【REC 】key to start recording, the
recording time starts to go second chronograph.

** Pause recording: In the recording state, short press【REC】key to pause recording, recording time
flashes and pause Walking seconds, then short press the [REC] key to continue recording.
** Stop / save the recording: In recording mode, short press 【 】 button to stop the recording and
save the recording file automatically.
*o use external microphone recording, external microphone connected to the [input] jack to recording
*If the battery is very low, the machine saves the current recording file automatically.
3Recording voice settings: When select "Voice enabled”, in the recording process, the voice source
admitted less than the voice sensitivity settings will automatically pause the recording, the recording time
to stop walking seconds, when the admission of the sound back to the identification of the machine will
automatically continue recording, on or off both are available upon request.
"VOX" displayed on the screen represents the voice enabled.
etailed settings, please refer to the "System Settings" / "Voice Settings
4Recording monitor settings
** Enable / Disable: When this feature is turned on, can monitor the sound with headphones in
recording.
Note: in microphone (external microphone) recording, after the machine connected to
the headset, can not put the speaker of the headset too close to the microphone, the distance
should be kept more than 3cm (or turn off the monitor function), in order to avoid self-excited
screaming sound.
Detailed settings, please refer to the "System Settings" / "Monitor Settings
** Monitor volume adjustment: First set listener “listens enable”, in the recording state, short
press [+] / [-] button to adjust the size of the sound of the monitor.
5Line recordings (Line) / telephone recording:
** Connecting external audio devices: one end of the transcription line supplied by the company
insert into the machine [input] jack and the other end into the audio output jack of the
external device; telephone recording, insert telephone line into a special connector, then
use one end of the transcription line insert into the connector, the other end is inserted into
the machine [input】jack:
** Select the recording source: before line recording, select" audio recording "recording mode in
System Settings "/" recording source ", recording icon is displayed as“ ”.

Before recording, adjust (Test) the size of the external device output signal, coordinate with the
machine in order to achieve better recording quality.
in the same way as microphone recording;
6One button recording: In the arbitrary menu interface standby mode, short press 【REC】key can
recording, recording fast and convenient.
7Playback voice (recording) file
After save recordings, automatically stored in the voice mode, you can play audio files operation
** Play / Pause / Stop :In the voice mode standby mode, you can play audio files, and related
operations, please refer to the music player.
** Last / next track selection and fast forward / rewind
** Volume plus or minus: Please refer to the music player
** Cycle mode: In playing status, short press [M] key to switch and play cycle mode (as music)
** Sound mode: In playing status, short press [M] key to switch to the audio mode (as music)
** A-B repeat play: Please refer to the music player
** Quickly find the audio file: Please refer to song find setting.
Delete recording / Music files
Warning: This action will permanently delete the recording files can not be restored, with caution! ! !
1. Delete the file:
Under the standby stop playing status(delete music mode in the same way) , press【 】/
【 】key to select the files you want to delete, short press [M] key to bring up the sub-menu,
select "Delete Files" and "Delete All".
2. Select the method of deletion
Short press【 】/【 】key to select "Delete Files" (currently selected), the "delete all" (the
all files in this folder).
3. Delete files
Select the method of deletion, short press [M] key to enter the delete confirmation screen, select
"NO" to return to the idle screen, select "YES" short press 【PLAY】key to confirm to display “in
the delete.. "And will be a permanent deletion to the audio file;
4. To exit the interface of deleting files
**If you do not want to delete any files, please select "exit", or in the delete confirmation interface
select "ON".
**If after 10 seconds no key operation, not delete the file, it will automatically return to the standby
state;
**Or in the interface of deleting , short press 【 】 key to return to standby
Note: * not recommend to delete large files (a long time) when the battery is very low (the battery
will run out).
*You can also delete a file on the computer inside.
System Settings
In the main interface, select "System Settings", short press [M] key to switch to the system settings,

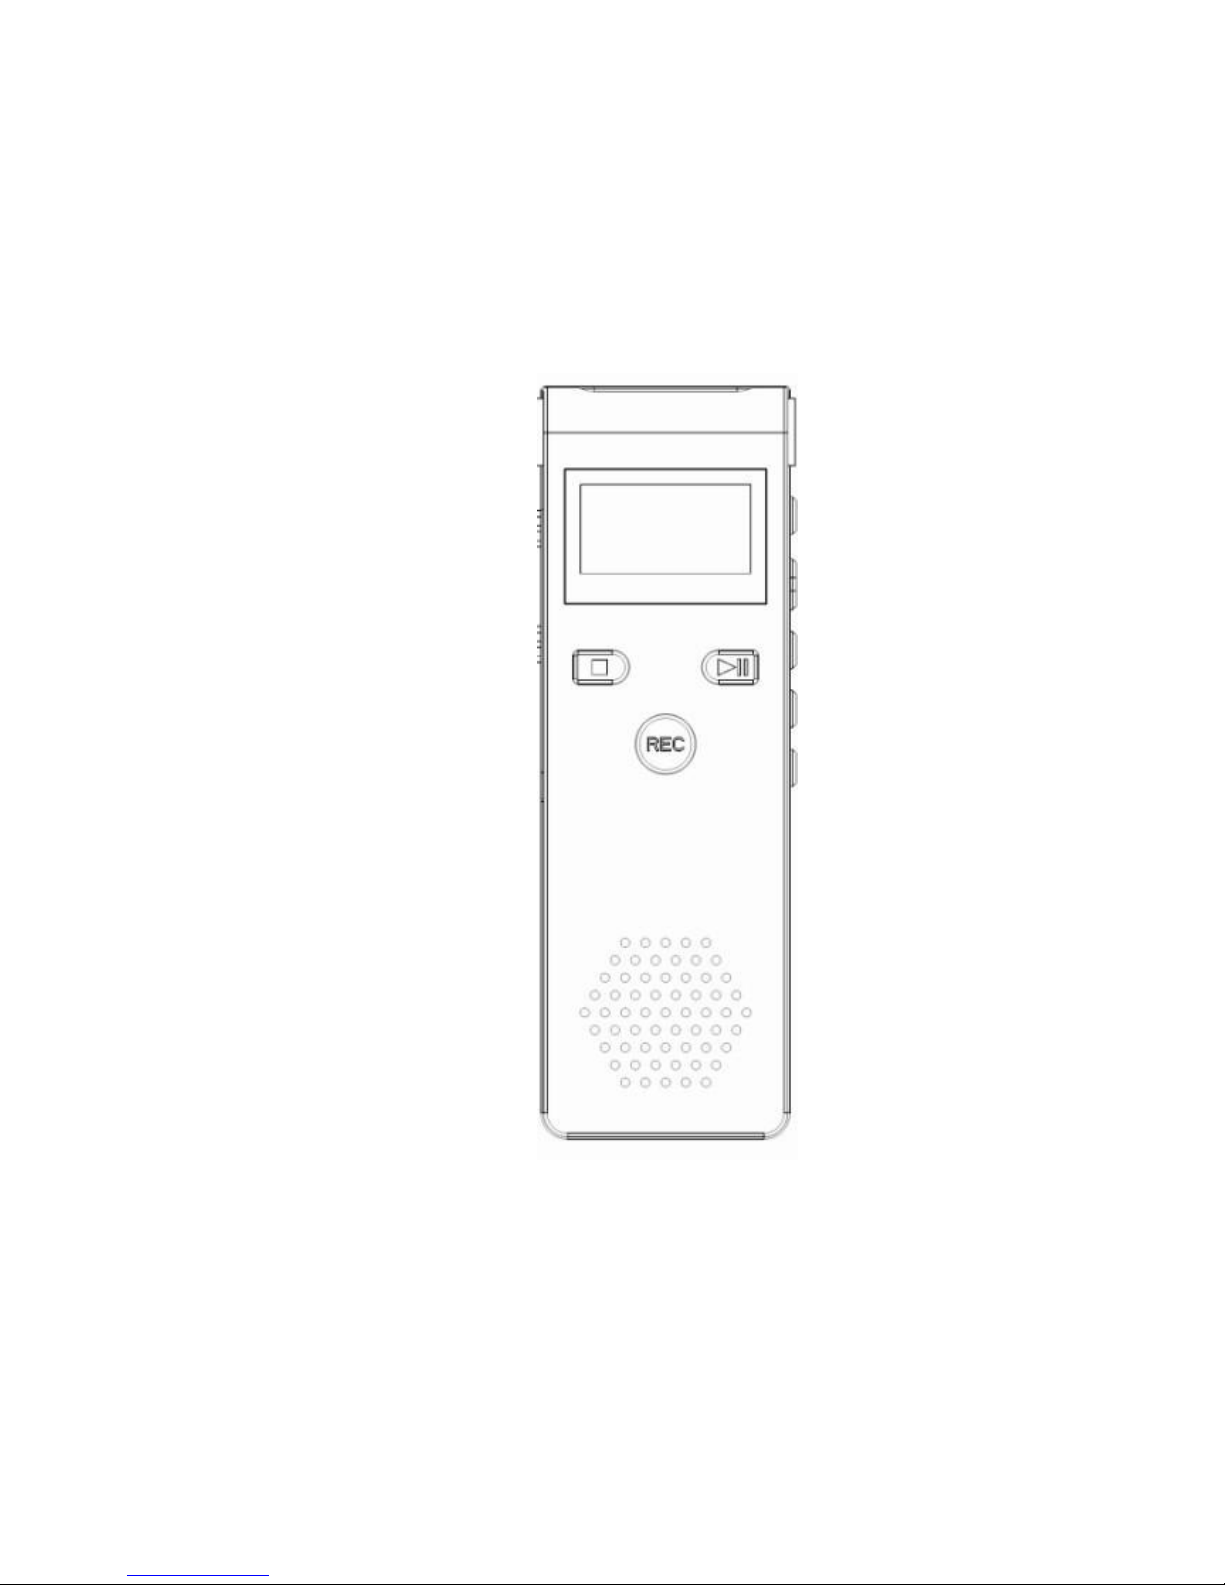
short press【】or【】key to select the menu, short press 【PLAY】key to confirm, short
press【 】key to exit. As shown below:
1Recording time
Short press【】or【】key to select the year / month / day, hour / minute / second location,
number flashes when selected, short press [+] / [-] keys to adjust the year, month, day, hour,
minute, and second values, press [PLAY] key to confirm to exit. If do not press the [PLAY] key to
confirm the modified value after 10 seconds, it will automatically exit, the revision is invalid.
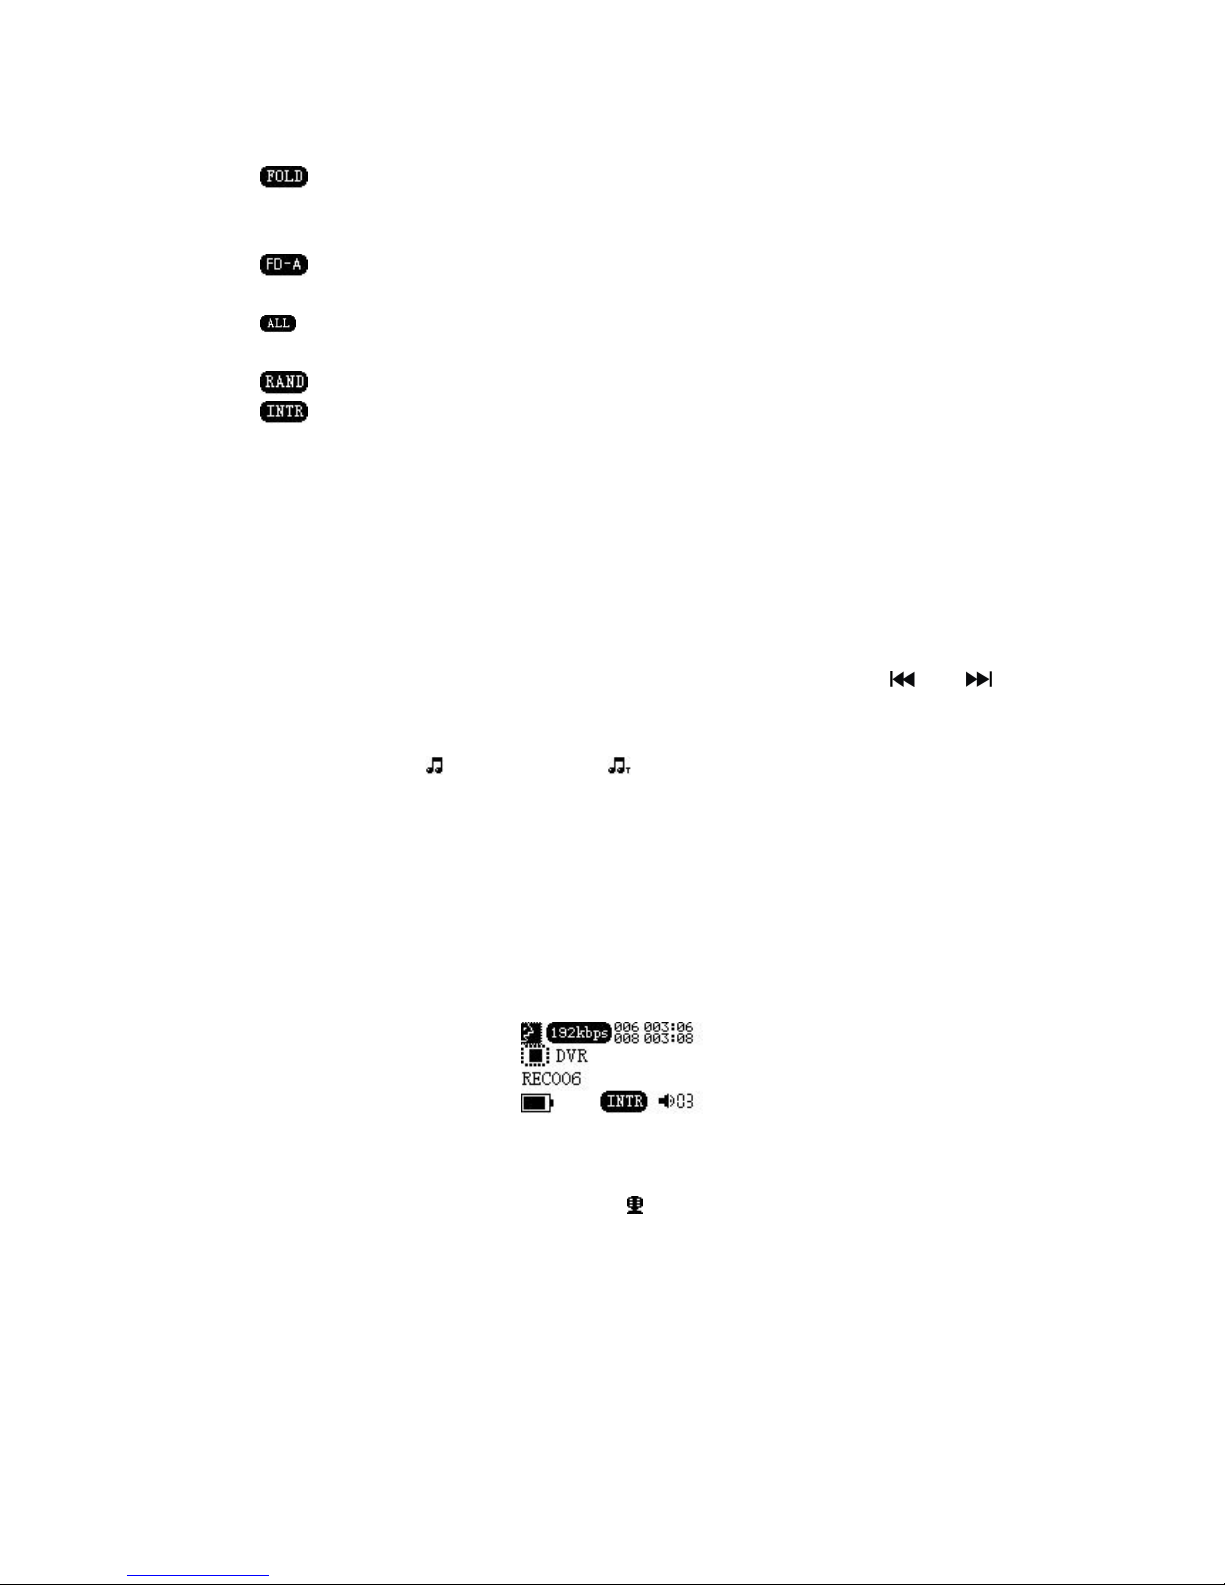
2Recording type (quality): Into the "Record Type" menu, short press 【 】
/
【 】 key to select
"32Kbps", "64Kbps’, ‘128Kbps, ‘192Kbps’ and ‘384Kbps’, short press [PLAY] key to
confirm and exit.
3Recording Source: Select "Record Source" menu to enter, short press【 】/【 】key to select
"the microphone recording" and "audio recording" and press [PLAY] key to confirm.
4Voice settings: Short press【 】/【 】key to select the "voice off" and "voice enabled’, press
[PLAY] key to confirm and exit.,he factory default is: voice off.
5Monitor settings: Short press【 】/【 】key to select "Monitor off" and "Monitor enabled’,
press [PLAY] key to confirm and exit,he factory default: monitor enabled.
6Backlight time: Short press [+] / [-] keys and slide to adjust the number of seconds between 0 to 30
seconds, short press [PLAY] key to confirm, when the time is set to 0 seconds, the
backlight lights for long time .
7Language Selection: Short press【 】/【 】keys to select the language, short press [PLAY] key
to confirm, you can set the language of Simplified Chinese / Traditional Chinese / English /
Japanese etc. more than 20 countries.
8Shutdown Setting
Short press【 】
/
【 】key to select "Shutdown Setting", short press [M] key to enter the ‘power
saving mode’ and" sleep mode "interface,。
8.1Power saving mode: Short press [+] / [-] key to select the desired time, press [PLAY] key to confirm
the setting,。
** In standby(■)state, within set time (in minutes) without any key operation, it will shutdown during
the set time period. When the set time is 0, the machine will always boot; In play( )state, "Power
Saving Mode" setting is invalid, it will always play to the lack of electricity automatically shut down;
8.2Sleep Mode: Short press [+] / [-] key to select the desired time, press [PLAY] key to confirm the
setting。
In any state (including standby / play music or voice status / recording status), if no key operation
within the set time (in minutes), will shutdown at the set time period; When the

time set to 0 not perform the sleep function; each sleep function is effective
before shutdown.
9Contrast adjustment: According to the brightness of the screen display, short press [+] / [-] keys to
select a value between 1 to 30, press [PLAY] key to confirm the setting
10Storage conditions: Before recording, you can inquire the remaining space in the query native
memory available for recording, select the " Storage conditions " and press [M] key, can check how much
space (in MB), short press [■] key to exit. As shown below:
1925M: the machine's memory capacity remaining 1952MB, has been used 05%.
Note: The amount of free space can refer to the attached sheet "Specifications" and can calculate
according to the current recording quality mode.
**When the remaining space is 0MB in the recording process, the screen display "full of space!"
Indicates that the memory space is not enough to recording, and automatically save the
current recorded files。
11Firmware version: Short press [M] key to confirm, you can check the firmware version number, short
press [■] key to exit
12Exit: Exit to the main menu after a short press [M] key to confirm.
※suggestion: use copy way
Formatting memory
1、The formatting process, you should put the voice recorder into a computer
USB port, enter the USB connection mode, format the voice recorder’s
memory (Note: above the version WINDOW2000, select "FAT32" low-level to
format.)
2、Formatting in any computer system, the same method as you format a
computer hard disk, floppy disk (selected "Removable Disk" to format).
Troubleshooting
problem
reason
measure
The LCD
does not
show
Low battery
Whether turn on
Timely charge
Turn on the power
supply;
Can not
record
Not transferred to the
recording state
Low battery
Memory capacity to the
limit or full
Transferred to the
recording state;
Timely charge;
Remove part of the file or
move to an external
device.

Unable to
open the
recording file
Low battery
There is no audio file
the volume in a
minimum
Timely charge;
check the file;
Adjust the volume;
letters
appearing
on the screen
is abnormal
The language choose
whether correct
Choose the right
language
Speaker no
sound
check the plug of
headphone
the volume to a
minimum
check the recording format is
correct
Remove the
headphones;
adjust the volume
Select the correct
recording format
No sound
from
headphones
Make sure that the
headset is properly
connected
he volume in a
minimum
Recording or MP3 files
have been destroyed in
the manufacture of
different levels of
noise, and even play
silent;
Connect the headset;
Adjust the volume;
Check the recording or
MP3 files whether are
destroyed, to ensure the
integrity of the document;
Can not be
normal
upload /
download the
audio file
Check the USB cable for
damage
Connection of USB
whether normal
Check if there are
blank memory;
Ensure USB cable is not
damaged
Check the connection of
USB
Remove the blank
memory;
Product warranty cards
Product Type S/N:
Dealer Name Date of Purchase
Dealer stamped at:

Replacement /
repair date
Replacement/maintenan
ce records
Replacement /
repair unit
(Stamp)
Description:
For replacement shall be marked at "replacement / maintenance records;
warranty card must be presented together with the official purchase invoice
and dealer’s stamp, fill this warranty card in detail and carefully, any alterations
on this card is invalid.
This manual suits for next models
1
Table of contents
Other Sunsky Voice Recorder manuals
Popular Voice Recorder manuals by other brands

AL Tech
AL Tech DSD 4921 RV user manual

Soniclear
Soniclear Tablet Recorder User's operation guide

Philips
Philips AQ6345/01Z user manual

Bosch
Bosch DIVAR IP all?in?one 5000 Series installation manual

Sony
Sony Voice File ICD-55 Service manual

Philips
Philips LFH9370 - Digital Pocket Memo 9370 Voice... user manual