Specifications
Parts included in kit
Initial 3-Day Charge
Turn the slide switch to OFF position. The solar
cell will charge the battery without activating the
unit. Leave the switch in this position for 3 sunny
days to ensure that the battery has a full charge
for motion sensor adjustment and normal
operation.
Motion sensor adjustment
Point the motion sensor to face the area you
want to detect motion in. The range of detection
is 90° centered at the angle the unit faces. The
sensor detects moving invisible infra-red radiation
given off by a human body. Test the coverage of
the area by walking slowly around until the light is
triggered to determine best angle of sensor for
use.
Cleaning
It is important that the solar panel is kept free of
dirt and debris. A dirty solar panel will not allow
the battery to fully charge, this will shorten the life
of battery and cause the light to malfunction.
Storage
If you wish to store your light indoors for more
than two or three days, follow these steps to
prevent damage to battery:
1. Turn the switch to OFF position.
2. Store the light and solar panel where it can
receive some sunlight or room light each day.
The battery needs light to maintain a charge
during storage.
3. During prolonged storage, unit must be fully
charged once every four months.
For best performance, do not store for
prolonged periods.
1 x Entree Light Fitting
1 x Wall Bracket
2 x Mounting Screws
2 x Mounting Anchors
IMPORTANT
Take normal safety precautions when using tools and ladders. Install only in dry weather.
This light fitting is not intended for use by persons (including children) with reduced physical, sensory or
mental capabilities, or lack of experience and knowledge, unless they have been given supervision or
instruction concerning use of the appliance by a person responsible for their safety. Young children should be
supervised to ensure that they do not play with the appliance.
Any changes or modifications made or attempted to this product, without the prior written approval of the
manufacturer, will void any and all stated warranties.
Battery (lithium-ion) 2600mAh @ 3.7V
LED Wattage 4 x 0.5 W LED
Duration Time 10±5s
Detection Range 90º, Max. 8 metres
Light Activation Level (approx) 10±10 LUX
IP Rating IP44
Solar Panel 1.8W 6V
Color Temperature 3000K
Max. Run Time*
PIR with courtesy light @ 10% 12 Hours
PIR with courtesy light @ 100% 3 Hours
PIR without courtesy light @ 100% 4 Hours
* Times based on fully charged batteries. Max run times are approximate only.
Direct sunlight is critical for operation of this light. When selecting your location
for mounting, ensure the solar panel is aimed to face as much direct sunlight as
possible. Insufficient sunshine hours may reduce time, as will older batteries.
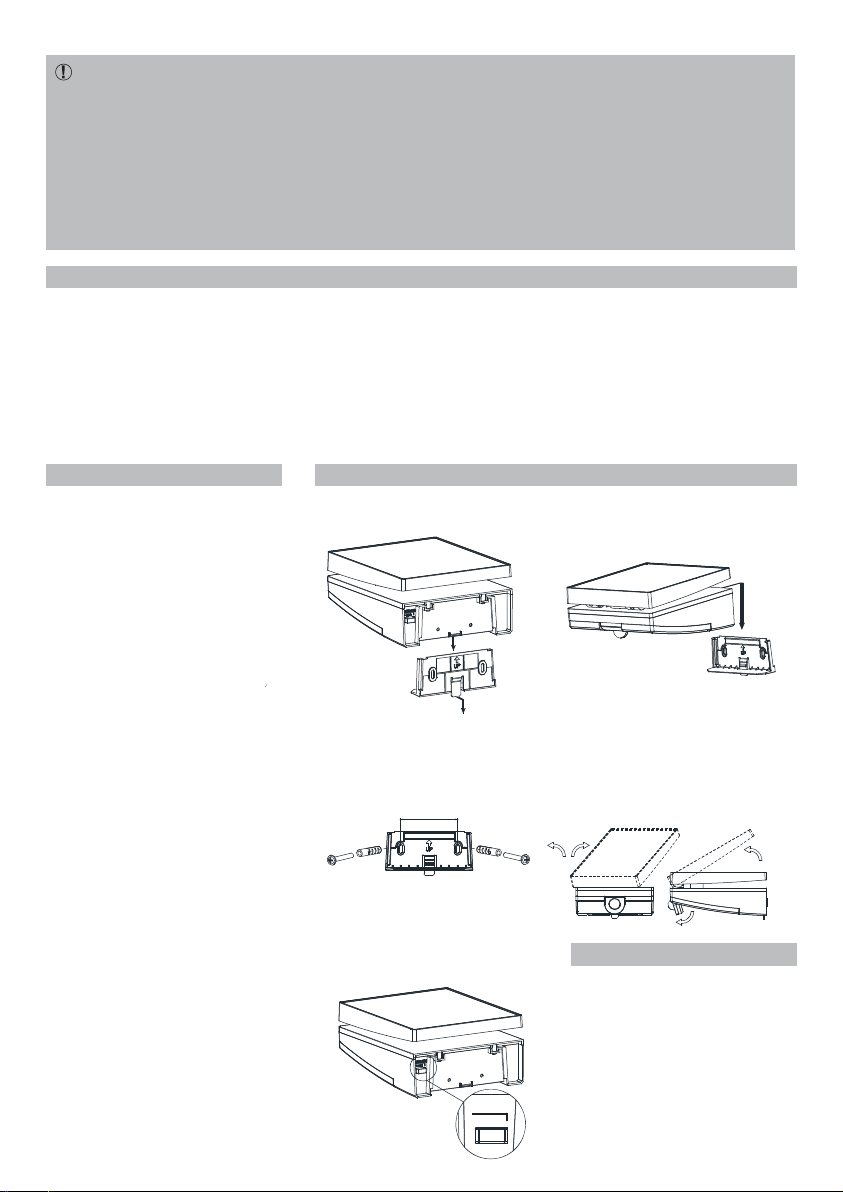
Installation
Settings
Lift tab towards you and pull down
to remove bracket from light fitting
Position and slide down light fitting
until it clicks into place on bracket.
position PIR sensor down as
appropriate
Lift panel up to a maximum of a 40°
angle and swivel left or right towards
best position for direct sun exposure.
Optimum panel operation is to aim
directly at where the sun is at 11am.
This shifts with the season so reaim
as needed
1
2
3
4
5
Measure and drill holes for screw
anchors, knock in anchors, position
bracket and screw firmly into place
76
30°
AUTO(10%/ 100%)
OFF AUTO
60°
30°
OFF
Position on delivery and initial 3-day charge
before first adjustment and use. Switch to OFF
for storage and long periods of non-use.
AUTO
At night light will activate at 100% brightness
when triggered by PIR sensor.
AUTO (100%/10%)
At night light will operate continuously at 10%
brightness and will activate at 100% brightness
when triggered by PIR sensor.
Switch light fitting to OFF setting for
initial 3 day charge, after which time
you may select your desired setting