Suntek HC-500G User manual

12MP 3G GPRS MMS SMS Control
Scouting Trail Camera

1. Introduction..............................................................................................................1
1.1 Application............................................................................................................1
1.2 Power Supply........................................................................................................1
1.3 Caution..................................................................................................................1
1.4 Key Features..........................................................................................................1
2. Whole View and Details of Camera.........................................................................3
2.1 Front View of Camera...........................................................................................3
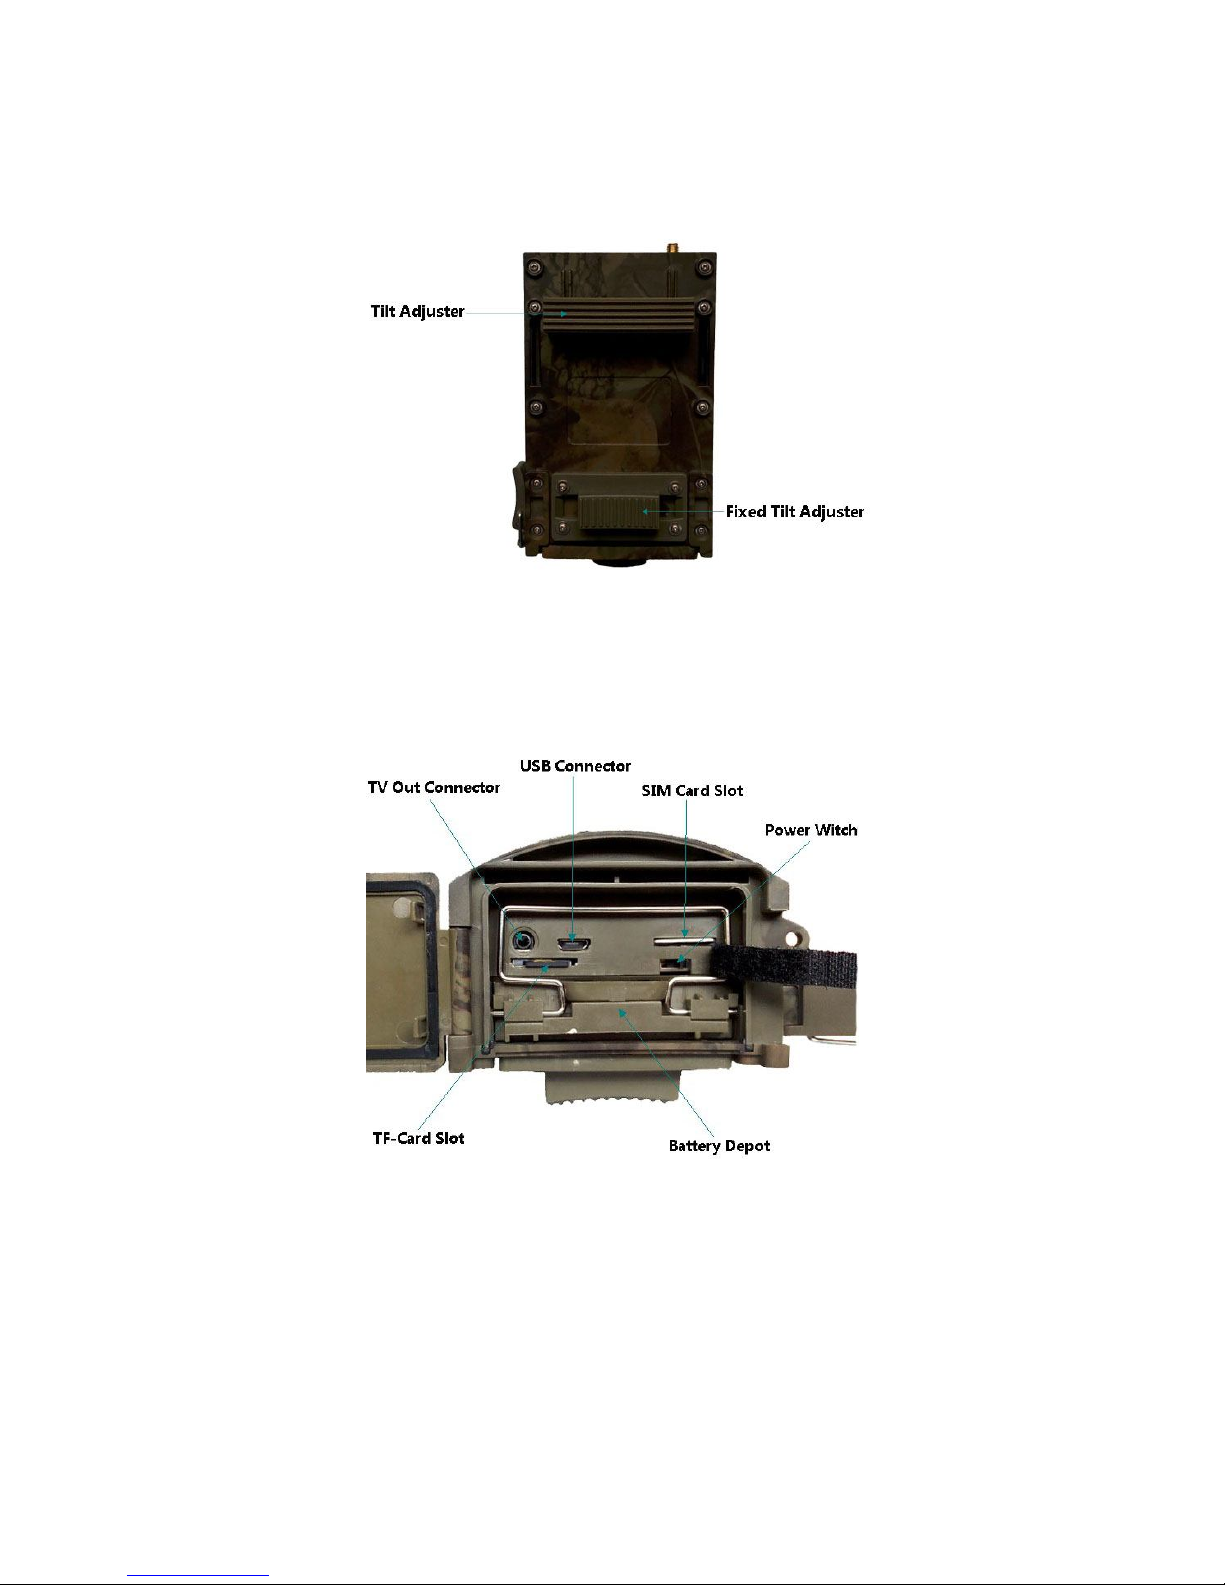
2.2 Right Side View of Camera...................................................................................3
2.3 Back View of Camera............................................................................................3
2.4 Bottom View of Camera........................................................................................4
2.5 Remoter.................................................................................................................4
2.6 Screen Information Display..................................................................................6
2.7 Settings Menu.......................................................................................................6
3. Quick Operation......................................................................................................7
3.1 Load Battery.........................................................................................................7
3.2 Insert TF Card......................................................................................................7
3.3 Power on...............................................................................................................8
3.4 Menu Setting Operation.......................................................................................8
3.4.1 Photo Menu.....................................................................................................8
3.4.2 Video Menu.....................................................................................................9
3.4.3 System Menu..................................................................................................11
3.4.4 MMS Menu....................................................................................................14
3.4.5 SMTP Menu...................................................................................................15
4. MMSCONFIG Setting...........................................................................................16
5. SMS Control..........................................................................................................17
6. Firmware Upgrade.................................................................................................18
7. Specification...........................................................................................................19
8. Packing List............................................................................................................20

1. Introduction
Thank you for choosing one of our highly qualified 3g sms control Scouting Trail
Camera. This 12MP HD digital camera was totally R&D by our diligent and smart
engineers based on feedbacks and requirements from customers globally.
1.1 Application
This digital camera is an ideal product for housing security, warehouse surveillance,
and monitoring wild animals with its camouflage appearance and nice shape. It is
convenient to install or fasten, could be used to take photographs manually and carry
on long-time videos in Test mode.
a. Instant surveillance camera for home, office, construction site, and warehouse, etc
b. Motion-triggered infra-red night vision surveillance;
c. Animal observation and hunting;
1.2 Power Supply
a. AA Alkaline batteries
This camera can either work with 4 or 8 AA Alkaline batteries.
Pls note that the voltage of rechargeable AA batteries (1.2V) is insufficient to power
this device. Batteries should be inserted as indicated inside the battery case.
b. Solar Panel
To bring users better using experience, our engineers designed this camera to be able
to work with most standard 6V lithium battery build-in solar panels.
We strongly recommend the camera works with the original solar panel.
c. Power Adapter
This camera can also be powered by an external 6V DC adapter. Recommend to
remove the alkaline batteries when power adapter is used, to avoid surcharging.
1.3
Caution
a. Please insert the TF-card when the power switch is at OFF position before testing
the camera.
b. Please do not insert or take out the TF-card when the power switch is at ON
position.
c. It is recommended to format the TF-card by the camera when used at the first time.
d. The camera will be in USB mode when connected to a USB port of a computer. In
this case, the TF-card functions as a removable disk.
e. Please ensure sufficient power when having firmware upgrade, otherwise the
upgrade process could be interrupted incorrectly. If any fault occurs after improper
upgrading process, the camera may stop function properly.
1.4 Key Features
1 Built-in 2.0" TFT color screen to review photos and videos on camera
2 22 pcs IR LEDs for flash range as 20 meters
3 Programmable 5/8/12 Megapixel high-quality resolution
4 Color pictures during day; black and white at night

5 Adjustable PIR sensitivity; HIGH, MID, LOW
6 Impressive quick trigger time: 0.7s
7 Multi-shot pictures; 1,3,6,9
8 Adjustable delay between motions; 1/5/10/30 seconds/minutes
9 Adjustable video length: 10/30/60/90 seconds
10 With 8 AA alkaline batteries, the longest standby time is up to 6 months
11 Available operation temperature: -20℃to 60℃
12 With specified Timer, camera can be programmed to work only during preset
time period every day
13 Stamp of date, time, temperature and moon phase on every picture
14 Sound Recording
15 Support 3G and 2G SIM cards to get real-time photos; If 3g SIM card, it will
works on 3G net work, faster sending photos
16 With MMS/SMTP function, camera can transmit photos to 1-4 preset mobile
phones or 1-4 email per trigger
17 SMS to enable camera to shoot a photo and send back instantly, ask camera to
work or not work, get number of taken picture and battery status

2. Whole View and Details of Camera
2.1 Front View of Camera
2.2 Right Side View of Camera
2.3 Back View of Camera

2.4 Bottom View of Camera
2.5 Remoter
The infrared remoter is an input device of the camera and is primarily used for
customer settings. Its maximum remote distance is 9 meters.

Note: Press the punctuation “*”for laser pointer.
Note:
1. Press OK directly, the camera will take picture or video directly.
2. Press Right directly, the picture or video recorded can be viewed
3. Viewing picture, press up or down
4. Viewing video, press Left to start, again to stop

2.6 Screen Information Display
Note: To active its MMS or SMTP function, the camera should find
signal and SIM card.
2.7 Settings Menu
There are five parts setting of the camera

3. Quick Operation
3.1 Load Battery
3.2 Insert TF Card
Note: To active its MMS or SMTP function, pls save setting file
Parameter.dat by MMSCONFIG to TF card.

3.3 Power on
Slide Power Witch from OFF to Test or On position, the camera powers
on
3.3.1 TEST
In this mode, the screen lights up. User can do the operations by remoter:
a. Setting Camera Menu, including photo, video and system
b. Take picture or video
c. View picture or video
3.3.2 On
In this mode, the screen is closed. The camera works automatically.
3.4 Menu Setting Operation
User can fix photo, video and system menu setting by remoter; MMS
menu and SMTP menu setting by software MMSCONFIG from CD.
3.4.1 Photo Menu setting

Description:
Menu Content Description
Resolution 12MP, 8MP, 5MP Photo size
Interval 1/5/10/30 sec/min Waiting time from the last
taking
Multi 1/3/6/9 Number of photos taken every
time
ISO 100,200,400 The camera exposure level
To change 12MP to 5MP Resolution, the remoter operations are:
Note:
1. The mode is Camera or camera&Video
2. Interval, Multi and ISO setting operations are same.
3.4.2 Video Menu

Menu Content Description
Resolution 1080P, 720P, WVGA, QVGA Video size
Video Length 10S, 30S, 60S, 90S The time length of video
Voice On, Off If On, Video sound is recorded
To change 1080P to 720P Resolution, the remoter operations are:
Note:
1. The mode is video
2. Video length and voice setting operations are same.

3.4.3 System Menu
Menu Content Description
Mode Camera, video, camera&video Taking picture, video, picture
and video
Language English, Francais, Deutsch
and so on
Camera Menu language
TV Mode NTSC, PAL TV play mode
Date/Time 31-07-2014 15:49:40 Date-Month-Year
Hour:Minute:Second
Password ON/OFF ON, OFF Password of entering camera
Password **** 4 digital number
Timer On, Off If On, the camera only works
in the period
To change Camera to Video mode, the remoter operations are:

Note:
1. Language, Distance, TV Mode, Format and Default setting operations
are same.
2. In Date/Time, Timer and Password setting:
a. Press or to select number
b. Press to enter into next menu
3. After select Default, the setting is:

Setting Default Items
Mode Camera Camera, Video, Camera&Video
Resolution
(Camera) 12M 12M, 8M, 5M
Delay 1 Seconds 1-30 Seconds, 1-30 Minute
Multi Single Single, 3, 6, 9 Pictures
ISO 400 100, 200, 400
Resolution
(Video) 1080P 1080P, 720P, WVGA, QVGA
Video Length 10s 10s, 30s, 60s, 90s
Date/Time Same as last time YY/MM/DD, MM/DD/YY, DD/MM/YY Adjust
Distance High High, Normal, Low
Language English
English, French, Germany, Spanish and
Russian
Timer 0 0 0 to 23 59 59 Adjust
Format Internal Memory Internal Memory, SD Card
TV Mode NTSC NTSC, PAL
Password Off Off, On

3.4.4 MMS Menu

3.4.4 SMTP Menu

4. MMSCONFIG Setting
1 Load CD into the computer
2 Run MMSCONFIG.exe file from MMSCONFIG folder
3 Fix Photo, Video and System Menu Setting
Note: After setting menu by remoter, user can skip it.
4 Fix MMS Setting
A. Auto MMS Mode:
In Auto MMS Mode, there is configured information for selection
a. Choose Country
b. Choose Operator
c. Add phone number for receiving photos
d. Add email address for receiving photos

B. Manual MMS Mode:
If there is no configured information for selection, pls choose Manual
MMS Mode.
Firstly, User need to contact SIM card operator to get APN, Account,
Password, MMSC, IP and Port information. Then
a. Add phone number for receiving photos
b. Add email address for receiving photos
5 Fix SMTP Setting
This way of sending pictures is also called GPRS transmission by users.
It’s highly welcome now, because the picture is sent from email to email,
only charing the flow cost.
A. Auto SMTP Mode:
In Auto SMTP Mode, there is configured information for selection

a. Choose Country
b. Choose Operator
c. Choose Type of email
d. Add sending email address on the left
e. Add sending email address password on the left
f. Add receiving email address on the right
B. Manual SMTP Mode:
If there is no configured information for selection, pls choose Manual
SMTP Mode.
Firstly, User need to contact SIM card operator to get APN, Account,
Password information; contact sending email provider to get server, port
information.
a. Add sending email address on the left
Table of contents