Supapowa SupaStart User manual

my rst
SupaPowa®
kit
User Manual
Let’s get
SupaStarted

CONTENTS
1. Included in SupaStart™ P 03
2. Correct usage and user safety P 04
3. Transmitter P 06
4. Portable Transmitter P 08
5. Receiver P 10
6. Specications P13
7. Warranty P 13
8. Correct Disposal of product P 13

SupaStartTM Full user guide Page 3
Included in SupaStart™
1 x Transmitter (B)
1 x Portable Transmitter (C)
1 x Receiver (A)
1 x Micro USB (FEMALE) to 30-pin adapter
1 x UK standard 3-pin USB 2.0 AC Adapter
1 x “Let’s Get SupaStarted” Guide
1 x 1.5m USB 2.0 A (Male) to Micro USB (Male) Cable
1 x 1.2m USB 2.0 A (Male) to Micro USB (Male) Cable
1 x 0.3m USB 2.0 A (Male) to Micro USB (Male) Cable
(B)
C)
(A)

2. Correct usage and user safety
Thank you for purchasing SupaStart™ product bundle.
Your rst SupaPowa® kit
Soon you will be ready to charge your
device(s) wirelessly at home, at work and
on the go using SupaPowa®
For your own safety ensure that you read
this User Manual in full before using these
products.
For warranty purposes, ensure that you
keep detail of the purchase, including date of
purchase and supplier.
For further details about the warranty please
refer to Section 7 of this document.
These products are compatible with the Qi standard for wireless charging.

SupaStartTM Full user guide Page 5
2.2. Dangers associated with incorrect use.
Do not attempt to open or dismantle any
of the products!
• Ensure that the products are kept at room
temperature at all times.
• Do not use products in direct sunlight as
excessive heat may impair the performance
and also cause risk of re.
• Avoid using the products in areas where
they may come into contact with liquids
and/or excessive dust.
• Always ensure that charging is undertaken
on a at, stable surface to minimise the risk
of products falling and being damaged or
causing damage.
• Always ensure that you use the products
as intended and as outlined in this User
Manual.
• Always dispose of any used products via an
approved collection / recycling point.
2.3. Use of products close to an active medical implant.
• It is recommended that any electrical device
is kept at least 15cm away from an active
medical implant.
• Always follow the manufacturer’s
recommendations.
• Do not use the wireless charging product if
you think there may be a problem caused
by interference.(R1)(R2)
Congratulations.
You now have the freedom to charge
your mobile device(s) wirelessly using SupaPowa®.

3. Transmitter
3.1 Connect to Mains Power (Figure 1)
1. Connect the USB 2.0 interface (on the 1.2m
cable) to the AC Adapter provided (Fig 1).
2. Connect the Micro USB interface (on the
1.2m cable) to the Micro USB Input port
located at the rear of the Transmitter.
3. Locate and plug the AC Adapter into a
suitable mains socket.
The LED Indicator light on the Transmitter
will illuminate Red when ready for use
(Standby mode).
3.2. Connect to Laptop/Desktop PC
1. Connect the USB 2.0 interface (on the
0.3m cable) into a USB port on the laptop/
desktop (Fig 2, Fig 3).
2. Connect the Micro USB interface (on the
0.3m cable) to the Micro USB Input port
located at the rear of the Transmitter.
3. The LED Indicator light on the Transmitter
will illuminate Red when ready for use.

SupaStartTM Full user guide Page 7
Fig. 1
Fig. 2 Fig. 3

4. Portable Transmitter
4.1 Charging the Portable Transmitter
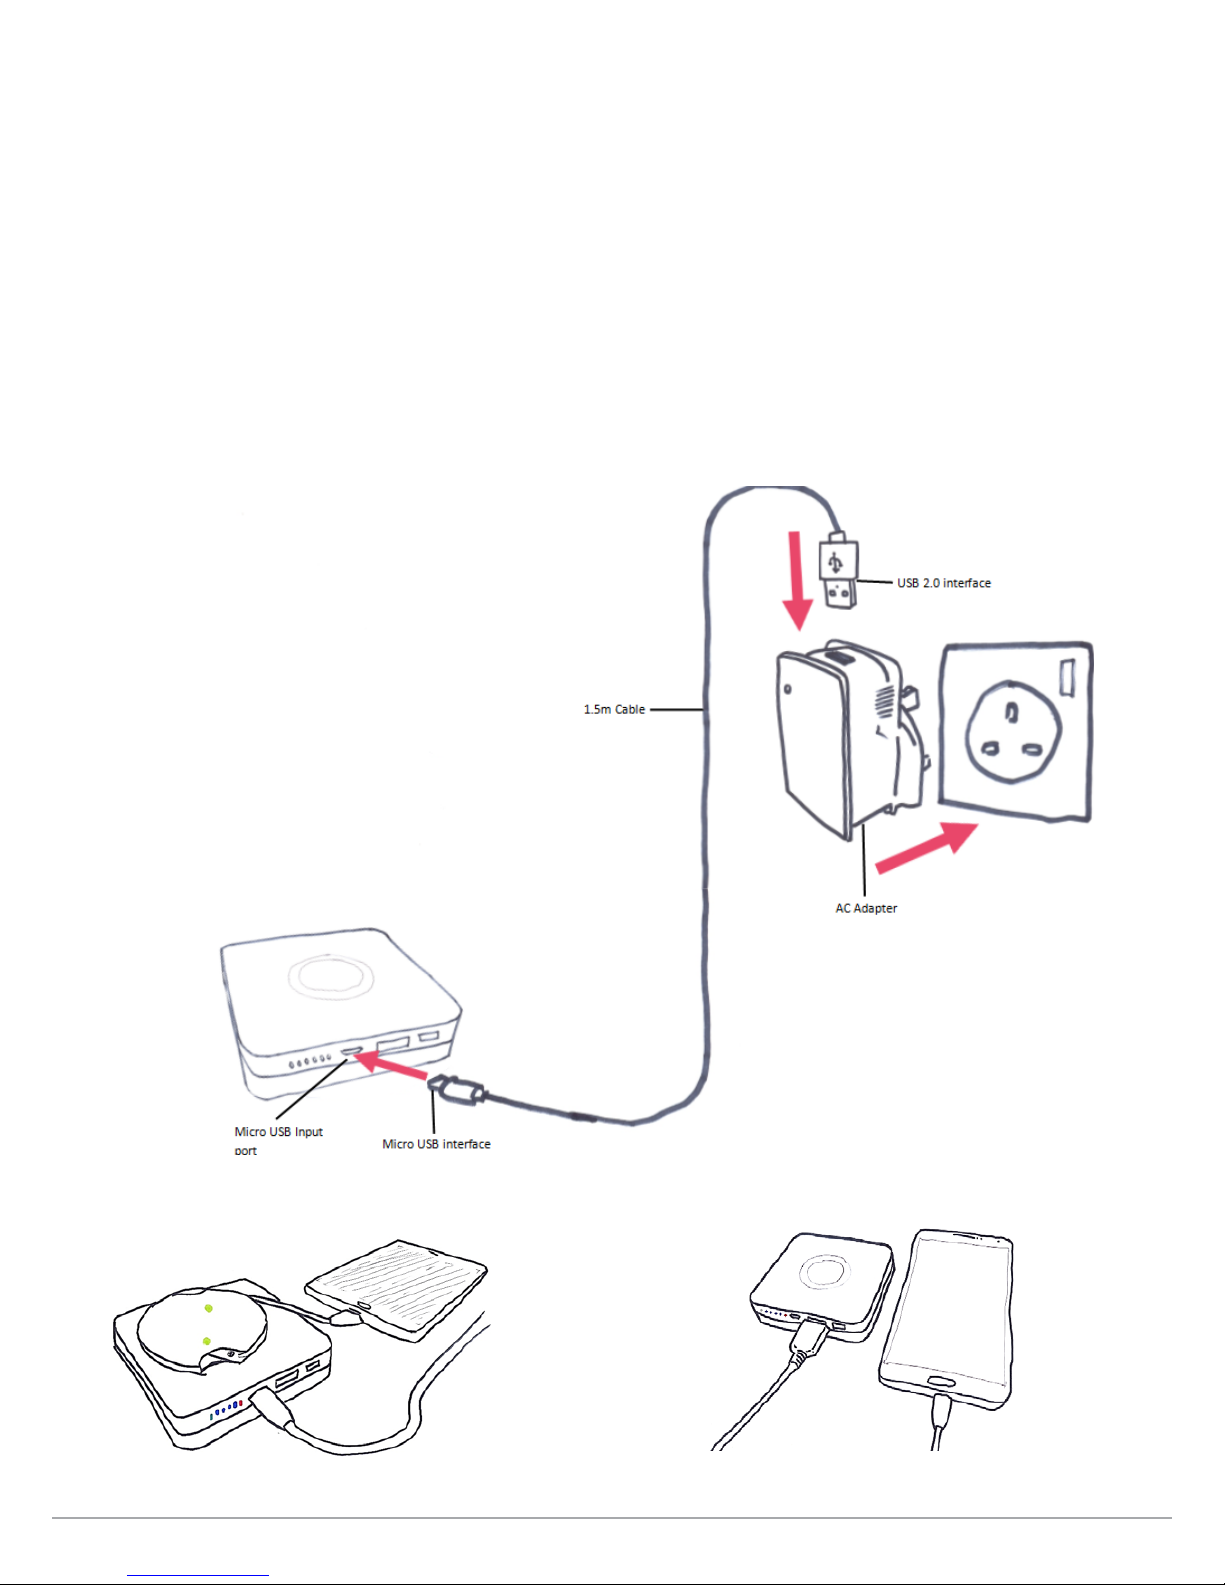
Priortorstuse,itisrecommendedthat
you fully charge the Portable Transmitter
by connecting to a suitable mains socket
(see Fig 4).
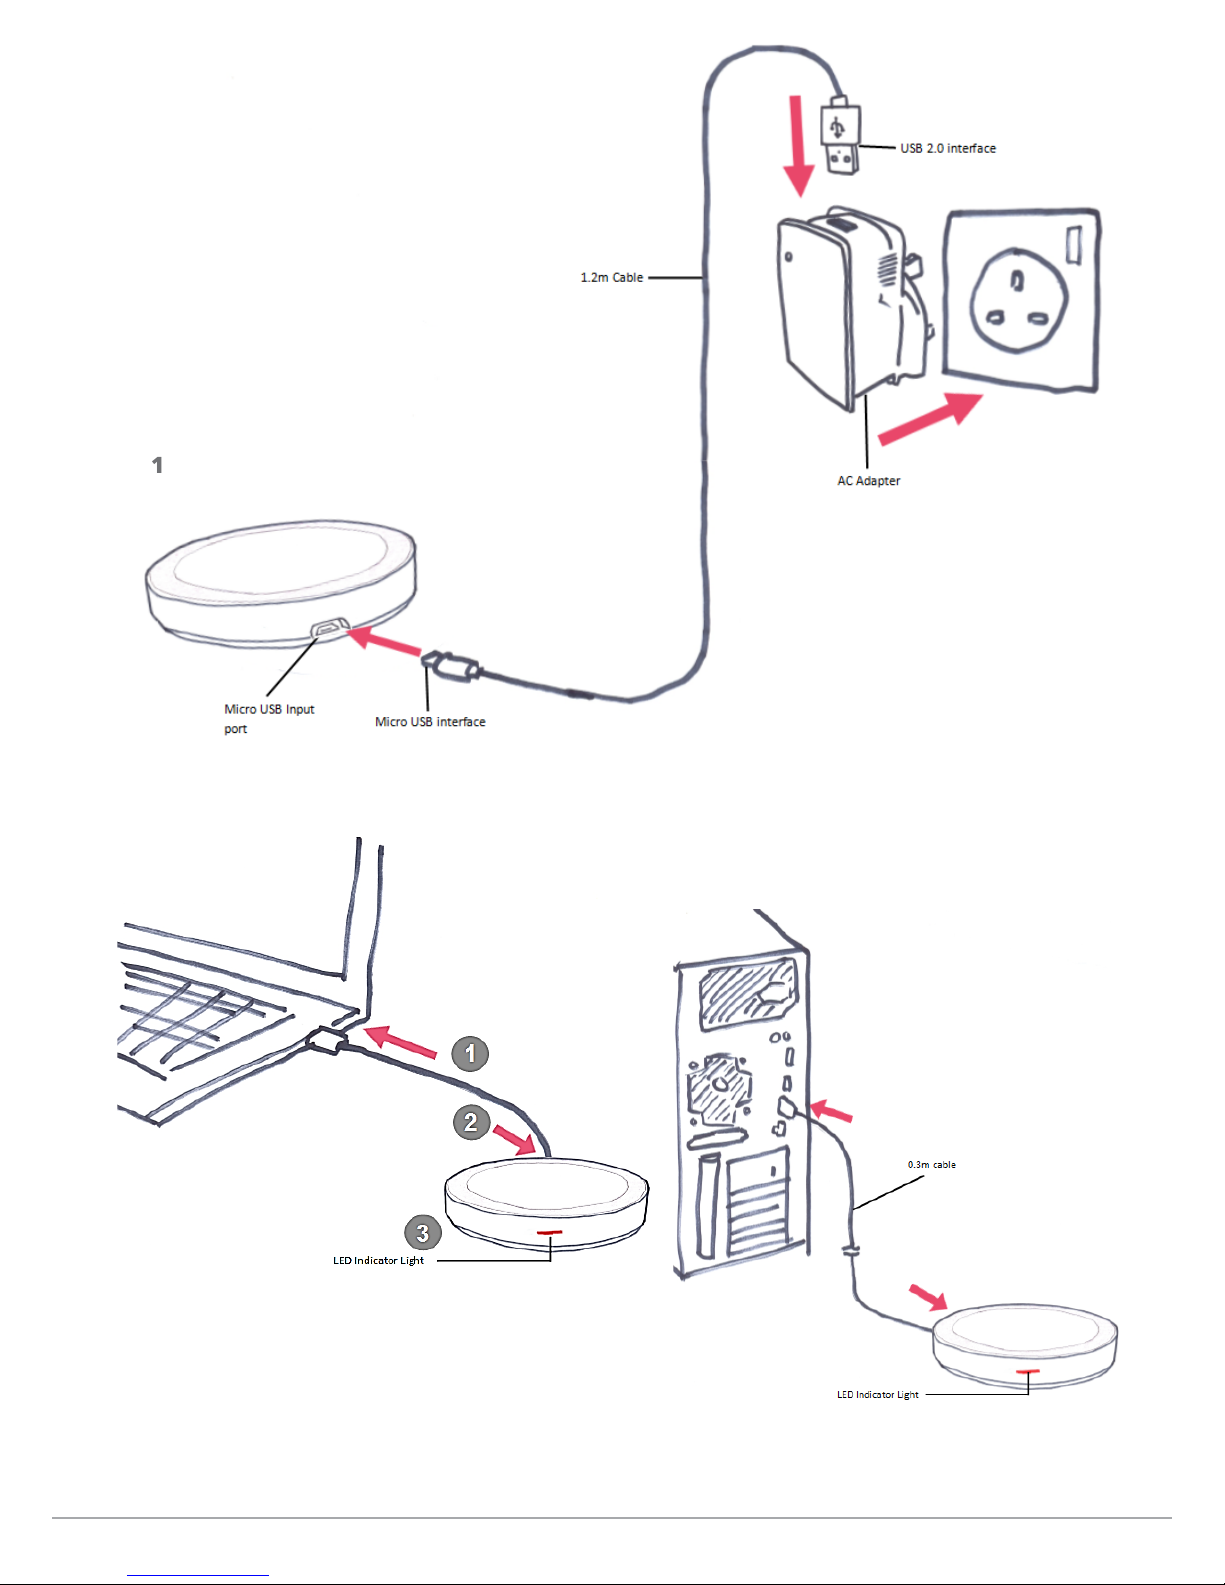
(NOTE: You can also connect to a laptop
or desktop pc’s to charge the Portable
Transmitter, but the time taken to
re-charge the Portable Transmitter’s
internal battery will increase slightly.)
1. Connect the USB 2.0 interface (on the 1.5m
cable) to the AC Adapter provided.
2. Connect the Micro USB interface (on the
1.5m cable) to the Micro USB Input port on
the Portable Transmitter.
3. Locate and plug the AC Adapter into a
suitable mains socket.
4. The Red Power Indicator Light will illuminate
to indicate that the Portable Transmitter’s
internal battery is charging.
The Portable Transmitter’s internal
charge state will be indicated by the
battery status indicator lights in four
stages:
* 1 Blue light = 15% power
* 2 Blue lights = 45% power
* 3 Blue lights = 75% power
* 4 Blue lights = 100% power.
When all four blue battery status indicator
lights are constantly lit, this will indicate that
the Portable Transmitter’s internal battery is
fully charged.
5. When connected to a mains power source,
you can also use the Portable Transmitter to
wirelessly charge a mobile device.
The Portable Transmitter’s internal battery
will continue to be charged (Battery Status
Indicator Lights will continue to ash) whilst
oering charge to the mobile device (Green
Wireless Charging Indicator Light illuminates
when a Receiver is introduced to the charge
area).

SupaStartTM Full user guide Page 9
The charging of the Portable Transmitter’s
internal battery may take longer when
charging a mobile device at the same time
(see Fig. 5).
6. You can either choose to wirelessly charge
your device by placing the Receiver onto the
charge area of the Portable Transmitter or you
can connect your device (using the designated
USB cable supplied with your mobile device
(not included in the SupaStart™) to the USB 2.0
output socket on the Portable Transmitter (Fig. 6)
The Portable Transmitter will identify which
charge method has been chosen when the
start button is pressed.
(NOTE: If the Portable Transmitter’s
Battery Status Indicator is showing a
singleashingBlueLight,theremaining
internal battery capacity is low (less
than 15%). Please re-charge the Portable
Transmitter when it is in this state.)
Fig. 4
Fig. 5 Fig. 6

5. Receiver
5.1. How to use your Receiver
There are two initial options available to
enable your mobile device for wireless
charging – (refer to Fig. 7).
Depending on your mobile device’s input – you
can use either:
a) the Micro USB connector or;
b) the Lightning connector.
If your device has a 30-pin input, you will need
to attach the supplied Micro USB to 30-pin
adapter to the Receiver’s Micro USB connector
(a) to enable your device to charge. (refer to
Fig. 8)
(NOTE: You cannot plug and charge two
devices at the same time with a single
Receiver).
Once your mobile device is connected to the
Receiver, simply place the Receiver onto the
charge area of the Transmitter or Portable
Transmitter. When correctly aligned the two
LED indicators on the Receiver will illuminate
and your mobile device will start charging.
(NOTE: For best performance always ensure
that the Receiver is centrally aligned to the
Transmitter)
Alternative receiver types are available
for various mobile devices. For more
information visit www.supapowa.org
There are already over 50 SupaPowa®-
ready mobile devices on the market.
To see if yours is one, visit
www.supapowa.org
a. Micro USB connector
LED Indicators
b. Lightning connector
30-pin adapter
Fig. 7
Fig. 8

SupaStartTM Full user guide Page 11
5.2. Using the Receiver with the Transmitter to charge your
mobile device
1. Ensure that the Transmitter is connected
and in standby mode by checking that its LED
indicator light is red (Fig. 9).
2. Centrally align the Receiver (or a device
which is SupaPowa® ready) onto the charge
area of the Transmitter (Fig. 9).
3. When correctly aligned, the LED Indicator
light on the Transmitter will ash Green to
indicate that charging has commenced
(Fig. 10).
IftheReceiverismisaligned,theLED
indicator light on the Transmitter will
remain Red and your device will not
charge.
Fig. 9 Fig. 10

5.3. Using the Receiver with the Portable Transmitter to charge
your mobile device
1. Press the Start button once to turn the
Portable Transmitter on.
2. The Power Indicator light(s) will be
displayed. This will enable the wireless
charging function. (Figure 9).
3. Place the Receiver on the charge area of the
Portable Transmitter.
4. When a device is charging wirelessly the
green Wireless Charging Indicator light will
illuminate and ash. (Figure 9).
(NOTE: If the Portable Transmitter is
inactive for 50 seconds or longer, i.e.
the Receiver is misaligned or removed
from the charge area, then the Portable
Transmitterwillturnitselfo.To
reactivate the Portable Transmitter press
the Start button.)
Fig. 11

SupaStartTM Full user guide Page 13
6. Specications
Transmitter
Input: DC5V, 1.5A Output: 5V500-1000mA
Eciency: > 72% Charging distance: Up to 5mm
Diameter: 69mm Thickness: 9mm
Net Weight: 50g
Portable Transmitter
Input: DC5V 1.5A Output: 5V500-1000mA
Eciency: <70% Charging distance: Up to 5mm
Product size: 82mm Thickness: 19mm
Net weight: 136g Battery Capacity: 4100mAh
Receiver
Micro USB Output: DC5V0.56A Lightning Output: DC5V0.5A
Receiving distance: 3-5mm Working frequency:
110 –250KHz
Eciency: >72% Diameter: 58mm
Thickness: 7.5mm Net weight: 24g
7. Warranty
12 month Return to Base warranty with valid proof of purchase.
Warranty is invalid if the product(s) are not used as specied in this User Manual or with the
supplied AC Adapter.
8. Correct disposal of product
European law requires that these devices must
not be discarded as ordinary household waste.
To dispose of these devices, take them to a
recycling collection point for electrical waste.
The wheelie bin symbol, indicated below,
indicates that this product is covered by the
European Directive 2002/96/EC.

Made in China
All products are compatible with the Qi standard for wireless charging
Qi and the Qi logo are the trademarks of WPC
SupaPowa® is a registered trademark of QiConnect Ltd
Table of contents
Popular Remote Starter manuals by other brands

Automotive Data Solutions
Automotive Data Solutions AKX install guide

Schumacher
Schumacher SL1317U owner's manual

Suaoki
Suaoki U7 user manual

Directed Electronics
Directed Electronics Ready Remote 23927 instruction manual

Directed Electronics
Directed Electronics READY REMOTE 24921 installation guide

Hyundai
Hyundai HYJS-950 user manual