Suresafe GO Plus User manual
User Guide

Battery Alerts
Find My Device
Fall Detection
Geo-Fence
No Movement Alarm
Heart Rate Monitor
Step Counter
Clock Type
Contact Us
EU Declaration of Conformity
The Set Up
Disclaimer
Product Overview
Getting To Know Your Device
Menu Screen Options
Installing A SIM Card
Charging Your Device
Switching Your Device On and Off
SOS Numbers
Activating an SOS Call
Password Control
Request Device Location
Set The Time
Set Device Nickname
3
7
8
9
10
12
13
14
17
19
21
22
23
Features In Detail
24
25
26
28
30
32
33
34
35
36
2

Disclaimer: Automatic Fall Detection
By using this alarm you confirm that you understand that
using the automatic fall detection feature of this product
does not guarantee that 100% of falls will be detected. Falls
can come in many different forms and the fall detector is
not guaranteed to detect every fall. We recommend that the
user manually activates the device whenever possible.
The fall detection technology in this product does not allow
the analysis and interpretation of all fall situations. Soft falls,
slumping falls, descent controlled falls against a wall or a
chair, etc… may not be detected by our products.
While the use of a fall detector provides a significantly
increased level of protection, due to limitations of the
technology used, and attempts to minimise false alarms, not
all falls (even some dangerous-heavy falls) will be detected.
The manual trigger should be used whenever possible.
We accept no liability for the failure of the automatic fall
detection not detecting a fall event.
3

Disclaimer: Regular Testing
& Powering Off/On
You should test your SureSafeGO Plus Alarm at least once
a month to remain familiar with how it works, and to check
that it functions as expected. This can also alert you if you
unknowingly run out of credit, or if there is an issue with
your device.
Your SureSafeGO Plus Alarm should also be powered off for
3-4 minutes, before being powered on again, at least once a
month. This resets the onboard computer and helps ensure
the device will function correctly.
Failure to follow this process could result in the alarm not
functioning correctly when needed.
4

Disclaimer: Mobile Devices–
Using GPS/GSM/4G
By using this product, you confirm that you understand that
it works using a combination of mobile phone networks
and/or GPS. We are not responsible, in any way, for any
failure of a product or service based upon, arising from, or in
consequence of a total or partial failure of the mobile phone
networks or GPS. By using this product you acknowledge
that mobile phone networks/GPS can be unreliable, and
signal quality can vary dramatically from time to time, even
in the same location. We are not responsible in any way
when the product does not connect with, or is unable to
connect to, the mobile phone network or GPS. This exclusion
of liability includes where we have provided you with the SIM
card inside the SureSafeGO Plus.
It is your responsibility to ensure that there is sufficient
credit on your SIM card, where credit is needed. We are not
responsible, in any way, for the device not operating because
there was insufficient credit. This includes failure to top up
credit, failure to register for low credit alerts and failure to
receive low credit alerts.
5

Disclaimer: Heart Rate Monitor
& Step Counter
Unless otherwise specified, SureSafe products and services
are not a medical devices, and are not intended to diagnose,
treat, cure, or prevent any disease. With regard to accuracy,
SureSafe has developed products and services to track
certain wellness information as accurately as reasonably
possible. The accuracy of SureSafe’s products and services
is not intended to be equivalent to medical devices or
scientific measurement devices.
6

Product Overview
The SureSafeGO Plus Alarm is a wrist worn personal safety
device designed to help older people, or people of all ages
with medical conditions, continue to live independently.
It is a mobile personal alarm that allows the wearer to call
for help at the touch of a button. It also has a fall detector
that will notify nominated contacts when a fall has been
detected.
It uses mobile phone technology that allows it to be used
anywhere that there is mobile phone signal. This means it
can be used at home, in the garden as well as when ‘out and
about’.
It uses GPS technology to provide location information
for the device when it is activated. All SOS alerts and Fall
Detection alerts come with a text message that includes
a Google Maps link to the location of the device. You can
also request the alarm’s location by sending it a single text
message.
7

Getting To Know Your Device
Dec 12 WED
Battery
Status
Time /
Date
SOS
Button
Heart Rate
Monitor
Charging
Connectors
Strap removal
buttons
Wireless
Charger
8

Menu Screen Options
There four other screens that are visible by swiping left on
the device. These include battery status, step counter, heart
rate and other settings.
09:20 AM
Settings
09:20 AM
Heart rate
09:20 AM
Step Counter
12 DEC WED
Charging
75%
9

Installing A SIM Card
Your SureSafeGO Plus comes with a SureSafe Mobile SIM
card already installed. The SIM card phone number can be
found printed on the plastic SIM card holder found inside
the box. The SIM card number is the same as the phone
number for the alarm.
The alarm will work best with the SureSafe Mobile SIM card.
It is a roaming safety SIM that gives you the best signal
possible across the 3 big UK networks. We are also able
to provide better ongoing customer support where the
SureSafe SIM card is used.
10
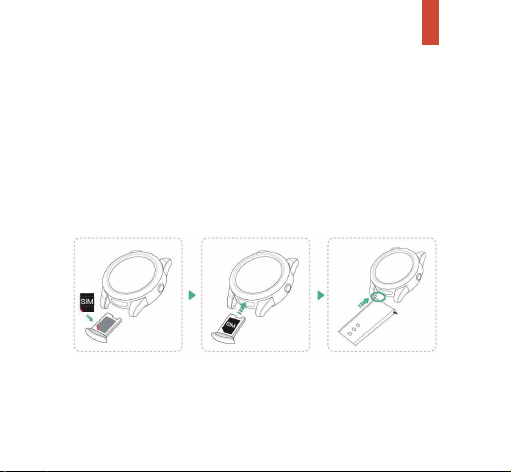
Installing A Sim Card continued...
Should you need to change the SIM card, the SIM card
holder is located behind where the strap attaches to the
watch face, on the button side. Remove the watch strap
and open the tray. This can be done with your nail, or gently
using a small flathead screwdriver. Slide the tray out and
insert a Nano size SIM. Insert the tray back into the watch
and reattach the strap.
11
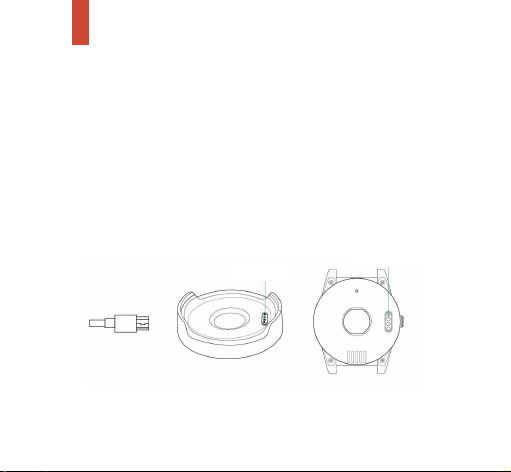
Charging Your Device
Plug in your desktop charger to a power socket and turn on
the power. Place the watch onto the charging cradle, lining
up the gold contacts on the back of the watch face with gold
contacts on the charging station.
The alarm will announce that it is charging.
The alarm takes between 2-4 hours to charge from a flat
battery.
Charging pins
Charging contacts
12

Switching Your Device On and Off
(and Remotely)
To turn the alarm On, press and hold side button on side for
2 seconds. The watch will play a short tune and you will see
the welcome screen.
To turn the alarm Off, go to ‘Settings’.
This is done by swiping left on the screen until you get to
‘Settings’.
Tap on ‘Settings’ and then scroll your finger up to ‘System’.
Tap ‘System’ and then tap on ‘Power Off’.
Finally, tap the ‘tick’ to switch the device off, or tap the ‘X’ to
cancel switching it off.
You can also turn the SureSafeGO Plus off by sending a text
message to the device.
Text Command: Off
Note: You cannot turn the alarm on using text messages.
13

Programming SOS Numbers
Your SureSafeGO Plus can be programmed with up to 5
emergency contact numbers. These are programmed by
sending text commands to your alarm. You do not have to
use all 5.
Example:
To program 07770123123 as the 1st number, text:
A1,07770123123. The alarm will text you back to confirm the
number has been stored.
NOTE: Please make sure there are no spaces anywhere in
your text message.
Set SOS Contact Number Text Command
1 A1,telephone_number
2 A2,telephone_number
3 A3,telephone_number
4 A4,telephone_number
5 A5,telephone_number
14

Deleting SOS Numbers
SOS numbers can be deleted by sending the following text
command to your alarm:
The alarm will text you back to confirm the number has
been deleted.
NOTE: Please make sure there are no spaces anywhere in
your text message.
Delete SOS Contact Number Text Command
1removeA1
2 removeA2
3removeA3
4removeA4
5 removeA5
15

Checking Saved SOS Numbers
You can check the numbers currently stored in your
SureSafeGO Plus alarm.
Text Command: A?
The alarm will text you back with a list of the stored
numbers.
16

Activating an SOS Call
To activate the alarm, press and hold the SOS button on the
side of the watch face for 2 seconds.
The wristband will vibrate and the watch will announce that
the alarm has been activated/it is dialling for help.
You can cancel at any time by pressing the X on the screen.
3 sec
17

Activating an SOS Call continued...
The alarm will ring the 1st number for 20 seconds. It will
also send a text message to the 1st number that includes a
Google Maps link to the location (usually within 60 seconds
of the SOS button being pressed). If there is no answer to the
call within 20 seconds it will then call and text the second
number (unless you cancel it on the watch).
If the 1st number answers, a 2 minute call with two-way voice
communication will be possible. At the end of the 2 minutes,
or if the call is ended within the 2 minutes, the alarm will call
and text the next number (where there is one).
To cancel the call and text to the next number, press the X
that appears on the watch face.
The alarm will then return to standby mode.
We recommend that you set up the voicemail on your
mobile phone to ring for 25 seconds before it answers. This
will prevent the alarm being answered by your voicemail.
Contact your mobile phone provider if you are unsure of how
to do this.
18

Password Control
You can set a password to prevent anyone else being able to
program your alarm.
The password needs to be 6 numbers long, for example
123456.
Text Command: p(chosen_password)
Example:
To program 123456 as your password, text: p123456.
After a password is set you will need to text the password in
front of every programming command.
For example, to check the SOS numbers saved in the alarm
you would text: 123456A?
19

Password Control continued...
Replacing the SIM card will not remove any stored
passwords. If you forget your password please contact
SureSafe Alarms for assistance.
To delete the password, text the password plus ‘P0’ (P ZERO)
to the alarm. You need to include the existing password in
the text message to delete it.
Example: 123456P0
NOTE: Please make sure there are no spaces anywhere in
your text message.
20
Table of contents


