SurfLink Mobile User manual

OPERATIONS MANUAL

2
3
Table of Contents
Introduction 4
Terminology 5
SurfLink Mobile Overview 6
Touch Screen Display 7
Battery Charging 8
On/Off Button 9
Volume Up 9
Volume Down 10
Micro USB Port 10
SurfLink Mobile Microphone Ports 10
Accessories 10
Getting Started / Setup 14
Syncing Hearing Devices with SurfLink Mobile 14
Pairing Cell Phone with SurfLink Mobile 16
Operation 20
Adjusting Your Hearing Devices 20
Streaming Cell Phone Calls 22
Streaming Audio 26
Streaming Bluetooth Landline Phone Calls 30
Settings 34
Bluetooth 35
Hearing Devices 42
Tools 44
Required Information 50
FCC Information 52

4
Introduction
SurfLinkMobile is designed to interface with your wireless
hearing devices in multiple ways:
•
As a cell phone streaming device
•
As an audio streaming device from:
– Bluetooth devices
– Wired input connected via the micro USB port
– SurfLinkMobile directional or omnidirectional
microphones
•
As a remote control to make hearing device settings
adjustments

5
Terminology
Streaming/Audio Streaming – Sound is sent wirelessly
from an audio device to the hearing devices via SurfLink
Mobile.
Sync – To establish a connection between SurfLink Mobile
and wireless hearing devices so that the hearing devices
can receive streamed audio and settings changes from
SurfLink Mobile.
Pair – To establish a connection between a Bluetooth
device (e.g., cell phone, MP3 player, laptop) and SurfLink
Mobile for the purpose of streaming audio from the
Bluetooth device to the hearing devices via SurfLink
Mobile.
Assistive Listening Device – A device used to overcome
listening challenges resulting from distance from a sound
source, background noise or reverberation by sending the
sound source directly to the listener.
Directional – A microphone designed to receive sound
from a particular direction (in front of the microphone)
and to reduce the level of sounds from other directions.
Directional microphones are useful for listening to a single
speaker in the presence of background noise.
Omnidirectional – A microphone which receives sounds
from all directions. Omnidirectional microphones are useful
for listening to multiple speakers in quiet environments.
Bluetooth – Wireless communication technology used for
audio and data transmission over short distances between
two paired devices.

6
SurfLinkMobile
Overview
SurfLinkMobile Overview
1. On/Off Button
2. Volume Up/Down Buttons
3. Touch Screen
4. Micro USB Port
5. Built-In Microphone
Ports
1
5
2
3
4

7
SurfLinkMobile
Overview
Touch Screen Display
SurfLinkMobile incorporates a full-color display with
an innovative touch screen to control all features of
the device. Press and release the Touch Screen display
buttons to make selections via the Touch Screen.
The taskbar at the top of the display provides information
about the SurfLinkMobile battery status as well as
indication of the Bluetooth antenna On state.
100%
80%
60%
40%
20%
Fully Charged
Low Battery Warning Screen Example of warning on device
Charging @80%
Charging @60%
Charging @40%
Charging @20%
80%
100%
60%
40%
20%
80%
100%
60%
40%
20%
10%
<20%
Battery Status
Tools
Language
Screens
Brightness
20%
20%
OK
20%
OK
When the SurfLinkMobile Bluetooth antenna is On,
Basic
Remote Screen
Intermediate Advanced Pressed
Remote
Labels On
Remote Remote Remote
RemoteRemote RemoteRemote
Volume Graphic “Pressed” State
Graphic appears WHITE DURING
each button press
Volume Graphic “Released” State
Graphic appears BLUE for 1/2 (?) second
AFTER each button press
Remote
Home
Favorite
Mute
Memory
Left
Binaural
Right
Left
Left
Binaural
Binaural
Right
Right
Memory
Mute
Favorite
Home
Memory
Mute
Favorite
Home
will display on the left end of the taskbar. When the
Bluetooth antenna is Off, no symbol will display.
Status of the SurfLinkMobile rechargeable battery will
be provided as follows:
•
Fully charged
100%
80%
60%
40%
20%
Fully Charged
Low Battery Warning Screen Example of warning on device
Charging @80%
Charging @60%
Charging @40%
Charging @20%
80%
100%
60%
40%
20%
80%
100%
60%
40%
20%
10%
<20%
Battery Status
Tools
Language
Screens
Brightness
20%
20%
OK
20%
OK
•
80% charged
100%
80%
60%
40%
20%
Fully Charged
Low Battery Warning Screen Example of warning on device
Charging @80%
Charging @60%
Charging @40%
Charging @20%
80%
100%
60%
40%
20%
80%
100%
60%
40%
20%
10%
<20%
Battery Status
Tools
Language
Screens
Brightness
20%
20%
OK
20%
OK
•
60% charged
100%
80%
60%
40%
20%
Fully Charged
Low Battery Warning Screen Example of warning on device
Charging @80%
Charging @60%
Charging @40%
Charging @20%
80%
100%
60%
40%
20%
80%
100%
60%
40%
20%
10%
<20%
Battery Status
Tools
Language
Screens
Brightness
20%
20%
OK
20%
OK
•
40% charged
100%
80%
60%
40%
20%
Fully Charged
Low Battery Warning Screen Example of warning on device
Charging @80%
Charging @60%
Charging @40%
Charging @20%
80%
100%
60%
40%
20%
80%
100%
60%
40%
20%
10%
<20%
Battery Status
Tools
Language
Screens
Brightness
20%
20%
OK
20%
OK
•
20% charged
100%
80%
60%
40%
20%
Fully Charged
Low Battery Warning Screen Example of warning on device
Charging @80%
Charging @60%
Charging @40%
Charging @20%
80%
100%
60%
40%
20%
80%
100%
60%
40%
20%
10%
<20%
Battery Status
Tools
Language
Screens
Brightness
20%
20%
OK
20%
OK
•
<20% charged
100%
80%
60%
40%
20%
Fully Charged
Low Battery Warning Screen Example of warning on device
Charging @80%
Charging @60%
Charging @40%
Charging @20%
80%
100%
60%
40%
20%
80%
100%
60%
40%
20%
10%
<20%
Battery Status
Tools
Language
Screens
Brightness
20%
20%
OK
20%
OK
A low battery warning message will appear on the SurfLink Mobile touch screen
display when the remaining battery charge is 20% and again at 10% charge
remaining. It is strongly recommended that the SurfLink Mobile device be charged
when the message occurs.
8
SurfLinkMobile
Overview
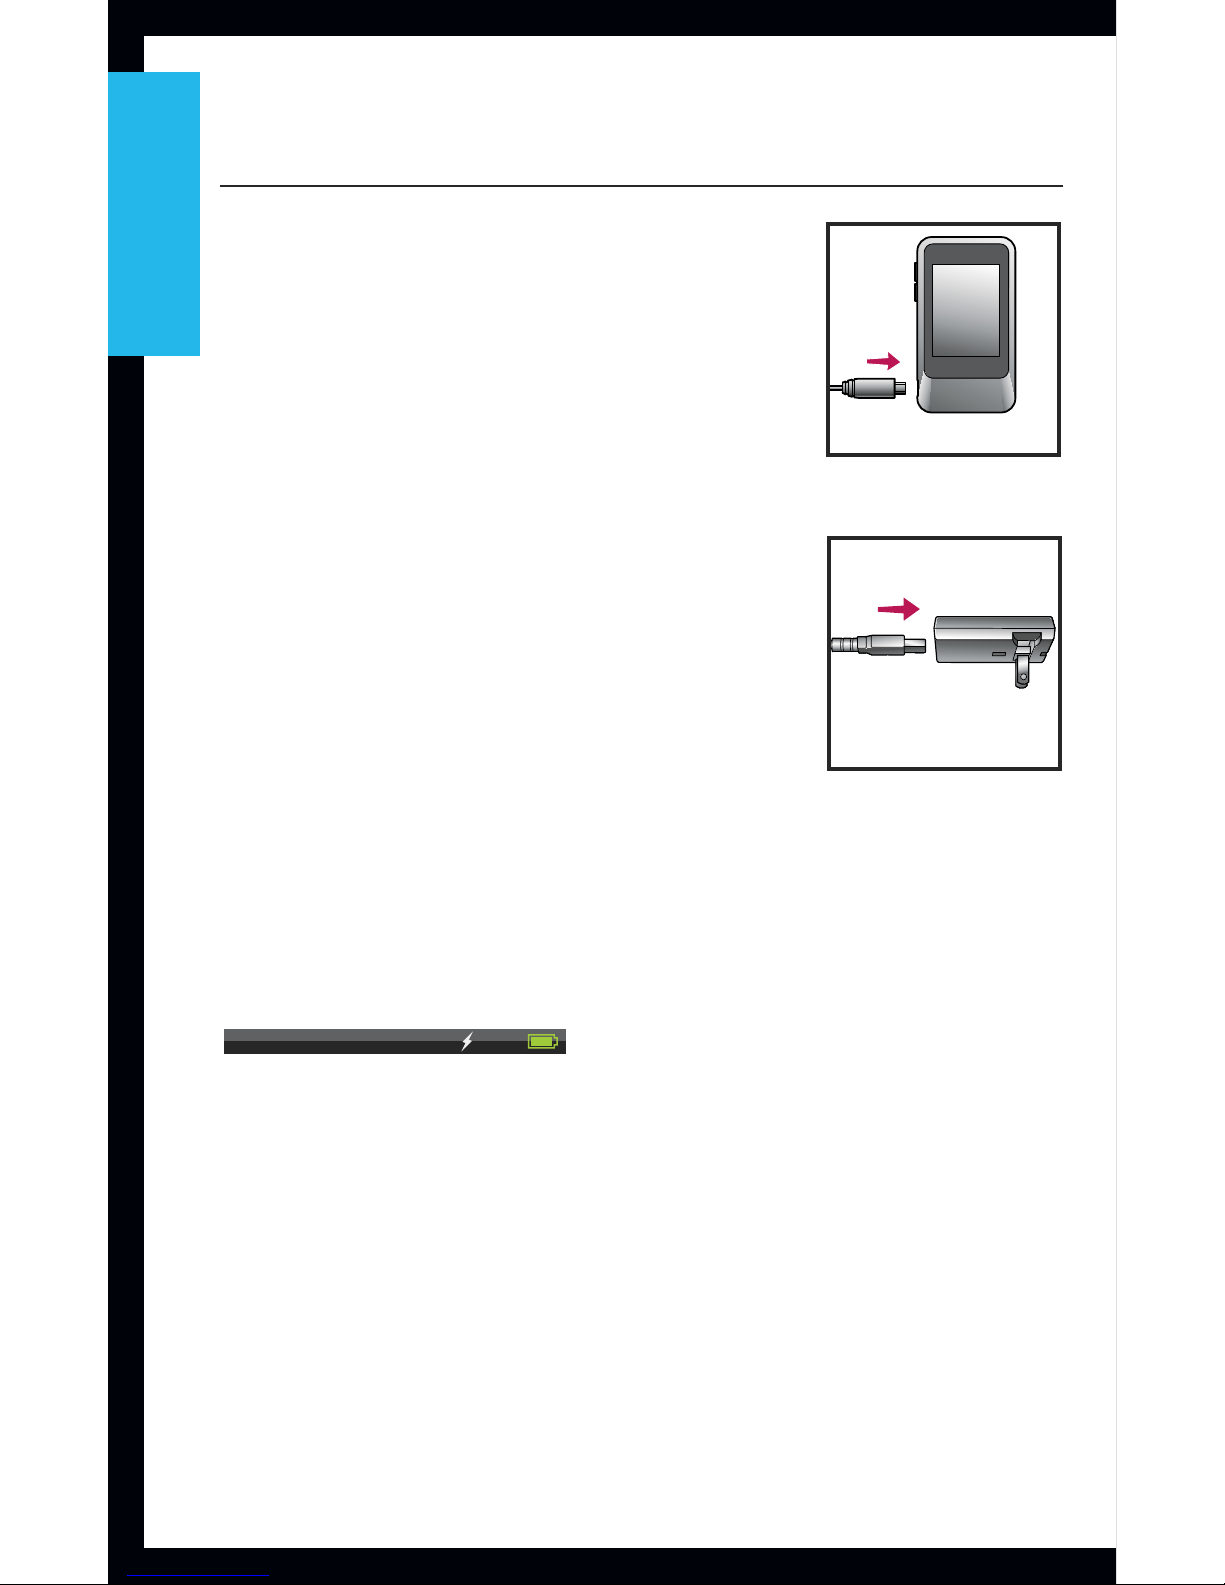
Battery Charging
SurfLink Mobile contains a Lithium-
ion rechargeable battery.
To recharge the battery, connect the
battery charging cable to the micro
USB port on the SurfLink Mobile
device (Figure 1) and attach the USB
connector of the charging cable to
the power adaptor (Figure 2). Plug
the power adaptor into a power
outlet.
The SurfLink Mobile battery can
also be charged via a computer
USB port or an optional car charger
adaptor, although it may take
longer than charging via a wall outlet. To ensure that
charging is occurring, verify that the lightning bolt
charging indicator appears in the device taskbar.
100%
80%
60%
40%
20%
Fully Charged
Low Battery Warning Screen Example of warning on device
Charging @80%
Charging @60%
Charging @40%
Charging @20%
80%
100%
60%
40%
20%
80%
100%
60%
40%
20%
10%
<20%
Battery Status
Tools
Language
Screens
Brightness
20%
20%
OK
20%
OK
Charging time from fully depleted to full charge is
approximately 3 hours, but may be slightly longer if
the device is being used for streaming while it is being
charged.
Streaming time from a fully charged battery is up to 4
hours.
Standby time is up to 60 hours.
S
URF
L
INK
Fig. 1
Fig. 2

9
SurfLinkMobile
Overview
On/Off Button
To turn the SurfLinkMobile On, press and hold the On/
Off button until the touch screen display
powers on.
When SurfLinkMobile is On, you can put the device into
Sleep Mode by a short press and release of the On/
Off button. In Sleep Mode, the device is still On, but
the Touch Screen display is turned off. Sleep Mode can
be used to prevent accidental input to the Touch Screen
display as well as a way to preserve SurfLinkMobile
battery life during use. SurfLink Mobile will automatically
enter Sleep Mode to conserve power when no Touch
Screen input is received for one minute. To wake the
screen, press and release the On/Off button, then press
the push to unlock button on the screen.
To turn SurfLinkMobile Off, press and hold the On/Off
button until the Touch Screen displays the “Powering
Down” message and the device turns off.
Volume Up
To increase the volume of sounds coming through the
wireless hearing device, press and release the Volume
Up button on the side of SurfLink Mobile. Continue to
press and release until the desired volume is reached.
10
SurfLinkMobile
Overview
Volume Down
To decrease the volume of sounds coming through the
wireless hearing device, press and release the Volume
Down button on the side of SurfLink Mobile. Continue
to press and release until the desired volume is reached.
Micro USB Port
The Micro USB port is used for charging the
SurfLinkMobile rechargeable battery as well as for
streaming audio from a wired input.
SurfLinkMobile Microphone Ports
SurfLinkMobile incorporates both a Directional
microphone and Omnidirectional microphone for use
in streaming audio as an assistive listening device. The
Directional microphone is intended to focus primarily on
a single speaker, whereas the Omnidirectional
microphone can be used to pick up multiple speakers in
a quiet environment. Selection of the microphones for
streaming is done from the Streaming screen – see page
21 for more information.
Accessories
SurfLink Mobile comes with the following accessories:
USB Cable
USB Power Adaptor
Wired Line In Cable
Base Clip
Lanyard Attachment
Belt Clip Attachment

11
SurfLinkMobile
Overview
All of the aforementioned accessories can also be
purchased separately, as replacements or extras.
Available for purchase separately:
USB Car Charger Adaptor
The clip and lanyard accessories allow the SurfLink
Mobile device to be worn for hands-free use. The base
clip attaches directly to SurfLink Mobile and accepts
either of the interchangeable attachments for wearing
the device on the belt (belt clip attachment) or around
the neck (lanyard attachment).
Base Clip Front/Back Belt Clip AttachmentLanyard Attachment

12
SurfLinkMobile
Overview
Slide the desired attachment option
(lanyard or clip) onto the base
clip, then attach the base clip to
SurfLink Mobile by orienting the clip
according to the shadowed outline
of the base clip on the back of the
device (Figure 3).
To interchange attachments, remove
the base clip from SurfLink Mobile,
then press down on the release tab
(Figure 4) of the base clip to unlock
and slide the attachment out of
position toward the center of the
base clip (Figure 5), where it can be
removed (Figure 6). Insert the desired
attachment into the center position
of the base clip (Figure 7) and slide
into position at one end of the base
clip to lock the attachment into place
(Figure 8).
The Wired Line In Cable allows
SurfLink Mobile to be connected
to any audio device with a 3.5 mm
audio jack. Simply connect the micro
Fig. 3
Fig. 4
Fig. 6
Fig. 5
Fig. 7
S
URF
L
INK
Fig. 9Fig. 8

13
SurfLinkMobile
Overview
USB end of the adaptor to SurfLink Mobile (Figure 9)
and connect the 3.5 mm jack to the headphone jack
of the audio device. See page 27 for instructions on
streaming audio to the hearing devices via SurfLink
Mobile.

14
Getting Started /
Setup
Getting Started / Setup
Syncing Hearing Devices with SurfLink Mobile
To use SurfLinkMobile with your wireless hearing
devices, you must first sync the hearing devices with
SurfLink Mobile:
1. Navigate to the Settings screen using the navigation
arrows at the bottom of the touch screen display.
Basic
Remote Screen
Intermediate Advanced Pressed
Remote
Labels On
Remote Remote Remote
RemoteRemote RemoteRemote
Volume Graphic “Pressed” State
Graphic appears WHITE DURING
each button press
Volume Graphic “Released” State
Graphic appears BLUE for 1/2 (?) second
AFTER each button press
Remote
Home
Favorite
Mute
Memory
Left
Binaural
Right
Left
Left
Binaural
Binaural
Right
Right
Memory
Mute
Favorite
Home
Memory
Mute
Favorite
Home
Streaming
Streaming
Pressed Directional Mic. Graphic
Dir. Mic. Omni Mic. USB
Cell Phone Landline MP3 Player Computer
Television Stereo Automobile Other
Normal
Labels On
Streaming
Volume Graphic
Point device toward
sound source
Streaming
Streaming
iPod
Start
Streaming
iPod
Start
Streaming
iPod
Start
Focus
Focus
Surround
Surround
Wired
Wired
Mobile
Mobile
Phone
Phone
iPod
iPod
Laptop
Laptop
Computer
Computer
Stereo
Stereo
Car
Car
Other
Other
Start
Stop
Start
Start
Streaming
iPod
Start
Stop
Stop
Streaming Screen
iPod
Normal Pressed
Settings
Tools
Hearing Devices
Bluetooth
Tools
Screens
Language
Brightness
Normal Pressed
Settings
Tools
Hearing Devices
Bluetooth
Tools
Screens
Language
Brightness
Brightness
Okay Cancel
Brightness
Settings
Tools
Hearing Devices
Bluetooth
Tools
Screens
Language
Brightness
Language
English
Bulgarian
Danish
Language
Yes Cancel
Set language
to English?
Settings
Tools
Hearing Devices
Bluetooth
Tools
Screens
Language
Brightness
ScreensScreens
Set Default Screen
Show/Hide Streaming
Voice Pickup Options
Remote Options
Screens
Screen Defaults
Show/Hide Streaming
Voice Pickup Options
Remote Options
Screens
Screen Defaults
Show/Hide Streaming
Voice Pickup Options
Remote Options
Screens
Screen Defaults
Show/Hide Streaming
Voice Pickup Options
Remote Options
Screens
Screen Defaults
Show/Hide Streaming
Voice Pickup Options
Remote Options
Screens
Set as default screen:
Remote
Streaming
Button Labels:
On
O
Screens
Hide
Show
Hide Streaming
Screen?
Screens
Hide
Show
Hide Hearing Aid
Microphone from
Voice Pickup
options?
Screens
Select style of Remote
Advanced
Intermediate
Basic
Settings > Tools Screens
2. On the Settings screen, select Hearing Devices.
Settings
Tools
Hearing Devices
Bluetooth
Hearing Dev.
No devices
are synced
at this time
Sync New
Hearing Dev.
No devices
are synced
at this time
Sync New
Cancel
Open and close the battery
door of the hearing device(s)
you wish to Sync. Devices
will be automatically
detected and displayed.
Syncing
Select devices to sync
0123456789
9876543210
Play Tone Sync
Syncing Hearing Dev.
Synced Hearing Devices
0123456789
9876543210
Sync New
Hearing device
syncing is complete
Okay
Syncing
Settings
Tools
Hearing Devices
Bluetooth
Hearing Dev.
Synced Hearing Devices
0123456789
9876543210
Sync New
Un-sync
0123456789
from device?
Un-Sync
Yes Cancel
Hearing Dev.
Synced Hearing Devices
0123456789
Sync New
Settings > Hearing Devices Screens
Settings
Tools
Hearing Devices
Bluetooth
Basic
Remote Screen
Intermediate Advanced Pressed
Remote
Labels On
Remote Remote Remote
RemoteRemote RemoteRemote
Volume Graphic “Pressed” State
Graphic appears WHITE DURING
each button press
Volume Graphic “Released” State
Graphic appears BLUE for 1/2 (?) second
AFTER each button press
Remote
Home
Favorite
Mute
Memory
Left
Binaural
Right
Left
Left
Binaural
Binaural
Right
Right
Memory
Mute
Favorite
Home
Memory
Mute
Favorite
Home
15
Getting Started /
Setup
3. Press the Sync New button to put the
SurfLinkMobile into syncing mode.
Settings
Tools
Hearing Devices
Bluetooth
Hearing Dev.
No devices
are synced
at this time
Sync New
Hearing Dev.
No devices
are synced
at this time
Sync New
Cancel
Open and close the battery
door of the hearing device(s)
you wish to Sync. Devices
will be automatically
detected and displayed.
Syncing
Select devices to sync
0123456789
9876543210
Play Tone Sync
Syncing Hearing Dev.
Synced Hearing Devices
0123456789
9876543210
Sync New
Hearing device
syncing is complete
Okay
Syncing
Settings
Tools
Hearing Devices
Bluetooth
Hearing Dev.
Synced Hearing Devices
0123456789
9876543210
Sync New
Un-sync
0123456789
from device?
Un-Sync
Yes Cancel
Hearing Dev.
Synced Hearing Devices
0123456789
Sync New
Settings > Hearing Devices Screens
Settings
Tools
Hearing Devices
Bluetooth
4. Follow the on-screen instructions to open and close
the battery door of the hearing devices you wish to
sync with SurfLinkMobile.
Settings
Tools
Hearing Devices
Bluetooth
Hearing Dev.
No devices
are synced
at this time
Sync New
Hearing Dev.
No devices
are synced
at this time
Sync New
Cancel
Open and close the battery
door of the hearing device(s)
you wish to Sync. Devices
will be automatically
detected and displayed.
Syncing
Select devices to sync
0123456789
9876543210
Play Tone Sync
Syncing Hearing Dev.
Synced Hearing Devices
0123456789
9876543210
Sync New
Hearing device
syncing is complete
Okay
Syncing
Settings
Tools
Hearing Devices
Bluetooth
Hearing Dev.
Synced Hearing Devices
0123456789
9876543210
Sync New
Un-sync
0123456789
from device?
Un-Sync
Yes Cancel
Hearing Dev.
Synced Hearing Devices
0123456789
Sync New
Settings > Hearing Devices Screens
Settings
Tools
Hearing Devices
Bluetooth
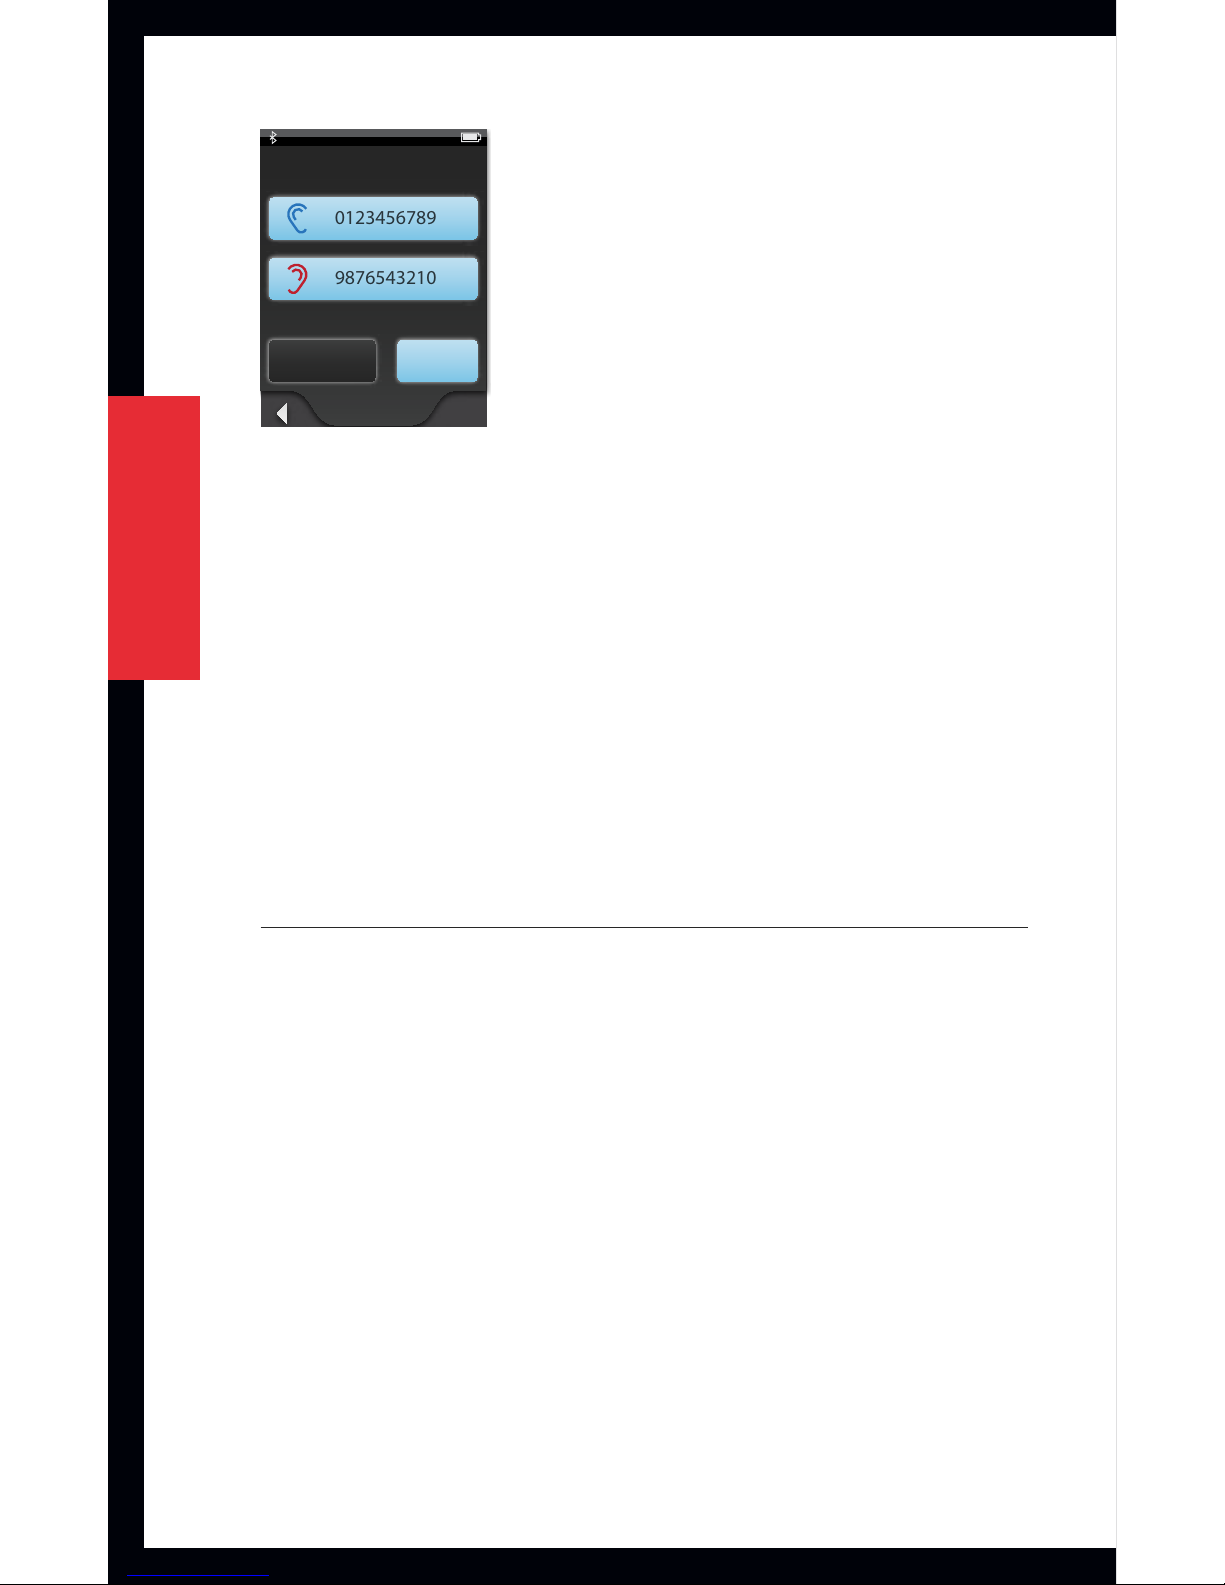
5. The hearing devices will be detected by
SurfLinkMobile and the serial numbers will be
shown on the display. If you wish, you can present
a tone in the hearing devices to confirm that the
correct devices were detected by selecting the Play
Tone button. Otherwise, press the Sync button to
complete the syncing process.
16
Getting Started /
Setup
Select devices to sync
0123456789
9876543210
Play Tone Sync
Syncing
Note: When syncing is successful, you will see a
success message on the SurfLink Mobile display and
you will hear a sustained success tone presented
through the hearing instrument.
6. Your wireless hearing devices and
SurfLinkMobile device will now work together as
a wireless system.
Pairing Cell Phone with SurfLink Mobile
To stream calls from a cell phone using
SurfLinkMobile, you must first pair the cell phone
with SurfLink Mobile:
1. Navigate to the Settings screen using the
navigation arrows at the bottom of the touch
screen display.

17
Getting Started /
Setup
Basic
Remote Screen
Intermediate Advanced Pressed
Remote
Labels On
Remote Remote Remote
RemoteRemote RemoteRemote
Volume Graphic “Pressed” State
Graphic appears WHITE DURING
each button press
Volume Graphic “Released” State
Graphic appears BLUE for 1/2 (?) second
AFTER each button press
Remote
Home
Favorite
Mute
Memory
Left
Binaural
Right
Left
Left
Binaural
Binaural
Right
Right
Memory
Mute
Favorite
Home
Memory
Mute
Favorite
Home
Streaming
Streaming
Pressed Directional Mic. Graphic
Dir. Mic. Omni Mic. USB
Cell Phone Landline MP3 Player Computer
Television Stereo Automobile Other
Normal
Labels On
Streaming
Volume Graphic
Point device toward
sound source
Streaming
Streaming
Input
Play
Input
Input
Input
Input
Input
Input
Input
Input
Input
Input
Input
Input
Input
Input
Input
Input
Input
Input
Input
Input
Input
Input
Room O
Play
Stop
Room O
Play
Stop
Streaming Screen
Labels On
Streaming
Input
Play
Streaming Streaming
Input Input
Play Play
Settings
Tools
Hearing Devices
Bluetooth
device_B
device_B
Change List Order
New Label
Devices
device_B
device_A
device_C
Bluetooth
Devices
Pairing Mode
Settings
Tools
Hearing Devices
Bluetooth
Bluetooth
Devices
Pairing Mode
normal
normal pressed disabled
disabled
pressed
generic button - disabled
disabled
disabled text color
R71 G71 B71
normal pressed disabled
Computer
Phone
Stereo
Television
Automobile
MP3 Player
MP3 Player
Computer
Television
Stereo
Automobile
Phone
Other
Other
Cell Phone
Cell Phone
New Device
Choose Device Label
“device_C”
has been paired
successfully
Label
Phone
MP3 Player
Cell Phone
New Device
Retry Cancel
Bluetooth pairing
was unsuccessful
(error)
device_B
device_A
device_C
device_B
Okay Cancel
device_B
Settings
Tools
Hearing Devices
Bluetooth
device_B
device_B
Change List Order
New Label
Devices
device_B
device_A
device_C
Bluetooth
Devices
Pairing Mode
Un-pair
Yes Cancel
Un-pair
device_B
from device?
Settings > Bluetooth Screens
2. On the Settings screen, select the Bluetooth button.
Settings
Tools
Hearing Devices
Bluetooth
Settings
Tools
Hearing Devices
Settings
Tools
Hearing Devices
Bluetooth
Bluetooth
Normal
Scrolling List screens
Pressed
Scrolling List
Label
Label
Label
Pressed
Scrolling List
Label
Label
Label
Settings Screens
3. Ensure that the Bluetooth cell phone is turned On
with Bluetooth enabled and is within 10 meters/30
feet of the SurfLinkMobile device. Put the cell phone
into pairing mode.
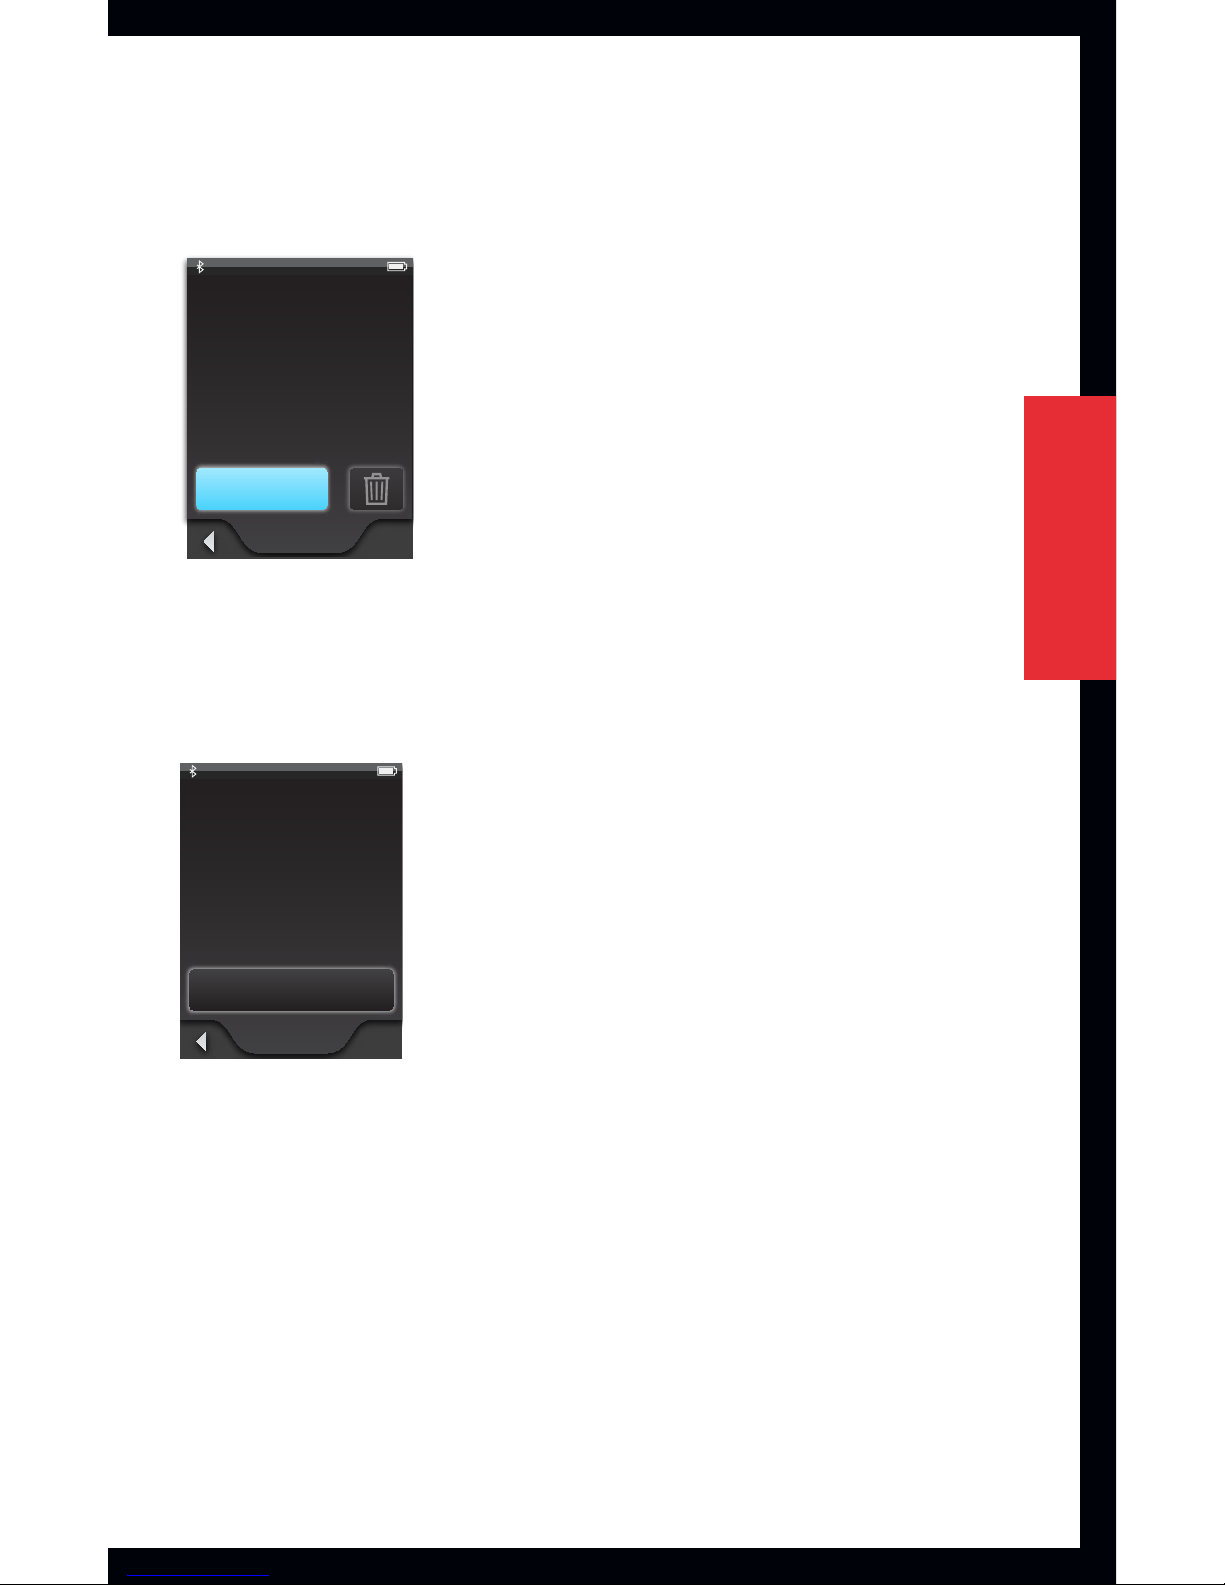
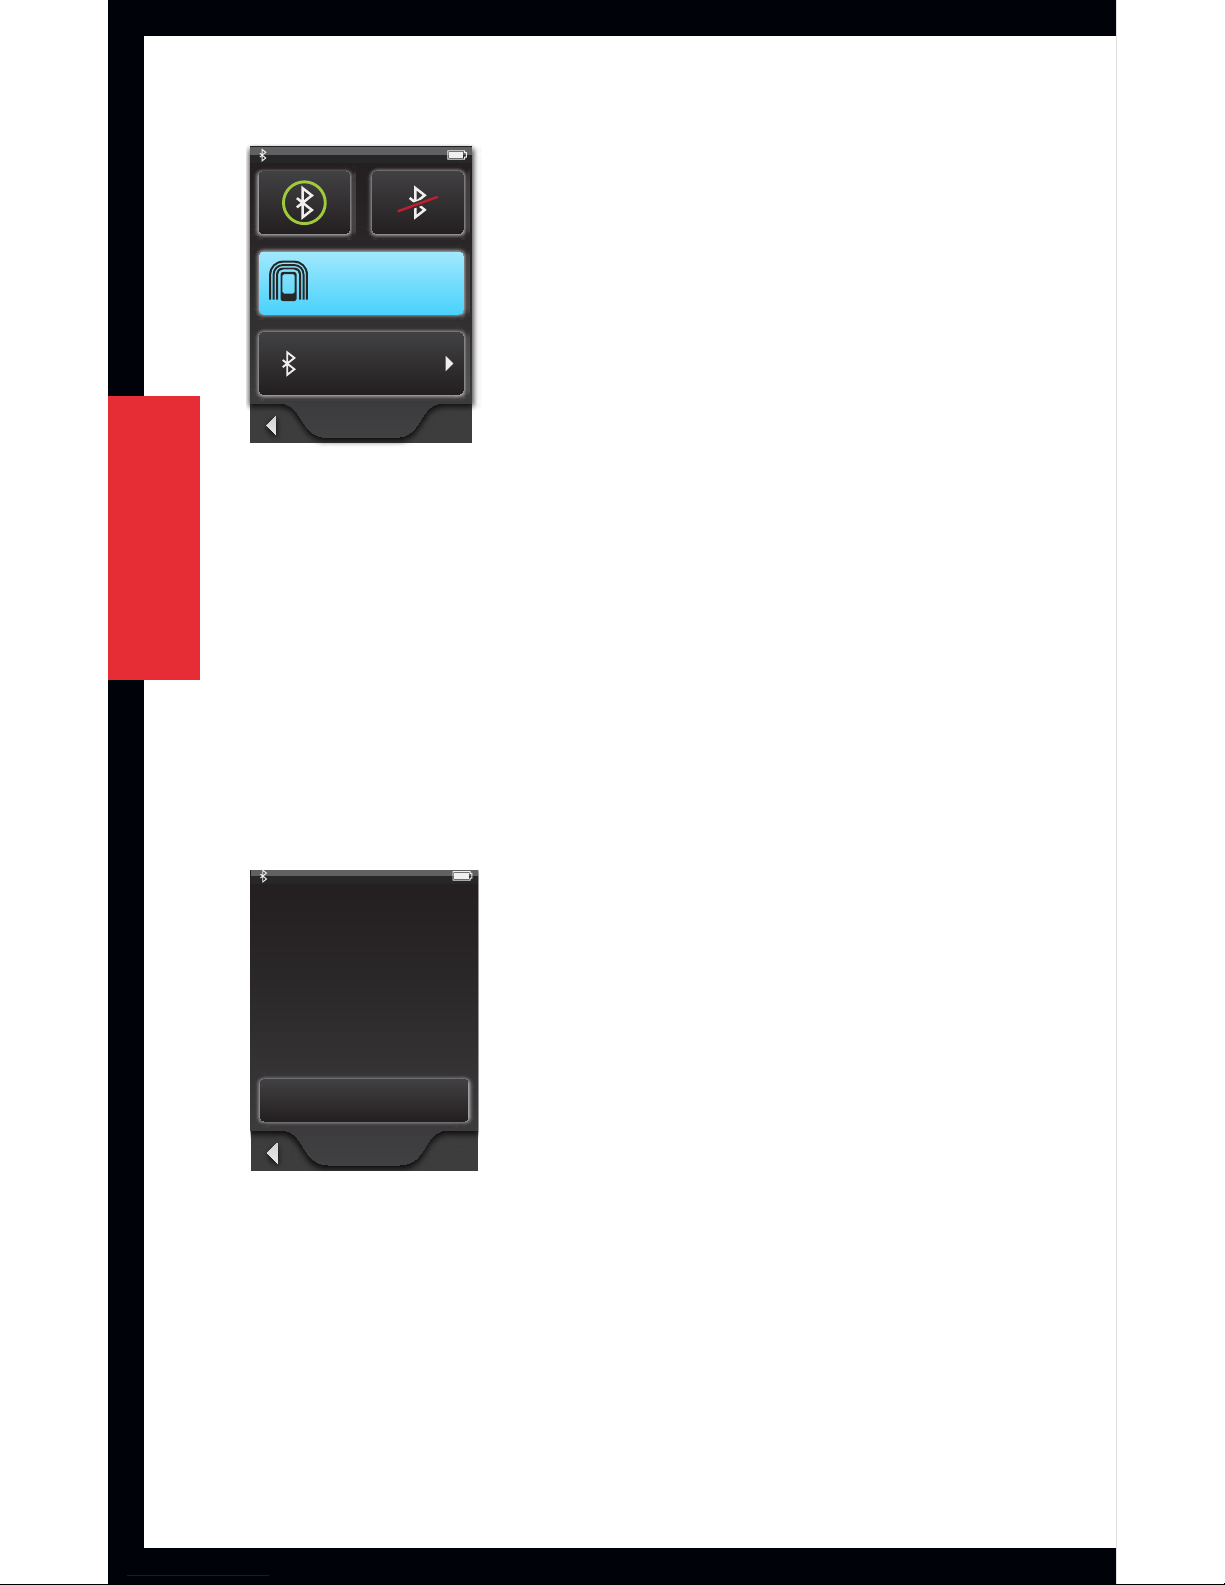
4. On SurfLink Mobile press the Pairing Mode button in
the center of the screen. This button will remain active
for the duration of the Bluetooth pairing process.
18
Getting Started /
Setup
Settings
Tools
Hearing Devices
Bluetooth
device_B
device_B
Change List Order
New Label
Devices
device_B
device_A
device_C
Bluetooth
Devices
Pairing Mode
Settings
Tools
Hearing Devices
Bluetooth
Bluetooth
Devices
Pairing Mode
normal
normal pressed disabled
disabled
pressed
generic button - disabled
disabled
disabled text color
R71 G71 B71
normal pressed disabled
Computer
Phone
Stereo
Television
Automobile
MP3 Player
MP3 Player
Computer
Television
Stereo
Automobile
Phone
Other
Other
Cell Phone
Cell Phone
New Device
Choose Device Label
“device_C”
has been paired
successfully
Label
Phone
MP3 Player
Cell Phone
New Device
Retry Cancel
Bluetooth pairing
was unsuccessful
(error)
device_B
device_A
device_C
device_B
Okay Cancel
device_B
Settings
Tools
Hearing Devices
Bluetooth
device_B
device_B
Change List Order
New Label
Devices
device_B
device_A
device_C
Bluetooth
Devices
Pairing Mode
Un-pair
Yes Cancel
Un-pair
device_B
from device?
Settings > Bluetooth Screens
5. Confirm the Bluetooth pairing from the cell
phone. If you are unsure of how to get your cell
phone to recognize Bluetooth devices, consult the
manufacturer of your phone.
6. Once the pairing process is complete, the
Bluetooth Pairing Confirmation screen will
display on SurfLinkMobile.
Settings
Tools
Hearing Devices
Bluetooth
device_B
device_B
Change List Order
New Label
Devices
device_B
device_A
device_C
Bluetooth
Devices
Pairing Mode
Settings
Tools
Hearing Devices
Bluetooth
Bluetooth
Devices
Pairing Mode
normal
normal pressed disabled
disabled
pressed
generic button - disabled
disabled
disabled text color
R71 G71 B71
normal pressed disabled
Computer
Phone
Stereo
Television
Automobile
MP3 Player
MP3 Player
Computer
Television
Stereo
Automobile
Phone
Other
Other
Cell Phone
Cell Phone
New Device
Choose Device Label
“device_C”
has been paired
successfully
Label
Phone
MP3 Player
Cell Phone
New Device
Retry Cancel
Bluetooth pairing
was unsuccessful
(error)
device_B
device_A
device_C
device_B
Okay Cancel
device_B
Settings
Tools
Hearing Devices
Bluetooth
device_B
device_B
Change List Order
New Label
Devices
device_B
device_A
device_C
Bluetooth
Devices
Pairing Mode
Un-pair
Yes Cancel
Un-pair
device_B
from device?
Settings > Bluetooth Screens

19
Getting Started /
Setup
7. Select a graphic icon to represent the cell phone
device by pressing the Choose Device Label
button. The recommended graphic icon is the Cell
Phone graphic. Use the up/down arrows as needed
to page through the list of available graphic icons.
Settings
Tools
Hearing Devices
Bluetooth
device_B
device_B
Change List Order
New Label
Devices
device_B
device_A
device_C
Bluetooth
Devices
Pairing Mode
Settings
Tools
Hearing Devices
Bluetooth
Bluetooth
Devices
Pairing Mode
normal
normal pressed disabled
disabled
pressed
generic button - disabled
disabled
disabled text color
R71 G71 B71
normal pressed disabled
Computer
Phone
Stereo
Television
Automobile
MP3 Player
MP3 Player
Computer
Television
Stereo
Automobile
Phone
Other
Other
Cell Phone
Cell Phone
New Device
Choose Device Label
“device_C”
has been paired
successfully
Label
Phone
MP3 Player
Cell Phone
New Device
Retry Cancel
Bluetooth pairing
was unsuccessful
(error)
device_B
device_A
device_C
device_B
Okay Cancel
device_B
Settings
Tools
Hearing Devices
Bluetooth
device_B
device_B
Change List Order
New Label
Devices
device_B
device_A
device_C
Bluetooth
Devices
Pairing Mode
Un-pair
Yes Cancel
Un-pair
device_B
from device?
Settings > Bluetooth Screens
8. Once the graphic icon has been selected, the
Bluetooth Devices screen will appear and will show
the newly paired cell phone in the list of available
paired Bluetooth devices.
Note: The pairing procedure between SurfLink Mobile
and the Bluetooth device only has to occur one time.
To stream audio from the Bluetooth device, an active
Bluetooth connection needs to exist between the
Bluetooth device and SurfLink Mobile. See page 40
for information on how to view Bluetooth connection
status of paired devices.
20
Operation
Operation
Adjusting Your Hearing Devices
To make hearing device adjustments via
SurfLinkMobile, use the Remote screen:
1. The Remote screen is the default screen when
you power on SurfLink Mobile. This screen is also
accessible from the Streaming and Phone Call
screens, allowing you to adjust your hearing devices
while streaming audio.
Basic
Remote Screen
Intermediate Advanced Pressed
Remote
Labels On
Remote Remote Remote
RemoteRemote RemoteRemote
Volume Graphic “Pressed” State
Graphic appears WHITE DURING
each button press
Volume Graphic “Released” State
Graphic appears BLUE for 1/2 (?) second
AFTER each button press
Remote
Home
Favorite
Mute
Memory
Left
Binaural
Right
Left
Left
Binaural
Binaural
Right
Right
Memory
Mute
Favorite
Home
Memory
Mute
Favorite
Home
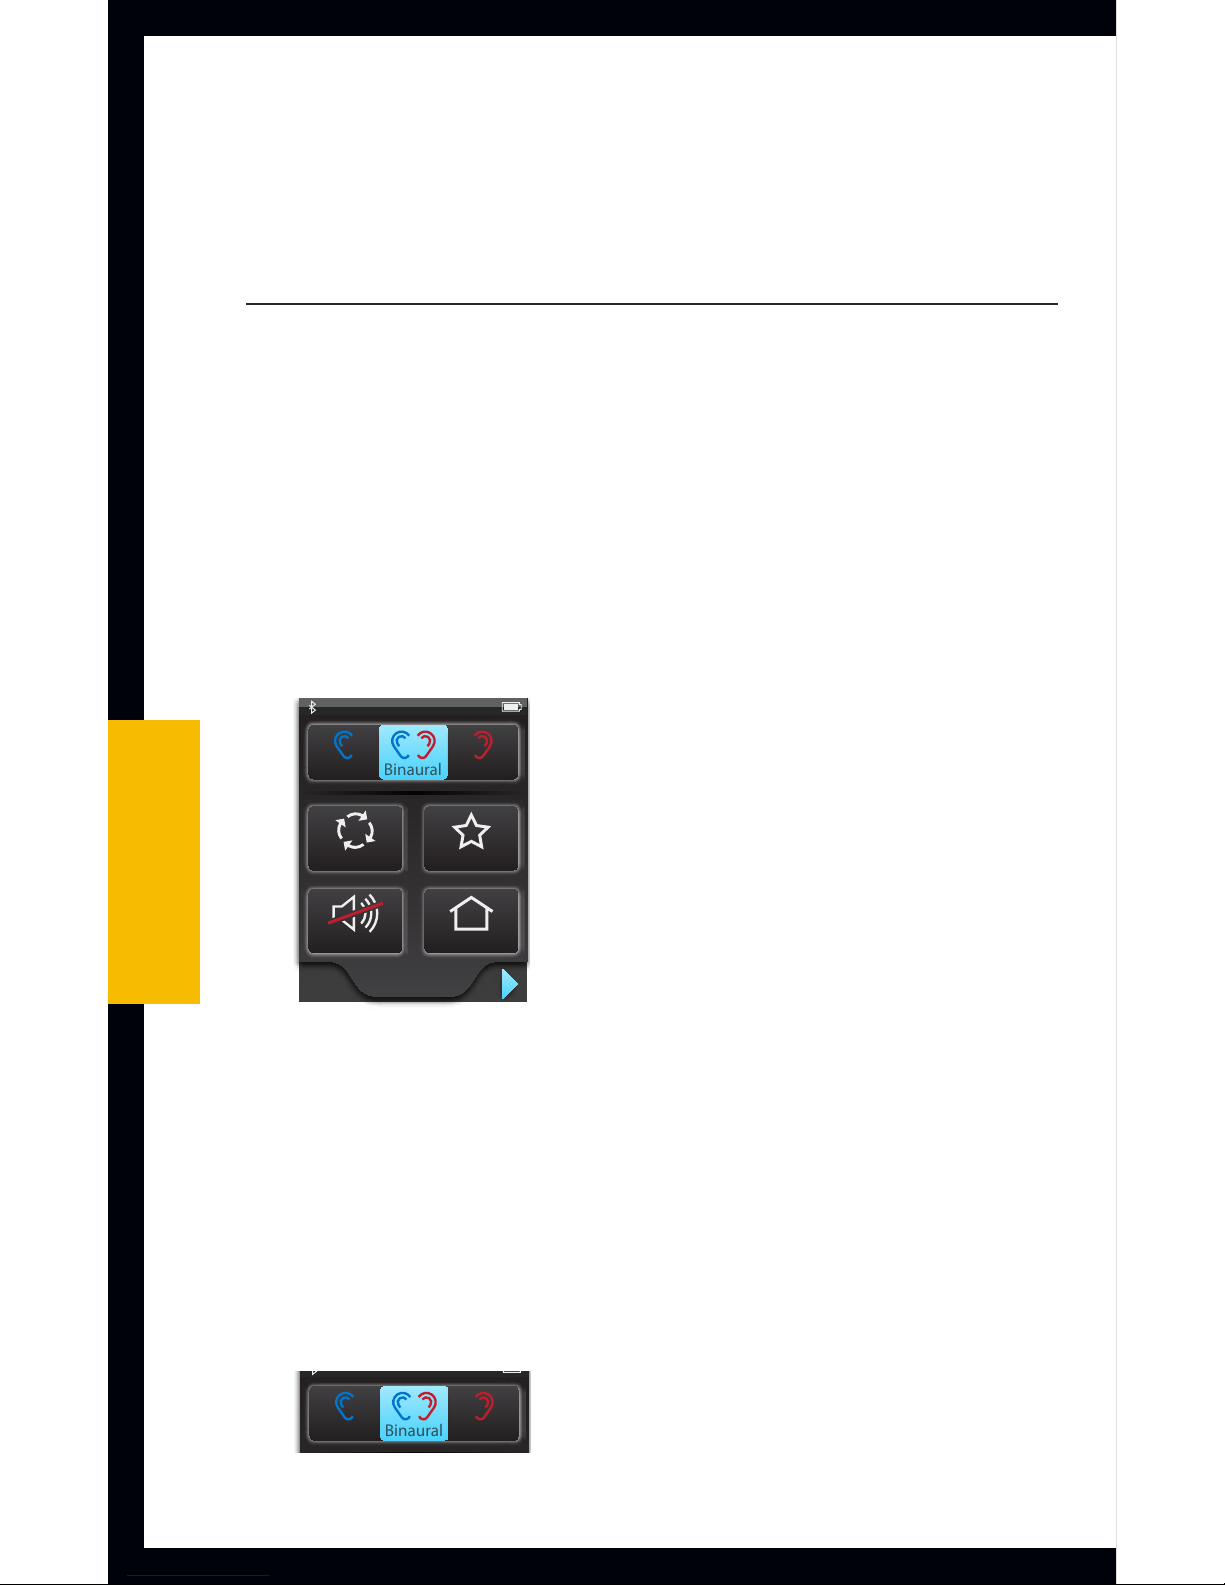
2. From the Remote screen, you can make the
following hearing device adjustments:
Left / Binaural / Right Control – use these buttons
to specify whether remote control adjustments will
be made to a single hearing device or both hearing
devices at the same time.
Basic
Remote Screen
Intermediate Advanced Pressed
Remote
Labels On
Remote Remote Remote
RemoteRemote RemoteRemote
Volume Graphic “Pressed” State
Graphic appears WHITE DURING
each button press
Volume Graphic “Released” State
Graphic appears BLUE for 1/2 (?) second
AFTER each button press
Remote
Home
Favorite
Mute
Memory
Left
Binaural
Right
Left
Left
Binaural
Binaural
Right
Right
Memory
Mute
Favorite
Home
Memory
Mute
Favorite
Home
Other manuals for Mobile
1
This manual suits for next models
1
Table of contents


