Bowers & Wilkins Zeppelin Air User manual

Zeppelin Air

Contents
Welcome to Bowers & Wilkins and Zeppe-
lin Air 2
2
www.bowers-wilkins.com
Welcome to Bowers & Wilkins and Zeppelin Air
Thank you for choosing Bowers & Wilkins. When John Bowers
first established our company he did so in the belief that
imaginative design, innovative engineering and advanced
technology were keys that could unlock the enjoyment of audio
in the home. His belief is one that we continue to share and it
inspires every product we design.
Zeppelin Air is more than just an iPod® dock and speaker
system. As well as listening to audio stored on your iPod or
iPhone® you can use it to:
• Play audio directly from iTunes® via either a cable or wireless
network connection.
• Play audio stored on or streamed to your computer via USB.
• Connect and listen to an external audio source such as a TV or
a non-USB portable music player.
• Sync your iPod or iPhone to iTunes via USB.
• Output video from your iPod or iPhone to a TV screen or
monitor.
This manual will tell you everything you need to know to get the
most from your Zeppelin Air. It begins by describing the contents
of the Zeppelin Air carton.

3
Diagram 1
iPod and iPhone compatibility
1. Zeppelin Air
2. Power cable
3. 1m Ethernet cable
4. Remote control handset
5. Document pack containing a Quick Start Guide,
warranty information and statutory safety warnings.
This product complies with international directives,
including but not limited to the estriction of
azardousubstances (RoHS) in electrical and
electronic equipment, the egistration, valuation,
uthorisation and restriction of emicals (REACH)
and the disposal of astelectrical and lectronic
quipment (WEEE). Consult your local waste
disposal authority for guidance on how properly to
recycle or dispose of this product.
2nd generation
(aluminum)
3rd generation
(video)
1st generation
4th generation 2nd generation3rd generation
4th generation
(video)
5th generation
(video camera)
6th generation
Zeppelin Air AirPlay works with iPad, iPhone 4,
iPhone 3GS, iPod touch (4th, 3rd and 2nd
generations) with iOS 4.2 and iTunes 10.1
(Mac and PC) or later.
Zeppelin Air dock connector works with iPhone 4,
iPhone 3GS, iPhone 3G, iPhone, iPod touch (4th,
3rd, 2nd, and 1st generations), iPod classic and
iPod nano (6th, 5th, 4th, 3rd and 2nd generations).

4
You can connect to your Zeppelin Air three different
ways:
• Using AirPlay® to stream wirelessly from iTunes.
• Using the front mounted iPod dock.
• Using the rear panel mounted connection sockets.
Diagram 2 illustrates the Zeppelin Air rear panel
connection sockets.
Zeppelin Air is able to play audio from iTunes either
wirelessly or via a wired (Ethernet) connection using
AirPlay streaming technology. When connected to
the same network as a computer running iTunes,
Zeppelin Air can appear as an output option in the
pop-up menu at the bottom of the iTunes window.
See Section 5 for information on conguring
Zeppelin Air to join your home network and on
conguring iTunes to play through Zeppelin Air.
Note: iTunes Version 10.1 or later must be used.
Note: A standard Ethernet cable is required if you
wish to connect your Zeppelin Air to an Ethernet
network.
As well as streaming audio from iTunes, AirPlay
also makes it possible to stream audio directly to
Zeppelin Air from an iPod, iPhone or iPad®. Any
iPod, iPhone or iPad application that incorporates
a volume control will have an additional icon that
enables selection of available remote speakers for
playback. Any Zeppelin Air within wireless range will
be included in the selection list.
Note: Full iPod, iPhone and iPad AirPlay
functionality is only available with the iPad,
iPhone 4, iPhone 3GS and second generation
iPod touch and above using iOS 4.2 or later.
The Zeppelin Air dock connector is compatible with
the iPod and iPhone models illustrated in Diagram 1.
Other iPod or iPhone models, or alternative music
players, may be used by connecting their headphone
sockets to the Zeppelin Air rear panel input.
iPhone and iPod models are charged at all times
when docked if the Zeppelin Air is connected to
mains power.
If you wish to listen to audio either stored or
streamed on your Mac/PC using the Zeppelin Air
input, connect it using a USB cable from a
spare Mac/PC USB socket. The Zeppelin Air USB
input also enables synchronisation of your iPod
or iPhone to iTunes. See Section 6.2 for more
information.
Note: A USB A-B cable (a USB printer cable) is
required if you wish to connect your Zeppelin
Air to a Mac/PC for any use other than wireless
AirPlay streaming. For reliable operation the
cable should not exceed 3m (10 ft) in length. The
Zeppelin Air should be connected directly to the
Mac/PC USB port and not via any intermediate
USB hardware.
If you wish to listen to an external analogue or
digital audio source, connect it to the Zeppelin Air
input socket using either an analogue cable
terminated with a mini-jack plug or a digital cable
terminated with a mini-TosLink optical plug. Zeppelin
Air will automatically identify the type of cable used
and congure the input socket appropriately.
Note: Zeppelin Air is able to play stereo digital
audio at up to 24 bit/96kHz resolution. It is not
compatible with surround-sound encoded 5.1
channel digital audio.
Zeppelin Air incorporates a composite video output
phono socket that enables video on a docked iPod
or iPhone to be sent to a TV or computer monitor
with a suitable input. Video programme can be
played with audio reproduced by the Zeppelin Air
and the video displayed by the TV or monitor.
Note: Zeppelin Air is not able to display iTunes
album cover artwork via its video output.
Connect the Zeppelin Air to a mains outlet socket
using the supplied mains cable. When rst
connected to mains power the Zeppelin Air will
automatically enter mode with its indicator
illuminating dim red.
Note: The table in Section 4 describes all
the Zeppelin Air indicator colours and their
meanings.
Diagram 2
Zeppelin Air back panel
ETHERNETPOWER USB AUX COMP

5
Diagram 4
Zeppelin Air insulating tab removal
Zeppelin Air can be operated either from the controls
on its body, illustrated in Diagram 3, or from the
remote handset. If the remote handset is to be used,
the battery insulating tab must rst be removed. This
is illustrated in Diagram 4. Diagram 5 illustrates the
handset key functions.
In addition to normal operating mode, Zeppelin Air
has both and modes. In
mode, all Zeppelin Air functions are switched off and
the power consumption minimised. In mode,
the Zeppelin Air wireless function remains connected
to the network. The Zeppelin Air indicator illuminates
bright red in mode and dim red in
mode.
Zeppelin Air can be switched on from or
modes by the following actions:
• Pressing the Zeppelin Air button .
• Pressing handset key .
• Docking an iPod or iPhone.
When Zeppelin Air is switched on from
or , the last input used will be selected if it is
still connected. If the last input used is no longer
connected, Zeppelin Air will automatically scan its
inputs (Dock, AirPlay, USB, (AUX)iliary) and select
the rst connected one it nds. The Zeppelin Air
indicator will change to the colour that designates
the selected input. If no connected input is found,
Zeppelin Air will select the AirPlay input by default.
Note: If the AirPlay input has not been set up the
indicator will ash purple.
Note: The table in Section 4 describes all
the Zeppelin Air indicator colours and their
meanings.
To switch Zeppelin Air into mode, either press
the remote handset key or press and hold
the Zeppelin Air button for 2 seconds. The
Zeppelin Air indicator will illuminate bright red.
To switch Zeppelin Air into mode, press
and hold the Zeppelin Air button for
4 seconds. The Zeppelin Air indicator will illuminate
dim red.
Note: It is not possible to switch Zeppelin Air into
Standby mode from the handset. Zeppelin Air
cannot enter Standby mode directly from Sleep
mode.
Diagram 3
Zeppelin Air controls explained
Diagram 5
Zeppelin Air remote control explained

6
Diagram 6 illustrates Zeppelin Air with all its possible
audio sources connected.
With the Zeppelin Air switched on from or
:
• You can listen to your iPod or iPhone audio.
• You can output iPod or iPhone video to a TV or
monitor, with audio on the Zeppelin Air.
• You can connect to a wired or wireless network
and listen to your iTunes audio via AirPlay.
• You can listen to other digital or analogue audio
sources via the Zeppelin Air (AUX)iliary input.
• You can listen to audio stored or streamed on your
computer via USB.
Note: See Section 6 for more on using the
Zeppelin Air USB input.
• You can use the handset keys or the
Zeppelin Air buttons to control volume.
• If an iPod or iPhone is docked, or Zeppelin Air is
connected to iTunes via AirPlay, you can use the
handset key to play or pause audio,
or the and keys to select the next
or previous track.
Note: Remote iTunes control must be enabled.
Open iTunes and go to Preferences > Devices
and tick, “Allow iTunes control from remote
speakers”.
• You can use the handset key or the
Zeppelin Air button sequentially to select
connected inputs.
Note: There is a short delay when Zeppelin Air
inputs are switched. This is a consequence of
the need to re-establish USB, Network or iPod
communication.
A Zeppelin Air used close to a wall or near a room
corner may overemphasise the bass elements of
music played on it. You can reduce the bass by
following the steps below.
• With the Zeppelin Air switched on from ,
dock an iPod or iPhone and play some music.
While the music is playing, select the iPod or
iPhone icon.
• Scroll to the bottom of the page and
select .
• The default Zeppelin Air setting is . This
is appropriate for a Zeppelin Air used away from
walls and corners. reduces the bass
output appropriately for a Zeppelin Air used with
its back close to a wall. reduces the bass
output appropriately for a Zeppelin Air used near
a room corner. and options are
also provided to enable personal preferences also
to be accommodated. You should select whichever
option you feel sounds best on a range of music.
The bass adjustment happens as soon as you
highlight the option.
• The selected bass adjustment is retained by the
Zeppelin Air once the docked iPod or iPhone is
removed and is applied to all the Zeppelin Air
inputs.
Note: When you use Zeppelin Air with AirPlay or
a docked iPod or iPhone it is best to switch-off
any equalisation. Select the “at” equalisation
option.
In some circumstances the Zeppelin Air will
automatically switch to its AirPlay input or switch on
from mode:
• If iTunes streamed audio is present on the AirPlay
input when the dock input is selected and a
docked iPod or iPhone stops playing, the AirPlay
input will automatically be selected.
• If iTunes streamed audio is present on the AirPlay
input when the USB or (AUX)iliary input is selected
but no audio playing, the AirPlay input will
automatically be selected.
• If iTunes streamed audio is present on the AirPlay
input when the Zeppelin Air is in mode, it
will automatically switch on and play the streamed
audio.
Diagram 6
Zeppelin Air connectivity

7
The Zeppelin Air indicator illuminates in a range of
colours to indicate different operational conditions.
The table below describes the colours and their
meanings.
In order to play your iTunes music on your Zeppelin
Air using AirPlay, your Zeppelin Air must join the
same network as the computer on which iTunes
is installed and running. Zeppelin Air network
addressing is set to DHCP which means that once it
has joined the wireless network it will not require any
further conguration.
To set up Zeppelin Air to join your wireless network
you should rst connect it physically to the Mac/PC
using the supplied Ethernet cable. Once connected
you can browse to the Zeppelin Air setup page.
Follow the steps described below.
Note: Zeppelin Air can also use a wired network
for AirPlay streaming.
• Unplug every cable from the Zeppelin Air and
undock any docked iPod or iPhone.
• Using the Ethernet cable supplied connect the
Zeppelin Air rear panel socket to an
socket on the computer.
• Connect the power cable. Zeppelin Air will switch
on in mode with the indicator illuminated
dim red.
• Switch on the Zeppelin Air from mode by
pressing its button.
• Zeppelin Air will automatically select its AirPlay
input and establish a connection to the network.
This may take up to 90 seconds during which time
the Zeppelin Air indicator will ash purple. The
indicator will show continuous purple when the
wired network connection is fully established.
• Using an internet browser application running
on the computer connected to the Zeppelin Air
type the Zeppelin Air default network address
() in the browser address eld
and press “return”. This will open the Zeppelin Air
setup page (see Diagram 7 on next page).
• Before you connect to the home wireless network,
the setup page provides the option to change the
Zeppelin Air name. Changing the name is useful
if more than one Zeppelin Air is to be connected
to the network. Enter a new name (Zeppelin Air
Kitchen for example) in the Zeppelin Air Name box
and click on .
• Select your home network from the
drop down list and enter the in the
appropriate box. Take care to type the password
correctly. Selecting the option
will help ensure the password is correct.
• When you are nished, click on the button
and on the button in the following dialogue
box, then close the Zeppelin Air setup page.
Disconnect the Ethernet cable.
• The Zeppelin Air indicator will change to steady
purple when the wireless network connection is
established. This will take around 15 seconds.
Note: If Zeppelin Air fails to connect to your
home wireless network, the most likely fault is
an incorrectly entered network password. Follow
the reset instructions in Section 8 and begin the
network setup procedure again.
Dim Red Standby N/A
Bright Red Sleep N/A
Blue On Dock
Fast ashing Blue Volume adjustment Dock
Green On USB
Fast ashing Green Volume adjustment USB
Orange On Aux
Fast ashing Orange Volume adjustment Aux
Slow ashing Orange Digital audio lock error Aux
Purple On AirPlay
Fast ashing purple Volume adjustment AirPlay
Slow ashing purple No network connected AirPlay
Fast ashing Red Volume at minimum or maximum Any
Slow ashing Yellow Wireless setup mode N/A
Yellow iPod/iPhone Synchronisation mode USB
White Firmware update N/A
Flashing white Firmware error N/A

8
You can also set up your Zeppelin Air to join your
wireless network by rst temporarily connecting
a computer to the Zeppelin Air’s own temporary
wireless network. Follow the steps described below.
• Unplug every cable from the Zeppelin Air and
undock any docked iPod or iPhone.
• Connect the power cable. Zeppelin Air will switch
on in mode with the indicator illuminated
dim red.
• Press the Zeppelin Air button once.
The indicator will initially ash purple. Wait (up to
45 seconds) until the indicator ashes yellow.
• If the computer to be used to connect to the
Zeppelin Air temporary wireless network is already
connected to your home wireless network it will be
disconnected at the next stage.
Note: Your computer is unlikely to be able to
access your home network and the internet while
it is connected to the Zeppelin Air temporary
wireless network.
• Use the computer’s wireless network control panel
to join the Zeppelin Air default network called
. The Zeppelin Air default
network requires no password. Joining the network
may take up to 90 seconds.
Note: The Zeppelin Air default wireless network
should not be used for anything more than
temporary setup access.
• Using an internet browser application running
on the computer connected to the Zeppelin Air
wireless network, type the Zeppelin Air default
network address () in the
browser address eld and press “return”. After
requesting acceptance of a digital security
certicate this will open the Zeppelin Air setup
page (see Diagram 7).
Note: An alternative network address for the
Zeppelin Air setup page is http://169.254.1.1.
Use of this address however carries a small
security risk.
• Before you connect to the home network, the
setup page provides the option to change the
Zeppelin Air name. Changing the name is useful
if more than one Zeppelin Air is to be connected
to the network. Enter a new name (Zeppelin Air
Kitchen for example) in the Zeppelin Air Name box
and click on .
• Select your home network from the
drop down list and enter the in the
appropriate box. Take care to type the password
correctly. Selecting the option
will help ensure the password is correct.
Note: If your home network name is not initially
visible in the setup page drop down list, reload
the page.
• When you are nished, click on the button
and on the button in the following dialogue
box, then close the Zeppelin Air setup page.
• The computer can now be disconnected from the
Zeppelin Air temporary network and reconnected
to your home wireless network if desired. It may
have reconnected automatically.
• The Zeppelin Air Indicator illuminates continuous
purple when the wireless network connection is
established. This may take up to 45 seconds.
Note: If Zeppelin Air fails to connect to your
home network, the most likely fault is an
incorrectly entered network password. Follow
the reset instructions in Section 8 and begin the
network setup procedure again.
Diagram 7
Zeppelin Air temporary wireless network
45s 45s
Diagram 8
iTunes
With Zeppelin Air connected to your home network
(wired or wireless) you can congure iTunes to use
it as an output device. Congure iTunes by following
the steps below (see Diagram 8).
• Open iTunes and click on the
tab.
• Select the options,
and
. Close
iTunes .
• Choose in the devices menu at the
bottom right hand corner of the iTunes display.
iTunes will now play through the Zeppelin Air.
Multiple Zeppelin Air units can be connected to
the wireless network and used to provide audio
in separate rooms. Each will be available in the
iTunes devices menu, identied by either the names
specied in the setup page, or by default the last
three digits of their serial numbers.
http://169.254.1.1
Change Settings Current Settings
Wireless network:
Password:
Choose item
Another network 01
Your hone network
Join
Warning: Incorrect parameters may cause undesired
behaviour. To save the new settings, click OK and then
unplug the network cable

9
The USB input enables you to connect your Zeppelin
Air to a Mac/PC in order to play stored or streamed
audio, or to synchronise data held on your Mac/PC
with your iPod or iPhone.
When Zeppelin Air is connected to a Mac/PC via
USB and its input is selected, the computer will
identify as an output only audio device.
Specifying Zeppelin Air in the Mac/PC audio control
panel will allow it to play audio data either stored
locally on the computer or streamed via a network or
the internet. The Zeppelin Air indicator will illuminate
green when the input is selected.
Note: The table in Section 4 describes all
the Zeppelin Air indicator colours and their
meanings.
Depending on the Mac/PC audio application in use,
the handset may be used to control playback, skip
tracks and adjust volume.
When Zeppelin Air is connected to a Mac/PC via
USB it can be used as an iTunes synchronisation
dock to synchronise data stored on the computer
with data stored on the iPod or iPhone.
To function as a synchronisation dock, the Zeppelin
Air must rst be switched into mode by
pressing the handset key, or pressing
and holding the button for 2 seconds.
Once in mode, pressing and holding the
button again for two seconds switches
the Zeppelin Air into mode (entry
into synchronisation mode is not possible from the
remote handset). In synchronisation mode, a docked
iPod or iPhone will be linked directly to the Mac/
PC via USB so that iTunes can be used to manage
data synchronisation. The Zeppelin Air indicator will
illuminate yellow in synchronisation mode.
Note: If no iPhone or iPod is docked or no Mac/
PC is connected, Zeppelin Air will not enter
synchronisation mode.
When synchronisation is complete, synchronisation
mode can be cancelled either by un-docking the
iPod or iPhone or pressing and holding the Zeppelin
Air button for two seconds. It is good
practice always to “eject” iPod and iPhone models
from iTunes before physically disconnecting the USB
connection. The Zeppelin Air will return to
mode when synchronisation mode is cancelled.
Note: Cancelling synchronisation mode while
synchronisation is underway may result in data
loss.
Updated Zeppelin Air rmware may from time to time
be made available for download from the Zeppelin
Air support section of the Bowers & Wilkins web
site. With the rmware le downloaded to your Mac/
PC, update your Zeppelin Air by following the steps
below:
• Un-dock any docked iPod or iPhone and
disconnect Zeppelin Air from its power supply.
• If it is not already connected, connect the Zeppelin
Air to the Mac/PC via USB.
• While holding down the Zeppelin Air
button, connect the Zeppelin Air power cable.
The indicator will illuminate white to conrm that
the Zeppelin Air is in rmware update mode and
connected to a Mac/PC.
• Launch the rmware updater on the Mac/PC and
follow the dialogue box instructions.
Note: On computers running Mac OS X,
launching the Zeppelin Air rmware updater will
install a Zeppelin Air Programmer application
in the OS X Applications folder. Launching the
application by double-clicking on its icon in the
Applications folder will begin the rmware update
process.
Note: On computers running Microsoft Windows
(XP or later), launching the Zeppelin Air rmware
updater will install a Zeppelin Air desktop
icon. Double-click on the icon to begin the
update process. If the process has not been
run before, a dialogue box will request that the
location of the USB Driver also installed by the
updater is specied (the default location is:
C:\Program Files\Bowers & Wilkins\Zeppelin
AirProgrammer\). Once the location of the USB
driver has been specied, the rmware update
process will continue.
Once the rmware update is complete, the Zeppelin
Air indicator will illuminate dim red and the unit will
return to normal operation.
Note: Updated Zeppelin Air rmware may
incorporate new features. Download the most
recent owners manual for the latest information.
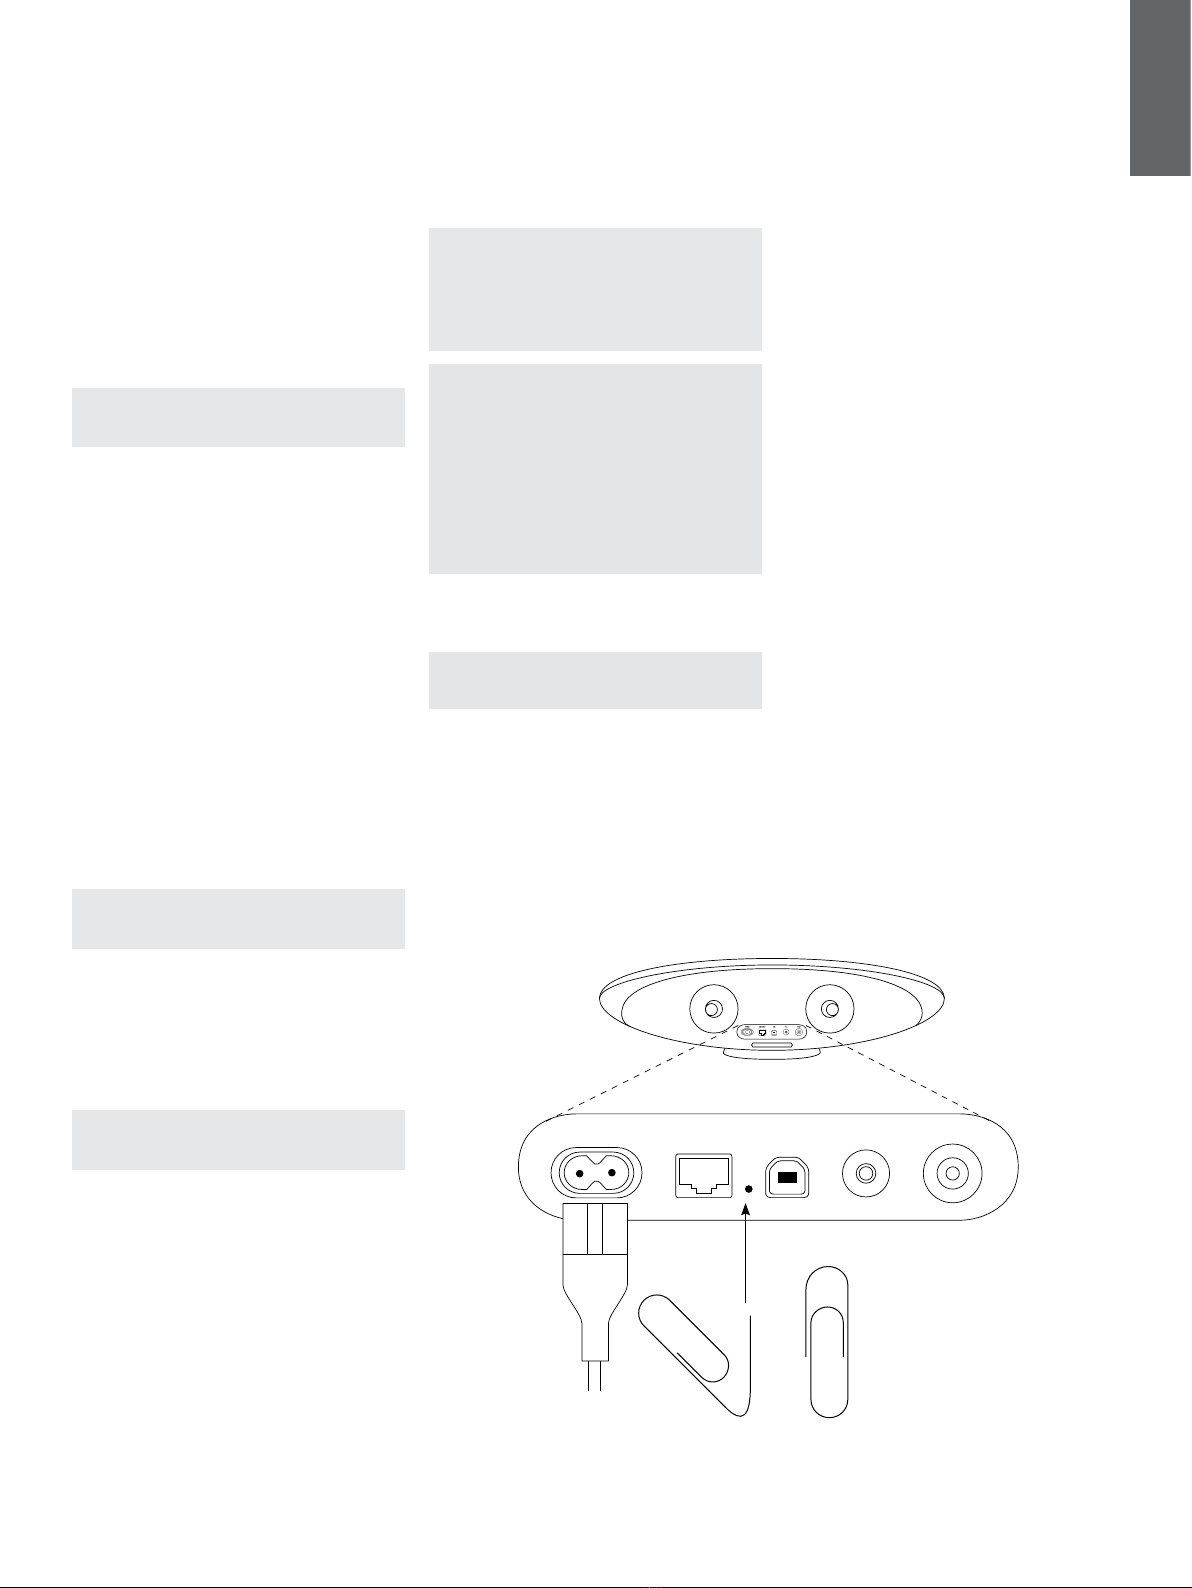
Zeppelin Air has a pin-hole reset button located
on its rear connection panel. The reset button is
illustrated in Diagram 9. To return the Zeppelin
Air network settings (AirPlay input) to the factory
defaults, ensure the power cable is connected, and
power the Zeppelin Air on. Wait 60 seconds before
pressing and holding the reset button for 2 seconds.
The indicator will ash red ve times.
Diagram 9
Zeppelin Air factory reset
Use a clothes brush or vacuum cleaner with nozzle
attachment to clean the grille cloth. Wipe other
surfaces with a clean lint-free cloth. If you wish to
use a cleaning agent, apply it onto the cleaning
cloth, not directly onto the Zeppelin Air. Test a
small area rst, as some cleaning products may
damage some of the surfaces. Avoid products that
are abrasive, or contain acid, alkali or anti-bacterial
agents.
If you need help troubleshooting a specic problem,
or have a question you’d like answered, please
consult our Troubleshooting guide, or Frequently
Asked Questions section on the Zeppelin Air Product
Support page of our website.
www.bowers-wilkins.com
ETHERNETPOWER USB AUX COMP

B&W Group Ltd
Dale Road
Worthing West Sussex
BN11 2BH England
T +44 (0) 1903 221800
F +44 (0) 1903 221801
www.bowers-wilkins.com
B&W Group (UK Sales)
T +44 (0) 1903 221 500
B&W Group North America
T +1 978 664 2870
B&W Group Asia
T +852 3 472 9300
Copyright © B&W Group Ltd. E&OE
AirPlay, iPhone, iPod, iPad and iTunes
are trademarks of Apple Inc., registered
in the US and other countries.
Issue 1
Other manuals for Zeppelin Air
25
Popular Cell Phone Accessories manuals by other brands

Inline
Inline 48090 user manual

Intelligent Micro Electron
Intelligent Micro Electron iReminder IME-B6 user manual

JK Audio
JK Audio CellTap user guide

Simons Voss Technologies
Simons Voss Technologies IPhone4-Adaptor Instruction leaflet

Alphavox Technologies
Alphavox Technologies Signolux A-2695-0 user manual

JVC
JVC TF-HF30(J) Service manual