SanDisk iXpand User manual

USER GUIDE
iXpand™Memory Case
Western Digital Technologies, Inc.
951 SanDisk Drive, Milpitas, CA 95035
Western Digital Technologies, Inc. is the seller of record
and licensee in the Americas of SanDisk® products.
©2016 Western Digital Corporation. All rights reserved
Rev 1.0

Introduction
Getting Started
•Connecting to the iPhone 6 or iPhone 6s
•Charging the iXpand Memory Case
•Charging the iXpand Battery Pack (sold separately)
•Understanding the LED indicator
Applications
•App Overview
•Camera Roll Backup
•File Management
•Photo
•Video
•Music
•Password Protection
•Sharing
•Contact Management
Memory Case Settings
•Case Name
•Formatting
•Firmware update
Troubleshooting & Support

Instructional Icons
Warning
Information
Quick Tip

Introduction
iXpand™Memory Case Overview
Pass through for
Power Button
Mute Button
Micro USB Connector
Lightning Connector
Figure: iXpand Memory Case layout
Upgrade your phone by upgrading your case. The iXpand™ Memory Case delivers more
storage for your iPhone 6 or iPhone 6s. Available in 32GB, 64GB or 128GB1of extra
storage for all your content2and with an add-on battery pack that can double your
battery capacity (sold separately), the iXpand Memory Case not only looks good while
protecting your iPhone, it gives you more room for all the stuff you can’t live without.
So you can keep taking pictures, listening to music, watching videos, playing games and
doing all of the other things you do with your iPhone.
More Space for What You Love
With 32GB, 64GB or 128GB of extra storage, suddenly the possibilities are
exponential. Take more photos. Watch more videos. Listen to more music.

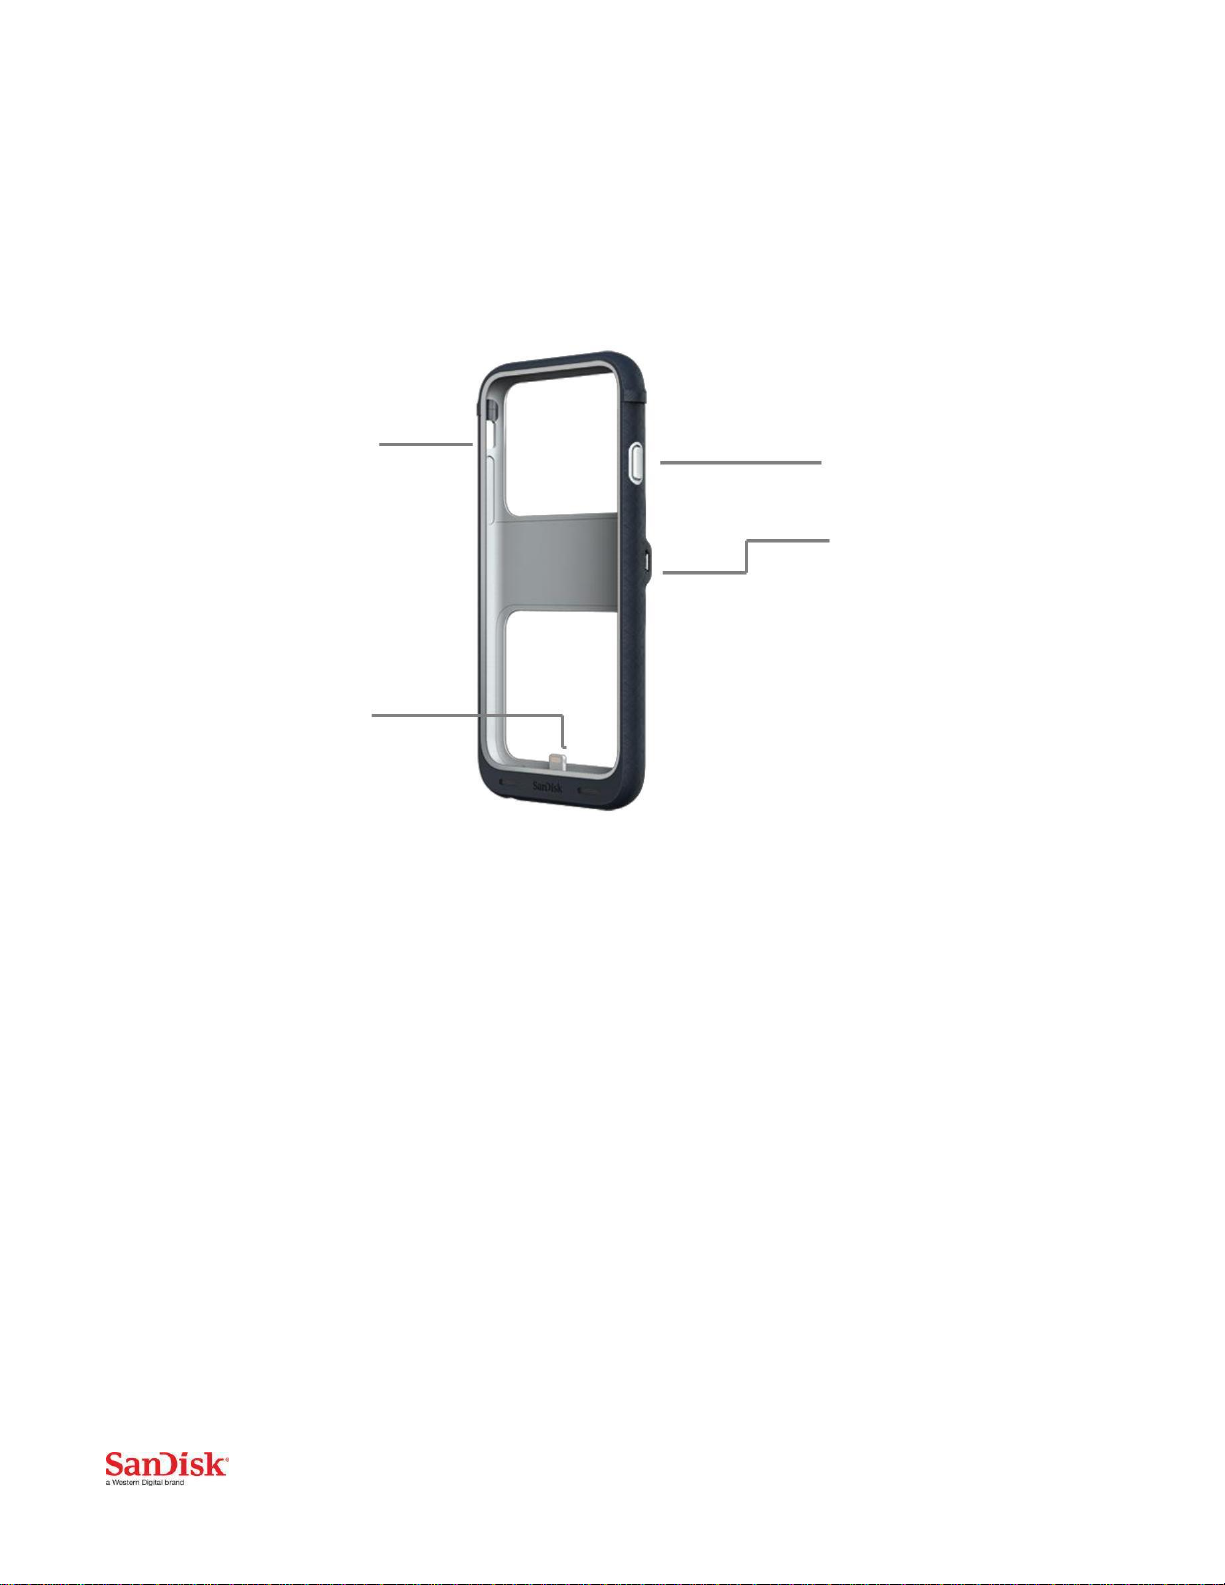
Durable, Protective Case
Extra memory is great. But a case also needs to protect your phone. The iXpand
Memory Case features hard plastic outside and soft rubber inside to protect
your phone.
No Need to Call for Backup
The iXpand Case app automatically backs up the photos and videos from your
camera roll.
Password-Protect your Photos, Videos and Files
With the iXpand Memory Case, your sensitive content is protected from prying
eyes when you use the iXpand Memory Case app to move it from your case to
your Mac or PC and back again. The iXpand Memory Case includes the SanDisk
SecureAccess™ software for Windows and Mac computers, making it easy to
protect and access your files.
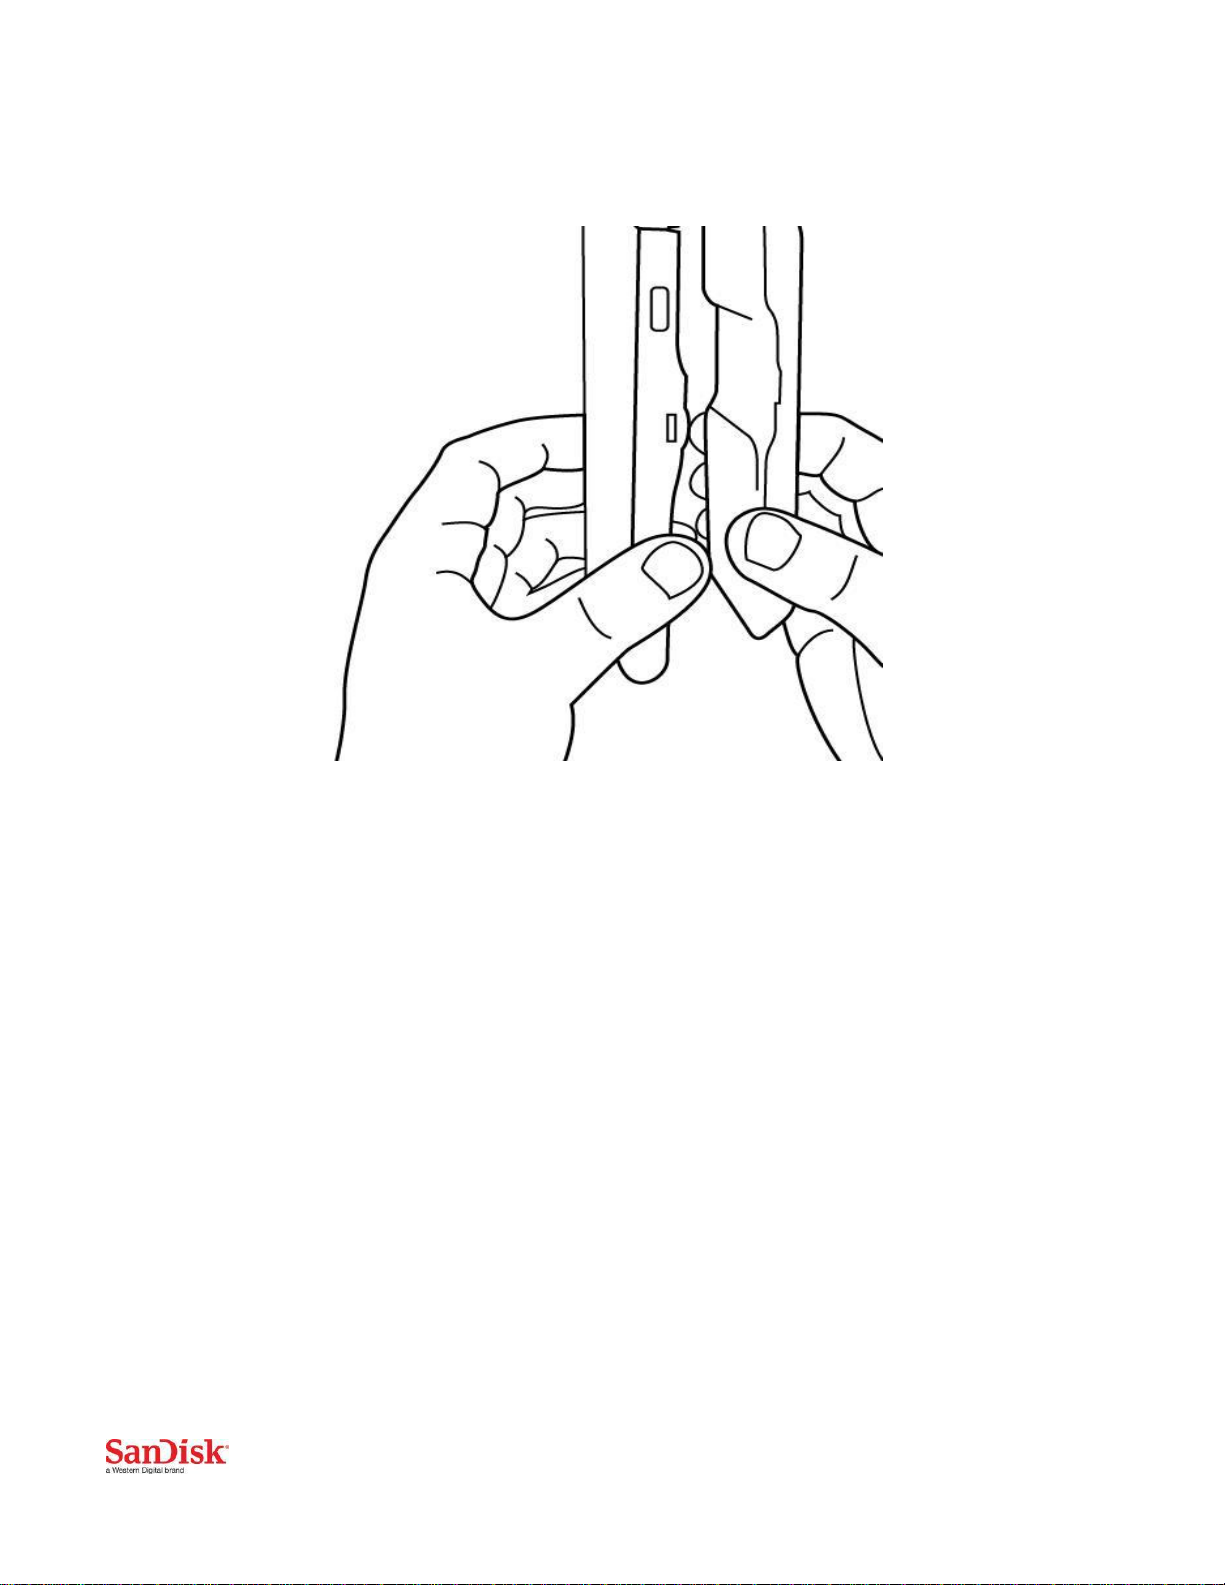
Optional Battery Pack Available (sold separately)
The add-on battery pack doubles your battery life for those days when you need
more juice—and you can remove it when you want to travel light. When
connected, the optional battery pack detects when your phone’s battery runs
low, and kicks in to charge it. So you can focus on other things, not whether
your phone has a charge.
Features
Protective case with 32GB, 64GB or 128GB of built-in memory
Works with iPhone 6 or iPhone 6s
Instantly create more space for photos, videos and music
Protects your phone with hard plastic outside and soft rubber inside
Use the app to shoot and view photos and video directly from the case
memory
Automatic transfer of photos and videos to the iXpand Memory
Case memory
Playback popular file formats; supports all natively-supported iOS formats
128-bit AES encryption
Get more power with the add-on battery pack (sold separately)

Works with
iPhone 6 or iPhone 6s (iOS 8.2 or above)
Windows Vista®, Windows 7, Windows 8, Windows 10, Mac OS X v10.6+.
Specifications
Interface: Lightning and Micro USB B connector
Available in: 32GB, 64GB and 128 GB
Dimensions: 151.3mm x 76.2mm x 15mm
Weight: iXpand Memory Case: 35gm (1.23oz)
Operating temperature: 0ºC to 45 ºC
Storage temperature: -10ºC to 70ºCE
iOS 8.2 or above required to run the App
Package contents: iXpand Memory Case, 3ft micro USB cable, headphone
audio adapter
Warranty: 1 Year Warranty
2Password protection uses 128-bit AES encryption and is supported by iOS 8.2+, Mac OS X v10.6+ (Software download
required for Mac, (see http://www.sandisk.com/support/iXpandCase) Windows Vista, Windows 7 and Windows 8
and Windows 10.
11GB=1,000,000,000 bytes. Actual user storage less.

Getting Started
Connecting to iPhone 6 or iPhone 6s
Physical connection
1. Remove the top of the case from the case frame by lifting the corner
of the cap over the locking piece.
2. Slide the iPhone 6 or iPhone 6s into the case bottom first.
3. Slide it in until the Lightning connector inserts fully into the iPhone.
4. The cap is oriented so that it will only fit in one direction onto the
case. Please orient it so that the grooves in the case fit in the correct
direction. Note: The inside of the cap is also labeled Left and Right to
help you orient it.
5. To lock the cap in place, lift the corner of the cap over the locking piece.
To ensure a tight fight, make sure both sides are connected by
squeezing the top cap against the phone.
Your iPhone will detect the case and notify you to install the iXpand Case app from the App Store. Follow the
instructions in the app to use your iXpand Memory Case.

Attaching the optional Add-on Battery
The case will function and add additional memory storage to your iPhone,
without the external battery. When additional power is desired, the battery
pack can be attached.
1. Align the battery to the notch in the bottom of the case.
2. Snap the battery onto the back of the case. It will attach to the case frame by
hidden magnets.

Charging the iPhone
Connect the included micro-USB cable to the case connector, located near the
right center of the case. Connect the other end to an Apple approved power
supply. After plugging the power cable there will be a small delay until charging
starts, allowing the case to detect the port and guarantee a safe charge.
USB AC adaptor: not included with the iXpand Memory Case
Charging the iXpand Battery Pack (sold separately)
The Battery pack is shipped with under 30% charge to comply with
international safety regulations for Lithium Ion Batteries (IATA UN 3480,
PI 965, Section 1B). Please charge the Battery Pack before you use it the
first time.
Connect the included micro-USB cable to the case connector, located in
the bridge near the right center of the case. Connect the other end to an
Apple approved power supply.

You can also charge your battery pack separately from the case. Plug the included
micro-USB cable into the battery pack as shown in the illustration below. Connect
the other end to an Apple approved power supply* or computer
When you connect the Battery Pack to the iXpand Memory Case, the case will
start charging your iPhone. When the phone is fully charged, the battery pack will
begin to charge. 4 LEDs in the battery pack will show the charging level of the
battery. An additional Blue LED shows that charging is active.
*USB AC adaptor: not included with the iXpand Memory Case

LED Indicator
The 5 LEDs on the bottom of the iXpand Memory Case indicate its battery
and charging status as explained below.
•Four Blue LEDs indicate 25,50,75 and 100% charge.
•A Green LED illuminates to indicate battery charging.
Battery charge can be checked by pressing the LED button. This is located on
the bottom side of the battery pack. Press the button inwards and the LED lights
will show charge level.

Installing the App
When you’ve connected the iXpand Memory Case to your iPhone, you’ll be
prompted to install the companion iXpand Case app.
1 On the screen, select “App Store”.
2 Install the “iXpand Case”app from the App Store.

Applications
App overview
The iXpand Case app is the companion to your iXpand Memory Case. Major
functions include:
1. Home screen with quick access to view and play your photos, videos, music and
other files, with easy sorting options.
2. Add photos/videos from the camera roll to the iXpand Memory Case with the
‘+’ button.
3. Take a photo directly from the Home screen.
4. Play all your Music right from the App. iTunes Music and Music stored on the
case is combined in one simple view. Create and edit playlists for both sources.
5. Manage your battery status and charge preferences when the optional add-
on battery (purchased separately) is attached.

Camera Roll Backup
You can back up your camera roll to the iXpand Memory Case by setting up auto-
backup or manually syncing as needed.
Automatic Backup of your Camera Roll
Set-up once and transfer your camera roll to the iXpand Memory Case automatically
each time the iXpand Case App is opened.
To set-up:
1Insert your iPhone into the iXpand Memory Case.
2On the iXpand Case App, go to Menu Camera Backup.
3Turn on the “Automatic Backup” option on the camera Backup screen.
4After the Backup is complete, an option pops up to delete the copied photos from
the camera roll of the Phone.
Backing up may take longer than normal the 1st time. Once set up, only newly added
files will be copied to the iXpand Memory Case. Deleted photos can still be
recovered within 30 days using the iPhone Photos app.
Note : To Free up space on your iPhone, you must choose the option to delete
the original photos on the iPhone. We will never delete these photos without
your permission.
Note: A pop-up will appear if the initial camera backup was denied.

Manual Backup
Backup your camera roll with the iXpand Memory Case as needed using manual
Backup.
To Backup:
1Insert your iPhone into the iXpand Memory Case.
2Go to Menu Camera Backup.
3To change the destination of the backed up files on the Case, select the
“Destination option”, then select a Destination folder.
4Select “Back Up Now”.
5All the files in your Camera Roll will be copied to the iXpand Memory Case in the
folder specified as the Backup Destination.
Backing up may take longer than normal the 1st time. Once set up, only newly added
files will be copied to the iXpand Memory Case. Deleted photos can still be recovered
within 30 days using the iPhone Photos app.
Note : To Free up space on your iPhone, you must choose the option to delete
the original photos on the iPhone. We will never delete these photos without
your permission.

File Management
Use your iXpand Memory Case and iXpand Case app to transfer and manage files
between your iPhone, PC and Mac computer.
Transfer files from your iPhone to the iXpand Memory Case
1Insert your iPhone into the iXpand Memory Case.
2Select a category (Photos, Videos, or Files)
3Select the add file button “+”.
4When prompted to “select files”, choose the files you want to transfer
from iPhone to the iXpand Memory Case.
5“Select Destination” to specify where to store the files on your iXpand Memory
Case.
6A progress bar will appear to show the transfer progress.
Note: A “warning’ notification will pop if the file size is above 30 MB.
You can choose “New Folder” option to create a new folder as the destination of
the file transfer on the iXpand Memory Case.
Transfer files from iXpand Memory Case to iPhone
1Insert your iPhone into the iXpand Memory Case.
2Chose the content area you wish to explore (photos, videos, music)
3Press “Select” button to choose the files from the iXpand Memory Case.
4Press at the bottom of the screen.

5Choose “Save image” if you’re copying iOS-supported photos and videos only,
choose “Save Images/Videos” to save them to the Camera Roll. For example, if
you have a power point file stored on the Memory case, and want to transfer it
to the iPhone, it will be stored in the App’s internal memory.
6The selected files will be saved to your phone.

Transfer files between PC and iXpand Memory Case
To transfer files between your iXpand Memory Case and computer simply plug the
iXpand Memory Case using the included micro USB to USB cable into your
computer’s USB port.
1In the AutoPlay window, click Open folder to view files:
2Drag and drop music, videos, photos, and documents between your computer
and the iXpand Memory Case window.
Transfer files between Mac computer and iXpand Memory Case
To transfer content between your iXpand Memory Case and Mac computer:

1Plug your iXpand Memory Case into your Mac computer’s USB port by connecting
the simply plug the iXpand Memory Case using the included micro USB to USB
cable into your computer’s USB port.
2Drag and drop music, videos, photos, and documents between your Mac
computer and the iXpand Memory Case window.

Delete files
1Insert your iPhone into the iXpand Memory Case.
2Press and choose the files you’d like to delete from the iXpand Memory
Case.
3Press at the bottom of the screen.
4A progress bar will appear to show the deletion progress.
You can swipe left on a file icon in list view and choose “delete” to easily remove
individual files.
Swipe Le , then delete
Other manuals for iXpand
6
Table of contents