Surtek SAG532 User manual

SAG532
Soplo-Aspiradora a Gasolina
Gas Blower-Vacuum
ATENCIÓN: Lea, entienda y siga las instrucciones de seguridad contenidas en este
manual, antes de operar esta herramienta.
WARNING: Read, understand and follow the safety rules in this manual, before operating this tool.
Manual de Usuario y Garantía.
User’s Manual and Warranty.
SAG532 manual.indd 1 08/06/16 2:58 p.m.

ENGLISHESPAÑOL
Introduction
General safety rules
Specific safety rules
Features
Operation instructions
Maintenance
Troubleshooting
Technical data
Warranty policy
Introducción
Normas generales de seguridad
Normas específicas de seguridad
Características
Instrucciones de operación
Mantenimiento
Solucionador de problemas
Especificaciones técnicas
Garantía
10
10
10
11
13
14
15
15
16
3
3
4
4
6
8
8
9
16
CONTENIDO CONTENT
2
SAG532 manual.indd 2 08/06/16 2:58 p.m.

3
ESPAÑOL •Manual de Usuario
INTRODUCCIÓN
Este producto tiene características que harán
su trabajo más rápido y fácil. Seguridad, como-
didad y confiabilidad fueron previstos como
prioridad para el diseño del mismo, haciendo
más fácil su mantenimiento y operación.
ADVERTENCIA: Lea atentamente el manual
antes de intentar usar este producto. Asegúre-
se de prestar atención a todas las advertencias
y las precauciones a lo largo de este manual.
NORMAS GENERALES DE SEGURIDAD
ADVERTENCIA: Lea y entienda todas las
instrucciones. El no seguir las instrucciones
listadas abajo puede resultar en una descarga
eléctrica, fuego y/o lesiones personales serias.
GUARDE ESTAS INSTRUCCIONES PARA
FUTURAS REFERENCIAS
ADVERTENCIA: Al utilizar la unidad, para
reducir el riesgo o lesiones personales graves
y daños a la unidad siempre se debe de seguir
las instrucciones y precauciones básicas de se-
guridad, incluyendo las que se mencionarán a
continuación.
NOTA: Lea estas instrucciones antes de utilizar
este producto y guardelas para futuras refe-
rencias.
• No permita que niños o personas no capacita-
das utilicen la unidad.
• No encienda o haga funcionar el motor en
un área cerrada, inhalar los gases del escape
puede ser mortal.
• Use ropa de trabajo, esta le proporciona-
rá protección durante el uso de su máquina,
como pantalones largos y gruesos, botas de
seguridad, guantes de trabajo pesado, casco,
careta o gafas de seguridad y tapones para los
oídos.
• Mantenga a niños, espectadores, y animales
a un mínimo de 50 pies (15 m) de distancia.
Apague la unidad inmediatamente si estos se
acercan.
• Para reducir el riesgo de lesiones asociadas a
objetos que puedan ser atraidos a las piezas gi-
ratorias, no use ropa suelta, bufandas, collares
u otros articulos similares. Sujete el cabello lar-
go por arriba del nivel del hombro para evitar
que se enrede en las piezas giratorias.
• No haga funcionar esta unidad si está can-
sado, enfermo o bajo la influencia de alcohol,
drogas o medicamentos.
• No trabaje con la máquina en condiciones de
poca luz.
• Manténgase alejado de toda pieza móvil y
superficies caliente de la unidad.
• Use una máscarilla con filtro en condiciones
de mucho polvo para reducir el riesgo de lesio-
nes causadas por la inhalación de polvo.
• Verifique el área de trabajo antes de cada
uso. Retire objetos solidos como piedras, vidrio
roto, clavos, alambre o cuerda que puedan salir
disparados o sean succionados a la máquina.
• Mantenga una posición firme y equilibrada.
No trabaje por fuera de su alcance, tratar de
hacerlo puede ocasionar pérdida del equilibrio
o exponerlo a las superficies calientes de la má-
quina.
• Cumpla con todas las normas de prevención
de incendios. Nunca opere la unidad sin pro-
tección anti-chispas; esta pantalla se encuentra
en el interior del silenciador (mofle).
• Para reducir el riesgo de fuego y quemadu-
ras, maneje con cuidado el combustible. Es al-
tamente inflamable.
• Vacíe el tanque de combustible y no mueva
la máquina antes de transportarla en un vehí-
culo.
• Apague la unidad antes de colocarla en el
piso.
• Antes de guardar, permita que el motor se
enfríe.
• No fume mientras maneje combustible.
• Mezcle y guarde el combustible en un reci-
piente aprobado.
• Mezcle el combustible en exteriores donde
no haya chispas ni llamas.
• Posicionees en un área despejada, apague el
motor y permita que se enfríe antes de reabas-
tecer de combustible.
• Afloje la tapa del combustible lentamente
para aliviar presión y así evitar que se escape
combustible por la tapa.
• Apriete bien el tapón del combustible des-
pués de reabastecer.
• Limpie el combustible derramado de la uni-
dad. Muevase a 30 pies (9 m) de distancia del
sitio de reabastecimiento de combustible antes
de arrancar el motor.
• Nunca intente quemar el combustible derra-
mado en ningún caso.
SAG532 manual.indd 3 08/06/16 2:58 p.m.

• Mantenga la unidad según las instrucciones
de mantenimiento de este manual.
• Inspeccione la unidad antes de cada uso para
verificar que no haya tornillos flojos, fugas de
combustible etc., sustituya las piezas dañadas.
NORMAS ESPECÍFICAS DE SEGURIDAD
• No haga funcionar la máquina en la moda-
lidad de aspiradora sin bolsa de aspirado ins-
talada; residuos que puedan ser expulsados
podrían causar lesiones graves. Siempre cierre
la bolsa de aspirado completamente antes de
operar.
• Siempre sujete la sopladora con la mano de-
recha, consulte las instrucciones de funciona-
miento de este manual.
• Para reducir el riesgo de pérdida auditiva aso-
ciada con el nivel de ruido, utilice protección
auditiva.
• La rotación de las aspas del ventilador pue-
den causar lesiones graves. Pare el motor antes
de abrir la puerta de aspirado o instale/cambie
las extensiones o partes. No coloque las manos
o cualquier otro objeto en los tubos de aspira-
do mientras se instalan en la unidad.
• Para reducir el riesgo de lesiones causadas
por contacto con las piezas giratorias, detenga
el motor antes de instalar o remover acceso-
rios. No utilice la máquina sin las guardas colo-
cadas en su lugar. Siempre desconecte la bujía
antes de hacer cualquier mantenimiento o al
tener contacto con las partes móviles.
• No apunte la boquilla de la sopladora hacia
personas o mascotas.
• Nunca haga funcionar la unidad sin el equi-
po adecuado instalado; cuando se utiliza como
una sopladora, instale siempre los tubos del
soplador, cuando lo utilice en la modalidad de
aspiradora siempre instale los tubos y la bolsa
de aspirado. Asegúrese de que la bolsa de la
aspiradora esté completamente sellada cuando
la unidad está en funcionamiento para evitar
que los residuos salgan disparados.
• Evite situaciones que causen que la bolsa
de aspirado se queme; no la utilice cerca de
flamas, como fogatas o incendios. No aspire
cenizas calientes de la chimenea, parrillas de
barbacoa, etc. No aspire habanos o cigarros
desechados a menos que las cenizas estén com-
pletamente frías.
CARACTERÍSTICAS
CONOZCA SU HERRAMIENTA
Antes de intentar usar este producto, familiarí-
cese con todas sus características de operación
y requerimientos de seguridad.
1. INTERRUPTOR ENCENDIDO/APAGADO.
2. MANGO PRINCIPAL.
3. MOTOR.
4. TUBO SUPERIOR.
5. BOQUILLA.
6. BOQUILLA AMPLIA BARREDORA.
7. ARRANCADOR.
8. TAPA DE COMBUSTIBLE.
9. BUJÍA.
10. CEBADOR.
11. ABRAZADERA DE TUBO.
12. DEPÓSITO DE COMBUSTIBLE.
13. AHOGADOR.
14. FILTRO DE AIRE.
15. GATILLO DE ACELERACIÓN.
16. CUBIERTA.
17. TUBO DE ASPIRADO SUPERIOR.
18. TUBO DE ASPIRADO INFERIOR.
ENSAMBLE Y AJUSTES
Retire con cuidado el soplador y los accesorios
de la caja. Asegúrese de que todos los artículos
de la lista estén dentro del empaque. Inspec-
cione el soplador y asegurese de que no haya
ninguna rotura o daño durante el envío.
1
9
7
8
15
10
12
14
13
11
16
17
18
2
3
4
5 6
4
SAG532 manual.indd 4 08/06/16 2:58 p.m.

5
ESPAÑOL •Manual de Usuario
ADVERTENCIA: Si faltan piezas, no haga
funcionar la unidad hasta que las piezas no
hayan sido reemplazadas. El incumplimiento
de esta advertencia puede causar lesiones cor-
porales serias.
ENSAMBLADO
ADVERTENCIA: Pare el motor y ponga el in-
terruptor en posición “STOP” antes de instalar
las piezas, realizar ajustes, limpieza, o cuando
no esté en uso. El incumplimiento de esta ad-
vertencia puede causar lesiones corporales se-
rias.
MONTANDO LOS TUBOS DE LA SOPLADORA
1. Enrosque la boquilla en
el tubo superior y apriete
bien. Verifique que este
bien apretado depues del
encendido inicial, vuelva a
apretar si es necesario.
2. Coloque la abrazade-
ra alrededor del cuello de
salida de la carcasa del so-
plador. Aun no apriete la
tuerca de mariposa.
3. Alinee la pestaña de
bloqueo del tubo superior
del soplador con la ranura
de la salida en la carcasa;
empuje el tubo a la carca-
sa. Gire para que encaje
en su lugar.
4. Rote el tubo para que
la boquilla se encuentre
apuntando hacia arriba
(barredor).
En seguida apriete la tuerca mariposa.
5. Para retirar los tubos, aflojar la tuerca de
mariposa de la abrazadera. Girar los tubos para
desbloquear, los retirará de la salida de la car-
casa del soplador.
INSTALANDO LA BOLSA DE ASPIRADO
1. Retire de la sopladora,
el tubo de la boquilla y el
tubo superior.
2. Abra el cierre de la
bolsa y coloquelo en el
adaptador como se mues-
tra en la foto.
3. Alinee la pestaña de
bloqueo del adaptador
con la bolsa en la ranura
en la salida de la carcasa
del soplador; empuje el
adaptador en la salida de
la carcasa. Gire para colo-
carlo en su lugar.
4. Apriete la tuerca de mariposa.
5. Gire el ensamble para que el codo quede
hacia la derecha.
6. Asegúrese de que la bolsa de la aspiradora
esté cerrada antes de encender la unidad.
ENSAMBLE DEL TUBO DE ASPIRADO
Para ensamblar los tubos
de aspirado
1. Inserte el tubo de aspi-
rado inferior en el tubo de
aspirado superior y aprie-
te con el tornillo propor-
cionado.
2. Afloje la perilla de la
puerta de la cubierta de
entrada y abrala. Coloque
la muesca en el brazo de
soporte del tubo de aspi-
rado superior.
3. Empuje el tubo de aspi-
rado superior en la carcasa
del soplador.
4. Alinee el tubo de aspirado superior con los
orificios en la carcasa, coloque los tornillos y
aprietelos bien.
Para desinstalar los tubos de aspirado:
1. Afloje la perilla de tubo de aspirado supe-
rior.
2. Desinstale los tubos de aspirado de la carcasa
del soplador (modalidad de aspiradora).
3. Cierre la cubierta de entrada y apriete la pe-
rilla con firmeza.
SAG532 manual.indd 5 08/06/16 2:58 p.m.

LLENADO DE COMBUSTIBLE
MEZCLA DE COMBUSTIBLE
Use una mezcla de gasolina sin plomo con acei-
te para motor de 2 tiempos. Mezcle gasolina y
aceite a una proporción de 40:1.
ADVERTENCIA: Nunca utilice solamente
gasolina en su unidad. Esto puede ocasionar
daños permanentes. Nunca utilice una mezcla
de combustible que haya permanecido almace-
nada por más de 90 días.
ADVERTENCIA: Se recomienda el uso de
aceite para motor de 2 tiempos grado pre-
mium con una proporción de 40:1, no debe de
utilizar ningun aceite para motor de 2-tiem-
pos, que indique como recomendación, una
mezcla con una proporción de 100:1
Si la causa de daños en el motor es debido a
una lubricación insuficiente, la garantía no
procederá.
• Agregue el aceite a un contenedor de gasoli-
na adecuado, permitiendo la distribución de la
mezcla de gasolina con aceite. Agitar el conte-
nedor para asegurar la mezcla adecuada.
• Afloje el tapón del depósito de combustible
y vierta la mezcla.
• Tenga cuidado de no derramar la mezcla, si
un derrame ocurre, límpielo con un trapo lim-
pio.
• Arranque el motor al menos a tres metros de
distancia de la zona donde se ha abastecido el
depósito de combustible con el fin de evitar
cualquier riesgo de incendio.
PELIGRO DE INCENDIO O QUEMADURAS
• Siempre extreme precauciones al manejar
combustible. El combustible es altamente in-
flamable.
• Nunca intente abastecer combustible si los
componentes del sistema de combustión, están
dañados o con fugas.
• Nunca intente reabastecer combustible mien-
tras el motor está en funcionamiento o que
aún se encuentre caliente. Deje que el motor
se enfríe antes de reabastecer.
• Nunca fume ni encienda algún tipo de fuego
cerca de la máquina.
• Siempre transporte y guarde el combustible
en el recipiente proporcionado.
• Nunca coloque material inflamable cerca del
escape del motor.
• Nunca opere la sopladora sin un escape que
funcione correctamente y el anti-chispas insta-
lado.
• Nunca opere la soplo-aspiradora si no está
completamente ensamblada y en buenas con-
diciones.
• No use gasolina que contenga etanol o meta-
nol, ya que puede dañar los conductos de com-
bustible y otras partes del motor.
• Mezcle el combustible lo suficiente de acuer-
do a sus necesidades. Si el combustible se debe
almacenar más de 30 días, debe primero ser
tratado con un estabilizador o un producto
similar.
INSTRUCCIONES DE OPERACIÓN
ENCENDIENDO/APAGANDO EL MOTOR
ENCENDIDO
NOTA: El método de encendido del soplo-aspi-
rador variará dependiendo de si el motor está
frío o caliente.
1. Mueva el interruptor de
apagado, a la posición de
encendido.
2. Mueva hacia arriba la
palanca del cebador a la
posición de inicio (arran-
que en frío).
NOTA: El paso 2 no es ne-
cesario si el motor ya está
caliente.
3. Presione el botón de
cebado 8 veces, hasta que
la mezcla de combustible
fluya dentro y fuera de la
manguera de desalojo si-
tuada encima del depósito
de combustible.
4. Jale el arrancador de
retroceso de 2 a 3 veces
hasta que escuche que el
motor encienda.
5. Empuje hacia abajo la
palanca del ahogador a la
posición de marcha (arran-
que en caliente).
6. Si en este paso el motor
no enciende, jale el arran-
cador las veces necesarias
para encender el motor.
6
SAG532 manual.indd 6 08/06/16 2:58 p.m.

7
ESPAÑOL •Manual de Usuario
7. Deje que el motor fun-
cione en vacío durante al
menos 10 segundos para
que se caliente.
APAGADO
1. Suelte el gatillo de ope-
ración y deje que el motor
funcione al vacío durante
unos momentos.
2. Mueva el interruptor
de apagado a la posición
marcada “STOP”.
3. El motor ahora se de-
tendrá.
OPERACIÓN
OPERACIÓN DEL SOPLADOR
Su SOPLADOR SURTEK fue diseñado para eli-
minar fácilmente los desechos de los patios,
pasillos, césped, arbustos y zonas de difícil ac-
ceso o donde los desechos puedan acumularse
fácilmente.
ADVERTENCIA: Antes de utilizar el sopla-
dor, revise las precauciones de seguridad en
este manual del usuario y siga todas las reglas
de seguridad para la operación de la unidad.
Estas precauciones y reglas de seguridad son
para la protección del usuario.
PRECAUCIÓN: Sostenga el soplador de ma-
nera que los gases que salen del escape no da-
ñen la ropa ni sean inhalados por el operador.
• NO OPERE el soplador con personas o anima-
les cerca del área de trabajo. Permita que haya
una distancia mínima de 9 m (30 pies).
• Opere lejos de escombros, a una distancia que
fácilmente le permita controlar la dirección de
soplado de los desechos. No sople estos escom-
bros en dirección de personas o animales.
MODO DE ASPIRADOR
ADVERTENCIA: NUNCA ponga en marcha
en modo de aspirado sin la bolsa correctamen-
te instalada. Desechos pueden salir volando y
así causar daños al operador y personas o ani-
males aledaños. Asegúrese siempre de cerrar
adecuadamente la bolsa o se ecuentre cerrada
antes de operar la maquina.
No aspire cenizas de las chimeneas o parrillas
al aire libre a menos que estas se encuentren
totalmente frías. No aspirar desechos de puros
o cigarrillos si no están totalmente apagados.
No haga funcionar la unidad cerca de llamas
o flamas.
PRECAUCIÓN: Esta unidad está diseñada
para aspirar residuos tales como hojas, peque-
ños trozos de papel, pequeñas ramas, hierbas,
residuos de césped, etc. NO utilice esta unidad
para cualquier otro propósito.
No trate de aspirar piedras, vidrios rotos, bo-
tellas, latas u otros objetos de este tipo. Puede
causar daños a la unidad, así como al operador.
1. Siga las instrucciones de ensamble y encendi-
do tal y como se explican en los procedimientos
de ensamble y encendido previamente mencio-
nados.
2. Tenga su unidad en modo de aspirado, colo-
quese el arnés por sobre el hombro y ponga la
correa de la bolsa de aspiración por encima del
otro hombro.
PRECAUCIÓN: No permita que la correa del
hombro llegue a cubrir, bloquear o entre en
contacto con el escape ya que el escape disper-
sa gases durante la operación. Adicionalmente
el escape produce calor y puede quemar, fun-
dir, o provocar daños a cualquier parte de la
unidad o al operador mismo.
3. Coloque su mano izquierda sobre la parte
superior derecha y manejar por sobre el cos-
tado.
PRECAUCIÓN: Para evitar la obstrucción
del tubo de aspiracion NO force la máquina o
succione colocando el tubo directamente sobre
una pila de desechos.
EN EL CASO DE OCURRIR UN BLOQUEO
• Para desbloquearlo encienda el motor, deje
que la bolsa se llene de aire y comprima la
bolsa de aspirado, esto provocará que aire se
expulse al invertir el flujo de aire esto suele
ser suficiente para la mayoría de desalojos por
bloqueos.
NOTA: Si la obstrucción no puede ser limpiada
por compresión de la bolsa en vacío, siga este
procedimiento:
1. Retire e inspeccione los tubos de vacío y re-
mueva el bloqueo.
2. Limpie cuidadosamente la boquilla.
3. Vuelva a instalar los tubos de aspirado.
ATENCIÓN: NUNCA ponga en marcha la
soplo-aspiradora sin el filtro de aire ya que po-
dría provocar que el polvo y la suciedad sean
SAG532 manual.indd 7 08/06/16 2:58 p.m.

arrastradas hacia el motor, lo que producirá se-
rios daños. El filtro de aire se debe mantener
libre. En caso de que se dañe instale un filtro
nuevo.
MANTENIMIENTO
ADVERTENCIA: Use accesorios de repuesto
originales de fábrica. Caso contrario se pueden
producir lesiones serias y resultados pobres.
SUSTITUCIÓN Y LIMPIEZA DEL FILTRO DE AIRE
Para un funcionamiento correcto y una larga
vida, mantenga el filtro de aire limpio.
1. Abra la tapa del filtro
de aire, empujando hacia
abajo.
2. Quite el filtro de aire y
límpielo en agua tibia con
jabón. Deje que se seque
completamente. Para un
mejor rendimiento, susti-
tuya el filtro de aire anual-
mente.
3. Instale nuevamente el
filtro de aire en la base del
filtro.
4. Coloque la tapa en su lugar. Empuje el pesti-
llo en la ranura y asegurese de que la cubierta
esté posicionada e instalada propiamente.
LIMPIAR EL FILTRO DEL COMBUSTIBLE
1. El depósito de combus-
tible está equipado con un
filtro.
2. El filtro está situado
en el extremo del tanque
del tubo de combustible
y puede sacarse con un
gancho de alambre o algo similar.
3. Revise el filtro de combustible periódica-
mente. No permita que polvo entre en el tan-
que de combustible. Un filtro obstruido puede
causar dificultades para arrancar el motor o
anomalías en el desempeño del motor.
4. Cuando el filtro esté sucio, reemplacelo.
5. Cuando el interior del depósito de combus-
tible esté sucio, puede limpiarlo enjuagándolo
con gasolina.
REVISIÓN DE LA BUJÍA
1. Revise la bujía cada 10-
15 horas de uso.
2. Retire la cubierta de la
bujía.
3. Utilice la llave de bu-
jías para retirarla girando
en sentido contrario a las
agujas del reloj.
4. Limpiar y ajustar la dis-
tancia entre electrodos a
0,6 - 0,7 mm.
5. Reemplace una bujía
dañada o visiblemente des-
gastada con una nueva.
6. Instale la bujía en cabezal del cilindro y lue-
go aprietela firmemente con la llave.
BOLSA DE LA ASPIRADORA
Un saco sucio reduce el rendimiento. Para lim-
piar la bolsa volteela y sacúdala. Lave la bolsa
con agua jabonosa. Limpie la bolsa por lo me-
nos una vez al año.
SOLUCIONADOR DE PROBLEMAS
PÉRDIDA DE POTENCIA O PARO REPENTINO
DEL MOTOR
• Compruebe que el depósito de combustible
esté vacío.
• La mezcla no llega al carburador. Limpie el
filtro de combustible en el depósito de com-
bustible.
• Hay agua en la mezcla. Drene y enjuague el
sistema del combustible.
• El filtro de aire está sucio. Limpie el filtro de
aire.
• Hay depósitos de carbón en el tubo de escape
del cilindro o el escape. Límpielas o cambie el
mofle.
ARRANCANDO UN MOTOR AHOGADO
• Desconecte el cable de la bujía y utilice la lla-
ve para quitarla, gire en el sentido de las agu-
jas del reloj.
• Si la bujía está dañada o empapada de com-
bustible, limpie o reemplace la bujía según sea
necesario.
• Drene el exceso de combustible de la cámara
de combustión jalando la soga de encendido del
motor varias veces mientras no tenga la bujía.
8
SAG532 manual.indd 8 08/06/16 2:58 p.m.

9
ESPAÑOL •Manual de Usuario
• Instale la bujía y apriétela firmemente con la
llave.
• Repita el procedimiento de arranque, como
si el soplador estuviese previamente en funcio-
namiento.
SI EL MOTOR NO SE DETIENE
• Si el motor continúa funcionando después
de posicionar el interruptor en la posición OFF
de apagado, detenga el motor moviendo la
palanca del ahogador a la posición completa-
mente cerrada. Si esta condición persiste, lleve
su sopladora a un centro de servicio autorizado
para su mantenimiento, antes de usarla nue-
vamente.
ESPECIFICACIONES TÉCNICAS
CILINDRADA
CAPACIDAD DEL TANQUE
DE COMBUSTIBLE
VELOCIDAD EN VACÍO
VELOCIDAD DEL AIRE
VOLÚMEN DEL AIRE
PESO
CAPACIDAD DE COLECTOR
32 cc
500 ml
7 000 r/min
200 Km/h
353 CFM (10 m³/min)
7,5 kg (16,5 lb)
40 L
SAG532 manual.indd 9 08/06/16 2:58 p.m.

INTRODUCTION
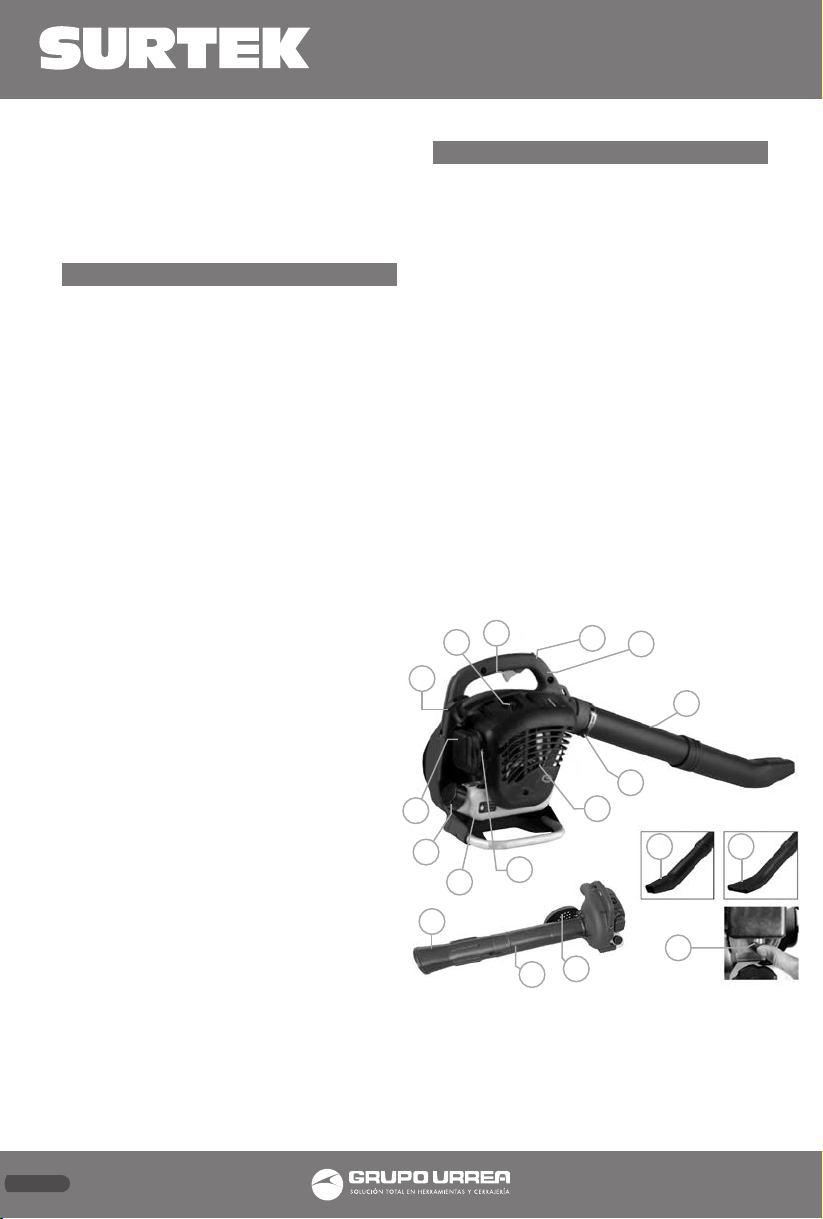
Your unit has many features that will make
your job faster and easier. Safety, performance
and reliability have been given top priority in
the design of this tool, qualities to make easy
to maintain and to operate.
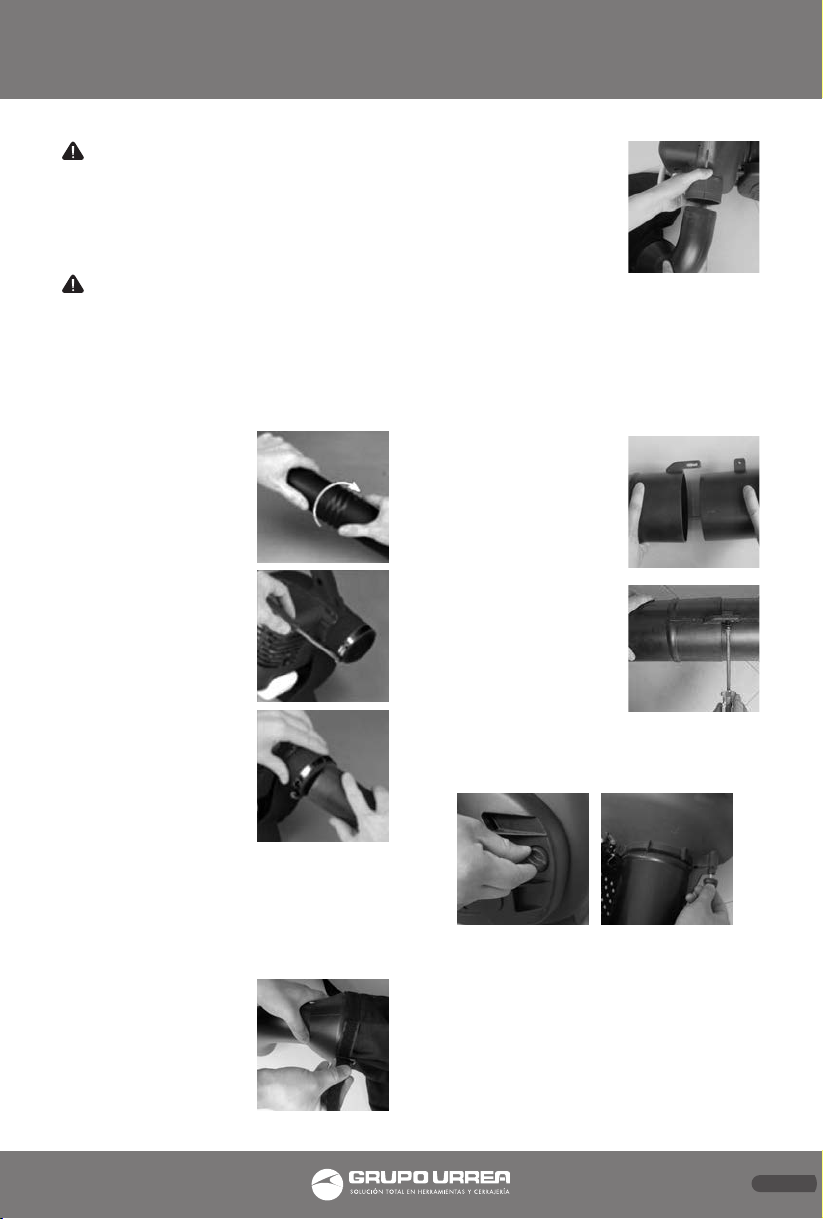
WARNING: Carefully read the entire man-
ual before attempting to use this tool. Make
sure to pay special attention to the safety rules
and indications, plus all the warnings and cau-
tions of this manual.
GENERAL SAFETY RULES
WARNING: Read and understand all in-
structions. Failure to follow all indications list-
ed below, may result in electric shock, fire and/
or serious personal injury.
SAVE THESE INSTRUCTIONS.
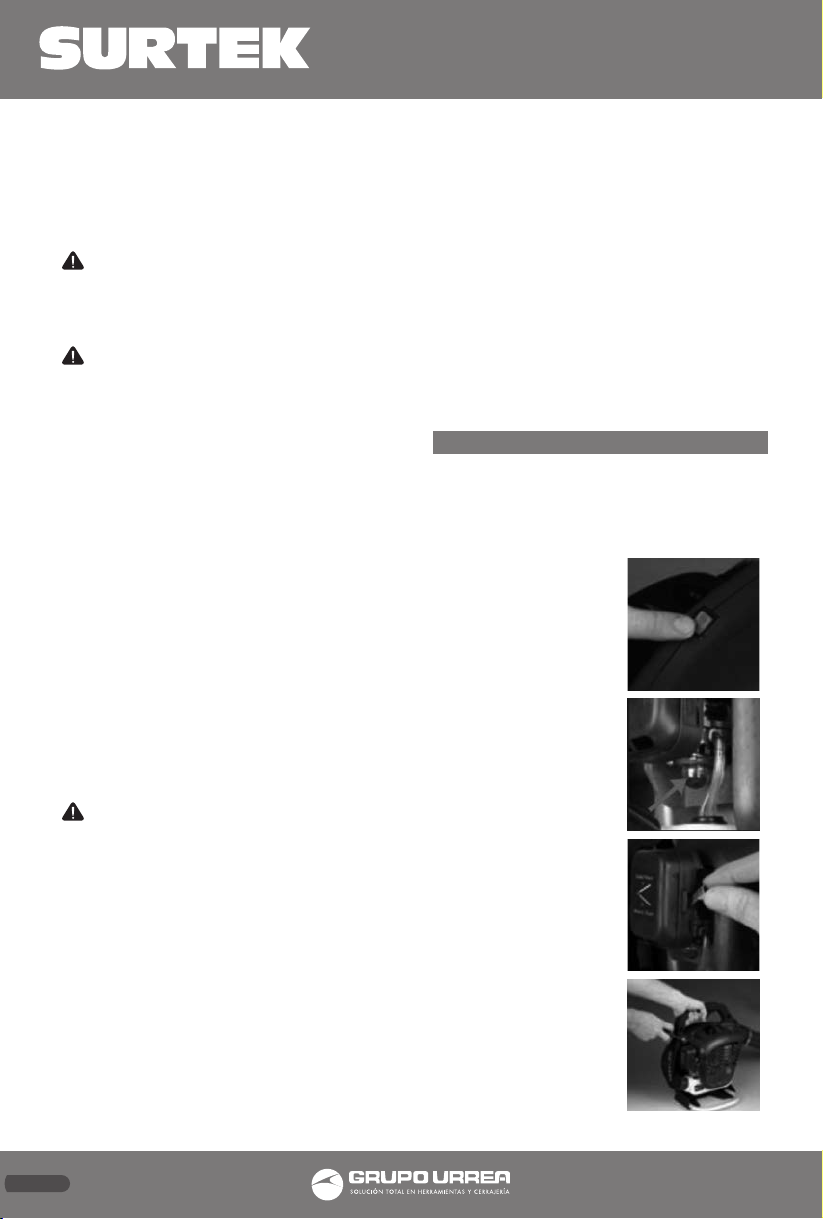
WARNING: When using the unit, basic safe-
ty precaution, including the following, should
always be followed to reduce the risk or seri-
ous personal injury and damage to the unit.
NOTE: Read all these instruction before oper-
ating this production and save this instruction.
Do not allow children or untrained individuals
to use the unit.
• Do not start or run the engine in a closed
area; breathing exhaust fumes can kill.
• Wear clothes fitting, tough work clothing
that will provide protection. Such as heavy
long pants, safety work shoes, heavy duty work
gloves, hard hat, a safety face shield, or safety
glasses for eyes protection and ear plugs for
hearing protection.
• Keep children, bystander, and animals 50 feet
(15m) away. If approached stop unit immedi-
ately.
• To reduce the risk of injury associated with
objects being drawn into the rotating parts, do
not wear loose clothing, scarves, necklace, and
the like. Secure long hair so it is above shoulder
level to prevent entanglement in any rotating
parts.
• Do no operate this unit when you are tired,
ill, or under the influence of alcohol, drugs, or
medication.
• Do not operate in poor lighting.
• Keep all parts of your body away from any
moving parts and all hot surfaces of the unit.
Wear a face filter mask in dusty conditions to
reduce the risk of injury associated with the in-
halation of dust.
• Check the work area before each use. Re-
move all objects such as rocks, broken glass,
nails, wire, or string which can be thrown or
became entangled in the machine.
• Keep firm footing and balance. Do no over-
reach. Overreaching can result in loss of bal-
ance or exposure to hot surfaces.
• Comply with all fire prevention regulations.
Compliance with all local, state, or federal laws
is the user’s responsibility. Never operate the
unit without a spark arrestor screen; this screen
is located inside the muffler.
• To reduce the risk of the fire and burn injury,
handle fuel with care. It is highly flammable.
• Empty fuel tank and restrain the unit from
moving before transporting in a vehicle.
• Turn the unit off before setting it down.
• Before storing, allow the engine cool.
• Do not smoke while handling fuel.
• Mix and store fuel in a container approved
for gasoline.
• Mix fuel outdoors where there is no sparks
or flames.
• Select bare ground, stop engine, and allow
cool before refueling.
• Loosen fuel cap slowly to release pressure
and to keep fuel from escaping around the
cap.
• Tighten the fuel cap securely after refueling.
• Wipe spilled fuel from the unit. Move 30 feet
(9 m) away from refueling site before starting
engine.
• Never attempt to burn off spilled fuel under
any circumstance.
• Maintain the unit per maintenance instruc-
tions in this Operator’s Manual.
• Inspect the unit before each use for loose fas-
teners, fuel leaks, etc. Replace damaged parts.
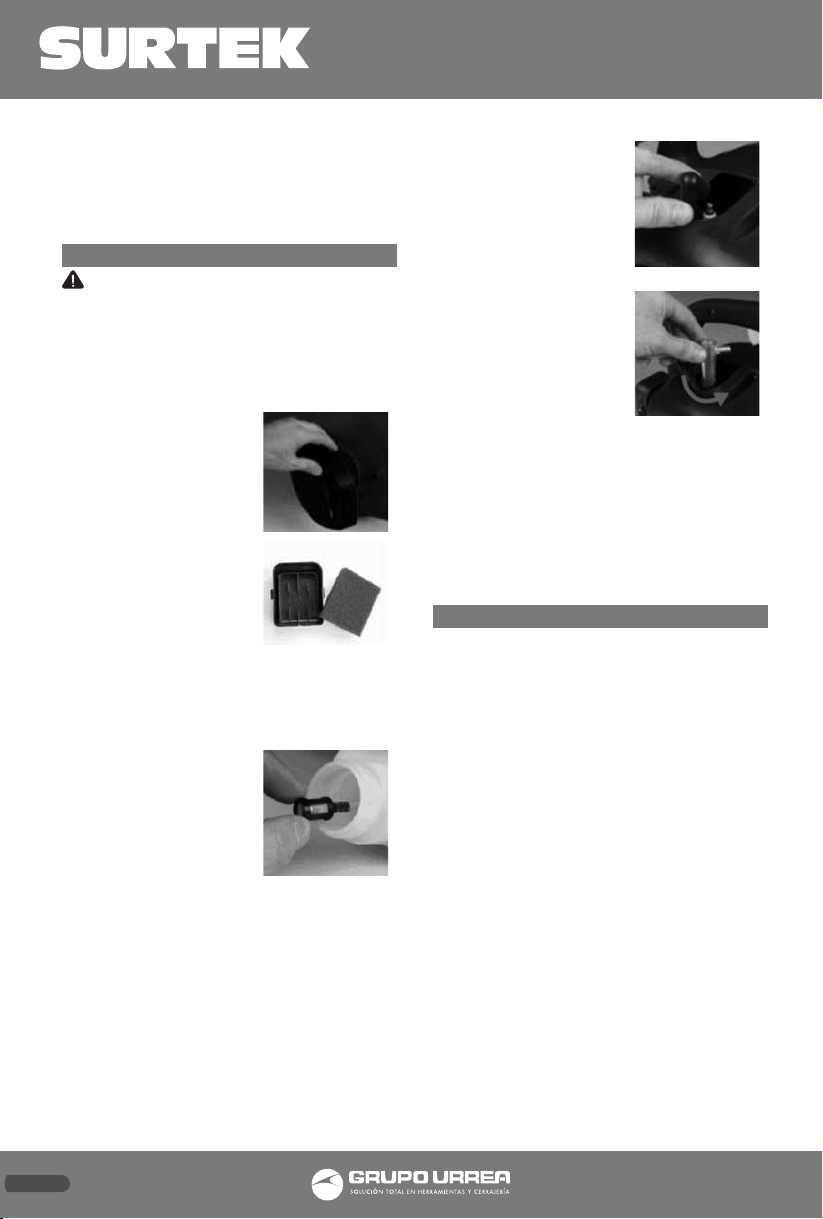
SPECIFIC SAFETY RULES
• Do not operate vacuum without vacuum
bag installed; flying debris could cause serious
injury. Always close vacuum bag completely
before operating.
10
SAG532 manual.indd 10 08/06/16 2:58 p.m.

• Always hold the blower in your right hand,
refer to the Operation Instructions in this
manual.
• To reduce the risk of hearing loss associ-
ated with sound level, hearing protection is
required.
• Rotating impeller blades can cause severe
injury. Stop the engine before opening the vac-
uum door or installing/changing tubes. Do not
put hands or any other object into the vacuum
tubes while they are installed on the unit.
• To reduce the risk of injury associated with
contacting rotating parts, stop the engine
before installing or removing attachments. Do
not operate without guard in place. Always
disconnect the spark plug before performing
maintenance or accessing any movable parts.
• Do not point the blower nozzle in the direc-
tion of people or pets.
• Never run the unit without the proper
equipment attached. When used as a blower,
always install the blower tubes. When used
as a vacuum always install the vacuum tubes
and vacuum bag. Make sure the vacuum bag is
completely zipped when the unit is running to
avoid flying debris.
• Avoid situations that could catch the vacuum
bag on fire. Do not operate near an open
flame. Do not vacuum warm ash from fire-
place, barbeque pits, etc. Do not vacuum dis-
carded cigars or cigarettes unless the cinders
are completely cool.
FEATURES
KNOW YOUR TOOL
Before attempting to use this product, become
familiar with all of its operating features and
safety requirements.
1. ON/OFF SWITCH.
2. MAIN HANDLE.
3. MOTOR.
4. UPPER TUBE.
5. DIRECT NOZZLE.
6. WIDE SWEEPER NOZZLE.
7. RECOIL STARTER.
8. PETROL CAP.
9. SPARK PLUG.
10. PRIMER.
11. TUBE LOCKING CLAMP.
12. FUEL TANK.
13. CHOKE.
14. AIR FILTER.
15. THROTTLE TRIGGER.
16. INLET COVER.
17. UPPER VACUUM TUBE.
18. LOWER VACUUM TUBE.
ASSEMBLY & ADJUSTMENTS
Carefully remove the blower and accessories
from the box. Make sure that all items listed
in the packing list are included. Inspect the
blower carefully to make sure no breakage or
damage occurred during shipping.
WARNING: If any parts are missing do not
operate the unit until the missing parts are re-
placed. Failure to do so could result in possible
serious personal injury.
ASSEMBLY
WARNING: Stop the engine and put the
switch to “STOP” place before installing parts,
making adjustments, cleaning, or when not in
use. Failure to do so could result in possible
serious personal injury.
ASSEMBLING THE BLOWER TUBES
1. Screw the nozzle onto upper blower tube
and tighten securely. Check tightness after ini-
tial run and retighten if needed.
ENGLISH •User's manual
11
1
9
7
8
15
10
12
14
13
11
16
17
18
2
3
4
5 6
SAG532 manual.indd 11 08/06/16 2:58 p.m.

2. Place clamp around the
neck of the blower hous-
ing outlet. Do not tighten
the wing nut yet.
3. Align the locking tab
on upper blower tube
with the slot in the blower
housing outlet; push the
tube into the housing.
Twist to lock into place.
4. Rotate the tube so the
nozzle is pointing upward
as shown. Tighten the
wing nut securely.
5. To remove the tubes,
loosen the wing nut on
the clamp. Rotate the
tubes to unlock them
remove from the blower
housing outlet.
ASSEMBLING THE VACUUM BAG
1. Remove the nozzle and
upper blower tube from
the blower.
2. Unzip the vacuum bag
and place the adaptor in-
side as shown.
3. Align the locking tab on
the bag adaptor with the
slot in the blower housing
outlet; push the bag adap-
tor into the housing. Twist
to lock into place.
4. Tighten the wing nut
securely.
5. Rotate the vacuum bag until the shoulder
is upright.
6. Make sure the vacuum bag is zipped and
closed before starting the unit.
INSTALLING THE VACUUM TUBE
To install the vacuum tubes:
1. Insert the lower vacuum
tube into the upper vacu-
um tube and tighten them
with the screw provided.
2. Loosen the door knob
on the inlet cover and
open. Place the notch in
the support arm of the
upper vacuum tube.
3. Push the upper vacuum
tube into the blower
housing.
4. Align the upper vacuum
tube with the hole in the
housing and tighten se-
curely.
To remove the vacuum tubes
1. Loosen the upper vacuum tube knob.
2. Remove the vacuum tubes from the blower
housing.
3. Close the inlet cover door and tighten the
door knob securely.
FUELING
MOTOR FUEL
Use regular grade unleaded gasoline mixed
with 2-cycle engine oil. Use 40:1 mixing ratio.
WARNING: Never use straight gasoline in
your unit. This will cause permanent engine
damage and void the warranty for the prod-
uct. Never use a fuel mixture that has been
stored for over 90 days.
WARNING: Use a premium grade oil for
2-cycle air cooled engines mixed at a 50:1 ratio.
Do not use any 2-cycle oil product with a reco-
mended mixing ratio of 100:1. If insuficient
lubrication es the cause of engine damage, it
cause a void in the warranty.
• Add the oil to an approved fuel container
followed by the gasoline to allow incoming
gasoline to mix with oil. Shake the container
to ensure thorough mix.
• Unscrew the fuel tank cap and pour the mix-
ture into the tank with the aid of a funnel.
• Be careful not to spill any mixture. If this hap-
pens, wipe the spill with a clean rag.
• Start the engine at least three meters away
from the area where the fuel tank has been
filled up in order to avoid any risk of fire.
12
SAG532 manual.indd 12 08/06/16 2:58 p.m.

DANGER OF FIRE AND BURN INJURIES
• Always use extreme care when handling fuel.
Fuel is highly flammable.
• Never attempt to fuel the blower-vacuum if
the fuel system components are damaged or
are leaking.
• Never attempt the refuel the engine while it
is running or still warm, allow it to cool before
fueling.
• Never smoke or light any fires near the
blower or fuels.
• Always transport and store fuels in an ap-
proved container.
• Never place flammable material close the the
engine muffler.
• Never operate the blower-vac without a
properly functioning muffler and spark arres-
tor installed.
• Never operate the blower-vac unless it is
properly assembled and in good working con-
dition.
• Do not use petrol which contains ethanol or
methanol as it may damage the fuel lines and
other engine parts.
• Mix only enough fuel for your immediate
needs. If fuel must be stored longer than 30
days, it should first be treated with a stabilizer
or similar product.
OPERATION INSTRUCTIONS
STARTING AND STOPPING
START THE ENGINE
NOTE: Starting the product differs depending
on whether the engine is cold or warm.
1. Move the ignition
switch to the on position
marked I.
2. Move the choke lever
upwards to the start posi-
tion (cold start).
NOTE: This is not required
if the engine is already
warm.
3. Push the primer button
8 times, until the petrol/oil
mixture flows in and out
of the discharge hose lo-
cated above the fuel tank.
4. Pull the recoil starter 2-3
times until you hear the
engine starting.
5. Push the choke lever
down to the run position
(warm start).
6. The engine may start, or
it may be required to pull
on the recoil starter until
the engine starts.
7. Allow the engine to run
idle for around 10 seconds
to let it warm up.
TO STOP
1. Release the throttle trigger and allow the
engine to idle for a few moments.
2. Move the ignition switch to the off position
marked STOP.
3. The engine will now stop.
OPERATE THE BLOWER
Your SURTEK blower is designed to easily re-
move debris from patios, walkways, lawns,
bushes, etc., and many hard to reach areas
where debris may accumulate.
WARNING: Because of flying debris, always
wear approved shielded safety glasses or face
shield when operating blower. Before using
your blower, review the safety precautions
in your user manual, and all regulations for
operation of the unit. These precautions and
regulations are for your protection
CAUTION: Hold the blower so that hot ex-
haust does not damage clothing and is not in-
haled by operator.
• DO NOT operate the blower with other peo-
ple or animals in the i mmediate vicinity. Allow
a minimum of 30 ft (9 m) between operator
and other people or animals.
· Stand away from the debris, at a distance that
will easily allow you to control the direction of
blown debris. Never blow debris in direction of
bystanders.
ENGLISH •User's manual
13
SAG532 manual.indd 13 08/06/16 2:58 p.m.

VACUUM OPERATION
WARNING: Never operate vacuum without
vacuum bag properly attached, as flying debris
could cause injury to operator and bystanders.
Always make sure vacuum bag zipper is closed
before operating unit.
Do not vacuum ash from outdoor fireplaces or
barbecue pits unless cinders are cool. Do not
vacuum lighted smoking material such as dis-
carded cigars or cigarettes. Do not operate unit
near open flame.
CAUTION: This unit is designed to vacuum
up debris such as leaves, small bits of paper,
small twigs, weeds, grass clippings, etc. Do not
use this unit for any other purpose.
Do not attempt to vacuum rocks, broken glass,
bottles, tin cans or other such objects. Damage
to impeller and unit as well as operator injury
could result. If vacuum tube is level with or
above power unit, rocks or large objects may
be drawn into tube, damaging the impeller.
1. Follow correct starting procedures as ex-
plained in this manual.
2. Allow engine to return to idle. Put the shoul-
der harness on so the strap is over your right
shoulder. Put the vacuum bag strap on so it is
over your left shoulder.
CAUTION: Do not allow shoulder harness to
cover, block, or come in contact with exhaust
outlet during operation. The muffler gener-
ates heat and could burn, melt, or damage
harness strap.
3. Place your left hand on the top handle and
right hand on side handle.
CAUTION: To avoid clogging vacuum tube.
DO NOT force or place suction tube into a pile
of debris.
VACUUM TUBE CLOGGING
• To Unclog Vacuum Tube, turn engine “OFF”.
Promptly compress vacuum bag while it is still
inflated, expelling air out of the suction tube.
This reverse airflow is usually sufficient to dis-
lodge most obstructions.
NOTE: If the obstruction cannot be cleared by
compressing vacuum bag, follow this proce-
dure:
1. Remove and inspect vacuum tubes.
2. Carefully clean out nozzle.
3. Reinstall vacuum tubes.
MAINTENANCE
WARNING: Use only original manufacture’s
replacement parts, accessories and attach-
ment. Failure to do so can cause possible injury,
poor performance.
REPLACING AND CLEANING THE AIR FILTER
For proper performance and long life, keep air
filter clean.
1. Push down the cover of
the air filter.
2. Remove the air filter
and clean it in warm soapy
water. Let dry completely.
For best performance,
replace the air filter an-
nually.
3. Reinstall the air filter
into the filter base.
4. Push the cover back in
place. Push the latch back
into the slot and ensure
the cover is locked in
place.
CLEAN FUEL FILTER
1. Fuel tank is fitted with
a filter.
2. Filter is situated at the
free end of fuel pipe and
can be picked out through
fuel port with a piece of
hooked wire or the like.
3. Check the fuel filter periodically. Do not al-
low dust to enter the fuel tank. Clogged filter
will cause difficulty when starting engine or
abnormalities in engine performance.
4. When the filter is dirty, replace the filter.
5. When the inside of the fuel tank is dirty, you
can clean by rinsing the tank out with petrol.
CHECKING THE SPARK PLUG
1. Check the spark plug every 10-15 hours of
use.
2. Remove the spark plug
cover.
3. Use the spark plug
wrench to remove the
spark plug, by turning it
counter-clockwise.
14
SAG532 manual.indd 14 08/06/16 2:58 p.m.

ENGLISH •User's manual
15
4. Clean and adjust the
spark plug gap to 0.6 -
0.7mm.
5. Replace any damaged
or visibly worn plug with
a TORCH L8RTC or equiva-
lent spark plug.
6. Install the spark plug finger tight in the cyl-
inder head, and then tighten it firmly with the
spark plug wrench.
VACUUM BAG
A dirty bag will reduce performance. To clean
the bag, turn it’s inside out and shake. Wash
the bag in soapy water. Clean the bag at least
once a year.
TROUBLESHOOTING
POWER LOSS OR SUDDEN STOPPING OF THE
ENGINE
• Check whether the fuel tank is empty.
• The mixture does not reach the carburetor.
Clean the fuel filter in the fuel tank.
• There is water in the mixture. Drain and rinse
all the fuel system.
• The air filter is dirty. Clean the air filter.
• There are carbon deposits in the cylinder
exhaust pipe or the muffler. Clean those or
change the muffler.
STARTING A FLOODED ENGINE
• Disconnect the spark plug lead, and use the
plug wrench to remove the spark plug in a
counter clockwise direction.
• If the spark plug is fouled or is soaked with
fuel, clean or replace the plug as required.
• Clean excess fuel from the combustion cham-
ber by cranking the engine several times while
the spark plug is removed.
• Install the spark plug and firmly tighten it
with the spark plug wrench.
• Repeat the starting procedure as if the blow-
er was already warm.
IF THE ENGINE WON’T STOP
• If the engine continues to run after switch-
ing the on/off switch to off, stop the engine
by pushing the choke lever to the fully closed
position. If this condition continues, have the
blower serviced before using it again.
DISPLACEMENT
GAS TANK CAPACITY
NO LOAD SPEED
AIR SPEED
AIR VOLUME
WEIGHT
COLLECTOR CAPACITY
32 cc
500 ml
7 000 r/min
200 Km/h
353 CFM (10 m³/min)
7,5 kg (16,5 lb)
40 L
TECHNICAL DATA
SAG532 manual.indd 15 08/06/16 2:58 p.m.

SAG532
ESPAÑOL
POLIZA DE GARANTÍA
ENGLISH
WARRANT POLICY
Urrea Herramientas Profesionales S.A. de C.V.
Warranties this product for a period of 1 year in
its parts, components and manual labour against
any manufacture defect from the purchasing date.
Purchase date: ____/____/____
Product:____________________
Brand:______________________
Model:______________________
______________________________
Distributor seal and signature
Sold and Imported by:
Urrea Herramientas Profesionales S.A. de C.V.
km 11,5 Carretera A El Castillo, El Salto, Jalis-
co, México. C. P. 45680, Tel. (33) 3208 7900,
RFC UHP900402Q29
Terms:
In order to make warranty effective you must pres-
ent the product along with the warranty properly
fillled and signed to an authorized distributor or
service center.
Urrea Herramientas Profesionales S.A. de C.V.
will cover the transportation cost related to the
warranty.
This warranty is not applicable in the follow-
ing cases:
· When the product has not been used according
to normal conditions or natural wear of its parts.
· When the product has not been used according
with this user’s manual instructions.
· When the product has been fixed or modified by
unauthorized or unqualified person.
Urrea Herramientas Profesionales S.A. de C.V.
garantiza este producto por el termino de 1 año
en sus piezas, componentes y mano de obra con-
tra cualquier defecto de fabricación a partir de la
fecha de entrega.
Fecha de venta: ____/____/____
Producto: ___________________
Marca: ______________________
Modelo: ____________________
______________________________
Sello y firma de distribuidor
Comercializado e Importado por:
Urrea Herramientas Profesionales S.A. de C.V.
km 11,5 Carretera A El Castillo, El Salto, Ja-
lisco, México. C. P. 45680, Tel. (33) 3208 7900,
RFC UHP900402Q29
Condiciones:
Para hacer efectiva la garantía deberá presentar
el producto junto con la poliza de garantia debi-
damente firmada y sellada por el establecimiento
donde la adquirio, en cualquiera de los centros de
servicio autorizados.
Los gastos de transportación que se deriven del
cumplimiento de la garantía seran cubiertos por:
Urrea Herramientas Profesionales S.A. de C.V.
Esta garantía no será valida en los siguientes
casos:
· Cuando el producto haya sido utilizado en condi-
ciones distintas a las normales o al desgaste natu-
ral de sus partes.
· Cuando el producto no haya sido operado de
acuerdo al instructivo de uso que lo acompaña.
· Cuando el producto haya sido alterado o repara-
do por personas no autorizadas.
16
SAG532 manual.indd 16 08/06/16 2:58 p.m.
Table of contents
Languages:
Other Surtek Blower manuals