Suvie SUVIE01 User manual

Multi-Zone Cooking
and Refrigeration
www.suvie.com
This product is intended for HOUSEHOLD USE ONLY
FILLWATERABOVE THELINE
Model No. SUVIE01 User Manual

Model No. SUVIE011
IMPORTANT SAFETY INSTRUCTIONS
SAVE THESE INSTRUCTIONS
To reduce the risk of burns, electric shock, fire, or injury to
persons when using your Suvie, be sure to follow the basic
safety precautions in this section.
WARNING
Spilled food can cause serious burns. Keep the appliance and
cord away from children. Never drape the cord over the edge of a
counter, never use an outlet below the counter, and never use an
extension cord with this appliance.
When using electrical appliances, ALWAYS follow basic safety precautions including
all of the following:
1. Read all instructions.
2. Do not touch hot surfaces directly; use handles or knobs.
3. To protect against electrical shock do not immerse cord or plugs in water or
other liquid.
4. Close supervision is necessary when any appliance is used by or near children.
5. Unplug from outlet before cleaning. Allow to cool before inserting or removing
parts.
6. Do not operate any appliance with a damaged cord or plug or after the appliance
malfunctions or has been damaged in any manner. Contact help@suvie.com for
examination, repair, or adjustment.
7. The use of accessory attachments not recommended by the appliance
manufacturer may cause injuries.
8. Do not use outdoors.
9. Do not let the cord hang over the edge of a table or counter, or to touch hot
surfaces.
10. Do not place on or near a hot gas or electric burner, or in a heated oven.
11. Extreme caution must be used when moving an appliance containing hot oil or
other hot liquids.
12. Always attach plug to appliance first, then plug cord into the wall outlet. To
disconnect, turn any control to “off”, then remove plug from the wall outlet.
13. Do not use appliance for anything other than its intended use.
14. Use extreme caution when removing trays or disposing of hot water or grease.
15. Do not clean with metal scouring pads. Pieces can break off the pad and touch
electrical parts, creating a risk of electric shock.
16. Intended for countertop use only.

Model No. SUVIE01 2
FCC (Federal Communications Commission)
Note:
This equipment has been tested and found to comply with the limits for a
Class B digital device, pursuant to part 15 of the FCC Rules. These limits
are designed to provide reasonable protection against harmful interference
in a residential installation. This equipment generates uses and can radiate
radio frequency energy and, if not installed and used in accordance with
the instructions, may cause harmful interference to radio communications.
However, there is no guarantee that interference will not occur in a particular
installation. If this equipment does cause harmful interference to radio or
television reception, which can be determined by turning the equipment off
and on, the user is encouraged to try to correct the interference by one or
more of the following measures:
•
Reorient or relocate the receiving antenna.
•
Increase the separation between the equipment and receiver.
•
Connect the equipment into an outlet on a circuit different from that to which
the receiver is connected.
•
Consult the dealer or an experienced radio/TV technician for help. This device
should be installed and operated with minimum 20 cm between the radiator
and your body.
WARNING
This equipment may generate or use radio frequency energy. Changes or
modifications to this equipment may cause harmful interference unless the
modifications are expressly approved in the instruction manual. The user could lose
the authority to operate this equipment if an unauthorized change or modification is
made.
• Changes or modifications not expressly approved by the party responsible for
compliance could void the user’s authority to operate the equipment.
• This device should be installed and operated with minimum 20 cm between the
radiator and your body.
This device complies with part 15 of the FCC’s Rules. Operation is subject to the
following two conditions:
1. This device may not cause harmful interference.
2. This device must accept any interference received, including interference that
may cause undesirable operation.

Model No. SUVIE013
Safety Symbols
Contact Suvie
These safety alert symbols can be found throughout the
guide, alerting you to potential hazards. It’s important to
comply with these directives to avoid possible injury or death.
DANGER Indicates a hazardous situation which you must prevent to
avoid death or injury.
WARNING Indicates a hazardous situation which you should prevent to
avoid possible death or injury.
CAUTION Indicates a hazardous situation which you must prevent to
avoid injury.
NOTICE Specifies a good practice or conveys important information.
Contact us with questions or concerns.
Email: [email protected]

Model No. SUVIE01 4
Before Using Your Suvie
DANGER
Do not operate Suvie if the cord or plug becomes damaged, if the appliance
malfunctions, or if the Suvie is dropped or damaged in any manner. Contact Suvie
immediately for examination, repair, or electrical or mechanical adjustment.
WARNING
• Place Suvie on a clean, solid, even surface to help prevent it from slipping. An anti-
tip bracket may be attached to the back of the appliance and the wall behind it for
extra stability, especially if there are young children in the house.
• Never use the Suvie in combination with parts or equipment from older
generations of Suvie. Never use your Suvie with damaged accessories.
• The use of attachments or items not recommended or sold by Suvie may cause
fire, electric shock, or injury.
• The Suvie can generate a constant flow of steam while cooking. Keep away from
any hot steam that escapes the appliance during operation. Steam may also leave
traces of moisture on your countertop. Be mindful of objects that sit near your
appliance.
• Scalding due to food that has overheated may occur if attempting to use quantities
of food in excess of a tray’s capacity. If overheating occurs, unplug the appliance
and allow it to cool. Use care when removing all components as they may stay hot
for some time.
• To avoid scalding, burn injury, and laceration hazard, do not attempt to open the
Suvie door by force. Only open the door when the program is complete.
• Fire hazard: Keep Suvie away from outside heat sources to avoid risk of fire.
• Trays will be hot: Always use an oven mitt when removing trays after cooking as
they may be extremely hot.
• Not intended for use by children: Close supervision is necessary when the Suvie is
used by or near children.
• You may get burned or scalded by escaping hot food or steam or by touching hot
surfaces.
• Remove all trays carefully to prevent contents from spilling or splashing.

Model No. SUVIE015
• Damaged accessories may cause injury. If any Suvie accessories are damaged
during food preparation, discard food. Contact help@suvie.com for a replacement
accessory.
• Never remove the reservoir or add more water during a cook.
• Do not modify your Suvie or any accessories.
• Never leave the Suvie unattended while it is in Broiler Mode.
• Keep your Suvie away from the edge of your counter to help prevent it from falling
off. Specific set up instructions are on Page 11 of this manual.
CAUTION
• Never overload trays beyond their top or, with the starch pan, their recommended
fill level.
• Be sure to keep the Broiler element clean of any food after use.
• Unplug the Suvie from outlet before cleaning.
• Do not put the Suvie appliance in water or other liquid.
• Never use anything other than plain water or the recommended cleaner in the
reservoir.
NOTICE
SAVE THESE INSTRUCTIONS

Model No. SUVIE01 6
Welcome to
BEFORE OPERATING THIS PRODUCT, IT IS IMPORTANT TO READ,
UNDERSTAND, AND FOLLOW THESE INSTRUCTIONS.
PLEASE SAVE THIS BOOKLET FOR FUTURE REFERENCE.

Model No. SUVIE017
Contents of this Manual
IMPORTANT SAFEGUARDS..............................................................................................1
SAFETY SYMBOLS............................................................................................................2
CONTACT SUVIE................................................................................................................2
BEFORE USING YOUR SUVIE...........................................................................................3
TECHNICAL DATA ..............................................................................................................8
YOUR NEW PERSONAL CHEF..........................................................................................9
IN THE BOX ......................................................................................................................10
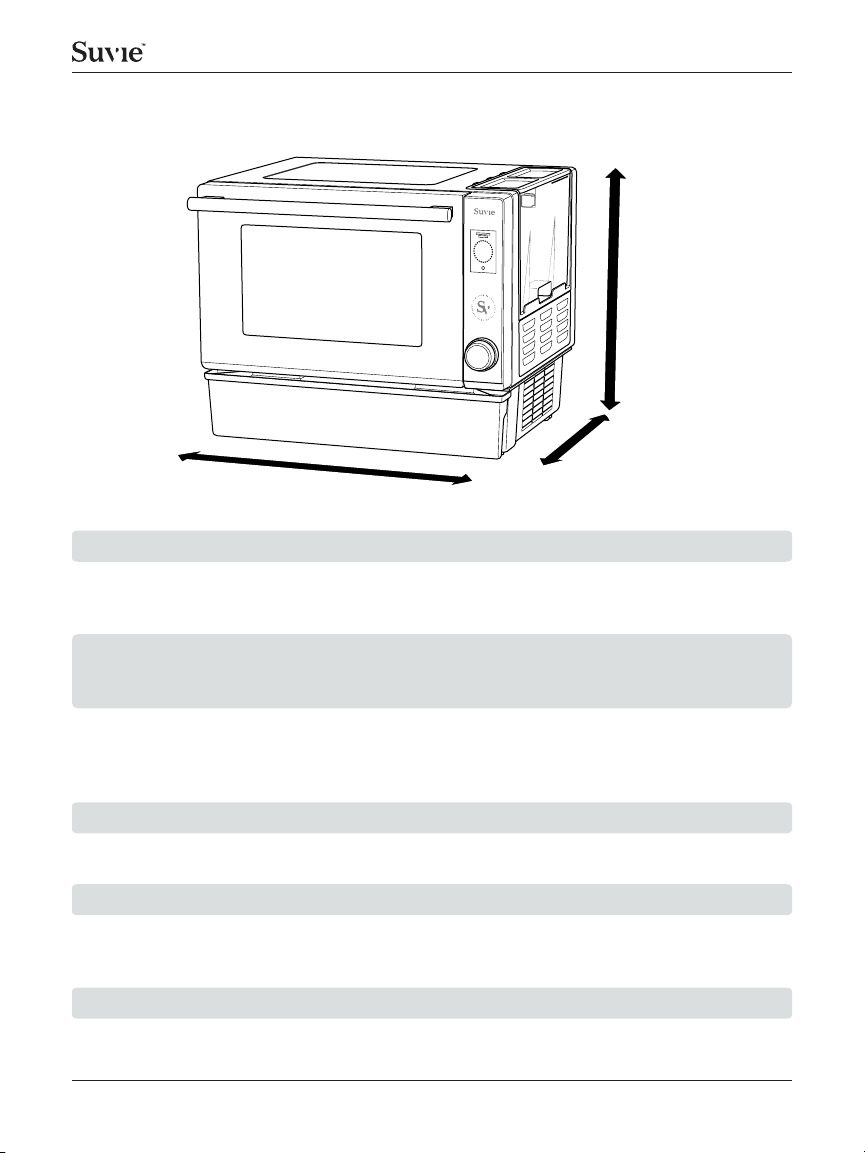
COUNTER PLACEMENT..................................................................................................10
GROUNDING INSTRUCTIONS ........................................................................................11
QUICK ON-SCREEN SETUP ...........................................................................................12
REGISTER YOUR SUVIE ACCOUNT...............................................................................14
FILLING THE RESERVOIR ...............................................................................................15
Water Level & Placement ........................................................................................15
USING THE DRAIN TRAY ................................................................................................16
Placement & Emptying ............................................................................................16
HOW IT WORKS ...............................................................................................................16
Simple Preparation Steps for Each Cook ..............................................................16
REFRIGERATION INFORMATION ...................................................................................17
TAKING YOUR FOOD FROM COOL TO COOK ..............................................................18
YOUR SUVIE PANS ..........................................................................................................19
Filling the Starch Pan...............................................................................................19
COOKING ZONES & INSTRUCTIONS.............................................................................20
The Vegetable Zone.................................................................................................20
The Protein Zone......................................................................................................21
The Broiler Feature ..................................................................................................21
The Starch Zone.......................................................................................................22
The Sauce Zone .......................................................................................................23
COOK SETTINGS FOR SUVIE SMART MEALS..............................................................24
The Tap Zone............................................................................................................24

Model No. SUVIE01 8
Safe Packaging with Suvie Smart Meals ...............................................................24
From Frozen Mode...................................................................................................24
COOKING WITH YOUR OWN INGREDIENTS.................................................................25
Sous Vide and Multi-Zone Mode ............................................................................25
Vacuum Sealing Tips .......................................................................................25
Sous Vide Temperature Guide ........................................................................25
My Cook Sous Vide & Multi-Zone Cooking Instructions...............................27
Slow Cook Mode......................................................................................................28
Slow Cook Instructions ...................................................................................28
INITIATING YOUR COOK .................................................................................................29
SCHEDULING SUVIE FROM YOUR PHONE...................................................................30
Suvie Automatically Updates the Mobile App .......................................................30
Adjust Dinner Completion Time..............................................................................30
Monitor the Status of Your Suvie ............................................................................30
WHEN COOKING IS COMPLETE ....................................................................................31
SUVIE CONTROL PANEL AND FEATURES ....................................................................31
CLEANUP AND MAINTENANCE.....................................................................................35
TROUBLESHOOTING ......................................................................................................36
SERVICE AND SUPPORT ................................................................................................39

Model No. SUVIE019
Technical Data
Submitted to UL for U.S. ApprovalCertification Marks
80 poundsWeight
1.25LVegetable Pan Volume
1.5LSauce Volume
1.25LProtein Pan Volume
480x320 Color TFT with push-button rotary dialControl Panel
225 grams
(3 cups of dry pasta, 1.5 cups of rice or grains)
Starch Volume
(Dry Max)
110-120 VAC 50/60Hz
Maximum power consumption 1,370W
Detachable power cord, 30 inches in length
Power
Height: 16.6 inches
Width: 20. 5 inches
Depth: 15.4 inches
Dimensions
1,300W power consumption with protection against
overheating
Heating System
20.5 in
16.6 in
15.4 in
FILLWATERABOVETHELINE

Model No. SUVIE01 10
Your New Personal Chef
The Suvie appliance uses water with four zones of temperature control to
independently cook a protein, starch, vegetable, and sauce.
Once you’ve loaded your Wi-Fi connected Suvie appliance, recipes will automatically
download, and you may use the Tap Zone with your Smart Meals to confirm what will
be cooked. Refrigeration will then begin.
If using your own ingredients, you will set the cook times manually and refrigeration
will begin (see instructions on page 25).
You can use your phone (or the dial on your appliance) to schedule mealtime (see
instructions on page 32).
FILLWATERABOVETHELINE

Model No. SUVIE0111
In the Box
Take a moment to explore your Suvie.
FILLWATER
ABOVETHE
LINE
Protein Pan
Vegetable Pan
Reservoir & Lid
Screen
Power Cord
Scan Zone
Dial
Drain Tray
Underneath Door
Sauce Pan
Starch Pan
& Strainer
Counter Placement
FILL WATER ABOVE THELINE
Leave at least 1 inch
free above appliance
Leave 1 inch free on the
left side and 4 inches
free on the right side o f
the appliance
Leave at least 2 inches free
between the appliance
and the back wall
(6 inches is optimal for
cooling performance)
Place on countertop surfaces
that can withstand possible moisture
from steam condensation
Use in a room that is
no warmer than 75
degrees Fahrenheit
Place near sink
Do not lean any
objects such as
books against Suvie

Model No. SUVIE01 12
WARNING
• An anti-tip bracket may be installed at the back of the appliance and attached to
the wall behind it for extra stability and protection.
• Do not install your Suvie over a range cooktop or other appliance that produces
heat. Installation of your Suvie near a heat source can adversely affect the
operation and possibly cause damage.
• Never use an extension cord with Suvie.
• Remove all packing materials and accessories. Examine your Suvie for any
damage such as dents or broken components.
• Remove any protective film on the oven or component surfaces.
• To prevent damage, do not block any inlet or outlet openings.
CAUTION
Grounding Instructions
The Suvie appliance must be grounded while in use to protect the operator
from electrical shock. Suvie is equipped with a 3-conductor cord and a 3-prong
grounding-type plug to fit the proper grounding-type receptacle. The appliance has a
plug similar to the figure above.
The grounding tab which extends from the adapter must connect to the permanent
ground in the outlet box. Plug your Suvie into a GFCI (Ground Fault Circuit
Interrupter) if within 6 feet from a sink.

Model No. SUVIE0113
The first time you plug in your Suvie, the control panel will prompt you to walk
through the setup. The process will take approximately 5 minutes.
For all manual interaction with you Suvie use the push-button dial at the bottom of
the control panel.
Quick On-Screen Setup
Dial
Push the knob to
select an option.
Turn the knob to
see options.
A list of detectable Wi-Fi networks will appear.
Rotate the dial to select the network Suvie will
use to connect to the Internet.

Model No. SUVIE01 14
Press the dial to make your selection.
Enter your password by rotating the dial and pressing
on each character.
Date and time will then be set automatically. You may
adjust the time zone and there is an option for daylight
savings.
Once all settings have been confirmed, you will be able
to check the details of your system’s connection and
firmware.

Model No. SUVIE0115
Register Your Suvie Account
To remotely control your Suvie and to order Suvie Smart Meals, first create a
username and password at app.suvie.com. Then follow these steps:
1. From the standby screen, locate your registration
code by turning the dial to display the Suvie menu.
Choose Register.
If you have not connected to Wi-Fi yet, you will be
prompted to do so. You will then be presented with a
code on the screen.
2. Once you have downloaded the Suvie mobile app
from the Google Play or Apple App Store, log in with
your Suvie account.
If no appliance has been registered to the account,
you will immediately be prompted with a registration
screen where you enter the registration code you see
on the appliance screen.
3. The appliance should update automatically when
registration is complete and provide an on screen
indication that registration has been successful. This
process allows the mobile app to interact with the
appliance.

Model No. SUVIE01 16
Filling the Reservoir
Water Level & Placement
Before each cook fill the reservoir with water until the
water reaches the fill line indicated, about ¼ inch from
the top of the reservoir.
FILL WATERABOVE THELINE
Fill to Here
1/4 inch Below Lid
There are two ways to fill the reservoir:
1. Remove the reservoir and bring it to your kitchen sink. After filling, firmly place
the reservoir back into the Suvie and be sure that it both seats completely and
connects with the appliance; push down again to confirm that it is securely in
place. There may be a small amount of water on the reservoir holder, and this is
normal. If water has leaked, push the reservoir in more securely. If the reservoir
leaks after a few seconds, please contact help@suvie.com for service.
2. Remove the reservoir lid and pour water directly into the appliance using a
pitcher or other container. Or if convenient, fill the reservoir with a handheld sink
faucet. When water reaches ¼ inch below the top, place the lid back onto the top
of the reservoir.
WARNING
• Never remove the reservoir or add water during any phase of cooling or cooking. If
the reservoir is missing, Suvie will automatically pause.
WARNING
• The reservoir will give off some steam and become hot during cooking. DO NOT
touch it at this time.
WARNING
• Never use anything in the reservoir other than plain water or cleaning solution as
indicated by Suvie.
• Suvie won’t always use all the water, and that’s perfectly normal.
NOTICE

Model No. SUVIE0117
Using the Drain Tray
Placement & Emptying
The drain tray sits in the lower front of the appliance
and is dishwasher safe.
After each cook, pull out the drain tray to remove. Then
discard the water into the nearest sink. Once emptied,
replace the drain tray completely into the appliance.
FILLWATERABOVETHELINE
Drain Tray
How It Works
Simple Preparation Steps for Each Cook
Your Suvie can make between 1 and 6 servings depending on the recipe.
Step 1: Fill the Reservoir
Fill the removable reservoir with water to the fill line indicated on the side of the
reservoir, approximately ¼ inch below the top of the reservoir. This water is used for
both refrigerating and cooking your meal. Never add water during cooling or cooking.
Step 2: Add Your Protein
Place your vacuum-sealed, pre-seasoned protein into the removable protein pan
and fill it with water. If using a Suvie-provided Smart Meal, these packages are ready
out-of-the-box. For your own recipe, simply put your seasoned protein in a sous-vide
compatible bag and seal it.
A sous-vide compatible bag is any plastic bag that can be sealed securely so that
the water surrounding it does not touch the protein itself. You may use a vacuum
sealer or a store bought sealable bag.
Step 3: Add Your Vegetables
Place your fresh vegetables in the removable stainless steel vegetable tray.
• Never overfill or use any ingredients that extend beyond the capacity of the trays.
CAUTION

Model No. SUVIE01 18
Step 4: Add Your Starch
Place or pour starches into the starch tray with a dash of salt similar to the way you
do on a stove. Appropriate starches to use include rice, pasta, quinoa, and small
potatoes. This zone is NOT refrigerated; only use shelf stable or dry starches here.
Step 5: Add Your Sauce
Add the sauce to the warming pan. This zone is NOT refrigerated; only use shelf
stable sauces here.
After loading your meal items, use the dial on the control panel to either (a) schedule
your meal for a specific serving time, (b) tell Suvie to store and refrigerate your meal
until later, or (c) cook now. At any point in the day, you can choose a serving time on
your Suvie appliance or with the mobile app on your phone or tablet.
Suvie uses a water-based cooling method with a mini compressor (similar to that of
your household refrigerator) to keep your protein and vegetables cold until they are
ready to be cooked. Suvie is designed to keep your food under 41F as per FDA safe
storage guidelines. For best refrigeration performance please make sure to follow
our counter-top placement guidelines on page 10.
By refrigerating your vegetables and proteins, Suvie allows you the convenience of
being able to load ingredients either in the morning before work or in the evening
before bed, so you have a perfectly cooked meal that is ready to enjoy when you
want it.
• If you fill the Starch tray beyond capacity, your Suvie will not cook.
CAUTION
Refrigeration Information
• Only the vegetable and protein zones are refrigerated. Be sure to only store shelf-
stable items that DO NOT need to be refrigerated in the lower zones.
NOTICE

Model No. SUVIE0119
You tell Suvie when you want to eat, and Suvie performs meticulous calculations to
ensure a perfectly prepared and timed meal.
Start times vary in each of the different cooking zones based on the method of
cooking — sous vide for protein, steaming for vegetables, boiling for starches,
warming for sauces, and roasting for the final touch.
After you’ve filled the reservoir, a typical Suvie cool-to-cook process is generally as
follows:
• The water reservoir fills the protein and vegetable area
• The vegetable and protein areas cool until it’s time to cook
• The sous vide protein area heats up
• The vegetable area heats up and steams
• Hot water fills the starch tray
• The sauce area begins warming
• The starch cooking completes and the water here drains
• The broiler finishes your vegetables and proteins
• Your meal is ready to plate and serve.
Taking Your Food From Cool-to-Cook
Table of contents