manuals.online logo
Brands
  1. Home
  2. •
  3. Brands
  4. •
  5. Suzhou Radiant Photovoltaic Technology
  6. •
  7. Vacuum Cleaner
  8. •
  9. Suzhou Radiant Photovoltaic Technology RDNIMOS User manual

Suzhou Radiant Photovoltaic Technology RDNIMOS User manual

瑞智辉
USER GUIDE
- 光伏清洁机器人说明书
-ラディアント製 パネル掃除ロボット取扱説明書
- Instructions for photovoltaic cleaning robot
苏州瑞得恩光能科技有限公司
江苏省苏州市吴中区胥口镇子胥路 636 号
蘇州瑞得恩光能科技有限公司
中華人民共和国江蘇省蘇州市呉中区胥口鎮子胥路 636 号
Suzhou Radiant Photovoltaic Technology Co., Ltd
No.636, Zixu Road, Xukou Town, Suzhou, Jiangsu, China
44
English
Contents
Impor tant safet y note s
List of product accessories
and parameters of the machine
Product assembly
and usage scenarios
Product cleaning and maintenance
Hazardous substance information
and precautions
P44
P45-47
P48-58
P59-61
P62-63
45
WARNINGS:
These warnings apply to this product, all tools and accessories, and any
chargers or power adapters you may need.
To reduce the risk of re, electric shock and injury:
- This product cannot be used by people with physical, sensory or
intellectual disabilities, or people without relevant experience (including
children), unless there is a guardian's care or guidance to ensure that
they can use this product safely.
- Do not use this product as a toy; Close attention is especially needed
when approaching children; Please take care of children to ensure that
they do not use this product as a toy.
- To use the machine, please follow the instructions.
- Do not touch the connector with wet hands.
- Do not use if the cable or connector is damaged.
- Do not use this product in rainy days.
- If the product does not operate as designed, suers serious impact,
falls from high place, is damaged, or falls into water, please do not use
it, and please contact the after-sales help hotline.
- Contact the after-sales hotline for maintenance or repair. Do not
disassemble the product. Improper disassembly may cause electric
shock or re.
- Warning: Do not operate machine at temperature above 35 ℃ or below
5 ℃ , or at the surface temperature of PV module above 50 ℃ or below
5 ℃ . Otherwise, the machine may slip and fall.
- Warning: Use and store the machine with care to avoid strong impact,
which may cause vibration damage to internal structural components
and electrical components.
- Do not burn the product even if it is badly damaged. Batteries and
electrical components may explode in the re.
- It is strictly forbidden to stop the machine for cleaning operation in
situ, which may damage the panel surface.
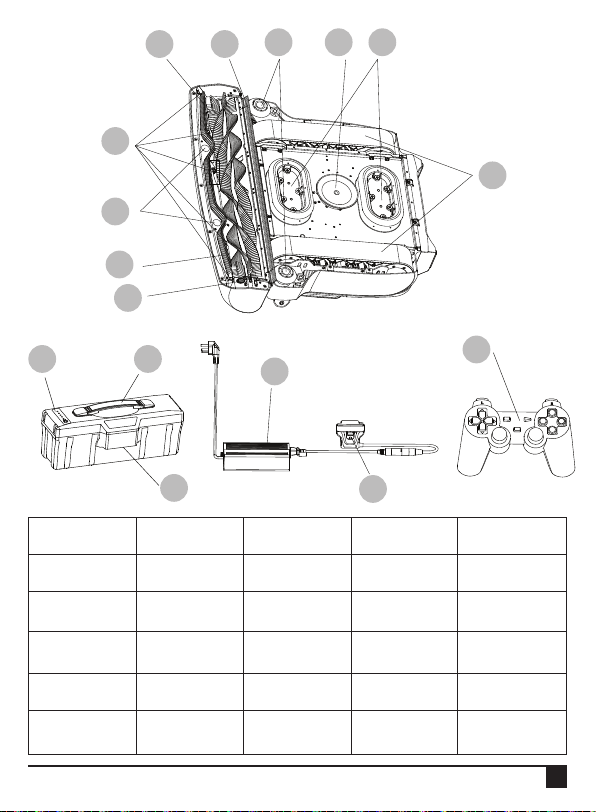
- List of product accessories and parameters of the machine.
46 47
List of product accessories and parameters of the machine
-
Product list
1 2 3 4 5
6
7
8
9
10
11
12
47
46 47
1. Nose lamp 2. Nose cover
plate
3. Cameras 4. Status display
light
5. Portable water
tank
6. xed handle 7. Battery cover 8. Power switch 9. Emergency
stop switch
10. Left and right
startup switch
11. Horizontal and
vertical mode
startup switch
12. Rear cover
support pad
13. Cleaning roller
brush
14. Adaptive
scraper
15. Sensor group
16. Center
adsorption
17. The tracks 18. Roll brush
quick-removal
module
19. Front sensor 20. Front brush
21. Spray nozzle 22. Battery power
display
23. Battery pack
handle
24. Battery pack
charging interface
25. The charger
26. Adapter 27. Remote
controller
28. Fore and
aft adsorption
(optional)
MODE
SELECT START
Y
B
A
X
27
26
25
22 23
24
13 14 15 16 28
17
18
19
20
21
48 49
List of product accessories and parameters of the machine
-
Parameters of the machine
Product name Photovoltaic cleaning robot
Ambient temperature 5 ~ 35℃
Operating voltage range DC: 25V ~ 29.4V
Power of the machine 350W
Cleaning eciency 300 m²/h
Moving speed 0.15 米 / 秒
Array angle Standard version ≤ 20°
High conguration version ≤ 30°
Remote control Remote control within 30 meters
The charger Maximum charging voltage 29.4V, charging current 5A
Charging time of battery
pack 5.5 hours
Battery pack capacity 25.6 Ah
Weight of product Net weight : 28kg, water tank capacity: 8L
Endurance
Battery endurance time: photovoltaic panel angle ≦ 20
degrees, endurance time is 6 hours; photovoltaic panel
angle >20 degrees, endurance time is 3 hours
Water endurance time: 60% of water pump speed
regulation, about 75 minutes; 80% of water pump speed
regulation, about 45 minutes
Obstacle passing ability Component gap, array spacing ≤ 50mm, Component
height dierence ≤ 15m
Complete machine
protection and service life IP55 /5 years
Please read the instructions and precautions carefully before using the machine.
Non-professional personnel are not allowed to operate the machine or enter
the working area. Please keep a safe distance to prevent danger.It is not
recommended to use this product on rainy days.
Note: Be sure to be familiar with the machine's ability to pass obstacles, and
arrange it to run in appropriate scenarios.
48 49
Product assembly and usage scenarios
-
Product assembly
Self-locking
nose spring
bolt
Nose neck
cover button
35PIN joint
male connector Spring bolt limit hole
Limit shaft of self-
locking mechanism
35PIN female joint
Quick-removal
mechanism chute
Quick-removal
Be sure to remove the battery before assembly or removal.
This product consists of 4 parts:
Body, battery pack, portable water tank and cleaning nose
The assembly of body and cleaning nose.
1. Press the buttons on both sides of the nose neck cover to open. Check that the
spring bolt of the cleaning nose self-locking mechanism does not protrude. Align
the quick-removal mechanism slide rail of the cleaning nose with the quick-release
mechanism chute of the machine body and rmly push down the cleaning nose on
both sides. After matching the position, pull up the limit shaft of the self-locking
mechanism, extend the spring bolt o the locking limit, and x the cleaning nose in
the xed space.
2. Insert the male harness quick-connector of the nose into the female connector of
the body. If you hear an obvious clicking sound, it means that the connectors are
matched.
3. Insert the water pipe of the nose into the water pipe quick connector of the machine
body, and cover the nose neck cover. The assembly of the cleaning nose and the
body is completed.
50
Quick installation of cleaning nose
Do not install and dissemble the nose frequently. The installation of the nose as
described above.
The step to remove the cleaning nose:
1. Open the cleaning nose compartment cover and pull out the water pipe from the
quick connector.
2. Pull out the male connector of the harness quick plug connector in the cleaning
nose. Before pulling out the plug, use a at-head screwdriver to lift the press plate
and open the latch of the male and female plug.
3. Pull the unlocking trigger of the self-locking mechanism on both sides of the nose
outward, the limit shaft of the self-locking mechanism will spring up automatically,
and the spring bolt will retract
4. Hold the two ends of the cleaning nose with both hands and lift it up. If necessary,
shake it slightly from left to right to prevent it from getting stuck up until the nose
slide rail exits from the body chute.
Lift the pressing
plate from here
Pull the self-locking mechanism to
unlock the trigger lever
51
Assemble the water tank into the machine body
After the water tank is lled with water, tighten the water tank cover. Put the front end
(one end of the water tank cover) into the tank cabin of the machine body, and then
press the front end gently, so as to make the male and female connectors of the water
tank outlet are reliably connected.
Assemble the battery into the machine body
Open the battery compartment cover and put the battery pack into it. Insert the female
connector of the battery pack into the male connector of the body, and enter the
battery pack along left and right side chutes. Gently press the battery pack down to
position and close the battery compartment cover.
Portable water tank
female connector
of battery pack
Replace the water tank
If the yellow and green lights ashes alternately when machine stop, please check the
water in the tank.
Hold the water tank handle, lift the water tank vertically, pull out the water tank,
replace the backup water tank, and reinstall it as described above.
Water tank handle
52
Light display description
Description: As shown below, the light has 8 states
1. The green light ashes: the machine operates normally
2. The yellow light ashes: the machine is checking itself before moving
3. The red light ashes: the machine alarms due to fault
4. Steady blue light: the machine enters remote control mode
5. Steady blackish green light: the machine enters mobile APP manual mode
6. The purple light ashes: the machine is in emergency stop state
7. The green and yellow lights ashes alternately: the machine is short of water and
needs water supply
8. Steady yellow light: The machine is short of power, and the battery needs to be
replaced
Replace the battery
When the machine stop, if the yellow light is steady on, please check the battery
power:
Power determination: Gently press the battery pack power indicator, and the current
power will be displayed by 5 grids of light:
5 grids of green light:power is 100%
4 grids of green light:power is 80%
3 grids of green light:power is 60%
2 grids of green light:power is 40%
1 grid of green light:power is 20%
No green light: the battery power is low, please replace the battery pack, and charge in
time.
This operation is the reverse operation of the battery assembly operation. Open the
battery compartment cover, pull out the battery pack from the battery compartment of
the machine body, and assemble the backup battery as described above.
Status display light
53
Battery charger
1. When the battery pack is fully charged, the ve indicator lights should be all on, and
the indicator lights of the discharged battery will be all o.
2. When you press the light button on the top of the battery pack, if there is only one
light left, it means that the battery pack has low power. At this time, connect the
charger to charge it in time.
3. Open the protection cover of the adapter, and insert the male terminal of the
adapter into the charging port of the battery pack.
4. Connect the power plug to the AC power supply.
5. When charging, the indicator light of the charging adapter is red, indicating that
charging is in progress, while the indicator light is green, indicating that the battery
is fully charged.
Note:
1. It is forbidden to charge in the outdoor or indoor humid environment.
2. After the battery is fully charged, rst pull out the plug at the power end, and then
pull out the adapter plug of the battery pack.
3. Do not run out of battery power, please charge it in time when there is 1 grid.
The power plug Power display
lamp group Power display Adapter plug
Mobile APP Application
Refer to the app operating document or scan the following QR code.
54
Emergency stop switch
Press the emergency stop switch to stop the machine in case of safety risks or other
emergency faults.
Release the emergency stop switch: turn the emergency stop switch to the right, and
the emergency stop switch will pop up to reset.
Mode switch
Left and right start mod: Left start, turn the knob to L, right start, turn the knob to R.
Horizontal and vertical mode switch: Horizontal array, turn the knob to H, vertical array,
turn the knob to V.
Horizontal and vertical mode switch
Left and right startup mode switch Power switch
Emergency stop switch
Startup and shutdown
1. Place the machine on the photovoltaic panel and observe the type of module
array; Determine the left and right starting modes or array horizontal and vertical
arrangement.
2. Select a mode in the mode switch.
3. Check whether the emergency stop switch is open, and try to turn the emergency
stop switch to the right.
4. Press and hold the POWER key of the power switch for 3 seconds to start the
machine. The yellow light will flash after being turned on, and there will be a
30-second self-inspection program. Normally, the machine will not move in the
self-inspection
5. After running, press the POWER key of the power switch to shut down the machine.
55
The remote control
Description: Key functions are shown in the following chart:
Key Name Function Remarks
Direction keys Move the robot
forward/backward/left/right
Select key Exit the remote cleaning mode
It can only be controlled after the
remote cleaning mode is turned on,
otherwise this button has no function
Start key Remote control
on/enter remote cleaning mode
Mode key Remote control on
Function keys “X”: central adsorption up
“B”: central adsorption down
Left rocker Press to enter manual mode
Right rocker Press to exit manual mode
L1 The key has no function
L2 Backward in manual mode
R2 Forward in manual mode
MODE
SELECT START
Y
B
A
X
SELECT START
MODE
L1 R2 R1L2
Direction keys Select
key
Start
key
Mode key
Left rocker Right rocker
Function keys
56 57
56
Follow the steps below to turn the remote control on/o
1. Power on: Press MODE and press START.
2. Remote control indicator: Steady green indicates that the remote control works
normally.
3. Press the left rocker to connect the remote control to the machine.
4. Observe that the status indicator of the machine is steady blue, and then start the
remote control.
5. Press the right rocker and the remote control exits the connection.
6. Power off: When the robot is connected, press and hold the MODE key for 5
seconds to power off. When the robot is not connected, it will power off in 15
seconds automatically.
Note:
1. When the machine moves on the photovoltaic panel, please control machine to move
within the safe area and shall not protrude out of the array boundary to prevent it
from falling.
2. It is recommended that the distance of using the remote control to operate the
machine should not exceed 25 meters.
3. When using the remote control, pay attention to the front and avoid obstacles.
4. There is a one-to-one correspondence between the remote control and the
machine. Please confirm the match with the machine when using the remote
control.
56 57
Horizontal cleaning path:
This machine is wet sweep mode with water.
Vertical cleaning path:
Horizontal and vertical cleaning steps:
(the arrangement in the gure is only for display, and the actual cleaning is not limited
to quantity of the rows or columns)
1. Place the machine at the initial cleaning position of the photovoltaic array, and the
machine nose position is shown in the gure. The machine edge is as close to the
array boundary as possible, but not beyond it. The portable water tank is lled with
water and assembled into the machine.
2. Set the horizontal sweep mode as described above.
3. Set the left-right startup mode as described above.
Product assembly and usage scenarios
-
Usage scenarios
58
Cleaning steps with bridge array:
1. The bridge is made of convenient installation aluminum plate.
2. Select the bridge mode in the APP.
3. Repeat the preceding steps for other operations.
5. Turn the emergency stop button clockwise to release it.
6. Hold down the power button for 3 seconds, and the machine will automatically clean
after it enters the 30S self-check time.
7. The cleaning path is shown in the gure. Considering dierent component lengths,
vertical cleaning will adaptively increase the cleaning path.
8. After cleaning the whole panel, the machine will stop at the end of the cleaning path
and need to be transported to other arrays manually.
The following steps should be taken when a running fault occurs:
1. If the path is abnormal, that is, the machine is faulty, and the machine will stop
running.
2. Use remote control or mobile APP to control the machine to the safe position.
3. Check the fault status through APP. If necessary, contact the customer service
department to eliminate the fault information.
Breakpoint cleaning step when the water tank needs to ll water:
1. When the water tank indicates that the water volume is too low, the machine status
light will ash alternately in yellow and green, and it stops operation.
2. When the machine is in the process of going straight, use the remote controller to
move it to a safe position.
3. Replace the water tank, and then use remote controller or mobile APP to move the
59
Breakpoint cleaning step when the battery needs to be replaced:
1. When the water tank indicates that the water volume is too low, the machine status
light will ash alternately in yellow and green, and it stops operation.
2. When the machine is in the process of going straight, use the remote controller to
move it to a safe position.
3. Replace the water tank, and then use remote controller or mobile APP to move the
machine to the position of continuous cleaning.
4. Disconnect the remote control, and the machine will continue to work according to
the track.
Note:
1. It is strictly prohibited to start the machine at any position of the array at will; the
position of this instruction must be referred to.
2. If the machine is shut down, it is required to use remote control or APP to control
the operation. It is strictly prohibited to pull it buy human force.
machine to the position of continuous cleaning.
4. Disconnect the remote control, and the machine will continue to work according to
the track.
60 61
Product cleaning and maintenance
-
Product cleaning
Cleaning and maintenance of the brush
Quick release
button of the
brush
Quick release
button of the
brush
Limit shaft Brush notch
Removal and installation of roller brush:
When the roller brush has been used for more than 1000 hours, it is recommended to
replace the it. You can replace it yourself or contact the after-sales service.
Remove the roller brush:
1. Hold the roller brush with one hand and press the quick release button inwards to
reach the limit position.
2. Move the roller brush ( the side close to the quick release mechanism ) outward, and
the roller brush will move out of the cleaning nose.
Install the roller brush:
1. Install the notch at one end of the roller brush to the limit shaft of the cleaning nose.
2. Press the quick release button of the roller brush inwards with one hand to push the
movable side of the roller brush inwards.
3. Release the quick release button of the roller brush, fix the roller brush to the
movable bearing. Rotate the roller brush manually to move freely, which indicates
that the roller brush is installed OK.
61
60 61
Quick release
button of the
brush
The nozzle
Nozzle core can
be pulled out The nozzle
Replace the track:
If the track has been used for more than 1000 hours, it is recommended to replace it.
Please contact the after-sales service.
Replace the central sucker:
When the central sucker has been used for more than 1000 hours, it is recommended
to replace the it. You can replace it yourself or contact the after-sales service.
Remove and install the central:
Put the equipment upright, insert the M12 external hexagon wrench into the xed hole
of the central sucker, and rotate it anticlockwise. Loosen the xing nut and remove the
central sucker. After replacing the sucker, reverse the operation and fasten the sucker.
Clean the nose nozzle
During the cleaning process, it is found that the cleaning eect is poor, please check
whether the nose nozzle is blocked. If it is blocked, use a at-head screwdriver to
remove it, and then clean the nozzle and nozzle core.
62 63
The Faults Probable Causes Solutions
The machine does
not work
1. Low battery Charge in time
2. Power switch is not pressed Press and hold the power switch
3. The fuse is blown Stop using and contract after-sale
service
Machine self -check
failed
1. The machine is in improper
placement.
1. Put it on the photovoltaic panel and
restart
2. The machine is subject to
external interference
2.Restart or Stop using and contract
after-sale service
Edge patrol time is
too long The machine has a little slip Add a little water to wet the wheels
WIFI is disconnected WIFI connection signal is weak
The distance between mobile phone
and machine should be within 6
meters
The scraper is not
raised Scraper motor is failed Stop using and contract after-sale
service
Fan does not work Debris or moisture enters the fan Replace the adsorption component
The machine does
not turn The central sucker is leaking Replace the adsorption component
The machine does
not spray water Nozzle is blocked Clean the nozzle
Remote control
doesn't work
1. Low battery 1. Charge or replace the battery
2. The remote controller is crashed 2. Replace the battery and restart the
machine
Product cleaning and maintenance
-
Common faults and solutions

Popular Vacuum Cleaner manuals by other brands

Shark DuoClean quick start guide

Shark

Shark DuoClean quick start guide

EINHELL TC-VC 18/20 Li S Series operating instructions

EINHELL

EINHELL TC-VC 18/20 Li S Series operating instructions

Pro-Lift I-8870 Operating instructions and parts manual

Pro-Lift

Pro-Lift I-8870 Operating instructions and parts manual

aspiron AS-CA035 instruction manual

aspiron

aspiron AS-CA035 instruction manual

OgenaSolutions ANIVAC ProHeat II Basic Care & Maintenance

OgenaSolutions

OgenaSolutions ANIVAC ProHeat II Basic Care & Maintenance

Ronda 5-58 Duo user manual

Ronda

Ronda 5-58 Duo user manual

POLTI FORZASPIRA AG200 instruction manual

POLTI

POLTI FORZASPIRA AG200 instruction manual

cecotec SCOBA 2100 JALISCO instruction manual

cecotec

cecotec SCOBA 2100 JALISCO instruction manual

Mi SSXCQ01XY user manual

Mi

Mi SSXCQ01XY user manual

Kärcher IVC 60/30 Ap M Z22 manual

Kärcher

Kärcher IVC 60/30 Ap M Z22 manual

Clatronic AKS 827 instruction manual

Clatronic

Clatronic AKS 827 instruction manual

Morphy Richards 70317 instructions

Morphy Richards

Morphy Richards 70317 instructions

Variovac CENTRAL VACUUM CLEANER Operating and installation instructions

Variovac

Variovac CENTRAL VACUUM CLEANER Operating and installation instructions

Hamron 604-169 operating instructions

Hamron

Hamron 604-169 operating instructions

Draper WDV18 instructions

Draper

Draper WDV18 instructions

Electrolux Ultrapower EUP84DB Instruction book

Electrolux

Electrolux Ultrapower EUP84DB Instruction book

Eureka 50 Series owner's guide

Eureka

Eureka 50 Series owner's guide

Samsung SU08H30 SERIES user manual

Samsung

Samsung SU08H30 SERIES user manual

manuals.online logo
manuals.online logoBrands
  • About & Mission
  • Contact us
  • Privacy Policy
  • Terms and Conditions

Copyright 2025 Manuals.Online. All Rights Reserved.