Swann Sky Duel User manual

© Swann Communications 2011
©S
wan
nC
omm
uni
cat
ion
s2
011
Vericación de la FCC:
NOTA: Este equipo ha sido probado y se encontró que cumple con los límites para aparatos digitales
Clase B, de acuerdo con la parte 15 de la FCC. Estos límites están diseñados para proveer protección
razonable contra interferencia dañina en una instalación residencial. Este equipo genera, usa y puede
irradiar energía de radiofrecuencia, si no se instala y se usa de acuerdo con las instrucciones, puede causar
interferencia dañina en la recepción de radio o televisión, lo cual se puede determinar encendiendo y
apagando el equipo, se alienta al usuario intentar corregir la interferencia mediante una o más de las
siguientes medidas:
• Reoriente o cambia de ubicación la antena receptora.
• Incremente la separación entre el equipo y el receptor.
• Conecte el equipo a una toma en un circuito diferente al que está conectado el receptor.
• Consulte al distribuidor o a un técnico en radio/televisión con experiencia por ayuda.
Estos dispositivos cumplen con la parte 15 del Reglamento de la FCC. El funcionamiento está sujeto a las
dos siguientes condiciones:
(1) Estos aparatos no deben causar interferencia dañina, y
(2) Estos aparatos deben aceptar cualquier interferencia recibida, incluyendo interferencia que pueda
causar un funcionamiento no deseado.
Centro de asistencia técnica
Ver http://www.worldtimeserver.com para obtener información acerca de las distintas zonas
horarias y la hora en Melbourne Australia, comparada con su hora local.
Soporte Técnico Swann
Todos los países Correo Electrónico: tech@swannsecurity.com
Atención Telefónica al Usuario
ESTADOS UNIDOS Sin costo
1800-627-2799
(Dom, 2pm-10pm HP EE.UU.Lun-Juev, 6am-10pm, HP EE.UU.
Viern, 6am-2pm HP EE.UU.)
ESTADOS UNIDOS Cambios & Devoluciones
1-800-627-2799 (Opción 1)
(Lun-Viern, 9am-5pm HP EE.UU.)
Sky Duel
MSKDUEL281111E

2
The Helicopter
Upper Rotors
Lower Rotors
Infrared“Weapon” LED Power ON/OFF Switch, Charging Port
& Infrared Sensor
Tail rotor
1. Place one helicopter on the ground with the tail facing away from you. Make
sure you are away from crowds, animals, obstructions or valuables that could
break. Turn ON the helicopter.
2. Ensure the throttle on the controller is at minimum, and then turn on the
controller. Pair the controller to the helicopter (see “Pairing the Remote
Controls” on page 6).
3. One helicopter is now ready to y.
4. Repeat for the second helicopter.
Check the guides on the following pages on how to control your helicopter.
ENGLISH
Taking to the Air
47
Especicaciones técnicas
El tiempo de carga Aprox. 40 - 50 minutos
El tiempo de vuelo Aprox. 5 - 8 minutos
Control de la distancia Aprox. 8 - 10 m / 25 pies - 30 pies (línea de vista es necesario)
Control Remoto Infrarrojo
Tipo de Batería (el helicopter) DC 3.7V output
Tipo de Batería (Control Remoto) AA 1.5V x 6 (not included)
RIESGO DE ASFIXIA :Partes pequeñas.
No apto parra niños menores de 3 años.
!
Especicaciones y Garantía
ESPAÑOL
Swann Communications garantiza este producto por defectos de fabricación y
material,por un período de un (1) año a partir de la fecha original de compra. Usted
deberá presentar su recibo como prueba de la fecha de compra para validar la garantía.
Cualquier unidad que se compruebe defectuosa durante el período antes citado será
reparada sin cobrar los repuestos o la mano de obra, o será sustituida, a discreción
exclusiva de Swann. La reparación o sustitución se garantizará por noventa días o por el
período que falte de la garantía original de un año, el que resulte más largo de los dos.
El usuario final asume los costos de fletes incurrido para enviar el producto a los centros
de reparación de Swann. El usuario final se responsabiliza de los costos de envío en que
incurran cuando envía desde y hacia cualquier país distinto al país de origen. La garantía
no cubre daños accidentales, circunstanciales o que resulten del uso o la imposibilidad
de utilizar este producto. Cualquier costo asociado con la adaptación o remoción
de este producto por parte de un vendedor o de otra persona, o cualquier costo
asociado con el uso del mismo son responsabilidad del usuario final. Esta garantía aplica
exclusivamente al comprador original del producto, y no es transferible a terceros.
Si el usuario final o un tercero hacen modificaciones no autorizadas a cualquier
componente o si hay evidencia de mal uso o abuso del dispositivo, se anularán todas
las garantías.

46
El
helicóptero
no se
puede
controlar
• Asegúrese de que el controlador esté ENCENDIDO.
• Asegúrese de que el helicóptero esté ENCENDIDO.
• Vuelva a intentar vincular el control remoto al helicóptero.
• Controle las pilas del control remoto y, si es necesario, cámbielas
por pilas nuevas.
• Asegúrese de que el helicóptero esté completamente cargado.
• No emprenda el vuelo del helicóptero si hay vientos fuertes, ya
que esto puede dicultar su control.
• Centre el control de estabilización y, si es necesario, vuelva a
ajustar la estabilización.
El
helicóptero
no
asciende
El helicóptero aterrizará automáticamente si pierde las tres vidas.
Reinicie el helicóptero para recuperar sus vidas. Si eso no funciona, es
posible que:
• La carga de la batería del helicóptero sea demasiado poca. Será
necesario recargar el helicóptero.
• Asegúrese estar acelerando lo suciente para que el helicóptero
levante vuelo.
• Es posible que algo interera con la señal del control remoto.
Evite los entornos brillantes (en especial la luz solar directa), los
entornos con polvo o humo y la presencia de otros dispositivos
infrarrojos.
Helicóptero
aterriza
demasiado
rápido
• Es posible que esté reduciendo la aceleración demasiado rápido.
Reduzca la aceleración con suavidad para lograr un descenso
gradual hacia el suelo y un aterrizaje más suave.
Parece que
es más fácil
dispararle
a un
helicóptero
que al otro
Esto probablemente se deba a la posición del sensor infrarrojo en la
base del helicóptero. Un cambio en la posición o el ángulo de este
sensor alterará la sensibilidad a la luz infrarroja y, en consecuencia,
aumentará o reducirá la distancia a la cual el helicóptero registrará un
disparo del helicóptero opuesto o los comandos del control remoto.
• Asegúrese de que la ubicación del sensor infrarrojo sea idéntica
en ambos helicópteros.
• Es posible que esto deba ajustarse con el paso del tiempo. Con
los sucesivos usos e impactos, el sensor puede desplazarse.
Resolución de problemas
ESPAÑOL 3
The Remote Control
Right Stick (direction)
Trim Control
Power Indicator LED
Left Stick
(throttle)
Fire Button
Charging Lead
Compartment
Power Switch
Charging Indicator LED
IR Band Select Switch
IMPORTANT: Do NOT crash the helicopters into one
another! This can and will damage the helicopters, and
could lead to injury.
!
ENGLISH

4
Charging the Helicopter
Charging the helicopter
Before you can take ight, you need
to charge the battery in the helicopter
using the charging lead which extends
from the remote control.
• Ensure the helicopter is turned OFF
before attempting to charge it.
If left on, it won’t charge.
• Open the charging lead
compartment on the remote
control.
• Insert the charging lead into the
socketon thebase ofthe helicopter.
• Turn the remote control ON.
• It willtake 45- 60minutesto charge.
Don’t over-charge the helicopter
and do not leave it connected to
the charger for more than ninety
(90) minutes.
While the helicopter is charging, the charging
light on the controller will be GREEN.
The charging LED will TURN OFF when the
helicopter is fully charged.
Note: If the helicopter has trouble lifting o the ground (and you’re not out of lives
- see “The Game” on page 10) it means the battery is running low and needs
recharging.
Don’t leave the helicopter unattended while
charging. Don’t leave the helicopter on charge for
longer then 90 minutes.
!
ENGLISH 45
se detecte algún daño, no se deben utilizar ni el helicóptero no el controlador
hasta que se reparen por completo.
Helicopter Battery Warnings
El helicóptero tiene un batería de polímeros de litio integradas. Estas baterías son
livianas y poderosas debido a que su química está basada en litio, un metal liviano y
extremadamente volátil.
• Cargue las baterías en un ambienta aislado y controlado. Mantener lejos de
materiales inamables.
• Nunca deje el helicóptero sin atención mientras lo cargue.
• La batería del helicóptero se calentará si se carga durante demasiado tiempo y
puede dañarse. No sobrecargue la batería del helicóptero.
• Nunca agote las baterías por completo. Cuando el helicóptero comience a
quedarse sin energía, apáguelo y cárguelo tan pronto como pueda.
• NO arroje las pilas del control remoto ni la batería del helicóptero al fuego, ya que
podrían explotar.
• Las baterías se deben desechar de manera responsable.
• NO exponer a luz solar directa. Hay un riesgo de que la batería se sobrecaliente,
se incendie y/o explote.
• NO desarme, modique, caliente o cause un cortocircuito en la batería. No la
ubique en el fuego o la deje en lugares cerda de fuentes de calor.
• No tite la batería o la someta a impactos fuertes.
• No permita que la batería se humedezca.
• Sólo cargue la batería desde el equipamiento de carga proporcionado. Utilizar
otro equipamiento de carga anulará su garantía, puede dañar la batería y
representa un riesgo de incendio o explosión.
• Utilice la batería sólo en este helicóptero y use sólo esta batería en el helicóptero.
• Lea estas instrucciones cuidadosamente y obedezca todas las indicaciones
mencionadas.
• En el caso poco probable de pérdida o explosión, use arena o un extinguidor de
fuego químico para extinguir las baterías.
Si su profesora de química del colegio alguna vez demostró lo que sucede cuando
el sodio se ubica en agua (la descripción técnica del resultado es “bum”) está
familiarizado de alguna manera con cuán volátil es el litio, ¡con la diferencia de
que el litio es incluso más volátil que el sodio! Básicamente, ¡obedezca todas las
indicaciones y respete el poder del litio!
PELIGRO: ¡Nunca inserte objetos cortantes, agujas
o tornillos en el helicóptero ya que pueden unzar las
baterías internas!
!
ESPAÑOL

44
Safety Information
Instrucciones de seguridad de la batería
• Requiere 6 baterías alcalinas 1,5 V AA (no incluidas).
• NO se recomiendan las baterías recargables.
• El reemplazo de las baterías debe estar a cargo de un adulto competente.
• Siga el diagrama de polaridad (+ / -) en el compartimento para baterías.
• Quite rápidamente las baterías muertas/agotadas del controlador.
• Deseche las baterías de manera responsable.
• NO incinere las baterías.
• NO deseche las baterías en el fuego ya que pueden explotar o causar derrames.
• NO mezcle baterías nuevas con baterías viejas o distintos tipos de baterías (es
decir, alcalinas con estándares).
• NO recargue baterías no recargables.
• NO ocasione un cortocircuito en las terminales de alimentación.
Precautions and Maintenance
• Mantenga las manos, cabello o ropa suelta fuera del alcance de los rotores cuando
el interruptor de encendido/apagado esté encendido.
• Despegue siempre desde una supercie plana.
• Nunca sostenga el helicóptero en sus manos cuando esté despegando.
• NO lance el helicóptero cerca de personas o animales.
• Manténgalo alejado de obstáculos y riesgos eléctricos.
• Para limpiarlo, pase un trapo húmedo suavemente. Evite el uso de solventes ya
que pueden dañar los componentes plásticos.
• Mantenga el helicóptero y el control remoto alejados de fuentes de calor.
• No sumerja el helicóptero o el control remoto en agua. Esto dañará los componentes
electrónicos y puede representar un riesgo serio para la batería integrada.
• Siempre quite las baterías del controlador cuando no se use por periodos de
tiempo extendidos.
• Se requiere la guía de los padres para usuarios menores.
• Mantenga su helicóptero cerca y dentro de la línea de visión, si se pierde la línea
de visión del controlador, perderá el control del helicóptero.
• Para el mejor rendimiento, sólo utilice baterías alcalinas AA nuevas en el controlador.
• Lea y obedezca todas las advertencias e indicaciones de seguridad en este manual.
• El controlador y el cargador están especícamente diseñados para cargar este
helicóptero. ¡Nunca utilice otro equipamiento de carga!
Aviso especial para adultos:
• El helicóptero no está diseñado para el uso de los niños menores de catorce
(14) años de edad a menos que estén supervisados directamente por un adulto
competente todo el tiempo.
• Elhelicópterosólodebeser utilizadoconelcontrolador/cargadorproporcionados.
• Examine regularmente el helicóptero y el controlador para detector daños en los
enchufes, cerramiento, rotores, tapas de batería y otras partes. En el caso de que
ESPAÑOL 5
Installing Batteries in the Remote
1. The battery compartment is located on the rear of the remote control. Using a
precision screwdriver, undo the screw holding the battery compartment cover
in place and remove it to reveal the battery compartment.
2. Insert 6 AA alkaline batteries into the battery compartment, ensuring each
battery is oriented the correct way for polarity. The correct way is shown inside
the battery compartment and also in the picture below.
3. Replace the battery compartment cover, securing it with the screw removed in
step 1.
Charging the Helicopter via USB
You can use the included USB cable to charge the helicopter from a computer or USB
power supply.
Don’t leave the helicopter connected to USB power for more than 90 minutes.
Don’t charge the helicopter from any power supply other than 5V 500mA.
It’s a good idea to charge by USB when you’ve got access to it, as it will greatly extend
the life of the batteries in the remote control - the controller itself uses much less
power than charging the helicopter does.
Install 6 x AA
Alkaline batteries
Remove battery
compartment Replace battery
cover
Use only fresh, high quality alkaline batteries in the
controller. Don’t use rechargeable batteries, as they
simply don’t have high enough voltage to charge the
helicopter.
!
ENGLISH

6
Before the games can begin, you’ll need to pair the remote controls to the two
helicopters.
It’s vitally important to set the two controllers to dierent control bands. You can
do this by selecting Aon one controller and B on the other. Either controller can
be used with either helicopter - the pairing process assigns one controller to each
helicopter.
To pair a helicopter:
1. Make sure you are away from any other helicopters or any other infrared devices/
controllers which may cause interference of be interfered with.
2. Turn ON one helicopter and one remote control. Place the helicopter on the
ground.
3. Push the left stick (throttle) completely forwards to full throttle and then back
down to its starting position.
4. If you gently push the throttle forward again, the helicopter should respond and
the rotors will start spinning. The helicopter will now be paired to that remote
control.
Be careful when testing the pairing since once paired, pushing the throttle to full
again will cause the rotor blades to spin at full speed. The helicopter is likely to y
o at high speed causing unexpected and possibly dangerous results.
Pairing the Remote Controls
When using both helicopters at once, ensure that one controller
is set to CHANNEL A and the other set to CHANNEL B.
Pair the helicopters very carefully. For best results, pair the
helicopters in separate rooms. Ensure they are not within line of
sight of one another while pairing.
!
Step 3: Push the
throttle up to full
throttle.
Step 4: Pull the
throttle back down
to zero throttle.
Step 1: Set the
control band (A
or B).
Step 2: Turn on the
remote control.
ENGLISH 43
Cómo funciona el juego
¿Alguna vez jugó a las etiquetas láser? Básicamente, se trata de atarse pequeños
sensores al cuerpo y llevar un arma (bueno, el equivalente de un control remoto
televisivo con forma de arma) que puede utilizarse para disparar a los sensores de los
demás. Los helicópteros funcionan de manera bastante parecida, pero utilizan luces
infrarrojas para dispararse unos a otros.
Los LED del “arma” IR (infrarroja) se encuentran en la parte delantera de los
helicópteros, mirando hacia adelante. Tienen un alcance de hasta 10 m/30 pies bajo
condiciones típicas; casi igual al control remoto. La luz ambiente brillante, el humo,
el polvo y cualquier otra interferencia atmosférica reducirán el alcance de los haces
infrarrojos.
El haz infrarrojo del helicóptero es detectado por el mismo sensor que detecta los
comandos del control remoto.
Acerca de las “armas” con LED infrarrojo:
Los LED infrarrojos son completamente inofensivos y casi tan potentes como el LED
de un control remoto televisivo o un dispositivo similar.
Los LED infrarrojos no son láseres. No disparan en líneas perfectamente rectas
y tienen un alcance limitado. Si piensa en el haz de una linterna concentrado con
un punto brillante en el centro, ha comprendido la idea. Sólo en punto brillante del
centro apuntará al sensor infrarrojo.
El haz se dispersa un poco con la distancia, ¡y puede utilizar esto para su benecio!
Además, el haz se reejará en los espejos y otras cosas brillantes: ¿a alguien le parece
buena idea dispararle al enemigo desde la vuelta de la esquina?
Diagrama que muestra la dispersión aproximada del haz del “arma” infrarroja.
Si el sensor infrarrojo del helicóptero enemigo se encuentra en alguna parte del área marcada, registrará el
disparo.
Sea cuidadoso cuando juegue cerca de otros dispositivos que utilicen
controles remotos infrarrojos. El control remoto del helicóptero o sus “armas”
pueden afectar al otro dispositivo, causando comportamientos inesperados y
el otro dispositivo puede causar interferencias con el control del helicóptero.
ESPAÑOL

42
Disparar:
Para disparar el “arma” del helicóptero presione el botón ubicado en la esquina
superior derecha del controlador.
Cuando su helicóptero dispara:
Los tres LED a los costados del helicóptero parpadearán y el parlante interno dentro
del controlador emitirá el sonido del disparo de un misil.
Los helicópteros tienen “municiones” ilimitadas. Existe un breve retraso de
aproximadamente un segundo entre un disparo y otro.
Vidas
Los tres LED al costado del helicóptero indican cuántas vidas le quedan.
Su helicóptero tiene tres vidas, al igual que el de su oponente. Cada disparo en
el blanco le quita una vida al helicóptero. El helicóptero continuará en vuelo sin
problemas cuando la cantidad de vidas restante sea “cero”; pero si recibe un disparo
más en el blanco quedará eliminado.
Cuando su helicóptero sea alcanzado por un disparo:
Girará sin que pueda controlarlo durante aproximadamente tres segundos y los LED
al costado del helicóptero parpadearán. El helicóptero registrará la pérdida de una
“vida”.
Cuando se quede sin vidas:
El helicóptero girará mientras desciende, aterrizando con suavidad.
El conteo de vidas se restablecerá automáticamente una vez que el helicóptero haya
aterrizado y el acelerador vuelva a ajustarse en la posición cero. (Probablemente su
oponente haga lo mismo, ya sabe, a causa de la“equidad” y demás.)
El juego
El botón de DISPARO
LED indicadores
ESPAÑOL 7
Control
Up/Down (Ascend/Descend)
The height the helicopter ies is controlled
by the throttle which varies the speed of
the spinning rotors.
Ascend: Push the throttle UP gently to
increase the spinning speed of the rotors
and make the helicopter ascend.
Descend: Push the throttle DOWN to
reduce the speed of the spinning rotors
and make the helicopter descend.
To get good results, be gentle and
subtle. Small adjustments made slowly
and carefully are the best way to get the
helicopter to y well.
Forward, Backwards
The right stick on the controller aects the
helicopter’s direction, kind of like the right
stick on a video game controller.
Forwards: Pushing the right stick up will
pitch the nose of the helicopter down and
move the helicopter forward.
Backwards: Pulling the right stick down
will pitch the nose of the helicopter up
and move the helicopter backwards.
Rotating the helicopter left and right
The rudder can be used to turn the
helicopter to the left or right. When
hovering, this will make it rotate but when
the helicopter is in motion, this can be
used to perform tricks like spiralling to the
left or right.
Rotate/TurnRight:Tomakethe helicopter
turn to the right, push the right stick (the
rudder) to the right.
Rotate/Turn Left: To make the helicopter
turn to the left, push the right stick (the
rudder) to the left.
ENGLISH

8
Trim
What is trim (rotation)?
You may nd that the helicopter rotates left or right while hovering, even when you
are not using the right stick on the controller. This rotation is because the two sets of
rotor blades sometimes get out of sync requiring adjustment to the trim.
The trim control is located underneath the ight control stick on the controller and
ne-tunes the speed of the rotor blades to keep the helicopter ying straight.
Trim should be adjusted each time you y the helicopter (and occasionally during
ight) to make sure the chopper ies straight.
While hovering, if the helicopter is
rotating anti-clockwise, adjust the trim
control to the right until the helicopter
stops drifting to the left.
If the helicopter is rotating clockwise,
gently adjust the trim control to the
left until the helicopter stops drifting
to the right.
CAUTION: Do not touch the running rotors. Do not
y above or near someone’s head. Adult supervision is
required at all times.
!
Adjust the TRIM control
to the right...
Adjust the TRIM
control to the left...
...if the helicopter is
drifting clockwise
...if the helicopter is
drifting anti-clockwise
WARNING: Do NOT y near eyes or face.
!
ENGLISH 41
Guía de vuelo
Viento: Básicamente, son helicópteros a escala 1/40 (aproximadamente). Los helicópteros
de tamaño real no pueden volar en vientos altos, tampoco pueden hacerlo los modelos. Si un
helicóptero de tamaño real tiene dicultades para sobrepasar vientos de 50 mph, el modelo
tendrá la misma dicultad con vientos de 1 a 2 mph (es decir, en uno a escala 1/40 como
mucho) No hay nada que se pueda hacer con eso, es la física.
Aire acondicionado: El aire caliente sube y el aire frío baja, esto crea movimiento en el aire
causando un efecto llamado “corte del viento”. Básicamente, esto es cuando una columna de
aire caliente sube luego de que el aire frío baja. Muchos accidentes de aeronaves a gran escala
han sido causados por esto. Los aires acondicionados crean desplomes de corte del viento. Si
el helicóptero vuela a través de un corte del viento, parecerá que de repente vuela hacia arriba
o hacia abajo (según la dirección del corte del viento).
El efecto del suelo: Cuando un helicóptero está cerca del suelo, el aire que empuja hacia
abajo con su rotor no tiene dónde ir, el suelo está en medio del camino. Parte de ese aire
rebota, esto empuja el helicóptero hacia arriba. Cuando el helicóptero está cerca del suelo, se
elevará un poco más de lo que se elevaría normalmente. Esto es algo para tener en cuenta al
aterrizar.
El efecto del techo: De manera inversa al efecto del suelo, cuando vuela cerca de un techo,
se crea una pequeña bolsa de presión baja debajo del helicóptero, y se succionará hacia arriba.
Esto puede ser malo, si golpea el techo el helicóptero entrará en pérdida, caerá y posiblemente
se dañará.
Helicópteros múltiples: Si usa más de un helicóptero a la vez en un mismo espacio,
tenga cuidado al ajustar la banda del controlador y vincular los helicópteros. Quizás
descubra que el mismo controlador está a cargo de dos o más helicópteros, lo que
puede ocasionar choques, accidentes, heridas u otras consecuencias no deseadas.
Lugares donde volar: Debido a que los fuertes vientos pueden ser un problema, se
recomienda volar en interiores. Sin embargo, realmente necesita bastante espacio para poder
aprovechar el helicóptero. Algunos lugares que son Buenos para el vuelo incluyen garajes
grandes (mientras que no se encuentre el auto estacionado dentro), áreas de deportes en
interiores, hangares de aeronaves, plataforma para submarinos subterráneas secretas, etc.
(por qué jugaría con un helicóptero de juguete en su plataforma para submarino subterránea
secreta va más allá de nosotros). O una gran sala de estar con decoraciones delicadas ubicadas
en algún lugar fuera del paso, lo que tenga.
Poca carga de la batería: Para obtener la vida útil más prolongada posible de la
batería incorporada, nunca la descargue por completo. En cuanto el helicóptero
muestre algún signo de que funciona con poca carga de la batería (como respuestas
lentas o dicultades para mantener la altitud) apáguelo y cárguelo en cuanto pueda.
Para obtener más información sobre el cuidado de la batería, consulte “Advertencias
sobre la batería del helicóptero” en la página 13.
ESPAÑOL

40
Estabilizada
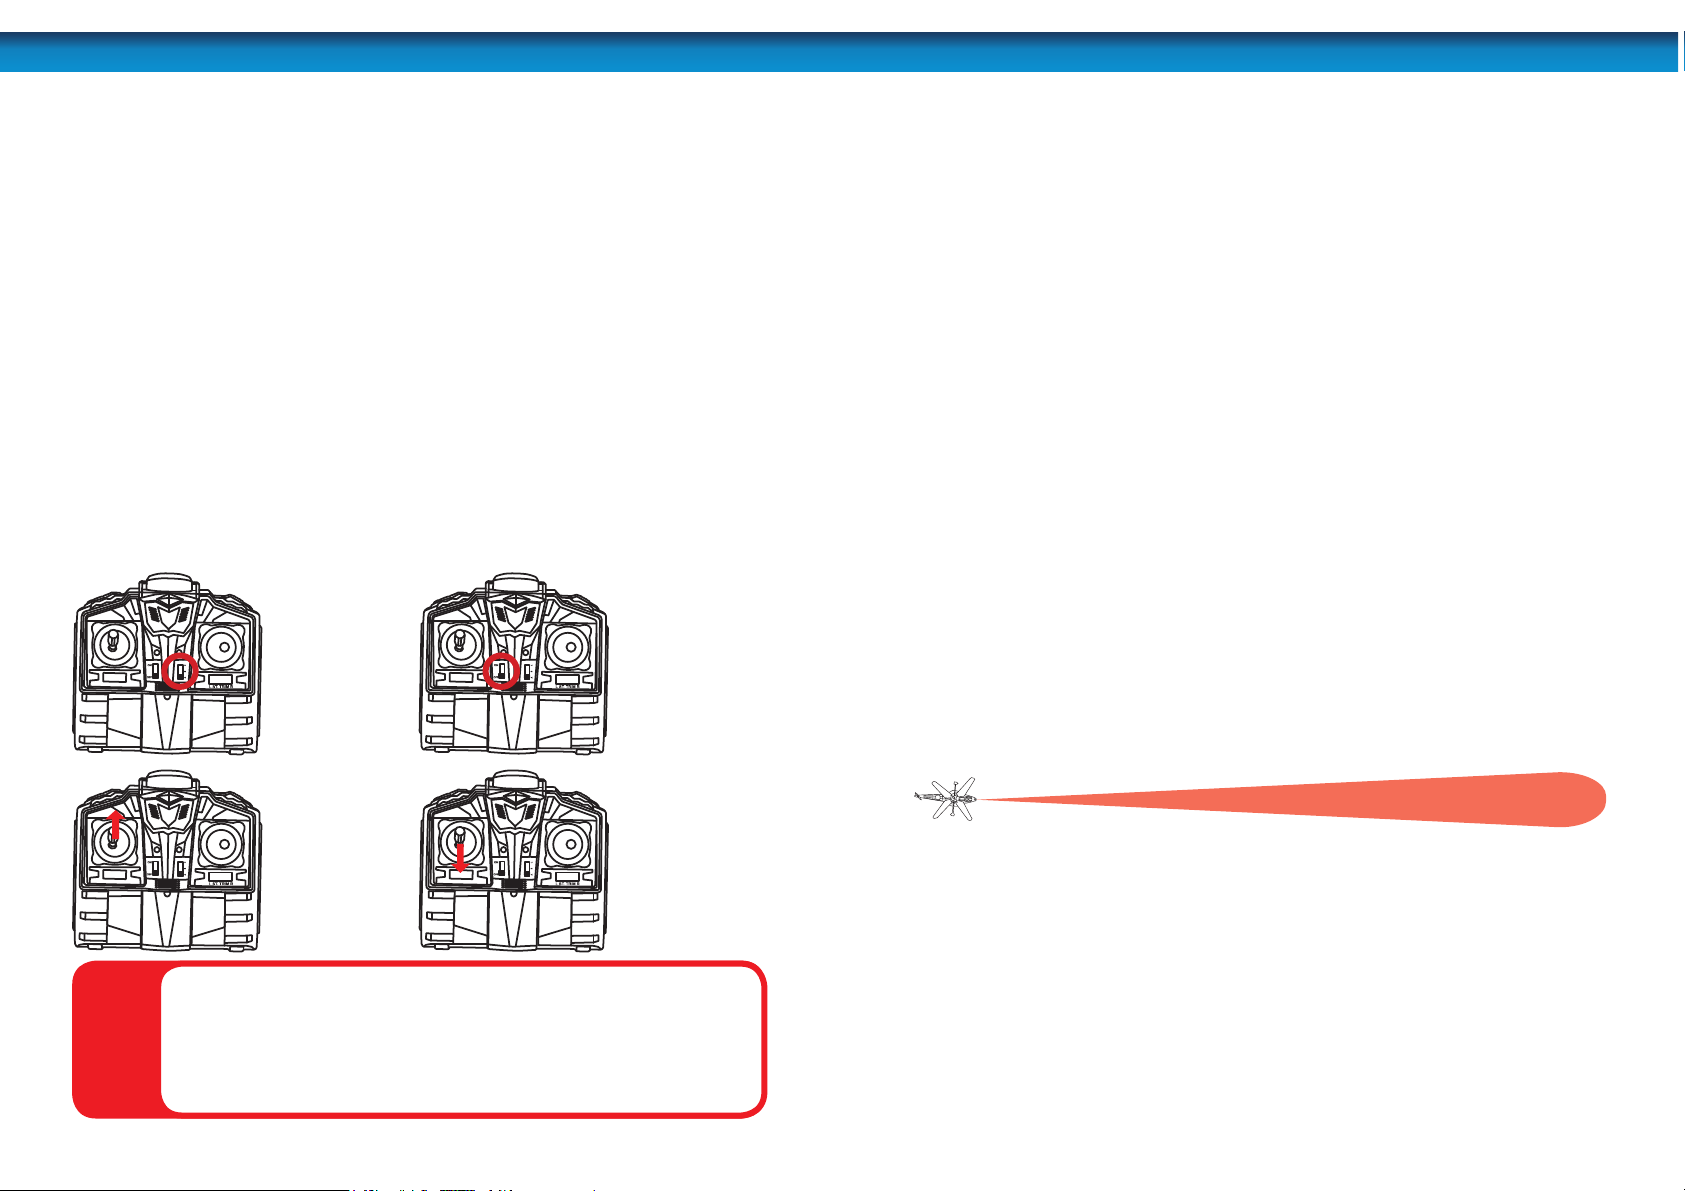
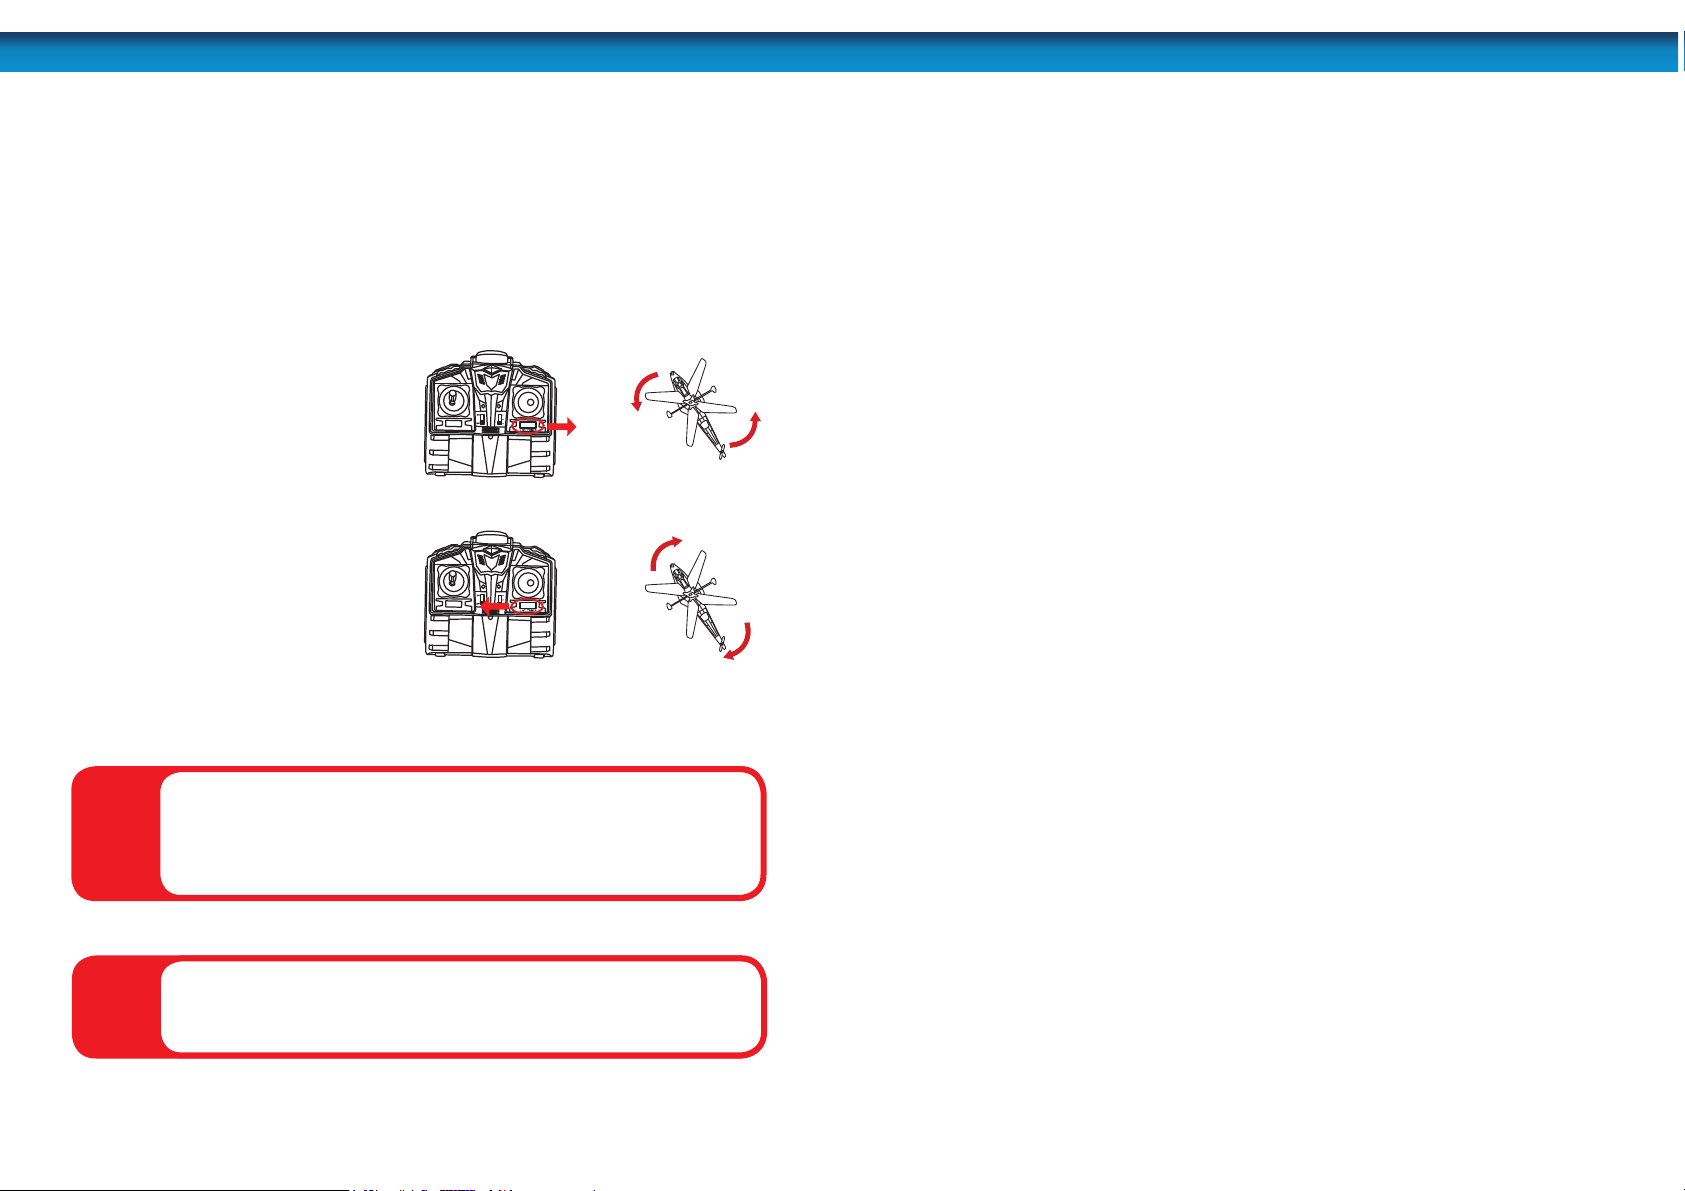
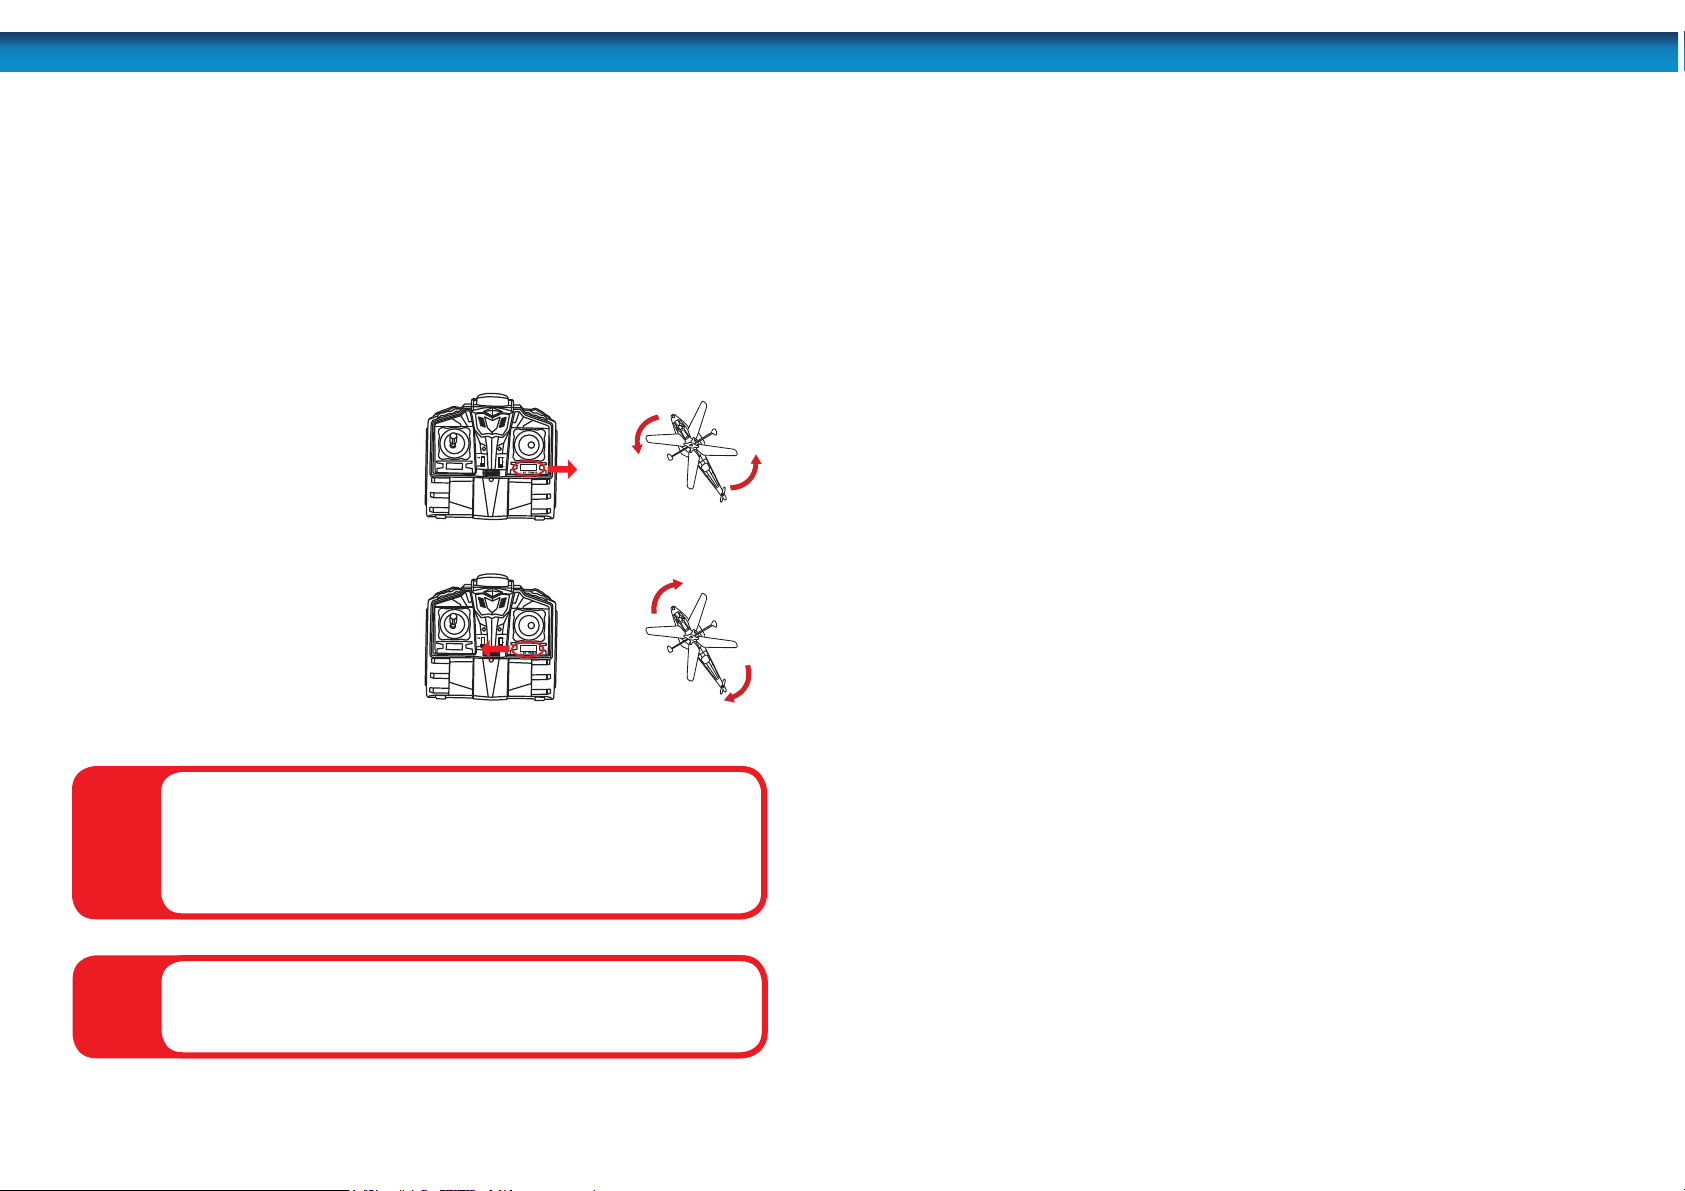
¿Qué es la rotación estabilizada?
Puede descubrir que el helicóptero gira hacia la izquierda o la derecha mientras
está suspendido en el aire, incluso cuando no está utilizando la vara derecha del
controlador. Esta rotación se debe a que los dos conjuntos de aspas del motor en
ocasiones pierden la sincronización y necesitan que se ajuste la estabilización.
El control de estabilización se encuentra debajo de la vara de control de vuelo en el
controlador y ajusta la velocidad de las aspas giratorias para mantener el helicóptero
volando en sentido recto.
La estabilización debe ajustarse cada vez que eleva el helicóptero (y en ocasiones
durante el vuelo) para asegurarse de que el aparato vuele en sentido recto.
Mientras el helicóptero está
suspendido en el aire, si gira en el
sentido contrario a las agujas del reloj,
ajuste el control de estabilización hacia
la derecha hasta que el helicóptero
deje de desplazarse hacia la izquierda.
Si el helicóptero gira en el sentido de
las agujas del reloj, ajuste el control
de estabilización con suavidad hacia
la izquierda hasta que el helicóptero
deje de desplazarse hacia la derecha.
PRECAUCIÓN: No toque los rotores cuando están en
funcionamiento. No vuele sobre o cerca de la cabeza de
alguien. Se requiere la supervisión de un adulto todo el
tiempo.
!
Ajuste el control de ESTABILIZACIÓN
hacia la derecha...
Ajuste el control de ESTABILIZACIÓN
hacia la izquierda...
...si el helicóptero se desplaza en
el sentido de las agujas del reloj
...si el helicóptero se desplaza
en el sentido contrario
a las agujas del reloj
ADVERTENCIA: NO vuele cerca de los ojos o cara.
!
ESPAÑOL 9
Flight Tips
Wind: Basically, these are (approximately) 1/40th scale helicopters. Full sized
helicopters can’t y in high winds – and neither can the models. If a full sized
helicopter has diculty overcoming 50mph winds, then the model will have the
same diculty with 1~2 mph winds (i.e. 1/40th as much). There’s nothing that can be
done about this, it’s just physics.
Air conditioning: Hot air rises and cool air falls – this creates movement in the air,
leading to an eect called“wind shear”. Basically, this is when there’s a column of hot
air going up next to cold air going down. Many full-scale aircraft accidents have been
caused by wind shear. Air conditioners create heaps of wind shear. If the helicopter
ies through wind shear, it will seem to suddenly y up or down (depending on the
direction of the wind shear).
The Ground Eect: When the helicopter is near the ground, the air it pushes down
with its rotor has nowhere to go – the ground is in the way. Some of this air bounces
back, this pushes the helicopter up. When the helicopter is near the ground, it will
get slightly more lift than it normally would. This is something to keep in mind when
landing.
The Ceiling Eect: Conversely to the ground eect, when you y too close to a
ceiling, a small pocket of low pressure is created above the helicopter, and it will be
sucked upwards. This could be bad – if you hit the ceiling, the helicopter will stall, fall
and possibly be damaged.
Multiple Helicopters: If you’re using more than one helicopter in a space at once, be
very careful when setting the controller band and pairing them to the helicopters.You
may nd that the more than one helicopter will be controlled by a single controller,
and this can lead to crashes, accidents, injuries or other very undesirable outcomes.
Places to Fly: Because high winds can be a problem, we recommend ying indoors.
However, you really do need a bit of space to get the most out of the helicopter.
Some places which are good for ight include large garages (whilst the car’s not
parked there), indoor sports areas, aircraft hangars, secret underground submarine
pens and so on (though why you’d y a toy helicopter in your secret underground
submarine pen is beyond us). Or a large lounge room with delicate items stashed
somewhere out of the way - whatever you’ve got.
Low Battery: To get the longest possible life from the built-in battery, never
completely discharge it. As soon as the helicopter shows any sign of running low on
power (such as responding slowly or being unable to maintain altitude easily) turn it
o and charge it as soon as practicable. For more information about battery care, see
“Helicopter Battery Warnings” on page 13.
ENGLISH

10
Firing:
To re the helicopter’s “weapon” tap the button located on the right hand shoulder
of the controller.
When your helicopter res:
The three LEDs on the sides of the helicopter will ash, and the internal speaker
inside the controller will make the sound of a missile ring.
The helicopters have unlimited “ammunition”. There’s a short delay of approximately
one second between shots.
Lives
The three LEDs on the side of the helicopter indicate how many lives you have
remaining.
Your helicopter has three lives, as does your opponent’s. Each successful hit removes
one life from the helicopter. Your helicopter will continue to y just ne with “zero”
lives remaining - but one more hit and you’re out!
When your helicopter is hit:
It will spin out of control for about three seconds, and the LEDs on the side of the
helicopter will ash. Your helicopter will register the loss of one“life”.
When you’re out of lives:
The helicopter will spin and descend, landing softly.
Your lives count will automatically be reset once the helicopter has landed and the
throttle is set to the zero position. (Your opponent should probably do the same, you
know, “fairness”and all.)
The Game
The FIRE Button
Indicator LEDs
ENGLISH 39
Guide de pilotage
Moverse hacia abajo y hacia arriba
La altura de vuelo del helicóptero es
controlada por el acelerador que varía la
velocidad de los rotores giratorios.
Ascenso:desplaceelaceleradorsuavemente
hacia ARRIBA para aumentar la velocidad de
giro de los rotores y hacer que el helicóptero
ascienda.
Descenso: Desplace el acelerador hacia
ABAJO para reducir la velocidad de los
rotores giratorios y hacer que el helicóptero
descienda.
Para obtener buenos resultados, sea suave
y sutil. La mejor manera de hacer que el
helicóptero vuele bien es realizar pequeños
ajustes lentamente y con cuidado.
Hacia atrás, hacia adelanta
l comando derecho en el controlador afecta
la dirección del helicóptero, es parecido al
comando derecho en el controlador de un
video juego.
Hacia adelante: El desplazamiento de la
vara derecha hacia arriba inclinará la parte
frontal del helicóptero hacia abajo y hará
que éste se mueva hacia adelante.
Hacia atrás: La extracción de la vara derecha
hacia abajo inclinará la parte frontal del
helicóptero hacia arriba y hará que éste se
mueva hacia atrás.
Para hacer girar el helicóptero
Mueva el comando derecho a uno de
los lados. Esto causará que los rotores
principales cambien sus velocidades,
causando que el cuerpo del helicóptero gire
en el lugar.
Rotar/Girar hacia la derecha: para hacer
que el helicóptero gire hacia la derecha,
desplace la vara derecha (el timón) hacia la
derecha.
Rotar/Girar hacia la izquierda: para hacer
que el helicóptero gire hacia la izquierda,
desplace la vara derecha (el timón) hacia la
izquierda.
ESPAÑOL

38
Antes de poder comenzar a jugar, deberá vincular los controles remotos a los dos helicópteros.
Es de vital importancia que los dos controladores se conguren en bandas de control
diferentes. Puede hacer esto al seleccionar Aen un controlador y Ben el otro. Cada
controlador puede utilizarse con cualquiera de los helicópteros; el proceso de vinculación
asigna un controlador a cada helicóptero.
Para vincular un helicóptero:
1. Asegúrese de estar lejos de cualquier otro helicóptero o dispositivo/controlador
infrarrojo que pudiera generar interferencia con el suyo.
2. ENCIENDA un helicóptero y un control remoto. Coloque el helicóptero sobre el piso.
3. Desplace la vara izquierda (acelerador) completamente hacia adelante hasta la
posición máxima y luego hacia atrás hacia su posición inicial.
4. Si desplaza el acelerador hacia adelante otra vez con suavidad, el helicóptero debe
responder y los rotores comenzarán a girar. El helicóptero ya está vinculado con ese
control remoto.
Tenga cuidado cuando prueba la vinculación. Una vez vinculados el helicóptero al
control remoto, el desplazamiento del acelerador otra vez a la posición máxima hará
que las aspas del rotor giren a máxima velocidad. Es probable que el helicóptero
salga volando a alta velocidad y provoque resultados inesperados y posiblemente
peligrosos.
Sincronización del control remoto
Cuando use ambos helicópteros a la vez, asegúrese de que un
controlador esté congurado en el CANAL A y el otro en el CANAL B.
Vincule los helicópteros con mucho cuidado. Para obtener mejores
resultados, vincule los helicópteros en habitaciones separadas.
Asegúrese de que no estén uno dentro de la línea visual del otro
durante la vinculación.
!
Paso 3: desplace
el acelerador
hasta la posición
máxima.
Paso 4: vuelva
a desplazar el
acelerador hasta
llegar a cero.
Paso1:determine
la banda de
control (A o B).
Paso 2: encienda el
control remoto.
ESPAÑOL 11
How the Game Works
Ever play laser tag? Basically, it involves strapping little sensors to yourself, and
carrying a gun (well, the equivalent of a television remote control shaped like a gun)
which you can use to shoot other people’s sensors. The helicopters work much the
same way, but they use infrared light to shoot at each other.
The IR (infrared) “weapon” LEDs are located on the front of the helicopters, facing
forwards. They have a range of up to 10m/30ft under typical conditions - about
the same as the remote control. Bright ambient light, smoke, dust or any other
atmospheric interference will reduce the range of the infrared beams.
The infrared beam from the helicopter is detected by the same sensor that detects
commands from the remote control.
About the infrared LED“weapons”:
The infrared LEDs are completely harmless, and are about as powerful as the LED in
a television remote control or similar device.
The infrared LEDs aren’t lasers. They don’t re in a perfectly straight line, and they
do have a limited range. If you think of a focused ashlight beam with a bright spot
in the center then you’ve got the idea - only the bright spot in the center will trigger
the infrared sensor.
The beam does spread out a little bit with distance, and you can use this to your
advantage! The beam will also be reected by mirrors and other shiny things: does
shooting your foe around corners sound like a good idea to anyone?
Diagram showing the approximate spread of the infrared “weapon” beam.
If the enemy helicopter’s infrared sensor is somewhere within the marked area, it will register a hit.
Be mindful around other devices which use IR remote controls. Either the
helicopter’s remote control or“weapons” may aect the other device causing
unexpected behavior, or the other device might interfere with the helicopter.
ENGLISH

12
Safety Information
Battery Warnings:
• Requires 6 x 1.5V AA Alkaline batteries (not included).
• Rechargeable batteries are NOT recommended.
• Replacing batteries must be undertaken by a competent adult.
• Follow the polarity diagram ( + / - ) in the battery compartment.
• Promptly remove dead/exhausted batteries from the controller.
• Dispose of used batteries responsibly.
• DO NOT incinerate used batteries.
• DO NOT dispose of batteries in re, as batteries may explode or leak.
• DO NOT mix new and old batteries or types of batteries (i.e. alkaline/standard).
• DO NOT recharge non-rechargeable batteries.
• DO NOT short circuit the supply terminals.
Precautions and Maintenance
• Never y near your face. Keep rotor away from your ngers, hair, eyes and other
body parts.
• Always lift o from a at surface.
• Never hold the ying helicopter in your hand, or hold the helicopter when lifting o.
• DO NOT launch helicopter near people or animals.
• Stay away from obstacles and electrical hazards.
• To clean, wipe gently with a damp cloth. Avoid use of solvents, as these can
damage the plastic components.
• Keep the helicopter and remote away from heat sources.
• Do not submerge the helicopter or remote control in water. This will damage the
electronic components, and could pose a severe risk to the built-in battery.
• Turn o controller/charger and helicopter while not in use. Remove batteries
from the controller when not in use.
• Parental guidance is required for younger users.
• Keep your helicopter close and within line of sight – if the line-of-sight to the
controller is lost, you may lose control of the helicopter.
• For best performance, use only fresh Alkaline AA batteries in the controller.
• Read and obey all warnings and safety guidelines in this manual.
• The controller and charger are specically designed to charge this helicopter.
Never use any other charging equipment!
Special Notice to Adults:
• The helicopters are NOT intended for use by children under fourteen (14) years
old, unless directly supervised by a competent adult at all times.
• The helicopters must only be used with the supplied controllers/chargers.
• Regularly examine the helicopter and controller for any damage to the plugs,
enclosures, rotors, battery covers and other parts. In the event of any damage,
neither the helicopters nor controllers should be used until the damage is
completely repaired.
ENGLISH 37
Reemplazo de baterías en el controlador
1. El compartimiento para las pilas está en la parte de atrás del control remoto.
Con un destornillador de precisión, aoje el tornillo que sostiene la tapa del
compartimiento para pilas en su lugar y quítela para acceder al compartimiento.
2. Inserte 6 pilas alcalinas AA en el compartimiento, asegurándose de que cada
una esté orientada en el sentido correcto según su polaridad. El sentido correcto
se muestra dentro del compartimiento para pilas y también en la imagen a
continuación.
3. Vuelva a colocar la tapa del compartimiento para pilas, asegurándola con el
tornillo que retiró en el paso 1.
Carga del helicóptero mediante el cable USB
Puedeutilizarelcable USB incluido para cargarel helicópterodesde unacomputadora
o un suministro de energía con conexión USB.
No deje el helicóptero conectado a la alimentación USB durante más de 90 minutos.
No cargue el helicóptero desde ningún suministro de energía diferente a 5 V 500 mA.
Es una buena idea cargar el helicóptero mediante el cable USB cuando se tiene
acceso a este tipo de conexión, ya que extenderá en gran medida la vida útil de las
pilas del control remoto; el controlador mismo utiliza mucha menos energía que la
que requiere la carga del helicóptero.
Instale 6 pilas
alcalinas AA
Retire el
compartimiento
para pilas
Vuelva a colocar
la tapa del
compartimiento
Use only fresh, high quality alkaline batteries in the
controller. Don’t use rechargeable batteries, as they
simply don’t have high enough voltage to charge the
helicopter.
!
ESPAÑOL

36
Carga del helicóptero
Antes de poder emprender el vuelo,
debe cargar la batería del helicóptero
mediante el cable de carga que se
extiende desde el control remoto.
• Asegúrese de que el helicóptero
esté APAGADO antes de cargarlo.
Si queda encendido, no cargará.
• Abra el compartimiento del cable
de carga en el control remoto.
• Inserte el cable de carga en el toma
de la base del helicóptero.
• ENCIENDA el control remoto.
• El helicóptero tardará de 45
a 60 minutos en cargarse. No
sobrecargue el helicóptero.
Tampoco lo deje conectado al
cargador durante más de noventa
(90) minutos.
Mientras el helicóptero se está cargando, la
luz de carga en el controlador mostrará el
color VERDE.
El LED de carga se APAGARÁ cuando el
helicóptero esté completamente cargado.
Nota: si el helicóptero tiene problemas para emprender el vuelo (y no se quedó sin
vidas, consulte “El juego” en la página 10) eso signica que la batería tiene poca
carga y necesita volver a cargarse.
Nunca deje el helicóptero sin atención mientras lo
cargue. No deje el helicóptero cargando durante más
de 90 minutos.
!
ESPAÑOL 13
Helicopter Battery Warnings
The helicopter has a built in Lithium Polymer battery. This battery is light and
powerful, as its chemistry is based on lithium, a light and extremely volatile metal.
• The battery pack in the helicopter will become warm if charged for too long and
could become damaged. Do not overcharge the battery in the helicopter.
• Charge battery in an isolated, controlled environment. Keep far away from
ammable materials.
• Never leave the helicopter unattended while charging.
• The battery pack in the helicopter becomes warm after use. We recommend you
allow 30 minutes for it cool before re-charging the helicopter.
• Never completely exhaust the battery. When the helicopter starts to lose power,
turn it o and charge it as soon as practicable.
• DO NOT dispose of the batteries in the remote control or the helicopter in re as
they may explode.
• The battery must be disposed of responsibly.
• DO NOT expose to direct sunlight: there is a risk that the battery may overheat,
ignite and/or explode.
• DO NOT disassemble, modify, heat, or short circuit the battery. Don’t place it in
re or leave in hot places or near heat sources.
• DO NOT drop the battery or subject it to strong impacts.
• DO NOT allow the battery to get wet.
• Only charge the battery from the supplied charging equipment. Using other
charging equipment will void your warranty, may damage the battery and poses
a risk of re or explosion.
• Use the battery only in this helicopter, and use only this battery in the helicopter.
• Read these instructions carefully and thoroughly, and obey all guidelines herein.
• In the unlikely event of leakage or explosion, use sand or a chemical re
extinguisher to extinguish the batteries.
If your high school chemistry teacher ever demonstrated what happens when
sodium is placed in water (“bam” is the technical description of the outcome) then
you’re somewhat familiar with how volatile lithium is – except that lithium is lighter
(and therefore packs a bigger bang per gram) than sodium is. Basically, obey all the
guidelines and respect the power of lithium!
DANGER: Never insert any sharp objects, pins or
screws into the helicopter as this may puncture the
internal battery!
!
ENGLISH

14
Cannot
control the
chopper
• Ensure the controller is switched ON.
• Ensure the helicopter is switched ON.
• Try pairing the remote and the helicopter again.
• Check the batteries in the remote and if needed, replace with new
batteries.
• Ensure the helicopter is fully charged.
• Do not y the helicopter in high winds as this may make it hard
to control.
• Center the trim control and if needed, adjust the trim again.
Helicopter
will not
ascend
The helicopter will automatically land if you lose all three lives. Reset
the helicopter to get your lives back. If that doesn’t work, then maybe:
• The charge in the helicopter may be too low. You will need to
recharge the helicopter.
• Check that you are providing enough throttle to lift the chopper.
• Something might be interfering with the control signal. Avoid
bright environments (particularly direct sunlight), dusty or smoky
environments and other infrared devices.
Helicopter
lands too
fast
• You may be reducing the throttle too fast. Reduce the throttle
gently to get a gradual descent to the ground and a softer landing.
One
helicopter
seems
easier to
hit than the
other
This is most likely due to the positioning of the infrared sensor on
the base of the helicopter. A change to the positioning or angle of
this sensor will alter the sensitivity to infrared light and, therefore,
increase or decrease the distance at which the helicopter will register
either a hit from the opposing helicopter or commands from the
remote control.
• Ensure that the placement of the infrared sensor is identical for
both helicopters.
• This may need to be adjusted over time - with successive uses
and impacts, the sensor may be displaced.
Troubleshooting
ENGLISH 35
El control remoto
Comando derecho
Dirección de
rotación
LED indicador de
encendido
Comando
izquierdo
Botón de fuego
Entrada para cargaInterruptor de
encendido/
apagado
LED indicador de carga
Interruptor de
selección de
banda infrarroja
IMPORTANTE: ¡NO haga chocar un helicóptero contra
el otro! Esto dañará los helicópteros y puede causar
heridas.
!
ESPAÑOL

34
El helicóptero
Rotores superiores
Rotores inferiores
LED de“arma”infrarroja Interruptor de encendido/apagado
Entrada para carga
Rotor de cola
1. Coloque el helicóptero sobre el piso con la cola en sentido contrario a usted.
Asegúrese de estar lejos de multitudes, animales, obstáculos y elementos de
valor que podrían romperse. ENCIENDA el helicóptero.
2. Asegúrese de que el acelerador del controlador esté al mínimo y luego encienda
el controlador. Vincule el controlador con el helicóptero (consulte “Conexión
de los controles remotos”en la página 6).
3. Ahora, uno de los helicópteros está listo para volar.
4. Repita los pasos para el segundo helicóptero.
Consulte las siguientes páginas de la guía para saber cómo controlar el helicóptero.
Cómo emprender el vuelo
ESPAÑOL 15
Technical Specications
Charging time Approx. 40 - 50 minutes
Flying time Approx. 5 - 8 minutes
Control distance Approx. 8 - 10m / 25 ft - 30 ft (line of sight required)
Control Method Infrared
Battery (helicopter) DC 3.7V output
Battery (remote control) AA 1.5V x 6 (not included)
CHOKING HAZARD: Small parts. NOT for children
under 3 years.
!
Specications & Warranty
Limited Warranty Terms & Conditions
Swann Communications warrants this product against defects in workmanship
and material for a period of one (1) year from it’s original purchase date. You must
present your receipt as proof of date of purchase for warranty validation. Any unit
which proves defective during the stated period will be repaired without charge
for parts or labour or replaced at the sole discretion of Swann. The end user is
responsible for all freight charges incurred to send the product to Swann’s repair
centres. The end user is responsible for all shipping costs incurred when shipping
from and to any country other than the country of origin.
The warranty does not cover any incidental, accidental or consequential damages
arising from the use of or the inability to use this product. Any costs associated with
the tting or removal of this product by a tradesman or other person or any other
costs associated with its use are the responsibility of the end user. This warranty
applies to the original purchaser of the product only and is not transferable to any
third party. Unauthorized end user or third party modications to any component
or evidence of misuse or abuse of the device will render all warranties void.
By law some countries do not allow limitations on certain exclusions in this
warranty. Where applicable by local laws, regulations and legal rights will take
precedence.
For Australia: Our goods come with guarantees which cannot be excluded under
Australian Consumer Law. You are entitled to a replacement of refund in the case
of major failure and for compensation for any other reasonably foreseeable loss or
damage. You are also entitled to have the goods repaired or replaced if the goods
fail to be of an acceptable quality and the failure does not constitute major failure.
ENGLISH

16
© Swann Communications 2011
Helpdesk / Technical Support Details
Swann Technical Support
All Countries E-mail: tech@swannsecurity.com
Telephone Helpdesk
USA toll free
1-800-627-2799
(Su, 2pm-10pm US PT)
(M-Th, 6am-10pm US PT)
(F 6am-2pm US PT)
USA Exchange & Repairs
1-800-627-2799 (Option 1)
(M-F, 9am-5pm US PT)
AUSTRALIA toll free
1300 138 324
(M 9am-5pm AUS ET)
(Tu-F 1am-5pm AUS ET)
(Sa 1am-9am AUS ET)
NEW ZEALAND toll free
0800 479 266
UK
0203 027 0979
FCC Verication
This equipment has been tested and found to comply with the limits for Class B digital
device, pursuant to part 15 of the FCC Rules. These limits are designed to provide
reasonable protection against harmful interference in a residential installation. This
equipment generates, uses and can radiate radio frequency energy and, if not installed
and used in accordance with the instructions, may cause harmful interference to radio
or television reception, which can be determined by turning the equipment o and on,
the user is encouraged to try to correct the interference by one or more of the following
measures:
Reorient or relocate the receiving antenna
Increase the separation between the equipment and the receiver
• Connect the equipment into an outlet on a circuit dierent from that to which the receiver
is connected
• Consult the dealer or an experienced radio/TV technician for help
WARNING: Modications not approved by the party responsible for compliance could void
user’s authority to operate the equipment.
l
e
s
d
o
,
g
r
d
ENGLISH 33
Sky Duel
ESPAÑOL
ESPAÑOL

32
© Swann Communications 2011
FRANÇAIS
Vérication FCC
Note : Cet équipement a été testé et est en conformité avec les limites édictées dans le paragraphe 15
des Règlementations FCC, relatif aux équipements numériques de classe B. Ces limites ont été dénies
dans le but de fournir une protection raisonnable contre les interférences néfastes dans les installations
résidentielles. Cet équipement génère, utilise et peut irradier des énergies de fréquences radio et, s’il
n’est pas installé dans le respect des instructions fournies, peut provoquer des interférences auprès des
appareils de réception radio-télévisée. Ces dernières peuvent être déterminées en allumant et éteignant
l’équipement installe. L’utilisateur est incité à essayer, si besoin est, de corriger les interférences à l’aides
des mesures suivantes :
Réorienter ou déplacer l’antenne réceptrice.
Augmenter l’espace entre l’équipement et le récepteur
Brancher l’équipement sur une prise ou un circuit diérents de celui auquel le récepteur est connecté.
Consulter le revendeur ou un technicien radio/télévision expérimenté.
Ces appareils sont conformes au paragraphe 15 des normes FCC. Leur opération est sujette aux deux
conditions suivantes :
(1) ces appareils ne doivent pas provoquer d’interférence dangereuse, et
(2) ces appareils doivent accepter toute inteférence reçue, y compris les interférences pouvant entraîner
un fonctionnement non désiré.
Aide / Support Technique
Félicitation pour votre achat. Si à n’importe quel moment ce produit ne fonctionne pas quand vous le
branchez pour la première fois ou si vous vous rencontrez un problème, ne le rapportez pas au magasin !
Utilisez le guide d’installation /
Manuel de la boite, ou
Visitez le site www.swannsecurity.com
Pour les FAQ, les astuces de dépannage
et plus encore, ou
Contactez notre équipe d’experts du
support technique…
Europe eusupport@swannsecurity.com
Etats-Unis tech@swannsecurity.com
Europe (Royaume-Uni)
0203 027 0979
Lun.-Ven., 10h-19h CET
Sans frais États-Unis:
1-800-627-2799
(Dim, 14h00- 22h00 Heure du Pacique)
(Lun-Jeu, 6h00-10h00 Heure du Pacique)
(Ven, 6h00-14h00 Heure du Pacique)
17
FRANÇAIS
Sky Duel
Ç
FRAN
Ç
AI
S
FRANÇAIS

18
L’hélicoptère
Rotors supérieurs
Rotors inférieurs
« Arme » à rayon infrarouge Interrupteur d’alimentation & Prise de charge
Rotor de
queue
1. Posez l’hélicoptère sur le sol, la queue étant dans votre direction opposée.
Assurez-vous d’être susamment éloigné(e) de tout groupe de personnes,
animal ou objet faisant obstruction ou pouvant se briser. Allumez l’hélicoptère.
2. Assurez-vous que la manette de gaz sur la télécommande soit sur la position
minimale et allumez la télécommande. Jumelez la télécommande à l’hélicoptère
(voir « Jumeler les télécommandes » en page 6).
3. Le premier hélicoptère est maintenant prêt à s’envoler.
4. Répétez la même opération pour le second hélicoptère.
Vériez dans les pages suivantes les instructions sur la façon de commander votre
hélicoptère.
Envol de l’hélicoptère
FRANÇAIS 31
Spécications techniques
Temps de charge Env. 40 - 60 minutes
Le temps de vol Env. 5 - 8 minutes
Contrôle à distance Env. 8 - 10 m / 25 ft - 30 ft (ligne de vue nécessaire)
Méthode de contrôle Infrarouge
Batterie (hélicoptère) DC 3.7V output
Batterie (télécommande) AA 1.5V 6 (non inclus)
RISQUE D’ÉTOUFFEMENT : Petites pièces. Non
recommandé pour les enfants en bas de 3 ans.
!
Spécications & Garantie
FRANÇAIS
Swann Communications garantit ce produit contre tous les défauts de fabrication et de
matériel pour une période d’un (1) an à partir de sa date d’achat initiale. Vous devez
présenter votre ticket de caisse comme preuve d’achat pour valider la garantie. Toute unité
qui se révèlerait défectueuse pendant la période mentionnée sera réparée sans frais pour les
pièces et la main d’oeuvre, ou remplacée à la seule discrétion de Swann. La réparation ou le
remplacement sera garanti soit pour quatre-vingt-dix jours soit pour le reste de la période
initiale de garantie, selon la période la plus longue. L’utilisateur final est responsable des frais
de port subis pour envoyer le produit vers les centres de réparation de Swann.
L’utilisateur final est responsable pour tous les frais de port et d’expédition subis lors de
l’expédition de ce produit à partir et vers un autre pays que le pays d’origine. La garantie
ne couvre pas les dommages dus à des incidents, des accidents ou résultant de l’utilisation,
ou de l’incapacité d’utiliser ce produit. Tous frais associés de montage ou de démontage de
ce produit par un artisan ou toute autre personne, ou tous les autres frais associés à son
utilisation sont de la responsabilité de l’utilisateur final. Cette garanties’applique seulement à
l’acheteur initial du produit, et n’est pas transférable à une tierce partie.
Les modifications non-autorisées par l’utilisateur ou toute tierce partie de n’importe
quelle composante ou tout preuves de mauvaise utilisation ou d’abus de l’appareil
annuleront toute garantie.

30
L’hélicoptère
ne peut
pas être
commandé
• Assurez-vous que l’interrupteur de la télécommande soit sur ON
(MARCHE).
• Assurez-vous que l’interrupteur de l’hélicoptère soit sur ON (MARCHE).
• Essayez de jumeler à nouveau la télécommande et l’hélicoptère.
• Vériez les piles de la télécommande et, au besoin, remplacez-les par
des piles neuves.
• Assurez-vous que l’hélicoptère soit complètement chargé.
• Ne faites pas voler l’hélicoptère par vent fort dans la mesure où son
contrôle pourrait devenir dicile.
• Centrez la commande de compensation rotationnelle et, au besoin,
réglez-la à nouveau.
L’hélicoptère
ne veut pas
prendre de
l’altitude
L’hélicoptère atterrira automatiquement si vous perdez les trois vies.
Réinitialisez l’hélicoptère pour récupérer vos vies. Si le jeu ne fonctionne
toujours pas, c’est que peut-être :
• La charge de la pile de l’hélicoptère est trop faible. Vous devrez
recharger l’hélicoptère.
• Vériez que vous ouvrez susamment les gaz pour faire décoller
l’hélicoptère.
• Il se peut que quelque chose interfère avec le signal de commande.
Évitez de jouer dans des lieux trop éclairés (surtout ceux exposés
aux rayons du soleil), trop poussiéreux ou trop enfumés ainsi qu’en
présence d’autres appareils à infrarouge.
L’hélicoptère
atterrit trop
rapidement
• Il se peut que vous ayez réduit les gaz trop rapidement. Réduisez
doucement les gaz pour que l’hélicoptère perde régulièrement de
l’altitude et atterrisse en douceur.
Un
hélicoptère
semble plus
facile à tirer
dessus que
l’autre
Ce qui est très probablement dû à la position du capteur infrarouge sur
la partie inférieure de l’hélicoptère. Changer la position ou l’angle de ce
capteur modiera sa sensibilité à la lumière infrarouge et, par conséquent,
augmentera ou diminuera la distance à laquelle l’hélicoptère enregistrera
un tir réussi en provenance de l’hélicoptère adversaire ou les commandes
émises par la télécommande.
• Assurez-vous que la position du capteur infrarouge soit la même sur
les deux hélicoptères.
• Ce qui peut nécessiter un nouveau réglage plus tard, le capteur
pouvant bouger à la suite d’une utilisation ou d’impacts répétés.
Dépannage
FRANÇAIS 19
La télécommande
Manette de droite
Compensation
rotationnelle
Voyant de mise sous
tension
Manette de
gauche
Bouton de tir
Prise de chargeInterrupteur
d’alimentation
Voyant de charge
Sélecteur de bande
infrarouge
IMPORTANT : NE PAS provoquer d’accidents entre les
hélicoptères! Ce qui pourrait à coup sûr endommager les
hélicoptères et être la cause de blessures corporelles.
!
FRANÇAIS

20
Charger l’hélicoptère
Avant qu’il ne puisse prendre son
envol, il faut que vous chargiez la pile
de l’hélicoptère à l’aide du câble de
charge qui sort de la télécommande.
• Assurez-vous que l’hélicoptère soit
éteint avant d’essayer de le charger.
S’il est allumé, il ne se chargera pas.
• Ouvrez le logement du câble de
charge sur la télécommande.
• Insérez le câble de charge dans la
prise située dans la partie inférieure
de l’hélicoptère.
• Allumez la télécommande.
• La charge devrait prendre entre 40
et 60 minutes. Ne surchargez pas
la pile de l’hélicoptère au-delà des
limites et ne le laissez pas branché
sur le chargeur plus de quatre-
vingt-dix (90) minutes.
Pendant que l’hélicoptère se charge, le
voyant de charge sur la télécommande sera
VERT.
Le voyant de charge s’éteindra quand
l’hélicoptère sera complètement chargé.
Remarque : si l’hélicoptère à des dicultés pour décoller (et si vous n’êtes pas à
court de vies - voir « Le jeu » en page 10), cela veut dire que la pile est faible et doit
être rechargée.
Ne jamais laisser l’hélicoptère sans surveillance
lorsque qu’il se recharge. Ne laissez pas l’hélicoptère
se recharger plus de 90 minutes.
!
FRANÇAIS 29
l’hélicoptère ni le contrôleur ne doivent être utilisés jusqu’à ce que le dommage ait
été réparé.
Instructions Piles Li-Po
L’hélicoptère a une pile Lithium Polymer intégrées. Ces piles sont légères et puissantes,
puisque leur composition chimique est basée sur le lithium, un métal léger et
extrêmement volatil.
• L’ensemble pile de l’hélicoptère deviendra chaud s’il est chargé trop longtemps, ce
qui pourrait l’endommager. Ne pas surcharger la pile de l’hélicoptère.
• Charger les piles dans un environnement isolé et contrôlé. Garder éloigné des
matériaux inammables.
• Ne jamais laisser l’hélicoptère sans surveillance lorsque qu’il se recharge.
• The battery pack in the helicopter becomes warm after use. We recommend you allow
30 minutes for it cool before re-charging the helicopter.
• Ne jamais aaiblir complètement la pile. Lorsque l’hélicoptère commence à perdre de
la puissance, fermez le et chargez le aussitôt que possible.
• NE PAS jeter au feu les piles de la télécommande ou de l’hélicoptère dans la mesure
où elles pourraient exploser.
• Les piles doivent être disposées de façon responsable.
• Ne pas exposer à la lumière directe du soleil : il y a un risque que la pile surchaue,
s’enamme et/ou explose.
• Ne pas démonter, modier ou court-circuiter la pile. Ne pas la placer dans du feu ou
la laisser dans des endroits chauds ou près des sources de chaleur.
• Ne pas laisser tomber la pile ou l’exposer à des gros impacts.
• Ne pas laisser la pile se mouiller.
• Charger la pile uniquement avec l’équipement de charge fourni. Utiliser tout autre
équipement de charge annulera la garantie, peut endommager la pile et pose un
risque de feu ou d’explosion.
• Utiliser la pile uniquement dans cet hélicoptère et utiliser uniquement cette pile dans
l’hélicoptère.
• Lire ces instructions attentivement et en entier, et respecter toutes les directives dans
la présente.
• Dans l’éventualité peu probable d’une fuite ou d’une explosion, utiliser du sable ou
un extincteur chimique pour éteindre les piles.
Si votre professeur de chimie a déjà démontré ce qui se produit lorsque le sodium est
placé dans l’eau (« boum » est la description technique du résultat) alors vous êtes
quelque peu familier avec le degré de volatilité du lithium – sauf que le lithium est encore
plus volatile que le sodium! En résumé, respectez toutes les directives et respectez la
puissance du lithium!
DANGER: Ne jamais insérer d’objets pointus, broches
ou vis dans l’hélicoptère puisque ceci peut crever les
piles internes!
!
FRANÇAIS
Table of contents
Languages:
Other Swann Toy manuals

Swann
Swann Micro Lightning remote control model... User manual

Swann
Swann Xtreem Micro Attack User manual

Swann
Swann iFly Micro Lightning User manual

Swann
Swann Crimson Eye User manual

Swann
Swann Air Duel User manual

Swann
Swann Sky Eye User manual

Swann
Swann Air Force User manual

Swann
Swann Missile Strike User manual

Swann
Swann Black User manual