Swimline HydroTools Solar Reel 50050 User manual

Premium Aluminum Reel System
For Above Ground Solar Pool Covers
Item #50050 Instructions

1. Congratulation on your purchase of our PREMIUM ALUMINUM Solar Reel System for Above Ground Pools.
Please follow the instructions carefully so as to not void our warranty.
2. Please use your solar blanket and reel assembly in the manner it was intended for:
a. Your solar blanket is not a safety cover
b. Remove the solar blanket and Solar Reel assembly from the pool completely before swimming use.
c. Do not store the solar blanket on the ground in direct sunlight, as it will burn the lawn
3. Preparation & Assembly: Check inventory of all items and assemble as illustrated below:
PARTS LIST
(2) Resin Mounting Brackets
(2) Aluminum Bases
(2) Aluminum Base Posts
(4) Axle Bearings (Installed)
(2) Lock collars w/ Allen screws
(1) Allen Wrench for lock collar
(1) 3” Aluminum Tube Insert
(1) 3” Aluminum Tube Insert w/ Axle
(2) Base Safety Caps
(2) Hold Down Screws
(2) Quick Release Pins
(1) Strap Kit
(8) Self Drilling Mounting Screws
(2) 3.25” SS Axle Bolts & Nuts
STRAP KIT
(11 Pcs.)
Plastic Screw
(1 extra piece)
(21 Pcs.)
Plastic Strap Plate
(1 extra piece)
(1 Pc.)
Driver Bit
(11 Pcs.)
Stainless Steel
Self-Drilling Screws
(1 extra piece)
(10 Pcs.) Fabric Straps
(1 extra piece)
Aluminum
Tubing
(Depending On Your Tube Kit
Pre-Drills & Hardware May Vary)
Crank Base
Safety
Cap
Alum.
Base
Hold Down
Screw
Hold Down
Screw
Alum.
Base
Post
Alum.
Base
Post
Alum.
Base
Resin
Mount Bracket
Resin
Mount Bracket
Lock
Collar
Lock
Collar
Axle
Bolt
Quick Release
Pins
Axle
Bolt
Axle
Bearings
Axle
Bearings
(2 Pcs.)
Aluminum Tube
Inserts
Allen
Screw
Allen
Screw
Allen
Wrench
Axle
Base
Safety
Cap
Item # 50050
Aluminum Reel System
For Above Ground
Solar Pool Covers

4. Depending upon the size of your pool you will also require one of the following tube kits:
(Tube Assembly is detailed below and on back cover)
8. Assembling The Tube Kit:
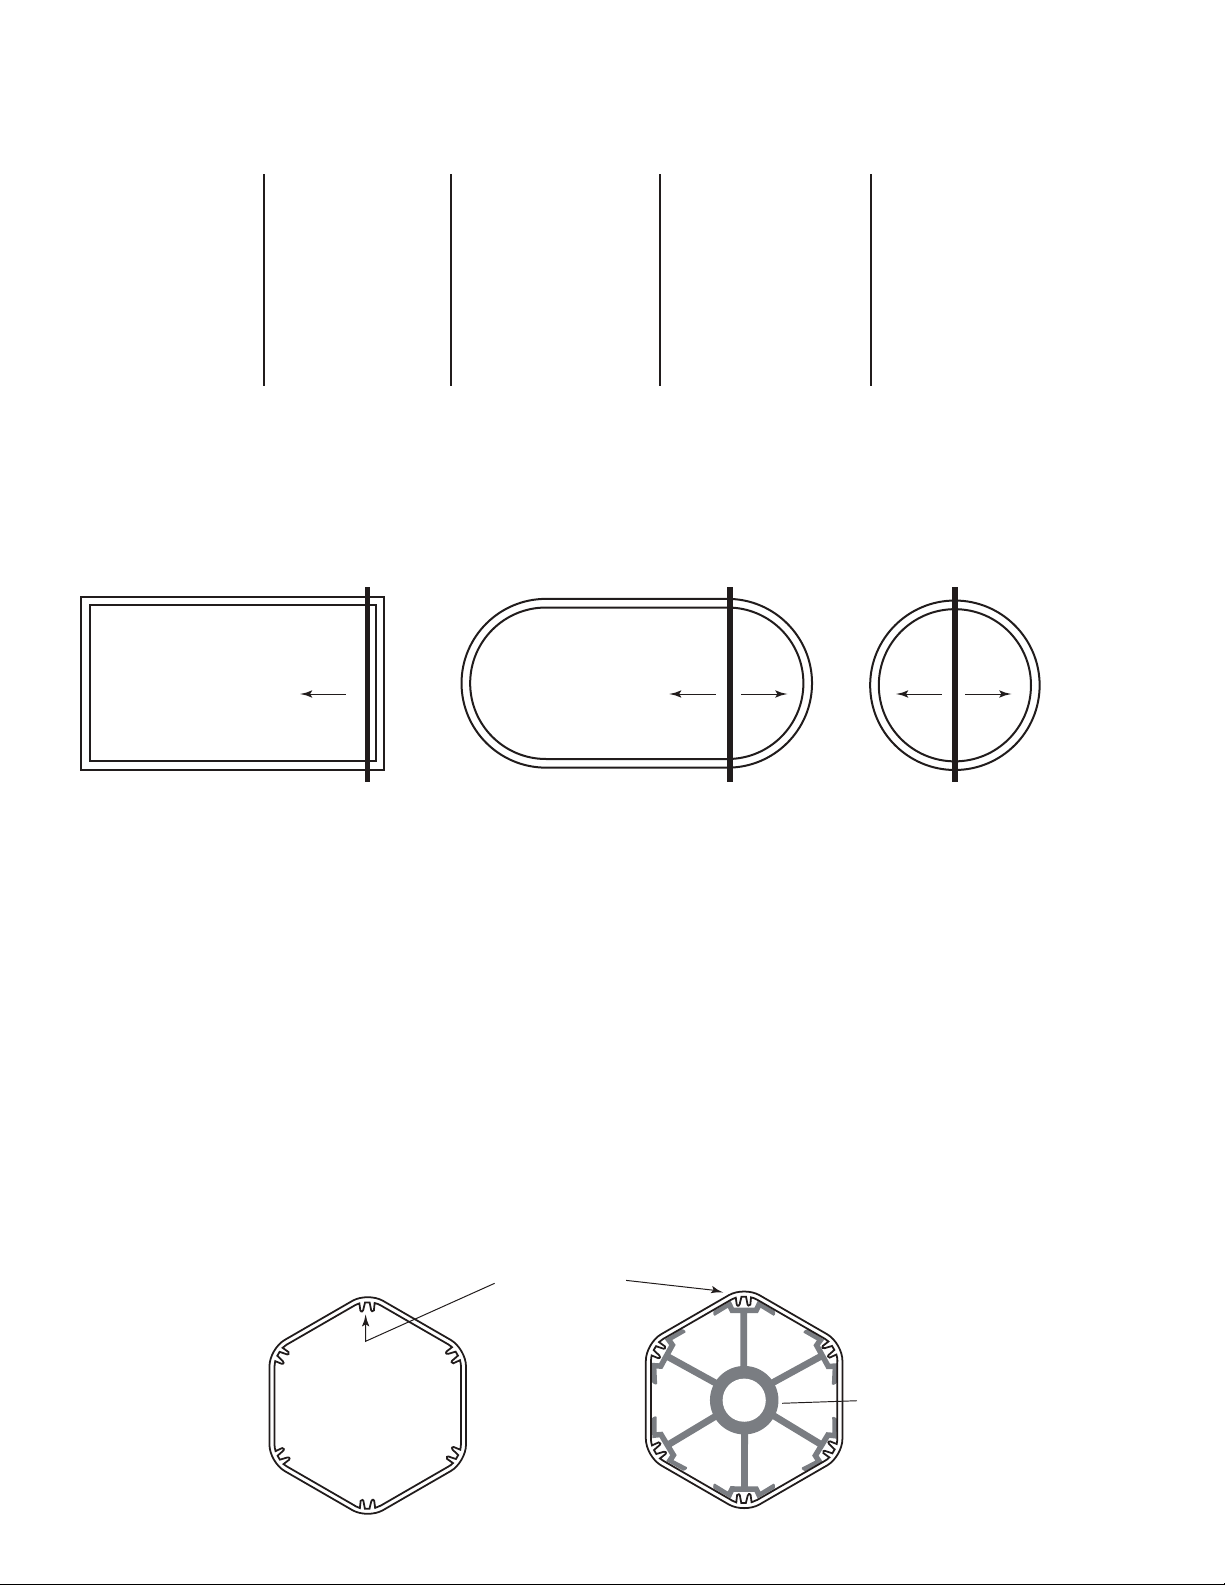
All tube kits consist of 6 sided Hexagon shaped aluminum tubing. There are two sizes of tubing, the smaller size nesting into
the larger size. All tube kits begin and end with the smaller diameter tubes. The Aluminum tube inserts require
CAREFUL ALIGNMENT! (See illustration below for proper insertion).
End View
Small
Aluminum Tube
End View
Small
Aluminum
Tube Insert
ALUMINUM
TUBE INSERT
MUST
ENGAGE
TEETH
INSIDE
SMALL
ALUMINUM
TUBE!
Fig. B
Fig. A
5. Positioning Your Solar Reel:
For Rectangular pools, place top-rail brackets at either end of pool.
For Oval pools, place top-rail brackets at either end of pool where radius begins.
For Round pools, place top-rail brackets at center of pool. (See Illustrations below)
RECTANGULAR OVAL ROUND
Unroll Unroll Unroll Unroll Unroll
6. Trimming Your Solar Blanket:
• Lay your Solar Blanket (not provided) on top of water.
IMPORTANT! Oval & Round Pool owners will need to fold their solar covers at point of placement
of brackets! The cover will unroll left and right of brackets & cross pole. Please allow 6 inches more
material on length to allow for a fold where straps will be attached for wind onto reel system. (See Fig A above)
• With scissors trim blanket to fit shape of pool. Be sure to clear the inside top rail of pool.
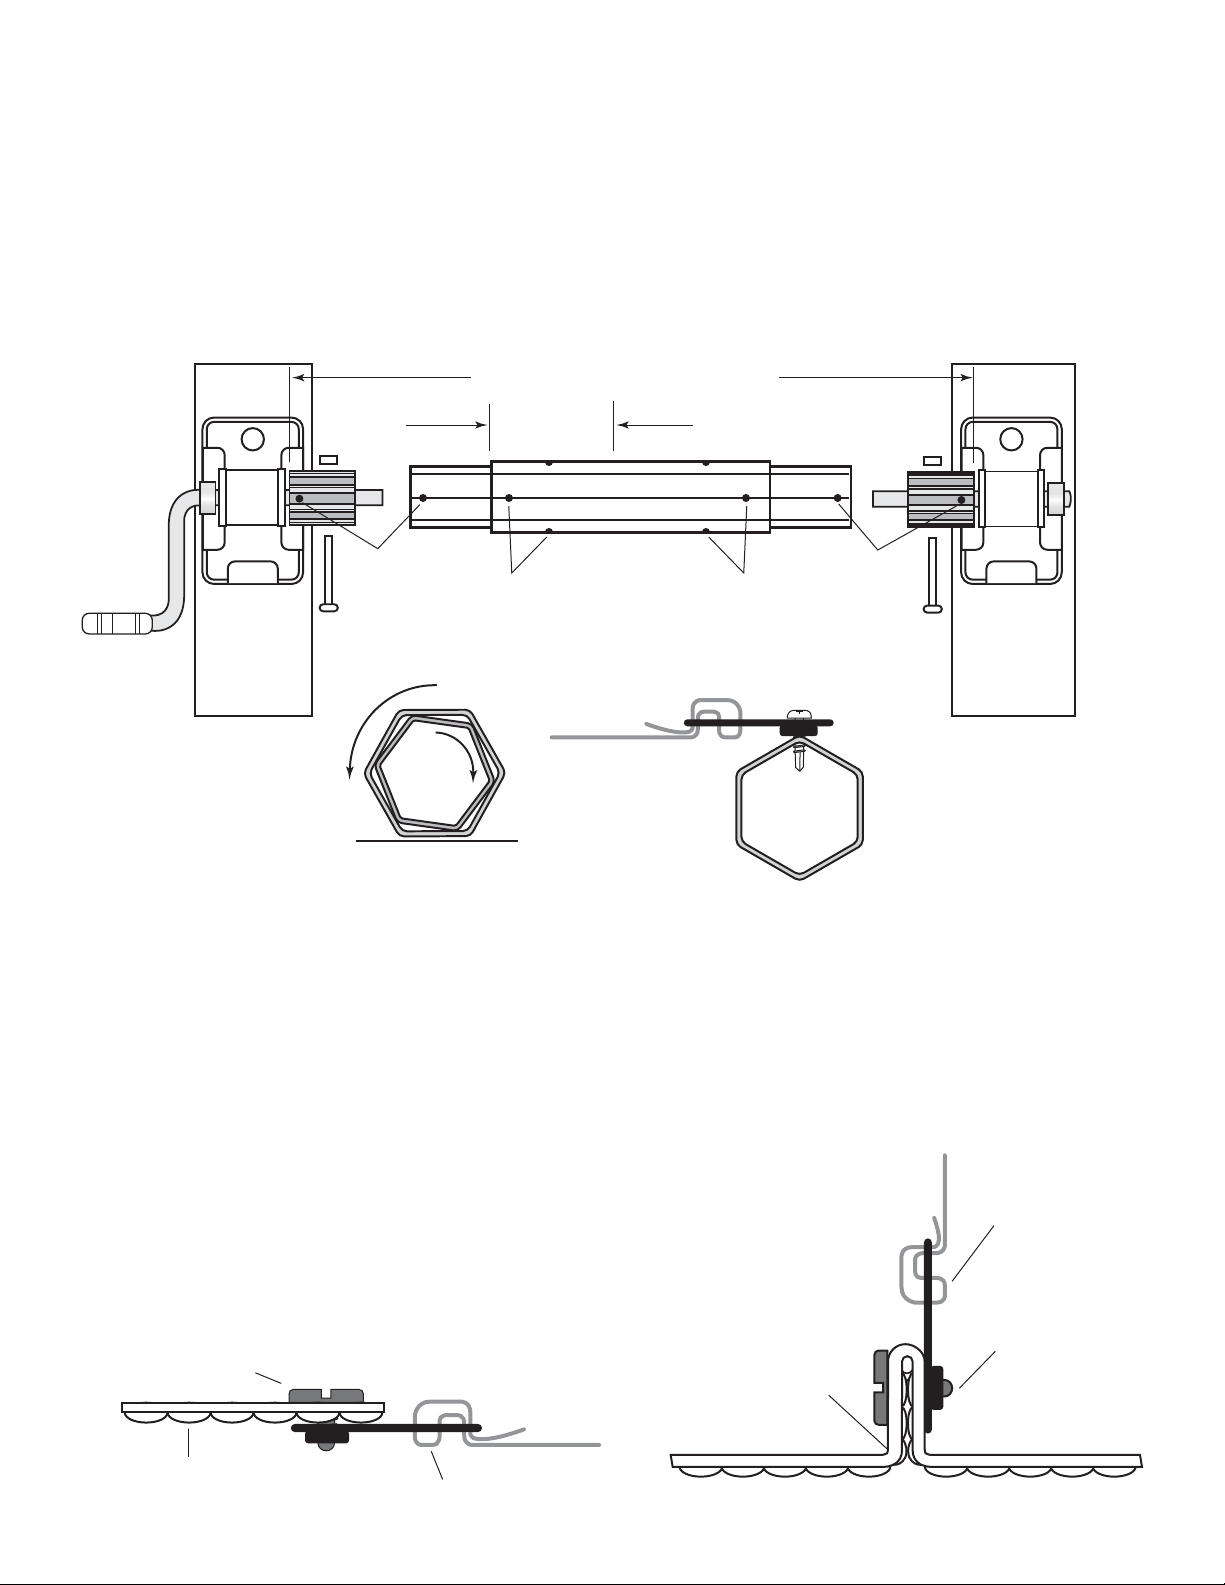
7. Mounting your Solar Reel Brackets: Exercise caution before drilling any holes in your top rail to avoid damaging the wall or liner.
Plastic Mounting Bracket - Use of plastic mounting bracket allows you to slide the aluminum base out of bracket and store the
complete reel system out of way when pool is in use. Locate area on top rail of pool where you want to mount your reel system.
Plastic mounting bracket is attached to the top rail with self-drilling screws through the four counter sunk holes in the bracket.
Item #51120 3” Tube Kit
Contains
(1) 59-1/2" x 2.920" Diameter
extruded aluminum shaft
(2) 59-1/2" x 2.745" Diameter
extruded aluminum shaft
(4) 3” Through Bolts
(1) Drill Bit
Item #51160 3” Tube Kit
Contains:
(1) 72" x 2.920" Diameter
extruded aluminum shaft
(2) 72" x 2.745" Diameter
extruded aluminum shaft
(4) 3” Through Bolts
(1) Drill Bit
Item #51200 3” Tube Kit
Contains:
(2) 59-1/2" x 2.920" Diameter
extruded aluminum shaft
(3) 59-1/2" x 2.745" Diameter
extruded aluminum shaft
With (8) 3” Through Bolts
(1) Drill Bit
Item #51240 3” Tube Kit
Contains:
(2) 68" x 2.920" Diameter
extruded aluminum shaft
(3) 68" x 2.745" Diameter
extruded aluminum shaft
With (8) 3” Through Bolts
(1) Drill Bit
Item #51284 4” Tube Kit
Contains:
(3) 58" x 3.80" Diameter
extruded aluminum shaft
(4) 58" x 3.725" Diameter
extruded aluminum shaft
With (8) 3” Through Bolts
(1) Drill Bit
(2) 4”x 6” Aluminum tube inserts

8. Assembling The Tube Kit: (Continued)
Loosely assemble tubes together. Slide excess width into adjoining tubes, dividing it up as equally as possible.
Note: You must have a minimum of 9” overlap in each tube!
Measure the width across the pool from tube insert to tube insert and adjust length of the tube assembly to fit the span.
Once you have determined exact length of tube assembly, AND With tubes on flat surface, lock the tubes together by rotating
each adjoining tube in the opposite direction. (See Figure C Below)
Using the pre-drilled holes in the outer tube as a guide to drill the smaller inner tube, drill holes for the through bolts to
connect the tubes. Drill from each side with the drill bit supplied.
Fasten with 2 bolts & nuts at each join. Bolts are at OPPOSING angles to each other.
9. Attach Straps to Tubes:
Come in 6 inches from each tube end and attach a strap plate to the aluminum tube assembly.
Use the self drilling screws on the drill line to attach the plate. Look at the holes that were pre-drilled
at the factory and use the same drill line. There are 6 lines on each tube.
Take the remaining strap plates and connect them evenly along the length of the tube assembly.
Attach Straps to strap plate. (See Fig. D Above Right)
10. Attach Solar Blanket to Straps:
If reel is to be located at the end of the pool, attach cover to strap plate with plastic screw
as shown in Fig. E Below Left. If reel is to be located offset or at the center of the pool
then attach cover to strap plate forming a fold to act like a hinge and the plastic screw will
go through two layers of the solar blanket as shown in Fig. F Below Right.
Bubbles should face down.
Solar Blanket
Strap & Bracket
Plastic Screw Solar Blanket Folded
Plastic Screw
Strap & Bracket
Pool
Top
Rail
Pool
Top
Rail
Fasten
With
Axle
Bolt
POLE SET
ASSEMBLY: Minimum
9"
Overlap
Fasten with
2 Bolts at each join
(pre-drilled in outer tube)
Fasten with
2 Bolts at each join
(pre-drilled in outer tube)
Fasten
With
Axle
Bolt
Measure Plug Surface To Plug Surface
Thread
Strap
as Shown
Fig. D
Fig. E Fig. F
IMPORTANT!
With Tubes On Flat Surface
Twist Tubing To
Remove Excess Play Prior
To Screwing Together.
Fig. C
Popular Cables And Connectors manuals by other brands

Tektronix
Tektronix Keithley 4200-RPC-2 Assembly instructions

Eaton
Eaton COOPER POWER SERIES Installation instruction

Philips
Philips SWV3433S/10 user manual

Belden
Belden grass valley ICONTROL IC-BASE-EDITION-V3 quick start guide

Philips
Philips SWV3431S/10 user manual

Lenze
Lenze EYP A Series Mounting instructions