Swissh 25PLC Manual

GLASS/DISHWASHER
25PLC
INSTALLATION
INSTRUCTIONS &
USER MANUAL
Retain this manual for future references.
Swissh Commercial Equipment
6060 Métropolitain E.
Bureau 200
Montréal, Québec H1S 1A9
Phone:514 524-6005
Fax: 514 524-3305
Toll Free: 1-888-794-7749
E-mail: [email protected]

IMPORTANT SAFETY INSTRUCTIONS
Your Swissh Dish/Glasswasher has been designed and engineered by our
craftsmen to exacting standards of reliability and long life while still provid-
ing you with outstanding performance and results.
To ensure proper use of the unit and guarantee efficiency, please take a moment to
read the installation instructions and user manual thoroughly.
WARNING: When using your dishwasher, follow basic precautions, including the following:
(a) Read all instructions before using the dishwasher.
(b) Use the dishwasher only for it’s intended function.
(c) Use only detergents or wetting agents recommended . Chlorinated products
must not be used with this unit. Using chlorinated products will void the warranty.
(d) When loading items to be washed:
(1) Load sharp knifes with the handles up to reduce the risk of cut type injuries.
(e) Do not abuse, sit on, or stand on the door or dish rack of the dishwasher.
(f) Under certain conditions, hydrogen gas may be produced in a hot water system
that has not been used for two weeks or more. HYDROGEN GAS IS EXPLOSIVE. If
the hot water system has not been used for such a period, before using dishwasher
turn on all hot water faucets and let the water flow from each for several minutes.
This will release any accumulated hydrogen gas. As the gas is flammable, do not
smoke or use an open flame during this time.
Remove the door to the washing compartment when removing an old dishwasher from
service or discarding it.
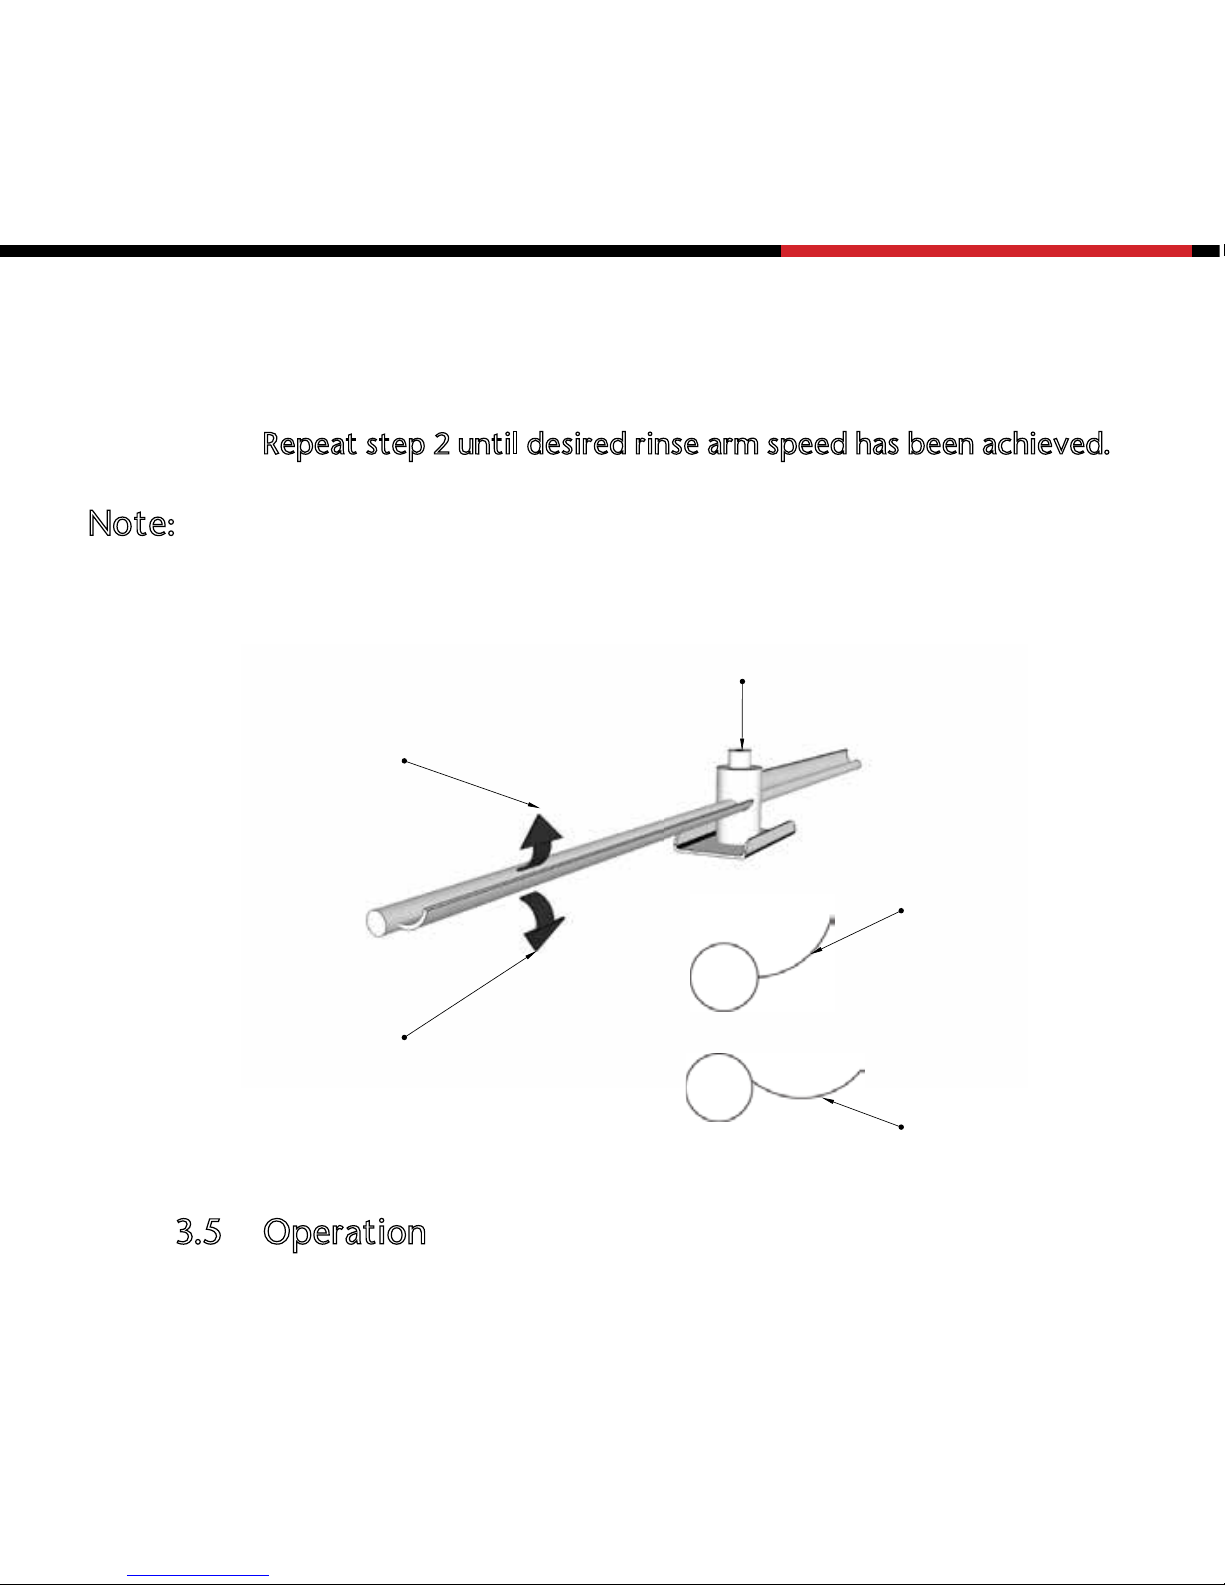
NOTE:
Before leaving the factory, every dishwasher has been thoroughly tested and adjusted to
standard conditions. Therefore, it is possible that a small quantity of water remains in the
wash tank.
DO NOT REMOVE THE OVERFLOW PIPE

1.0 GENERAL
1.1 Carefully remove unit from carton
While removing the unit from the carton, make sure that the equipment has
not been damaged during the transport and that no parts are missing.
Make sure, that machine has been delivered with following parts:
• 2 Washpipes
• Dirt filter
• Overflow pipe
• Drain reducer connector
• 1 dishrack / 1 cutlery rack
Bras de rincage /
Rinse Arms
Tuyaux de lavage /
Wash Pipes
Bras de lavage /
Wash Arm
Tuyau de renvoi /
Overflow Pipe
Activateur de porte /
Door Switch
Filtre /
Dirt Filter
DD
P
I
O
Table de bord / Display Board
Programme /
Program
Détartrage / Nettoyage
Daily Cleaning / Descaling
Sone de detergent /
Detergent Probe
Tuyau pour detergent (noir)
Detergent Hose (black)
Tuyau pour rince (clair)
Rince agent hose (clear)
Ecrou a ailettes /
Wing Nut
Sonde de remplissage /
Water level probe
ON/OFF
Cycle 1
Cycle 2
Injecteur de détergent /
Detergent injector

2.0 INSTALLATION AND PLACEMENT
To simplify the Technical Spec Sheet (see pages 6 & 7), all connections
(drain, water, electricity) have been located to the right side of the equip-
ment. However, with the fact that the Swissh has flexible connections, and
by respecting the indicated measurements, some or all connections can be
either on the left or right side of the machine.
Apart from the space required for your machine, make sure, that you also provide enough
space for the placement of your detergent and rinse chemicals. Detergent and rinse pails
come in two different sizes, according to the space available. Pail sizes of 4 litres requires
405mm (16”) clearance in height and 165mm (6”) in width. The 20 litres pail sizes require
455mm (18”) in height and 305mm (12”) in width.
2.1 Drain connection
To minimise the future maintenance of your dish/glasswasher, the Swissh
25PLC has been designed to drain by gravity. Depending on the height of
the machine base, the drain height can never exceed the recommended max-
imum drain height (see technical spec sheet pages 6 & 7).
Recommended maximum drain height:
• No base (standard) max. 100mm (4”)
• 4” base (standard) max. 150mm (6”)
• 6” base (standard) max. 200mm (8”)
6 1/2"
12"
12"
18"
4 Litres
20 Litres
4"

2.2 WATER CONNECTION
The water supply pipe must be minimum 1/2” with a 3/4”male national pipe
thread connector (see drawing 2). Make sure that the water pressure is con-
stant (not less then 25 psi and doesn’t exceed 50 psi), otherwise a pressure
regulator must be installed.
2.3 PLACEMENT AND CONNECTION
1. Adjust dish/glasswasher to required height with four corner screws.
(If applicable, mount legs and tighten them with supplied bolts and
nuts.) Use a spirit level to level the equipment.
2. Place the dish/glasswasher in designated location and make sure
that the water, drain, detergent hoses and the electrical cable feed
without squeezing to their proper connection location.
3. Re-check that machine is level.
4. Attach 3/4” quick connect (female national pipe thread) with sup-
plied gasket to 3/4” male national pipe thread connector.
5. Connect the supplied drain hose with a gear clamp to the 32mm (1
1/4”) copper drainpipe. Connect the electrical supply (plug or connec-
tor box).
6. Place the black hose in the detergent solution and the clear hose in
the rinse solution.
7. Your dish/glasswasher is now installed and ready for start-up.

2 3/4"
(70 mm)
14"
(356 mm)
15 1/4"
(387 mm)
max 12"
(305 mm)
23 5/8"
(600 mm)
21 11/16"
(550 mm)
21 11/16"
(550 mm)
SPECIFICATION SUMMARY:
Maximum hourly output : 48 standard racks; 864 - 9” plates; 2,352 - 2 1/2 ” glasses
Water consumption : 3 liters per rack (0.79 U.S. gal)
sdnoces063-03mofelbatsujdA:emitelcyC
Motor pump : 1 Hp
Detergent & Rinse pump : Integrated and controlled by PLC (Programmable Logic Control)
Ease of service: Adjustment & component replacement from the front
Technical phone assistance 24/7
.robalnoraey1;strapnosraey2:ytnarraW
NOTE S :
BAS E MEASUR E MEASUR E
xam”4”4/123”0
)mm001()mm918(
xam”6”2/163-”2/143”4
)mm051()mm729-mm678()dradnatS(
xam”8”2/183-”2/163”6
(927 mm - 978 mm) (200 mm)
SUPP LY VO LTAGE AMPS DESCRIPTION
208-240/60/ 1 37A * Electrical plug (50A) type 6/50R (e.g. Eagle #1252).
(Dishwasher is supplied with power cord and plug)
208-240/60/ 3 24A Connector box - Dishwasher supplied with power cord only
* For information on availability of 27A or 17A rating, call 1-888-794-7749
Unit is supplied with exible stainless steel water hose with 3/4” female pipe thread connector
- 140°F (60°C) recommended water temperature.
- Minimum 1/2” pipe with 3/4” male pipe thread connector (N. P.S.).
- Acceptable water ow pressure range : 25-50 psi. If water pressure varies, a water
regulator is recommended (by others) with 35 psi setting
Dishwasher is supplied with 30” (750 mm) exible drain hose and two s/s hose clamps.
- Dishwasher is drained by gravity (no pump).
- Inner diameter (ID) of drain hose is 1 1/4” (32 mm).
1. Utilities may be placed on either side of the unit provided measures of shaded area
are respected
2. Reserve place for detergent and rinse chemicals:
- 4 liters; width 6 1/2” (165 mm), height 12 1/4” (310 mm)
- 20 liters; width 12 1/4” (310 mm), height 15 1/2” (395 mm)
TECHNICAL SPECIFICATION

2 3/4"
(70 mm)
14"
(356 mm)
15 1/4"
(387 mm)
max 12"
(305 mm)
23 5/8"
(600 mm)
21 11/16"
(550 mm)
21 11/16"
(550 mm)
SPECIFICATION SUMMARY:
Maximum hourly output : 48 standard racks; 864 - 9” plates; 2,352 - 2 1/2 ” glasses
Water consumption : 3 liters per rack (0.79 U.S. gal)
sdnoces063-03mofelbatsujdA:emitelcyC
Motor pump : 1 Hp
Detergent & Rinse pump : Integrated and controlled by PLC (Programmable Logic Control)
Ease of service: Adjustment & component replacement from the front
Technical phone assistance 24/7
.robalnoraey1;strapnosraey2:ytnarraW
NOTE S :
BAS E MEASUR E MEASUR E
xam”4”4/123”0
)mm001()mm918(
xam”6”2/163-”2/143”4
)mm051()mm729-mm678()dradnatS(
xam”8”2/183-”2/163”6
(927 mm - 978 mm ) (200 mm)
SUPP LY VO LTAGE AMPS DESCRIPTION
208-240/60/ 1 37A * Electrical plug (50A) type 6/50R (e.g. Eagle #1252).
(Dishwasher is supplied with power cord and plug)
208-240/60/ 3 24A Connector box - Dishwasher supplied with power cord only
* For information on availability of 27A or 17A rating, call 1-888-794-7749
Unit is supplied with exible stainless steel water hose with 3/4” female pipe thread connector
- 140°F (60°C) recommended water temperature.
- Minimum 1/2” pipe with 3/4” male pipe thread connector (N. P.S.).
- Acceptable water ow pressure range : 25-50 psi. If water pressure varies, a water
regulator is recommended (by others) with 35 psi setting
Dishwasher is supplied with 30” (750 mm) exible drain hose and two s/s hose clamps.
- Dishwasher is drained by gravity (no pump).
- Inner diameter (ID) of drain hose is 1 1/4” (32 mm).
1. Utilities may be placed on either side of the unit provided measures of shaded area
are respected
2. Reserve place for detergent and rinse chemicals:
- 4 liters; width 6 1/2” (165 mm), height 12 1/4” (310 mm)
- 20 liters; width 12 1/4” (310 mm), height 15 1/2” (395 mm)

3.0 START-UP
3.1 Detergent and rinse agent
Make sure that you have enough detergent and rinse agent for your
operation and that spare detergent and rinse agent are on stock for
continuous operation. Verify that both hoses are fed to the appropri-
ate pail (detergent = black hose, rinse = clear hose).
3.2 Placement of necessary parts
Place overflow pipe into the drain opening of the machine. Place the
dirt filter on the inside of the front wall of the machine (drawing 1).
3.3 Wash and rinse arms
Verify that the wash and rinse arms turn freely and in a regular rotat-
ing movement. Insert wash pipes at the top left and right corners.
Make sure that they are correctly placed (you will hear a clicking
sound).
3.4 Rinse arm speed adjustments
Depending on local water pressure, the speed of the rinse arms must
be adjusted for best results.
1. Close the front door and press the “I/O” button. The red LED
will light up and after a short delay (approximately 3 seconds)
the dishwasher will fill itself through the rinse arms.
2. Let machine fill for 5 seconds and then switch the “I/O”
button in the off position and simultaneously open the door
to verify the speed of the rinse arms. A rotation rate of 1 - 1.5
revolutions per second is desirable.

Rinse arm too slow => open wing tips slightly
Rinse arm to fast => close wing tips slightly
Repeat step 2 until desired rinse arm speed has been achieved.
Note: After the first few days of operation (break-in period) verify the
rinse arm speed and re-adjust accordingly if necessary.
3.5 Operation
Close the front door. Press the “I/O” button. The red LED will light up.
Wait - dishwasher will automatically fill up and inject detergent. To
operate, press the CYCLE 1 or CYCLE 2 button
FERME / CLOSE
OUVERT / OPEN
ECROU D'AILE / WINGNUT
PLUS FERME = PLUS LENTEMENT
MORE CLOSED =
SLOWER
PLUS OUVERT = PLUS VITE
MORE OPEN = FASTER
PLUS FERME = PLUS LENTEMENT
MORE CLOSED = SLOWER
PLUS OUVERT = PLUS VITE
MORE OPEN = FASTER

4.0 CLOSE-DOWN AND DAILY MAINTENANCE
In case of heavy use, the close-down or the daily maintenance
can be done several times a day. For close-down and the daily
maintenance, proceed with the following steps:
4.1 Press the “I/O” button (the red “LED light will go off).
4.2 Open front door and remove the overflow pipe. Caution:
Overflow pipe and washwater might be hot.
4.3 Remove and clean dirt filter and washpipes. Make sure
that wash and rinse arms are clean and rotate freely.
4.4 Should wash arm not rotate freely or has blocked jets, re-
move wash arm by removing wingnut below rinse arm (drawing
4) and pull-off wash arm to be cleaned. After cleaning jets and
shaft, reassemble. Wash arm should rotate freely again.
4.5 Rinse machine by pressing the “I/O” button. Let the ma-
chine rinse for at least 10 seconds and press the “I/O” again to
stop the process.

5.0 TROUBLE SHOOTING
5.1 Bad results
5.1.1 In case of bad results, i.e. dirty or spotted dishes, follow
the regular close-down procedure. Before using the machine
again, gently clean the tip of the detergent probe in the back
left corner with a green scrubbing pad from dirt and residue.
Start machine by following the described start-up steps and
make sure:
• That wash arms and rinse arms run freely
• That you are using the proper detergent and rinse agent
• That there is enough detergent and rinse agent in the pails
• That the detergent and rinse pads and not being squeezed by
anything
5.1.2 Should the bad results prevail even though you have fol-
lowed the steps under 5.1.1 call your detergent supplier. In the
meantime to remedy the situation, you can hand feed your
dish/glasswasher with detergent:
1. Add 1/4 cup detergent at the start-up.
2. Add every 3 cycles 1/8 cup of detergent into the washing
chamber.
5.2 At start-up, machine fills continuously.
• Switch machine off by pressing “I/O” button. (The red LED
will go off).
• With a green scrubbing pad, gently clean the water level
probe (front left) from possible dirt and residue.
If problem should persist, call your local Swissh service technician

WARNING: Improper connection of the equipment-grounding conductor can result in a risk
of electric shock. Check with a qualified electrician or service representative if you are in
doubt whether the appliance is properly grounded. Do not modify the plug provided with
the appliance; if it will not fit the outlet have a proper outlet installed by a qualified electri-
cian.
GROUNDING INSTRUCTIONS: This appliance must be grounded. In the event of a malfunc-
tion or a breakdown, grounding will reduce the risk of electric shock by providing a path
of least resistance for electric current. This appliance is equipped with a cord having an
equipment-grounding conductor and a grounding plug. The plug must be plugged into an
appropriate outlet that is installed and grounded in accordance with all local codes and
ordinances.
(a) Verify the rating of your machine.
Machines with ratings of 208 - 240/60/1 phase require 37 Ampere and the fitting of
an electrical plug (female type 6/50R e.g. Eagle #1252). Mount the receptacle above
the water and drain line in a dry place 4 - 8” to the right or left of the dishwasher
(see pages 6 &7)
(b) Machines with rating of 208/60/3 phase require a connector box installed in the
place of the electrical plug.
(c) The power-supply receptacle for the appliance shall be installed in a cabinet or
on a wall adjacent to the under counter space in which the appliance is to be in-
stalled.
(d) There shall be an opening through the partition between the compartments
specified in (c) that is large enough for the attachment plug to pass through. The
longest dimension of the opening shall not be more than 38mm.
(e) The edges in the opening specified in (d) shall, if the partition is wood, be
smooth and rounded or, if the partition is metal, be covered with an edge protector
provided for this purpose by the manufacturer; and
(f) Care shall be exercised, when the appliance is installed or removed, to reduce
the likelihood of damage to the power-supply cord.
Table of contents