Synesthesia Mandala User manual

MandalaTM
Instruction Manual
©2006 SYNESTHESIA CORPORATION

2
INTRODUCTION
Thank you for purchasing the Mandala™ Drum and Brain
v1.0. I hope you enjoy exploring sonic terrains previously
uncharted by performance-based electronic instruments. With
unprecedented speed and sensitivity, the Drum translates your
rhythmic nuances and tonal preferences into signals that
generate sounds and transmit MIDI info, taking full advantage
of the position and velocity of your strikes for new levels of
electronic musical expression. Whether using the Brain’s
internal sound generator or controlling your external gear via
MIDI, the user-friendly Mandala helps you find wormholes to
creative dimensions that will hurl your mind into the
unknown!
At Synesthesia Corporation, we are musicians who expect first-
rate quality in the gear we use, and we strive to deliver that
quality in our own products. Each Mandala Drum and Brain
is hand-assembled and thoroughly tested before it is shipped,
and we continually review the Mandala’s capabilities in order
to keep it updated with any possible improvements. We also
provide complimentary tech support to our fellow explorers,
and welcome your feedback and suggestions.
Thanks again for your support. I am confident you’ll find the
Mandala Drum an exciting vehicle with which to tap into your
undiscovered sonic potentials.
Sincerely,
Vince De Franco

3
CONTENTS
Introduction……………………………………………………. …… 2
PT I. Features…………………………………………………….… 4
PT II. Brain Panels ………………………………………………… 5
Top Panel…………………………………………………………... 5
Rear Panel………………………………………………………….. 7
PT III. Quick Start……………...………………………………….. 8
PT IV. Modes and Function Pages…..……..……………………... 9
Realtime Mode………..………………………………………….. 10
Changing Presets…………………………………………… 11
Saving Presets……………………………………………… 12
Navigation Mode…………………………………………………. 12
Zone Description…………………………………………………... 14
Edit Mode……………………….………………………………… 15
Zone Setup Page…………………………………………………… 16
Changing Number of Zones……………………………………….. 16
Edit a Zone’s Settings……………………………………………… 17
PT V. Zone Edit Pages……………………………………………... 17
Instrument Page…………………………………………………… 17
Mod Page………………………………………………………….. 18
Scales Page………………………………………………….…….. 19
Scales……………………………………….……………… 20
Scale Patterns……………………………….……………… 20
PT VI. Editing Global Settings……………………………………. 22
Reverb/Delay Page………………………………………………… 22
Chorus/Flange Page……………………………………………….. 23
4-Band EQ Page…………………………………………………… 23
Parameters Page………………………………………….………... 24
Position Controller Page…………………………………………... 25
Velocity Controller Page………………………………………….. 25
Foot Pedal Controller Page………………………………………... 26
Options Page………………………………………………….. …... 26
Instrument List…………………………………………………….. 27
Drum Set Table…………………………………………………….. 28
MANDALA SAFETY……………………………………………… 29
IMPORTANT NOTES…………………………………………….. 32

4
PT. I - FEATURES
The Mandala Drum and Brain was conceived from a need for an
electronic MIDI trigger with unprecedented sensitivity to human motor
precision and individual performance styles.
The Mandala Package features:
•The Drum Pad, which is a dynamic multiple control zone
electronic surface that uses patented sensor technology to detect
where and how hard a surface strike occurs
•The Brain, driven by a dual-microprocessor powered circuit with
an onboard sound synthesizer chip containing a library of sounds
that are assignable to respond according to the Drum’s ultra-fast
triggering and controller info
•Full functionality as a programmable real-time MIDI controller;
specifically intended to manipulate external MIDI-compatible
gear (synths, computers, samplers, tone modules, etc.)
•Onboard Reverb, Delay, Chorus and Flange effects, as well as 4-
band EQ, pitch-bend, modulation, volume and panning
parameters
•An array of per-zone tonal options, including scales and
modalities, root note intonation, intervallic sequences, and
programmable range definitions
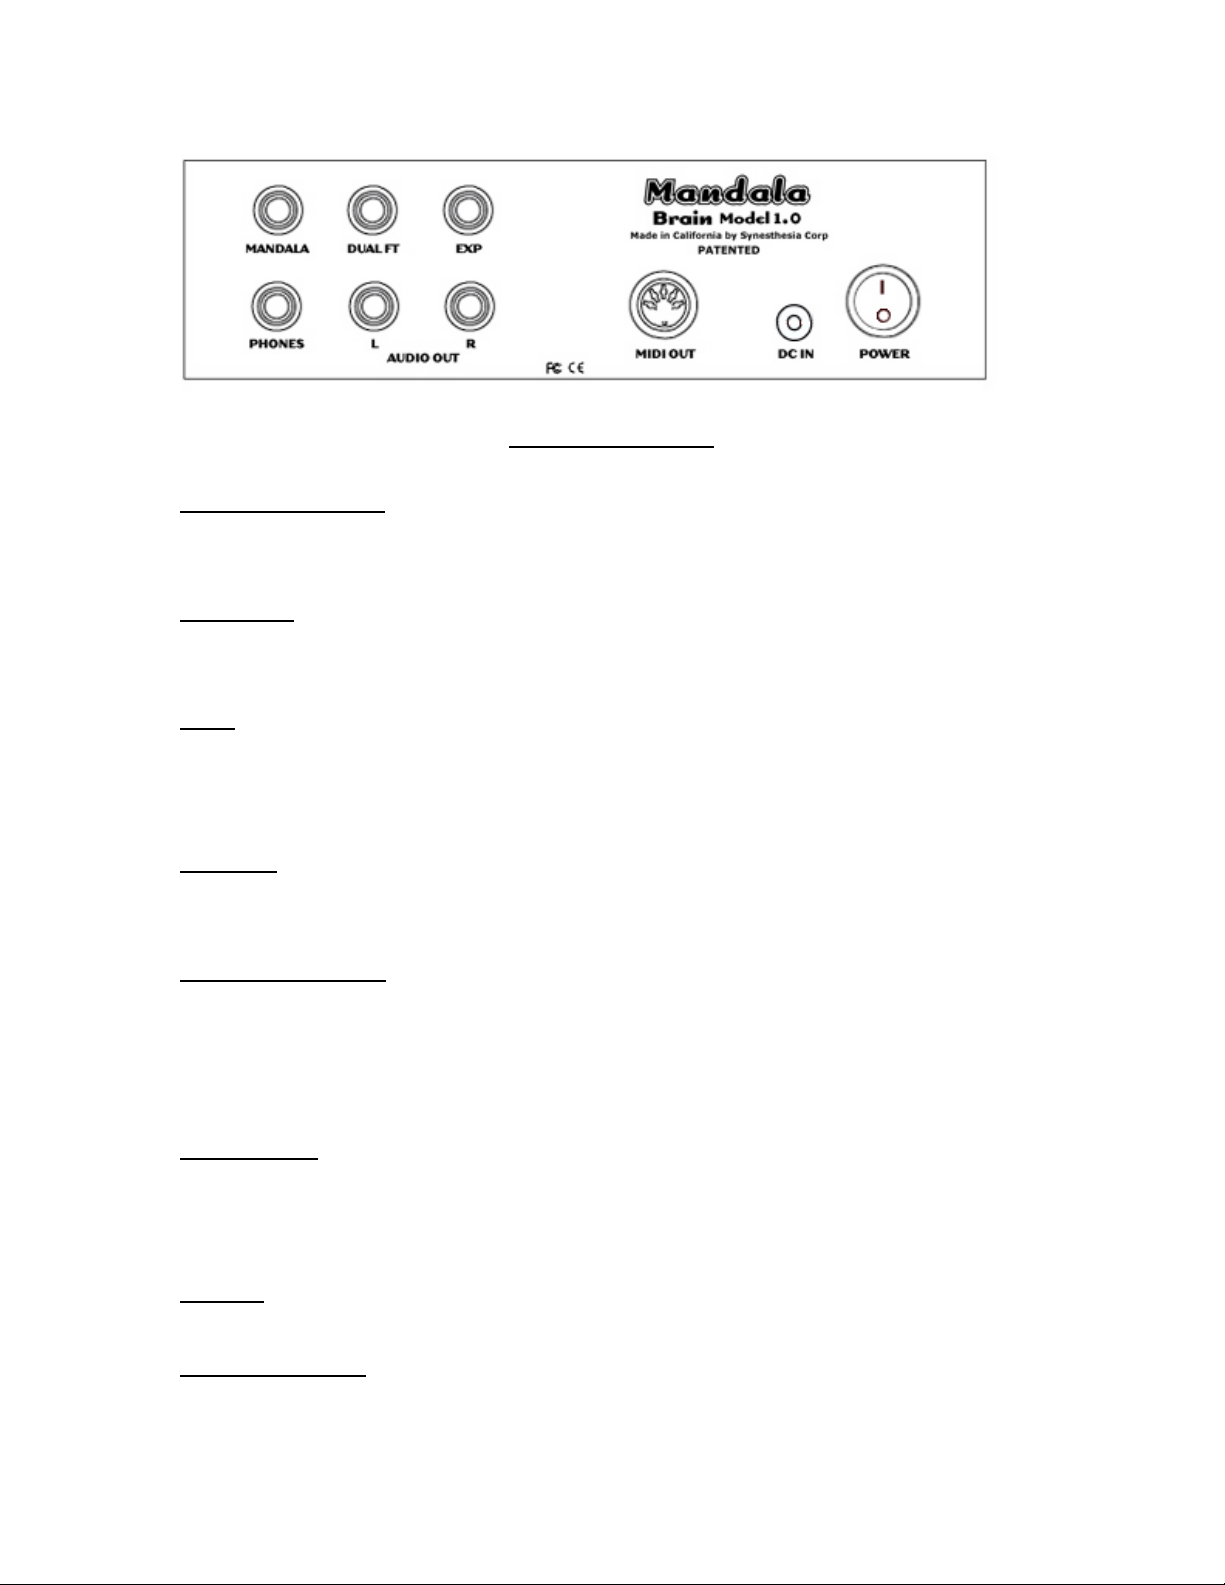
•A provided dual footswitch for hands-free preset scrolling, as well
as an input for a continuous controller expression pedal such as
the recommended Roland FV-50 (not included)
The Complete Mandala Package includes the Drum Pad, Drum Brain, a
dual-button footswitch, AC power supply, a TRS cord that connects the
Drum to the Brain and a 9.5mm L-Rod for mounting the Drum on
standard drum kit hardware. Snare stands provide the steadiest
support, and are recommended.

5
PT. II - BRAIN PANELS
TOP PANEL
LCD Display – This is the window through which you communicate
with the Mandala. It’s main functions are to display realtime data as
you play and to show you Edit Pages full of Zone Parameters which
you can adjust to customize Preset Programs and sculpt new User
Programs.
Scroll Knob/Switch – Use this to move from one Edit Page to
another and to shuffle through lists of Zone Parameters and adjust
parameter values (PUSH AND TURN to adjust parameter values
faster). From most pages, pushing the Scroll Knob once will take you
back to Navigation Mode (the cursor mentioned below must be solid,

6
not blinking). A second push will ferry you back to the MANDALA
REALTIME page.
Button – Pressing the Button creates a cursor that serves two main
functions: a solid/underline cursor allows the Scroll Knob to advance
through Zone Parameter Options, and a blinking cursor enables the
Scroll Knob to adjust parameter values within each option. From the
MANDALA REALTIME page, a sustained push of the Button
enables any changes to be saved.
Volume Knob - Controls the volume of all triggered sounds and
[momentarily] cuts any assigned effects’ tails when the knob is
adjusted.

7
REAR PANEL
Mandala Input – Receives control signals from the Drum Pad
through a provided TRS cord.
Dual FT - Lets you use the provided Dual Footswitch to load Presets
one-at-a-time in either direction.
Exp - A TS input that receives continuous controller signals from an
expression pedal (we recommend a Roland FV-50 or Ernie Ball
Volume Pedal, neither of which are included).
Phones - Short for Headphones, and this stereo output jack will help
reduce the chances of any cops showing up at your door.
Audio Out L-R - Send a stereo signal into any external audio gear
you can get your hands on, like recording devices, effects processors,
and amplified speakers. Be ready to quell complaints from uptight
neighbors.
MIDI Out – This jack enables the Mandala to carry out its most
exciting feature: controlling external synths, samplers, computers etc.,
which is an original inspiration for this technology’s genesis.
DC In – Power in from the provided AC power supply.
Power Switch – You’ll need this switch to turn the unit on, and then to
eventually turn it off.

8
PT. III - QUICK START
The easiest way to get going with your Mandala is to:
1. Connect the Drum Pad to the Mandala Input of the Brain using
the included TRS cable.
2. Connect the Audio Outs (L and R) from the Brain to a mixer or
stereo amplifier using 2 instrument cables (or connect your headphones
to the Phones jack on the Brain).
Note: Always turn the master volume of your amplifier or mixer to
its lowest setting before connecting and powering up equipment such
as the Mandala Brain. Also, keep your headphones off of your head
when connecting them to the Mandala Brain and powering up the
Mandala Brain.
3. Connect the included Dual Footswitch to the Dual FT jack on the
Brain.
4. Power up the Brain.
5. Make sure the volume knob is up on both the Mandala Brain and
your mixer/amplifier.
6. You should see preset 000 Shobbz Wuz Hear on the LCD
Display. Start playing!
7. When you want to hear something different just press the right
button on the Dual Footswitch to advance to Preset 001 Diego and play
away! There are 82 presets in all. They are locked into memory so
don’t worry about experimenting and altering their parameters. If you
fiddle with their settings and you like your creation just save your new
program to a memory location from 83-139.

9
PT. IV – MODES and FUNCTION PAGES
The Mandala Brain operates in 3 separate Modes. These Modes utilize
14 Function Pages.
Modes
1. Realtime Mode: Displays all strike information as you play and is
your doorway into all other Modes.
2. Navigation Mode:Arrows are displayed on both sides of the
screen meaning you are ready to scroll through Function Pages.
3. Edit Mode: Allows you to alter parameters within Function Pages.
Function Pages
1. MANDALA REALTIME
2. SAVE
3. ZONE SETUP
4. ZONE INSTRUMENT
5. b. ZONE MOD
6. c. ZONE SCALE
7. REVERB/DELAY
8. CHORUS/FLANGE
9. 4-BAND EQ
10. PARAMETERS
11. POSITION CONTROLLER
12. VELOCITY CONTROLLER
13. PEDAL CONTROLLER
14. OPTIONS
The following screen diagrams will acquaint you with the Mandala’s
functions and walk you through the process of playing factory Presets,
customizing them, and saving any changes as your own Presets. Of
course, you can also build your own Presets from scratch, but for now...

10
MODE 1: Realtime Mode
This Mode consists of the MANDALA REALTIME page (which is
the Mandala’s default Startup page) and the SAVE page.
MANDALA REALTIME Page
When you power on the Brain, this default startup page tells you the
name of the currently loaded Preset and the number of its location. This
page also displays the realtime info each of your strikes generates:
which Zone was last struck
which Note played in that zone
and with what Velocity...
also, as a result of your strike you have generated
strike Position Controller data (POS), and
strike Velocity Controller data (VEL)
You will also see how the pad’s surface is configured to react in the
current preset by way of:
You’ll see Surface Settings(sur): Normal(n)/Choke(c)/Dynamic(d).
Additionally, the Realtime Page reminds you of any Pedal assignments
in the Preset by displaying ‘ped’ next to the Surface Setting. (All these
functions will be elaborated upon through this manual, rest assured.)

11
Changing Presets:
- Press the button once. A blinking cursor will appear over the location
number.
-Use the Scroll Knob to scroll through the list of Presets. For now,
choose #17_Tutorial_1.
-Press the button again, and the Preset will load. Grab your sticks and
play away on the surface for a minute to hear the settings.
(Instead of using the Button and the Scroll knob you can always just
step on the right switch of the included Dual Footswitch to
automatically load the next preset in the Mandala Brain’s memory… or
press the left switch to load the previous preset.)
When you are ready to start warping the Preset’s impressionable young
mind press the Button twice. This will take you to the ZONE SETUP
page, which is fully detailed in the MODE 3: Edit Mode section of this
manual.
Note: After that second Button push, navigation arrows will appear
on each side of the screen, which means you are in Navigation Mode.

12
SAVE Page
Saving Presets:
From the MANDALA REALTIME Page, hold the Button down until
the ‘SAVE? Y/N’ option appears. Use the Scroll Knob to select ‘Yes,’
and then scroll through the presets until you find your desired location.
Push the Button once. The cursor will move from the chosen location
number to the character spaces. To start spelling the name of your new
preset, push the Button again, and when the cursor blinks the Scroll
Knob will take you through all available characters. After entering a
character, push the Button to advance to the next space. To skip around,
push the Scroll Knob down to solidify the cursor and move it forward
or backward (a Button push will make that cursor blink so you can
enter in or change a character). When you’re ready, press and hold the
Button until ‘SAVING’ appears on the screen. Give it a second, and the
new Preset’s MANDALA REALTIME page will appear. At most
times during the SAVE process you can push the Scroll Knob to move
back one step if you change your mind and want to exit.
MODE 2: Navigation Mode
Whenever you see the navigation arrows on each side of the screen,
you are in Navigation Mode, which is basically a scroll directory

13
consisting of the 12 editable non-realtime function pages. When the
navigation arrows are present your options are to:
- Turn the scroll knob and shuttle from page to page until you reach
your desired page.
- Press the button at your desired page and thereby enter into EDIT
MODE.
- Press the scroll knob once in order to return to the MANDALA
REALTIME page.
As you turn the scroll knob in Navigation Mode you will move
circularly through the Function Pages in the following order:
from Options
|
ZONE SETUP
|
ZONE INSTRUMENT
|
REVERB/DELAY
|
CHORUS/FLANGE
|
4-BAND EQ
|
PARAMETERS
|
POSITION CONTROLLER
|
VELOCITY CONTROLLER
|
PEDAL CONTROLLER
|
OPTIONS
|
back to Zone Setup

14
OK, wait a minute. Before we go any further, let’s make sure nobody is
scratching their heads wondering:
So what’s the deal with these ZONES?
A Zone is a concentric division of the Drum Surface that can be
assigned its own Instrument, Parameter Settings, and MIDI
channel, if desired. The whole Pad can be one zone, or divided
into up to seven zones. If you program multiple zones, Zone 1
will always be in the center, and each added zone will evenly
divide the pad concentrically out to the edge. See the diagram
below.
Everything related to setting up and editing these zones will be
discussed in the following section, amply titled:

15
MODE 3: Edit Mode
Edit Mode is reached by pressing the Button once while in Navigation
Mode. A solid underline cursor will appear under the first parameter
value in the current page. Spinning the knob will move the cursor from
parameter to parameter. When you reach the parameter you would like
to alter just press the button and the cursor will begin to blink. Now
you can spin the knob and change the parameter value. Changes occur
as you make them so hit the surface if you’d like to hear what you’re
doing. Also, pressing the scroll knob while you are turning it to alter a
parameter will increase the rate of your change in order to speed things
up a bit.
Edit Mode is entered into by pressing the button at any of the
following pages while in Navigation Mode:
- ZONE SETUP PAGE
- ZONE INSTRUMENT PAGE
- REVERB/DELAY
- CHORUS/FLANGE
- 4-BAND EQ
- PARAMETERS
- POSITION CONTROLLER
- VELOCITY CONTROLLER
- PEDAL CONTROLLER
- OPTIONS
The following serves as a description of each of these pages as well as
a tutorial on programming the Mandala:

16
ZONE SETUP Page
This page displays the number of zones used in the chosen Preset.
Changing the number of Zones:
-Make sure you’ve pressed the button to get from Navigation Mode to
Edit Mode in order to begin changing the number of zones.
-Use the Scroll Knob to set the desired amount of zones (up to seven).
-Push the button to confirm your choice. (The cursor will vanish, and
those pesky navigation arrows will reappear on each side of the
screen. You’re back in Navigation Mode.)
-The Scroll Knob will move you through the Zone INSTRUMENT
pages, each of which serves as a different zone’s ‘Edit Page 1.’ (From
these you can access each zone’s two additional Edit Mode Pages.)
Scrolling past the Zone INSTRUMENT pages will bring you to the
Preset’s Global Effects pages (REVERB, CHORUS, and EQ), a MIDI
PARAMETERS page, and several CONTROLLER OPTIONS settings
pages. First we’ll learn how to set up individual zones, then we’ll put
global effects and controllers on the lot of them.

17
To edit a particular zone’s settings:
-Use the Scroll Knob to select the Zone’s INSTRUMENT page.
-Press the button once. The navigation arrows will vanish and a cursor
line will appear under the Instrument’s location number.
-Use the Scroll Knob to move the cursor line to any of the other
parameter options. Scroll your way through all three Edit pages.
-Press the Button once at any parameter option you want to edit. The
cursor will start blinking, which means you’re good to go.
-Use the Scroll Knob to change the value of your chosen parameter.
-Remember to press the Button again after you’ve adjusted each
parameter’s value to your liking. The cursor line must be solid before
you can scroll to the next parameter option.
PT. V - ZONE EDIT PAGES
Each Zone has 3 pages of editable Parameter Options:
ZONE EDIT Page 1 – INSTRUMENT

18
This is essentially each zone’s Main page, and is found in the
Navigation Mode menu. Choose this page to access each zone’s
additional EDIT Pages.
Instrument/Location #: Scroll through all instruments stored in the
Brain*
Note: if you opt to employ any of the scales on the MOD Edit Page,
this parameter allows you to choose the scale’s root note
MIDI Channel: all Zones are assignable to any MIDI channel from 1-
16 (MIDI channels default to matching Zone numbers)
*A large selection of drum sounds can be found on MIDI Channel
10; to use them, set a zone’s MIDI channel to 10 and set the Root
Note Parameter value anywhere from B0 to A4 (see Drum Set Table
below).
ZONE EDIT Page 2 – MOD
On this page, all Parameter Option values range from 0-127.
Parameters can also be controlled by footpedal (ped), strike velocity
(vel), and strike position on the drum surface (pos). (See the manual’s
GLOBAL SETTINGS section for descriptions of each controller’s
SETUP page.)
Mod: Values set modulation amount: 0 = none; 127 = full
Note: The following Zone parameter settings are relative to the
GLOBAL PARAMETER Page’s settings.

19
Pbnd: Pitchbend values can change a note’s intonation by up to 2
octaves
Vol: 128 Values can set a strike’s maximum volume
Pan: Values can set a zone’s sound to pan as much as:
0 = full Left; 64 = Center; 127 = Full Right
ZONE EDIT Page 3 – SCALES
This page shapes the Mandala’s tonal dimensions. You can set which
scale or mode each zone will orient to [see the list below], and for the
tonally (and atonally) inclined, you can use multiple zones to literally
create new scales and modes.
It will behoove you have Preset #17_Tutorial_1’s Zone 1 SCALES
Edit Page displayed while referencing this section
Scale: scroll through the list and choose a scale or mode to
manipulate (see below for list)
Step: set up which notes to use within the chosen scale: 1 = every
note, 2 = every other note (third intervals for you music
school kids), 3 = every 3rd note (fourth intervals), 4 = every
4th note (fifth intervals), and so on…

20
Patrn: assign a contour pattern (literally, a linear shape) to your
chosen scale’s sequence of notes. (See list)
Rg: program the scale’s tonal range by deciding how many notes
you want to fit into the contour
Here’s an example of a zone’s SCALE Edit Page setting:
Scale: Major (let’s use the key of C for this example)*
Steps: 1 – all of the chosen scale’s notes are sequential (meaning
there are no skipped notes)
Pattern: 2 – scale up (bottom to top, bottom to top, etc.)
Range: 7 – seven notes total before starting again at the bottom
Result: Your usable notes will draw from a C Major scale (set the key –
or root note – of the scale using the Note Parameter Option found on
the Zone’s INSTRUMENT Edit Page). Each note will be one step up
from the last, and all seven notes in the scale will be available. C, D, E,
F, G, A, B
*On the INSTRUMENT page, set the Note Parameter Value to C3
SCALES
Major, Natural Minor, Melodic Minor, Diminished, Whole Tone,
Pentatonic Major, Pentatonic Minor, Blues Major, Blues Minor,
Ryuku, Gamelan, Indian, Combined Diminished, Chromatic, Ionian,
Dorian, Phrygian, Lydian, Mixolydian, Aeolian, Locrian, scale off
SCALE PLAY PATTERNS
1. Upwave: (low–>hi–>low etc.)
Table of contents
Popular Music Equipment manuals by other brands

ns design
ns design NS-CR4 Radius Bas owner's manual

Zoom
Zoom 9001 Advanced Multi-Effecis Processor Operation manual

Intellistage
Intellistage Staging 101 installation instructions

evenharmonic
evenharmonic Gtak6 user manual

Paia
Paia 9407 Tube MicPreAmp quick start guide

STILLSON HAMMER
STILLSON HAMMER MARK II Operation manual