Tabata Tusa DC-Solar IQ-1203CE User manual

DC-SolarIQ1203CEDiveComputer
Owner’sManual
1st.
The CE mark is used to mark conformity with the European Union
EMC directive2004/108/EC.

1
Thank you for your selection of the TUSA IQ-1203CE Dive Computer.
◆This dive computer does not conform to
the diver watches(100m) stated in the ISO6425 and JISB7023.
Applications
This is a dive computer to support no decompression dive safely.
Solar panel generates electric power to run the dive computer.
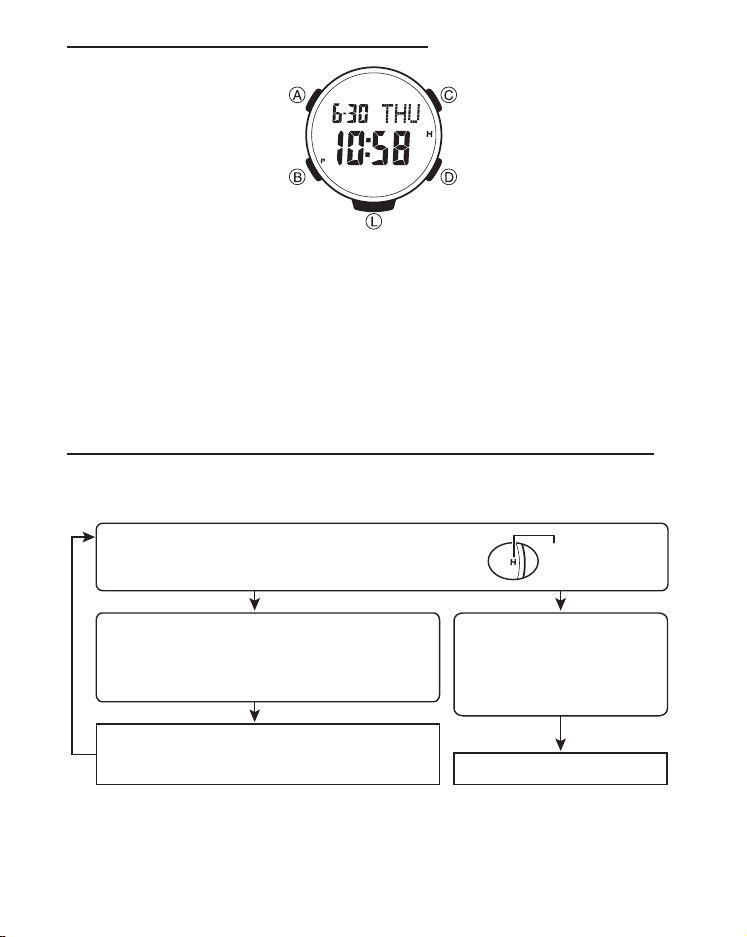
It has multi-functions as watch, alarm, timer, stopwatch, direction
compass and angle, world time watch in the Time mode, and
surface interval time and desaturation time (DESAT time) in surface
interval. In the Dive Mode, information of water depth, water
temperature,dive time, ascent speed and decompression are
provided. When divers exceeds no decompression limit, the dive
computer givesdivers alarm with display.
It applies to Nitrox (EANx) dive too. You can set fraction of
oxygen(FO2) % per 1 % from 21% (Air) to max. 50%.
The calculation model we use for the decompression program of
the dive computer is based on the decompression theory of Dr. A.
A. Buhlmann.
Before use, you need understand how to use, all warnings and
cautions of the dive computer written on this Instruction Manual.
To avoid any serious accidents, please make sure to read and fully
understand the dive computer. If you have any questions, please
ask the shop you purchased the dive computer.
Whenever there is a thing you do not know in how to use of the
dive computer, we strongly recommend to access the web site of
TUSA and read this instruction manual well.
Understanding and using the functions of the dive computer
ensures safe dive you can enjoy.

2
Safety Precautions
Please read the followings before use.
TUSA shall assume no responsibility on damages, lost profit
and/or any claims caused in use or by malfunctions of this dive
computer from customers and any third parties.
Danger
• Make sure to understand how to use, warnings, and cautions
of this dive computer with this Instruction Manual completely
before use. Confirm that you understand how to use the dive
computer in closed water as in a pool before using in open
water.
• When using the dive computer in scuba diving, you need to take
dive training course both in learning rules and practical skills,
and obtain C card (certification card) issued by internationally
acknowledged dive training organizations beforehand. (You
can use the dive computer in the training under the guidance of
instructors of such organizations)
• When using the dive computer in Nitrox (EANx) dive, you need
to take Nitrox (EANx) dive training course and complete it
beforehand. Otherwise, do not use the dive computer in Nitrox
(EANx) dive.
Ref: EANx: Enriched Air Nitrox (commonly called Nitrox).
It is mixed gas with higher FO2% than normal compressedair
(FO2is 21%)
• If “Decompression stop violation” warning and/or “Out of
measurement range” warning are released, cancel dive for a
day and pay attentions on changes of your physical condition.
• When you notice abnormal conditions on the dive computer,
stop using it immediately and contact the shop you purchased
the dive computer.

3
• Check the battery power level is “H” before dive. If power
levelgets low and warning (WARNING!! BATT) is released while
dive, exit as soon as possible and recharge the dive computer.
●Even this warning is released in dive, enough power for dive
remains. Deal with the situation calmly without panic Ref.
Power Levels … P.11
• Follow the displayed warnings and messages for cautions on
the dive computer at once.
• When using the dive computer, also use other devices as
another dive computer, divers watch, and depth indicator
together as backup tool.
• The dive computer is to be used for recreational dive only.
Do not use the dive computer for any other dive.
• Never lend or share the dive computer with anyone else if
residual nitrogen still exists in the body after use of the dive
computer.
• Make sure to set FO2% in every dive. It is extremely dangerous
if FO2% in tank and in the dive computer don’ t match.
• Dot not disassemble, repair, modify, exchange the secondary
battery or conduct pressure chamber test on the dive computer
by yourself. This will be extremely dangerous since doing this
without sufficient knowledge causes malfunction.
• Check out the dive computer by yourself once a year regardless
of frequency of use. Especially, check it out definitely when you
have not used the dive computer for more than 3 months since
last dive season.

4
• The dive computer is applicable to the air with FO221 % and
Nitrox (EANx) gas with FO222-50%. The dive computer can not
be used with any other mixed gas.
• Each diver should be responsible in planning and conducting of
safety dive according to each diver’ s condition.
• Please try cautious dive not exceeding the displayed data in
the dive computer. The dive computer can not prevent from
developing decompression illness completely.
• The dive computer does not measure, display and control the
air pressure in tank. Use the residual air pressure indicator and
check it by yourself.
• When removing the secondary battery from the dive computer,
be careful for small children not to swallow it. Put the battery
out of reach of children. If swallowed, contact a doctor at once.

5
Contents
1. About This Instruction Manual
2. Things To Check Before The Dive Computer
3. Charging The Dive Computer
Charging Guide
Power Levels
Power Recovery Mode
Charging Times
Power Saving
To Recover From The Sleep State
Low Power Alarm
4. Mode Reference Guide
5. Timekeeping
6. Configuring Home City Settings
To Configure Home City And Daylight Saving Setting
7. Configuring Current Time and Date Settings
To Change The Current Time And Date Settings
8. Displays In The Surface Mode
9. Dive Mode (DIVE)
How To Switch The Mode To Dive Mode
No Decompression Mode
Safety Stop
What Makes “Safety Stop Function” End
No Decompression Limit (NDL) Warning
Decompression Dive
The below information is shown in decompression dive.
Warnings in dive
1) Ascent Rate
2) Decompression Dive
3) Decompression Stop Violation
4) Out Of Measurement Range

6
5) O2Indicator (Oxygen Limited Indicator (OLI))
6) PO2(Pressure of Oxygen)
7) M Value
Nitrox (EANx) Dive
Dive At High Altitude
10. Log Mode (LOG)
Check Dive History
Check Dive Log
Warnings Recorded In Log
Check Dive Profile
11. Plan Mode (PLAN)
Set Safety Factor
Set Safety Factor
Set FO2%
Set M Value Warning
FO2% Default Function
Plan Dive
12. Taking Direction Readings
To Take A Direction Reading
To Perform Bidirectional Calibration
To Specify Temperature And Depth Display Units
13. Using The Stopwatch
To Enter The Stopwatch mode
To Perform An Elapsed Time Operation
14. Using The Countdown Timer
To Enter The Countdown Timer Mode
To Specify The Countdown Start Time
To Perform A Countdown Timer Operation
To Stop The Alarm
15. Using The Alarm
To Enter The Alarm Mode
To Set An Alarm Time
To Turn An Alarm And The Hourly Time Signal On And Off

7
To Stop The Alarm
16. Checking The Current Time In A Different Time Zone
To Enter The World Time Mode
To View The Time In Another Time Zone
To Specify Standard Time Or Daylight Saving Time (DST)
For A City
17. Illumination
To Turn On Illumination Manually
To Change The Illumination Duration
To Turn The Auto Light Switch On And Off
18. Other Settings
To Turn The Button Operation Tone On And Off
To Turn Power Saving On Or Off
Dive Mode Screen Setting
19. Free Diving Mode
Setting Of The Free Diving Log Number
Switching To Free Diving Mode
Free Diving Function
Button Operations
20. Depth Interval Alarm Setting
Setting Of Depth Interval Alarm
Setting Range
21. Gauge Mode
Setting Of Gauge Mode
Canceling Gauge Mode
22. Troubleshooting
23. Specification

8
1. About This Instruction Manual
• Button operations are indicated using the letters shown in the
illustration.
• Note that the dive computer illustrations in this Instruction
Manual are intended for reference only, and so the actual dive
computer may appear some what different than depicted by an
illustration.
2. Things To Check Before Using The Dive Computer
1. Check the battery power level.
Is “H” or “M” displayed for the battery power
Go to step 2.
Power is low.Charge the watch by placing it in a
location where it is exposed to light. For details,
see “Charging the Dive Computer” (page 9).
SEYON
YES
Does any one of the following conditions exist?
•Battery power indicator shows “L” and “LOW ” is
flashing on the display.
•“CHG” is flashing on the display.
•The face is blank.
The watch is charged
sufficiently.
For details about charging, see
“Charging the Dive Computer”
(page 9).
NEXT
Battery power
indicator
indicator (page 11)?

9
2. Check the Home City and the daylight saving time (DST) setting.
Use the procedure under "To configure Home City and summer
time settings" to configure your Home City and daylight saving
time settings.
World Time Mode data depend on correct Home City, time,
and date settings in the Time mode or Surface Mode.
Make sure you configure these settings correctly.
Important!
3. Set the current time.
See "Configuring Current Time and Date Settings
3. Charging the Dive Computer
The face of the dive computer is a solar panel that generates
power from light. The generated power charges a built-in
rechargeable battery, which powers dive computer operations.
The dive computer charges whenever it is exposed to light.
Charging Guide
Whenever you are not wearing the dive computer,
leave it in a location where it is exposed to light.
• Best charging performance is achieved by
exposing the dive computer to the strongest light
available.

10
When wearing the dive computer, make sure that its
face is not blocked from light by the sleeve of your
clothing.
• The dive computer may enter a sleep state if its
face is blocked by your sleeve even only partially.
Leaving the dive computer in bright light for charging may
make it become quite hot.
Take care when handling the dive computer to avoid burn
injury. The dive computer can become particularly hot
when exposed to the following conditions for long periods.
• On the dashboard of a car parked in direct sunlight
• Too close to an incandescent lamp
• Under direct sunlight
Warning!
• Allowing the dive computer to become very hot can cause
its liquid crystal display to black out. The appearance of the
LCD should become normal again when the dive computer
returns to a lower temperature.
• Turn on the dive computer's Power Saving function and
keep it in an area normally exposed to bright light when
storing it for long periods. This helps to ensure that power
does not run down.
• Storing the dive computer for long periods in an area where
there is no light or wearing it in such a way that it is blocked
from exposure to light can cause power to run down.
Expose the dive computer to bright light whenever possible.
Important!

11
Power Levels
You can get an idea of the dive computer's power level by
observing the battery power indicator on the display.
Battery power
indicator
Level Battery Power Indicater Function Status
1
(H)
All functions enabled.
2
(M)
All functions enabled.
3
(M)
・
(CHG)
Mode cannot be changed to Dive Mode.
4
(L)
Illumination, beeper, and sensor operation
disabled.
5
(CHG)
Except for the current time and the CHG
(charge) indicator, all functions and display
indicators disabled.
6 – – – All functions disabled.
• When (M) is on and (CHG) blinks at the Level 3 (Mand CHG),
and all other display is shown OK, mode cannot be changed to
Dive Mode. (You can not dive.)
• The blinking LOW indicator at Level 4 (L) tells you that battery
power is very low, and that exposure to bright light for charging
is required as soon as possible.
• At Level 6, all functions are disabled and settings return to their
initial factory defaults.

12
Once the battery reaches Level 2 (M) after falling to Level 6,
reconfigure the current time, date, and other settings.
• Display indicators reappear as soon as the battery is charged
from Level 6 to Level 2 (M).
• Leaving the dive computer exposed to direct sunlight or some
other very strong light source can cause the battery power
indicator to show a reading temporarily that is higher than the
actual battery level.
The correct battery level should be indicated after a few
minutes.
• All data stored in memory is deleted, and the current time and
all other settings return to their initial factory defaults whenever
battery power drops to Level 6 and when you have the battery
replaced.
Power Recovery Mode
• Performing multiple sensor, illumination, or alarm operations
during a short period may cause all of the battery power
indicators (H, M, and L) to start blinking on the display. This
indicates that the dive computer is in the power recovery mode.
Illumination, alarm, countdown timer alarm, hourly time signal,
and sensor operations will be disabled until battery power
recovers.
• Battery power will recover in about 15 minutes. At this time, the
battery power indicators (H, M, and L) will stop blinking.
This indicates that the functions listed above are enabled again.
• If all of the battery power indicators (H, M, L) are blinking and
the CHG (charge) indicator also is blinking, it means the battery
level is very low. Expose the dive computer to bright light as
soon as possible.

13
• Even if battery power is at Level 1 (H) or Level 2 (M), the Digital
Compass Mode, Dive Mode sensor may be disabled if there
is not enough voltage available to power it sufficiently. This is
indicated when all of the battery power indicators (H, M, L) are
blinking.
• Frequent blinking of all of the battery power indicators (H, M, L)
probably means that remaining battery power is low. Leave the
dive computer in bright light to allow it to charge.
Charging Times
〔Recharging time 〕
Condition (luminance)
Recharging hours needed
for a dive from the time low
power alarm is released.
Recharging hours needed
to full charge from the time
low power alarm is released.
Outdoor sunlight (50,000 lux) 1 hrs. 8 hrs.
Sunlight through a window
(10,000 lux) 2 hrs. 30 hrs.
Daylight through a window
on a cloudy day (5,000 lux) 4 hrs. 60hrs.
Indoor fluorescent lighting
(500 lux) 36 hrs.
• Actual exposure times depend on lighting conditions.
• For details about the operating time and daily operating
conditions, see the "Power Supply" section of the
Specifications.

14
Power Saving
When turned on, Power Saving enters a sleep state automatically
whenever the dive computer is left for a certain period in an area
where it is dark.
The table below shows how dive computer functions are affected
by Power Saving.
• For information about enabling and disabling power saving, see
"To Turn Power Saving On And Off".
• There actually are two sleep state levels: "display sleep" and
"function sleep".
Elapsed Time in Dark Display Operation
60 to 70 minutes (display sleep) Blank Display is off, but all functions are enabled.
6 or 7 days (function sleep) Blank
All functions are disabled, but timekeeping
6 or 7 days (function sleep) Blank is
maintained.
• The dive computer will not enter a sleep state between 6:00 AM
and 9:59 PM. If the dive computer is already in a sleep state
when 6:00 AM arrives, however, it will remain in the sleep state.
• The dive computer will not enter a sleep state while it is in
the Dive Mode, Stopwatch Mode or Countdown Timer Mode.
In Surface Mode, display becomes blank but functions are
enabled.
To Recover From The Sleep State
Move the dive computer to a well-lit area, press any button, or
angle the dive computer towards your face for reading.

15
Low Power Alarm
For safe dive, when power becomes too low to dive, Low power
alarm is on with message to urge divers to recharge the power.
Since sensors of the dive computer would not function when
power level becomes (L), dive is not allowed. Suppose you started
dive with the power level (M), and it becomes (L) while dive, no
information related the dive is shown anymore.To avoid this
dangerous situation, when power becomes too low to dive, you
can not dive until the power becomes high enough for dive.
Diving functions disabled
High
Middle
Low
①Diving is available①
②
(Pressure sensor does not work)
Battery warning level Can not move to
diving mode
Normal condition
(Pressure sensor works OK)
②Warning is released
Current mode Displayed alarms
Time mode or Surface Mode [CHG] will blink
Dive Mode
[WARNING!! BATT] will move from right to left 5 times,
and [M] on the right side of the display will blink.
[WARNING!! BATT] will be re-shown every minute.
Alarm will be on for 6 seconds
◆The alarm will continue until power becomes high enough for
dive. No dive is allowed when the alarm is on.

16
4. Mode Reference Guide
Your dive computer has 10 "modes". The mode you should select
depends on what you want to do.
Mode types and how to switch them:
The below shows mode types and how to switch them.
Modes Functions Ref. page
Time mode
and Surface Mode
(TIME)
To display current time, date, day19P
To view the current date in the Home City19P
To configure Home City and daylight savin
time (DST) settings 20P
To configure time and date settings21P
Surface Mode (TIME) To display desaturation time (DESAT time)22P
To display surface time22P
Dive Mode (DIVE) To display no decompression limit (NDL)24P
To display safety stop25P
To display NDL warning26P
To display decompression dive27P
To give warnings in dive28P
Nitrox (EANx) dive32P
Dive at high altitude34P
Log Mode (LOG) To display dive history35P
To display dive log35P
To display dive profile38P
Plan Mode (PLAN) To display dive plan39P
To set safety factor (SF)40P
To set FO2%40P
Digital Compass Mode To determine your current bearing or the
direction from your current location 44P
Stopwatch Mode To use the stopwatch to measure elapsed time51P
Countdown Timer Mode To use the countdown timer53P
Alarm Mode To set an alarm time56P
World Time Mode To view the current time in one of 48 cities
(31 time zones) around the globe 58P
Free Diving Mode To use the Free Diving Mode67P
Gauge Mode To use the Gauge Mode73P

17
Selecting A Mode
• The illustration below shows which buttons you need to press
to navigate between modes.
Countdown
Timer Mode
Alarm Mode Free Mode
Stopwatch Mode Digital compus Mode
Time Mode
Plan modeLog ModeDive Mode
Hold(1.5 sec.)
+
World Time
Mode
General Functions (All Modes)
The functions and operations described in this section can be
used in all of the modes.

18
Auto Return Features
• The dive computer will automatically return to the Time mode if
you do not perform any button operation for a particular amount
of time in each mode.
Mode Name Approximate Elapsed Time
Log, Plan 3 minutes
Alarm, Digital Compass 3 minutes
Setting screen (digital setting blinking) 3 minutes
• If you leave a screen with blinking digits on the display for two
or three minutes without performing any operation, the dive
computer exits the setting screen automatically.
Initial Screens
When you enter the Alarm, World Time, or Digital Compass Mode,
the data you were viewing when you last exited the mode
appears first.
Scrolling
The Cand Dbuttons are used on the setting screen to scroll
through data on the display. In most cases, holding down these
buttons during a scroll operation scrolls through the data at high
speed.

19
5. Timekeeping
Use the Time mode (TIME) to set and view the current time and
date.
• Each press of Ain the Time mode will change screen contents
as shown below.
Hour :
Minutes
〔Surface Mode〕
Day
PM
indicator
Seconds
Seconds
Day of week
Day of week
Table of contents
Other Tabata Diving Instrument manuals