Tack life TGG02 Owner's manual

Assembly Instructions & User’s Manual
2 Burner Gas Griddle
Keep this manual for future reference
READ INSTRUCTION MANUAL BEFORE ATTEMPTING TO ASSEMBLE OR
OPERATE THIS PRODUCT.
Adult assembly required.
Keep screws and parts out of reach of children.
Warning:
Model No.: TGG02
Supplier Model No.: SRGG21706

WARNINGS
DANGER
• NEVER operate this appliance unattended.
• le liquid.
•
department. Do not attempt to extinguish an oil or a grease fire with water.
fire, explosion or burn hazard which
could cause property damage, personal injury or death.
When using this appliance, basic safety precautions should always be observed. Read and
understand the meaning of these symbols before assembling and using this appliance.
SAFETY SYMBOLS:
DANGER
Indicates a hazardous situation, which if not avoided, will result in death or serious injury.
WARNING
Be alert to the possibility of serious personal injury if the instructions are not followed.
CAUTION
Indicates a potentially hazardous situation, which if not avoided, could result in moderate injury.
CAUTION
This instruction manual contains important information necessary for the proper assembly and
saf
using the appliance. Follow all warnings and instructions when using the appliance.
e use of the appliance. Read and follow all warnings and instructions before assembling and
DANGER
If you smell gas:
• Shut off gas to the appliance.
•
•If odor continues, keep away from the appliance and immediately department.
losion which could cause
property damage, personal injury or death.
5
2

TABLE OF CONTENTS
Warnings...............................................................................................2, 4-8
Parts List.....................................................................................................11
Assembly Instructions.................................................................................12
Troubleshooting.........................................................................................15
Care and Maintenance...............................................................................13
Warranty Information..................................................................................15
NOTE: Before beginning assembly of product, make sure all parts are present.
Compare parts with package content list and hardware contents.
If any part is missing or damaged do not attempt to assemble the unit.
Contact customer service for replacement parts.
Exploded View............................................................................................10
Operating Instructions................................................................................. 8
Product Dimension.......................................................................................9
3

WARNINGS
DANGER
Failure to follow these instructions and warnings could result
cause property damage, personal injury or even death. Using an LP appliance has a degree of risk that
you are assuming. Properly following these instructions and warnings will help minimize that risk.
• DO NOT USE ON SURFACES such as wood, asphalt or plastic. These surfaces are combustible
• Hot cooking liquids can remain dangerously hot long after cooking. NEVER handle the cooking
• Do not move the appliance when in use.
Equipped for use on: Propane. Main Max. Input Rating: 17,000 BTU/H
Outdoor Cooking Specialty Gas Appliance
WARNING: FOR OUTDOOR USE ONLY. If stored indoors, detach and leave cylinder outdoors.
Minimum clearance from sides and back of unit to combustible construction: 24 inches from sides
and 36 inches from back.
The appliance shall not be located or used under overhead unprotected combustible construction.
WARNING: This appliance comes with a supplied CSA approved regulator which must
be used with this appliance. Replace only with regulator Model No. RY0505D or GR-148.
CAUTION: The instruction manual contains important information necessary for the proper
assembly and safe use of the appliance. Read and follow all warnings and instructions before
assembling and using the appliance. Follow all warnings and instructions when using the appliance.
If instructions or parts are missing contact customer service.
This appliance is not designed nor intended for commercial use.
SAVE THESE INSTRUCTIONS
Read and understand all instructions before assembling and using this appliance.
Follow all warnings while using this appliance. Failure to follow these instructions could result
DANGER
If you smell gas: If possible, immediately turn off gas supply to the appliance by turning the LP tank
valve clockwise (right). If this cannot be accomplished safely, immediately get away from the appliance
(Always have an approved extinguisher on hand when using this product. A Class “B” dry chemical OR
CO2 extinguisher or preferably a Class “K” extinguisher. Special care must be taken to understand the
manufacturers instructions and be prepared to operate the appropriate extinguisher prior to using this
appliance.) If you continue to smell gas, immediately contact t
go near the appliance.
4
appliance until the cooking liquid has cooled to less than 115˚F (45˚C).

WARNINGS
• This appliance will be hot during and after use.Use insulated oven mitts or gloves to protect from hot surfaces
or splatter from cooking liquids. Closed toed shoes should always be worn during operation of this appliance.
• Keep children and pets away from the cooking appliance at all times.
• The use of alcohol, prescription drugs or non-prescription drugs may impair the consumer's ability to
properly assemble or safely operate the appliance. Do not operate when u
•
The minimum outside operating temperature of this appliance is 32˚F (0˚C). NEVER use this
appliance when temperature is below this minimum.
• Take CAUTION when in close proximity to appliance. Falling or tripping near the gas appliance may
result in the splashing or igniting of hot cooking liquids and potentially cause personal injury or
property damage.
• This appliance is NOT intended for commercial use.
• The installation must conform with local codes or, in the absence of local codes, with the National Fuel
Gas Code, ANSI Z223.1/NFPA 54, Storage and Handling of Liquefied Petroleum Gases, ANSI/NFPA 58; or
Natural Gas and Propane Installation Code,CSA B149.1; Propane Storage and Handling, CSA B149.2.
• NEVER operate this appliance indoors or any enclosed area. This appliance should ONLY be used
outdoors. The appliance shall not be used in a building, garage or any other enclosed area.
• NEVER install or use this appliance on a boat or other recreational vehicles.
• This product is NOT designed to be used as a heater. NEVER use this appliance as a source of
heat.
• Introduction of water or ice from any source into the oil/grease may cause overflow and severe
burns from hot oil and water splatter.
• When cooking, the appliance must always be on a level, stable, non-combustible surface such as
brick, concrete, or dirt. NEVER use this appliance around surfaces such as asphalt, wood, dry grass
or leaves, vinyl or plastic.
• Keep the fuel supply hose away from any heated surfaces.
• NEVER attempt to attach this appliance to the self-contained LP gas system of a camper, trailer or
motor home. The pressure regulator and hose assembly supplied with the appliance MUST BE THE
ONE USED. Replacement hose assembly must be GA09 or WG01.
• Check and clean burner/venturi tubes for insects and insect nes
beneath the appliance.
•
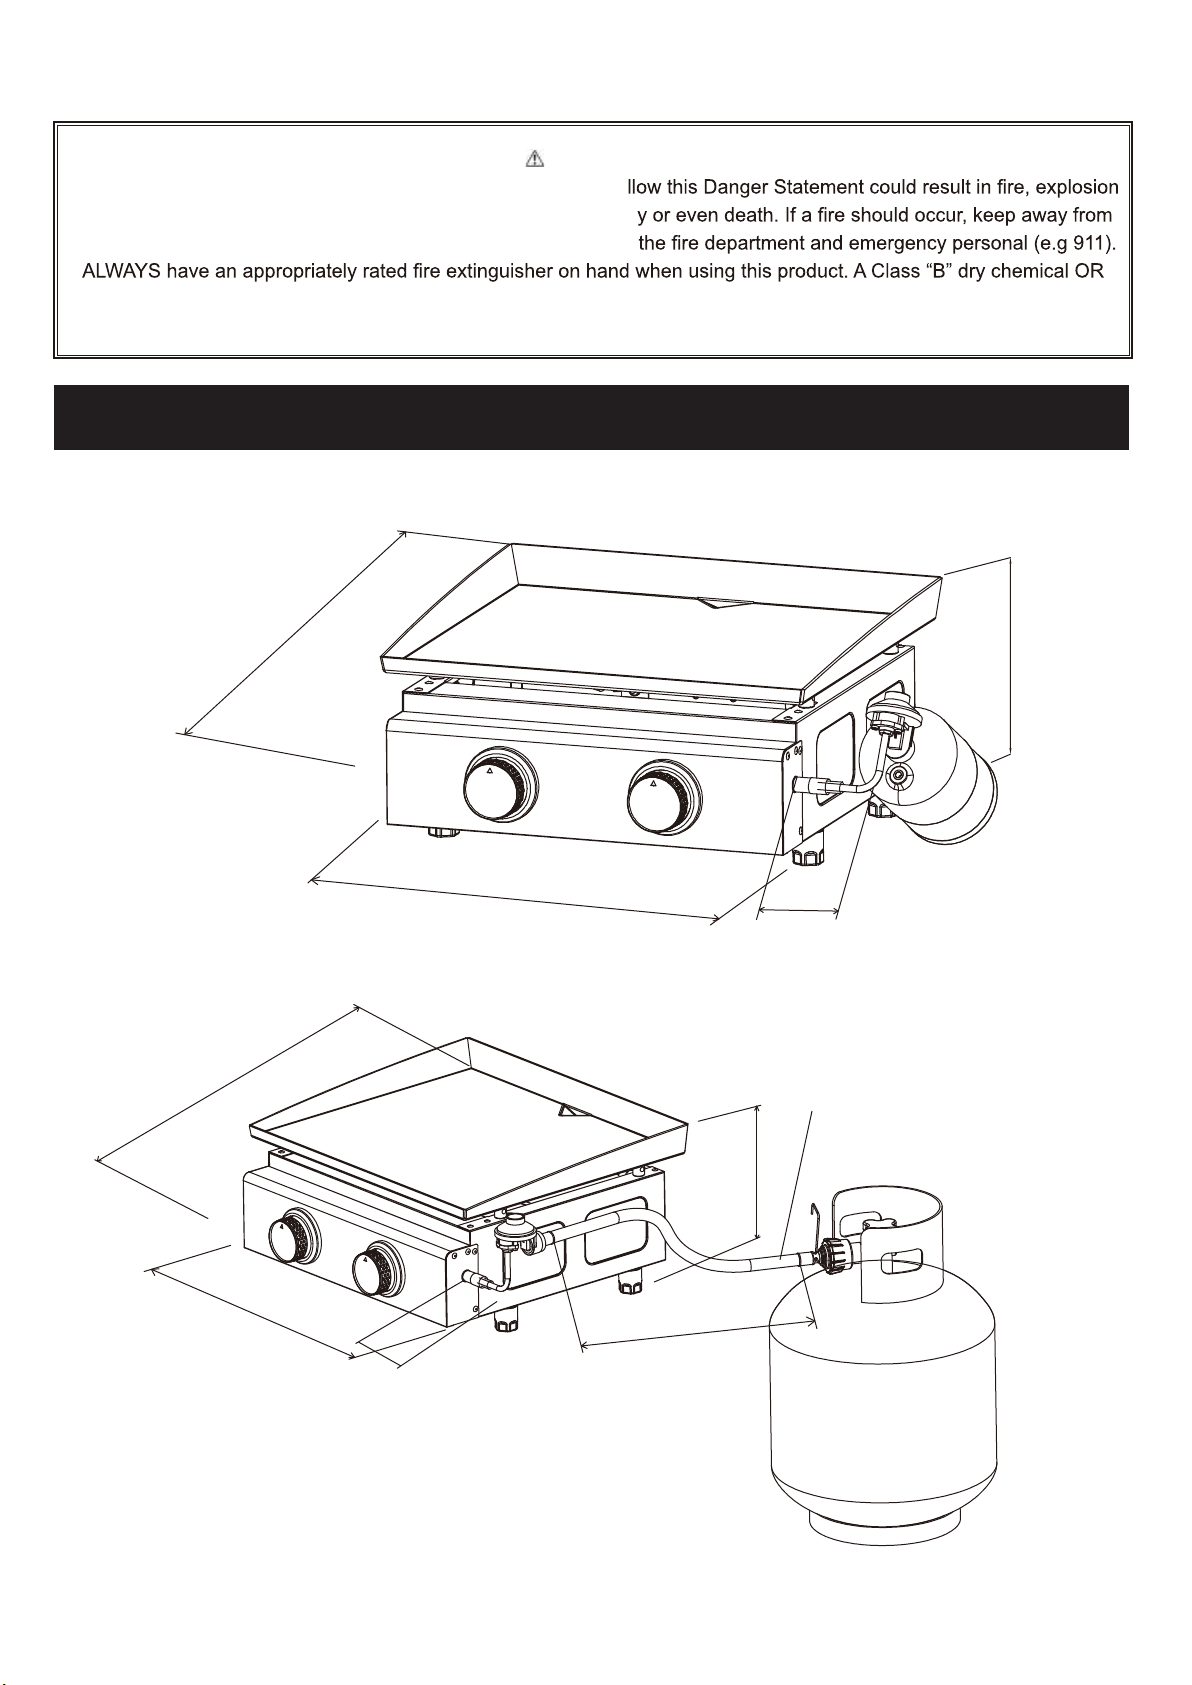
• Maintain proper clearances from combustible construction. Minimum clearance from sides and back
of unit to combustible construction: 24 inches from sides and 36 inches from back.
• Do not leave the appliance unattended. Keep children and pet
• When cooking with oil or grease, have a type BC or ABC fire extinguisher readily available.
• In the event of an oil or grease fire do not attempt to extinguish with water. Immediately call the fire
department. A Type BC or ABC fire extinguisher may, in some circumstances contain the fire.
WARNING: This product can expose you to chemicals including lead, which is known to the State
of California to cause cancer, and carbon monoxide, which is known to the State of California to cause
birth defects or other reproductive harm. For more information, go to www.P65Warnings.ca.gov.
s away from the appliance at all times.
tilation.
!
5

WARNINGS: LP TANK
LP TANK REMOVAL, TRANSPORT AND STORAGE:
1. Turn control knobs to OFF position.
2. 20Lb. cylinder: Turn off the cylinder valve. Turn coupling nut counterclockwise by hand only.
NEVER use tools to disconnect. When the appliance is not in use, the gas must be turned off
at the supply cylinder.
3. 1Lb. cylinder: Rotate LP gas tank counter-clockwise until it is loose. NEVER use tools to
disconnect. The cylinder must be disconnected when the appliance is not in use.
1. Do not store a spare LP gas cylinder under or near this appliance.
2. NEVER fill the cylinder beyond 80 percent full.
3. If the instructions in 1 and 2 are not followed exactly, a fire causing death or serious injury may occur.
4. The safety release valve on the LP tank could activate the leaking of gas and cause a severe fire
and increase the risk of serious injury or death.
5. If you smell, see or hear leaking gas IMMEDIATELY get away from the LP tank and contact your
FIRE DEPARTMENT.
4. Place dust cap on cylinder valve outlet whenever the cylinder is not in use. Only install the type
of dust cap on the cylinder valve outlet that is provided with the cylinder valve. Other types of
caps or plugs may result in leakage of propane.
5. A disconnected LP tank in storage or being transported must have a safety cap installed.
NEVER leave an LP tank in a car that can become overheated by the sun.
6. The cylinder must be stored outdoors out of the reach of children. NEVER store the cylinder in
enclosed spaces such as a garage, carport, covered porch or any other structure.
7. Storage of an appliance indoors is permissible only if the cylinder is disconnected and removed
from the appliance.
LP TANK:
The LP tank must meet the following requirements in order to be used with your appliance:
•
•
Measurements must be 12” (30.5cm) in diameter by 18” (45.7cm) high with 20lb. (9.1kg)
maximum capacity.
Measurements must be 3.858" (9.8cm) in diameter by 7.874" (20cm) high with 1lb. (16.4oz)
maximum capacity.
•
•
The LP gas supply cylinder must be constructed and marked in accordance with the
National Standard of Canada (CAN/CSA-B339), Cylinders, Spheres and Tubes for the
Transportation of Dangerous Goods.
Only cylinders marked "propane" shall be used.
The 20Lb. LP tank must include the following:
• QCC Type 1 outlet compatible with regulator or appliance.
• Safety relief valve.
•
hand wheel. Only use tanks equipped with this type of valve.
• LP tank must be arranged for vapor withdrawal and include collar that protects LP tank valve.
• LP gas is odorless, non-toxic, and colorless when produced. For your safety, LP gas has been
given an odor (similar to rotten eggs) so you can smell if there is any leaking.
•
DANGER
Indicates a hazardous situation, which if not avoided, will result in death or serious injury.
6

7
WARNINGS: LP TANK
CONNECTING HOSE ASSEMBLY TO 20LB. CYLINDER:
1. Make sure cylinder valve is turned OFF
(turning clockwise).
2. Check cylinder valve to ensure it has proper external
male threads as illustration(type 1 ANSI Z21.81).
3. Make sure all burner valves are in the OFF positions.
4. Inspect valve connections, port and regulator
assembly. Look for any damage or debris. Remove any debris. Inspect hose for damage.
Never attempt to use damaged or obstructed equipment. See your local LP gas dealer for repair.
5. When connecting hose assembly to the cylinder valve, do so manually, do not use a tool. Tighten
firmly clockwise by hand only. The use of a tool will
damage the seal and cause a serious risk of gas leak.
6. SLOWLY - Open the cylinder valve fully. Proceed
to a leak test (see LEAK TESTING section).
CONNECTING REGULATOR ASSEMBLY TO 1LB CYLINDER
1. Make sure all control knobs are in the OFF positions.
2. Inspect valve connections, port and regulator assembly. Look
for any damage or debris. Remove any debris. Inspect hose for damage. Never
attempt to use damaged or obstructed equipment. See your local LP gas dealer
for repair.
3. Align the nozzle of the cylinder with the regulator and turn the cylinder clockwise to
tighten. Tighten firmly by hand only. The use of a tool will damage the seal and cause
a serious risk of gas leak.
4. Proceed to a leak test (see LEAK TESTING section).
LEAK TESTING VALVES, HOSE AND REGULATOR
•
• DO NOT smoke or have anything nearby that can easily ignite, such as lighters or matches.
•
• Appliance must be leak checked outdoors in a well-ventilated area away from open flames or sparks.
STEPS TO LEAK TEST:
1. Use a clean paint brush and 50/50 soap and water solution.
NOTE: Use a mild soap and water. DO NOT use household cleaning agents. Damage to gas
train components could result.
2. Brush soapy solution onto all metal seams and entire valve area. Slowly turn the LP tank valve
immediately turn the valve off by turning clockwise. After 10 seconds, turn the LP tank to the off
position and continue to watch for any bubbles. UNDER NO CIRCUMSTANCE SHOULD THE
VALVE REMAIN IN THE ON POSITION FOR MORE THAN 12 SECONDS.
3. If bubbles are observed at the valve attachment, you may attempt to tighten the valve, and repeat
4. Brush soapy solution onto indicated connections as shown
the test from the beginning after waiting 5 minutes.
5. If "growing" bubbles appear, there is a leak. Close LP tank valve immediately and retighten
connections. If leaks cannot be stopped, do not try to repair. Call for replacement parts.
6. For assistance with any malfunction related to the LP tank, regulator or hose, contact your
propane dealer or customer service.
WARNING
If growing bubbles begin to appear there is a leak. IMMEDIATELY turn off LP tank valve. If bubbles
continue, IMMEDIATELY get away from the LP tank and contact your FIRE DEPARTMENT (e.g. 911)
External threads
(type 1 ANSI Z21.81)
OPD triangular
handle
Shut off gas supply by rotating valve of gas cylinder clockwise.
Gas cylinder
Fix hose
assembly
by rotating it
clockwise
7

WARNINGS: LP TANK
INSTRUCTIONS FOR LIGHTING BURNER:
OPERATING INSTRUCTIONS
1. Read all instructions before lighting.
2. Make sure all control knobs are in the OFF position.
3. When use 20lb. cylinder: Turn on the cylinder valve.
4. Select the burner to be lit. Push and turn the control knob
of that burner counter-clockwise to HIGH. Hold the control
knob pushed down for 2-3 seconds. It will light the burner.
5. Adjust the flame by turning control knob between HIGH and LOW.
6. Repeat step 4 for lighting other burner.
7. If ignition does not occur in 5 seconds, turn the burner control(s) OFF, wait 5 minutes, and repeat
the lighting procedure.
MANUAL LIGHTING
1. Make sure all control knobs are in the OFF position.
2. When use 20lb. cylinder: Turn on the cylinder valve.
3. Remove the cooking plate. Insert a match into the match lighter.
Strike the match and place near the gas outlet openings on the
burner. Push and turn the control knob of that burner
counter-clockwise to HIGH. Hold the control knob pushed down for
2-3 seconds. It will light the burner.
4. Adjust the flame by turning control knob between HIGH and LOW.
5. Repeat step 3 for lighting other burner.
6. If ignition does not occur in 5 seconds, turn the burner control(s)
OFF, wait 5 minutes, and repeat the lighting procedure.
7. Place the cooking plate back onto the plancha body.
Note: Match lighter is attached to the main valve tube at the bottom of gas plancha
by the manufacturer. Place the match lighter on the platform of the control panel after use.
SHUT DOWN INSTRUCTIONS
2. 20LB. cylinder: Turn LP cylinder gas valve clockwise to OFF position when plancha is not in use.
1LB cylinder: Turn the cylinder counter-clockwise to disconnect cylinder from regulator when
plancha is not in use.
1. Push and turn control knob clockwise to OFF position.
WHEN THE BURNER FLAME IS ACCIDENTALLY EXTINGUISHED
1. Close the LP tank valve.
2. Push and turn control knob clockwise to OFF position.
3. Inspect if the hose etc. connections are good, wait 5 minutes. After waiting 5 minutes, re-start the
appliance following the lighting instructions.
REGULATOR HOSE ASSEMBLY CHECK:
WARNING
Before each use, check to see if there is evidence of abrasion, wear, cuts or leaks on the hose. If
damage is evident, the hose must be replaced prior to appliance use.
DISCONNECTING HOSE ASSEMBLY FROM 20LB. CYLINDER:
1. Turn control knob to the OFF position.
2. Turn the cylinder valve off fully (turn clockwise to stop).
Detach the hose assembly from the cylinder valve
by turning the quick coupling nut counterclockwise.
DISCONNECTING REGULATOR ASSEMBLY FROM 1LB CYLINDER
1. Turn control knob to the OFF position.
2. Turn the cylinder counter-clockwise to disconnect cylinder
from regulator assembly.
NOTE: Loosen by hand only. DO NOT use tools.
8
Shut off gas supply by rotating valve of gas cylinder clockwise.
Gas cylinder
Detach hose assembly
by rotating it
counterclockwise
OFF OFF

DANGER
NEVER allow this appliance to operate unattended. Failure to fo
or burn hazard that could cause property damage, personal injur
the appliance, move everyone to safety and immediately contact
CO2 extinguisher or preferably a Class “K” extinguisher. Special care must be taken to understand the manufacturers
instructions and be prepared to operate the appropriate extinguisher prior to using this appliance.
PRODUCT DIMENSION
9
18.3"
18.3"
4.3"
4.3"
35"
9"
9"
WARNING:
Hose is a trip hazzard
21.2"
21.2"

EXPLODED VIEW
10
4
5
6
3
2
1

PARTS LIST
Part # Description Image Qty
1 Plancha body 1
12
3
Cooking Plate
NOTE: Wash all parts that will come in contact with food or water with
warm soapy water, rinse and towel dry.
4 Adjustable Feet 4
5 Regulator Assembly 1
6 Hose Assembly 1
Grease Box 1
11

ASSEMBLY INSTRUCTIONS
STEP
1
Choose a good, cleared assembly area, lay a
cardboard down to protect gas plancha finish
and assembly area.
Place the plancha body (1) upside down.
Screw 4 adjustable feet (4) into the plancha
body (1).
Turn the gas plancha body (1) over after
this step finished.
4
1
STEP 2
Place the cooking plate (2) onto the plancha
body (1).
STEP 3
Hang the grease box (3) on the two bolts at
the back side of plancha body (1).
12
1
1
3
2
R
STEP 4
Turn clockwise the nut on regulator assembly
(5) to connect regulator assembly (5) with the
plancha body (1).
15
STEP 5
USE 20LB CYLINDER
Rotate the hose assembly (6) clockwise to
attach the hose assembly (6) to regulator
assembly (5).
STEP 5
Align the nozzle of the cylinder with the
regulator assembly (5) and turn the cylinder
clockwise to attach the regulator assembly
(5) to the cylinder.
Do not over tighten with a wrench or pliers.
Make sure the 1lb cylinder is connected at an
angle for proper use.
Refer to instructions on PAGE 7 of
CONNECTING HOSE ASSEMBLY TO 20LB.
CYLINDER.
STEP 6
Connect to LP tank.
USE 1LB CYLINDER
>350
5
6
5

HOW TO CLEAN:
Proper care and appliance maintenance will keep your product operating smoothl
Keep appliance area clear and free from combustible materials, gasoline, and other flammable vapors
and liquids.
Keep the ventilation opening(s) of the cylinder enclosure free and clear from debris.
NOT obstruct the flow of combustion and ventilation air.
Check for proper burner flame characteristics. Each burner is adjusted prior to shipment; however,
variations in the local gas supply may take minor adjustments.
Burner flames should be blue and stable with no
yellow tips, excessive noise, or lifting. Slight yellow
tipping is normal for LP gas.If the flame is yellow, it
indicates insufficient air. If the flame is noisy and
tends to lift away from the burner, it indicates too
much air.
Visually check the burner flames prior to each use,
the flames should look like this picture, if flames do not, call our customer service line.
BURNER FLAME CHECK
y.
CLEAN THOROUGHLY AFTER EVERY USE.
NOTE: Clean the entire appliance each year and tighten all hardware on a regular basis (1-2 times
a year or more depending on amount of use).
1. Before cleaning turn off the appliance at the gas cylinder. Check that there is no flame, gas smell
and the valves are in off position. Next, make sure unit is properly disconnected from propane tank
prior to any cleaning.
2. Everything that was in contact with the food must be hand washed with warm soapy water and
nylon pad. DO NOT spray oven cleaner on cooking plate to remove grease or soot. It will cause
the finish to become dull. If food remains stuck to the cooking plate, add hot water and let it soak,
after cooling, scrub with steel wool.
3. lacing in storage.
4. We recommend that the unit be thoroughly cleaned prior to every use.
5. Store all components in a dry location when not in use.
For replacement parts, call our customer service department at 866-814-0585, 8 a.m. - 8 p.m., EST,
Monday - Friday.
The regulator should be hung on the gas plancha to prevent it from being damaged.
CAUTION
Allow unit to fully cool (115˚F or 45˚C) before performing any cleaning.
CARE AND MAINTENANCE
2 in.
1 in.
0 in.
1 inch
13

CARE AND MAINTENANCE
SUGGESTED CLEANING MATERIALS:
• Hot water
• Mild dishwashing liquid detergent
• Soft, nylon cleaning pad
CLEANING BURNERS
14
D5 Spring Washer
M5 Nut M5 x 12 Screw (A)

WARRANTY INFORMATION
TROUBIESHOOTING
The appliance has been manufactured under the highest standards of quality and workmanship. We
warrant to the original consumer/purchaser that all aspects of this product will be free of defects in
material and workmanship for one (1) year from the date of purchase. A replacement for any defective
part will be supplied free of charge for installation by the consumer. Defects or damage caused
by the use of other than genuine parts are not covered by this warranty. This warranty shall be effective
from the date of purchase as shown in the purchaser’s receipt.
This warranty is valid for the original consumer/purchaser only and excludes industrial, commercial
or business use of the product, product damage due to shipment or failure which results from alteration,
product abuse, or product misuse, whether performed by a contractor, service company, or consumer.
We will not be responsible for labor charges and/or damage incurred in installation, repair or
replacement, nor for incidental or consequential damage.
SHINERICH INDUSTRIAL LTD.
Toll free No.:1-866-814-0585
Addr.:8/F, Noble Center, 1006 Fuzhong 3rd.Rd,
Futian District, Shenzhen, China
Problems
Possible causes
Solutions
Burners can’t be lit by the
existing ignition system
1/ LPG gas bottle is empty
2/ Faulty regulator
3/ Obstructions in the burners
4/ Obstructions in gas pipe or
hose
1/ Replace with full bottle
2/ Check or replace the
regulator
3/ Clean burners
4/ Clean gas pipe or hose
Burners can’t be lit by a match
1/ LPG gas bottle is empty
2/ Faulty regulator
3/ Obstructions in the burners
4/ Obstructions in gas pipe or
hose
1/ Replace with full bottle
2/ Check or replace the
regulator
3/ Clean burners
4/ Clean gas pipe or hose
Weak flame or backfire (Fire
inside the burner - you can hear
a whistling or rusting noise)
1/ LPG gas bottle is too small
2/ Obstructions in the burners
3/ Obstructions in gas pipe or
hose
4/ Windy weather
1/ Use a bigger bottle
2/ Clean burners
3/ Clean gas pipe or hose
4/ Place the plancha in a more
protected place
Control knob is difficult to turn
1/ Windy weather
Replace the gas valve
15
Other manuals for TGG02
1
This manual suits for next models
1
Table of contents
Popular Griddle manuals by other brands

U.S. Range
U.S. Range "REGAL" SERIES parts list

LE MARQUIER
LE MARQUIER PLOG260D user manual

Electrolux
Electrolux Thermaline 9CHG584122 Installation and operating instructions

Black Stone
Black Stone ADVENTURE Ready 2304 owner's manual

Horeca Select
Horeca Select GEG 2001 instruction manual

LE MARQUIER
LE MARQUIER INOX PLTI260I user manual