Tasty Trotter KYQ-1016G User manual

ASSEMBLY INSTRUCTIONS MINI SPIT ROAST OVEN
Model: KYQ-1016G
0359/16
FOR OUTDOOR USE ONLY
PLEASE READ INSTRUCTIONS CAREFULLY BEFORE ASSEMBLY
RETAIN THIS MANUAL FOR FUTURE REFERENCE

WARNING
Hazardous fire or explosion may result if instructions are ignored
It is the consumer’s responsibility to see that the oven is properly assembled, installed, and taken
care of. Failure to follow instructions in this manual could result in bodily injury and/or property
damage.
1. Read the instructions before using the appliance.
2. Retain this manual for future reference.
3. Use outdoors only.
4. Warning accessible parts may be very hot. Keep young children away.
5. Do not move the appliance during use.
6. Turn off the gas supply at the gas cylinder after use.
7. Do not modify the appliance.
8. This appliance must be kept away from flammable materials during use.
9. The regulator and hose must be connected correctly to the appliance. A spanner must be used
to tighten the nut onto the connection thread.
10.In addition a logo or a warning shall be used to forbid gas cylinders in places of the appliance
not intended to receive gas cylinders if any.
FOR YOUR SAFETY IF YOU SMELL GAS:
1. Turn off gas supply at bottle.
2. Extinguish all naked flames; do not operate any electrical appliances.
3. Ventilate the area.
4. Check for leaks as detailed in this manual.
5. If odour persists, contact your dealer or gas supplier immediately.
PRECAUTIONS:
1. Leak test all connections after each tank refill.
2. Never check for leaks with a match or open flame.
3. Do not store of use gasoline or other flammable vapours and liquids in the vicinity of this or any
other appliance.
4. Any gas cylinder not connected for use shall not be stored in the vicinity of this or any other
appliance.
WARNING: Whilst every effort has made in manufacture of your oven to remove any sharp edge,
you should handle all components with care to avoid accidental injury.
Tools required: Either a philips crosshead or flat-bladed screwdriver and either a spanner (we
have supplied a multifunction spanner) or a pair pliers.
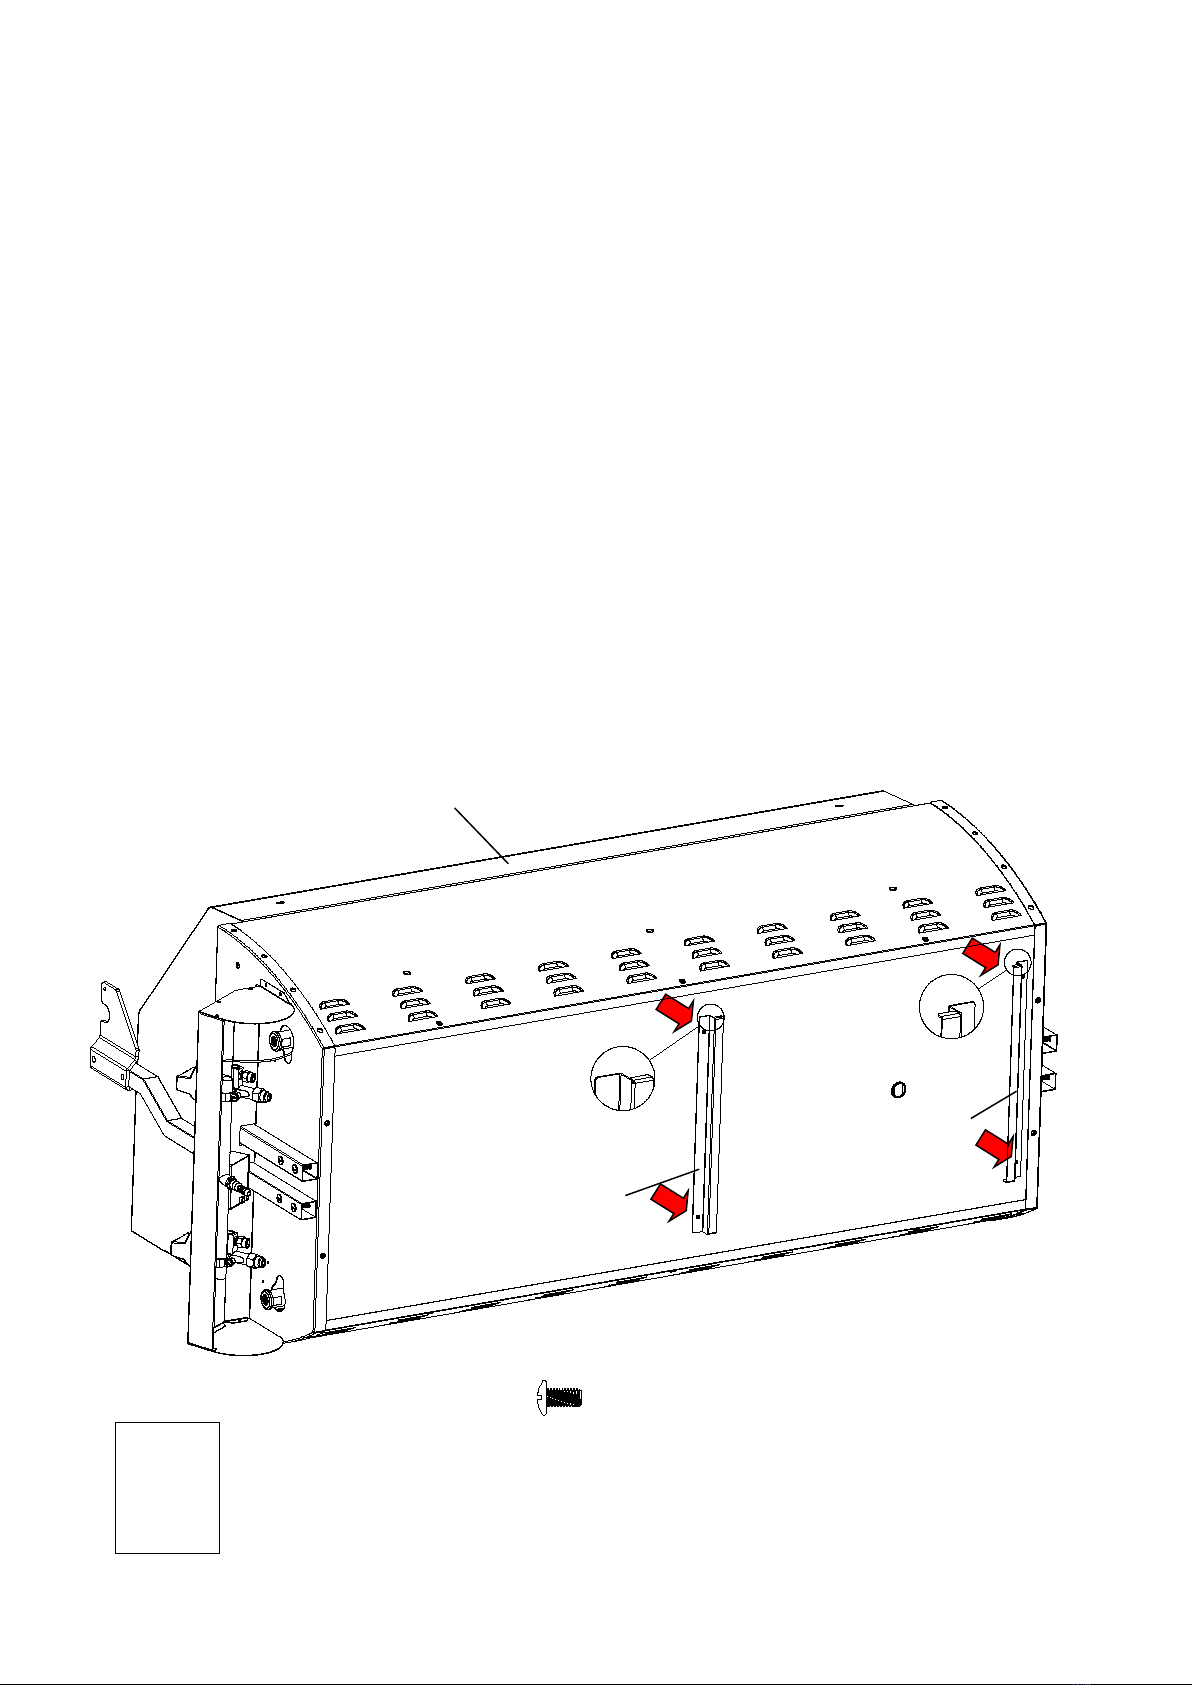
ASSEMBLY:
Please read all instructions thoroughly before proceeding. Find a large, clean area in which
to assemble your Tasty Trotter oven. Please refer to the parts list and assembly diagram as
necessary. Assembly of this oven involves many large components; it is advisable to have
two people to assemble the unit.
NOTICE: Make sure all the plastic protection (usually a blue film) is removed before
assembling!

1
2
3
2
2
2
2
3
4
4
4
4
5
5
5
9
8
15
6
6
6
7
10
11
6
13
14
12
16
4
Exploded view:KYQ-1016G

Part List: KYQ-1016G
Hard Wares List: KYQ-1016G
Ref Description KYQ-1016G
1 Spit rod 1
2 U-Shaped fork assembly 5
3 Fork assembly 2
4 R Clip 10
5 U-Shaped fork support 5
6 Dish 4
7 Roaster body assembly(glass windows) 1
8 Motor heat shield panel 1
9 Motor 1
10 Caster bracket assembly-left 1
11 Drip tray brace-left 1
12 Hood handle assembly 1
13 Drip tray brace-right 1
14 Caster bracket assembly-right 1
15 Motor support 1
16 Cart connector pipe assembly 1
Ref
Description
KYQ-1016G
A M4×10 Screw 4
B M6×15 Screw
2
ASSEMBLY INSTRUCTIONS
WARNING: Whilst every effort has made in manufacture of your roaster to remove any sharp
edge, you should handle all components with care to avoid accidental injury.
Tools required: Standard a Philips crosshead screwdriver and a adjustable spanner
.
ASSEMBLY:
Please read all instructions thoroughly before proceeding. Find a large, clean area in which
to assemble your roaster. Please refer to the parts list and assembly diagram as necessary.
Assembly of the roaster involves many large components; it is advisable to have two
people assemble the unit.
NOTICE: 1. Make sure all the plastic protection (usually a blue film) is removed before
assembling!
2. Before assembly, turn the roaster over, NOTE: put some soft cushions or
protective mat or similar on the floor to protect the roaster body and hood
1
Ref # 7
Ref # 11
Ref # 13
Ref # A M4×10×4 PCS
2
3
Remove those four
M6x35 screws and four
M6 nuts of both sides
Ref # 14
Ref # 10
Attach with the removed
screws and nuts.
M6×35×8 PCS
M6 Nut×8 PCS

4
5
Remove those two
M6x40 screws and two
M6 nuts of both sides
Attach with the removed
screws and nuts.
Ref # 16
M6×40×4 PCS
M6 Nut×4 PCS

6
7
Ref # 12
Ref # B M6×15×2 PCS
Ref # 8,9,15
Loosen the screws then
locate the motor
assembly and re-tighten..

8
9
Ref # 6
Ref # 1
Ref # 3
Ref # 2,4,5
Ref # 2,4,5
Put the fork lock piece
between the spit rod
and the fixed bolt, and
tighten the fixed bolt.
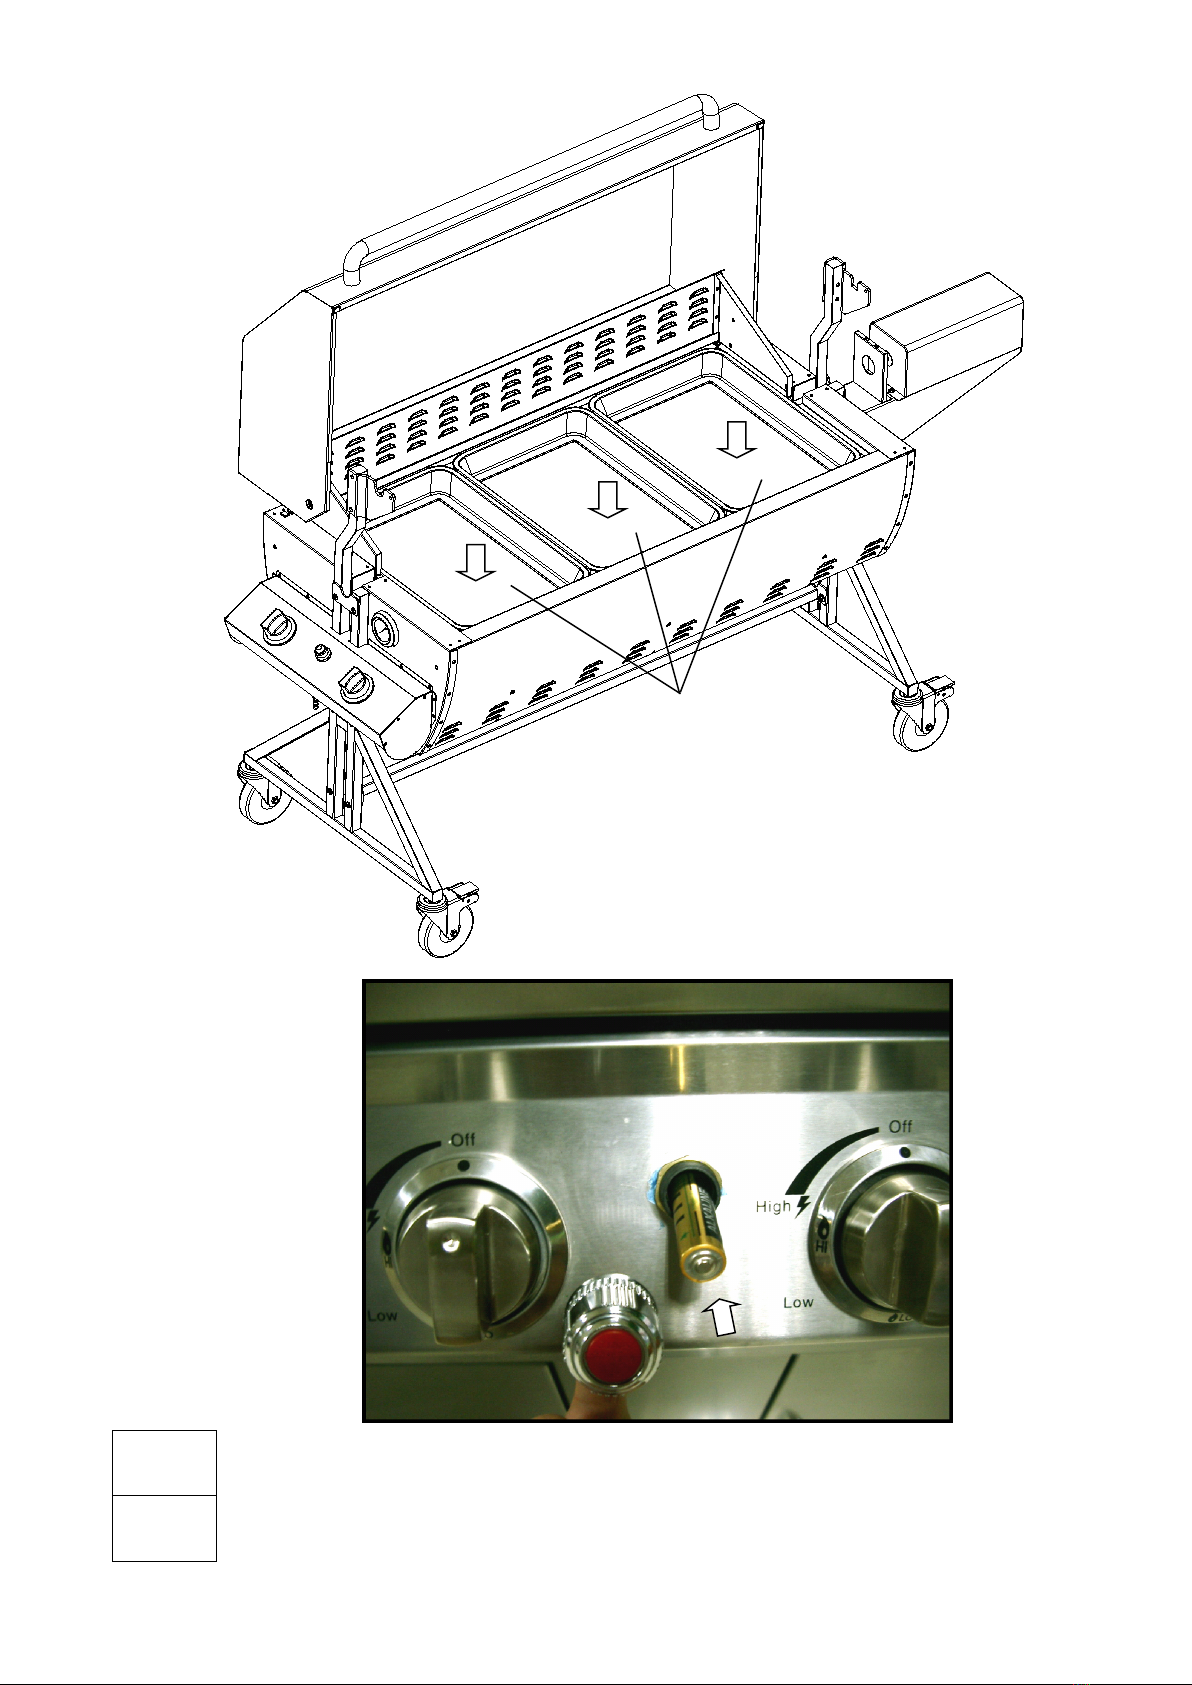
Unscrew the igniter cap and insert a AA
battery with the “ +“ end upwards.
10
11
Ref # 6

Technical Information:
APPLIANCE
MANUFACTURED BY:
TASTY TROTTER / GUANGDONG KANGYE ELECTRIC
APPLIANCE CO., LTD.
APPLIANCE CODE:
KYQ-1016G
TOTAL HEAT INPUT:
(ALL GAS CATEGORIES)
9.00kW(643g/h) The grill burners are rated at 4.5kW per burner.
GAS CATEGORY:
I3+(28-30/37)
I3B/P(30)
TYPES OF GAS:
Butane
Propane
LPG GAS MIXTURES
GAS PRESSURE:
28-30 mbar
37 mbar
30 mbar
INJECTOR SIZE:
Grill: 1.0mm
0359/16
IDENTIFICATION CODE:
0359CL1072
COUNTRIES OF
DESTINATION
I
3+(28-30/37)
BE, CH, CY, CZ, ES, FR, GB, GR, IE, IT, LT, LU, LV, PT,
SK, and SI.
I3B/P(30) BE, CY, DK, EE, FI, FR, HU, IT, LT, NL, NO, SE, SI, SK, RO,
HR, TR, BG, IS, LU and MT.
FOR USE OUTDOORS AND IN WELL VENTILATED AREAS
ACCESSIBLE PARTS MAY BE VERY HOT. KEEP YOUNG CHILDREN AWAY.
DO NOT MOVE THE APPLIANCE DURING USE.
TURN OFF THE GAS SUPPLY AT THE GAS CYLINDER AFTER USE.
DO NOT MODIFY THE APPLIANCE.
THIS APPLIANCE MUST BE KEPT AWAY FROM FLAMMABLE MATERIALS DURING USE.
READ THE INSTRUCTION LITERATURE BEFORE USING THE APPLIANCE.
IN ADDITION A LOGO OR A WARNING SHALL BE USED TO FORBID GAS CYLINDERS IN
PLACES OF THE APPLIANCE NOT INTENDED TO RECEIVE GAS CYLINDERS IF ANY.
Ignition: Main: 1.5 volt battery operated multi spark unit which lights the main burner
WARNINGS INFORMATION
IMPORTANT:
Read the following instructions carefully and be sure your oven is properly installed, assembled and cared
for. Failure to follow these instructions may result in serious bodily injury and/or property damage.
If you have any questions concerning assembly or operation, consult your dealer or gas supplier.
When used on the ground always place the appliance and cylinder on flat level ground.
NEVER light the BURNERS with the HOOD in the closed position or the 3 stainless steel trays in position.
Your oven can be used with gas cylinders from 5 kg upwards. Your oven will perform better if propane or
LPG mixtures are used. Butane can be used but because of the rate of the appliance the cylinder will tend
to freeze and supply gas at reduced pressures affecting the performance of your barbecue. So we suggest
a bottle of at least 13 kilos for propane and at least 12kilos for Butane – NOTE always ensure you have
sufficient gas available to complete the cooking process.
NOTE FOR CONSUMER: Retain for future Reference

CONNECTING THE GAS CYLINDER TO THE APPLIANCE
This appliance is only suitable for use with low-pressure butane or propane gas or LPG mixtures, fitted with
the appropriate low-pressure regulator via a flexible hose. The hose should be secured to the regulator and
the appliance with hose clips. This barbecue is set to operate a 28 mbar regulator with butane gas and a
37 mbar regulator with propane gas 30 mbar for LPG mixtures or 50 mbar for LPG mixtures. Use a
suitable regulator certified to BSEN 12864: 2001. Please consult your LPG dealer for information
regarding a suitable regulator for the gas cylinder.
Regulator and Hose
This oven comes complete with a hose but requires a regulator. Regulators are available from your
equipment retailer or an authorised LPG gas stockist. Use only regulators and hose approved for LP Gas
at the above pressures. The life expectancy of the regulator is estimated as 2 years. It is recommended
that it the regulator is changed within 2 years of the date of manufacture. The type of regulator needs to
match the connector on your butane or propane gas bottle.
The use of the wrong regulator or hose is unsafe; always check that you have the correct items before
operating the oven.
The hose used must conform to the relevant standard for the country of use. The length of the hose must
be 1.5 metres (maximum). Worn or damaged hose must be replaced. Ensure that the hose is not
obstructed, kinked, or in contact with any part of the barbecue other than at its connection.
Storage of Appliance
Storage of an appliance indoors is only permissible if the cylinder is disconnected and removed from the
appliance. When the appliance is not to be used for a period of time it should be stored in its original
packaging and stored in a dry dust free environment.
Gas Cylinder
The gas cylinder should not be dropped or handled roughly! If the appliance is not in use, the cylinder
must be disconnected. Replace the protective cap on the cylinder after disconnecting the cylinder from the
appliance. The gas cylinder must be sited outside the body of the appliance.
Cylinders must be stored outdoors in an upright position and out of the reach of children. The cylinder
must never be stored where temperatures can reach over 50°C. Do not store the cylinder near flames,
pilot lights or other sources of ignition. DO NOT SMOKE near cylinders.
This Tasty Trotter oven is designed for use outdoors, in a well-ventilated area, away from any flammable
materials. It is important that there are no overhead obstructions and that there is a minimum distance of
1m from the side or rear of the appliance. It is important that the ventilation openings of the appliance are
not obstructed. The oven must be used on a level, stable surface.
The appliance should be protected from direct draughts and shall be positioned or protected against direct
penetration by any trickling water (e.g. rain).
Parts sealed by the manufacturer or his agent must not be altered by the user. No modifications
should be made to any part of this oven and repairs and maintenance should only be carried out by
a GAS SAFE registered service engineer.
Rotisserie and motor
Warning:
Rotisserie and motor must not be exposed to water or damp conditions or used when raining.
The plug of AC motor may be required to be plugged using an extension lead from indoor; this should not
be used in wet conditions because it may result in electrocution.
Connection to Appliance
Before connection, ensure that there is no debris caught in the head of the gas cylinder, regulator, burner
and burner ports. Spiders and insects can nest within and clog the burner/venturi tube at the orifice. A
clogged burner can lead to a fire beneath the appliance.

Clean burner holes with a heavy-duty pipe cleaner/wire brush.
Fit the hose to the appliance using a spanner to tighten it onto the connection thread. If the hose is
replaced it must be secured to the appliance and regulator connections with hose clips. Disconnect the
regulator from the cylinder (according to the directions supplied with the regulator) when the oven is not in
use.
The oven must be used in a well ventilated area. Do not obstruct the flow of combustion air to the burner
when the oven is in use. ONLY USE THIS OVEN OUTDOORS.
BEFORE USE CHECK FOR LEAKS
Never check for leaks with a naked flame, always use a soapy water solution
TO CHECK FOR LEAKS
Make 2-3 fluid ounces of leak detecting solution by mixing one part washing up liquid with 3 parts water.
Ensure the control valve is “OFF”.
Connect the regulator to the cylinder and ON/OFF valve to the burner, ensure the connections are secure
then turn ON the gas.
Brush the soapy solution onto the hose and all joints. If bubbles appear you have a leak, which must be
rectified before use.
Retest after fixing the fault
Turn OFF the gas at the cylinder after testing.
If leakage is detected and cannot be rectified, do not attempt to cure leakage but consult your gas dealer.
Lighting Instructions for barbecue
1. Open the hood of the oven before attempting to light the burners and remove the 3 stainless steel
trays.
2. Turn all the control knobs clockwise to “OFF” position.
3. Connect the regulator to the gas bottle. Turn the gas supply “ON” at the regulator. Check with the use
of soapy water for any gas leakage between the bottle and the regulator.
4. On one of the two burners, push in the control knob and turn it anti-clockwise to the “HIGH” position,
at the same time hold in the ignition button (a clicking sound will be heard) this will light the pilot and
the burner. Keep pressing in the knob for a further 15 seconds observe if the burner has lit. If not,
repeat this process. Then repeat for the second burner if required.
5. If the burner has not lit after retrying wait 5 minutes and repeat step 4.
6. Adjust the heat by turning the knob to the High/Low position.
7. If the burner does not light with the ignition spark it can be lit manually with a long reach lighter from
the inside. Consult your gas dealer to rectify the ignition.
8. To turn the burner ‘OFF,’ turn the control knob clockwise to the ‘OFF’ position. If you wish to turn the
complete oven ‘OFF’ turn the cylinder valve or regulator switch to the ‘OFF’ position and then turn the
control knob on the appliance clockwise to the ‘OFF’ position on both burners.
Warning: If the burner fails to ignite, turn the control knob off (clockwise) and also turn the cylinder valve
off. Wait five minutes before attempting to relight with ignition sequence.
Before cooking for the first time, operate the oven for about 15 minutes with the lid closed and the gas
turned on HIGH. This will “heat clean” the internal parts and dissipate odour from the painted finish.
Clean your oven after each USE. DO NOT use abrasive or flammable cleaners, as it will damage the parts
of the product and may start a fire. Clean in hot soapy water. BUT ensure you protect the motor from water
ingression.

WARNING: Accessible parts may be very hot. Keep young children away from the hot appliance at all
times (even while cooling down!). It is recommended that protective gloves (e.g. oven gloves) be used
when handling particularly hot components.
CLEANING AND CARE
CAUTION: All cleaning and maintenance should be carried out when the oven is cool and with the fuel
supply turned OFF at the gas cylinder.
CLEANING
“Burning off” the oven after every use (for approx 15 minutes) will keep excessive food residue to a
minimum.
OUTSIDE SURFACE
Use mild detergent or baking soda and hot water solution. Non-abrasive scouring powder can be used on
stubborn stains, then rinse with water.
If the inside surface of the oven lid has the appearance of pealing paint, baked on grease build-up has
turned to carbon and is flaking off. Clean thoroughly with strong hot soapy water solution. Rinse with
water and allow to completely dry. NEVER USE OVEN CLEANER.
INTERIOR OF OVEN BOTTOM
Remove residue using brush, scraper and/or cleaning pad then wash with a soapy water solution. Rinse
with water and allow to dry.
CLEANING THE BURNER ASSEMBLY
Turn the gas OFF at the control knob and disconnect the cylinder.
Clean the burner with a soft brush or blow clean with compressed air and wipe with a cloth.
Clean any clogged ports with a pipe cleaner or stiff wire (such as an opened paper clip).
Inspect burner for any damage (cracks or holes). If damage is found, replace with a new burner. Reinstall
the burner, check to ensure that the Gas valve orifices are correctly positioned and secured inside the
burner inlet (venturi).
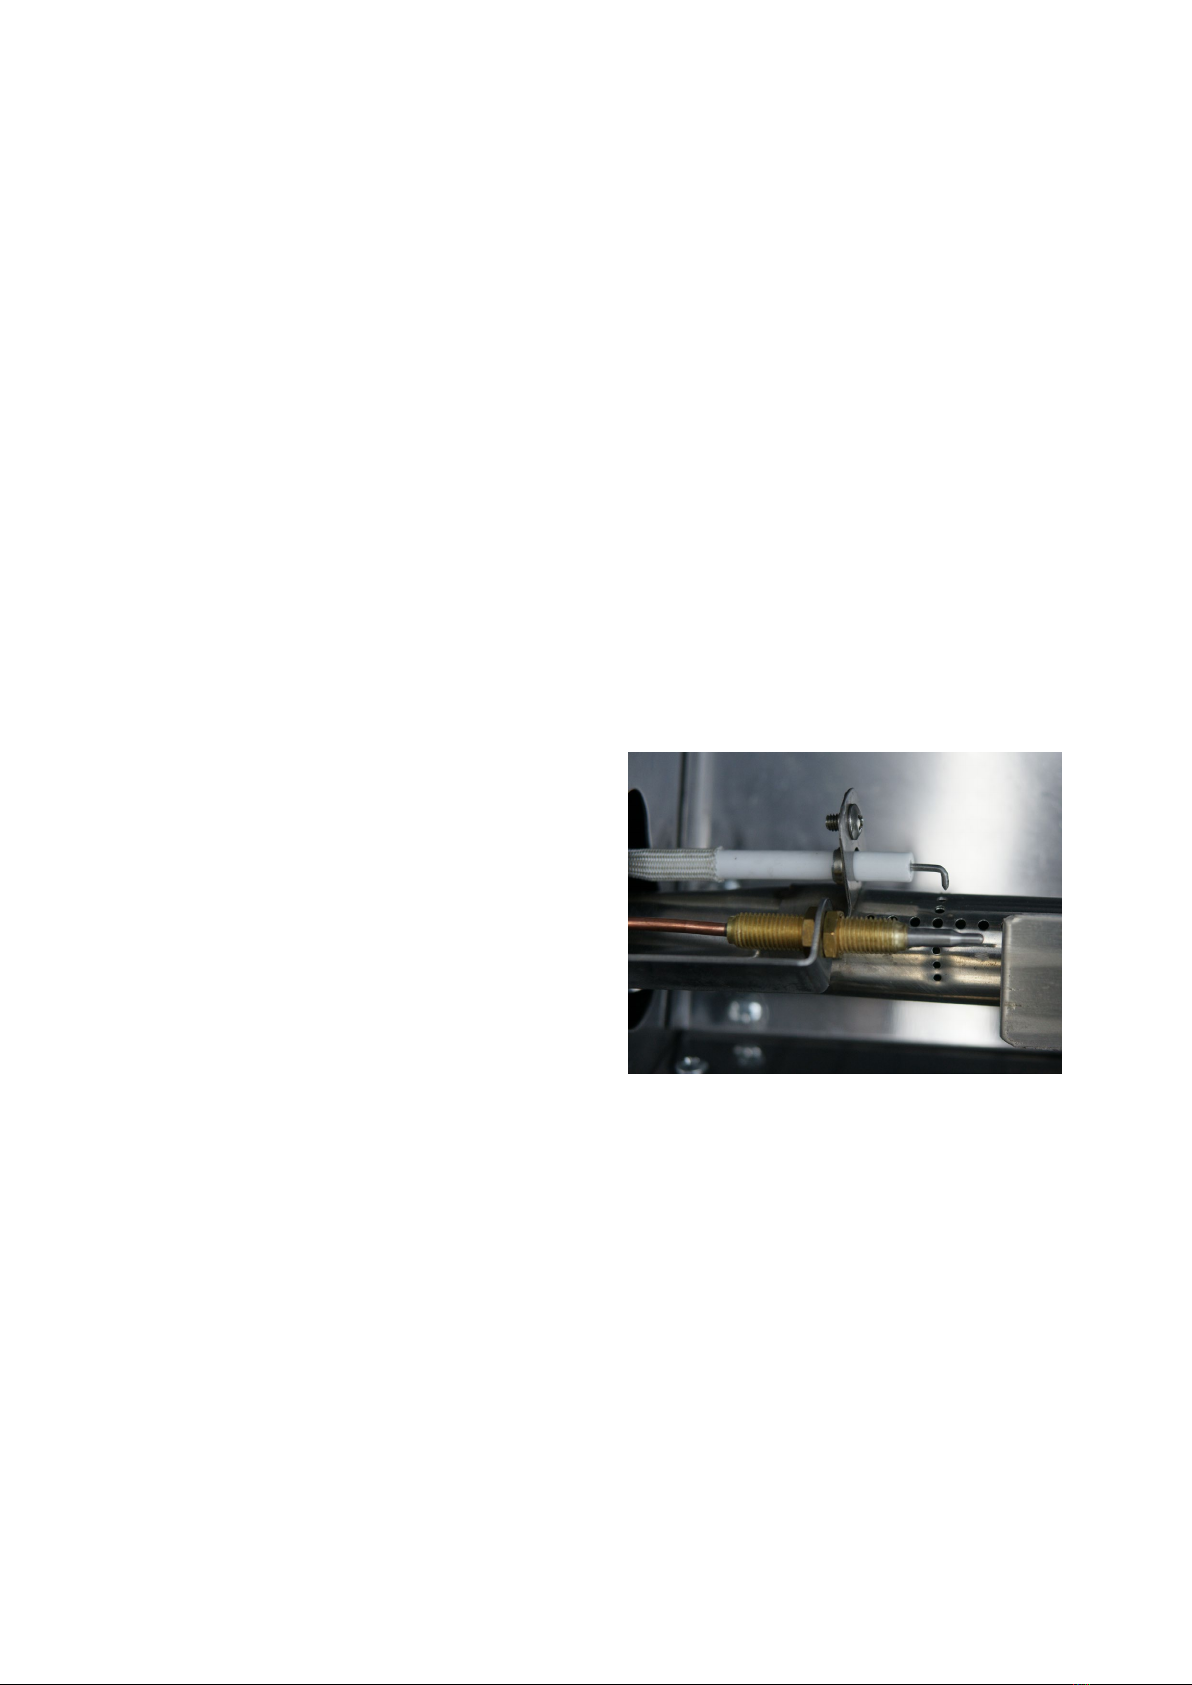
IGNITER TIP CLEANING:
If lighting the burners is difficult you may need to clean and adjust the igniter tip located near the burner
orifice. (FIG. 12). To ensure that the igniter lights properly, clean off any cooking residue from igniter tip
and burner. Use a very fine grit sand paper to clean igniter tip an edge of burner. Igniter tip should be
4–6 mm away from burner edge. (FIG. 13)This is the ideal distance for most effective ignition.
Burner Igniter tip
FIG. 12
5¡À1mm
Burner Igniter tip
FIG. 13

SERVICING
Your gas barbecue should be serviced annually by a competent registered person and an annual gas
safety certificate should be issued starting one year from date of purchase.
TROUBLE SHOOTING
PROBLEM POSSIBLE CAUSE SOLUTION
Burners will not light using
the ignition system
1. LP gas cylinder is empty
2. Faulty regulator
3. Obstructions in burner
4. Obstructions in gas jets or gas hose
5. Electrode wire loose or disconnected
on electrode or ignition unit
6. Electrode or wire is damaged faulty
pushbutton igniter
1. Replace with full cylinder
2. Have regulator checked
or replace
3. Clean burner
4. Clean jets and gas hose
5. Reconnect wire
6. Change electrode and
wire change igniter
Burner will not light with a
match
1. LG gas cylinder is empty
2. Faulty regulator
3. Obstructions in burner
4. Obstructions in gas jets or gas hose
1. Replace with full cylinder
2. Have regulator checked
or replace
3. Clean burner
4. Clean jets and gas hose
Low flame or flashback (fire
in burner tube-a hissing or
roaring noise may be heard)
1. LP gas cylinder too small
2. Obstructions in burner
3. Obstructions in gas jets or gas hose
4. Windy conditions
1. Use larger cylinder
2. Clean burner
3. Clean jets and gas hose
4. Use BBQ in a more
sheltered position
Battery insert:
Take out the ignition button,
inserting 1 pc of AA battery
IMPORTANT POINTS
Upon receipt, your oven will be covered in a thin layer of oil which is used in the manufacturing process,
this needs removing prior to first use with either hot soapy water or a remover such as white spirit. If you
don’t remove this prior to getting the oven hot on the first occasion, the burnt oil will tarnish the metal,
especially on the inside.
Avoid rubbing the printed ‘HOT’ areas on the oven with thinners or similar agents as they may damage the
printing.
Due to the heating and cooling of the oven and vibrations caused by the spit rotations, some of the
screws may become loose during transit or use. PLEASE tighten the screws periodically in
particular the 4 screws on the motor MUST be checked every time you cook as these are mounted
upside down they are particularly venerable to becoming slack and a motor falling off could cause
issues during the cooking process.
Brief Cooking guidance
The oven with both burners running on full will use around 1kilo of gas per hour
Monitor the meat closely at all times, the following is a rough guidance only and assumes you are cooking
a dressed hind around 40kilos in weight with the head and shoulders removed.
Ideally allow the meat to get to room temperature prior to cooking.
Place in the oven with both burners on full for the first 20-30mins to ‘sear’ the meat, that’s sealing the outer
skin. The meat skin should go crisp and darken, don’t let it go black! Next, turn down to either: one burner
on almost full and the other off or both to low for the next approx 3.5 to 4 hours, the slower you cook the
meat, the more succulent will be the result.
The general rule of thumb is an hours cooking time for every 10kg of meat. More if you want a ‘pulled pork’
style.
Once cooked, (use a temperature probe to be certain) lift the pig up to the carving position placing cut meat
into one of the 3 trays below. Keep one burner on low to keep the 3 trays hot. Pork meat needs to be at
least 75°C to be classed as safe (78°C in Scotland).
IMPORTANT – Do not have both burners on full for more than 35mins when cooking meat or you risk it
burning. Propane and Butane will perform differently based on ambient outside temperature, so you may
need a higher setting on a cold day.
Always ensure the fat and juices can freely drip out of the hole in the bottom of the oven which will reduce
excessive smoke and the risk of the fats igniting.
For a more in depth cooking guide please refer to the Tasty Trotter website www.tastytrotter.com
THERMOCOUPLE
The thermocouple can move during the first
cooking process, if it moves too far out of the
flame it will assume the burner has gone out and
shut down the gas valve – This is the most
common reason for a burner to go out.
Simple repositioning of the probe by altering
its position on the brass thread so it is nearer
the flame will quickly cure this problem.
Don’t get the thermocouple mixed up with the spark
igniter which has a white stem.
The probe and igniter can be found under the
protective cover at the control panel end, in the oven.

CARE AND PROTECTION OF STAINLESS STEEL SURFACES
1. Wipe over the outside stainless steel surface with a light water repellent oil, wipe the inside with a
vegetable oil or similar edible oil.
2. If stored outside, fit a rainproof cover over the oven when it is not in use.
If you require any further information on this product or wish to buy spares or accessories then please
contact us using the links on our website at www.tastytrotter.com
Your BBQ features Stainless Steel components, using moderate grade Stainless Steels. All Stainless Steel
grades require a level of care and protection to retain their appearance. Stainless Steels are not immune
to corrosion and neither are they maintenance-free, contrary to popular public perception. Even the
highest marine grades of Stainless Steel require frequent cleaning with fresh water to avoid oxidation and
other corrosive issues.
Modern tastes dictate that your BBQ features Stainless Steel with a brushed finish. This brushed finish is
attained by running Stainless Steel sheets through an abrasive process that removes the mirror finish and
leaves the brushed finish. Brushed-finish Stainless Steel requires frequent cleaning and care, to maintain
its quality of appearance. Without adequate care it is realistic to expect that it will show signs of corrosion
in time.
Stainless Steel is definitely not a maintenance-free material. Cleanliness and Stainless Steel are
closely related.
After assembly, we recommend that owners apply a thin layer of Olive Oil with a clean rag, to all
exposed Stainless Steel areas. This should then be polished in and buffed off with another clean rag to a
non-oily finish. This process will aid protection against dirt and other corrosive contaminants, by providing a
temporary food-safe shield. The Olive Oil layer also makes later polishing and removal of fingerprints
easier. This process should be repeated frequently when cleaning your grill.
You may wish to buy a protective cover for your BBQ. It is recommended that a BBQ cover should be
used at all times when the BBQ is not in use to protect your investment. However it is vital to understand
that unless the BBQ is cool, clean and dry when the cover is fitted, use of a cover can in fact be
detrimental. A cover placed on a warm, wet or unclean BBQ (or any mix of these factors) can in fact be a
very effective corrosion breeder!
For this reason, the BBQ should always be cool, cleaned of any surface contaminants or dirt and be
thoroughly dry before a protective cover is fitted. This is especially important before a BBQ is stored
for any length of time i.e. if the BBQ doesn’t get frequent use, or when the BBQ is stored away over winter
months.
In order to maintain the quality of the finish of your Stainless Steel BBQ, the owner must be vigilant with
care and maintenance according to this advice.
Look after your oven investment carefully and it will serve you well for many years to come
and will have a healthy re-sell value should it be necessary.

TIPS and SUGGESTIONS
Juices – we recommend using a jug with the oven to keep the juices that are often discharged during the
cooking process which can be used to make your gravy. The fat can be used to cook your spuds in or
saved for later use. The juice can be used to make the gravy. We make our gravy using approx. 50% juice
20% fat (so pour off the majority of the fat from the jug) Add 30% hot water with a teaspoon of salt per litre.
The gravy is used to ensure the meat is moist (not wet) so when carving the pork into the top trays the
gravy can be added just prior to serving, we keep our gravy hot in a soup heater or a bain-marie or use the
top trays to keep it hot.
Pigs – Suckling pigs can be tricky as, they are very expensive per kilo and don’t have enough fat on them
to make the meat juicy. We suggest if you are only cooking for say 80 people that you use a full pig with
the shoulders removed (a dressed hind) and keep the shoulders for another occasion (most standard pigs
in the UK are grown to around 55-60kilos, enough to serve around 140-200 people but too large for the
Mini Spit Roast Oven.)
Stuffing – we use take away tin foil trays to prepare our stuffing, they are approx. 200mm x 100mm and
that size provides a nice servable amount that we can keep hot and place on the serving area or put in the
bain-marie to keep hot. The granule mix can be easily prepared with freshly boiled water and improved
with around 30mins to an hour in the oven. We make it very watery like porridge as after an hour in the
oven it becomes much thicker.
The standard off the shelf mix can be made much nicer by adding cooked onions or other ingredients such
as apricots etc. if want to go the extra mile.
Crackling - this is a science on its own! The basic rule is that the skin needs to be dry in order to get good
crackling, so don’t use a freshly killed pig. Skin can be dried further by rubbing salt into it prior to cooking.
Following the cooking guide already mentioned will help to get the skin to blister and form the ‘foam’ style
crackling. If you cook without the crackling forming then it can make the skin very tough like leather and it
will then never form. One trick is to use a blow torch on the skin to form the crackling instantly – try doing
this after about 30mins of cooking it’s quicker than the salt process.
Cleaning - much easier if you put some wide tin foil on the bottom of the oven. Push the edges under the
burners and make sure you put your finger through the foil where the drain hole is and make sure you keep
the juices. When using the oven for the first time we have found that MER (found in automotive accessory
shops) can be applied on the oven to protect it from staining for longer.

Table of contents
Other Tasty Trotter Oven manuals

Popular Oven manuals by other brands


Kuppersbusch
Kuppersbusch EEH 6200.5 Instructions for use and installation instructions

camry
camry CR 111 user manual

White and Brown
White and Brown MF 215 Brownie user manual

Kenmore
Kenmore 79048029800 installation instructions

John Lewis
John Lewis JLBIDU712 instruction manual

Fisher & Paykel
Fisher & Paykel Aerotech OB30SD installation instructions