Tatsumaki TA-639 User manual

TATSUMAKI - 1375 Egbert Ave., San Francisco, CA 94124
Tel: 1-888-725-0989 Fax: 415-671-0839
E-mail: info@gotatsumaki.com | Website: www.GoTatsumaki.com
T A T S U M A K I
●Installation Manual
●Disclaimer
●Warranty
TA-639 / TA-689
Questions, problems or missing parts?
Please call at us 1-888-725-0989
Monday - Friday 9am - 5pm PST
or email us at info@gotatsumaki.com.
龍捲風抽油煙機系列
TM

TATSUMAKI - 1375 Egbert Ave., San Francisco, CA 94124
Tel: 1-888-725-0989 Fax: 415-671-0839
E-mail: info@gotatsumaki.com | Website: www.GoTatsumaki.com
WARNING
—————————————————————————————————————————————
SUITABLE FOR USE IN HOUSEHOLD COOKING
AREA.
TO REDUCE THE RISK OF FIRE, ELECTRICAL
SHOCK, OR INJURY TO PERSONS, OBSERVE
THE FOLLOWING:
1. Use this unit only in the manner intended by the
manufacturer. If you have the questions, contact the
manufacturer at the email address or telephone num-
ber listed in the warranty.
2. Before servicing or cleaning unit, switching power off
at service panel and lock service panel to prevent
power from being switched on accidentally. When the
service disconnecting means cannot be locked, se-
curely fasten a prominent warning device, such as a
tag, to the service panel.
3. Installation work and electrical wiring must be done by
a qualified personnel in accordance with all applica-
ble codes and standards, including fire-rated con-
struction codes and standards.
4. Sufficient air is needed for proper combustion and
exhausting of gases through the flue (chimney) of fuel
burning equipment to prevent back-drafting. Follow
the heating equipment manufacturer’s guidelines and
safety standards such as those published by the Na-
tional Fire Protection Association (NFPA), and the
American Society for Heating, Refrigeration and Air
Conditioning Engineers (ASHRAE), and the local
code authorities.
5. When cutting or drilling into wall or ceiling, do not
damage electrical wiring and other hidden utilities.
6. Ducted fans must always be vented to the outdoors.
7. Do not use this unit with any solid-state speed control
device.
8. To reduce the risk of fire, use only steel ductwork.
9. This unit must be grounded.
TO REDUCE THE RISK OF A RANGE TOP
GREASE FIRE:
A. Never leave surface units unattended at high settings.
Boil overs cause smoking and greasy spillovers that
may ignite. Heat oils slowly on low or medium set-
tings.
B. Always turn hood ON when cooking at high heat or
when cooking flaming foods.
C. Clean ventilating fans frequently. Grease should not
be allowed to accumulate on fan or filter.
D. Use proper pan size. Always use cookware appropri-
ate for the size of the surface element.
WARNING
————————————————————————————————————————————
TO REDUCE THE RISK OF INJURY TO PERSONS IN
THE EVENT OF A RANGE TOP GREASE FIRE, OB-
SERVE THE FOLLOWING*:
1. SMOTHER FLAMES with a close-fitting lid, cookie
sheet or metal tray, then turn off the burner. BE
CAREFUL TO PREVENT BURNS. IF THE
FLAMES DO NOT GO OUT IMMEDIATELY,
EVACUATE AND CALL THE FIRE DEPARTMENT.
2. NEVER PICK UP A FLAMING PAN –You may be
burned.
3. DO NOT USE WATER, including wet dishcloths or
towels –This could cause a violent steam explo-
sion.
4. Use an extinguisher ONLY if:
A. You own a Class ABC extinguisher and you
know how to operate it.
B. The fire is small and contained in the area where
it started.
C. The fire department has been called.
D. You can fight the fire with your back to an exit.
*Based on “Kitchen Fire Safety Tips” published by NFPA.
CAUTION
————————————————————————————————————————————
1. For general ventilating use only. Do not use to ex-
haust hazardous or explosive materials and vapors.
2. To avoid motor bearing damage and noisy and/or
unbalanced impellers, keep drywall spray, con-
struction dust, etc. off power unit.
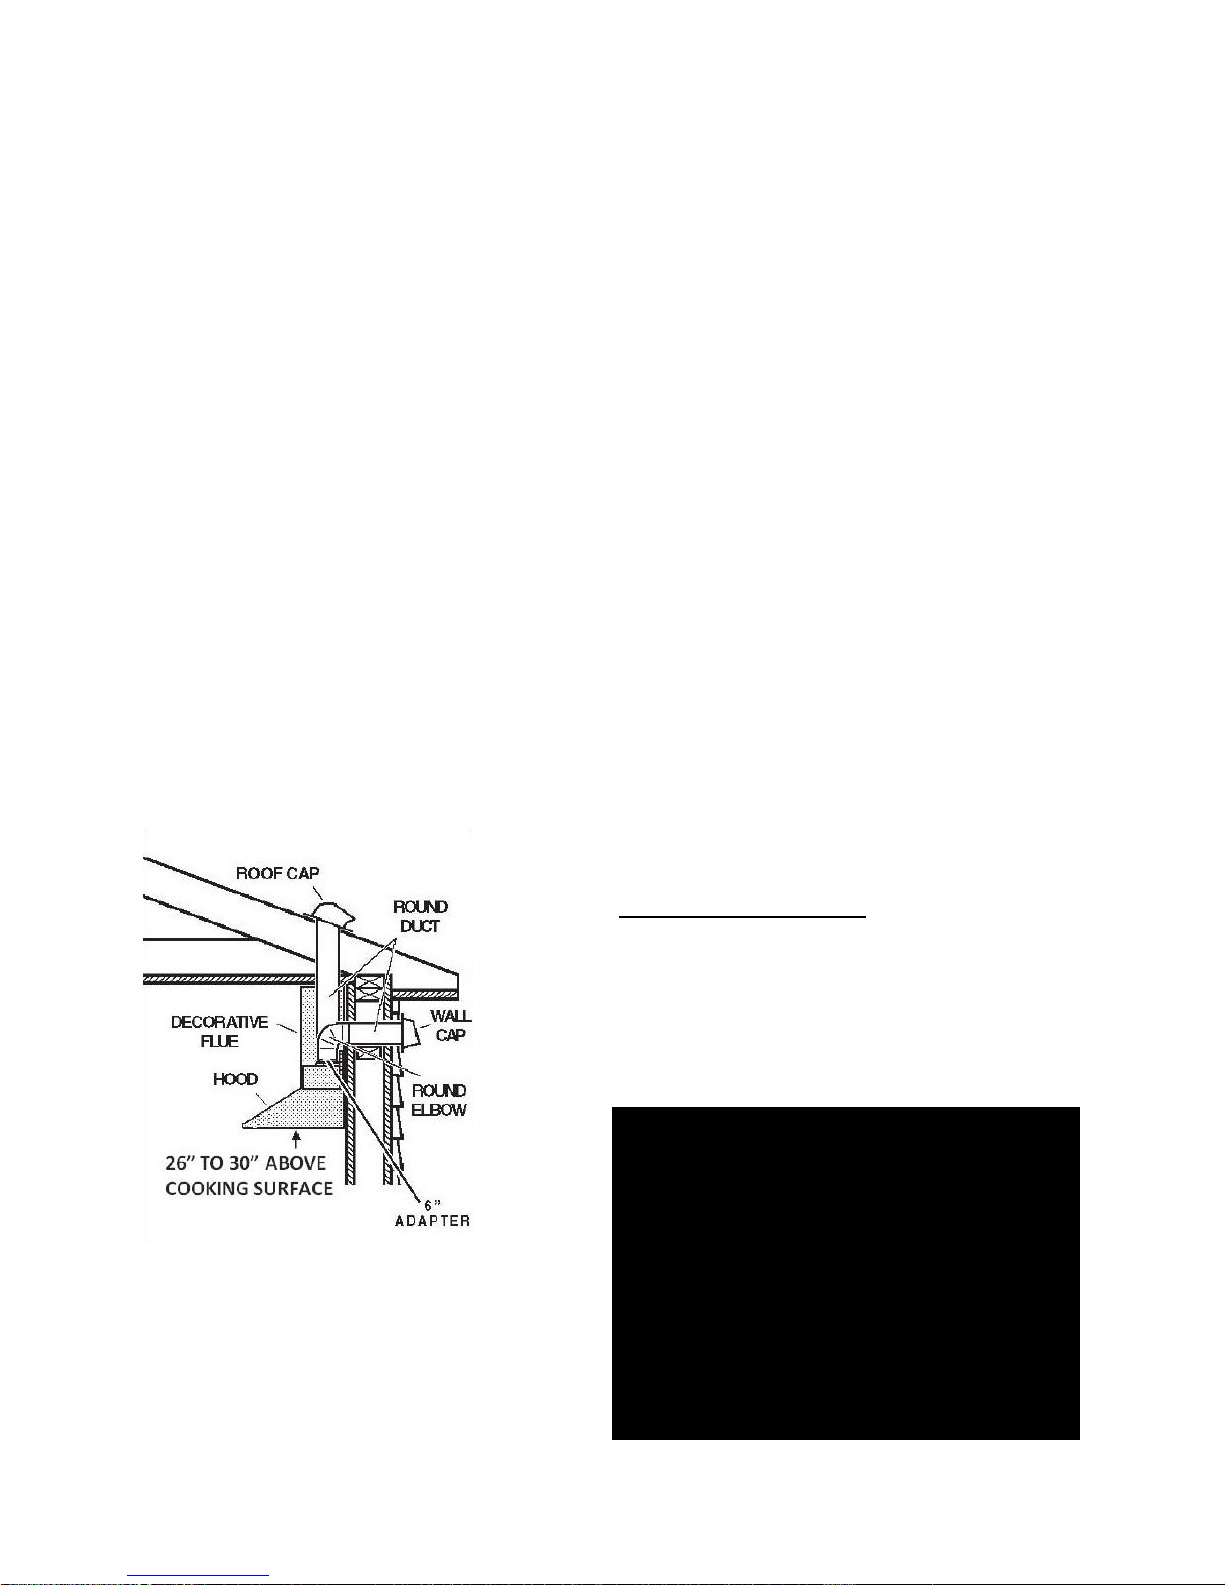
3. For the best capture of cooking impurities, your
range hood should be mounted so that the top of
the hood is 26”-30” above the cooking surface (min
26” for electric cooktop, 28” for gas cooktop). The
minimum hood distance above cooktop must not be
less than 26”; any installation less than 26” may
cause over heat and cause damage to the range
hood, TATSUMAKI does not warrant this improper
installation.
4. Two installers are recommended because of the
larger size and weight of this hood.
5. To reduce the risk of fire and to properly exhaust air,
be sure to duct air outside –Do not exhaust air into
spaces within walls and ceiling or into attics, crawl
space or garages.
6. Because of the high exhausting capacity of this
hood, you should make sure enough air is entering
the house to replace exhausted air by opening a
window close to or in the kitchen.
7. Use with approved cord-connection kit only.
8. Please read specification label in product for further
information and requirements.
R E A D A N D S A V E T H E S E I N S T R U C T I O N S
F O R D O M E S T I C C O O K I N G O N L Y
INSTALLER: Leave this manual with the homeowner.
HOMEOWNER: Use and Care information on Page
If hood is to be installed Non-Ducted (Recirculation) , then purchase a set of (2) non-ducted charcoal filters
from your local distributor or retailer and attach them to the motor.
TATSUMAKI - 1375 Egbert Ave., San Francisco, CA 94124
Tel: 1-888-725-0989 Fax: 415-671-0839
E-mail: info@gotatsumaki.com | Website: www.GoTatsumaki.com
SPECIFICATIONS
—————————————–———-—————
Suction Power: 900 CFM
Ceiling Height: Up to 8 feet
Filter Type: Baffle
Lamp: 1.5w LED
INSTALL DUCTWORK
—————————————–———-—————
VENTING REQUIREMENTS
Determine which venting method is best for your
application. Ductwork can extend either through
the wall or the roof.
A straight, short duct run will allow the hood to per-
form most efficiently. Long duct runs, elbows, and
transitions will reduce the performance of the hood.
Use as few of them as possible. Larger ducting
may be required for best performance with longer
duct runs. The length of the ductwork and the num-
ber of elbows should be kept to a minimum to pro-
vide efficient performance.
The size of the ductwork should be uniform. Do not
install two elbows together. Use 2” duct tape to
seal all joints in the ductwork system.
Install a roof or wall cap. Connect round metal
ductwork to cap and work back towards hood loca-
tion. Use caulking to seal exterior wall or floor
opening around the cap.
.
Flexible ductwork is not recommended. Flexible
ductwork creates back pressure and air turbulence
that greatly reduces performance. USE ONLY
METAL DUCTWORK. Make sure there is proper
clearance within the wall or floor for exhaust duct
before making cutouts. Do not cut a joist or stud
unless absolutely necessary. If a joist or stud must
be cut, then a supporting frame must be con-
structed.
CALCULATE THE DUCT RUN LENGTH
The duct run should not exceed 35 equivalent feet
if ducted with the required minimum of 6” round
duct. Calculate the length of the ductwork by add-
ing the equivalent feet in FIGURE 2 for each piece
of duct in the system. An example shown in FIG-
URE 3.
For the best results, do not use more than three
90∘elbows in a system. Make sure that there is a
minimum of 24” of straight duct between elbows if
more than one is used. DO NOT install two elbows
together. If you must elbow right away, do it as far
away from the hood’s exhaust opening as possible.
Distances over 30” are at the installer and users
discretion.
Cold weather installations
An additional back draft damper should be installed
to minimize backward cold air flow and a nonmetal-
lic thermal break should be installed to minimize
conduction of outside temperatures as part of the
vent system. The damper should be on the cold air
side of the thermal break. The break should be as
close as possible to where the vent system enters
the heated portion of the house.
W A R N I N G
●Venting system MUST terminate outside the home.
●DO NOT terminate the ductwork in an attic or other
enclosed space.
●DO NOT use 4” laundry-type wall caps.
●Flexible-type ductwork is not recommended.
●DO NOT obstruct the flow of combustion and ventila-
tion air.
●Failure to follow venting requirements may result in a
fire.
●Indoor installation ONLY.
●If any trouble shooting happen, DO NOT try to repair
yourself. If not, warranty void.
ELECTRICAL REQUIREMENTS
45∘Elbow 3.0 feet
90∘Elbow 5.0 feet
90∘Flat Elbow 12.0 feet
Wall Cap 0.0 feet
FIGURE 2
9 feet straight duct 9.0 feet
2 - 90∘Elbows 10.0 feet
Wall cap 0.0 feet
—————
Total feet 19.0 feet
FIGURE 3

TATSUMAKI - 1375 Egbert Ave., San Francisco, CA 94124
Tel: 1-888-725-0989 Fax: 415-671-0839
E-mail: info@gotatsumaki.com | Website: www.GoTatsumaki.com
——————————————————————--
Before installation and usage, read all the in-
structions and make sure that the voltage (V)
and the frequency (Hz) indicated on the identi-
fication plate (found inside your range hood)
and all the data inside the appliance are exactly
the same as the voltage and frequency in your
home.
Note: The manufacturer declines all responsibilities
in the event of failure to observe all the accident-
prevention regulations in force which are neces-
sary for normal use and regular operation of the
electric system.
This appliance must be grounded.
This appliance is equipped with a grounding plug cord,
the plug must be plugged into an outlet that is properly
installed and grounded.
Set the electrical power supply within the space covered
by the decorative flues. Position the power socket at a
maximum distance of 30” from where the lead exits from
the hood. Make sure this does not interface with the
bracket fastening area or with the decorative flue (where
the flue attached to the wall).
Fit the plug into the power socket. Hard wire connection
is not recommended.
A 120 volt, 60 Hz AC-only electrical supply is re-
quired on a separate 15 amp fused circuit. A time-
delay fuse or circuit breaker is recommended. The
fuse must be sized per local codes in accordance
with the electrical rating of this unit as specified on
the serial/rating plate located inside the unit near
the field wiring compartment. THIS UNIT MUST BE
CONNECTED WITH COPPER WIRE ONLY. Wire
sizes must conform to the requirements of the Na-
tional Electrical Code, ANSI/NFPA 70 –latest edi-
tion, and all local codes and ordinances. Wire size
and connections must conform with the rating of
the appliance. Copies of the standard listed above
may be obtained from:
National Fire Protection Association
Batterymarch Park
Quincy, Massachusetts 02269
For residential use only.
This appliance should be connected directly to the
fused disconnect( or circuit breaker) through flexi-
ble, armored or nonmetallic sheathes copper cable.
Allow some slack in the cable so the appliance can
be removed if servicing is ever necessary. A UL
Listed, 1/2” conduit connector must be provided at
each and of the power supply cable (at the appli-
ance and at the junction box)
When making the electrical connection, cut a 1-1/4”
hole in the wall. A hole cut through wood must be
sanded until smooth. A hole through metal must
have a grommet.
WARNING -TO REDUCE THE RISK OF FIRE OR
ELECTRIC SHOCK, do not use this fan with any
solid-state speed control device.
WARNING -TO REDUCE THE RISK OF FIRE,
ELECTRICAL SHOCK, OR INJURY TO PER-
SONS, OBSERVE THE FOLLOWING: Use this
unit only in the manner intended by the manu-
facturer. If you have any questions, contact the
manufacturer..
Before servicing or cleaning unit, switch power off
at service panel and lock the service disconnecting
means to prevent power from being switched on
accidentally. When the service disconnecting
means cannot be locked, securely fasten a promi-
nent warning device, such as a tag, to the service
panel.
When cutting or drilling into wall or ceiling, do not
damage electrical wiring and other hidden utilities.
CAUTION: For General Ventilating Use Only. DO
NOT use to exhaust hazardous or explosive
materials and vapors.
WARNING - TO REDUCE THE RISK OF FIRE,
ELECTRICAL SHOCK, OR INJURY TO PER-
SONS, OBSERVE THE FOLLOWING: Installa-
tion work and electrical wiring must be done by
qualified person(s) in accordance with all appli-
cable codes and standards, including fire-rating
construction.
W A R N I N G
●Electrical ground is required on this range hood.
●If cold water pipe is interrupted by plastic, non-
metallic gaskets or other materials, DO NOT
use for grounding.
●DO NOT ground to a gas pipe.
●DO NOT have a fuse in the neutral or grounding
circuit. A fuse in the neutral or grounding circuit
could result in electrical shock.
●Check with a qualified electrician if you are in
doubt as to whether the range hood is properly
grounded.
●DO NOT use this appliance with any solid state
fan speed control device.
●DO NOT use an extension cord. If the power
supply cord is too short, have a qualified electri-
cian install an outlet near the appliance.

TATSUMAKI - 1375 Egbert Ave., San Francisco, CA 94124
Tel: 1-888-725-0989 Fax: 415-671-0839
E-mail: info@gotatsumaki.com | Website: www.GoTatsumaki.com
INSTALLATION
1. Disconnect and move freestanding range from
cabinet opening to provide easier access to
rear wall. Put a thick, protective covering over
cook top, set-in range or countertop to protect
from damage or dirt. For maximum perform-
ance, install the range hood 25.5” to 29.5”
above the cook top.
25.5” - 29.5”
2. For the most secure installation, the mount-
ing screws should be installed on brick wall or
solid wood.
3. Create three 5/16 inch holes on the wall, then insert the screw plug provided and
secure the bracket with screws provided.
4. Attach the range hood to the installed bracket.
5. For ducted installation, determine and make all necessary cuts in the wall for the
ductwork. Install the ductwork before the range hood.
Screws
Wall Bracket
Screw Plug
Holes on Wall
TATSUMAKI - 1375 Egbert Ave., San Francisco, CA 94124
Tel: 1-888-725-0989 Fax: 415-671-0839
E-mail: info@gotatsumaki.com | Website: www.GoTatsumaki.com
5. Determine the proper location for the Power Supply Cord by making sure it:
A) allows the field wiring compartment or socket outlet to be hidden by the Lower
Chimney cover .
B) does not have the ductwork blocking your access to the field wiring compart-
ment or socket outlet.
6. After fixing the range hood to the wall, fix the exhaust pipe (use 6” round rigid steel
pipe is highly recommended, DO NOT use semi-rigid or flexible hose). Sealed with
duct tape, NO screws.
7. Install the dampers carefully if necessary. Install dampers only when you are using
the common vent at apartment, or City inspection. Generally we recommend not to
install dampers, instead to install roof cap with damper preferred.
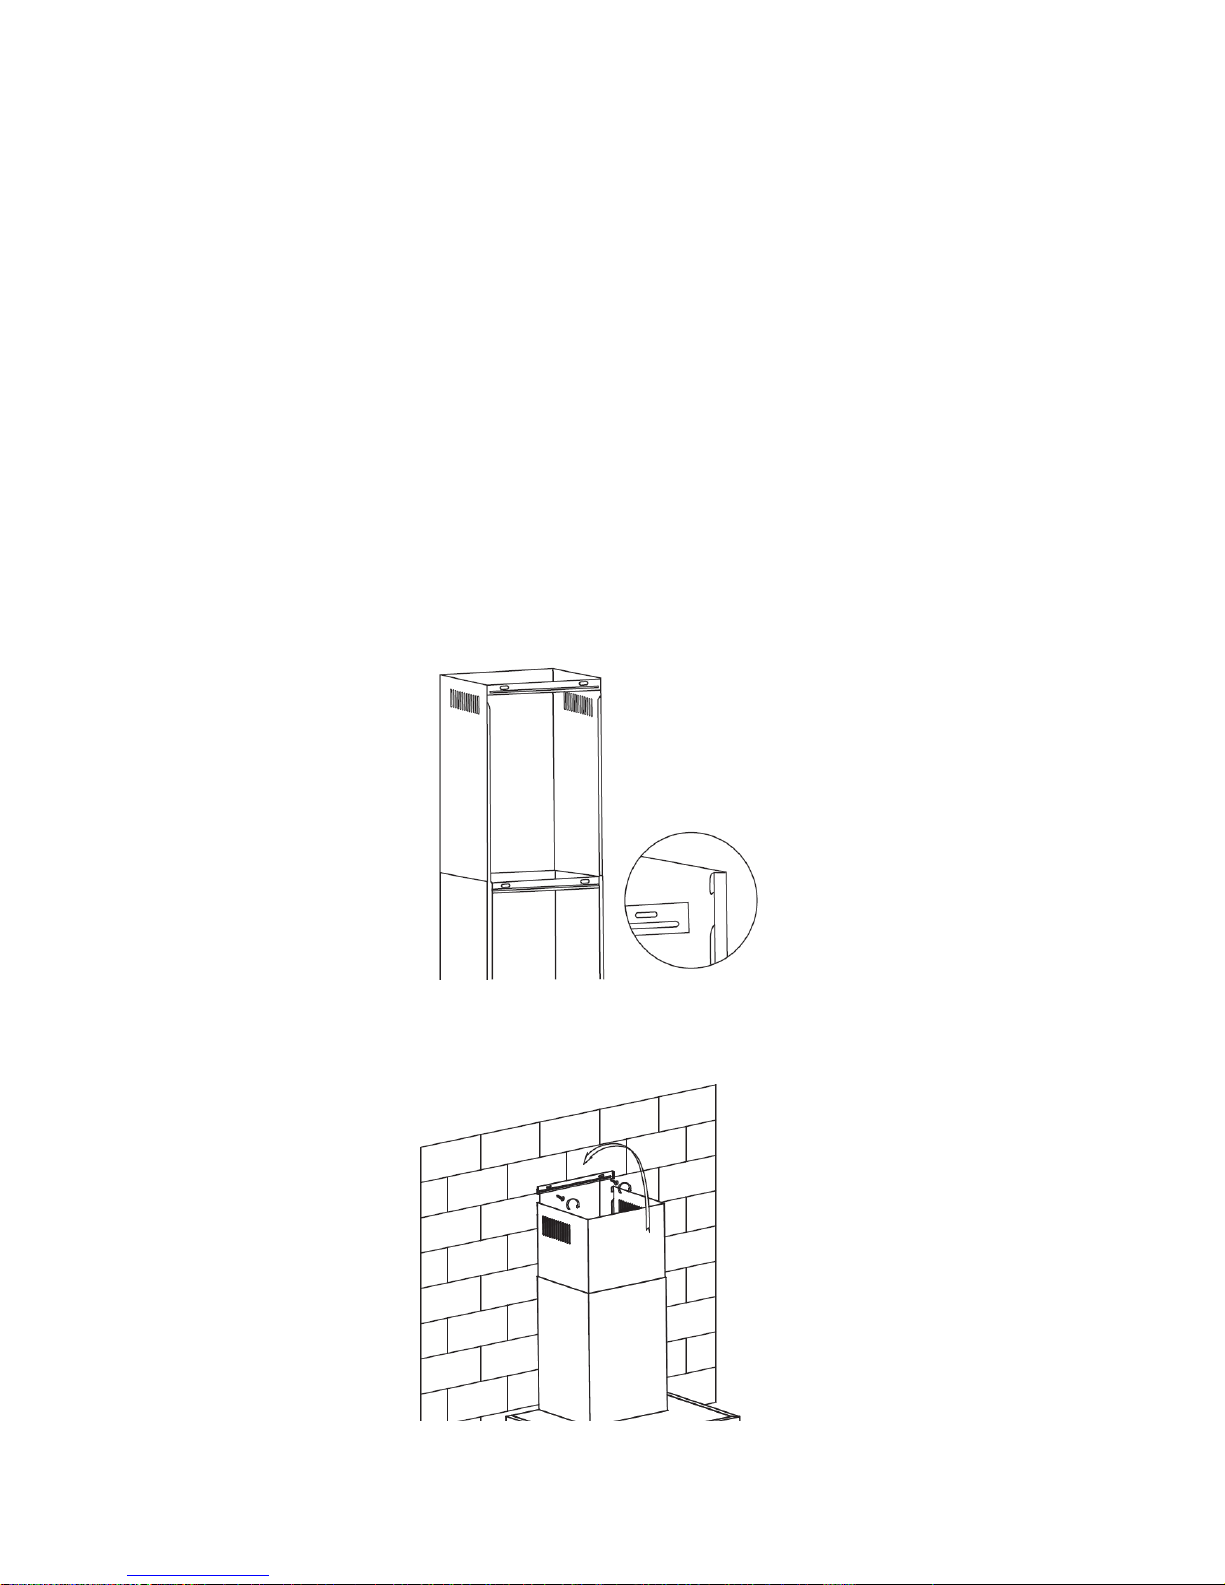
8. Put the Upper Chimney inside the Lower Chimney and install it on the range hood.
Slide up the Upper Chimney to the desirable height.
9. Adjust Upper Chimney to the desirable height, then install the plate as shown in the
below picture.
10. Drill two holes on the wall to accommodate the plates and attach the Upper Chim-
ney to the wall with screws provided. (See below picture)
TATSUMAKI - 1375 Egbert Ave., San Francisco, CA 94124
Tel: 1-888-725-0989 Fax: 415-671-0839
E-mail: info@gotatsumaki.com | Website: www.GoTatsumaki.com
Non-Ducted Recirculation (Charcoal Filter) Installation
——————————————————————-
If you have no options to install proper ductwork in your kitchen, recirculation charcoal filter is
the only solution. Charcoal filters are available for use with range hoods that re-circulate fil-
tered air back into the kitchen. These filters are designed to absorb odors as well as filter out
contaminants.
For the circulation installation, you can add two optional charcoal filters inside the hood. They
should be replaced approximately every 3 months.
Installation
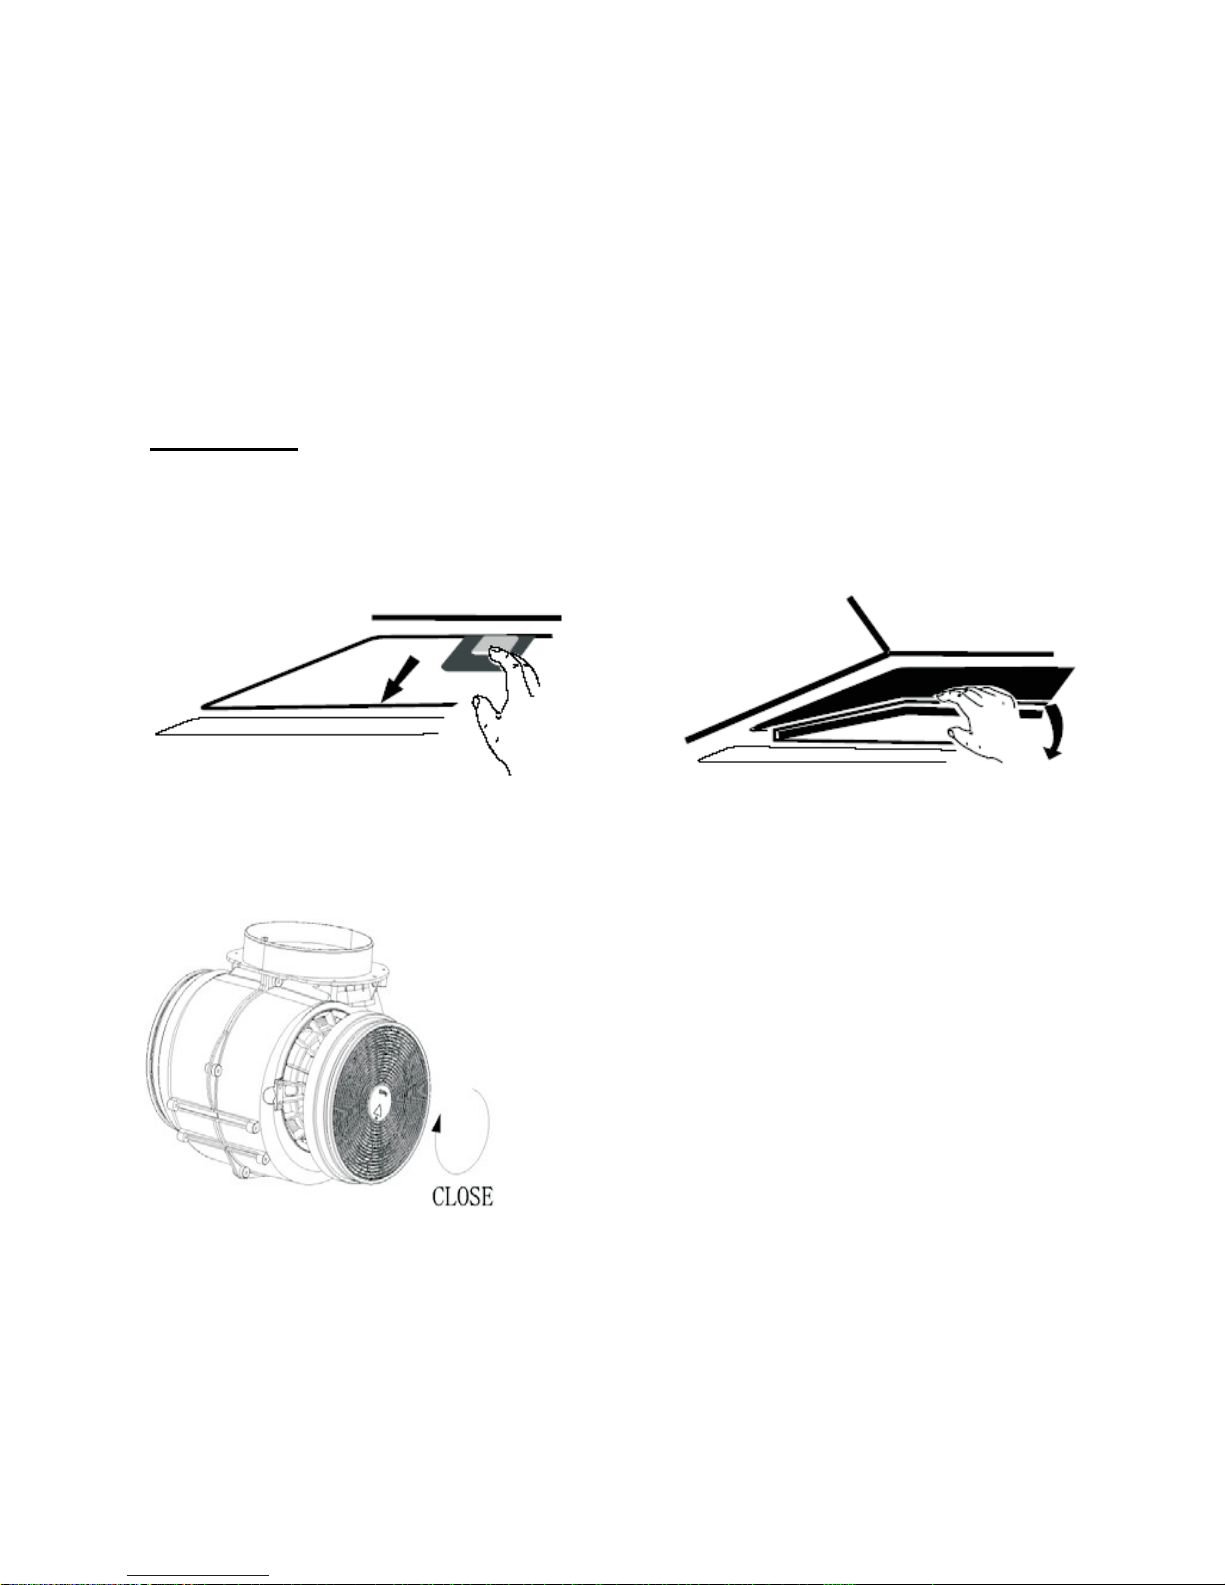
Remove baffle filter by pressing the button and pull down. (See Figure A) Then insert the char-
coal filters on the side of the blower/motor, rotate the filters clockwise to lock. (See Figure B)
Figure A
Figure B
NOTE:
1. Make sure filter is securely lock. Loosen charcoal filter can damage the range hood.
2. Installing the charcoal filter will decrease the suction power.

TATSUMAKI - 1375 Egbert Ave., San Francisco, CA 94124
Tel: 1-888-725-0989 Fax: 415-671-0839
E-mail: info@gotatsumaki.com | Website: www.GoTatsumaki.com
OPERATION___________________________________
Touch Control (with auto delay power-off)
Press to power on and off.
Press once to lower fan speed.
Press once to increase fan speed.
Press once to turn on the light. Press again to turn it off.
Press to activate automatic delay power-off function.
- To configure the delay power-off function, press and hold the
button for 3 seconds until the power button blinks. Set time from
1 minute to 9 minutes. Press the button again to save the setting.
Lamp Replacements
Ask your dealer or visit our website to buy the latest version of LED

TATSUMAKI - 1375 Egbert Ave., San Francisco, CA 94124
Tel: 1-888-725-0989 Fax: 415-671-0839
E-mail: info@gotatsumaki.com | Website: www.GoTatsumaki.com
Maintenance
CAUTION: Never put your hand into the area
housing the fan while the fan is operating.
Proper maintenance of the range hood will assure
proper performance of the unit.
Grease or Baffle Filters
The grease filters and the bottom panel should be
cleaned frequently. The grease filters or baffle fil-
ters must be cleaned approximately once every 30
hours of operation.
Use a warm detergent solution. Grease or baffle
filters are dishwasher safe.
Tips: Soaking the filters into warm detergent for 1
hour before putting into dishwasher. Separate other
dishware when cleaning the filters.
Tips: Just put the filters into a boiling water pot with
detergent for 5 mins, then rinse.
Remove filter by pushing filter towards the
back of hood and rotating filter towards.
Baffle grease filters contain two layers of roll
formed baffles, equally spaced. Spacing creates an
air flow which causes grease to collect, drain down
the baffles and into collecting trough. Filters are
designed to prevent flame from passing through
the filter baffles, and are made to withstand differ-
ent temperature levels. Baffler filters are 10 times
durable than standard aluminum filters.
Some models are equipped with baffle filters. If you
want to buy the filters or replacement, please con-
tact your dealer or visit our website:
www.tatsumaki.us
Non-ducted recirculation Charcoal filter
The charcoal filter should be changed approxi-
mately once every 120 hours of operation. The
charcoal filter is not washable
HOOD CLEANING
Stainless steel is known for its ability to be a clean
surface that resists corrosion an rust. Dirt, dust and
grime, however, put stainless at risk for corrosion
and rust. Luckily, stainless steel responds well to
cleaning, never wearing out from excessive clean-
ing, as long as certain rules are followed.
1.Water and a cloth. Routine cleaning can be ac-
complished by using warm water and a cloth. This
is the least risky option for cleaning stainless steel.
Dry with a towel or cloth to prevent water spots.
Wipe in the directions of the polish lines.
2. Mild detergent, (dish washing liquid) and
cloth. For cleaning that needs more power, mild
detergent and warm water can do a great job with-
out damaging the stainless steel. Make sure you
rinse the surface thoroughly to prevent staining and
spotting. Towel dry to prevent water spots which
can be caused by minerals in water.
3. Glass cleaner for fingerprints. Fingerprints are
one of the biggest complaints about stainless steel,
but can be taken care by using glass cleaner or
household ammonia. Rinse thoroughly and towel
dry. There are some newer types of finishes for
stainless steel that resist fingerprints, a must if your
pint-sized helpers leave their mark on your
stainless steel appliances.
4. Stainless Steel Cleaner. If you’ve had staining
or scratching, or need to polish your stainless steel,
a stainless steel cleaner may be a good option.
Some of these cleaners and polishes can help
minimize scratching and remove stains. They also
can polish stainless steel surfaces nicely. Read the
directions on the stainless steel cleaner and test in
an inconspicuous spot. Be sure to rinse thoroughly
and towel dry.
Warning- When cleaning the hood, never spray
cleaning agent directly on the controls; spray it
on the cleaning cloth and wipe the control with
it. Spraying cleaning agent directly on the con-
trol will cause unexpected keyboard activation.
Do not use any steel or stainless steel wool or any
other scrapers to remove stubborn dirt.
Do not use any harsh or abrasive cleanser.
Do not allow dirt to accumulate.
Do not let plaster dust or any construction resides
reach the hood. During construction or renovation,
cover the hood to make sure no dust sticks to
stainless steel surface.
AVOID : when choosing a detergent
-Any cleaners that contain bleach will attack
stainless steel.
-Any products containing: chloride, fluoride, io-
dide, bromide will deteriorate surfaces rapidly.
-Any combustible products used for cleaning
such as acetone, alcohol, ether, benzoyl, etc.,
are highly explosive and should never be used
close to a range.

TATSUMAKI - 1375 Egbert Ave., San Francisco, CA 94124
Tel: 1-888-725-0989 Fax: 415-671-0839
E-mail: info@gotatsumaki.com | Website: www.GoTatsumaki.com
Disclaimer
——————————————————--
If the item arrives defective, please contact us
immediately.
Carefully inspect all items for damages. Note
any damages on the freight bill or express re-
ceipt. Request name and signature of the car-
rier’s agent and keep copy to support your
claim.
Upon acceptance of items, owner assumes re-
sponsibility for its safe arrival. Damages should be
reported to carrier and a claim filed. Failure to do
this could result in the carrier refusing to honor
your claim. The carrier will furnish you with neces-
sary forms for filing a claim.
Damages caused during transit are not covered
under our warranty.
Please inspect contents of packages carefully
upon receiving!
We must be notified in writing of any damages and/
or missing parts within the allocated days upon
receipt of packages. Contact your local TATSU-
MAKI dealer or distributor or contact TATSUMAKI
for the time limit.
Claims will not be accepted after the allocated
days.
Note: Items were thoroughly tested and carefully
packed in our factory.
For a defective item, we must receive the returned
merchandise and inspect it first before any replace-
ment/exchange. If you need an immediate replace-
ment, we will charge you for the replacement (plus
applicable fees). After inspection, if a defect is
found in normal residential use, TATSUMAKI will,
at its election, repair, provide a replacement part or
product, or make appropriate adjustment.
Products must be returned in good working condi-
tion with ALL original parts and documentation
packed in ALL original cartons, fillers and shipping
cartons. A restocking fee of 15% will be charged for
all approved return(s).
Make sure to inspect the hood for damages and
defects before installation. Defective item will
be replace with same item.
Appearance flaws of the hood found after installa-
tion and not affecting hood performance is not cov-
ered under our warranty for returns or exchanges.
Service visits not covered under warranty will carry
a service charge.
Before installation: Return for exchange or refund
(please see above for acceptable returns).
After installation: NO exchange or refund.
Warranty
LIMITED 2-YEAR WARRANTY
Tatsumaki warrants all products manufactured or
supplied by it to be free from defects in workman-
ship and materials during normal residential use for
as long as the original consumer purchaser owns
his/her own home. Damage to a product caused by
accident, misuse, or abuse is not covered by this
warranty. Proof of purchase (original sales receipt)
must be provided to TATSUMAKI with all warranty
claims. TATSUMAKI is not responsible for labor
charges, installation, or other consequential costs.
In no event shall the liability of TATSUMAKI exceed
the purchase price of the product. Its obligations
pursuant to this warranty are limited to a period of
two years from the date of purchase and to the re-
pair or replacement at its option and subject to the
terms and conditions stated below, of any compo-
nent part, which its examination shall disclose to be
so defective.
Residential Products: TATSUMAKI provides the
following warranties on its products to the original
purchaser, installed in a residential application.
Mechanical and Finish Warranty: A Limited 2-
Year Warranty is provided on all mechanical parts
and finish to be free from manufacturing defects in
materials and workmanship under normal use for
as long as the original purchaser owns their home.
TWO YEAR WARRANTY SERVICE PERIOD
Any covered failure occurring within two years of
original purchase arising from defective workman-
ship or non consumable parts or components in
manufacture will be repaired (or at our option the
unit will be replaced) free of charge by an author-
ized TATSUMAKI range hoods agent or TATSU-
MAKI as applicable. Labor warranty varies in differ-
ent regions, please check with local retailers for
details. Proof of purchase (original sales receipt)
must be provided to TATSUMAKI with all warranty
claims.
If the range hood is sold by the original purchaser
during the warranty period the new owner is pro-
tected until expiration of the original purchaser’s
warranty.

TATSUMAKI - 1375 Egbert Ave., San Francisco, CA 94124
Tel: 1-888-725-0989 Fax: 415-671-0839
E-mail: info@gotatsumaki.com | Website: www.GoTatsumaki.com
Conditions
The following conditions apply only in relation to
The warranty expressly given in this certificate.
1. This warranty applies only:
A) within USA and Canada.
B) to range hoods used for RESIDENTIAL SINGLE
FAMILY USE (if used for COMMERCIAL or MULTI-
PLE FAMILY USE or other purposes, warranty will
be voided).
2. Repair of any fault to be provided under this war-
ranty shall not provided:
A) if the identification number attached to the
range hood has been altered, rendered illegible or
removed;
B) if notice of the defect has not been given within
the period applicable;
C) for failure of light bulbs;
D) for physical damage;
E) for surfaces damaged by use of improper
chemical cleaning agents;
F) if the appliance has been:
i) subject to misuse, abuse, negligence, acci-
dent, incorrect t installation or failure to follow
the operating instructions;
ii) connected to improper, inadequate or faulty
electricity service or exhaust ducts or flues or
operated using incorrect or contaminated lubri-
cants;
iii) installed, maintained or operated otherwise
than in accordance with the instructions fur-
nished by TATSUMAKI range hoods including
the improper use of detergents, bleaches, or
cleaners.
G) for damage to range hood during transit, deliv-
ery, installation or removal;
H) for damage by or resulting from attempted re-
pairs conducted by anyone other than our au-
thorized service agent.
3. The purchaser shall be responsible for any ex-
penses involved in making the range hood
readily accessible for servicing and where the
range hood is installed outside the main sales
territory of the retailer or service territory of the
nearest approved TATSUMAKI range hood
agent as applicable, for any travelling ex-
penses and any costs of transporting the range
hood or parts thereof to and from the dealer or
service agent.
4. The purchaser must produce proof of purchase
together with this warranty certificate when
making the claim.
5. Damages caused during shipment are not cov-
ered under our warranty.
CONSEQUENTIAL DAMAGE
The warrantor is not responsible for any conse-
quential damage. Some states do not allow the
exclusion of consequential damage so the above
exclusion may not apply to you.
IMPLIED WARRANTIES / STATE LAW
Any implied warranties, including the implied war-
ranty of merchantability and fitness for purpose,
imposed on the sale by the laws of the state of
sales are limited to two year from the date of origi-
nal purchase. Some states do not allow limitations
on the duration of implied warranties. This warranty
gives you specific legal rights, and may also have
rights, which vary from state to state.
For service please contact:
TATSUMAKI
1375 Egbert Avenue,
San Francisco,
CA 94124
Tel: 1-888-725-0989
Fax: 415-671-0839
E-mail:
Website:
www.GoTatsumaki.com
** Tips - Email us with the photos of your range
hood, so that we can verify the model of your
range hood.

TATSUMAKI - 1375 Egbert Ave., San Francisco, CA 94124
Tel: 1-888-725-0989 Fax: 415-671-0839
E-mail: info@gotatsumaki.com | Website: www.GoTatsumaki.com
Tatsumaki Range Hood and Vent Fan
Two (2) Year Limited Warranty Service
To obtain repair service during the warranty period, contact us directly by email or
calling us. Attach a note and pictures to the product describing any problems or
malfunctions in detail. Be sure to send the product complete with all parts and ac-
cessories.
Registering your product is essential to ensure that you will receive all the benefits
of being a Tatsumaki customer. Please complete and fill out all the information,
and mail this card with correct postage and a copy of the original purchase receipt
with 21 days after the date of purchase. Or visit our website to register online.
Please mail the enclosed WARRANTY REGISTRATION to:
Tatsumaki
1375 Egbert Avenue
San Francisco, CA 94124
E-mail: info@gotatsumaki.com Tel: 1-888-725-0989
Record the following information for your record:
Model No.: ____________Serial No.: ________________
Purchased Date: ___ / ___/ ______
Purchased From:_________________________
Retain this portion for your record
●- - - - - - Cut from Here - - - - - - - - - - - - - - - - - - - - - - - - - -
Tatsumaki Warranty Registration Card
Your Name: ______________________ Date: __________
Address:_________________________________________
City: __________________State: _______Zip Code:_______
Tel No.: ______________Email: _______________________
Model No.: _________________
Serial No.: __________________
Purchased Date: ___ / ___/ ______
Purchased from: ______________________
This manual suits for next models
1
Table of contents


