ESISTYLE GAIA User manual

1
Libretto
Istruzioni
Instruction
Manual
Bedienungsanleitung
2
ISTRUZIONI
PER
L’INSTALLAZIONE,
LA
MANUTENZIONE
E
L’USO
DELLA
CAPPA
AVVERTENZE
Non operare se non si sono ben comprese tutte le notizie riportate nel manuale; in caso di dubbi richiedere sempre
l’intervento del servizio tecnico.
LA DITTA PRODUTTRICE si riserva il diritto di modificare specifiche e caratteristiche tecniche e/o funzionali della
macchina in qualsiasi momento senza darne preavviso.
IL PRESENTE MANUALE È DI PROPRIETÀ DELLA DITTA
PRODUTTRICE, ED È VIETATA QUALSIASI RIPRODUZIONE, ANCHE PARZIALE, SENZA L’AUTORIZZAZIONE
DELLA STESSA.
SIMBOLOGIE
USATE
SUL
PRESENTE
MANUALE
INDICAZIONE:
Indicazioni concernenti il corretto
utilizzo della cappa.
ATTENZIONE:
Punto nel quale viene espressa una
nota di particolare rilevanza.
PERICOLO:
Viene espressa un’importante nota di
comportamento per la prevenzione di
infortuni o danni materiali.
PREMESSA
1.1
SCOPO
E
CONTENUTO
DEL
MANUALE
Lo scopo del manuale è quello di consentire all’utente,
ma soprattutto all’operatore che dovrà utilizzare la cappa,di prendere quei provvedimenti e predisporre
tutte le procedure necessarie per un suo uso corretto, sicuro e duraturo.
Questo manuale contiene tutte le informazioni necessarie
per l’installazione, il montaggio, l’impiego e la manutenzione delle cappe.
La scrupolosa osservanza di quanto in esso descritto garantisce un elevato grado di sicurezza e produttività
dell’apparecchiatura.
1.2
CONSERVAZIONE
E
CONSULTAZIONE
DEL
MANUALE
Il manuale deve essere conservato con cura dell’utente utilizzatore in un luogo protetto ed asciutto e deve essere
sempre disponibile per la consultazione, sia da parte dell’operatore che dei tecnici.
Il manuale Istruzione Uso e Manutenzione è parte integrante
dell’apparecchiatura e deve essere conservato per futuri riferimenti fino allo smantellamento finale della stessa.
1.3
AGGIORNAMENTO
DEL
MANUALE
Il presente manuale rispecchia lo stato dell'arte, al momento dell’immissione sul mercato, dell’elettrodomestico.
Eventuali modifiche, adeguamenti od applicazione di nuove tecnologie su prodotti di nuova commercializzazione
non obbligano IL PRODUTTORE considerare gli elettrodomestici già presenti sul mercato, con la relativa
documentazione tecnica, carenti o inadeguate.
1.4
GENERALITÀ
Informazioni
In caso di scambio di informazioni con il Costruttore dell’apparecchiatura fare riferimento al numero di serie ed ai
dati identificativi
Con la consegna del presente manuale IL PRODUTTORE declina ogni responsabilità, sia civile che
penale, per incidenti derivati dalla non osservanza parziale o totale delle specifiche in esso contenute.
IL PRODUTTORE declina, ogni responsabilità derivante:
- dall’uso improprio o non corretto dell’apparecchio da parte del
cliente
- da modifiche e/o riparazioni non autorizzate
- dall’utilizzo di ricambi non originali o non specifici per questo modello cappa.

3
Uso
L'uso della cappa è subordinato, oltre che alle prescrizioni contenute nel presente manuale, anche al
rispetto di tutte le norme di sicurezza previste dalla legislazione specifica vigente nello stato dove la
stessa è installata.
1.5
CONFORMITA’
ALLE
NORMATIVE
Questo prodotto rispetta le seguenti normative:
A) Direttiva 73/23/CEE: "Bassa Tensione".
B) Direttiva 89/336/CEE: "Compatibilità Elettromagnetica".
Inoltre è realizzato secondo le norme internazionali per il trattamento delle sostanze pericolose (Direttiva EU
2002/95/CE - RoHs - Restriction of Hazardous Substances), e per lo smaltimento di prodotti elettrici ed elettronici
(Direttiva WEEE (2002/96/CE) - Waste Electrical and Electronic Equipment).
Questo simbolo sul prodotto, o sulla documentazione di accompagnamento, indica che il prodotto non
deve essere gettato nei rifiuti comuni ma raccolto in maniera separata e riciclato o smaltito rispettando
i regolamenti locali di ciascun paese.
1.6
GARANZIA
L'Utente, per poter usufruire della garanzia fornita dal Costruttore, deve osservare scrupolosamente le
prescrizioni indicate nel presente manuale, ed in particolare:
- operare sempre nei limiti d'impiego della cappa;
- effettuare sempre una costante e diligente manutenzione;
- autorizzare all’uso della cappa persone di provata capacità e attitudine.
L'inosservanza delle prescrizioni contenute in questo manuale implicherà l’immediata decadenza della garanzia.
Manutenzione
straordinaria
Le operazioni di manutenzione straordinaria devono essere eseguite da personale qualificato ed abilitato ad
intervenire sul modello di cappa a cui fa riferimento il presente manuale.
1.7
RESPONSABILITÀ
DEL
COSTRUTTORE
Il Costruttore declina ogni responsabilità civile e penale, diretta o indiretta,dovuta a:
- uso non conforme alle normative vigenti nel paese d'installazione;
- inosservanza delle istruzioni contenute nel manuale;
- uso da parte di persone non capaci;
- uso non conforme alle direttive di sicurezza;
- modifiche e riparazioni, non autorizzate dal Costruttore, effettuate sulla cappa;
- utilizzo di ricambi non originali o non specifici per il modello di cappa;
- carenza di manutenzione;
- eventi eccezionali.
- direttiva 85/374/CEE (Responsabilità del prodotto per eventuali difetti di costruzione)
1.8
PARTI
DI
RICAMBIO
Impiegare esclusivamente parti di ricambio originali.
Non attendere che i componenti siano logorati dall’uso prima di procedere alla loro sostituzione. Eseguire i controlli
periodici di manutenzione come indicato nel capitolo “MANUTENZIONE”.
1.9
AVVERTENZE
PER
LA
SICUREZZA
- E’ assolutamente vietato eseguire cotture con sviluppodi fiamma sotto la cappa (es. Flambée).
Non utilizzare la cappa in versione aspirante in ambienti dove funzionano in contemporaneità altri
apparecchi non elettrici (es. stufe a legna, stufe a gas, caldaie a combustibile) con scarico collegato
all’esterno a meno che non possa essere assicurata una buona areazionedell’ambiente medesimo.
Se la cappa è utilizzata nella versione aspirante, assicurarsi delle buone condizioni del camino
di scarico, nel caso in cui quest’ultimo sia rimasto fermo per molto tempo.Ricordarsi inoltre di prestare
attenzione alle norme vigenti locali, in merito allo scarico dell’aria da evacuare, nel caso di
funzionamento aspirante dell’apparecchio.
Non friggere mai lasciando la pentola senza sorveglianza: l’olio contenuto nella pentola può surriscaldarsi ed
incendiarsi. Nel caso di olio usato il rischio di auto combustione e più elevato.
Onde evitare pericolo d’incendio è necessaria la pulizia frequente del ventilatore e delle altre superfici.
- E’ importante sostituire frequentemente ogni filtro montato sulla cappa.
- Per l’allacciamento della cappa aspirante è vietato collegare lo scarico a canne fumarie, canali di scarico e canne
per l’areazione di locali espositivi.
L’aria evacuata non deve essere immessa in un condotto di circolazione d’aria calda.
- Nel caso in cui nella stanza vengono utilizzati sia la cappa che apparecchi non azionatida energia elettrica si deve
provvedere a creare una aerazione sufficiente dell'ambiente. Un uso corretto e senza rischi si ottiene quando la
4
depressione massima del locale non supera 4 Pa (4x10 bar).L'ambiente in cui andrà installata la cappa deve essere
dotato di una presa d'aria esterna di dimensioni che consentano un flusso in ingresso maggiore o uguale a quello dei fumi
in uscita dalla cappa.
1.10
ISTRUZIONI
PER
IL
MONTAGGIO
La cappa deve essere posizionata sopra ed al centro del piano di
cottura.
La distanza dal piano di cottura deve essere di:
- 650 mm nel caso di fornelli elettrici
- 750 mm nel caso di fornelli a gas o misti.
1.11
TIPI
DI
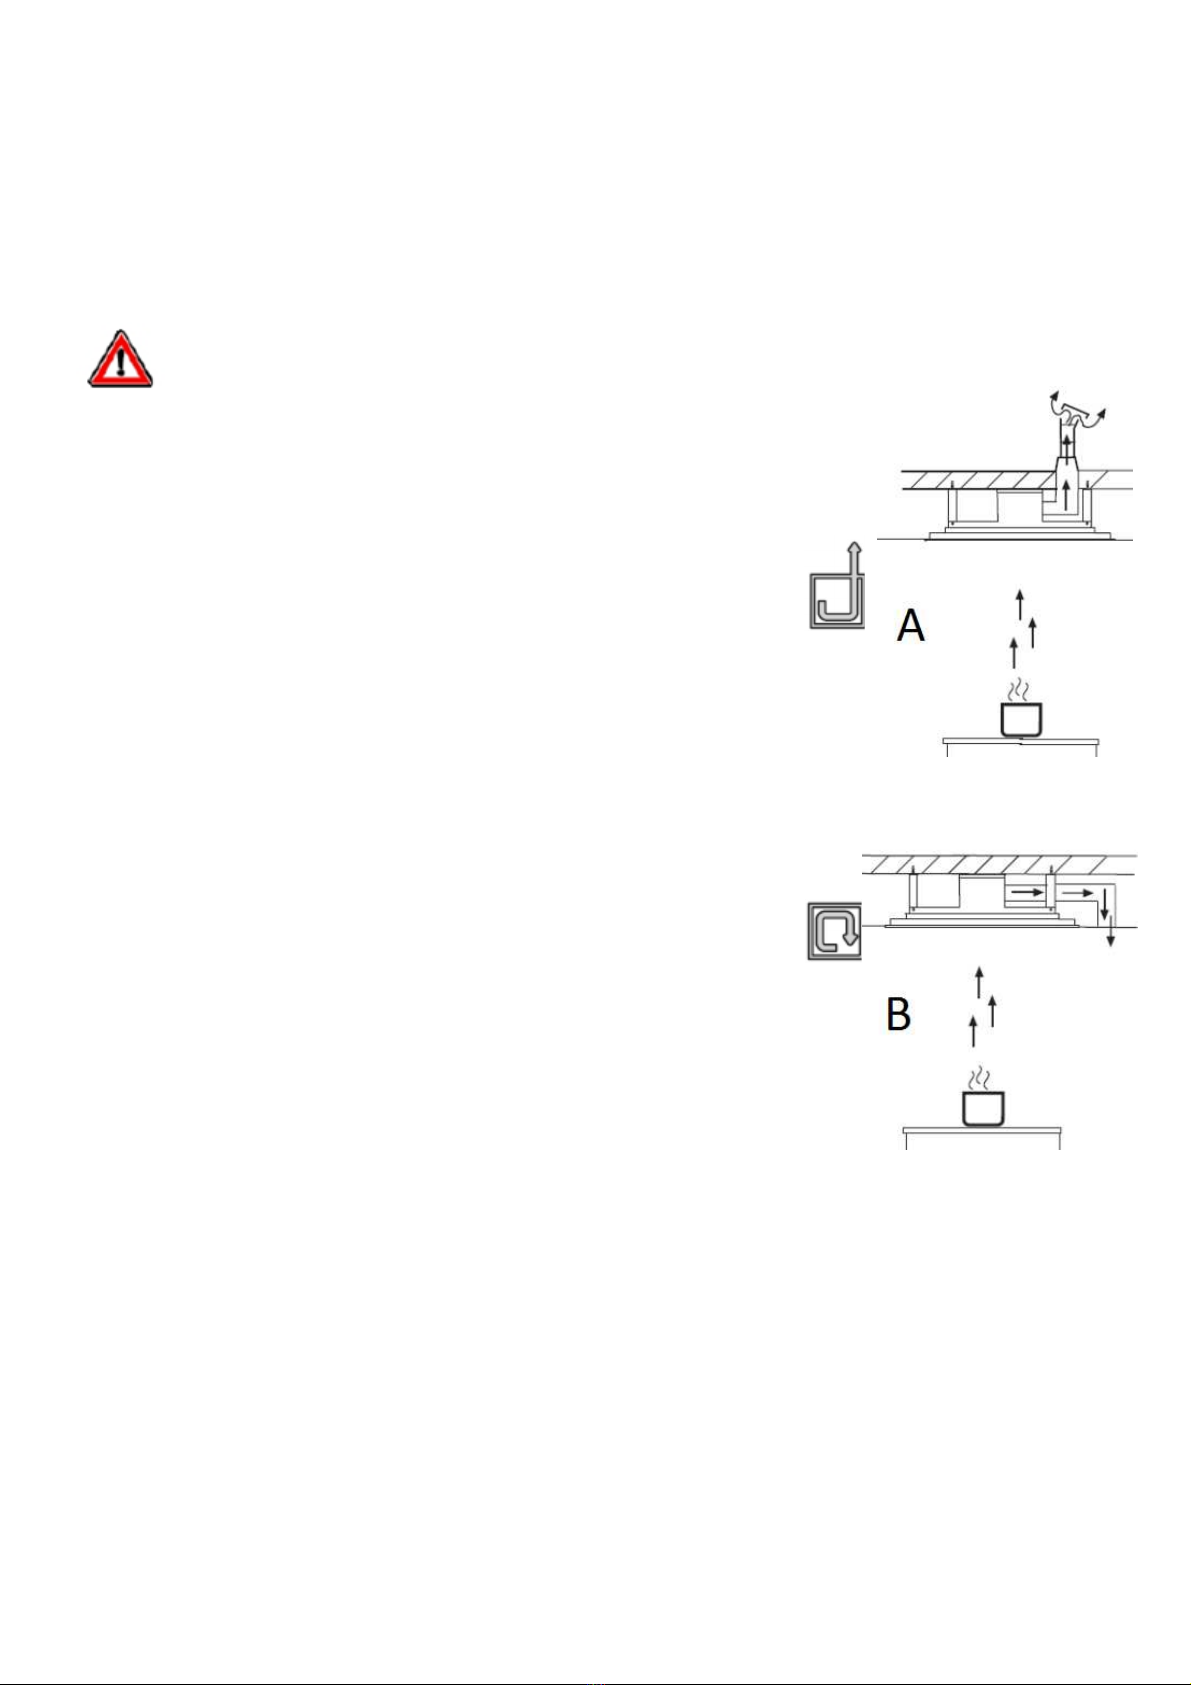
FUNZIONAMENTO
-ASPIRANTE (A) (OPTIONAL)
L’aria viene aspirata dal motore passa attraverso i filtri metallici che
trattengono
i grassi presenti nei fumi e tramite una tubazione
adeguatamente dimensionata in base alla potenza di aspirazione viene
espulsa all’esterno.
-FILTRANTE(B)
L’aria viene aspirata dal motore, passa attraverso i filtri al carbone attivo
che assorbono gli odori e viene rimessa in circolo nell’ambiente della
cucina
1.12
IMPIANTO
E
COLLEGAMENTO
ELETTRICO
Per tensioni di linea e frequenza consultare la targhetta matricola
posta all’interno dell’apparecchiatura. e verificare la compatibilità con il
proprio impianto.
Nel caso in cui la presa di corrente non sia accessibile, la cappa
deve essere collegata ad un interruttore magnetotermico
omnipolare con apertura dei contatti non inferiore a 3 mm.

5
1.13
USO E MANUTENZIONE
Si raccomanda di mettere in funzione l'apparecchio prima di procedere alla cottura di qualsiasi alimento. Si raccomanda di
lasciar funzionare l'apparecchio per 15minuti dopo aver terminato la cottura dei cibi, per un'evacuazione completa dell'aria. l
buon funzionamento della cappa è condizionato da una corretta e costante manutenzione; una particolare attenzione deve
essere data al filtro antigrasso e al filtro al carbone attivo.
Durante la manutenzione disinserire la corrente elettrica
La manutenzione delle parti esterne è una semplice pulitura
con una spugna umida, acqua e sapone neutro delle superfici.
Non usare detersivi, polveri abrasive o spazzole.
Non pulire in nessun caso l’interno della cappa con spugne umide o acqua.Si potrebbero causare cortocircuiti.
1.14
MANUTENZIONE
ORDINARIA
La manutenzione ordinaria si effettua:
PERIODICAMENTE sui filtri per i grassi e sui filtri a carboni attivi;
SALTUARIAMENTE sui faretti alogeni per l’illuminazione.
1.15
MANUTENZIONE
DEI
FILTRI
METALLICI
Deve essere lavato in acqua calda e detersivo ogni 10-15 giorni di esercizio.
MANUTENZIONE
DEI
FILTRI
AI
CARBONI
ATTIVI
Si esauriscono in funzione delle condizioni di funzionamento a cui sono sottoposti.
Non possono essere lavati.
Si consiglia la sostituzione almeno ogni
SEI
MESI
.

6
1.16
ISTRUZIONI PER L'INSTALLAZIONE
INSTALLAZIONE MODELLI A SOFFITTO
•Questa cappa é predisposta per essere installata a soffitto.
•Installare la cappa sopra il piano di cottura.
•L'altezza minima della cappa dal piano cottura non deve essere inferiore a cm 65.
•Aprire l’imballo contenente la cappa ed estrarre i componenti.
•Assicurarsi che il soffitto o controsoffitto sia sufficientemente resistente per poter reggere il peso della cappa, i
tasselli di ancoraggio forniti in dotazione potrebbero essere non compatibili con il vostro soffitto o controsoffitto,
verificare la compatibilità o utilizzare altri tasselli idonei. Il produttore non si assume responsabilità di danni a
persone o cose dovute all'inosservanza di tali regole.
ISTRUZIONI DI MONTAGGIO VERSIONE FILTRANTE
1. Rimuovere la cappa dall'imballo facendo attenzione a non rovinare parti estetiche.
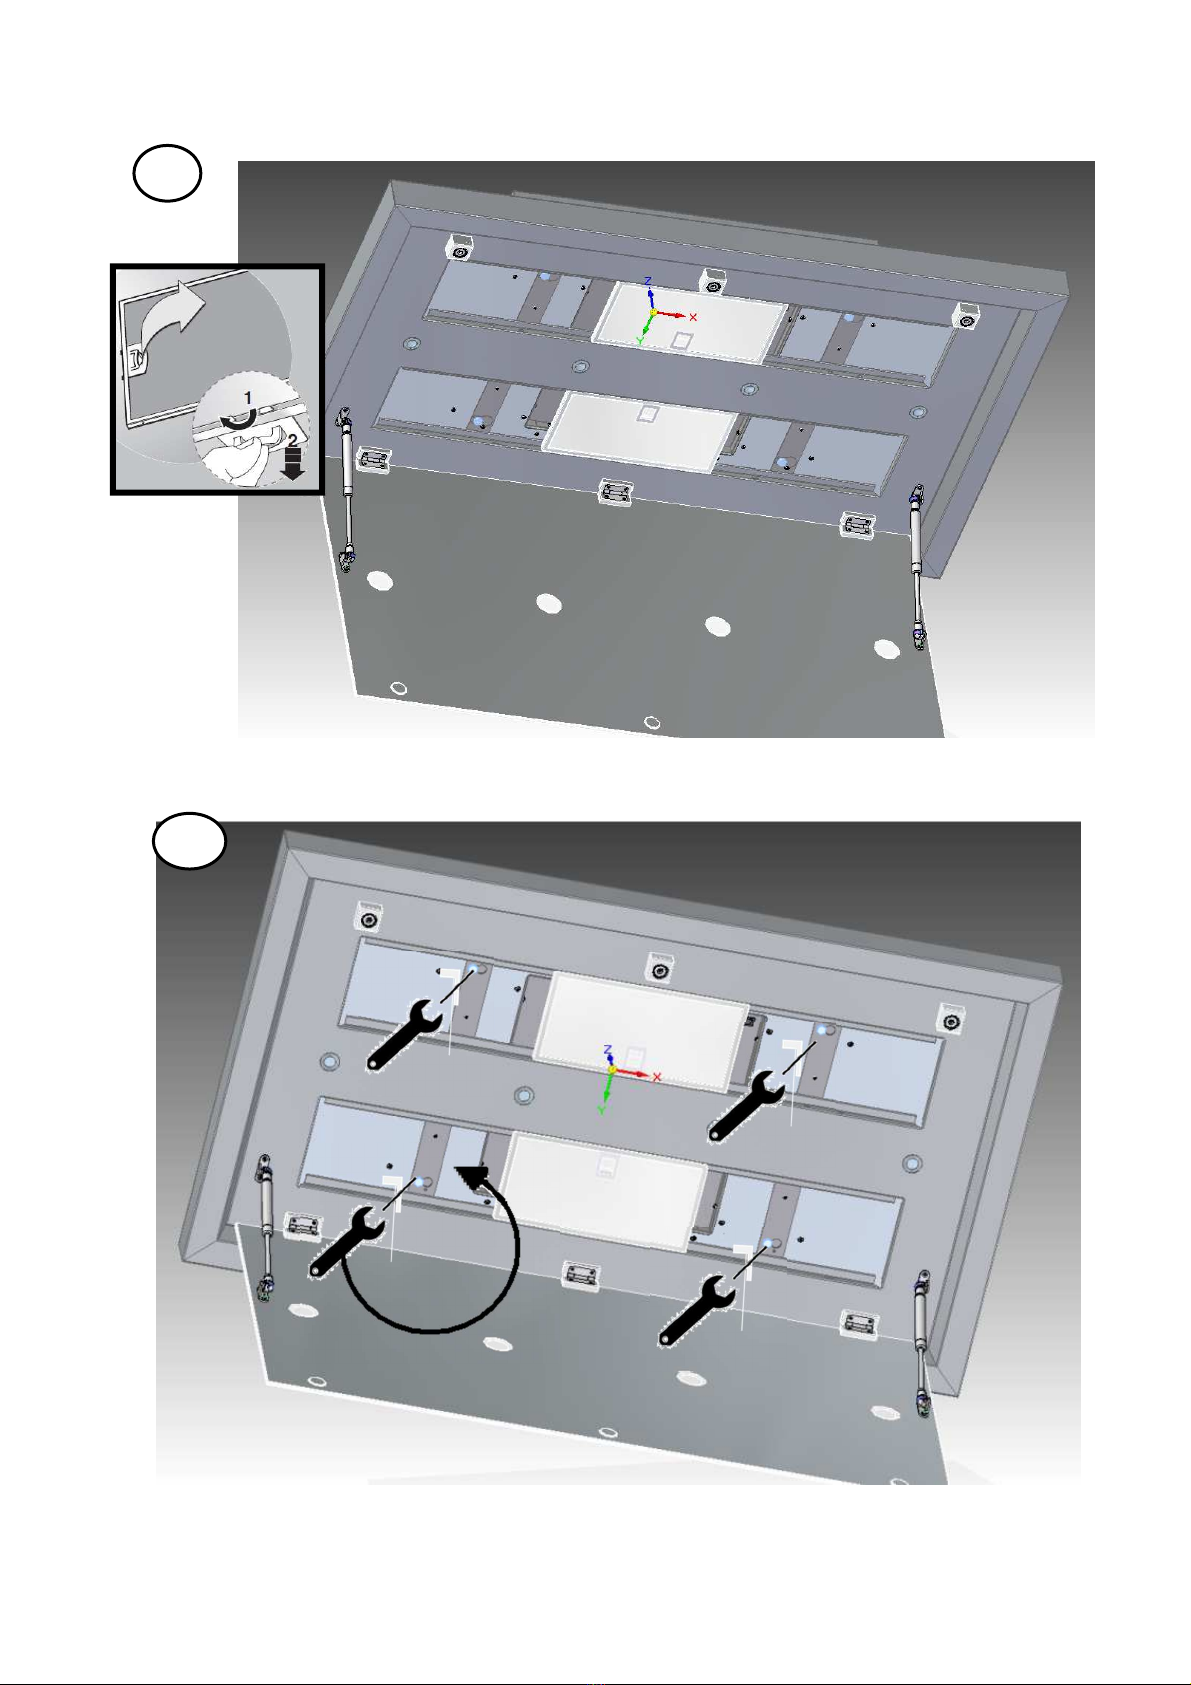
2. Aprire il pannello e rimuovere i filtri. (1)
3. Svitare leggermente 4 viti nelle posizioni indicate in figura e togliere le staffe di fissaggio a soffitto. Non
rimuovere completamente le 4 viti dalle staffe. (2) (3)
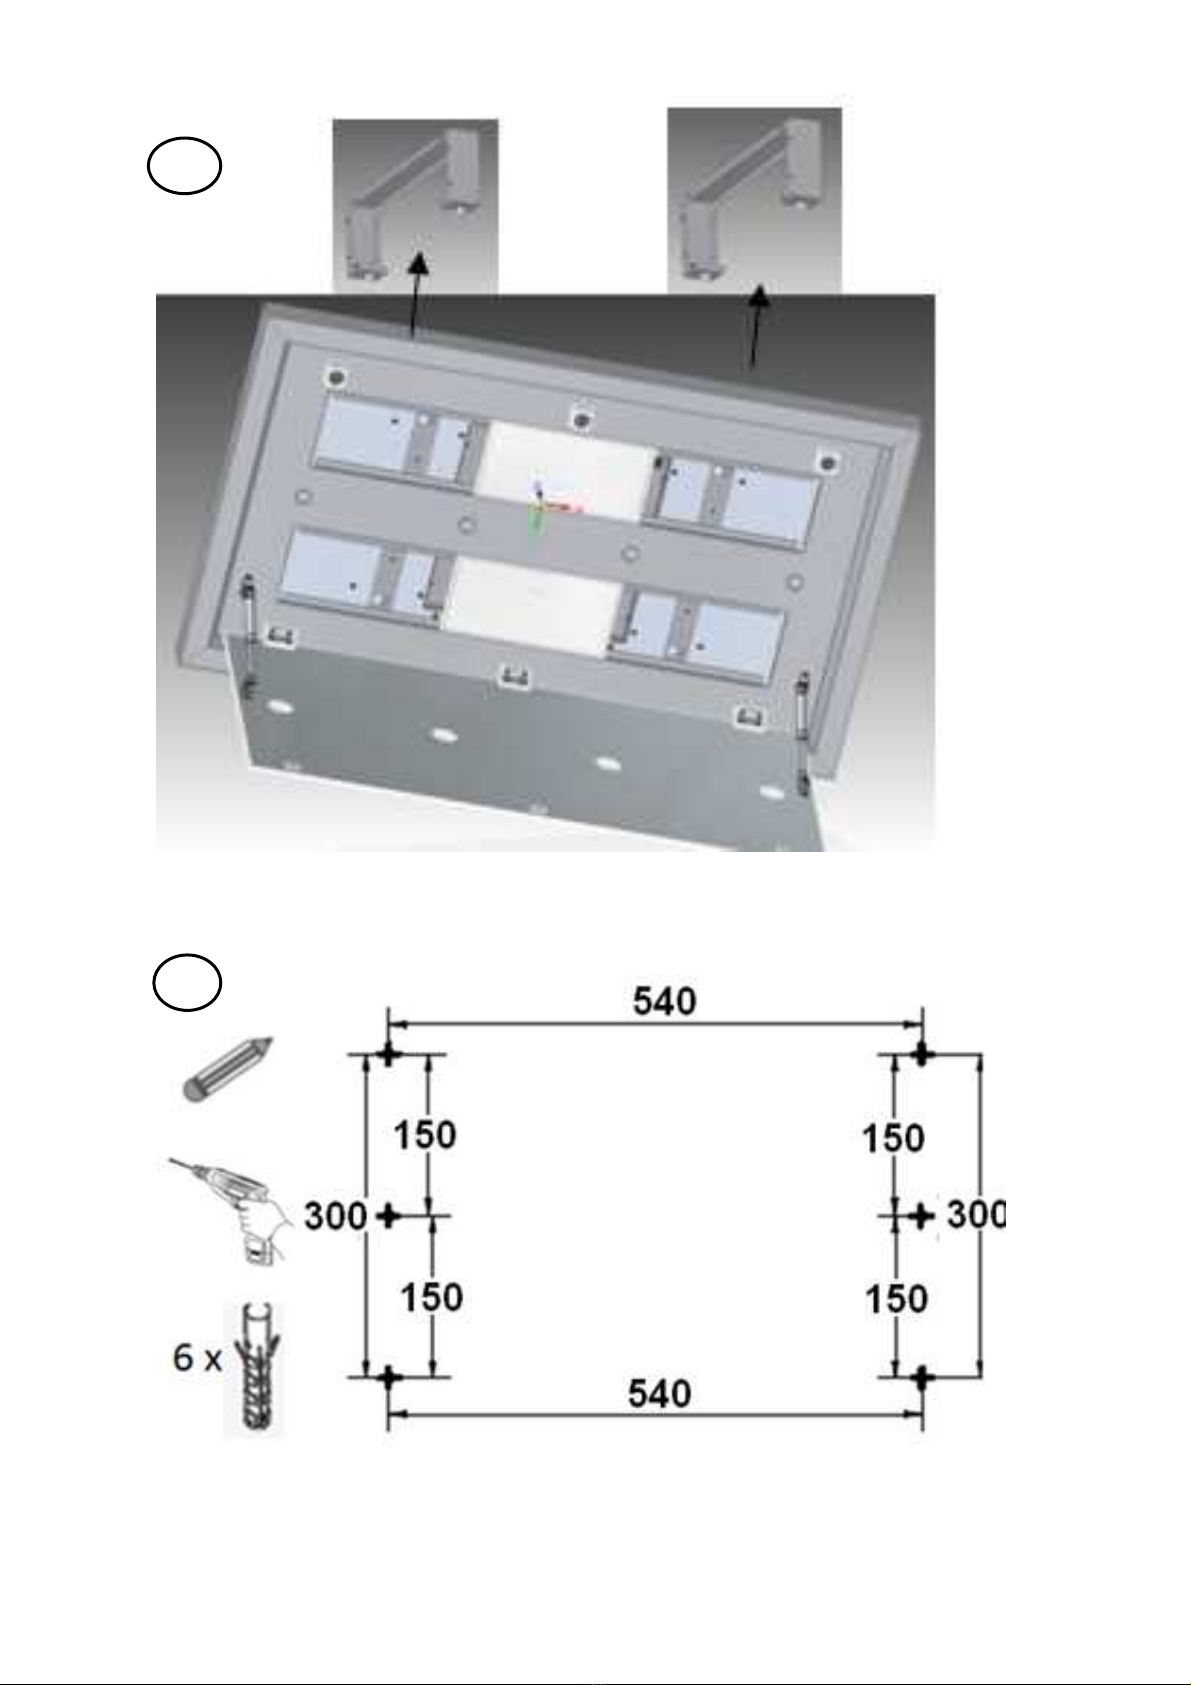
4. Creare fori a soffitto come indicato nella figura. (4)
5. Inserire nei fori tasselli di ancoraggio, verificare che i tasselli forniti in dotazione siano adatti al materiale di cui
è costituito il soffitto, altrimenti montare tasselli idonei.
6. Fissare le staffe al soffitto nei fori precedentemente creati (5), assicurarsi che le viti presenti nelle staffe siano
presenti e non completamente serrate, lasciare fra la testa della vite e la staffa almeno 10mm. (6)
7. Avvicinare la cappa al soffitto ed effettuare la connessione elettrica. (7)
8. Avvicinare la cappa con il pannello aperto alle staffe appena montate a soffitto.
Centrare le viti presenti nelle staffe con i fori presenti sulla cappa. (8)
Spostare il corpo cappa in maniera tale che le viti finiscano nella parte più piccola del foro. (9)
9. Inserire il piastrino di sicurezza fra la testa della vite e la cappa e fissarlo con un vite. Ripetere l'operazione
sulle 4 viti presenti. (10)
10. Serrare completamente le 4 viti di fissaggio. (11)
11. Applicare nuovamente i filtri alluminio, chiudere il pannello e testare il corretto funzionamento.

7
INSTRUCTIONS
FOR
THE
INSTALLATION,
MAINTENANCE
AND
USE
OF
THE
HOOD
WARNING
Do not operate without fulling understand all of the information reported in the manual; in case of doubts always
request the presence of a service technician.
THE MANUFACTURING COMPANY reserves the right to modify specifics and functional and/or technical
characteristics of the machine in any moment without without notice.
THE PRESENT MANUAL IS THE PROPERTY OF THE MANUFACTURING
COMPANY, AND ANY REPRODUCTION, EVEN PARTIAL, IS PROHIBITED, WITHOUT ITS AUTHORIZATION.
SYMBOLS
USED
IN
THE
PRESENT
MANUAL
INDICATION:
Indications pertaining to the correct
use of the hood.
ATTENTION:
Point in which a note of particular
relevance is expressed.
DANGER:
An important note of behavior for the
prevention of injuries or material
damage is expressed.
INTRODUCTION
1.1
PURPOSE
AND
CONTENT
OF
THE
MANUAL
The purpose of the manual is to allow the user,
but above all the operator that will have to use the hood, to take those precautions and arrange all the
procedures necessary for a correct, safe and long-lasting use.
This manual contains all the information necessary for the installation, assembly, use and maintenance of the hoods.
The scrupulous compliance of that which is described within guarantees a high degree of security and productivity
of the equipment.
1.2
MANUAL
PRESERVATION
AND
CONSULTATION
The manual must be preserved with care by the user in a safe dry place and must always be available for
consultation, both by the operator and by technicians.
The Use and Maintenance Instruction manual is an integral part of the equipment and must be preserved for future
references until its final dismantling.
1.3
MANUAL
UPDATE
The present manual reflects, at the moment of market introduction,
a state-of-the-art appliance.
Possible modifications, adjustments or applications of new technologies on newly-marketed products do not force
THE MANUFACTURER to consider the appliances already present on the market, with the relative technical
documentation, deficient or inadequate.
1.4
GENERAL
Information
In case of exchange of information with the Constructor of the equipment refer to the series number and to
identification data
Responsibility
With the consignment of the present manual THE MANUFACTURER declines all responsibility, civil or
penal, for accidents caused by the partial or total non-compliance with specifications contained within.
THE MANUFACTURER declines, all responsibility resulting from:
- the improper or incorrect use of the equipment by the customer
- unauthorized modifications and/or repairs
- the use of unoriginal spare parts or those not specifc for this hood model.
8
Use
Hood use is subject, in addition to all of the rules contained in the present manual, also to the respect
of all of the safety regulations provided for by the specifc local legislation in the state where it is
installed.
1.5
CONFORMITY
TO
REGULATIONS
This product respects the following regulations:
A) Directive 73/23/CEE: "Low Voltage".
B) Directive 89/336/CEE: "Electromagnetic Compatibility".
Additionally it is made according to the international regulations for the treatment of hazardous substances (EU
Directive 2002/95/CE - RoHs - Restriction of Hazardous Substances), and for the disposal of electrical and
electronic equipment (Direttiva WEEE (2002/96/CE) - Waste Electrical and Electronic Equipment).
This symbol on the product, or on the accompanying documentation, indicates that the product must
not be thrown away in common garbage but collected in a separate manner and recycled or disposed
of respecting the local regulations of each country.
1.6
GUARANTEE
The User, to be able to take advantage of the guarantee provided by the Constructor, must scrupulously
observe the rules indicated in the present manual, particularly:
- always operate within the use limits of the hood;
- always perform a constant and diligent maintenance;
- authorize hood use to persons of demonstrated ability and aptitude.
Non-compliance with the rules contained in this manual will imply the immediate void of the guarantee.
Special
maintenance
Special maintenance operations must be performed by qualified personnel able to operate on the hood model to
which the present manual refers.
1.7
CONSTRUCTOR
RESPONSIBILITY
The Constructor declines all civil and penal responsibility, direct or indirect, due to:
- use not conforming to the local regulations in country of installation;
- non-compliance with the instructions contained in the manual;
- use by unskilled persons;
- use not conforming to the safey directives;
- modifications and repairs, not authorized by the Constructor, performed on the hood;
- use of unoriginal spare parts or those not specific for the hood model;
- lack of maintenance;
- exceptional events.
- directive 85/374/CEE (Responsibility of the product for possible manufacturing defects)
1.8
SPARE
PARTS
Use exclusively orignal spare parts.
Do not wait for the components to be worn out of use before proceeding to their substitution. Perform periodic
maintenance checks as indicated in the “MAINTENANCE” chapter.
1.9
SAFETY
WARNINGS
- It is absolutely forbidden to carry out cooking with flame
under the hood (ex. Flambée). Do not use the hood in vacuum version in environments where other
non-electric devices are operating simultaneously (ex. wood-burning stoves, gas stoves, combustible
boilers) with exhaust connected to the exterior unless a good ventilation of the environment can be
assured. If the hood is used in the vacuum mode, be sure of the good condtion of the exhaust chimney,
in the case that it has remained stoped for a long time. Remember also to pay attention to local regulations, in
regards to the discharge of air to evacuate, in the case of the operation of the vacuum device. Never fry leaving the
pan unattended: the oil contained in the pan can overheat and ignite. If oil is used, the risk of self-combustion is
higher. In order to avoid fire danger it is necessary to frequently clean the ventilator and other surfaces.
- It is important to frequently replace every filter on the hood.
- For the connection of the vacuum hood it is prohibited to connect the exhaust to flues, discharge canals, and
pipes for the ventilation of facing rooms.
The evacuated air must not be put into a hot-air circulation duct.
Arrange a proper ventilation, if other appliances besides the hood, which are not supplied by electrical power , are being
used in the same room. A proper use without risks is obtained when the maximum depression of the room does not exeed
4 Pa.

9
Equip the room where the hood will be applied with a ventilation air intake to have an airflow bigger than the outlet of the
exhaust air from the hood.
1.10
ASSEMBLY
INSTRUCTIONS
The hood must be positioned above and at the center of the
cooking plane.
The distance from the cooking plane must be:
- 650 mm for electric burners
- 750 mm for gas or mixed burners.
1.11
OPERATING
TYPE
-VACUUM (A) (OPTIONAL)
The air is vacuumed by the motor passes through the metallic filters that
retain the grease present in the fumes and gets expelled to the exterior
through a piping suitably dimensioned on the basis of vacuum power.
-FILTERING (B)
The air is vacuumed by the motor, passes through the activated carbon
filters that absorb odors and is recirculated in the kitchen environment.
1.12
ELECTRICAL
INSTALLATION
AND
CONNECTION
For line and frequency voltage consult the serial plate posted inside
the equipment and ceck the compatibilty with your power network.
If the current socket is not accessible, the hood
must be connected to an omnipolar magnetothermic switch
with a contact opening of no less than 3 mm.
10
1.14
USE AND MAINTENANCE
It is advisable to turn on the hood shortly before starting to cook and leave it on for approx. 15 minutes after or at least until
the smell is completely removed.
Disconnect electrical current during maintenance.
The maintenance of external parts is a simple cleaning
of the surfaces with a damp sponge, water and neutral soap.
Do not use detergents, abrasive powders or brushes.
Do not clean in any case the inside of the hood with damp sponges or water. This could cause
shortcircuiting.
STANDARD
MAINTENANCE
Standard maintenance is carried out:
PERIODICALLY on grease traps and on activated carbon filters;
OCCASIONALY on halogen spotlights for illumination.
1.15
MAINTENANCE
OF
METALLIC
FILTERS
It must be washed in hot water and detergent every 10-15 days of use.
MAINTENANCE
OF
ACTIVATED
CARBON
FILTERS
They wear out according to the operating conditions to which they are
subjected.
They cannot be washed.
Replacement is recommended at least every
SIX
MONTHS
.

11
1.17 1INSTALLATION INSTRUCTIONS
CEILING MODELS INSTALLATION
• This hood is designed to be fixed to the ceiling.
• Install the hood above the cooktop.
• The distance between the lower part of the hood and the hob must be at least 65 cm or bigger.
• Open the package containing the hood carfellully and remove all the components.
• Ensure that the ceiling or the false ceiling is strong enough to support the weight of the hood, the anchor bolts supplied
may not be compatible with your ceiling material, check the compatibility or use other anchor bolts. The manufacturer
assumes no responsibility for damage to persons or property due to failure of these rules.
INSTALLATION INSTRUCTIONS VERSION FILTERING
1. Remove the hood from the packaging, taking care to not damage the aesthetic parts.
2. Open the panel and remove the aluminum filters. (1)
3. Slightly unscrew 4 screws at the locations shown in the figure and remove the ceiling mounting brackets. Do not
completely remove the four screws from the brackets. (2) (3)
4. Create holes in the ceiling as shown in figure. (4)
5. Insert anchor bolts into the holes, make sure that the anchor plugs supplied are suitable for the material of the
ceiling or use the right anchor plugs.
6. Attach the brackets to the ceiling in the holes previously created(5), make sure that the screws in the brackets are
present and not fully tightened, leaving between the screw head and the bracket at least 10mm. (6)
7. Bring the hood towards to the ceiling and make the electrical connection. (7)
8.
Position the hood to the brakets with the panel opened.
Fit hood's holes into the bra
kets screws(8).
Move the hood body in order to fit the screws in the smaller diameter part of the hole. In order to fix it with the
brakets. (9)
9. Insert the safety plate between the screw head and the hood and fix it with a screw. Repeat that for each one of the
4 screws. (10)
10. Fully tighten the 4 fixing screws. (11)
11. Apply filters again aluminum, close the panel and check the correct functioning.

12
ANWEISUNG
ZUR
INSTALLATION,
WARTUNG
UND
GEBRAUCH
DER
DUNSTABZUGSHAUBE
EINLEITUNG
Keinesfalls vorgehen, wenn Sie nicht alle Hinweise der Bedienungsanleitung verstanden haben. Im Zweifelsfall
immer den Eingriff vom Fachpersonal anfordern.
DER HERSTELLER behält sich das Recht vor, Änderungen an den Maschinen und an den Spezifikationen
jederzeit und ohne vorherige Ankündigung vorzunehmen.
DIE ANLEITUNGEN IN DIESEM HANDBUCH SIND EIGENTUM DES HERSTELLERS UND DÜRFEN WEDER
GANZ NOCH TEILWEISE OHNE VORHERIGE GENEHMIGUNG DES HERSTELLERS REPRODUZIERT
WERDEN..
VERWENDETE
SYMBOLE
HINWEIS:
Dieses Symbol weist auf nützliche Informationen zur Bedienung der Dunstabzugshaube
hin.
VORSICHT:
Dieses Symbol weist auf Informationen hin, die Ihre besondere Aufmerksamkeit
erfordern.
GEFAHR:
Dieses Symbol weist auf wichtige Sicherheitsvorschriften zur Verhütung von Personen-
und/oder Sachschäden hin.
VORWORT
1.1
ZWECK
UND
INHALT
DER
BEDIENUNGSANLEITUNG
SCOPO
E
CONTENUTO
DEL
MANUALE
Zweck dieser Bedienungsanleitung ist es, dem Bediener die nötigen Grundlagen zu liefern, um für
einen korrekten, sicheren und dauerhaften Gebrauch der Dunstabzugshaube die geeigneten
Massnahmen zu treffen.
Diese Bedienungsanleitung enthält alle für die Installation, den Gebrauch und die Wartung der Dunstabzugshaube
nötigen Informationen.
Die gewissenhafte Beachtung der in dieser Bedienungsanleitung enthaltenen Anweisungen ist Voraussetzung für
einen sicheren Gebrauch und eine lange Lebensdauer des Gerätes.
1.2
AUFBEWAHRUNG
UND
BENÜTZUNG
DIESER
BEDIENUNGSANLEITUNG
Diese Bedienungsanleitung muss zum späteren Nachlesen an einem trockenen, sicheren und für den Bediener
und das Wartungspersonal zugänglichen Ort aufbewahrt werden.
Dieser Bedienungsanleitung ist fester Bestandteil des Gerätes und muss deshalb für die ganze Lebensdauer des
Gerätes aufbewahrt werden.
1.3
AKTUALISIERUNG
DER
BEDIENUNGSANLEITUNG
Diese Bedienungsanleitung beschreibt den technologischen Stand des Gerätes am Zeitpunkt der Markteinführung
des Gerätes.
Die bereits am Markt befindlichen Geräte und deren technische Dokumentation werden von dem HERSTELLER
nach eventuellen Änderungen, Anpassungen oder Anwendung neuer Technologien für neue Geräte nicht als
überholt bzw. ungeeignet angesehen.
1.4
ALLGEMEINE
INFORMATIONEN
Informationen
Bei Nachfragen beim Hersteller immer die Seriennummer und die Identifikationsdaten angeben.
Mit der Übergabe dieser Bedienungsanleitung weist DER HERSTELLER jede sowohl zivil- als auch
strafrechtliche Haftbarkeit für allfällige Personen- oder Sachschäden zurück, die durch vollständige
oder teilweise Nichtbeachtung dieser Bedienungsanleitung entstehen.
DER HERSTELLER weist des Weiteren jede Verantwortung für allfällige Personen- oder Sachschäden zurück, die
in den folgenden Fällen auftreten:
- bei unzweckmässigem oder nicht korrektem Gebrauch des Gerätes seitens des Benutzers
- bei unbefugten Änderungen bzw. Reparaturen
13
- bei dem Einsatz von Nicht-Originalersatzteilen oder nicht spezifisch für dieses Modell geeigneten Ersatzteilen.
Gebrauch
Der Gebrauch der Haube unterliegt nicht nur den Anweisungen dieser Bedienungsanleitung, sondern
auch der Beachtung aller im Installationsland geltenden Sicherheitsnormen.
1.5
KONFORMITÄT
MIT
GELTENDEN
NORMEN
UND
GESETZEN
Dieses Gerät entspricht den folgenden Richtlinien:
A) 73/23/EWG (Niederspannung).
B) 89/336/EWG (elektromagnetische Verträglichkeit)
Dieses Gerät entspricht ausserdem der europäischen Richtlinie 2002/95/EWG (RoHs – Restriction of Hazardous
Substances) hinsichtlich der Beschränkung der Verwendung bestimmter gefährlicher Stoffe bei der Herstellung von
Elektro- und Elektronikgeräten und der WEEE-Richtlinie 2002/96/EWG (Waste Electrical and Electronic
Equipment), die die Entsorgung von Elektro- und Elektronikaltgeräten regelt.
Die durchgestrichene Mülltonne auf dem Gerät oder auf den Begleitpapieren bedeutet, dass dasProdukt nicht
über den Hausmüll entsorgt werden darf, sondern nach den örtlich gültigen Gesetzen
und Vorschriften weiterverwertet oder entsorgt werden muss.
1.6
GARANTIE
Der Benutzer kann nur dann die vom Hersteller gegebene Garantie in Anspruch nehmen, wenn er die in der
vorliegenden Bedienungsanleitung enthaltenen Vorschriften genau beachtet. Insbesondere muss er:
- sich immer an die Einschränkungen für den Gebrauch der Haube halten;
- die Haube konstant und sorgfältig instandhalten;
- die Haube nur von Personal mit geeigneten Kenntnissen und Fähigkeiten bedienen lassen.
Die Garantieleistung entfällt bei Nichtbeachtung der in der vorliegenden Bedienungsanleitung enthaltenen
Anweisungen.
Ausserordentliche
Wartung
Die ausserordentlichen Wartungsarbeiten müssen von Fachpersonal, das für den Eingriff auf dem in dieser
Bedienungsanleitung beschriebenen Dunstabzugshaube-Modell befugt ist, ausgeführt werden.
1.7
HAFTBARKEIT
Der Hersteller lehnt jede zivil- und strafrechtliche Verantwortung für Personen- und Sachschäden ab, die in den
folgenden Fällen entstehen:
- bei Gebrauch, der nicht mit den im Installationsland geltenden Normen übereinstimmt;
- bei Nichtbeachtung der in dieser Bedienungsanleitung enthaltenen Anweisungen;
- bei Gebrauch von Personen, die mit dem Gerät nicht vertraut sind;
- bei Nichteinhaltung der Sicherheitsvorschriften;
- bei an der Haube vorgenommenen Änderungen bzw. Reparaturen, die von dem Hersteller nicht befugt wurden;
- bei Einsatz von Nicht-Originalersatzteilen oder Ersatzteilen, die für das Abzugshaube-Modell ungeeignet sind;
- bei mangelhafter Wartung;
- bei aussergewöhnlichen Ereignissen;
- bei Anwendung der Richtlinie 85/374/EWG (Haftung für fehlerhafte Produkte)
1.8
ERSATZTEILE
Ausschliesslich Original-Ersatzteile verwenden.
Vor dem Austausch gewisser Bestandteile nicht erst abwarten, bis sie komplett abgenutzt sind. Die regelmässigen
Kontrollen zur Instandhaltung laut Kapitel „WARTUNG” durchführen.
1.9
SICHERHEITSHINWEISE
- Zubereitungsmethoden, bei denen kurzzeitig eine Flamme entsteht (z.B. Flambieren) sind unter der
Dunstabzugshaube strengstens untersagt.
Falls die Haube und andere, nicht mit elektrischer Energie betriebene
Geräte (z.B. Holzöfen, gas-, öl- oder kohlebetriebenen Heizgeräten) gleichzeitig in einem Raum benutzt werden, muss di
eser gut belüftet
werden. Falls der Abluftschacht lange nicht benutzt wurde und Sie die Haube mit Abluftbetrieb einschalten möchten, üb
erprüfen Sie den Zustand des Schachtes. Informieren Sie sich bei der Verwendung der Haube mit Abluftbetrieb über di
e einschlägigen örtlichen Normen und behördlichen Vorschriften. Entfernen Sie sich beim Frittieren niemals vom Herd:
das Öl im Topf bzw. in der Pfanne könnte sich überhitzen und entflammen. Bei der Wiederverwendung von Speiseöl er
höht sich das Risiko der Selbstentzündung. Um Brandgefahr zu vermeiden ist es nötig, den Ventilatorflügel und die a
nderen Oberflächen oft reinigen.

14
- Es ist wichtig, jeden in der Haube befindlichen Filter regelmässig zu ersetzen.
- Für den Abluftanschluss niemals einen in Betrieb befindlichen Rauch
- oder Abgaskamin oder einen Belüftungsschacht für Heizräume verwenden.
Die abgesaugte Luft darf nicht in einen Kanal, in dem Warmluft zirkuliert, abgeleitet werden.
Falls im Raum sowohl die Abzugshaube als Geräte benutzt werden, die nicht mit Elektroenergie betrieben werden, ist für
eine ausreichende Belüftung zu sorgen. Ein richtiger Einsatz ohne Risiken liegt vor, wenn der maximale Unterdruck im
Raum 4 Pa (4x10 bar) nicht überschreitet.
1.10
MONTAGEANLEITUNG
Die Haube muss stets über der Mitte der Kochstelle angebracht werden.
Der Mindestabstand zwischen Kochstelle und Dunsthaube muss folgendes betragen:
- 650 mm bei Elektroherden
- 750 mm bei Gas- oder Kombiherden.
1.11
BETRIEBSARTEN
-HAUBE
MIT
ABLUFTBETRIEB (A)
(OPT ONAL)
Bei dieser Ausführung strömt der während des Kochens enstehende
Dampf durch die Metall-Fettfilter in ein Abzugsrohr, in dem er nach
aussen abgeführt wird.
-HAUBE
MIT
UMLUFTBETRIEB (B)
Bei dieser Ausführung strömt die Luft durch Aktivkohlefilter, wo sie
gefiltert und erneut an den Raum abgegeben wird.
1.12
ELEKTRISCHER
ANSCHLUSS
Überprüfen Sie, das die Spannung und die Frequenz Ihres
Hausanschlusses mit dem auf dem Typenschild angegebenen
übereinstimmt.
Wenn die Haube nicht an eine gut zugängliche Steckdose
angeschlossen werden kann, muss in der Installation vom Netz eine
allpolige Trennvorrichtung mit Kontaktweiten von mindestens 3 mm
vorgesehen werden.

15
Für die Reinigung der Aussenteile einen feuchten Schwamm mit Wasser und milden Reinigungsmitteln
verwenden.
Keine Scheuermittel oder Bürsten verwenden.
Für die Reinigung der Innenteile der Haube sind Wasser oder feuchter Schwämme auf keinen Fall zu
verwenden, weil es zu Kurzschlüssen kommen kann.
ORDENTLICHE
WARTUNG
Die ordentliche Wartung kann regelmässig oder gelegentlich durchgeführt werden:
Die Wartung von Metall-Fettfiltern und Aktivkohlefiltern REGELMÄSSIG durchführen;
Die Wartung von Halogenstrahlern GELEGENTLICH durchführen.
1.15
WARTUNG
DER
METALLFILTER
Die Metallfilter sollen alle 10-15 Tage in lauwarmen Wasser mit milden Reinigungsmitteln gereinigt
werden.
WARTUNG
DER
AKTIVKOHLEFILTER
Die Lebensdauer der Aktivkohlefilter hängt von der Art des Gebrauchs ab.
Sie sind nicht waschbar.
Es ist ratsam, sie wenigstens alle
SECHS
MONATE
zu ersetzen
.

16
INSTALLATION DECKENLUEFETER
mit regulierbare Klammern eingestellt werden
- Die Haube ist konzipiert , um an der Decke befestigt werden.
- Installieren Sie die Haube über dem Kochfeld.
- Die Mindesthöhe zwischen der Haube und dem Kochfeld darf nicht weniger als 65 cm sein.
- Öffnen Sie die Verpackung mit der Haube und entfernen Sie die Komponenten.
- Stellen Sie sicher fest, dass die Decke oder die abgehängte Decke stark genug ist, um das Gewicht der
Haube zu unterstützen. Überprüfen Sie ob die mit gelieferten Verankerungsdübel , mit Ihrer Decke oder
Decken Abdeckung geeignet sind. Eventuell müssten Sie geeignete Dübel auffinden.
- Der Hersteller übernimmt keine Verantwortung für Schäden an Personen oder Sachen, die
durch "Nichteinhaltung“ dieser Vorschriften entstehen sollten.
BAUANLEITUNG UMLUFT VERSION
1. Die Haube aus der Verpackung nehmen, achten Sie das sich die ästhetischen Komponenten nicht
beschädigen.
2. Öffnen Sie den Panel und entfernen Sie die Filter.(1)
3. Lockern Sie die 4 Schrauben in der Abbildung gezeigten Positionen und entfernen Sie die
Montagehalterungen an der Decke. Die vier Schrauben nicht vollständig von den Klammern
entfernen.(2)(3)
4. Auf der Decke Löchern Erstellen so wie nach Abbildung. (4)
5. Setzen Sie die Dübeln in den Löcher, Überprüfen Sie ob die mit gelieferten Verankerungsdübel, fuer Ihre
Decke oder Decken Abdeckung geeignet sind. Anderseits müssten Sie geeignete Dübel auffinden.
6. Bringen Sie die Halterungen an der Decke in den zuvor erstellten Löcher(5), prüfen Sie , dass die
Schrauben in den vorhandenen Klammern nicht vollständig angezogen sind, so dass zwischen dem
Schraubenkopf und dem Träger mindestens 10mm Abstand findet. (6)
7. Bringen Sie die Haube an der Decke und stellen die elektrische Verbindung an. (7)
8. Nähern Sie die Haube mit geöffneten Panel an den zuvor eingebauten Halterungen an der Decke . Die
Schrauben mittig in den Klammer setzen mit den beinstimmenden Löchern der Haube.(8) Verstellen Sie
den Hauben Körper so dass die Schrauben in den kleineren Teil des Lochs enden. (9)
9. Setzen Sie die Sicherheitsplatte zwischen dem Schraubenkopf und der Haube und fixieren Sie diese mit
einer Schraube. Wiederholen Sie die folge mit den 4 vorhandenen Schrauben. (10)
10. Die 4 Befestigungsschrauben fest anziehen. (11)
11. Die Aluminium Filter wieder aufsetzten, schließen Sie den Panel und überprüfen Sie die
ordnungsgemäße Funktion.
17
VERS ONE F LTRANTE -
HOOD N F LTER NG MODE - HAUBE M T UMLUFTBETR EB
1
2
18
3
4

19
5
6
7

20
8
9
Table of contents
Languages:
Other ESISTYLE Ventilation Hood manuals


