TBS technologies TBS2603 User manual

1/ 22
User Guide-TBS2603
Contents
1. Overview………………………………………………………………………………....2
1.1 Application……………………………………………………………………………………………….2
1.2 Technical Specification………………………………………………………………………………2,3
2. Settings………………………………………………………………………………………3
2.1 IP setting..................................................................................................3
2.2 Network Setting.......................................................................................4
2.3 HDMI Main Stream Setting.......................................................................4,5,6
2.4 HDMI Second Stream Setting....................................................................6,7
2.5 Audio Expand...........................................................................................7
2.5.1 Audio Setting……………………………………………………………………………………….8
2.5.2 HDMI OSD Setting.................................................................................9
2.5.3 HDMI color Setting………………………………………………………………………………10
2.5.4 CVBS OSD Setting…………………………………………………………………………………11
2.5.5 CVBS color Setting………………………………………………………………………………..12
2.5.6 Image Setting………………………………………………………………………………………..13
2.6 System ......................................................................................................13
2.6.1 System settings.......................................................................................13,14
2.6.2 Change Password....................................................................................14
2.6.3 Upgrade settings.....................................................................................14,15,16,17
2.6.4 Version………………………………………………………………………………………………….17
2.7 RTMP protocol setting………………………………………………………………………………18,19
3. Status………………………………………………………………………………………….19,20,21,22

2/ 22
1. Overview
TBS2603 H.265/H.264 HD HDMI encoder is a professional high-definition video
coding box, which equipped with 1 HDMI channel input and dual stream RJ45 output.
TBS2603 supports MPEG-4 AVC/H.264/H.265 High Profile code format input and dual
stream H.264/H.265 format, audio AAC format output.
1.1Application
---- IPTV;
---- Digital Signage;
---- Video Conference;
---- Replace HD Video Capture Card;
---- Hotel TV system;
---- Live Broadcast;
----Teaching/Campus Broadcast;
---- Recording System;
---- NVR (Net Video Recorder);
1.2 Technical Specification
Video
Input
1x HDMI (1.3a)
HDMI
Resolution
1920×1080_60i/60P, 1920×1080_50i, 1280×720_60p,
1280×720_50p and below
Encoding
H.264/AVC Main Profile/High Profile ; H.265/HEVC Baseline
Profile; Audio AAC
Data Rate
0.8Mbps~12Mbps
Rate Control
CBR/VBR
GOP Structure
IBBP
Advanced
Pretreatment
De-interlacing, Noise Reduction, Sharpening
Audio
Encoding
AAC, MP3
Sampling rate
Auto
Bit-rate
48K/64K/96K/128K/160K/192K/256k
Sampling precision
16bit
Data Rate
64Kb/s ~ 384Kb/s
3/ 22
System
Ethernet/RJ45
1000 Base-T Ethernet interface
Protocol
HTTP, UDP, RTP, RTSP, RTMP, ONVIF(not yet)
Control
Interface
WEB
General Spec
Dimensions
115mm*75*25mm
Weight
170g(NW), 560g(GW)
Working
Temperature
0~45℃
2. Settings
On WEB setting page, modifying IP address of the computer is needed. Default IP
address of the HDMI HD encoder is 192.168.1.168
Reset & Initialization: When the HDMI HD encoder is powered up, you can reset and
initialize it by pressing & holding the RST button for 10 seconds, then it will restart
automatically. And IP address will be initialized to 192.168.1.168
2.1 IP setting
Computer IP address: 192.168.1.* (Note: "*" is any number ranging from 0 to 254
except 168 )
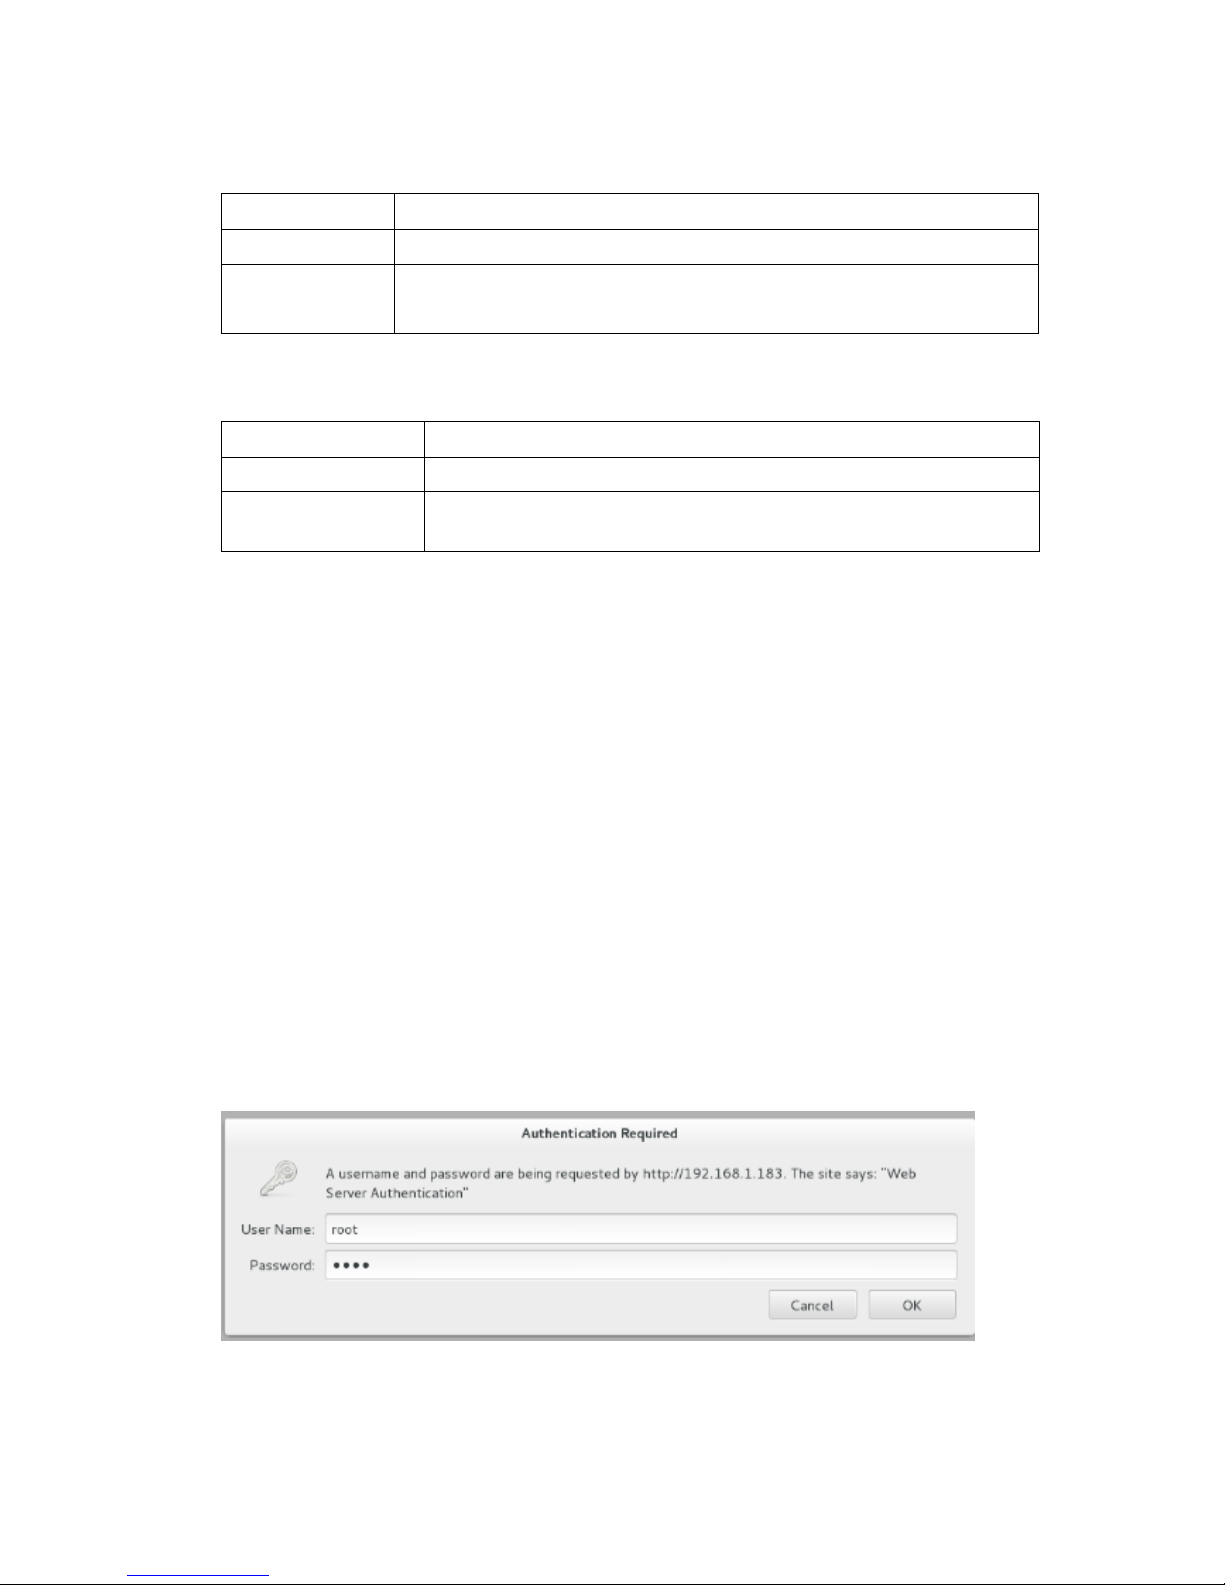
Open up IE, input "192.168.1.168" to go to WEB interface with User
Name: root and Password: root
4/ 22
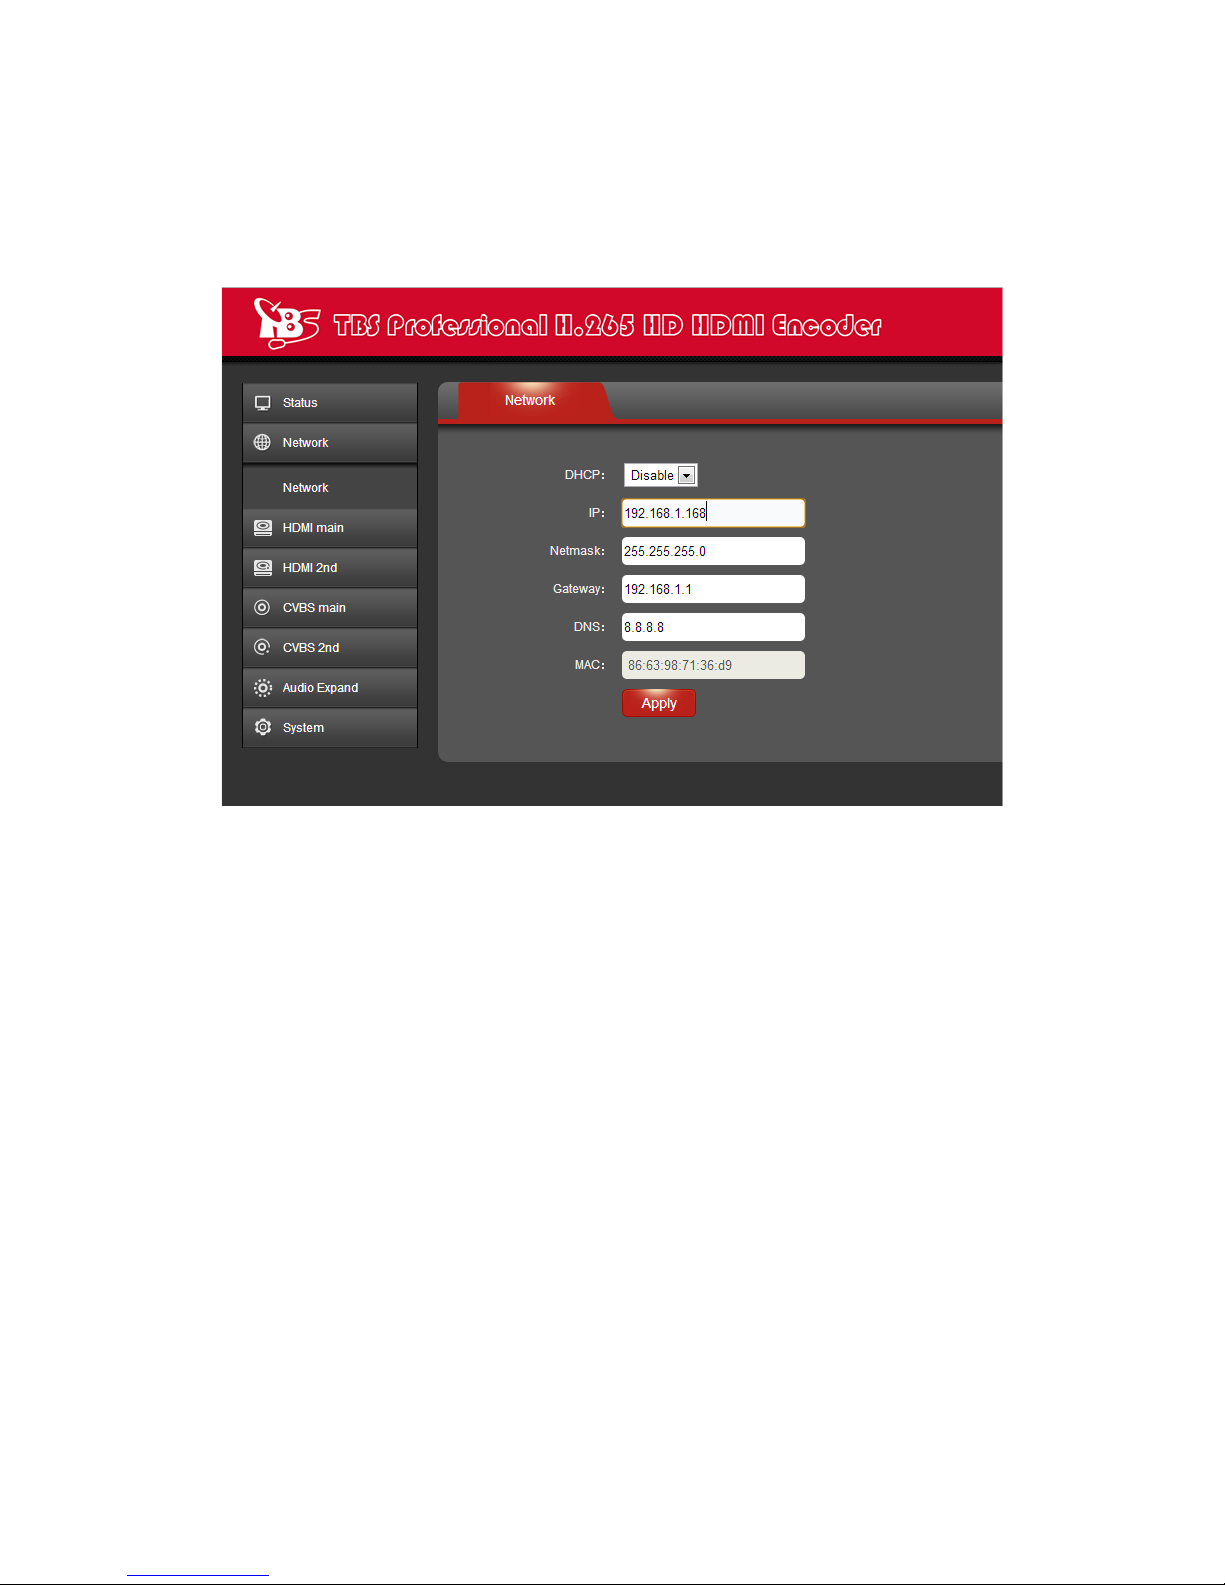
2.2 Network Setting
Default IP address is 192.168.1.168.If you forget the IP
address after changing it, please press the RST button for 10 seconds to restart it
when the machine is powered up, then it will restore factory default settings.
Notes: After network setting is done, you need to reboot the device to make it
work.
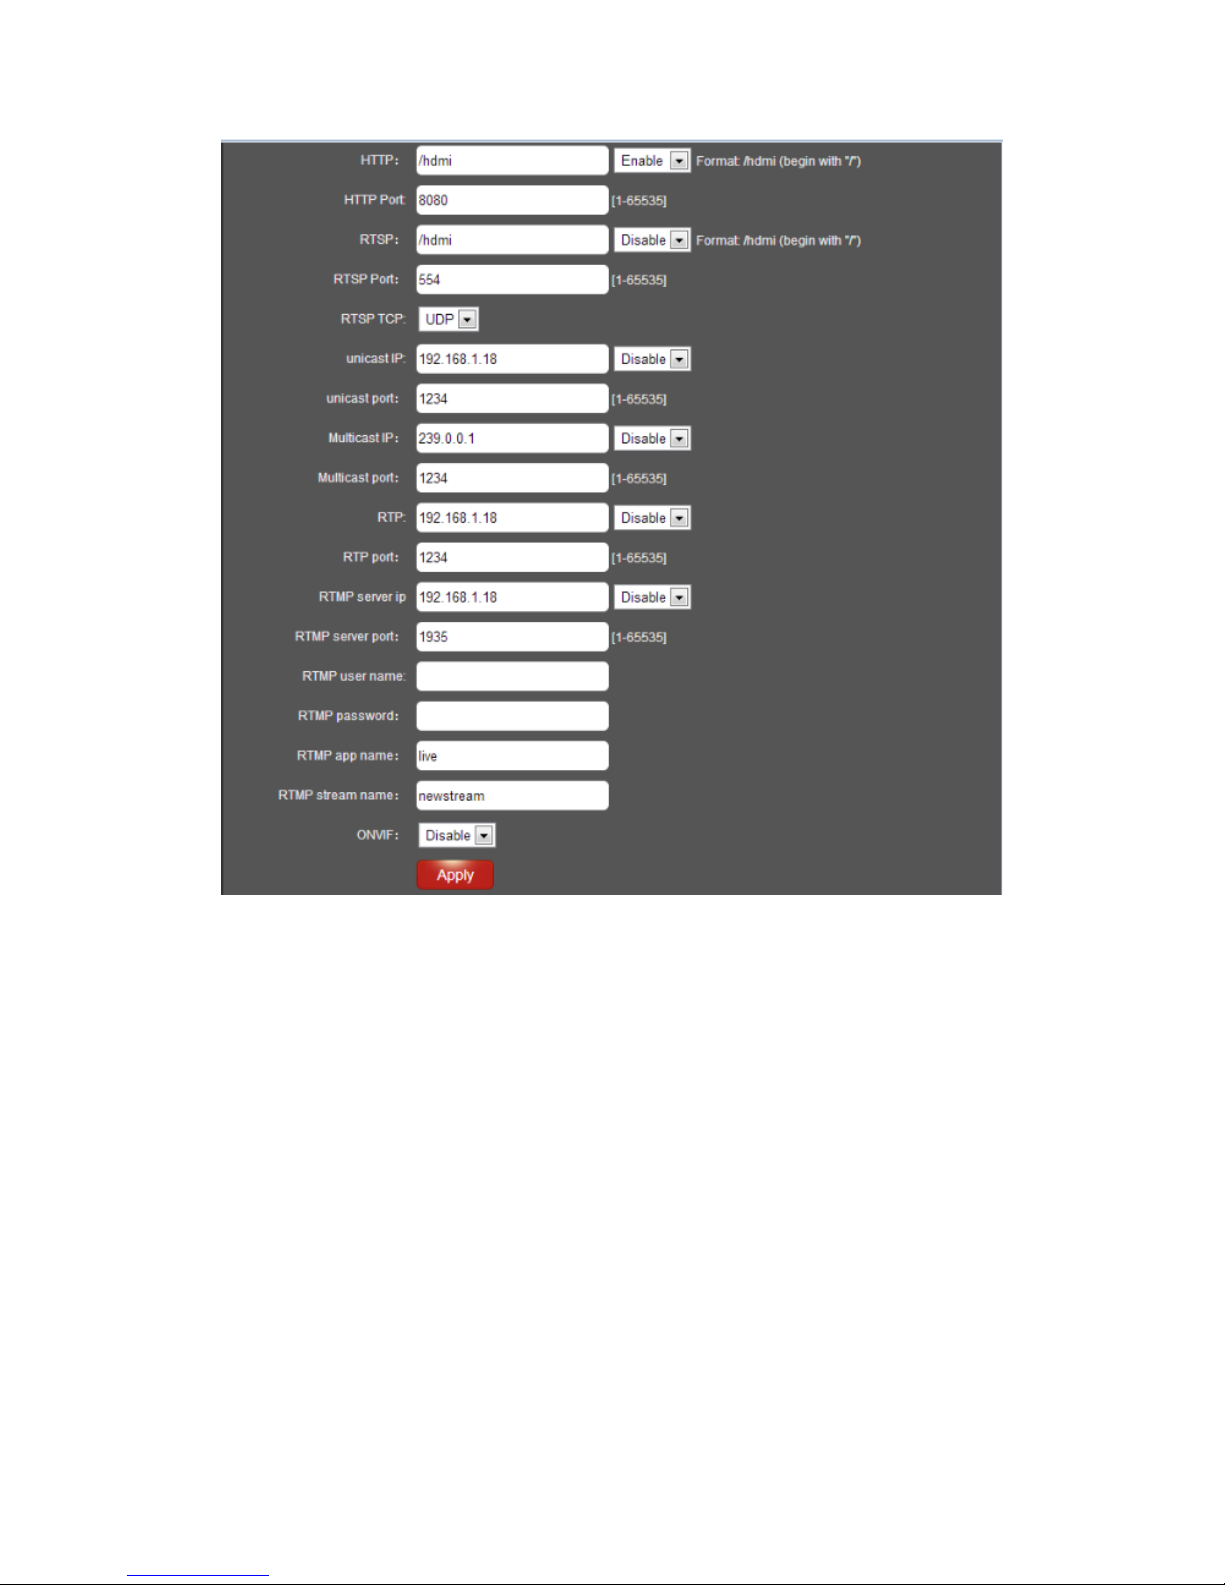
2.3 HDMI Main Stream Setting
You can enable HTTP, RTSP, unicast IP, Multicast IP, RTP or RTMP server ip for your
preference, and after all the data are filled in, please remember to click on button
"Apply".

5/ 22
Notes: Above data can be adjusted based on your practical application.
6/ 22
2.4 HDMI Second Stream Setting
HDMI second stream setting is similar with HDMI main encoding setting, but this
HDMI Encoder does not have CVBS interface, so CVBS main and CVBS second steam
setting are not needed.

7/ 22
Notes: Above data can be adjusted based on your practical application.
Notes: Above configuration parameter is the same with main stream
2.5 Audio Expand
You can modify "Audio Setting", "HDMI OSD Setting", "CVBS OSD Setting", "HDMI
color", "CVBS color" and "Image Setting" under this section (this HDMI Encoder does
not have CVBS interface, so CVBS color setting is not needed), but if you do not want
to modify it, you can just keep the original data.
8/ 22
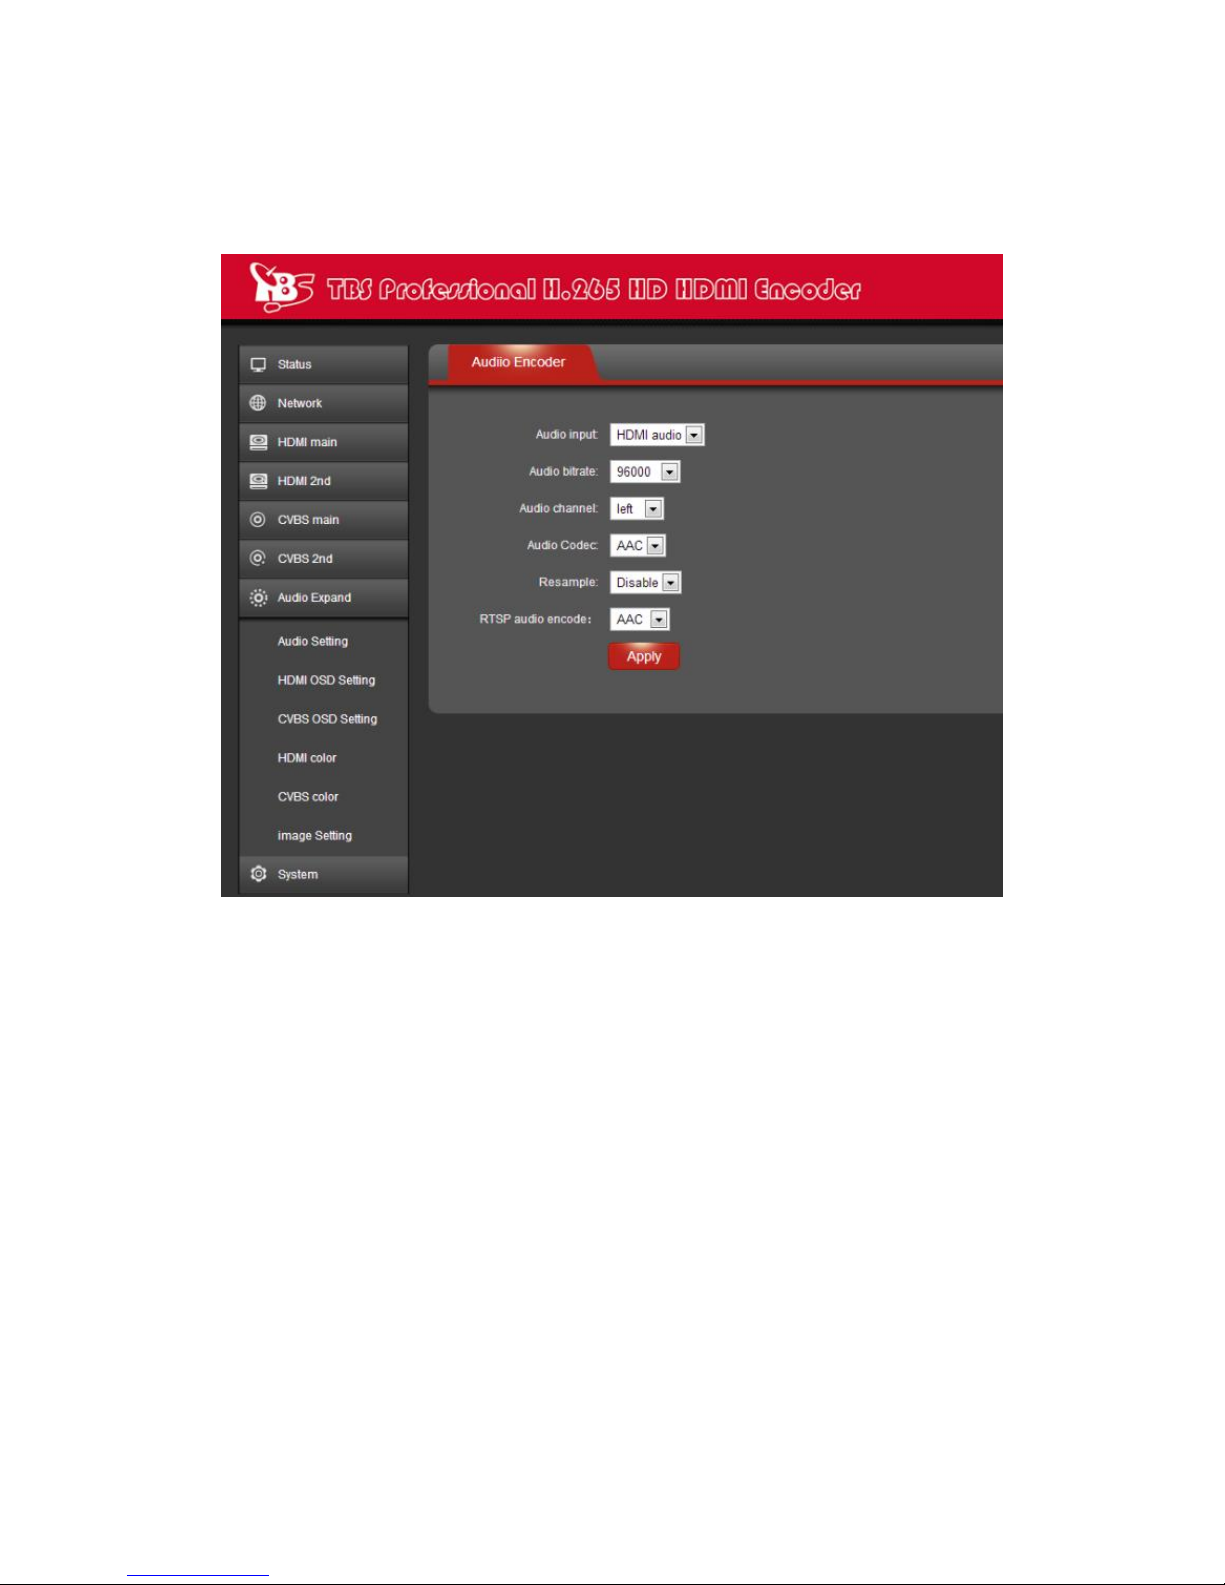
2.5.1 Audio Setting
9/ 22
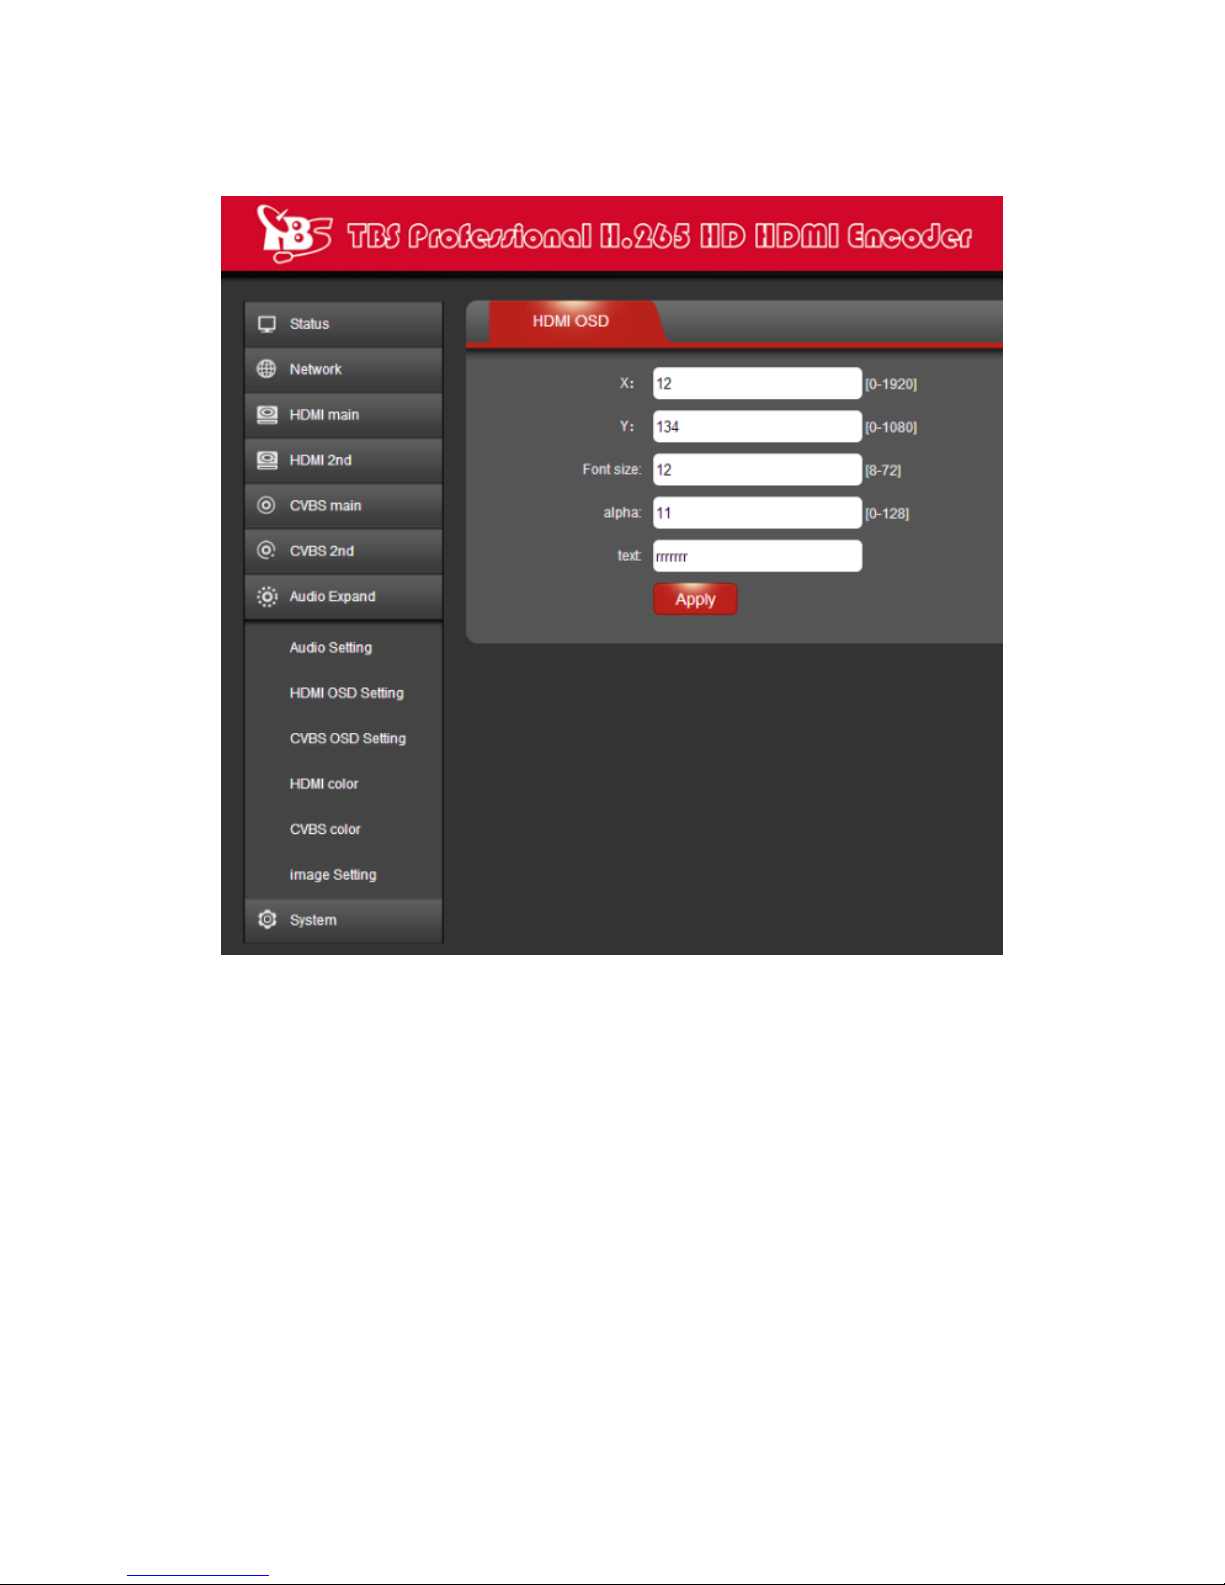
2.5.2 HDMI OSD Setting
10 / 22
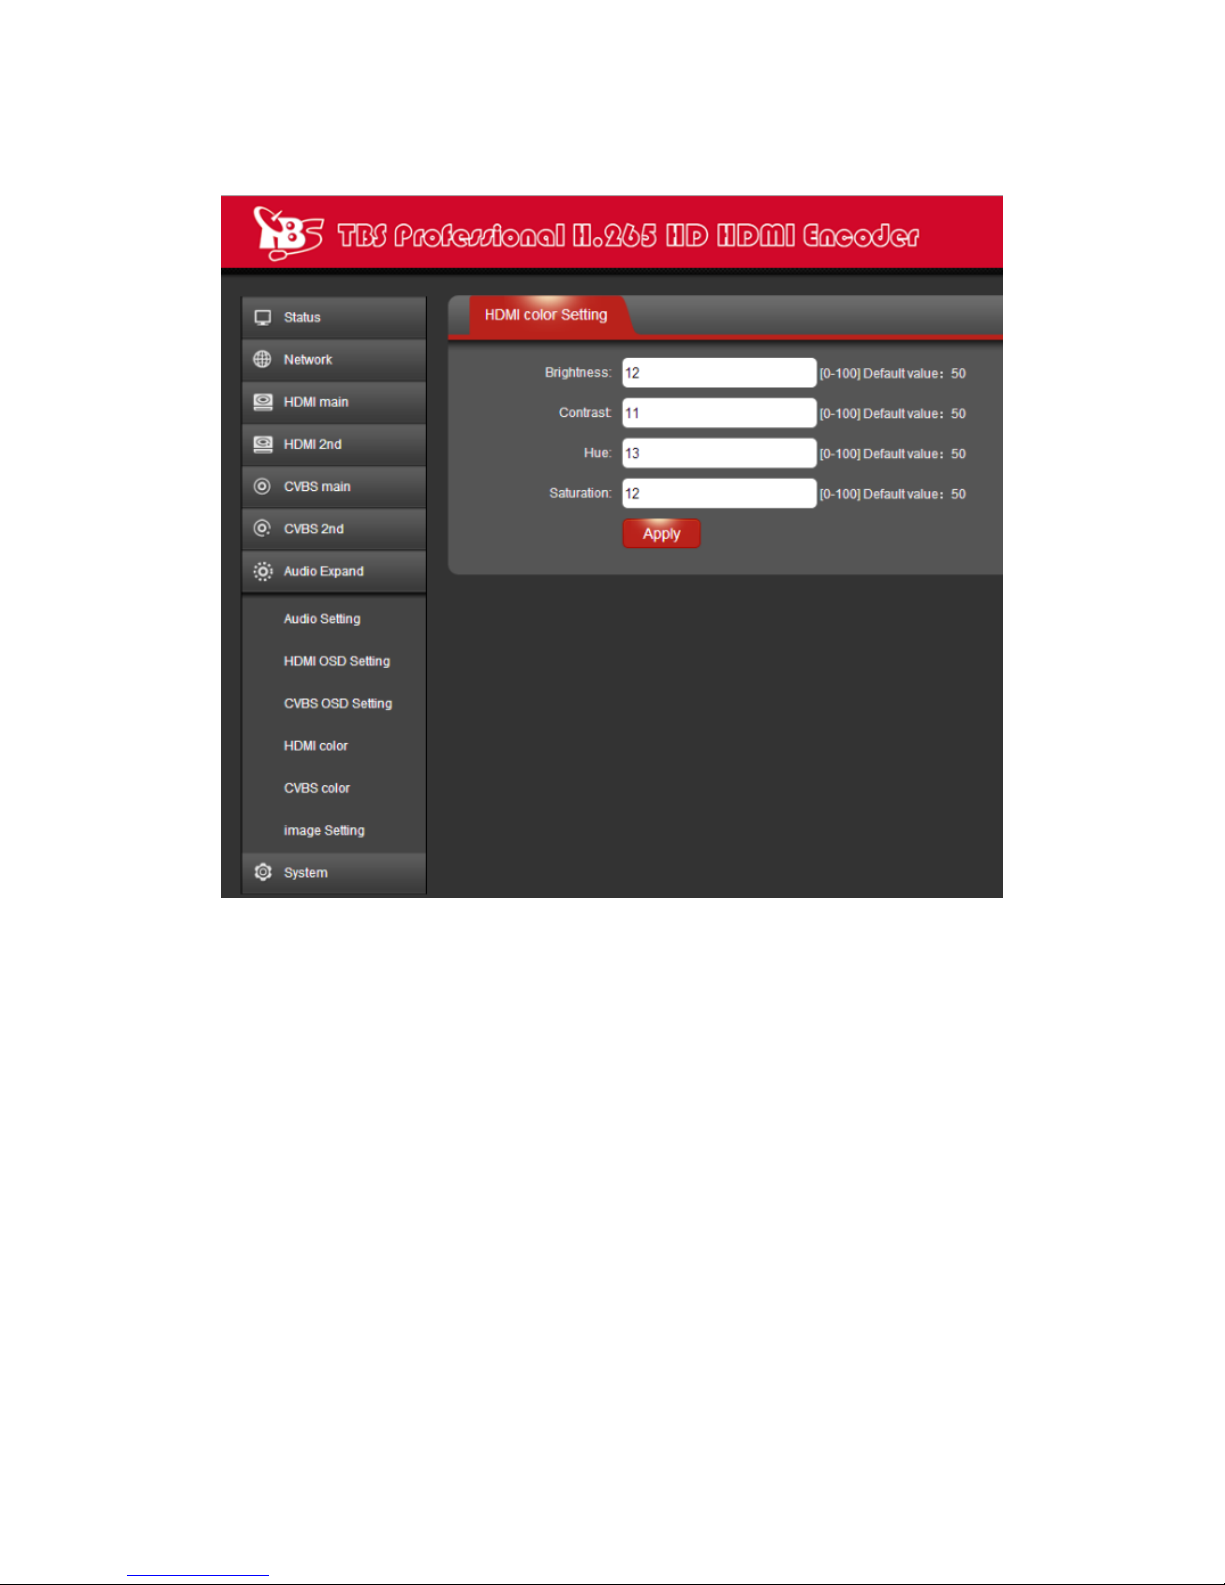
2.5.3 HDMI color Setting

11 / 22
2.5.4 CVBS OSD Setting

12 / 22
2.5.5 CVBS color Setting

13 / 22
2.5.6 Image Setting
2.6 System
You can do "System settings", "Change Password", "Upgrade settings" and check
"Version" information under this section.
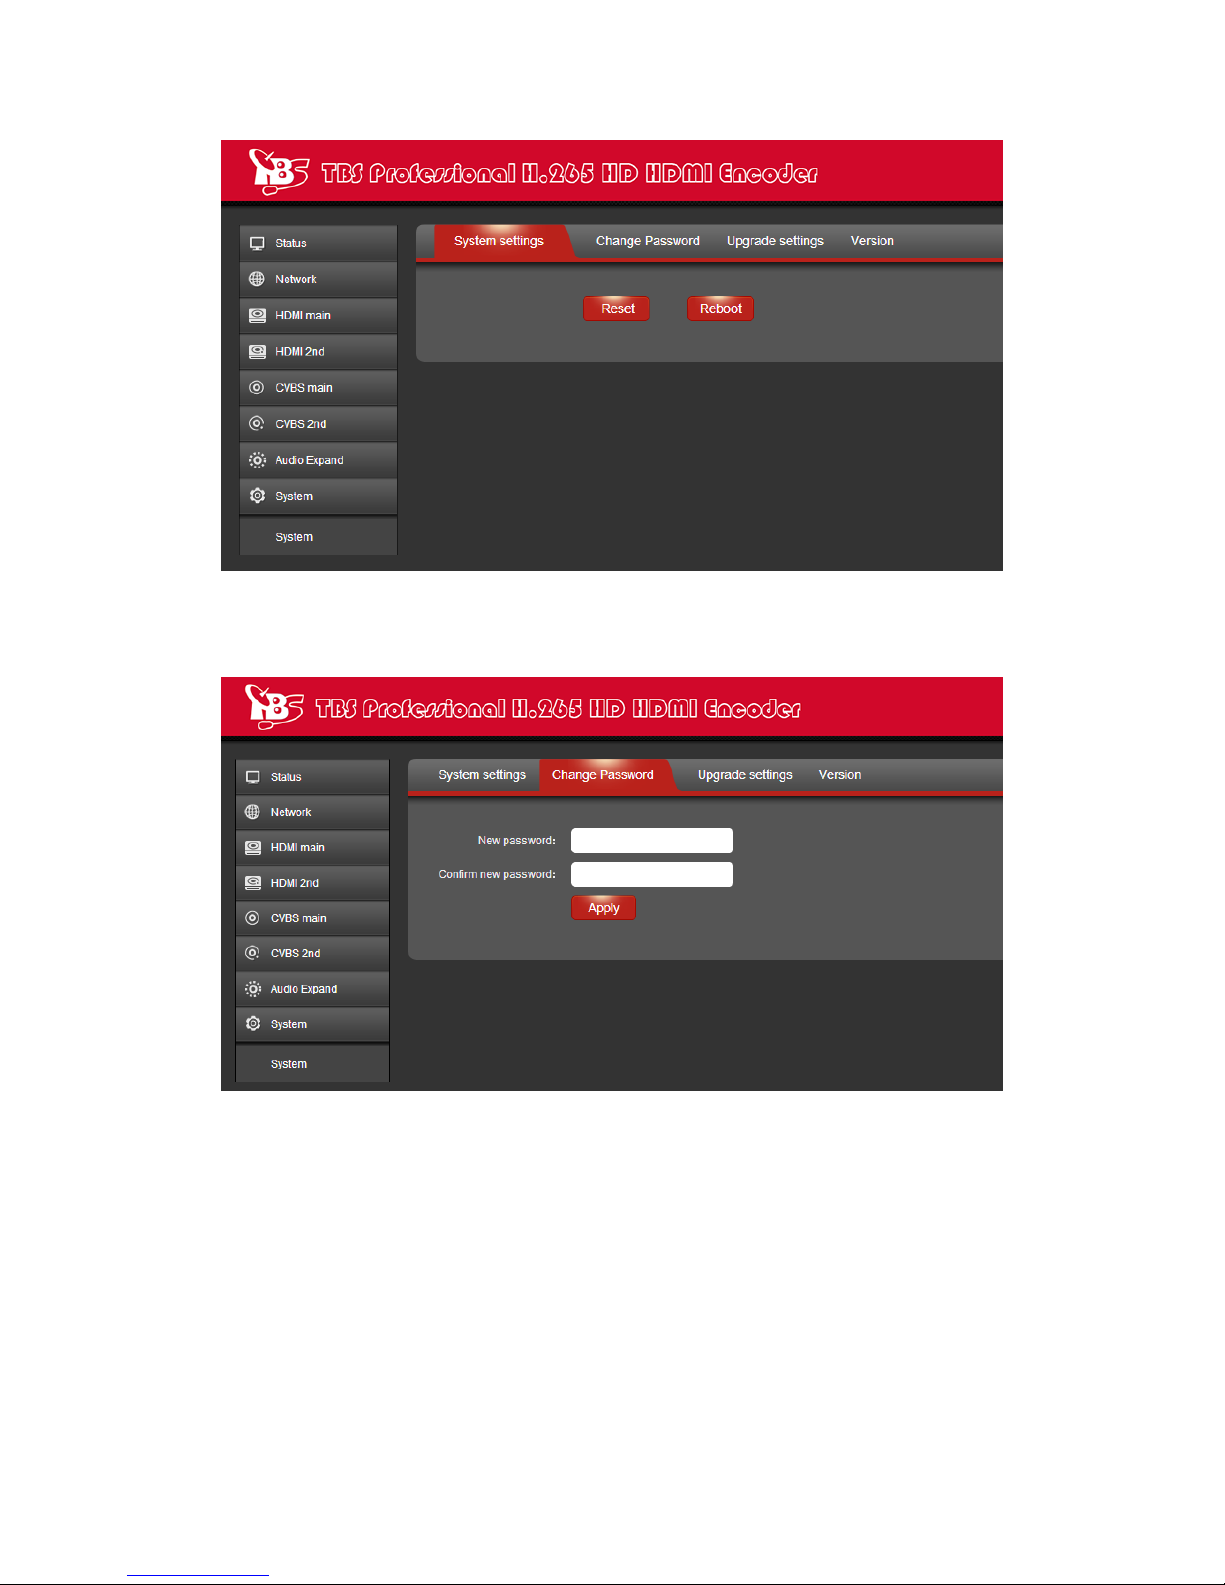
2.6.1 System settings
14 / 22
2.6.2 Change Password
2.6.3 Upgrade settings
This setting includes two steps-"upload" and "upgrade", you need to
upload the updating file first, then proceed with upgrading.
Step 1: Click button “Browse”to select the updating file in your
computer.

15 / 22
After the file is selected successfully, you will see the file name shown in
front of button “upload”, then please click “upload”to continue.
And after the file is uploaded successfully, you will see a note mentioning
successfully uploaded, then please click “OK”to continue.

16 / 22
Step 2: After the file is uploaded, please click button "upgrade", and you
will also see update status during the whole process.
After upgrade is successful, you will see a note mentioning "The system
successfully updated", then please click “OK”.

17 / 22
2.6.4 Version
You can check version information under this section.
18 / 22
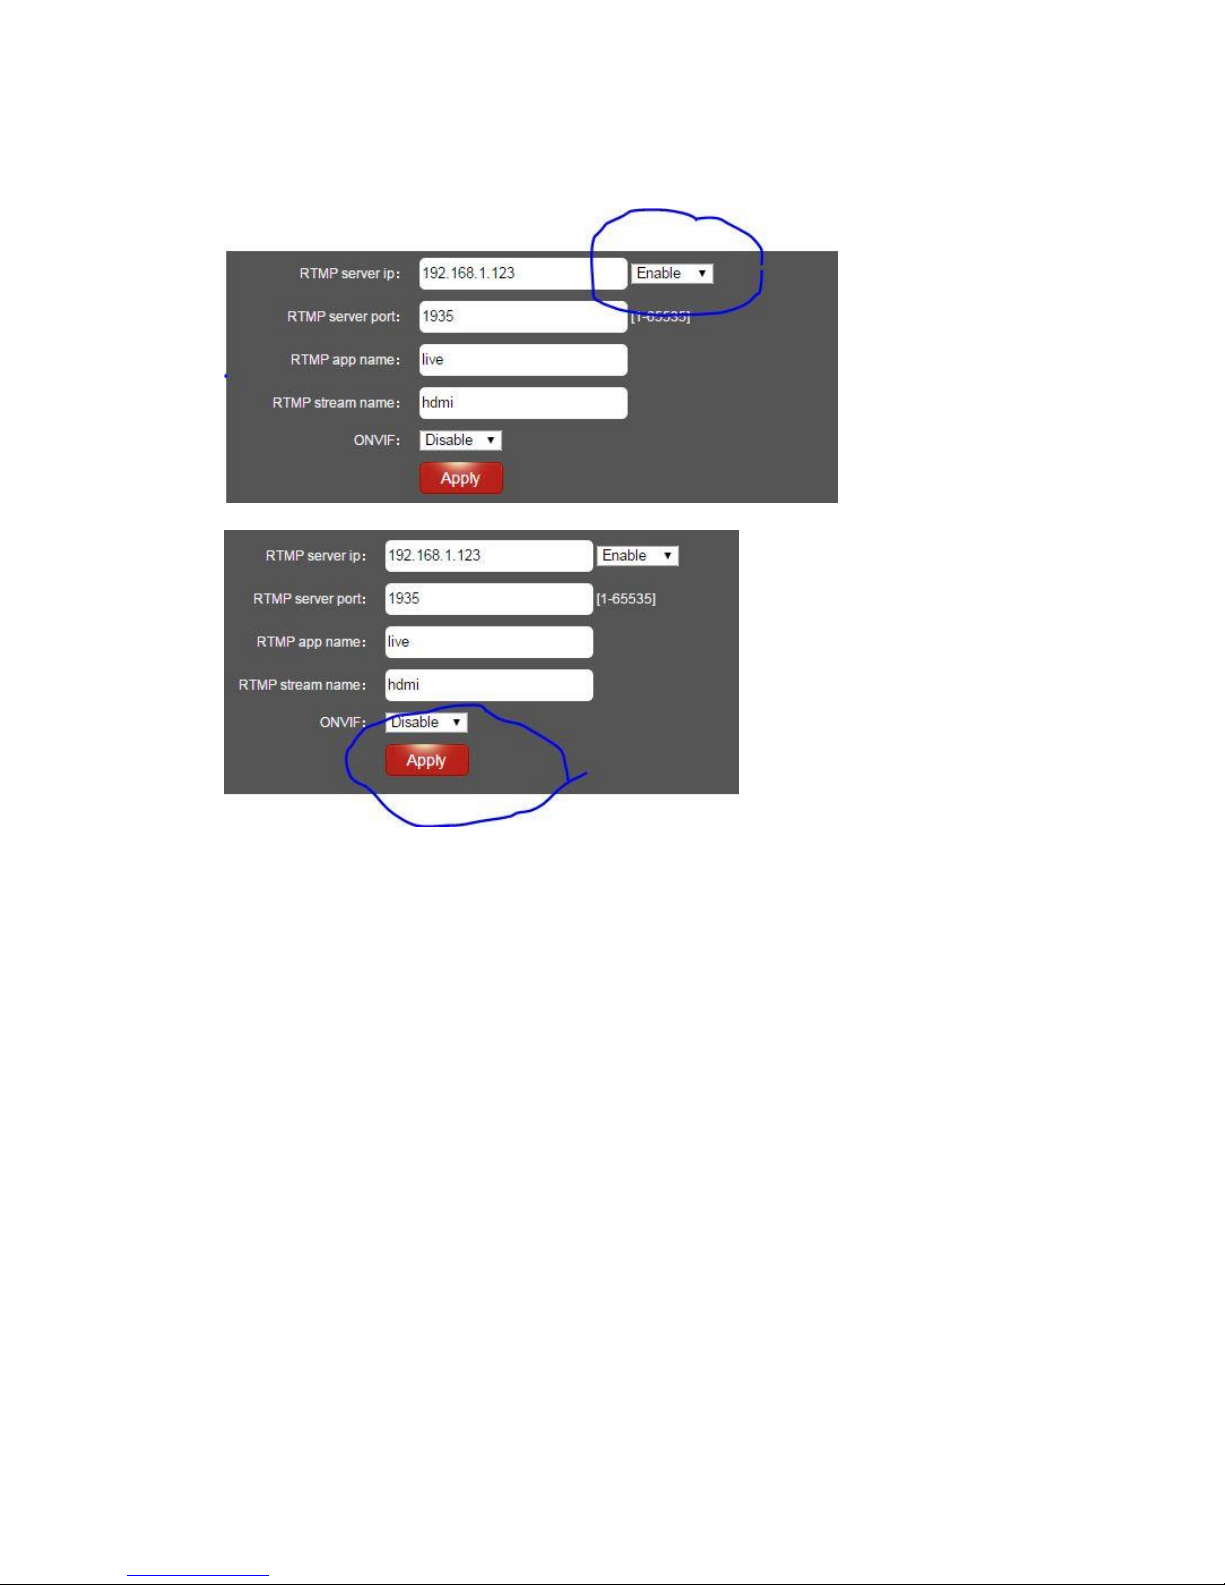
2.7 RTMP protocol setting
2.7.1 H.264/H.265 level: baseline main/ high/ profile. If you want
support RTMP, you should choose: baseline profile (H.265 only supports
baseline profile).
2.7.2 RTMP protocol: enable and able can choose
2.7.3 RTMP server IP: Input your corresponding serve IP
2.7.4 RTMP App Name: user-defined
2.7.5 RTMP stream name: user-defined
2.7.6 Sever Testing
2.7.6.1 Install the software: Flash+Media+Server 3.5, there is no need to input series
number, both user name and password are 1
2.7.6.2 Start the background software
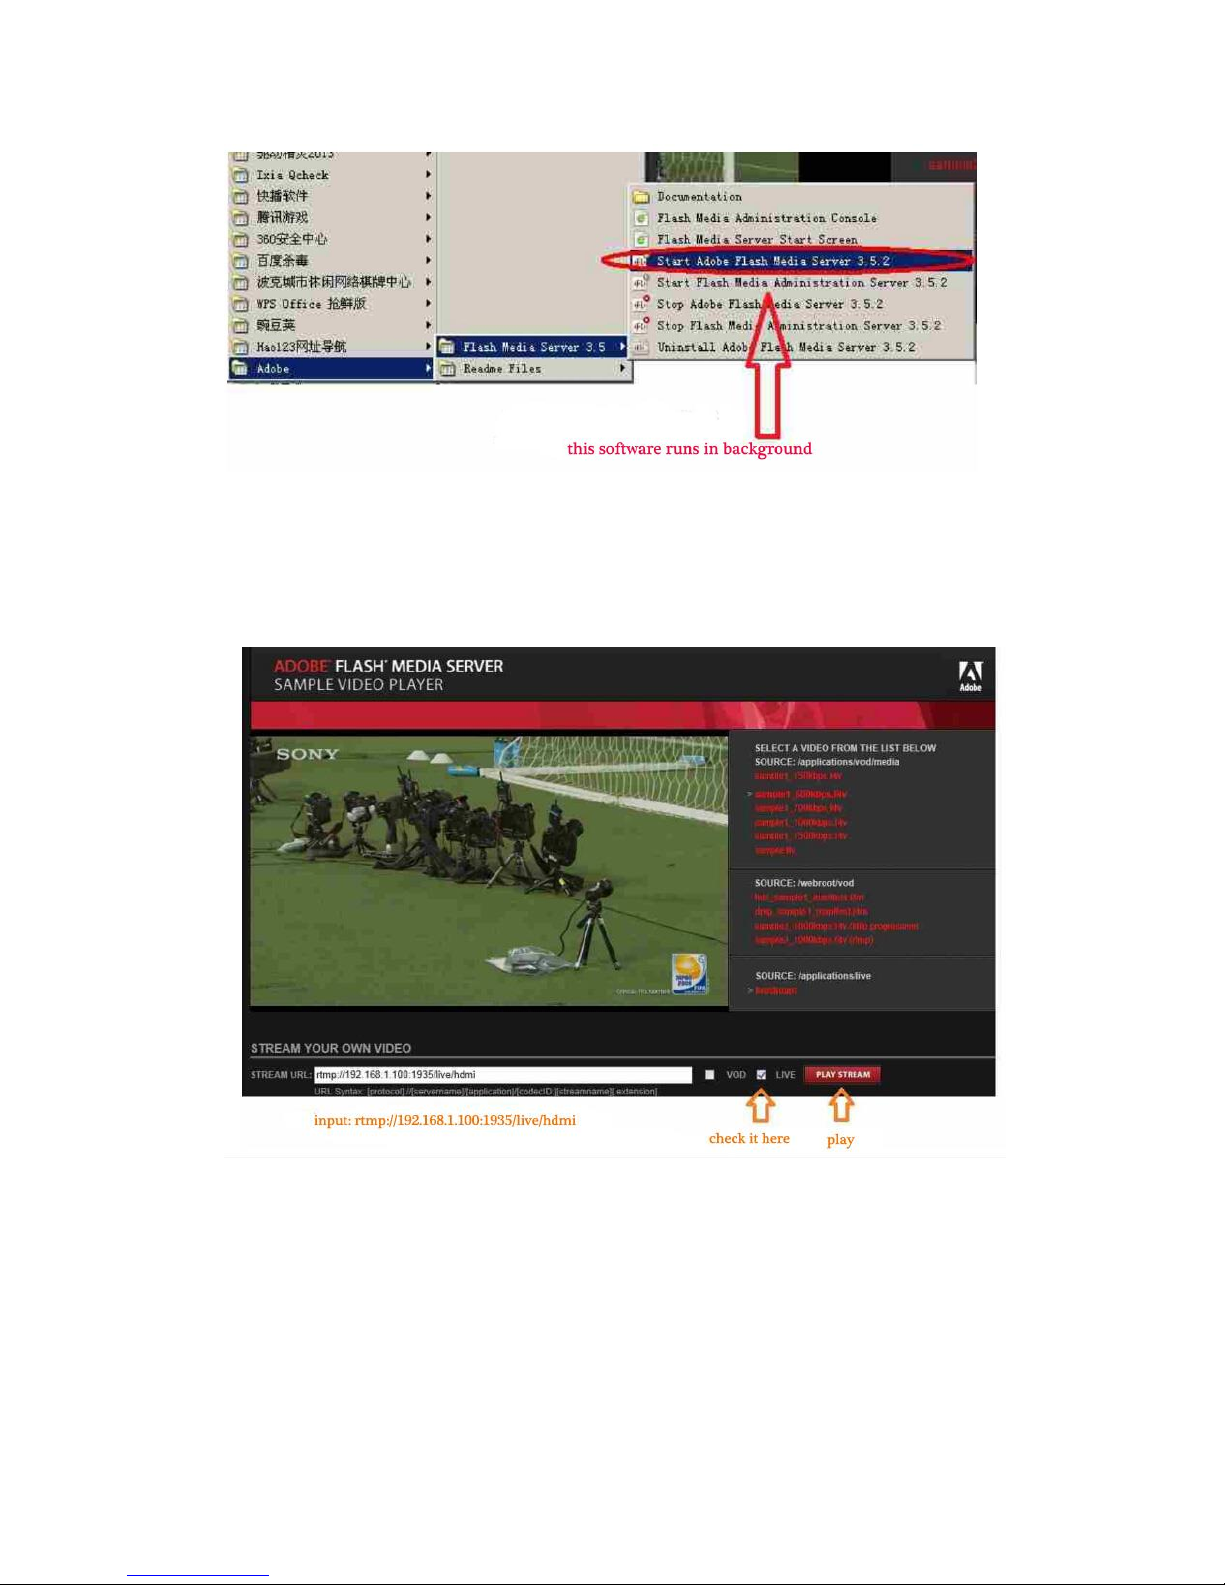
19 / 22
2.7.6.3 Go to folder "FlashPlayer", find "VideoPlayer.html" and open it
2.7.6.4 Input: rtmp://ip address/rtmp/hdmi, then choose "live" to see the images, or
input rtmp://192.168.1.100:1935/live/hdmi to choose "LIVE", then click "Play
stream"
3. Status
After HDMI main stream setting and HDMI second stream setting are done, you will
be able to see their access address, and you can directly copy it to the VLC player
software for decoding.

20 / 22
--Access Address: it can be directly copied to the VLC player software
for decoding.
--Video parameters: Video signal parameters that inputted in.
Table of contents
Other TBS technologies Media Converter manuals


Popular Media Converter manuals by other brands


PCB Piezotronics
PCB Piezotronics 422E35-SU Installation and operating manual

Ikelite
Ikelite 46076 Installation and use

Moxa Technologies
Moxa Technologies TCF-142-S Quick installation guide

Impact Acoustics
Impact Acoustics 40972 Operation manual

ADF Web
ADF Web HD67B82-A1 user manual

Alphatech
Alphatech 230171 Quick setup instructions