TCL F40S5906 User manual

EN 1
English
Important information
Safety
Ensure that your domestic mains supply voltage
matches the voltage indicated on the identication
sticker located at the back of your set. Where the
mains plug, AC inlet or an appliance coupler is used
as disconnect device, it shall remain readily operable.
On certain models, the light indicator is located at the
side of the TV set. The absence of a light indication
at the front does not mean that the TV set is fully
disconnected from the mains. To disconnect the TV
set completely, the mains plug must be pulled out.
The TV set’s components are sensitive to heat. The
maximum ambient temperature should not exceed
35º Celsius. Do not cover the vents at the back or
sides of the TV set. Leave sufcient space around it to
allow adequate ventilation. Install the appliance away
from any source of heat (replace, etc.) or appliances
creating strong magnetic or electric elds.
Moisture in rooms where the set is installed should
not exceed 75% humidity. Moving the set from a cold
place to a warm one can cause condensation on the
screen (and on some components inside the TV set).
Let the condensation evaporate before switching the
TV set on again.
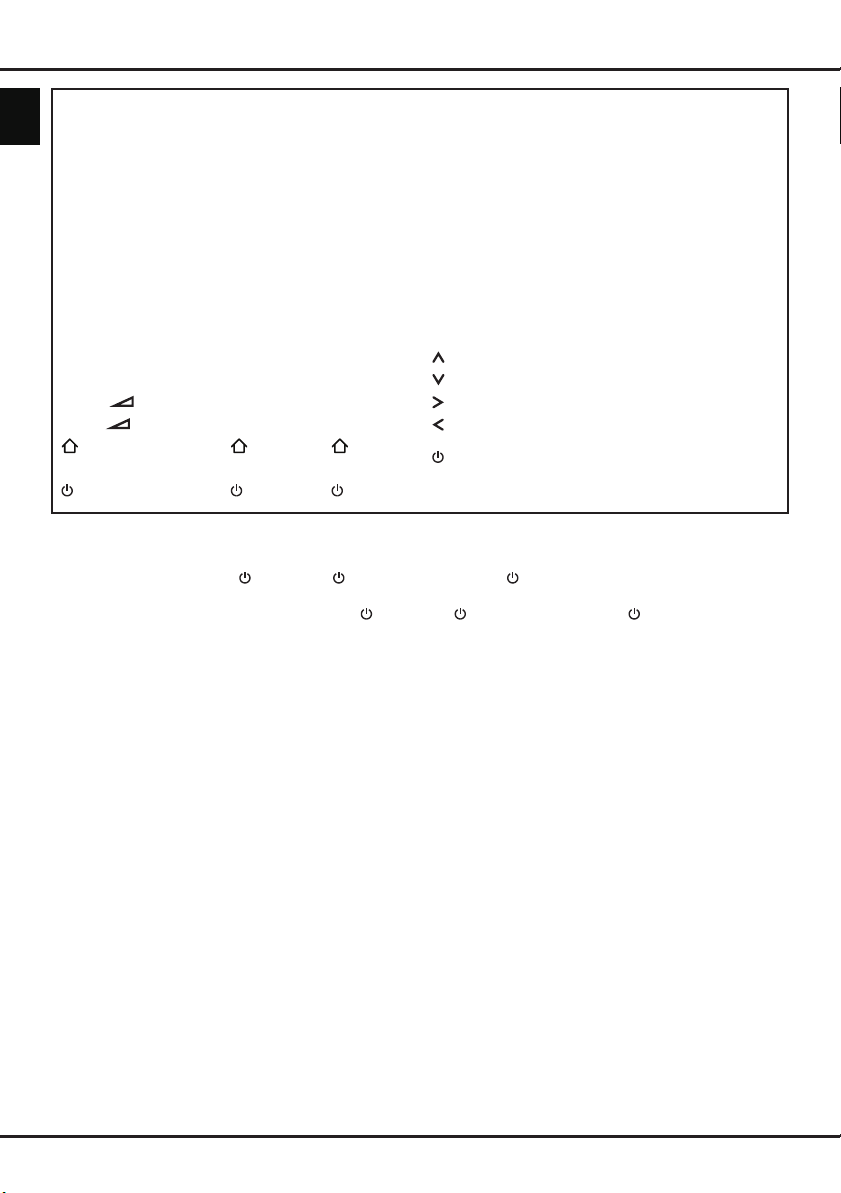
The or POWER/ button on the TV set or the
button on the remote control can be used to switch it
on and put it into standby mode. If you are not going
to be watching the TV for a lengthy period of time,
switch it off completely by removing the plug from the
mains power socket.
During thunderstorms, we recommend that you
disconnect the TV set from the mains and aerial so
that it is not affected by electrical or electromagnetic
surges that could damage it. For this reason, keep the
mains and aerial sockets accessible so they can be
disconnected, if necessary.
Unplug the TV set immediately if you notice it giving
off a smell of burning or smoke. You must never,
under any circumstances, open the TV set yourself,
as you run the risk of an electric shock in doing so.
WARNINGS
This appliance is intended for domestic household
use only and should not be used for any other
application, such as for non-domestic use or in a
commercial environment.
If the external exible cable or cord of this product is
damaged, it shall be replaced by the manufacturer or
his service agent or a similar qualied person in order
to avoid a hazard.
Leave more than 10cm clearance around the
television to allow adequate ventilation. The
ventilation should not be impeded by covering the
ventilation openings with items, such as newspapers,
table-cloths, curtains, etc.
The apparatus shall not be exposed to dripping or
splashing and no objects lled with liquids, such as
vases shall be placed on the apparatus.
Batteries (battery pack or batteries installed) shall not
be exposed to excessive heat such as sunshine, re
or the like.
To reduce the risk of re or electric shock, do not
expose this apparatus to rain or moisture.
Never place a television set in an unstable location. A
television set may fall, causing serious personal injury
or death. Many injuries, particularly to children, can
be avoided by taking simple precautions such as:
• Using cabinets or stands recommended by the
manufacturer of the television set.
• Only using furniture that can safely support the
television set.
• Ensuring the television set is not overhanging the
edge of the supporting furniture.
• Not placing the television set on tall furniture
(for example, cupboards or bookcases) without
anchoring both the furniture and the television set to
a suitable support.
• Not placing the television set on cloth or other
materials that may be located between the television
set and supporting furniture.
• Educating children about the dangers of climbing on
furniture to reach the television set or its controls.
If your existing television set is being retained and
relocated, the same considerations as above should
be applied.
Equipment with this symbol is a Class II or
double insulated electrical appliance. It has
been designed in such a way that it does not
require a safety connection to electrical earth.
Equipment without this symbol is a Class I
electrical appliance. It shall be connected to a
mains socket outlet with a protective earthing
connection.
To prevent the spread of re, keep candles or
other open ames away from this product at all
times.
To prevent injury, this apparatus must be securely
attached to the oor/wall in accordance with the
installation instructions.
CAUTION: Connect headphones with the volume
set low and increase if required. Prolonged listening
through headphones at high volume settings can
result in hearing damage.
Eye Fatigue
When using this product as a computer monitor,
health and safety experts recommend short frequent
breaks rather than occasional longer breaks. For
example a 5-10 minute break after an hour of
continuous screen work is considered to be better
than a 15 minute break every 2 hours.

EN 2
English
Do not use the monitor against a bright background or
where sunlight or other bright light sources will shine
directly onto the screen.
TV screen
The TV screen used in this product is made of glass.
Therefore, it can break when the product is dropped
or impacted upon by other objects.
The TV screen is a very high technology product,
giving you nely detailed pictures. Occasionally, a few
nonactive pixels may appear on the screen as a xed
point of blue, green or red. This does not affect the
performance of your product.
Care
Use a glass-cleaning product to clean the screen and
a soft cloth and mild detergent to clean the rest of the
set.
Important: Using strong detergents, alcohol-based
and abrasive products may damage the screen.
Dust the vents at the back and sides regularly. Using
solvents, abrasive or alcohol-based products could
damage the TV set. If an object or liquid enters the
appliance, unplug it immediately and have it checked
by an authorized engineer. Never open the appliance
yourself since this may put you at risk or damage the
appliance.
ESD regulation
This apparatus meets ESD performance criteria.
In case the apparatus does not recover in Ethernet
connection mode due to electrostatic discharge, user
interference is required.
Hanging the TV set on the wall
Warning: This operation requires two people.
To ensure a safe installation, observe the following
safety notes:
• Check that the wall can support the weight of the TV
set and wall mount assembly.
• Follow the mounting instructions provided with the
wall mount. For certain models, make sure to screw
the hexagonal VESA wall mounting screw bosses
(and screws) provided with the set into the nuts for
the wall mount at the back of your set before your
wall mounting.
• The TV set must be installed on a vertical wall.
• Make sure to use only screws suitable for the
material of the wall.
• Make sure that the TV set cables are placed so that
there is no danger of tripping over them.
All other safety instructions about our TV sets are also
applicable here.
Multi product user manual
The features described in this manual are common to
most models. Some features may not be available on
your TV and/or your TV may include features that are
Important information
not described in this user manual. The illustrations in
this manual may differ from the actual product. Please
refer to the actual product.

EN 3
English
Dear Customer,
This apparatus is in conformance with the valid European directives and standards regarding electromagnetic
compatibility and electrical safety.
TCL Operations Polska Sp. z o.o.
ul. A. Mickiewicza 31/41
96-300 Żyrardów, Poland
Figures and illustrations in this User Manual are provided for reference only and may differ from actual product
appearance. Product design and specications may be changed without notice.
Important information
Information for Users on Disposal of Old Equipment and Batteries
[European Union]
These symbols indicate that the electrical and electronic equipment and the battery with this
symbol should not be disposed of as general household waste at their end-of-life. Instead, the
products should be handed over to the applicable collection points for the recycling of electrical
and electronic equipment as well as batteries for proper treatment, recovery and recycling in
accordance with your national legislation and the Directive 2012/19/EU, 2006/66/EC and 2008/12/
EC.
By disposing of these products correctly, you will help to conserve natural resources and will help
to prevent potential negative effects on the environment and human health which could otherwise
be caused by inappropriate waste handling of these products.
For more information about collection points and recycling of these products, please contact your
local municipal ofce, your household waste disposal service or the shop where you purchased
the product.
Penalties may be applicable for incorrect disposal of this waste, in accordance with national
legislation.
[Business users]
If you wish to dispose of this product, please contact your supplier and check the terms and
conditions of the purchase contract.
[Other Countries outside the European Union]
These symbols are only valid in the European Union. If you wish to dispose of these items, please
do so in accordance with applicable national legislation or other rules in your country for the
treatment of old electrical equipment and batteries.
Notice:
The sign Pb
below the
symbol for
batteries
indicates that
this battery
contains lead.
Products
Battery

EN 4
English
Important information ………………………………… 1
Chapter 1 - Connections
Connect the power and antenna …………………… 5
Connect DVD player, home theatre system………… 5
Connect DVD recorder
,
cable receiver……………… 6
Connect
Blu-ray Disc player, HD game console, HD
camcorder
,
headphones, CI module………………… 6
Chapter 2 - Getting started
Remote control functions …………………………… 7
Switch the TV on and off ……………………………… 8
Chapter 3 - Installing channels
Initial setup …………………………………………… 9
Performing an automatic channel search…………… 9
Chapter 4 - Using your TV
Accessing channels ………………………………… 11
Watching connected devices ……………………… 11
Volume ……………………………………………… 11
Using TV menus …………………………………… 11
Selecting menu language ………………………… 11
Instant power on …………………………………… 11
Chapter 5 - Using more of your TV
Setting up your favourite channels ……………… 12
Energy saving ……………………………………… 12
SPDIF type ………………………………………… 12
Audio description …………………………………… 12
Diagnostics on digital TV channels ……………… 12
Using subtitles ……………………………………… 12
Turning on/off subtitles …………………………… 12
Enabling subtitle languages on digital TV
channels …………………………………………… 12
Selecting a subtitle type on digital TV channels 12
Using Teletext ……………………………………… 13
Selecting decoding page language …………… 13
Digital Teletext language ………………………… 13
E-Manual …………………………………………… 13
Time access ………………………………………… 13
Customising the input settings …………………… 13
Software update …………………………………… 13
Changing to shop or home mode ………………… 13
Common interface ………………………………… 13
Using the common interface module …………… 14
Accessing common interface services ………… 14
T-Link ………………………………………………… 14
Enabling or disabling T-Link …………………… 14
Using one-touch play …………………………… 14
Using system standby …………………………… 14
Reset shop ………………………………………… 14
LED Indicator ……………………………………… 14
Viewing pictures, playing music and watching videos
from a USB storage device………………………… 14
All …………………………………………………… 14
Picture ……………………………………………… 15
Video ……………………………………………… 15
Music ……………………………………………… 15
Using EPG (Electronic Programme Guide) ……… 15
MHL (Mobile High-Denition Link)………………… 16
Connecting MHL compatible device …………… 16
When using MHL ………………………………… 16
Chapter 6 - Network
Network connection ………………………………… 17
Connecting to a wired network ………………… 17
Connecting to a wireless network ……………… 17
Access Smart TV portal …………………………… 18
Share&See ………………………………………… 18
Connecting to your PC …………………………… 18
Enabling Share&See function …………………… 18
Adding media from your PC for sharing ……… 18
Share&See application…………………………… 18
TV Remote (nScreen) ……………………………… 18
WiFi display ………………………………………… 19
Networked waking up ……………………………… 19
HbbTV ……………………………………………… 19
HbbTV access …………………………………… 19
HbbTV deactivation ……………………………… 19
Chapter 7 - Other information
Password in Parental Control……………………… 20
Troubleshooting …………………………………… 20
Television specications …………………………… 20
OSS Notice ………………………………………… 20
Contents

EN 5
English
Connect the power and antenna
To switch on TV after connecting power cord, press or POWER/ .
Notes:
-Position of power socket varies according to TV model. On certain models, you have to turn on the power
switch rst.
-Disconnect the power cord before connecting devices.
Cable
DVD player/
Home theatre system
Chapter 1 - Connections
Connect DVD player, home theatre system

EN 6
English
Connect DVD recorder
,
cable receiver
Notes:
-Your TV might not have all connectors visible on diagram above. Number of USB and HDMI ports may vary
according to TV model.
-Button and connector locations may vary according to TV model.
-USB connectors are for data input from USB drives and for connecting other relevant USB devices where
applicable.
-All USB devices have to be directly connected to TV set without cable extenders. In case extender is
required, maximum 50cm length is recommended. Longer extenders should have ferrite beads.
-ARC (Audio Return Channel) function is only supported on the HDMI port identied with ARC. To use ARC
function, please turn on T-Link function rst as described in the T-Link section.
-MHL (Mobile High-Denition Link) function allows you to link an MHL-capable mobile device to the television
and is only supported on the HDMI port identied with MHL. Maximum video resolution is 1080P (50/60Hz).
-It is recommended to use high quality and well shielded HDMI cables to avoid possible interferences.
-Please use headphones with 3.5mm TRS connector. Excessive sound pressure from headphones can cause
hearing loss.
Connections
DVD recorder
Set-top box
Cable
HD game
console
Blu-ray Disc
player HD Camcorder
Connect
Blu-ray Disc player, HD game console,
HD camcorder
,
headphones, CI module

EN 7
English
Remote control functions
Most of your television's functions are available via the menus that appear on the screen. The remote control
supplied with your set can be used to navigate through the menus and to congure all the general settings.
Note: You are recommended to use the full screen mode. Do not use the display mode with black bars on both
sides of the picture (such as 4:3) for a long time; otherwise the TV screen may be damaged permanently.
Chapter 2 - Getting started
Standby / quit standby.
TV To access TV mode.
Alphanumeric
buttons
To enter channel numbers; to enter a letter, a digit or a symbol
in some functions.
ECO To select a desired energy saving mode.
SOURCE To select connected devices.
V+/- To control the volume.
To switch the sound off and back on.
To display programme information, if available.
P+/- To change channels.
To display the Settings menu.
To access the Smart TV homepage.
GUIDE To toggle the Electronic Programme Guide on or off (only
available for digital channels).
To display the Option menu.
▲/▼ To navigate through the menus; to select menu options.
◄/► To navigate through the menus; to select menu options and
change values.
OK To conrm an entry or selection.
To return to the previous menu.
EXIT To exit the menu, homepage or Teletext, etc.
ZOOM-/+ To select the screen mode.
LIST To display the channel list.
SLEEP To select the sleep timer options.
PRE-CH To return to the previous channel in TV mode.
FAV To bring up your favourite channel list.
Recording button. (Not available for some models.)
Colour
buttons
To select tasks or Teletext pages; to be used for HbbTV
function.
LANG To select a sound type available for selected analogue
TV programme; to select an audio language available for
selected digital TV programme.
SUBTITLE To select a subtitle language available for selected digital TV
programme.
TEXT To toggle Teletext on or off.
To select the previous picture, music or video.
To stop playback.
To start playback.
To select the next picture, music or video.
To start fast reverse.
To pause playback.
To start fast forward.
Note: The remote control type may be changed without notice.

EN 8
English
Important:
Batteries shall not be exposed to excessive heat such as sunshine, fire or the like. Remove batteries when
the remote control is not to be used for a long time. Batteries left in equipment may cause damage through
deterioration and corrosive leakage, invalidating the guarantee.
To protect the environment use local recycling facilities for battery disposal. Dispose of used batteries
according to the instructions.
CAUTION: Risk of explosion if batteries are replaced by an incorrect type. Replace only with the same or
equivalent type recommended by the equipment manufacturer.
If the batteries in your remote control are run down, you can use the buttons on your TV set. They have the
following functions:
For models with below buttons on the set: For models with below buttons on the set:
TV mode In menus TV mode In menus
PR+ or PR ▲ P+ ▲P+ ▲
PR- or PR ▼ P- ▼P- ▼
VOL+, + or VOL ► V+ ►V+ ►
VOL-, - or VOL ◄ V- ◄V- ◄
Features (Long
press)
OK (Short press)
OK OK OK Return (Long press)
Switch the TV on and off
1. When the power cord is connected, the TV will be turned on directly or be in standby mode. If the TV is in
standby mode, press the or POWER/ button on the set or the button on the remote control to turn it
on.
2. To put the TV into standby mode, press the or POWER/ button on the set or the button on the remote
control. The TV set remains powered up, but with low energy consumption.
3. To switch the TV off, unplug the mains plug from the mains outlet.
(*On certain models, you have to turn on the power switch rst.)
Getting started

EN 9
English
Chapter 3 - Installing channels
Initial setup
Initial setup involves selecting all the settings required
to be able to search for and store all the analogue
and digital channels you can receive.
Make sure that the television is switched on and
follow all the steps in turn specied hereafter.
Note: If the channel search retrieved only the
analogue channels it could be caused by poor
broadcasting and therefore is not covered
by manufacturer warranty. Manufacturers
cannot be held responsible for lack of or poor
broadcasting in some areas.
The rst time you switch the set on, the Initial Setup
wizard opens, which guides you through the initial
setup process. (Refer to Figure 1.)
Figure 1
Step 1: Environment setup
1. Press ▲/▼to select your language, then press
OK/► to enter the next step.
2. Press ▲/▼ to select your country, then press
OK/► to enter the next step.
Note: If you select France or Italy, you will have to
enter the password setting menu here to set
a password. Use the numeric buttons to enter
a four-digit number as your password. (0000
is too simple to be set as your password.)
Enter the same code again to conrm the
password. After that, you will enter the next
step automatically. (In this step, you can only
press ◄to return to the previous step.)
3. Press ▲/▼to select your location, then press
OK/► to enter the next step.
Step 2: Network setup
1. Press ▲/▼to select your network connection type
(Wired or Wireless), then press OK/► to enter the
next step.
2. Follow the guides on the screen and press the
corresponding buttons on the remote control to
proceed.
Note: You can also skip this step and step 3
by selecting "I do not have a network
connection", and connect to the Internet later.
For details please refer to section Network
Connection.
Step 3: Software update
1. If the set has connected to the network
successfully, it will search for upgrade les
automatically.
2. Follow the guides on the screen and press the
corresponding buttons on the remote control to
proceed.
Step 4: Channel installation
1. Press ▲/▼to select Continue to install channels.
2. Follow the guides on the screen and press the
corresponding buttons on the remote control to
proceed.
Note: To prevent the channel installation process
from being interrupted, wait for the message
indicating that the installation is complete.
You can also skip this step by selecting "I don't
want to install channels". In this case, to
search and store your channels you may do
an automatic channel search by following the
instructions in the next section Performing
an automatic channel search.
Step 5: Clock setup
If the set was not connected to the network, you can
use the numeric buttons to enter the date and time,
then select the OK button and press OK to conrm.
When the initial setup is completed, the
Congratulations message appears. Press OK to
conrm.
Performing an automatic channel search
This section describes how to search and store
channels automatically. This may be done in any of
the cases below:
- you have selected "I don't want to install channels"
in the initial setup;
- you see "No program info now, please search
channels rst!" in TV mode;
- you want to update your channels.
1. In TV mode, press on the remote control and
select Channel > Channel scan. Press OK/►to
enter.
2. The TV installs and arranges channels according
to your country. Press ▲/▼to select Country, and
press OK/►to enter. Enter the default password
1234 or your own password in case you have
changed the password in the System > Lock
menu. Press ▲/▼to select your country and press
OK/► to conrm.
3. Press ▲/▼to select Tuner mode, then press
OK/►to enter. Press ▲/▼to select Cable,
Antenna or Satellite, and press OK/► to conrm.
(Note: Satellite option is available only in selected
models.)
4. Follow a), b) or c) below.
- a) If you have selected Cable.

EN 10
English
Installing channels
• Press ▲/▼to select Automatic search, then
press OK/►to enter.
• Press ▲/▼to select Channel type.
- If you select Digital & Analogue, press OK
to enter. Press ◄/►to select your Scan
mode if available (Full or Advanced).
• If you select Full, press ▲/▼to select the
Search button and press OK to start the
automatic search for all DVB-C digital and/
or analogue channels.
• If you select Advanced, use the numeric
buttons to adjust the values for Frequency,
Symbol rate, Network ID, and use ◄/►to
select the Modulation mode. Then press
▲/▼to select the Search button and press
OK to start the automatic search for all
DVB-C digital and/or analogue channels.
- If you select Digital, follow the same process
as above to start your automatic search for all
DVB-C digital channels.
- If you select Analogue, press OK to start
your automatic search for all analogue
channels.
- b) If you have selected Antenna.
• Press ▲/▼to select Automatic search, then
press OK/►to enter.
• Press ▲/▼to select Channel type (Digital &
Analogue, Digital or Analogue), then press
OK to start the automatic search for all DVB-T
digital and/or analogue channels.
- c) If you have selected Satellite.
• Press ▲/▼to select Automatic search, then
press OK/►to enter.
• Press ▲/▼to select Select satellite and
press OK to enter the satellite list. Press ▲/▼
to select your desired satellite and press OK
to conrm or deselect it. You can also press
the red button to edit the parameters of the
selected satellite. Press the button to return.
Then with your desired options of Scan mode
and Channels, press ▲/▼to select the
Search button and press OK to start scanning.
5. The channel search may take a few minutes.
During the process, you can press OK to stop the
search halfway.
6. After the automatic search, channels are arranged
in a preset order. If you wish to skip channels,
modify the preset order, rename or delete
channels, press on the remote control, select
Channel > Channel organiser and press OK/►
to enter.

EN 11
English
Chapter 4 - Using your TV
Accessing channels
Using the numeric buttons: press the corresponding
numeric buttons on the remote control to access the
channels.
Using the P+/- buttons: press the P+/- buttons on
the remote control or the corresponding buttons on
the TV set to scroll through the channels.
Using the LIST button: press the LIST button on the
remote control to display the channel list and press
▲/▼/◄/►and OK to select channels.
Watching connected devices
Repeatedly press SOURCE on the remote control
or OK on the TV set to toggle between TV and other
input sources. Press P+/- to cycle through all TV
channels and other input sources.
Note: Not all models have OK button on the set.
Volume
Volume control: press the V+/- buttons on the
remote control or the corresponding buttons on the
TV set to increase or decrease the volume.
Sound mute: press the button to temporarily mute
the sound. Press this button again or the V+ button to
restore the sound.
Using TV menus
1. Press on the remote control to display the
Settings menu. (Refer to Figure 2.)
Figure 2
2. Press ▲/▼to select the desired item, then press
OK/► to enter the corresponding submenu.
3. In submenus, press ▲/▼to select menu options,
then press OK/► to enter the option list, the
adjustment interface, or the corresponding
submenu.
4. Press to return to the previous menu.
5. Press EXIT or to close the menu.
Note: You can also press on the remote control,
select Settings (if available) and press OK
to enter the Settings menu. Some options
may not be available for certain signal
sources.
Selecting menu language
You can choose your preferred menu language
following the instructions below.
1. Press on the remote control, select System >
Menu language > Language and press OK/► to
enter.
2. Press ▲/▼to select your desired language to
display the menus and press OK to conrm.
3. Press EXIT or to close the menu.
Instant power on
This function enables you to turn on your TV quickly.
1. Press on the remote control, select System >
Instant power on and press OK/► to enter.
2. Press ▲/▼to select On and press OK to conrm.
3. Press EXIT or to close the menu.

EN 12
English
Chapter 5 - Using more of your TV
Setting up your favourite channels
You can create a list of your favourite TV channels.
1. Press LIST.
2. Press the red button to enter Select channel list,
press ▲/▼to select a list and press OK to enter.
3. Press ▲/▼/◄/►to scroll through the channel list
and press the green button to add the selected
channel to your favourite list.
4. Repeat this procedure to set up other favourite
channels.
5. Press the red button to enter Select channel list,
select Favorites and press OK to enter.
6. Press ▲/▼/◄/►to select a channel, press OK
to watch it or press the green button to remove it
from your favourite list.
7. Press LIST or EXIT to exit.
Energy saving
1. Press on the remote control, select Picture >
ECO settings > Energy saving and press OK/►
to enter.
2. Press ◄/►to select a desired power saving mode
and press OK to conrm.
3. Press EXIT or to close the menu.
SPDIF type
Connect the TV to an audio device through the
SPDIF output. To select a proper sound type for your
SPDIF output, press on the remote control, select
Sound > SPDIF type and press OK/►to enter. Press
▲/▼to select an option and press OK to conrm.
- If you select Auto, the SPDIF output format is
• Dolby Digital when the programme’s sound format
is Dolby Digital or Dolby Digital Plus or HE-AAC.
• PCM when the programme’s sound format is
MPEG.
- If you select PCM, the SPDIF output format is PCM,
regardless of the programme’s sound format.
- If you select Off, this turns off the audio output from
the audio device connected to the SPDIF output.
Note: The options you may choose depend on the
programme you are watching. If the sound is
ahead of the picture, you can select SPDIF
delay from the Sound menu, press OK/►
then press ◄/►to adjust the delay time to
synchronize the sound with the picture.
Audio description
Audio description refers to an additional narration
track for blind and visually impaired viewers of visual
media, including television programmes and movies.
The description narrator talks through the presentation
describing what is happening on the screen during
the natural pauses in the audio (and during dialogue if
deemed necessary).
You can use this feature if the current broadcast
contains audio description.
1. Press on the remote control, select Sound >
Advanced settings > Audio description and
press OK/► to enter.
2. Select Speaker or Headphone, press OK/► to
enter, press ◄/►to select Audio description and
press OK to conrm.
3. To adjust the volume for audio description in case
this function is turned on, press ▲/▼to select AD
volume, press OK/► then press ◄/►to set the
volume. Press to return.
4. Press EXIT or to close the menu.
Diagnostics on digital TV channels
1. Press on the remote control and select
Channel > Channel diagnostics.
2. Press OK/► to display some signal information on
the current digital channel, such as signal strength,
frequency, etc.
3. Press OK to conrm.
4. Press EXIT or to close the menu.
Using subtitles
You can enable subtitles for each TV channel.
Subtitles are broadcast via Teletext or DVB-T/DVB-C
digital broadcasts. With digital broadcasts, you have
the additional option of selecting a preferred subtitle
language.
Turning on/off subtitles
1. Press on the remote control, select Channel >
Subtitle and press OK/► to enter.
2. Select the Subtitle option, press OK/► to enter,
press ▲/▼to select On or Off and press OK to
conrm.
3. Press EXIT or to close the menu.
Enabling subtitle languages on digital TV
channels
1. Press on the remote control, select Channel >
Subtitle > Digital subtitle language and press
OK/► to enter.
2. Press ▲/▼to select a subtitle language as your
preferred language and press OK to conrm.
3. Press ▲/▼to select Digital subtitle language
2nd and press OK/► to enter.
4. Press ▲/▼to select a secondary subtitle language
and press OK to conrm.
5. Press EXIT or to close the menu.
Shortcut operation: Press SUBTITLE on the remote
control to directly select a subtitle language available
for the selected digital TV programme.
Selecting a subtitle type on digital TV channels
1. Press on the remote control, select Channel >
Subtitle > Subtitle type and press OK/► to enter.

EN 13
English
Using more of your TV
2. Press ▲/▼to select a subtitle type and press OK
to conrm. You can select Hearing Impaired to
display the hearing impaired subtitles with your
selected language.
3. Press EXIT or to close the menu.
Using Teletext
Selecting decoding page language
1. Press on the remote control, select Channel >
Teletext > Decoding page language and press
OK/► to enter.
2. Press ▲/▼to select a proper type of language
in which Teletext will display and press OK to
conrm.
3. Press EXIT or to close the menu.
Digital Teletext language
On digital TV channels, depending on the
broadcaster, you may be able to enjoy a service with
multiple initial Teletext pages in different languages.
This function allows you to select an available
language as primary language, which relates to
different initial Teletext pages.
1. Press on the remote control, select Channel >
Teletext > Digital teletext language and press
OK/► to enter.
2. Press ▲/▼to select a language and press OK to
conrm.
3. Press EXIT or to close the menu.
E-Manual
E-Manual is an electronic user manual for the product.
You can nd instructions for the features of this TV
set.
1. Press on the remote control, select Support >
E-Manual and press OK to enter.
2. Press ◄/►to select the contents and press OK
to enter, then press ◄/►to view the instruction
pages. Press to return to the contents.
3. Press EXIT to exit.
Time access
You can access the time from digital channels
following the instructions below.
1. Press on the remote control, select System >
Timer > Clock > Auto synchronization and press
OK/► to enter.
2. Press ▲/▼to select On and press OK to conrm.
3. Press EXIT or to close the menu.
Customising the input settings
You can name your connected sources according to
the type of device instead of the type of socket.
1. Press on the remote control, select System >
Input settings and press OK/► to enter.
2. Press ▲/▼to select a connector your equipment
is connected to and press OK/► to enter.
3. Press ▲/▼to select the type of device connected
to this connector and press OK to conrm.
4. Press EXIT or to close the menu.
After conguring, the selected source name will be
displayed after the name of the related connector in
the source list when pressing SOURCE on the remote
control or OK on the TV set.
Note: Not all models have OK button on the set.
Software update
Note: Do not switch off or unplug the TV until the
upgrade is completed.
Press on the remote control, select Support >
Software update and press OK/►to enter. You have
the following options to update the software.
-By USB: Enables you to install a new version
software from a USB stick. Insert the USB stick
in which a new version software is stored into a
USB socket of the set. Select By USB and press
OK/►to enter. Follow the on-screen instructions to
complete the process.
-By network: Enables you to download and install
the latest version software from the Internet.
Make sure to set up a wired or wireless network
connection rst then select By network and press
OK/►to enter. Follow the on-screen instructions to
complete the process.
Note: Keep successful network connection during
upgrade.
-By channel: Enables you to install the latest version
software if available from the broadcast. Select By
channel and press OK/►to enter. Follow the on-
screen instructions to complete the process.
Changing to shop or home mode
1. Press on the remote control, select System >
Location and press OK/►to enter.
2. Press ▲/▼to select Home, Shop or Shop with
demo and press OK to conrm.
3. Press EXIT or to close the menu.
Note: According to the regulation of European
Commission 2009/125/EC, in Home
mode, TV will be put into standby mode
automatically if there is no operation in
4 hours. This feature can be deactivated in
the System > Timer > Auto standby menu.
Common interface
Encrypted digital TV channels can be decoded with a
common interface module and a card provided by a
digital TV service operator.
The common interface module may enable several
digital services, depending on the operator and
services you choose (for example, pay TV). Contact

EN 14
English
Using more of your TV
your digital TV service operator for more information
about services and terms.
Using the common interface module
WARNING: Switch off your TV before inserting a
common interface module. Be sure to follow the
instructions described below. Wrong insertion of
a common interface module may damage both the
module and your TV.
1. Following the directions printed on the common
interface module, gently insert the module into the
common interface slot on the TV.
2. Push the module in as far as it will go.
3. Turn on the TV and wait for the common interface
function to be activated. This may take several
minutes.
Note: Do not remove the common interface
module from the slot. Removing the module
will deactivate the digital services.
Accessing common interface services
After inserting and activating the common interface
module, press on the remote control, select
System > Common Interface and press OK/►to
enter.
This menu option is only available if the common
interface module is correctly inserted and activated.
On-screen applications and content are provided by
your digital TV service operator.
T-Link
Use this function to search for CEC devices connected
to the HDMI sockets in your TV and enable one-touch
play and one-touch standby between CEC devices.
Enabling or disabling T-Link
1. Press on the remote control, press ▲/▼to
select T-Link and press OK/► to enter.
2. Press ◄/►to select On or Off and press OK to
conrm.
3. Press EXIT to close the menu.
Using one-touch play
With one-touch play, pressing the play button on (for
example) your DVD remote control starts playback on
your DVD device and automatically switches your TV
to the correct source, displaying DVD content.
Using system standby
With system standby, pressing the button on (for
example) your TV remote control switches your TV
and all connected HDMI devices to standby mode.
Note: The CEC functions depend on the devices
connected and it is possible that some
devices may not interoperate correctly when
connected to this TV. The user manual or
the manufacturer of the problematic devices
should be consulted for further information.
Reset shop
Allows you to reset the TV to factory default settings.
1. Press on the remote control, select System >
Reset shop and press OK/► to enter.
2. Use the numeric buttons to enter the password.
3. Press ◄/►to select OK and press OK to conrm.
4. The Initial setup menu appears. Follow the
instructions in the section Initial setup.
LED Indicator
Allows you to select the LED indicator on the TV front
panel to ash or not.
1. Press on the remote control, select System >
LED Indicator and press OK/► to enter.
2. Press ▲/▼to select Flashing or Normal and
press OK to conrm.
3. Press EXIT or to close the menu.
Viewing pictures, playing music and watching
videos from a USB storage device
Your TV is tted with USB connectors that enable
you to view pictures, listen to music or watch videos
stored on USB drives.
Supported le formats:
Picture JPG/JPEG, BMP, PNG
Music MP3
Video AVI, MPG, MPEG, TS
Notes:
-Some USB keys and USB products like
digital cameras or mobile phones are not fully
compatible with USB standard so they may not
work with the TV media player. Not all USB
keys or devices are compatible with the USB
function. Not all above formats are recognised.
The encoding formats of your les will determine
whether or not they can be played.
-Please use high speed (minimum 5MB/s read
transfer) USB drives.
When a USB device is connected, press on
the remote control to display the homepage, press
▲/▼/◄/►to select Media and press OK to enter.
Press ◄/►to select a USB drive in case you have
inserted two or more USB drives and press OK to
enter.
All
Use this function to display all supported les, if
available.
1. Press ▲/▼to select All, then press OK/► to enter
the main le content browser.
2. In the main le content browser, use ▲/▼/◄/►to
select a le or an inner le folder.
3. Select an inner le folder, press OK to enter a sub
le content browser.

EN 15
English
Using more of your TV
4. Use ▲/▼/◄/► to select a le in either main or
sub le content browser. Press to display the
function menu in folder mode.
-Sort by: Sort folders and les by Name or Date.
-Parser: You can select Recursive to display all
supported les from all sub le folders.
5. Select a le and press OK to play.
6. Press to return to the previous interface.
Picture
Use this function to display pictures, if available.
1. Press ▲/▼to select Picture, then press OK/► to
enter the main le content browser.
2. Use ▲/▼/◄/►to select a picture in either main or
sub le content browser, press OK to watch, and a
slide show begins from the selected picture.
3. Press ◄/►to display the previous or the next
picture, press ▼to show the playlist, and press
OK to display the console.
4. Press to return to the previous interface.
Video
Use this function to watch videos, if available.
1. Press ▲/▼to select Video, then press OK/► to
enter the main le content browser.
2. Use ▲/▼/◄/►to select a video in either main
or sub le content browser, press OK to watch,
and automatic playback begins from the selected
video.
3. Press ◄/►to fast reverse or forward when the
focus is on the progress bar, press ▼to show the
playlist, and press OK to pause or play the video.
4. Press to display the video menu in the browser
mode. You can select different picture preset
settings, play modes and screen modes, etc.
5. Press to return to the previous interface.
Music
Use this function to play back music, if available.
1. Press ▲/▼to select Music, then press OK/► to
enter the main le content browser.
2. Use ▲/▼/◄/►to select a song in either main or
sub le content browser, press OK to play, and
automatic playback begins from the selected song.
3. Press ◄/►to select different control buttons
shown at the bottom of the TV screen and press
OK to conrm. You can pause or play the song,
select the previous or the next song, select
different play modes, and show the playlist, etc.
When you move the focus onto the progress bar,
you can press ◄/►to fast reverse or forward.
4. Press to display the music menu in the browser
mode. You can select different sound preset
settings, and show the music info if available, etc.
You can also select Audio only to listen to the
music with the screen turned off. Any key press
will turn the screen on.
5. Press to return to the previous interface.
Using EPG (Electronic Programme Guide)
EPG is an on-screen guide that displays scheduled
digital TV programmes. You can navigate, select,
view and record programmes.
1. Press GUIDE on the remote control, the Program
Guide menu will appear, which allows you to get
information about the current or next programme
playing on each channel. Navigate through the
different programmes using the ▲/▼/◄/►buttons
on the remote control.
2. Use the related buttons shown at the bottom of the
screen to view EPG.
-Prev day: Press to display EPG of the
previous day.
-Next day: Press to display EPG of the next
day.
-Filter: Programme guide lter for digital TV
programmes.
• Press to display the type list of the
programme.
• Navigate through the different types and
available subtypes using the ▲/▼/◄/►
buttons on the remote control.
• Select one or more types, which you want to
highlight from the Type list, press OK to select
or deselect. A checkmark will appear to the left
of the type when selected. When you select
a type, all its subtypes (if available) will be
selected accordingly.
• Also, you can select some desired subtypes (if
available) without selecting any type rst.
• Press to exit the type list.
• After ltering, all your desired digital TV
programmes will be highlighted.
-Schedule list: Press the yellow button to bring
up the Schedule list menu.
• Press the red button to add a schedule.
• Press the green buttton to delete a selected
schedule. Press OK to edit a selected
schedule.
-Add schedule: Press the red button to add a
schedule into your schedule list.
• Channel number: use ◄/►to select the
desired channel.
• Start date: use the numeric buttons to set the
start date.
• Start time: use the numeric buttons to set the
start time.
• End time: use the numeric buttons to set the
end time.
• Schedule type: use ◄/►to select the
available schedule type.
- Select Reminder to be reminded that you can
switch to the scheduled programme when the
time you have set comes.

EN 16
English
Using more of your TV
- Select Record (if available) if you want to
start your scheduled recording when the time
you have set comes. When time is out and
you do not execute any operation, scheduled
recording will start automatically.
• Repeat type: use ◄/►to select different
repeat mode for the schedule.
• Press ▲/▼to select Add schedule, and press
OK to conrm.
3. Press GUIDE or EXIT to exit EPG.
MHL (Mobile High-Denition Link)
(* not available for some models)
You can use the following functions by connecting the
HDMI port identied with MHL on the TV and the USB
port of an MHL compatible mobile phone or similar
device with an MHL cable.
• Charge your mobile phones from the TV.
• Two-way remote operation between TV and mobile
phone.
• Video or audio output from your mobile phone.
Notes:
-These functions may not be available depending
on the connected equipment.
-If there is no more battery life left in the
connected device, charging will not start.
-To operate the mobile phone with the TV remote
control, you need to turn on the T-Link function
rst, then press and select T-Link > Setup >
Guide menu. Follow the virtual keypad to do
operations.
Connecting MHL compatible device
• Connect the MHL compatible device to the HDMI
port identied with MHL on the TV using an MHL
cable (not supplied), charging will start automatically.
• When connecting an MHL compatible device to the
HDMI port identied with MHL on the TV, switch the
TV input source to the corresponding HDMI input.
Note: Do not connect the MHL compatible device
to any ports other than the HDMI port
identied with MHL.
When using MHL
• Interoperability with MHL devices from other
manufacturers is not guaranteed.
• TCL does not provide any guarantee, therefore,
against operational failure such as that described
below when an MHL source is connected to the TV.
- No picture or sound
- Some of the functions do not work by remote
operation from the TV
• If MHL does not work properly, also contact the
manufacturer of the source device for advice on its
use.
• Do not disconnect the power plug of the TV when
the TV is active and the MHL device is connected.
• Do not disconnect the power plug of the TV when
the TV is in standby mode and the MHL device is
connected.

EN 17
English
Chapter 6 - Network
Connecting to a wireless network
Your TV is equipped to be connected to your home
network wirelessly. To do that you need a wireless
router or modem.
1. Press on the remote control, select Network >
Internet connection and press OK/► to enter.
2. Press ▲/▼to select On and press OK to conrm.
3. Press ▲/▼to select Interface and press OK/► to
enter.
4. Press ▲/▼to select Wireless and press OK to
conrm.
5. Press ▲/▼to select Wireless settings and press
OK/► to enter. You can set the wireless network
connection in 3 ways:
-a) Scan
• Press ▲/▼to select Scan and press OK/►
to enter. The TV will search all access points
within range. Access points found by the TV will
be displayed.
• Press ▲/▼to select an available access point,
then press OK/►to connect.
• Press to return to the Wireless settings
menu.
Note: If you select a protected access point,
you will have to enter the corresponding
password. Press OK on the remote control
to display the virtual keyboard to enable you
to enter the password.
- b) Manual
Press ▲/▼to select Manual and press OK/►to
enter. You will be prompted to enter the correct
SSID of an available wireless router to set up the
connection. Press to return to the Wireless
settings menu.
- c) Auto
If your AP (Access Point) supports WPS (Wi-
Fi Protected Setup), you can connect to the
network via PIN (Personal Identication Number)
or PBC (Push Button Conguration). WPS will
automatically congure the SSID and WPA key
in either mode.
Press ▲/▼to select Auto and press OK/►to
enter.
• PIN: Select PIN and press OK/►to enter.
Choose a random PIN code. Make sure
this code is installed on the AP. (For the
procedures, refer to your router manual.) Select
OK and press OK to set up the connection.
• PBC: If your router has a PBC push button,
select PBC and press OK/►to enter. Press
the PBC push button on your router within 2
minutes before you select OK and press OK
again. Your TV will automatically acquire all the
network setting values it needs and connect to
your network.
Network connection
You can set up your TV so that it can access the
Internet through your local area network (LAN) using
a wired or wireless connection.
Connecting to a wired network
You can connect your TV to your LAN using cable in
three ways:
• You can connect your TV to your LAN by connecting
the LAN port on your TV to an external modem
using a Cat 5 cable.
• You can connect your TV to your LAN by connecting
the LAN port on your TV to an IP sharer, which is
connected to an external modem. Use Cat 5 cable
for the connection.
• Depending on how your network is congured, you
may be able to connect your TV to your LAN by
connecting the LAN port on your TV directly to a
network wall outlet using a Cat 5 cable. Note that
the wall outlet is connected to a modem or router
elsewhere in your house.
1. Press on the remote control, select Network >
Internet connection and press OK/► to enter.
2. Press ▲/▼to select On and press OK to conrm.
3. Press ▲/▼to select Interface and press OK/► to
enter.
4. Press ▲/▼to select Ethernet and press OK to
conrm.
5. Press ▲/▼to select IP settings and press OK/►
to enter. You can set Address type to Auto or
Manual.
- Select Auto if you want the TV to acquire and
enter the needed IP address automatically.
- Select Manual if you want to enter your IP
address manually, then:
• Press ▼ to go to the rst entry eld.
• Enter the IP address, Subnet mask, Default
gateway, Primary DNS and Secondary DNS
values. Use the numeric buttons to enter
numbers and the ▲/▼/◄/►buttons to move
from one entry eld to another.
- Once IP setting is completed, press ▲/▼/◄/►
to select OK and press OK to conrm. The set
will try to connect to the network and inform
you about the result. Press to return to the
Network menu.
6. If you want to check the information on current
connection, such as Interface, Address type, IP
address, etc., press ▲/▼to select Information
and press OK/► to enter. Press to return to the
Network menu.
7. If you want to check the Internet connectivity, press
▲/▼to select Connection test and press OK/►.

EN 18
English
• Press to return to the Wireless settings
menu.
- Press to return to the Network menu.
6. If you want to check the information on current
connection, such as Interface, Address type, IP
address, etc., press ▲/▼to select Information
and press OK/► to enter. Press to return to the
Network menu.
7. If you want to check the Internet connectivity, press
▲/▼to select Connection test and press OK/►.
Access Smart TV portal
Allows you to enjoy Internet Applications (Apps),
specially adapted Internet websites for your TV. You
can control the Apps with the TV remote control.
WARNING:
• Congure the network settings before using Smart
TV applications.
• Slow responses and/or interruptions may occur,
depending on your network conditions.
• If you experience a problem using an application,
please contact the content provider.
• According to circumstances of the content provider,
an application’s updates or the application itself may
be discontinued.
• Depending on your country's regulations, some
applications may have limited service or not be
supported.
• Changes in application content may be made
without prior notice by the service provider.
1. Press on the remote control, select Smart TV
and press OK/► to enter.
2. Select Smart TV portal and press OK/► to enter.
Note: Since the connection with Internet takes
time, it’s recommended that you wait a few
minutes to use the Smart TV feature after
activation of TV from standby.
Share&See
Note: Share&See is DLNA-compatible.
Connecting to your PC
Make sure to set up a wired or wireless connection
from your TV to a router rst. Then connect your
PC to your router either through a network cable
or wirelessly. Also make sure to select Network >
Internet connection and select On, and that your
computer rewall won’t block the connection.
Enabling Share&See function
Press on the remote control, select Smart TV >
Share&See and press OK/►to enter. Press ▲/▼
to select On and press OK to conrm. Follow the
steps in turn specied hereafter, then you can enjoy
recorded videos, images and music saved on your
PC.
Adding media from your PC for sharing
Install a DLNA media server on your PC. The simple
and familiar server you may install is Microsoft
Windows Media Player 11 and 11 above. Follow the
instructions below to allow your TV to access the
designated les on your PC.
1. Open the Microsoft Windows Media Player 11.
2. Select Library > Media sharing.
3. Check the checkbox Share my media to.
4. Select the icon of the TV set connected to your
PC.
5. Select Allow to allow the TV set to access your
PC, and select OK to enable the access.
Note: Use the Settings button to customize your
desired settings.
6. Select Library > Add to Library.
7. Select your personal folders or folders of other
users that you can access for sharing.
8. Select Add and press OK to enable the addition.
Share&See application
Select Media from the homepage and press OK to
enter. Then you can view pictures, listen to music or
watch videos, which are stored on your PC.
Supported le formats:
Picture JPEG, PNG, BMP
Music MP3, WMA, LPCM
Video FLV, TS, MP4
Notes:
- If Share&See is switched on, the TV will display
the list of available DLNA servers which are
available in local network.
- Content from third-party DLNA servers may not
play correctly on your TV due to compatibility
problems.
- When sharing media les from a PC, certain
features may be unavailable and, due to the le
and encoding formats used, playback issues may
occur.
- Because of network related conditions, playback
of media les may not be error-free. When this
happens, play them from a USB drive.
TV Remote (nScreen)
Note: This manual covers products with either TV
Remote or nScreen function. TV Remote
and nScreen are compatible.
This function allows you to turn a smart device into a
sophisticated remote control, providing more features
than your normal TV remote control. You can then
control your TV through your smart device.
1. Press on the remote control, select Smart
TV > TV Remote or nScreen and press OK to
enter. You will see details for downloading the TV
Network

EN 19
English
Network
Remote or nScreen application and other related
information.
Note: The following instructions are based on the
example of a laptop.
2. Download and install into the laptop the correct TV
Remote or nScreen application for the laptop.
3. Make sure the laptop and the TV are in the
same home LAN (local area network) or network
segment.
4. Run the TV Remote or nScreen application on the
laptop, it will search and communicate with the TV
automatically to enable the TV Remote or nScreen
functionality.
5. Once the TV and the laptop are linked as
described in step 4, you will be able to enjoy
the extra features of the TV Remote or nScreen
function.
6. To quit the TV Remote or nScreen function, press
EXIT on the remote control.
WiFi display
(*not available for some models)
WiFi display allows you to share screen and sound
of your device such as a smartphone or a tablet to
your TV, wirelessly (i.e. without cables). This makes
it possible to view on your TV, at the same time, what
your smartphone or tablet is showing. For example,
you can launch a video on your smartphone and
display it simultaneously on your TV, or use your
tablet as game controller with content displayed on
the big screen of your TV.
Whenever you want to use WiFi display, you must
rst activate this function in your TV. To do it follow
the steps below:
1. Press on the remote control, select Smart TV >
WiFi display and press OK to enter. You will see
details for this function.
2. Find the WiFi display function in your device.
Different devices may have different names for this
function.
3. Then click the “connection” function on the device.
If connected successfully, you will see on your TV
screen what the device is showing.
Note: TCL does not guarantee that the use of the
WiFi display function will be smooth or error-
free since not all devices are compatible with
the WiFi display function.
Networked waking up
This function allows you to turn on your TV from
standby mode via a network. To use this function,
please make sure:
1. Your TV is connected to an effective home
network;
2. The desired controller, such as a smartphone, is
connected to the same network as your TV;
3. An App which supports networked waking up
function, has been installed into the controller;
4. Networked standby is set to On in the Smart TV
menu.
When the TV is in networked standby mode, you can
use the App to wake up the TV remotely.
HbbTV
HbbTV (Hybrid broadcast broadband TV) is a service
offered by certain broadcasters and available only on
some digital TV channels. HbbTV delivers interactive
television over broadband Internet. These interactive
features are added to and enrich the normal digital
programmes, and include services such as digital
teletext, electronic programme guide, games, voting,
specic information related to the current programme,
interactive advertising, information magazines, catch-
up TV, etc.
To use HbbTV please ensure your TV is connected to
Internet and HbbTV is switched on.
Notes:
-HbbTV services are broadcast- or country-
dependent and may be unavailable in your area.
-You cannot download les to your TV with
HbbTV function.
-Application provider or broadcasting related
conditions may cause an HbbTV application to
be unavailable momentarily.
-To access HbbTV applications you must connect
your TV to the Internet via a broadband link.
HbbTV applications may not work correctly in
case of network related issues.
HbbTV access
1. Press on the remote control, select Smart TV >
HbbTV and press OK/► to enter.
2. Press ▲/▼to select On and press OK to conrm.
3. When you tune to a TV digital channel that offers
HbbTV, this will be signalled to you by an on-
screen indication (generally a red button, but
other colour buttons may also be used). Press
the indicated colour button to open the interactive
pages.
4. Use ▲/▼/◄/►and the colour buttons to navigate
through the HbbTV pages and press OK to
conrm.
HbbTV deactivation
To avoid disturbances that may be caused by HbbTV
broadcasting tests, you can turn off the HbbTV
function:
1. Press on the remote control, select Smart TV >
HbbTV and press OK/► to enter.
2. Press ▲/▼to select Off and press OK to conrm.

EN 20
English
Chapter 7 - Other information
Password in Parental Control
- The default password is 1234. You can change it to
a new one.
- The super password is 0423. If you forget your
code, enter the super password to override any
existing codes.
Troubleshooting
Please check the following list before requesting
service.
There is no picture or sound.
• Make sure the power cord is properly inserted in the
power outlet.
• Make sure the source type is set correctly.
• Make sure the antenna is properly connected.
• Make sure the volume is not set to minimum or the
sound is not set to mute.
• Make sure the headphones are not connected.
• The TV may be receiving a signal other than from
TV broadcasting stations.
Picture is not clear.
• Make sure the antenna cable is properly connected.
• Consider whether your TV signal is being properly
received.
• Poor picture quality can occur due to a VHS
camera, camcorder, or other peripheral being
connected at the same time. Switch off one of the
other peripherals.
• The ‘ghost’ or double image may be caused by
obstruction to the antenna due to high-rise buildings
or hills. Using a highly directional antenna may
improve the picture quality.
• The horizontal dotted lines shown on the pictures
may be caused by electrical interference, e.g., hair
dryer, nearby neon lights, etc. Turn off or remove
these.
Picture is too dark, too light or tinted.
• Check the colour adjustment.
• Check the brightness setting.
• Check the sharpness function.
Remote control does not work.
• Check the batteries of the remote control.
• Make sure the remote sensor window on the TV
front is not under strong uorescent lighting.
• Try to clean the remote sensor window on the TV
front with a soft cloth.
If the above suggestions do not solve your technical
issue, please refer to the warranty card for service
information.
Television specications
TV Broadcasting PAL/SECAM BG/DK/I/LL’
Receiving channels VHF/UHF/Cable
Tuner type Frequency synthesized
Operating Conditions
Temperature 5°C - 35°C (41°F - 95°F)
Humidity 20 - 75% (non-condensing)
Storage Conditions
Temperature -15°C - 45°C (5°F - 113°F)
Humidity 10 - 90% (non-condensing)
OSS Notice
This product uses the GPL (Version 2) and LGPL
(version 2.0 and 2.1) and MPL (version 1.1).
To send inquiries and requests for questions
regarding open source, contact nearest TCL ofce.
This product uses some software programs (libjpeg)
which are distributed under the libjpeg Project.
This product uses some software programs which are
distributed under the zlib Project.
This product uses some software programs (png,
png12) which are distributed under the libpng Project.
This product uses some software programs (ogg)
which are distributed under the libogg Project.
This product uses some software programs (libxml2)
which are distributed under the MIT.
This product uses some software programs (expat,
cyberlink for C, live555) which are distributed under
open source license.
This product uses some software programs which are
distributed under the GPL/LGPL/MPL/MNG/BSD.
GPL software: freetype, pango, gnutls, glib, Linux
kernel, gcc libgcc, gcc libstdc++, u-Boot loader,
ffmepg, DFB (DirectFB), libqrencode
LGPL software: cairo, gstreamer, gst-plugins-base,
gst-plugins-good, gst-plugins-bad, gst-plugins-ugly,
gst-ffmpeg, glibc
[Legal Statement] of TCL - manufacturer of this
TV set
Due to the various capabilities of products featuring
the SmartTV - Services, as well as limitations in the
available content, certain features, applications, and
services may not be available on all devices or in
all territories. Some features on SmartTV may also
require additional peripheral devices or membership
fees that are sold separately. Please visit our website
for more information on specic device information
and content availability. The services and availability
of content through SmartTV are subject to change
from time to time without prior notice.
All content and services accessible through this
device belong to third parties and are protected by
copyright, patent, trademark and/or other intellectual
property laws. Such content and services are
provided solely for your personal noncommercial use.
You may not use any content or services in a manner
that has not been authorized by the content owner
Table of contents
Other TCL UHD TV manuals