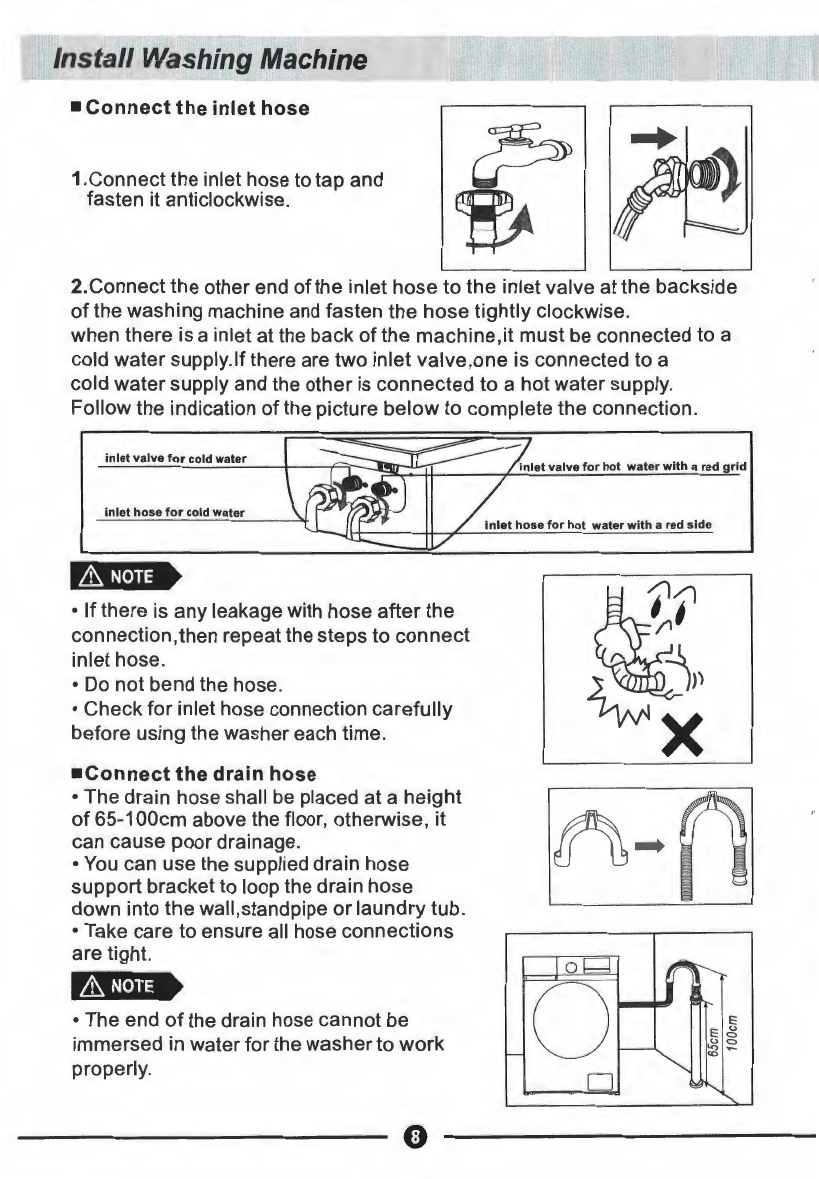
Install Washing Machine
■
Remove
transit
bolts
Before using this
washing
machine,transit bolts
must
be
removed from the
backside
of
this
machine
.Please take the following
steps
to remove the
bolts:
& Keep the
transit
bolts properly for futher use.
...
..... .....
1.Loosen
the
four
transit
2.Take
each
bolt
head
and
pull it
through
the
3.Fill
the
holes
with t
he
bolts
with
a
spanner
wide
part
of
the
hole.Repeat
for
each
bolt.
supplied
plastic
covers.
■
Level the
washing
machine
Install
or
place
the
washing
machine under the
environmenta
l
temperature
of
not less than 0°C
but
not outdoors,
for
it may
damage
the
programming
controller.
Base foot structure Factory status
■
Lockingnut close
to bottom
of
box
Support foot covered
__
___
■
Supporting
foot
close
111111-1:::
~
with rubber to locking nut
~----
-
------
--~
& Note:ln order
to
facilitate installation.the factory stutus
of
the
foot
may
not be all
locked,please be sure to lock all four feet before adjusting
the
level
1.When placing the machine.check whether
the bottom foot
is
in
the factory state.if \ •
not.please restore the bottom foot to the
~
factory state:the locking
nut
is
locked tightly
on
bottom
of
the box.and the support foot is locked
tightly
on
the locking nu
t:
3.To
ensure that the machine is placed
in
the right
state, loosen the locking nut according to the direction
shown
in
the diagram with the attached spanner to the
appropriate height until the supporting foot is close to
the ground and the machine is free from shaking
"
2.After the machine is placed,press the opposite
corner of the top cover plate ofthe washing
machine with both hands
in
turn
~
and shake it vertically downward
to
c~eck whether the supporting - - - -
-/
~
__
_
foot
Is
close to the ground and ,
whether the machine
is
shaken
4.Finally,use the spanner to turn the lock nut back
to
thebottom
of
the box to lock it(you can also
slightly fix the support foot by hand to avoid the
support foot moving again)
E"'"rn
thatthe
'"pport;"!I
~
~
feet
do
not move aga
in
_ _
1.The machine must be perfectly leveled and stabilized when the four
supporting feet are close to the ground. Lower the feet
as
much as possible on
the basis that the machine is leveled.
2.lmproper leveling adjustment may cause loud noise, machine vibrating,
machine displacement and other abnormal phenomena.
3.Air-vent is designed on the bottom of the machine (prevent blockage). Install
the washing machine on solid, smooth and skid-proof ground. Do not place the
washing machine on soft blanket or wooden floor,
or
various desktops and
stands,
in
case
of
unnecessary injury. 0