TCP 570 GU Series User manual
©TCP, Inc. 2008/02630a
TCP, Inc.
325 Campus Dr. | Aurora, Ohio 44202 | www.tcpi.com | Customer Service: 800.771.9335
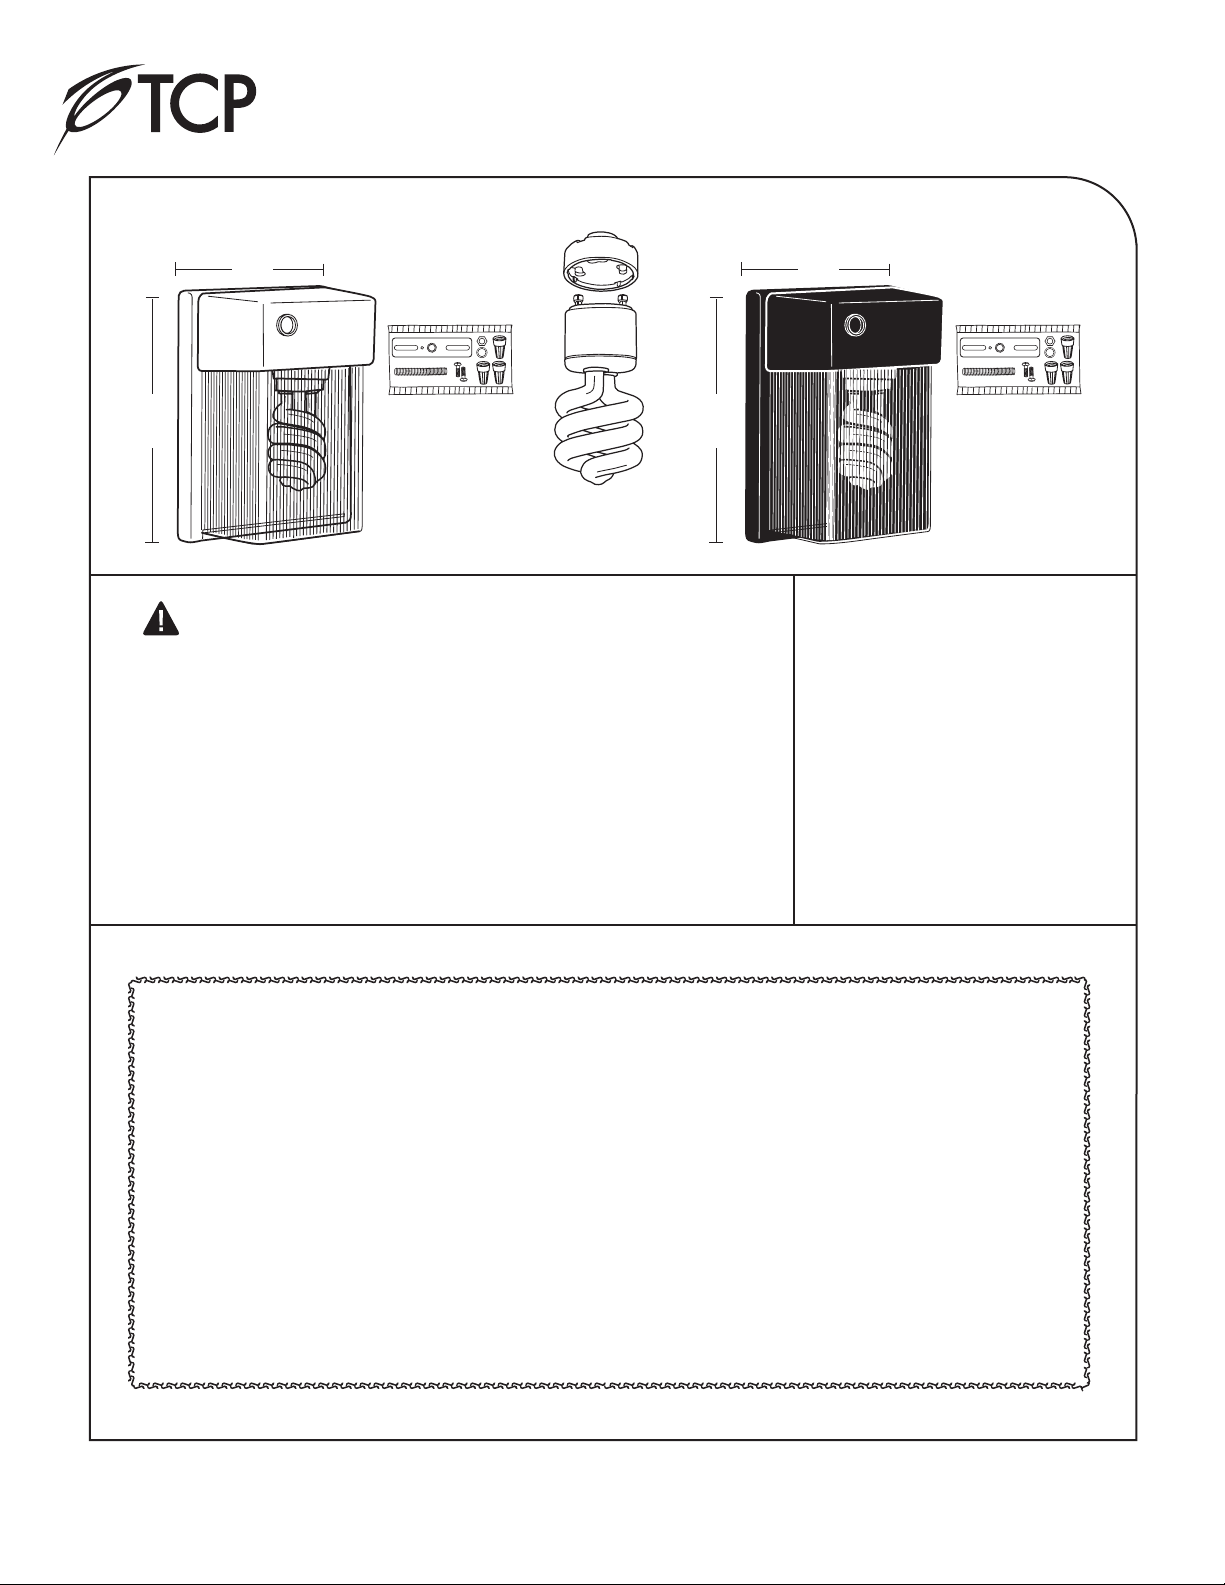
57000WPCGU
Outdoor Wall Fixture with
White Finish and Prismatic Diffuser
57000BPCGU
Outdoor Wall Fixture with
Black Finish and Prismatic Diffuser
LIMITED WARRANTY
This TCP product is warranted for a period of two years from date of original purchase against defects in
materials and workmanship. If this product should fail to operate due to defects in materials or workmanship,
simply return this product to the place of purchase or call TCP service center at 1-800-324-1496, along with
the original sales receipt within two years of purchase. This product will be repaired or replaced, at TCP’s
option. This warranty is expressly limited to repair or replacement of the product. This warranty gives the
consumer specific legal rights, which vary from state to state. Light bulbs are not covered under this warranty.
WARRANTY IS VOID IF PRODUCT IS NOT USED FOR THE PURPOSE FOR WHICH THIS PRODUCT IS
MANUFACTURED.
Height-10.0"
Width-7.4"
Depth-4.4"
WARNINGS AND CAUTIONS
WARNING
• Shut off power at
the circuit breaker
or fuse panel
before removing
the old fixture.
CAUTION
• DO NOT USE THIS FIXTURE WITH A DIMMING CIRCUIT.
If you presently have dimmer controls, you will need to
remove them, and replace them with regular electrical
swithces. If you have a three way dimmer, you will have
to replace it with a regular three way switch. If you are
unfamiliar with electrical installations, we recommend
you have a qualified electrician do your installation.
CARE AND MAINTENANCE
Your fixture is made from quality
materials that will last for many, many
years with minimum care. You may want
to periodically clean the fixture using a
mild, non-abrasive glass cleaner and
soft cloth. Do NOT use solvents or
cleaners containing abrasive agents.
When cleaning the fixture, make sure
you have the power turned off and do
not spray liquid cleaner directly onto the
bulb, socket, ballast, or wiring.
570 Series GU Wall Pack Fixtures
Installation Instructions
10"
Height-10.0"
Width-7.4"
Depth-4.4"
7.4"7.4"
10"
GU24 Lamp
Hardware Kit Hardware Kit
©TCP, Inc. 2008/02630b
TCP, Inc.
325 Campus Dr. | Aurora, Ohio 44202 | www.tcpi.com | Customer Service: 800.771.9335
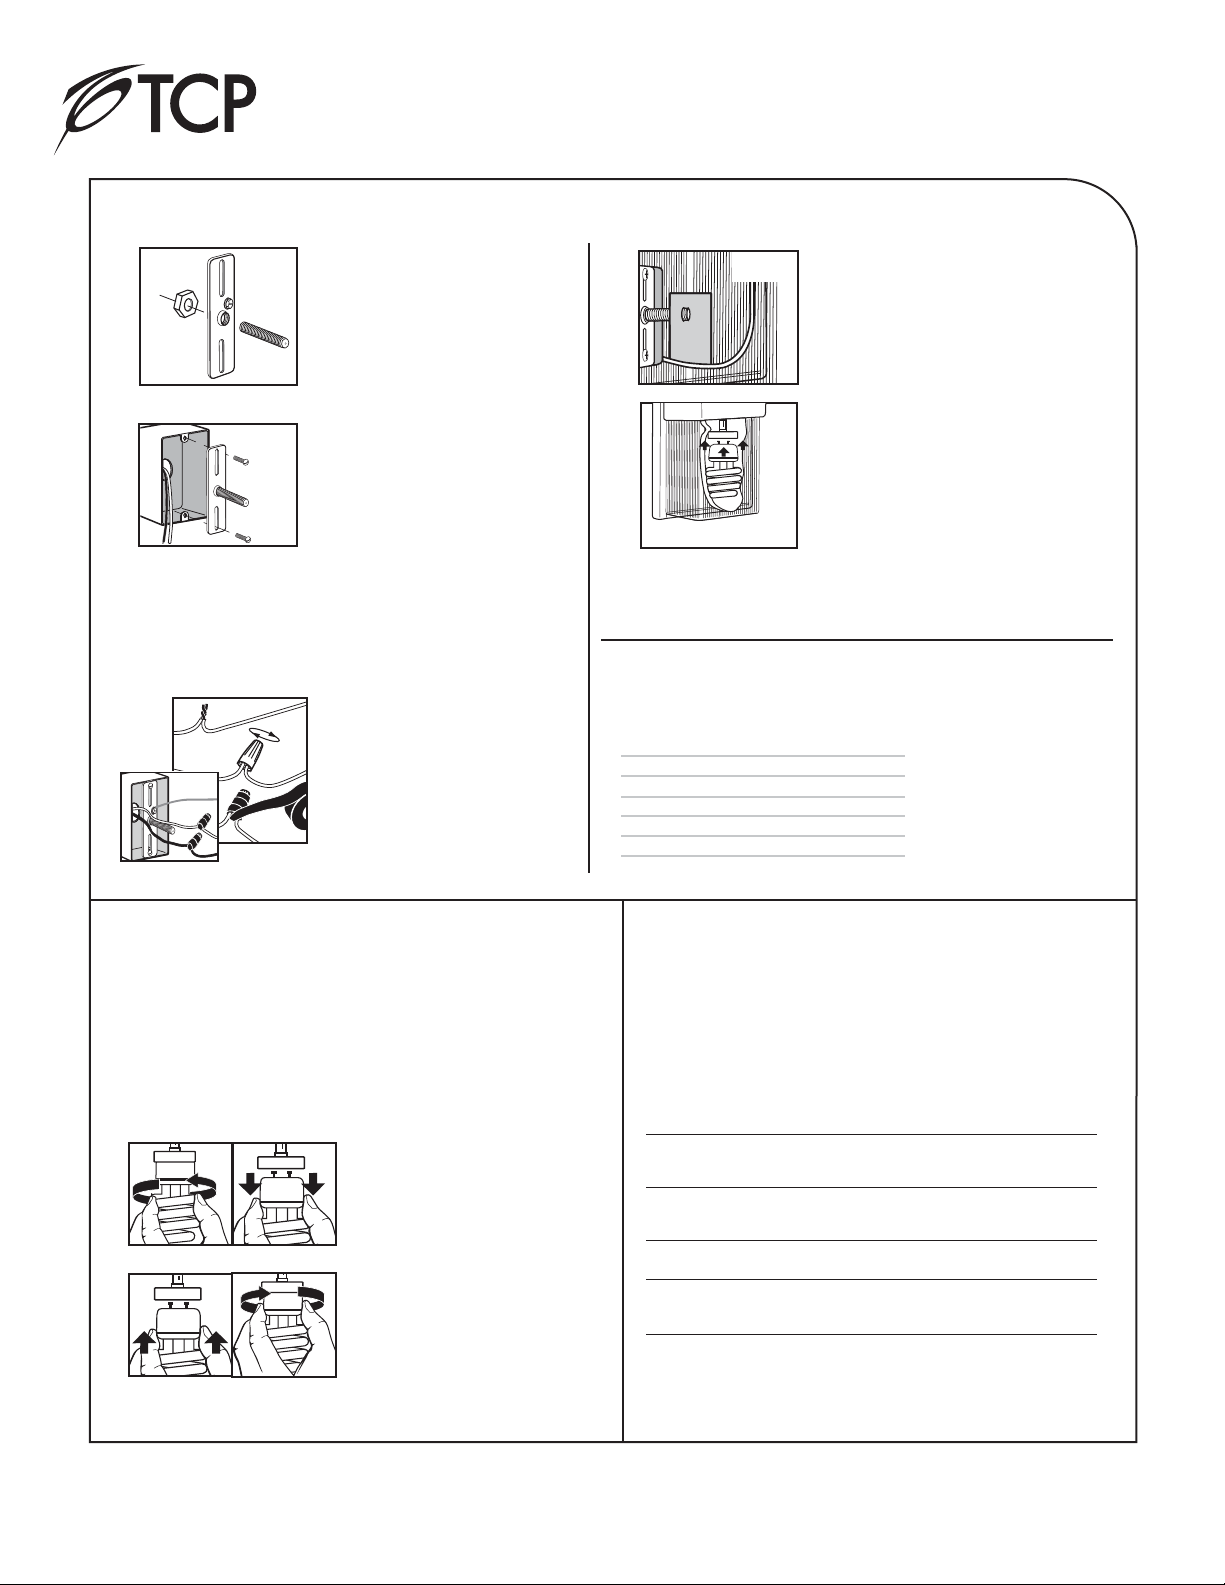
Fixture Installation
1
Remove the metal mounting
bracket and threaded rod from
the hardware kit. Fixture mounts
to a standard junction box using
the provided metal strap. (Fig1)
Fig. 1
2
Attach the metal strap to the
junction box using the two screws
provided. (Fig. 2)
Fig. 2
3
Remove the fixture’s lens diffuser by removing the Philips
screw. Set screw aside for future use. Lift and slide the
diffuser down and remove it from the fixture. Remove the
enclosed bulb and set it and diffuser aside.
4
Match up the white and black
wires from the fixture to the
black and white wire in the
junction box and connect
together using the provided wire
nuts. (Fig. 3)
6
Remove the bubble wrap from around the
bulb and insert the proper GU24 base
fluorescent lamp into the socket. Hold the
lamp by the base, insert the two pins into
the two curved slots in the socket and twist
clockwise until the bulb “seats.” CAUTION:
DO NOT HOLD THE LAMP BY THE GLASS
DURING INSERTION OR REMOVAL TO
PREVENT ACCIDENTAL BREAKAGE.
7
Reapply the fixture’s cover and secure it with the Philips screw
previously removed.
Replacement Parts:
White Wallpack Body w/ lens, no lamp: 570BKPCGU
Black Wallpack Body w/ lens, no lamp: 570WHPCGU
Fixture
57027BPCGU
57027WPCGU
57032BPCGU
57032WPCGU
57042BPCGU
57042WPCGU
Replacement Lamp
33127SP
33127SP
33132SP
33132SP
33142SP
33142SP
Replacement Lamps:
8
Restore power to the electrical box.
Bulb Replacement Instructions
Troubleshooting Guide
Fig. 3
Fig. 4
5
3
1
4
Your bulb should last up to 10,000 hours in normal use. When bulb
replacement is necessary, you must replace the bulb with a
self-ballasted GU24 base fluorescent bulb. These bulbs are readily
available at your local home center and most larger hardware stores.
Remove the old bulb by grasping it
firmly at the plastic base of the bulb
and firmly twist the bulb counter-
clockwise until it “unseats” and lines
up with the large end of the
openings (Fig. 3). Pull straight down.
Be careful not to drop the bulb.
Grasp the replacement bulb in
the same manner and re-insert
the replacement bulb into the
socket and twist the bulb
clockwise until it ‘seats’ (Fig. 4).
Do not force the bulb into the
socket or twist forcefully.
Restore power to the fixture.
Shut off power supply. Allow sufficient time for bulbs to
cool properly before handling.
2
Remove the fixture’s diffuser by removing the Philips screw.
Minor problems often can be fixed without the help of an electrician. Before doing
any work on the fixture, shut off power supply at the circuit breaker panel to avoid
electrical shock.
Minor problems often can be fixed without the help of an
electrician. Before doing any work on the fixture, shut off power
supply at the circuit breaker panel to avoid electrical shock.
Problem Cause Solution
Fixture doesn’t light Bulb is defective Replace bulb
Power is off Check if power
supply is on
Bad wire connection Check wiring
Bad switch Test or replace
switch
Fuse blows or circuit breaker trips Crossed wires or power Check wiring
when light is turned on wire is grounded out connections
Light bulb flickers Light is being Attach rubber
reflected back to sensor hood over
the sensor top of light sensor
570 Series GU Wall Pack Fixtures
Installation Instructions
Fig. 5
5
Tuck the wires into the junction
box and push the fixture base
over the threaded rod. Secure
fixture by adjusting the stud length
into the mounting bracket and
with the stud cap. Orientation of
fixture is base up.
Fig. 4
Fig. 3
This manual suits for next models
2


