Team efforts Revolution Series User manual

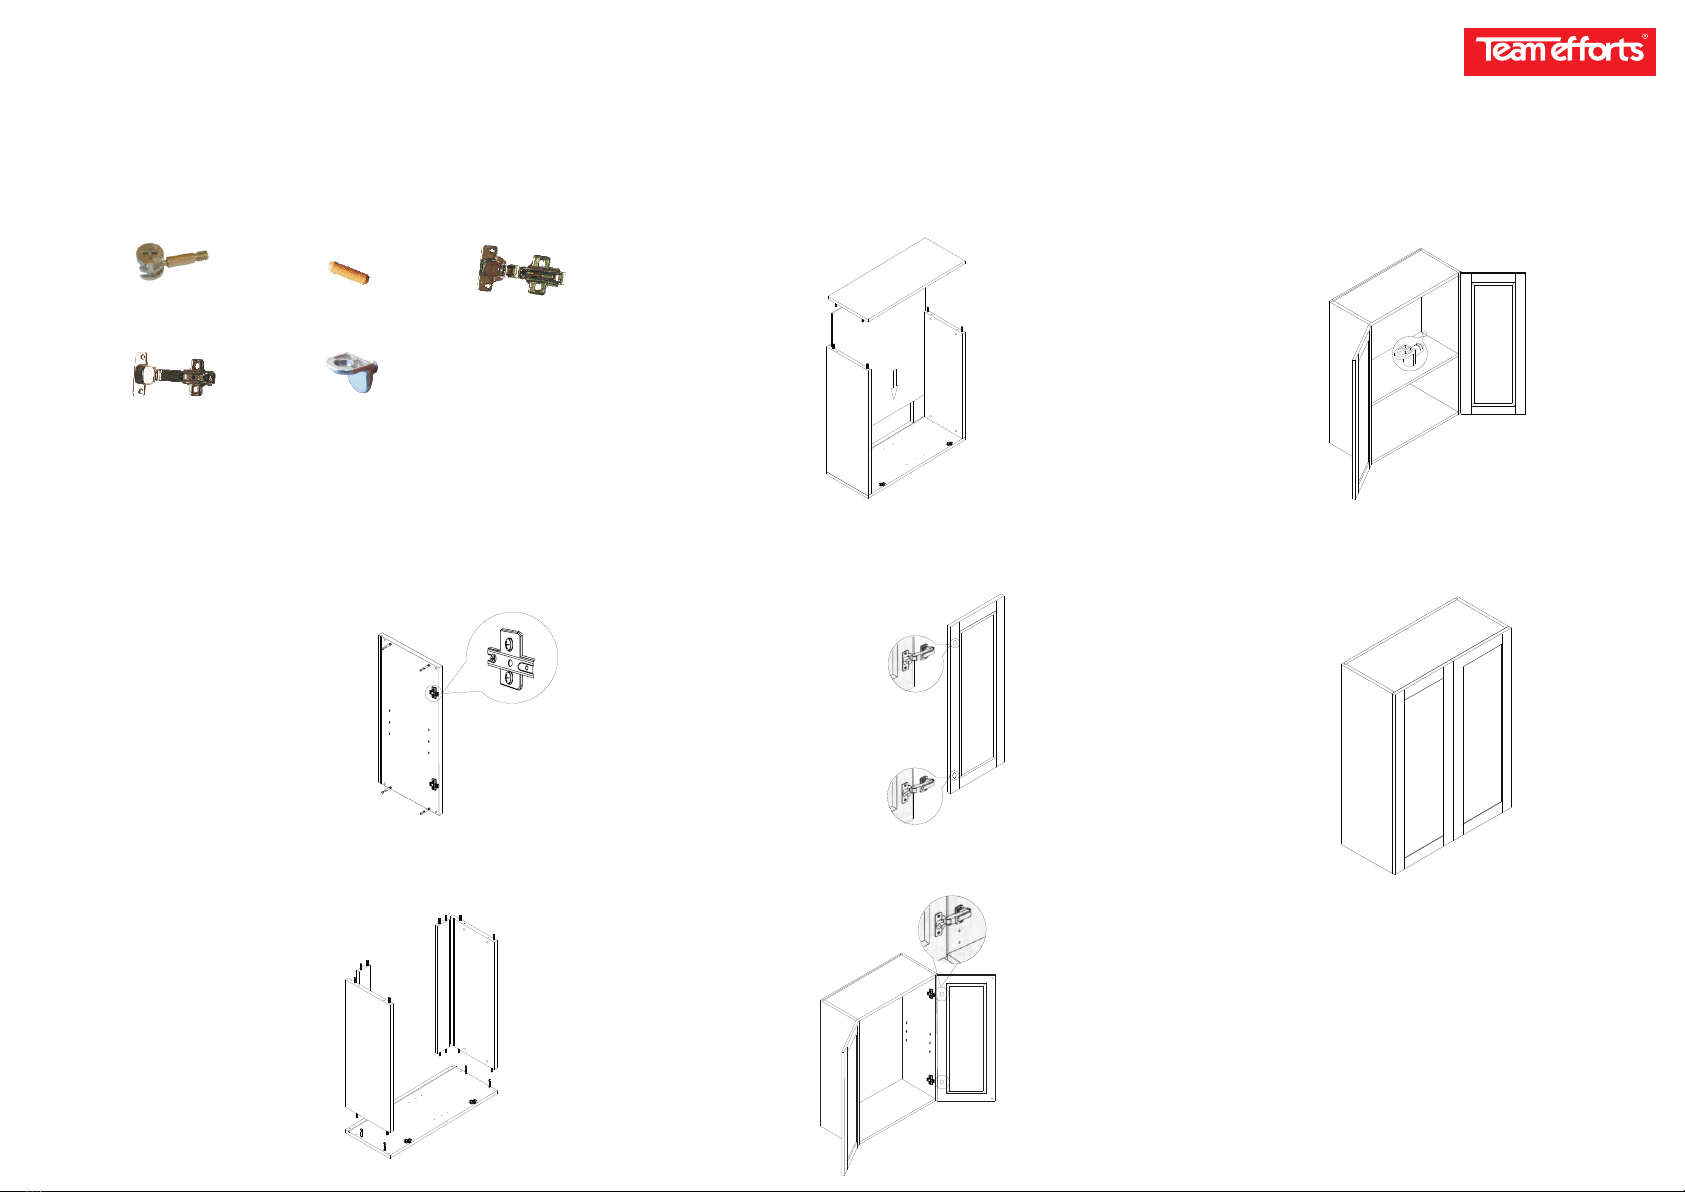
I.Hardware List:
Cam locks
II.Installation Steps:
Wood dowels
3/4" overlay soft-close hinges
3/4" overlay 6-way hinges
Step 3: Attach the Undermount soft-close slides onto the side panels using
the pre-drilled holes and the nickel round screws.
Step 4: ssemble the drawers and install the front connector on the
of the bottom panels of the drawers, secure with short screws.
A drawer underside
Soft-close slide rabbet
Front connector
Step 7: Connect the doors to the box, hinges on the door panels snap into the hinges on the
side panels.
Step 6: Install the 3/4"overlay soft-close hinges in the upper holes of the doors;Install
the 3/4"overlay 6-way hinges in the lower holes of the doors.
3/4" overlay soft-close hinges
Step :
. .
,
.
8 Install the shelf supports at the desired height then place shelves on top of the
supports Adjust the hinges to ensure that the clearance for all doors is the same
Finally check the firmness and stability of the cabinet tightening the cam locks
as necessary
Nickel Round Head screws 4 * 1 "
Undermount soft-close slides
Drawer front connectors
Step 5: Install the drawers.First,extend the arms of the drawer slides and place dawer on top of the
extended arms.There is a notch cut into the bottom of each side of the drawer where the arms
rest.Reach under and pull the arms to meet the drawer front connector. The arms should slide
forward until a " click" is felt.This is a secure connection.After that,a small lever on the
drawer front connector can be used to make small adjustments to correct clearance.
Adjust the height of drawer
Revolution Series Products Installation Instructions
------ Base Cabinet (B)
Shelf supports
3/4" overlay 6-way hinges
Step 2: Assemble the cabinet using cam locks and wood dowels.Start by screwing in all the male
ends of the cam locks and inserting the wooden dowels.When the sides,bottom base and
braces are loosely connected,tighten everything with the female part of the cam locks.
Finish by sliding the back panels into its groove.
Step 1: Install the soft-close hinge plate on upper holes of the side panels;install the 6-way
hinge plate on lower holes of the side panel.
Manufacturers
Cam locks
Shelf supports
I.Hardware List:
3/4" overlay 6-way hinges
3/4" overlay soft-close hinges
II.Installation Steps:
Step 2: connect the top ,bottom panel,back braces and side panel using cam
locks and wood dowels.
panel
Step 3: slide the back panel into its slot,then install the side panel using cam locks
and wood dowels.
Step 4: nstall the overlay soft-close hinges in the upper holes of the doors;
install the 3/4"overlay 6-way hinges in the lower holes of the doors.
I 3/4"
Step 6: Install the shelf supports at the desired height then place shelves on top of the
supports.
3/4" overlay soft-close hinges
3/4" overlay 6-way hinges
Step 7: Adjust the hinges to ensure that the clearance for all doors is the same.
Finally, check the firmness and stability of the cabinet tightening the
cam locks as necessary.
Step 5: connect the doors to the box,hinge on the door panels snap into the hinges on
the side panels.
Revolution Series Products Installation Instructions
------ Wall Cabinet (W)
Wood dowels
Step 1: Install the soft-close hinge plate on upper holes of the side panels;install the 6-way
hinge plate on lower holes of the side panel.
Manufacturers
I.Hardware List:
Cam locks
II.Installation Steps:
Wood dowels
3/4" overlay soft-close hinges
3/4" overlay 6-way hinges
Step 2: Assemble the cabinet using cam locks and wood dowels.Start by screwing in all the
male ends of the cam locks and inserting the wooden dowels.When the sides,bottom base
and braces are loosely connected,tighten everything with the female part of the cam locks.
Finish by sliding the back panel into its groove.
Step 3: Attach the Undermount soft-close slides onto the side panels using the pre-drilled
holes and the nickel round head screws.
Step 4: Assemble the drawers and install the drawer front connector on the underside
of the bottom panels of the drawers,secure with short screws.
Soft-close slide rabbet
Drawer front connector
Step 7: Connect the doors to the box,hinges on the door panels snap into the hinges on
the . pillar
Step 6: Install the 3/4"overlay soft-close hinges in the upper holes of the doors;Install the 3/4"
overlay 6-way hinges in the lower holes of the doors.
3/4" overlay soft-close hinges
3/4"overlay 6-way hinges
Step :
.
. ,
.
8 Install the shelf supports at the desired height then place shelves on top
of the supports Adjust the hinges to ensure that the clearance for all doors
is the same Finally check the firmness and stability of the cabinet
tightening the cam locks as necessary
Nickel Round Head screws 4 * 1 "
Undermount soft-close slides
Drawer front connector
Step 5: Install the drawers. First,extend the arms of the drawer slides and place drawer
on top of the extended arms.There is a notch cut into the bottom of each side
of the drawer where the arms rest. Reach under and pull the arms to meet the
drawer front connector.The arms should slide forward until a " click"is felt.
This is a secur onnector.After that,a small lever on the drawer front connector
can be used to make small adjustment to correct clearance.
Adjust the height of drawer
Revolution Series Products Installation Instructions
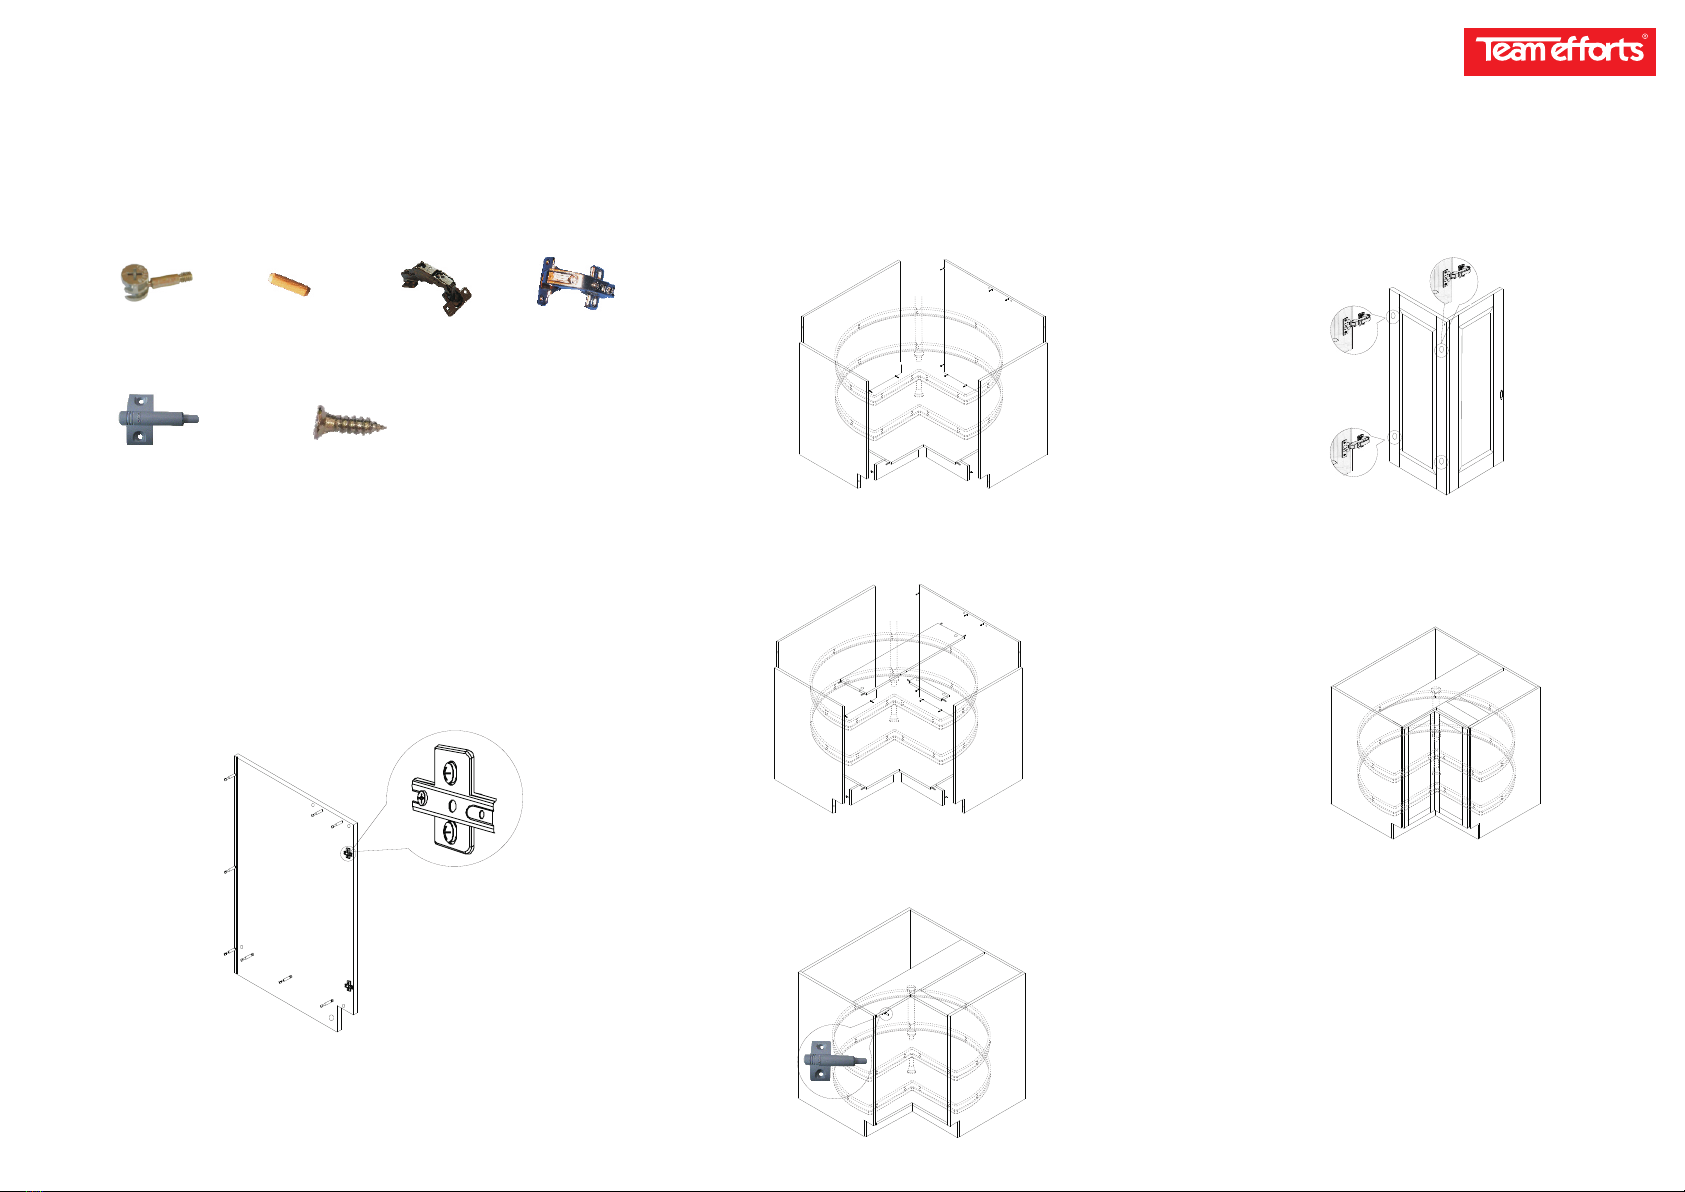
------ Base Blind Corner (BBC)
Shelf supports
Step 1: Install the soft-close hinge plate on upper holes of the pillar;install the 6-way
hinge plate on lower holes of the pillar.
Manufacturers

I.Hardware List:
Cam locks
II.Installation Steps:
Wood dowels
3/4"overlay soft-close hinges
3/4"overlay 6-way hinges
Step 2: Assemble the cabinet using cam locks and wood dowels.Start by screwing in all
male ends of the cam locks and inserting the wooden dowels.When the sides,
bottom base and braces are loosely connected,tighten everything with the female
part of the cam locks.Finish by sliding the back panel into its groove.
Step 3: Install the front panel to the front brace and attach using screws.
Step 5: Connect the doors to the box,hinges on the door panels snap into the hinges on the
side panels.
Step 4: Install the 3/4"overlay soft-close hinges in the upper holes of the doors;Install the 3/4"
overlay 6-way hinges in the lower holes of the doors.
3/4" overlay soft-close hinges
3/4" overlay 6-way hinges
Step 6: Adjust the hinges to ensure that the clearance for all doors is the
same.Finally, check the firmness and stability of the cabinet tightening
the cam locks as necessary.
Revolution Series Products Installation Instructions
------ Sink Base (SB)
Black screws 3.5 * 1.2 "
Step 1: Install the soft-close hinge plate on upper holes of the side panels;install the 6-way
hinge plate on lower holes of the side panel.
Manufacturers

I.Hardware List:
Revolution Series Products Installation Instructions
------ Base Drawer (DB)
II.Installation Steps:
Step 1: Assemble the cabinet using cam locks and wood dowels.Start by screwing in all
male ends of the cam locks and inserting the wooden dowels.When the sides,bottom
base and front and back braces are loosely connected,tighten everything with the
female part of the cam locks.Finish by sliding the back panel into its groove.
Step 4: Install the drawers.First,extend the arms of the drawer slides and
place drawer on top of the extended arms.There is notch cut into the
bottom of each side of the drawer where the arms rest.Reach under
and pull the arms to meet the drawer front connector.The arms should
slide forward until a "click"is felt.This is a secure connection.
Step 2: Attach the Undermount soft-close slides onto the side panels using the pre-drilled
holes and the nickel round head screws.
Step5:After that,a small lever on the drawer front connector can be used to make
small adjustments to correct clearance.Check the stability of the cabinet and
make adjustments by tightening the cam locks.
Step3: Assemble the drawers and install the drawer front connector on the underside
of the bottom panels of the drawers,secure with short screws.
Soft-close slide rabbet
Drawer front connector
Adjust the height of drawer
Cam locks
Wood dowels
Nickel Round Head screws 4 * 1 “
Undermount soft-close slides
Drawer front connector
Manufacturers

I.Hardware List:
Cam locks
II.Installation Steps:
Wood dowels
3/4" overlay soft-close hinges
3/4" overlay 6-way hinges
Step 6: Connect the doors to the box,hinges on the door panels snap into the
hinges on the side panels.
Step 5: Install the 3/4"overlay soft-close hinges in the upper holes of the doors;Install the 3/4"
overlay 6-way hinges in the lower holes of the doors.
3/4" overlay soft-close hinges
3/4" overlay 6-way hinges
Revolution Series Products Installation Instructions
------ Pantry Cabinet (WP)
shelf supports
Step 2: Connect the top panel,bottom panel,middle panel and back braces to
one side panel using cam locks and wood dowels.
Step 3: Slide the back panel into its slot in the top and bottom panels.
Step 4:Install the other side panel and toe kick using cam locks and wood dowels.
Step 7: Install the shelf supports at the desired height then place shelveson top
of the supports.
Step 8:Adjust the hinges to ensure that the clearance for all doors is the
same.Finally,check the firmness and stability of the cabinet tightening
the cam locks as necessary.
Sha
Step 1: Install the soft-close hinge plate on upper holes of the side panels;install the 6-way
hinge plate on lower holes of the side panel.
Manufacturers

I.Hardware List:
Cam locks
II.Installation Steps:
Wood dowels
3/4"overlay soft-close hinges
3/4"overlay 6-way hinges
Step 6: Connect the doors to the box,hinges on the door panels snap into the hinges
on the side panels.Insert the male fasteners into the female fasteners to attach
the center frame.
Step 5: Install the overlay soft-close hinges in the upper holes of the doors;install
the 3/4"overlay 6-way hinges in the lower holes of the doors.Install the male
fasteners on the center frarm.
3/4"
3/4" overlay soft-close hinges
3/4" overlay 6-way hinges
Step 1:
In the middle install the female
fasteners.
Install the soft-close hinge plate on upper holes of the side panels. install the
6-way hinge plate on lower holes of the side panel. ,
Revolution Series Products Installation Instructions
------ Oven Cabinet-Single (OVS)
shelf supports
Step 2: Connect the top panel,bottom panel,middle panels and back braces
to one side panel using cam locks and wood dowels.
Step 3: Slide the back panel into its slot in the top and bottom panels.
Step 4: Install the other side panel and toe kick using cam locks and wood dowels.
Step 7: Install the shelf supports at the desired height then place shelves on
top of the supports.
Step 8: Adjust the hinges to ensure that the clearance for all doors is the same.
Finally, check the firmness and stability of the cabinet tightening the cam
locks as necessary.
Panel fasteners (female)
Panel fasteners (male)
Manufacturers

I.Hardware List:
Cam locks
II.Installation Steps:
Wood dowels
3/4" overlay soft-close hinges
3/4" overlay 6-way hinges
Step 5: Connect the doors to the box,hinges on the door panels snap into the hinges on the side panels.
Insert the male fasteners into the female fasteners to attach the center frame.
Step 4: Install the 3/4"overlay soft-close hinges in the upper holes of thedoors;install the
3/4"overlay 6-way hinges in the lower holes of the doors.Install the male fasteners
on the center frame.
Step :
In the middle,install the female fasteners.
1 Install the soft-close hinge plate on upper holes of the side panels;install the 6-way hinge
plate on lower holes of the side panel.
3/4"overlay soft-close hinges
3/4"overlay 6-way hinges
Revolution Series Products Installation Instructions
------ Oven Cabinet-Double (OVD)
Shelf supports
Step 2: Connect the top panel,bottom panel,middle panels and back braces to one side panel using
cam locks and wood dowels.Slide the back panel into its slot in the top and bottom panels.
Step 3: Install the other side panel and toe kick using cam locks and wood dowels.
Step 6: Install the shelf supports at the desired height then place shelves on top of the
supports.
Step8:After that,a small lever on the drawer front connector can be used to make small adjustment to
correct clearance.Check the stability of the cabinet and make adjustment by tightening the cam locks.
Fasteners (female)
Fasteners (male)
Undermount soft-close slides
Drawer front connector
Soft-close slide rabbet
Drawer front connector
Step 7: Install the drawers.First,extend the arms of the drawer slides and place drawer on top of the extended
arms.There is a notch cut into the bottom of each side of the drawer where the arms rest.Reach under and
pull the arms to meet the drawer front connector.The arms should slide forward until a " click" is felt.
This is a secure connection.
Adjust the height of drawer
Nickel Round Head screws 4 * 1"
Manufacturers
I.Hardware List:
Cam locks
II.Installation Steps:
Wood dowels
Revolution Series Products Installation Instructions
------ Base Corner Cabinet (DCB)
O
165 hinges
O
135 hinges
Step 6: Connect the doors to the cabinet.Match up the screw holes on
the side panel to the holes in the hinge and tighten.Adjust the
hinges to ensure that the clearance for all doors is the same.
Finally,check the firmness and stability of the cabinet tightening
cam lock where necessary.
Soft-close bumpers
Step 4: Install the door hinges.First,connect the two door panels
together using the hiinges,then attach the hinges
to the door.
135 ° 165°
Step 2: When the 4 side panels, bottom and braces are loosely connected,
put the lazy susan trays into the cabinet.
Step1: Assemble the cabinet body using cam locks and wood dowels.Start by
screwing in all the male ends of the cam locks and inserting the wooden
dowels.
Nickel screws ø4 * 5/8"
Step 3 : Tightening everything with the female part of the cam locks.Finish by
sliding the back panel into its groove.
Step 5:
and bottom panels.
Install the metal turntable.Screw the flanges into the top
O
165 hinges
O
135 hinges
O
165 hinges
Manufacturers
Table of contents
Popular Indoor Furnishing manuals by other brands

Regency
Regency LWMS3015 Assembly instructions

Furniture of America
Furniture of America CM7751C Assembly instructions

Safavieh Furniture
Safavieh Furniture Estella CNS5731 manual

PLACES OF STYLE
PLACES OF STYLE Ovalfuss Assembly instruction

Trasman
Trasman 1138 Bo1 Assembly manual

Costway
Costway JV10856 manual


