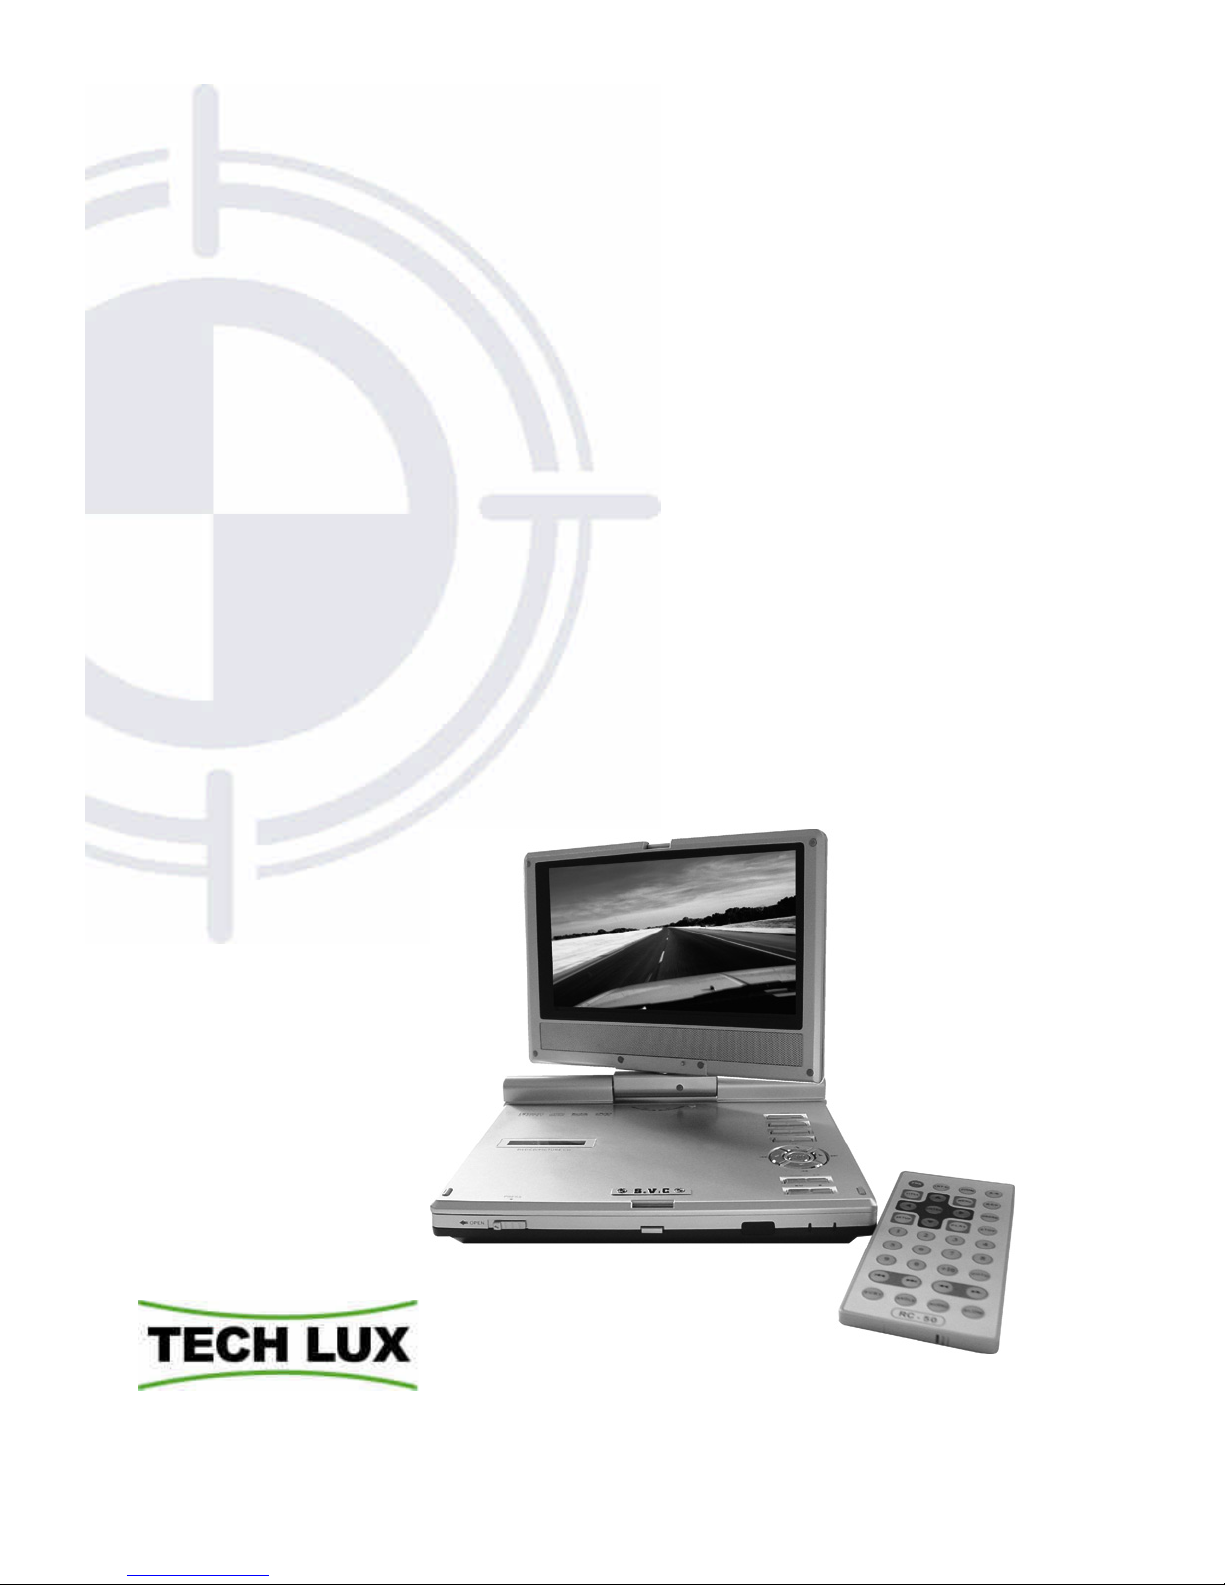
TECH LUX TL107004 User manual
1
TL107004
- Operating manual
TECH LUX 4
2
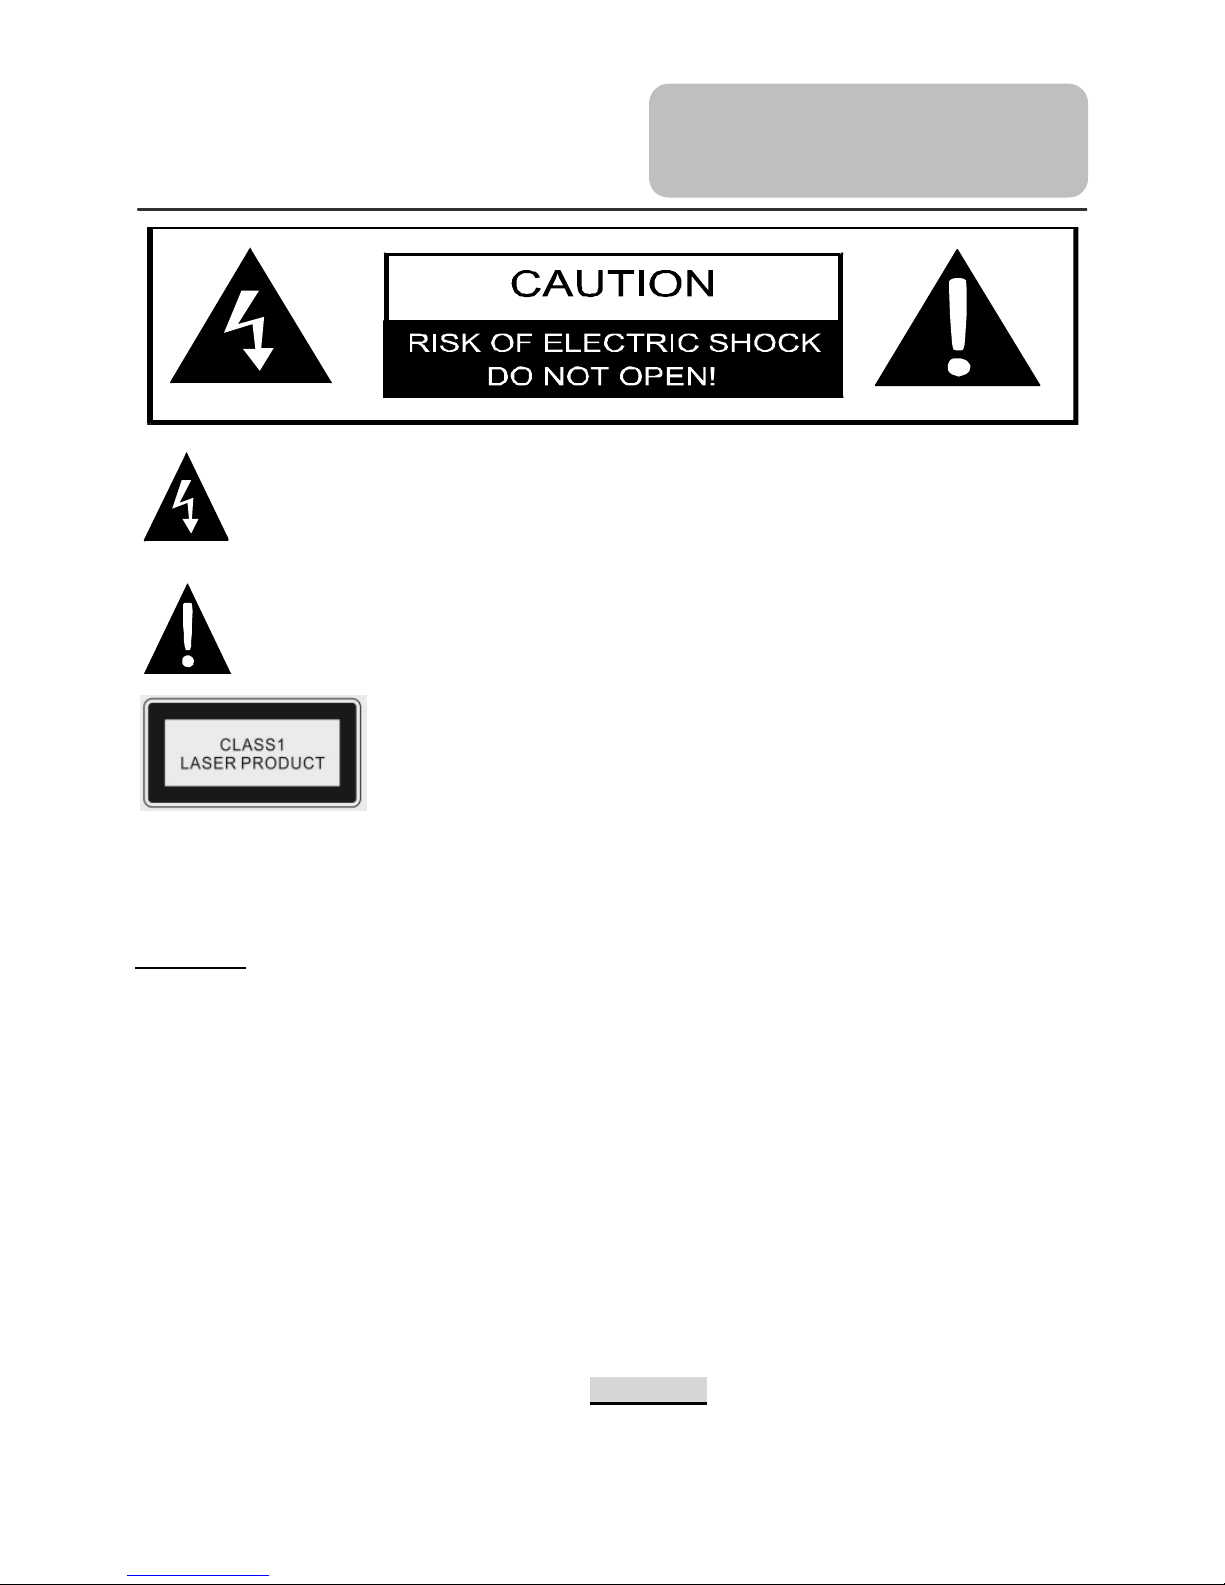
CAUTION: USE OF ANY CONTROLS, ADJUSTMENTS, OR PROCEDURES OTHER
THAN THOSE SPECIFIED HEREIN MAY RESULT IN HAZARDOUS RADIATION
EXPOSURE
CAUTION
1. The product contains a low-power laser device. In order to ensure the safety of the
laser device, do not remove any cover and attempt to repair the unit. If any service
is needed, please contact the distributor or its authorized service center.
2. To reduce the risk of electric shock, do not remove the cover (or back). No
user-serviceable parts inside. Refer servicing to qualified service personnel. Unplug
the product from the wall outlet before servicing or when it is unused for a long
period of time.
3. The manufacturer should not hold responsibility for the damage caused by any
substitutions and modifications of the product without authorization from the
manufacturer or authorized unit.
4. Danger of explosion if battery is incorrectly replaced. Replace only with the same or
equivalent type. WARNING
The apparatus shall not be exposed to dripping or splashing and that no objects filled
with liquids, such as vases, shall be placed on the apparatus.
The lightning flash with arrowhead symbol, within an equilateral triangle, is
intended to alert the user to the presence of un-insulated “dangerous
voltage” within the product’s enclosure that may be of sufficient magnitude
to constitute a risk of electric to persons.
The exclamation point within an equilateral triangle is intended to alert the
user to the presence of important operating and maintenance (servicing)
instructions in the literature accompanying the appliance.
CAUTION: Laser radiation when open. Do not stare into
beam.
Important Safety
Instruction

3
NOTES
1. Read these instructions.
2. Keep these instructions.
3. Heed all warnings.
4. Follow all instructions.
5. Do not use this apparatus
near water.
6. Clean only with dry cloth.
7. Do not block any ventilation openings. Maintain well ventilated conditions around
the product. Do not put product on bed, sofa or anything that blocks ventilation.
Install according to the manufacturer’s instructions.
8. Do not install near any heat sources such as radiators, heat registers, stoves or
other apparatus (including amplifiers) that produce heat.
9. Read, heed and follow all instructions to ensure correct and safe installation and
interconnection of the apparatus;
10. The apparatus shall not be exposed to dripping or splashing and that no objects
filled with liquids, such as vases, shall be placed on the apparatus;
11. The mains socket-outlet shall be installed near the apparatus and the mains plug
shall remain readily operable;
12. Protect the power cord from being walked on or pinched particularly at plugs,
convenience receptacles, and the point where they exit from the apparatus.
13. Only use attachments/accessories specified by the manufacturer.
14. Unplug the apparatus during lightning storms or when unused for long periods of
time.
15. Refer all servicing to qualified service personnel. Servicing is required when the
apparatus has been damaged in any way, such as power-supply cord or plug is
damaged, liquid has been spilled or objects have fallen into the apparatus, the
apparatus has been exposed to rain or moisture, does not operate normally, or has
been dropped.
16. The apparatus shall be connected to a mains socket outlet with a protective
earthing connection.
Note: Do not touch the color TFT LCD screen by hand directly.
Copyright Protection
This product incorporates copyright protection technology that is protected by U.S.
patents and other intellectual property rights. Use of this copyright protection technology
must be authorized by Macrovision, and is intended for home and other limited viewing
uses only unless otherwise authorized by Macrovision. Reverse engineering or
disassembly is prohibited.
IMPORTANT FOR LASER PRODUCTS
1. CLASS 1 LASER PRODUCT
2. DANGER: Visible laser radiation when open and
interlock failed or defeated. Avoid direct exposure to
beam.
3. CAUTION: Do not open the top cover. There are no
user serviceable parts inside the unit. Leave all
servicing to qualified service personnel.
Important Safety
Instruction

4
High-quality audio and video
Advanced Playing Functions
Other Special Functions
Excellent sound: Dolby Decoder
delivers great sound.
A
V In: External Audio, Video input can
be connected to most external AV
sources.
AV Out: Analog Audio output and video
output.
High Resolution: MPEG-2 decoding
format achieves more than 500 lines of
horizontal resolution.
Power Adapter Switch: Automatically
adapts to voltage requirements in U.S
and other countries.
On-screen Display: You can choose
from English, French, Spanish, etc. for
On-screen Display language.
Compatibility: Compatible with DVD, CD,
MP3 andPicture CD disks, etc.
Particular Performance: Multi-speed,
fast forward, fast backward and slow
forward, slow backward.
Search by Time:
Search for a certain
track of a diskby selected time.
Last Memory Playback: Memorize the
stopped playback track and continue
playing disk from this spot on power on
status or without opening the disc tray
cover.
Special Functions: Supports screen
aspect ratio changing, zooming in or out
pictures, multi-language caption,
multi-angle.
Docking Jack
(optional)
:
this unit
designed
with docking jack o
n the bottom for connecting
with the docking station. The docking station integrated with connectors for peripheral devices
to eliminate the complicated connections and save valuable space around.
Features
Region Code:
DVD players and discs are coded by region.
These regional codes must match.
If the codes don’t match, the disc cannot beplayed. This player’s code is region 2.

5
Accessories List
ITEM NAME QTY
Remote Control (with battery) 1
Carry bag with patented headrest
cover system 1
DC Adapter (Car Adapter) 1
Rechargeable Battery Pack 1
Operation Manual 1
Power Supply Cord with AC Adapter 1
Earphone 1
Audio/Video Cable 1
NOTE
:
Accessories and their parts numbers are subject to change without prior notice.
Accessories
6
DVD Playback
CD Playback
Picture CD Playback
MP3 Playback
Contents
……………………………………….…..2
…………………………………………...4
…………………………………………...5
…………………………………………...6
………………………………….………..7
……………………………………………9
………………………………………….10
…………………………………………..11
…………………………………………..12
…………………………………………..15
…………………………………………..18
…………………………………………..19
…………………………………………..22
…………………………………………..23
…………………………………………..24
…………………………………………..28
…………………………………………..30
…………………………………………..33
…………………………………………..35
…………………………………………..42
…………………………………………..43
…………………………………………..45
Important Safety Instructions
Features
Troubleshooting
Specifications
Definitions
System Setup
View of Side Panels
View of Main Unit Bottom
Power Supply Preparation
Rechargeable Battery
Notes on Discs
Playback Operation
Remote Control
System Connections
Accessories
View of Main Unit
Contents
Revolving LCD Screen

7
Front View
1. TFT LCD
7” color TFT screen presents high resolution picture.
2. Speakers
Twospeakers output high quality stereo sound.
3. MODE Button
Pressto change the brightness, contrast and color level.
Press it for 1~2 seconds to change the aspect ratio between 16:9 and 4:3 and overturn
the screen.
View of Main Unit

8
4. +/- Button
Pressto adjust the level of the selected item such as brightness, contrast, etc.
5. SETUP Button
Press to access the DVD setup menu.
6. TITLE Button
Press to display the disc title menu if the titles are coded in the disc
7. ZOOM Button
Press to activate the zoom function to zoom in or out the current image.
8. /,/,/,/Button
/:press the direction buttons to select items.
/:press to fast search backward and forward during disc playback.
/: press the direction button to select items.
/: press to play the previous track or the next track.
9. ENT Button
Press to confirm your selection.
10. PLAY/PAUSE Button
Press to start playback or pause the playback.
11. STOP Button
Pressto stop playback. Press the button to resume playback.
12. MENU Button
Pressto enter to the disc menu
13. Power Indicator
Light turns green when the unit is under operation; turns red in standby mode.
14. Charge Indicator
Light turns red when the battery is in charging; turns green when the battery is fully
charged.
15. Remote Sensor
Receive the signal from the remote control for operation.
16. OPEN Button
Push it to open disc tray cover.
View of Main Unit

9
Right Side View
1. VOLUME Control
Use to adjust the volume level of Speakers or Headphones.
2. Headphone Jack
When headphones are plugged into the unit, the speakers will turn off automatically.
3. AUDIO input/output Jack and Optical Digital Output Jack
When the AV IN/OUT switch is switched to “IN” mode, this jack is used for audio
input. When the AV IN/OUT switch is switched to “OUT”, this jack is used for audio
output or optical digital output.
4. VIDEO input/output Jack
For connecting to an external monitor or video source
5. AV IN/OUT Switch
Switch to “IN” to input an external Audio/Video signal. Switch to “OUT” to keep
normal playback or output.
6. DC 12V IN Jack
For connecting to power supply, including CarAdapter.
Left Side View
1. POWER ON/OFF Switch
Switch the power on or off.
View of Side Panels

10
View of the bottom
1. Rechargeable Battery Contacting Point
For connecting with the rechargeable battery pack.
2. Docking Jack
This portable DVD player is designed with a Docking Jack on the bottom. The
Docking Jack is designed for connecting to external Docking station (optional) to
get more expanded functions. Docking station is a set of electrical connection
interface that enables a portable DVD to effectively serve as a desktop DVD. It
typically integrated with connectors for peripheral devices to eliminate the
complicated connections and save valuable space around. With Docking Station
(optional), you can simultaneously enjoy the expansion possibilities of desktop
model DVD with the portability of portable DVD.
View of Main Unit
Bottom

11
Revolving Steps
The revolving LCD screen is one of the outstanding features about this product. We’d
like to suggest you to take the following steps for proper operation.
Pos.A
1. Open the screen cover to position
(A) as shown in left figure at which
the screen is vertical to the operation
panel.
Pos. B
2. Revolving the screen horizontally
about it’s axis in the clockwise only.
The maximum revolving degree is
180 (position C). If you want to return
to initial position (A), please revolve
screen counter clockwise until it
clicks.
Pos. C
3. You can rotate the screen vertically
from position C to the operation panel
as indicated in left fig.
Pos. D
4. The final rotating position (position D)
at which the screen facing upward
and back to operation panel.
Revolving LCD
Screen
12
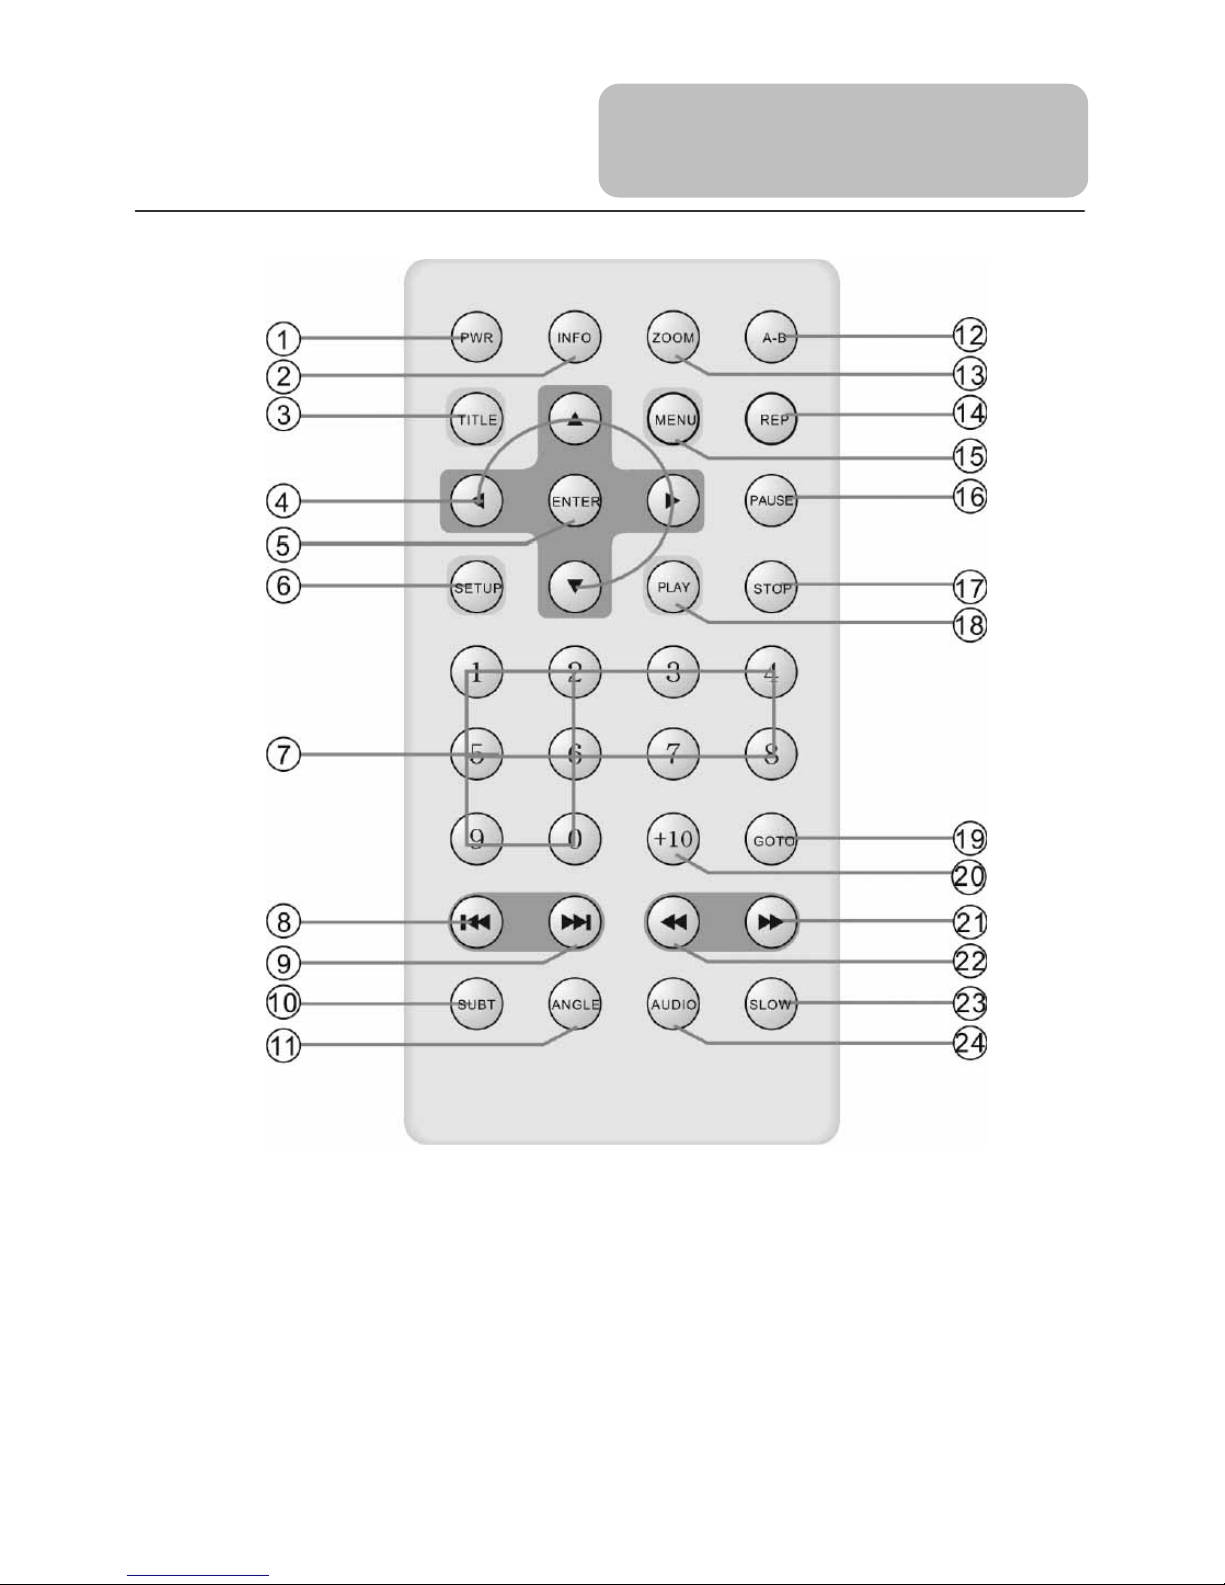
1. PWR button
Press to access standby mode or
playback mode.
2. INFO button
Press to display the detailed
information of the disc during
playing. Press it again to exit from
the information display.
3. TITLE button
Press to display title menu if the
titles are coded in the disc.
4. Direction button
Press to select menu items.
5. ENTER button
Press to confirm your selection.
6. SETUP button
Press to access the DVD player’s
setup menu.
Remote Control

13
7. 0-9 number buttons
Select numbers by pressing these
buttons.
8. button
Press to go to the beginning of
current track or chapter. Press twice
to go to the previous track or
chapter.
9. button
Press to go to the next track or
chapter.
10. SUBT button
When playing a DVD coded with
multi-subtitles, press to select a
subtitle language or to turn subtitles
off.
11. ANGLE button
Press to access various camera
angles, if the DVD disc contains
multiple camera angles.
12. A-B button
Press to play a section of the disc
from point A to point B. Press once
to select the starting point (A), press
again to select the end point (B). In
A-B repeat playback, press this
button to stop the repeat.
13. ZOOM button
Press to enter and cycle through
zoom functions, use the direction
buttons () to move around
the screen.
14. REP button
Press to repeat a chapter, track, title,
or the entire disc.
15. MENU button
Display the actual DVD Disc Menu
on screen in playback mode.
16. PAUSE button
Press to pause playback. Press the
PLAY button to resume normal
playback.
17. STOP button
Press once to stop playback. Press
the PLAY button to resume normal
playback. Press it twice to stop
playback completely.
18. PLAY button
Press to start playback.
19. GOTO button
Press to select the desired disc
starting time, track or title.
20. +10 button
Select number greater than 9 by
pressing the (+10) button first, and
then additional number button as
needed.
21. button
Press to fast search forward during
playback.
22. button
Press to fast search backward
during playback.
23. SLOW button
Press to activate slow playback.
24. AUDIO button
Press to access various audio
languages, when the DVD disc
contains multiple audio languages.
Remote Control

14
Battery Installation Steps
With the remote control unit placed on a flat surface and follow the steps below to install
the battery.
Step 1: Pull the battery holder out from the remote
control in the direction of the arrow.
Step 2: Load a new battery properly with
its (+) sided up.
Step 3: Insert the battery holder back into
remote control
Battery Property
Battery Type: CR2025 3V
Battery service Life: Approximately 1 year under normal use (at room temperature).
Using of Remote Control
1. For best results, aim the remote control directly at the player’s receiving window
within the range of 15 feet and angles of 60 degree, and without obstacles between
remote control and remote sensor.
2. Improper use of the battery may cause overheating, and explosion or ignition,
resulting in an injury or a fire. Battery leakage may damage the product.
3. Do not expose the remote control unit to direct sunlight.
4. Do not recharge, disassemble, deform or heat the battery.
5. Do not put the battery in fire or water.
6. Immediately replace used up battery.
Remote Control
15
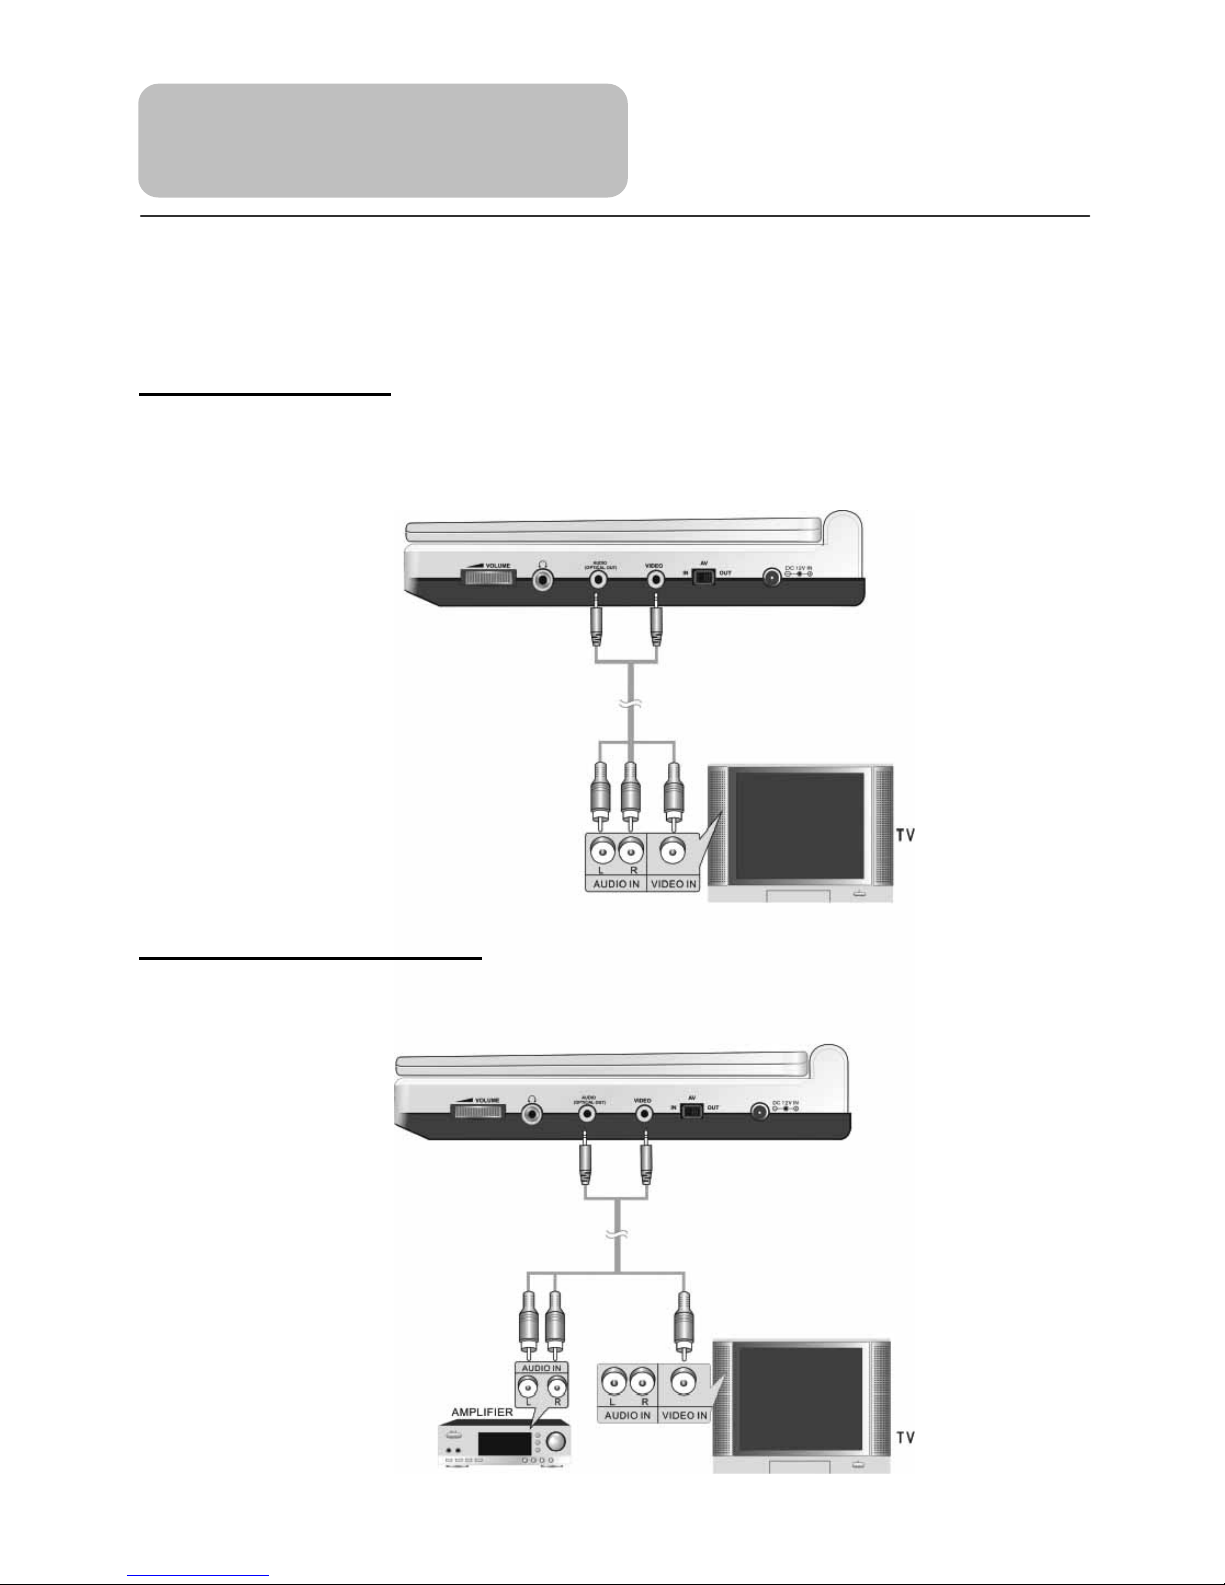
Always ensure that the DVD player, TV and any other electrical equipment that
connecting with DVD player is switched off and unplugged from the power supply.
Ensure that you observe the color coding when connecting audio and video cables.
Connecting to TV
Audio/Video connections
Follow the drawings below to connect the DVD player to TV's Audio/Video inputs with
Audio/Video cables.
Connecting to Amplifier
Refer to your Audio equipment's manual before connection.
Follow the drawings below to connect the DVD player to an AV amplifier.
System Connections
16
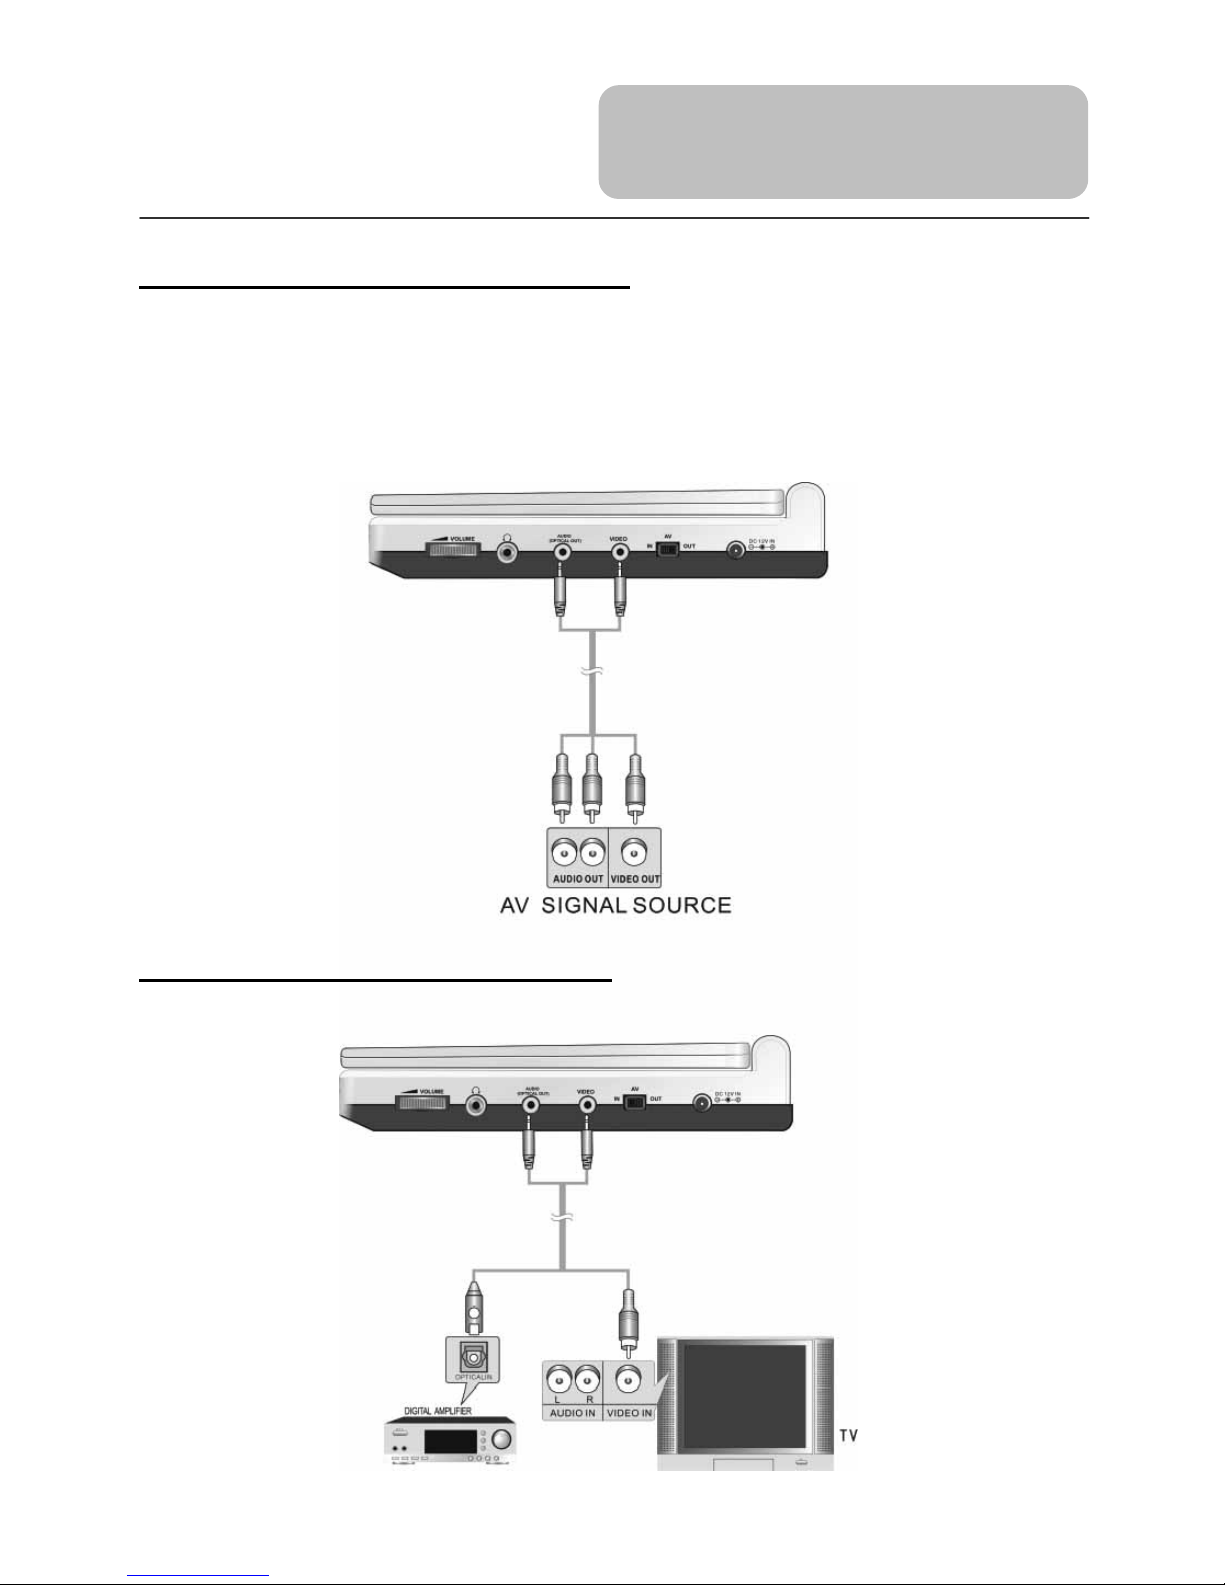
Connecting to External AV Source
The unit supports an AV signal input function. Use the audio/video cable to connect the
unit to the external AV signal source such as a DVD, VCR etc. After connecting, switch
the AV IN/OUT toAV IN.
Note: Noise may occur in speakers when there is an external audio signal input while
playing a DVD disc. Unplug the audio cable to clear the noise.
Connecting to A Digital Amplifier
The DVD Player can be connected to an amplifier with a digital optical input.
System Connections
17
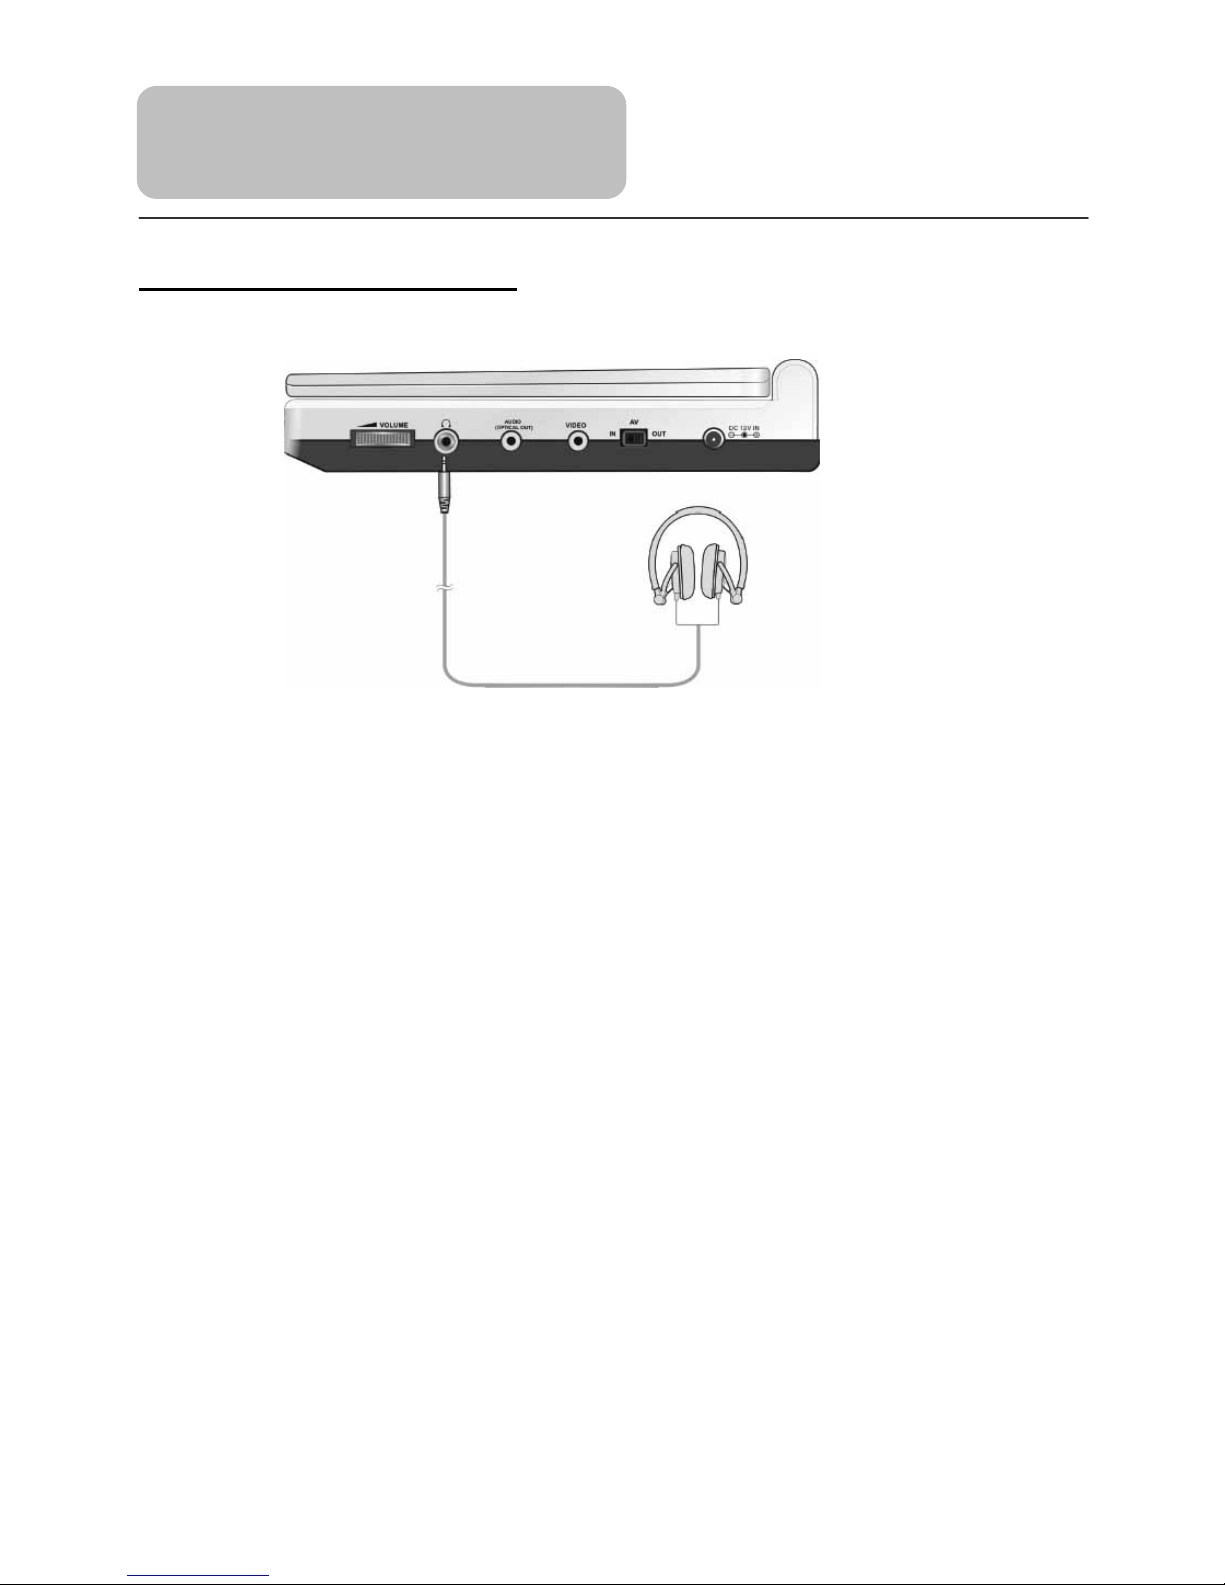
Connecting to Headphone
Connect the headphone to the headphone jack on the right side of the unit.
When headphone is connected, the speaker will automatically turn off.
System Connections

18
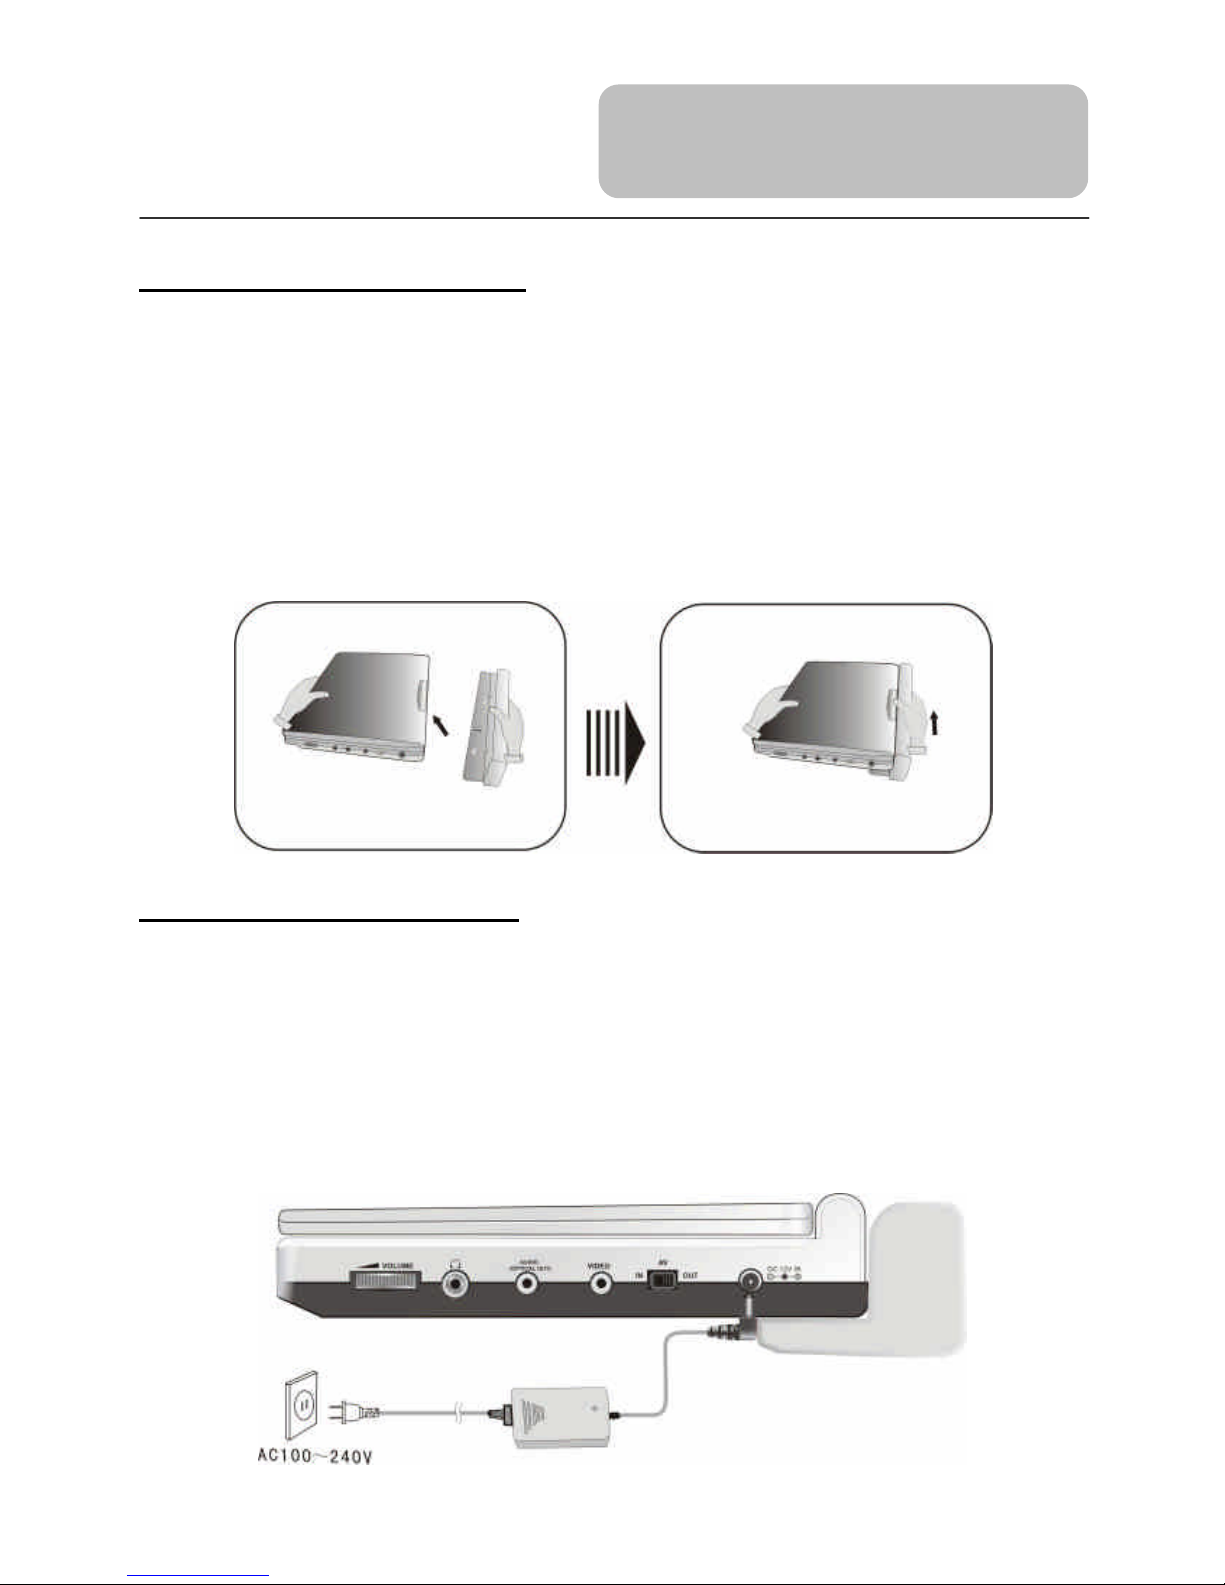
Using of AC Adapter
The player is supplied with an AC adapter for powering the unit and charging the battery.
Note: Turn player's power off before unplugging.
Note: When using the adapter, the LCD screen will be brighter than with the
rechargeable battery.
Using of Car Adapter
The player is supplied with a Car Adapter for powering the unit and charging the battery
while in a vehicle.
Attention
Do not operate the unit or view video software while driving a vehicle.
Place the unit in a proper position for viewing.
Please detach battery pack when using car adapter as power source.
Disconnect the player from the Cigarette Lighter when starting the vehicle.
Connect the Car Adapter Power Plug to
the unit's power jack and plug the other
end to the Vehicle’s 12V accessory/
cigarette lighter socket, as shown in the
right figure.
Power Supply
Preparation
1. Connect AC adapter to the right side
of the DVD player in the jack marked
DC 12V IN (as the right figure).
2. Plug the two-prong end of the power
cord into a grounded electrical socket.
The power indicator lights red.

19
About Rechargeable Battery Pack
Your portable DVD player comes with a lithium ion rechargeable battery that attaches to
the rear of the DVD player. Charge the battery fully before initial use. Charging time is
normally about 5 hours. A fully charged battery delivers about 3 hours of use, but playing
time varies from disc to disc. If the battery will not be used for a long period of time, fully
charge the battery prior to storage.
Working conditions and precautions of the battery
New batteries should be fully charged before initial use.
Battery should only be used and charged when temperatures are between 0 –
38°C.
Never put the battery in fire or water.
Do not expose the battery to high temperatures or store in hot, sunny places.
Maintain well-ventilated conditions around the product to avoid overheating. Don’t
put the product on bed, sofa or anything that may block ventilation to the product.
Do not short the battery terminals.
Do not open the battery.
Detach the battery after charging is complete. When charging the battery pack, the
charge light will turn red, when the charging is complete, the light will turn green.
Detach the battery when not in use.
When the battery is weak, “ ” will appear on the LCD screen and about five
minute later, the player will power OFF automatically.
Warning:
Do not touch any metal objects to the battery connectors, as it will put the battery in
standby mode. To exit the standby mode, connect the battery and DVD player to AC or
DC power
Rechargeable Battery
20
Attaching the Battery Pack
Refer to the following steps for attaching the Battery Pack:
1. Makesure the DVD player is off and theAC or car adapter is disconnected.
2. Place the DVD player on a soft and smooth surface.
3. With one hand on the DVD player to prevent it from moving, take the battery and
align the plastic tabs on the battery pack with holes on the player, and push the
battery pack into the DVD player.
4. The battery pack will click into place.
Charging the Battery Pack
The battery pack must be attached to the DVD player to charge it using the supplied AC
Power Adapter.
1. Attach the battery pack to the DVD player, as shown above.
2. Plug the supplied AC Power Adapter into the player’s power jack marked “DC
12V IN”, located on the right side of the DVD Player.
3. Plug the other end of the AC Power Adapter Cord into a household AC Outlet as
shown below.
Rechargeable Battery
Table of contents
Other TECH LUX Portable DVD Player manuals


