Tecnogas TNP HD ZEUS 1 User manual

¤Ù‹Á×Í¡ÒÃ㪌§Ò¹à¤Ã×่ͧ´Ù´¤Çѹ
TNP HD ZEUS 1
ÊÒúÑÞ
¢ŒÍÁÙÅà¡Õ่ÂǡѺ¼ÅÔµÀѳ±
¤Óá¹Ð¹Óà¾×่ͤÇÒÁ»ÅÍ´ÀÑÂ
ÃÒÂÅÐàÍÕ´¼ÅÔµÀѳ±
¡ÒõԴµÑ้§
ÃкºÃкÒÂÍÒ¡ÒÈ
¡ÒõԴµÑ้§Ãкºä¿¿‡Ò
¢Ñ้¹µÍ¹¡ÒõԴµÑ้§
ÇÔ¸Õ¡ÒÃ㪌§Ò¹á¼§¤Çº¤ØÁ
¡Ò÷ӤÇÒÁÊÐÍÒ´áÅСÒúÓÃاÃÑ¡ÉÒ
»˜ÞËÒ·Õ่ÍÒ¨¾ºä´Œ áÅÐÇÔ¸Õ¡ÒÃá¡Œä¢àº×้ͧµŒ¹
1
1
2
3
4
5
5
6
7
9

¢ŒÍÁÙÅà¡Õ่ÂǡѺ¼ÅÔµÀѳ±
1. à¤Ã×่ͧ´Ù´¤Çѹ´Õ䫹àÃÕº ËÃÙ ·Ñ¹ÊÁÑÂáÅСÒÃÍ͡ẺãËŒÁÕÃÙ»·Ã§·Õ่á¢็§áç
2. ´ŒÇ»ÃÐÊÔ·¸ÔÀÒ¾ÁÍàµÍÃáç´Ù´ÊÙ§ ¨Ö§ÊÒÁÒö¡Ó¨Ñ´¤Çѹ䴌Í‹ҧÁÕ»ÃÐÊÔ·¸ÔÀÒ¾
áÅÐÊÒÁÒöÃкÒÂÍÒ¡ÒÈ䴌໚¹Í‹ҧ´Õ
3. ·Ó§Ò¹´ŒÇÂÃдѺàÊÕ§µ่Ó ¨Ò¡¡ÒÃÍ͡ẺÁÍàµÍÃáÅÐ㺾ѴẺ¾ÔàÈÉ·Õ่ä´ŒÃѺ¡ÒõÑ้§ÈÙ¹ÂÁÒ໚¹Í‹ҧ´Õ
·ÓãËŒ¡Ò÷ӧҹ¢Í§à¤Ã×่ͧ´Ù´¤ÇѹÁÕ»ÃÐÊÔ·¸ÀÒ¾áÅÐÁÕàÊÕ§à§Õº¡Ç‹Òà¤Ã×่ͧ´Ù´¤Çѹ·Ñ่Çä»
4. µÑÇà¤Ã×่ͧ·Ó¨Ò¡Êáµ¹àÅʤسÀÒ¾ÊÙ§ ˹ŒÒ¨Í¤Çº¤ØÁ¡Ò÷ӧҹ໚¹¡ÃШ¡·¹¤ÇÒÁÌ͹
¨Ö§·ÓãËŒÊÒÁÒö·Ó¤ÇÒÁÊÐÍÒ´ä´Œ§‹Ò ¹Í¡¨Ò¡¹Õ้ ÂѧÊÒÁÒö¶Í´µÐá¡Ã§Ãͧ¹้ÓÁѹÍÍ¡ÁÒ
Ōҧ·Ó¤ÇÒÁÊÐÍҴ䴌͋ҧÊдǡ
5. ª‹Í§ÃͧÃѺ¹้ÓÁѹ ¶Ù¡Í͡ẺÁÒà¾×่ÍäÁ‹ãËŒà¡Ô´¡ÒÃÊÐÊÁ¢Í§¤ÃÒº¹้ÓÁѹº¹µÑÇà¤Ã×่ͧ
¤Óá¹Ð¹Óà¾×่ͤÇÒÁ»ÅÍ´ÀÑÂ
1. ¼¹Ñ§·Õ่¨Ð㪌µÔ´µÑ้§à¤Ã×่ͧ´Ù´¤Çѹ¤ÇÃÁÕ¤ÇÒÁá¢็§áçà¾Õ§¾Í·Õ่¨ÐÃѺ¹้Ó˹ѡ¢Í§à¤Ã×่ͧ´Ù´¤Çѹ䴌
2. ÃÐÁÑ´ÃÐÇѧÊÒÂä¿·Õ่½˜§ÍÂً㵌¼¹Ñ§¢³ÐµÔ´µÑ้§ à¾×่Í»‡Í§¡Ñ¹¡Òê็͵ ËÃ×Íä¿¿‡ÒÅѴǧ¨Ã
3. ¡ÒõԴµÑ้§ ª‹Ò§·Õ่µÔ´µÑ้§¤ÇÃ໚¹ª‹Ò§¨Ò¡ºÃÔÉÑ·¼ÙŒ¨Ñ´¨Ó˹‹Ò áÅÐÁÕ»ÃÐʺ¡Òó
㹡ÒõԴµÑ้§à¤Ã×่ͧ´Ù´¤Çѹ à¾×่Í»ÃÐÊÔ·¸ÔÀҾ㹡ÒÃ㪌§Ò¹ áÅеÃǨÊͺ´Ùãˌṋã¨Ç‹ÒÍѵÃÒ¡ÓÅѧä¿
·Õ่µ‹Íàª×่ÍÁ¹Ñ้¹¶Ù¡µŒÍ§
4. ˌͧ¤ÇÃÁÕ¡ÒÃÃкÒÂÍÒ¡ÒÈ·Õ่´ÕáÅÐà¾Õ§¾Í ã¹ÃÐËNjҧ㪌à¤Ã×่ͧ´Ù´¤Çѹ㹡ÒûÃСͺÍÒËÒÃ
5. ËÅÕ¡àÅÕ่§¡ÒÃãËŒà¤Ã×่ͧ´Ù´¤ÇѹÊÑÁ¼ÑʡѺà»ÅÇä¿â´ÂµÃ§
6. ËÒ¡¶Ò´Ãͧ¹้ÓÁѹà¤Ã×่ͧ´Ù´¤Çѹà¡Ô´µÔ´ä¿ ¤Ç÷ӡÒû´¡ÒÃ㪌§Ò¹ »´à¤Ã×่ͧ
áÅеÃǨÊͺNjÒà¡Ô´¤ÇÒÁàÊÕÂËÒÂä»·Õ่ÊÒÂä¿ ËÃ×ͪÔ้¹Ê‹Ç¹Í×่¹æÍÕ¡ËÃ×ÍäÁ‹
¤ÇõԴµ‹ÍºÃÔÉѷϼٌ¨Ñ´¨Ó˹‹ÒÂà¾×่ÍãËŒª‹Ò§¼ÙŒªÓ¹ÒÞ¡ÒÃࢌÒÁÒµÃǨÊͺáÅзӡÒÃᡌ䢵‹Íä»
7. ·Ó¤ÇÒÁÊÐÍÒ´¤ÃÒº¹้ÓÁѹº¹ÁÍàµÍà 㺾Ѵ áÅжҴÃͧ¹้ÓÁѹÍ‹ҧÊÁ่ÓàÊÁÍ
à¾×่Í»ÃÐÊÔ·¸ÔÀҾ㹡Ò÷ӧҹáÅФÇÒÁ»ÅÍ´ÀÑÂÊÙ§ÊØ´
8. ¤ÇÃÃÐÁÑ´ÃÐÇѧ㹡Ò÷ӤÇÒÁÊÐÍÒ´ÁÍàµÍÃËÃ×ͽҤÃͺÁÍàµÍÃäÁ‹ãËŒà¤Å×่͹ËÃ×ÍËÅØ´¨Ò¡µÓá˹‹§à´ÔÁ
à¾ÃÒÐÍÒ¨·ÓãËŒà¡Ô´¡ÒÃàÊÕÂÊÁ´ØÅ áÅÐÍҨ໚¹ÊÒà˵ãËŒà¡Ô´¡ÒÃÊÑ่¹ËÃ×ÍÁÕàÊÕ§´Ñ§¢³Ð·Ó§Ò¹ä´Œ
9. ·Ó¤ÇÒÁÊÐÍÒ´à¤Ã×่ͧ´Ù´¤Çѹ´ŒÇ¹้ÓÂÒ«Ñ¡¼ŒÒ͋͹æ ËÅÕ¡àÅÕ่§¡ÒÃ㪌¹้ÓÂÒ·Õ่ÁÕÄ·¸Ô์¡Ñ´¡Ã‹Í¹ ¹้ÓÁѹ
ËÃ×͹้ÓÁѹ¡Ò´ã¹¡Ò÷ӤÇÒÁÊÐÍÒ´ à¾ÃÒÐÍҨ໚¹ÊÒà˵ØãËŒà¡Ô´¡ÒèشµÔ´ä¿ä´Œ
10. ËÒ¡à¡Ô´¤ÇÒÁàÊÕÂËÒ·Õ่µÑÇÊÔ¹¤ŒÒËÃ×ͪÔ้¹Ê‹Ç¹ÍÐäËÅ‹ã´æ ¤ÇõԴµ‹ÍºÃÔÉÑ·¼ÙŒ¨Ñ´¨Ó˹‹ÒÂ
à¾×่ÍãËŒª‹Ò§¼ÙŒªÓ¹ÒÞ¡ÒÃࢌÒÁÒµÃǨÊͺáÅзӡÒÃà»ÅÕ่¹ÍÐäËÅ‹µ‹Íä» ¼ÙŒãªŒäÁ‹¤Ç÷ӡÒë‹ÍÁ
ËÃ×Í»ÃѺà»ÅÕ่¹ÍÐäËÅ‹´ŒÇµ¹àͧ à¹×่ͧ¨Ò¡ÍÒ¨¡‹ÍãËŒà¡Ô´ÍѹµÃÒÂä´Œ
11. ËÒ¡µŒÍ§¡ÒÃà»ÅÕ่¹ËÅÍ´ä¿ ¶Í´ªÔ้¹Ê‹Ç¹ ËÃ×Íà»ÅÕ่¹ÍÐäËÅ‹ã´æ ¤Çöʹ»ÅÑ๊¡ä¿¡‹Í¹·Ø¡¤ÃÑ้§
áÅÐËÅÍ´ä¿·Õ่㪌à»ÅÕ่¹ ¤ÇÃ໚¹ËÅÍ´·Õ่ÁÕ¾Åѧ§Ò¹µ่ÓÇ‹Ò 2 Çѵµ à¾×่ÍäÁ‹ãËŒà¡Ô´¤ÇÒÁÌ͹ÁÒ¡à¡Ô¹ä»
¨¹à¡Ô´à»š¹»ÃСÒÂä¿ä´Œ
12. ËÅÕ¡àÅÕ่§¡ÒÃÊÑÁ¼ÑʼÅÔµÀѳ±¢³Ð¡ÒÃ㪌§Ò¹ à¾×่Í»‡Í§¡Ñ¹¡ÒúҴà¨็º¨Ò¡¤ÇÒÁÌ͹º¹µÑÇÊÔ¹¤ŒÒ
13.¶Í´»ÅÑ๊¡áÅÐÊѺÊÇÔµ«·Ø¡¤ÃÑ้§¡‹Í¹·Ó¡Òë‹ÍÁ ËÃ×Íà»ÅÕ่¹ÍÐäËÅ‹ ¤ÇÃãÊ‹¶Ø§Á×Í
¢³Ð·Ó¤ÇÒÁÊÐÍÒ´¼ÅÔµÀѳ±
ÃÒÂÅÐàÍÕ´¼ÅÔµÀѳ±
ÃØ‹¹ÊÔ¹¤ŒÒ TNP HD ZEUS 1
¡ÓÅѧä¿ÃÇÁ 1800 m3/Hr
Power supply 220~240V/50Hz
¢¹Ò´ÊÔ¹¤ŒÒ W900 x D558 x H650-1000 (mm)
¡ÓÅѧä¿à¢ŒÒ 238W x 1
Noise Level (dB) ≤65
ἧ¤Çº¤ØÁ¡Ò÷ӧҹ ¤Çº¤ØÁ´ŒÇ·Ñ้§ÃкºÊÑÁ¼ÑÊáÅÐÃÕâÁ·
ÃдѺ¡Ò÷ӧҹ »ÃѺ¡Ò÷ӧҹ䴌 3 ÃдѺ
ª¹Ô´¢Í§ÁÍàµÍà âÅËÐ
ª¹Ô´ãº¾Ñ´ Sirocco
ËÅÍ´ä¿ LED light
ª¹Ô´ Filter Baffle filter ÊÒÁÒö¶Í´ÅŒÒ§ä´Œ
¢ŒÍÁÙŢͧÊÔ¹¤ŒÒ¨ÃÔ§ ÍҨᵡµ‹Ò§¨Ò¡¢ŒÍÁÙŨҡáÅ็»µÒÁµÒÃÒ§¢ŒÒ§µŒ¹àÅ็¡¹ŒÍÂ
ÍØ»¡Ã³·Õ่µŒÍ§ãªŒÊÓËÃѺ¡ÒõԴµÑ้§
1. »Ò¡¡ÒËÃ×ÍMarker 2. ÁÕ´ 3. ÊÒÂÇÑ´ 4. à¤Ã×่ͧÁ×ÍÇÑ´ÃдѺ
5. 䢤ǧ俿‡Ò 6. 䢤ǧ»Ò¡áº¹ 7. 䢤ǧ»Ò¡á©¡ 8. ¶Ø§Á×ÍËÃ×ÍÍØ»¡Ã³»‡Í§¡Ñ¹Á×Í
1 2
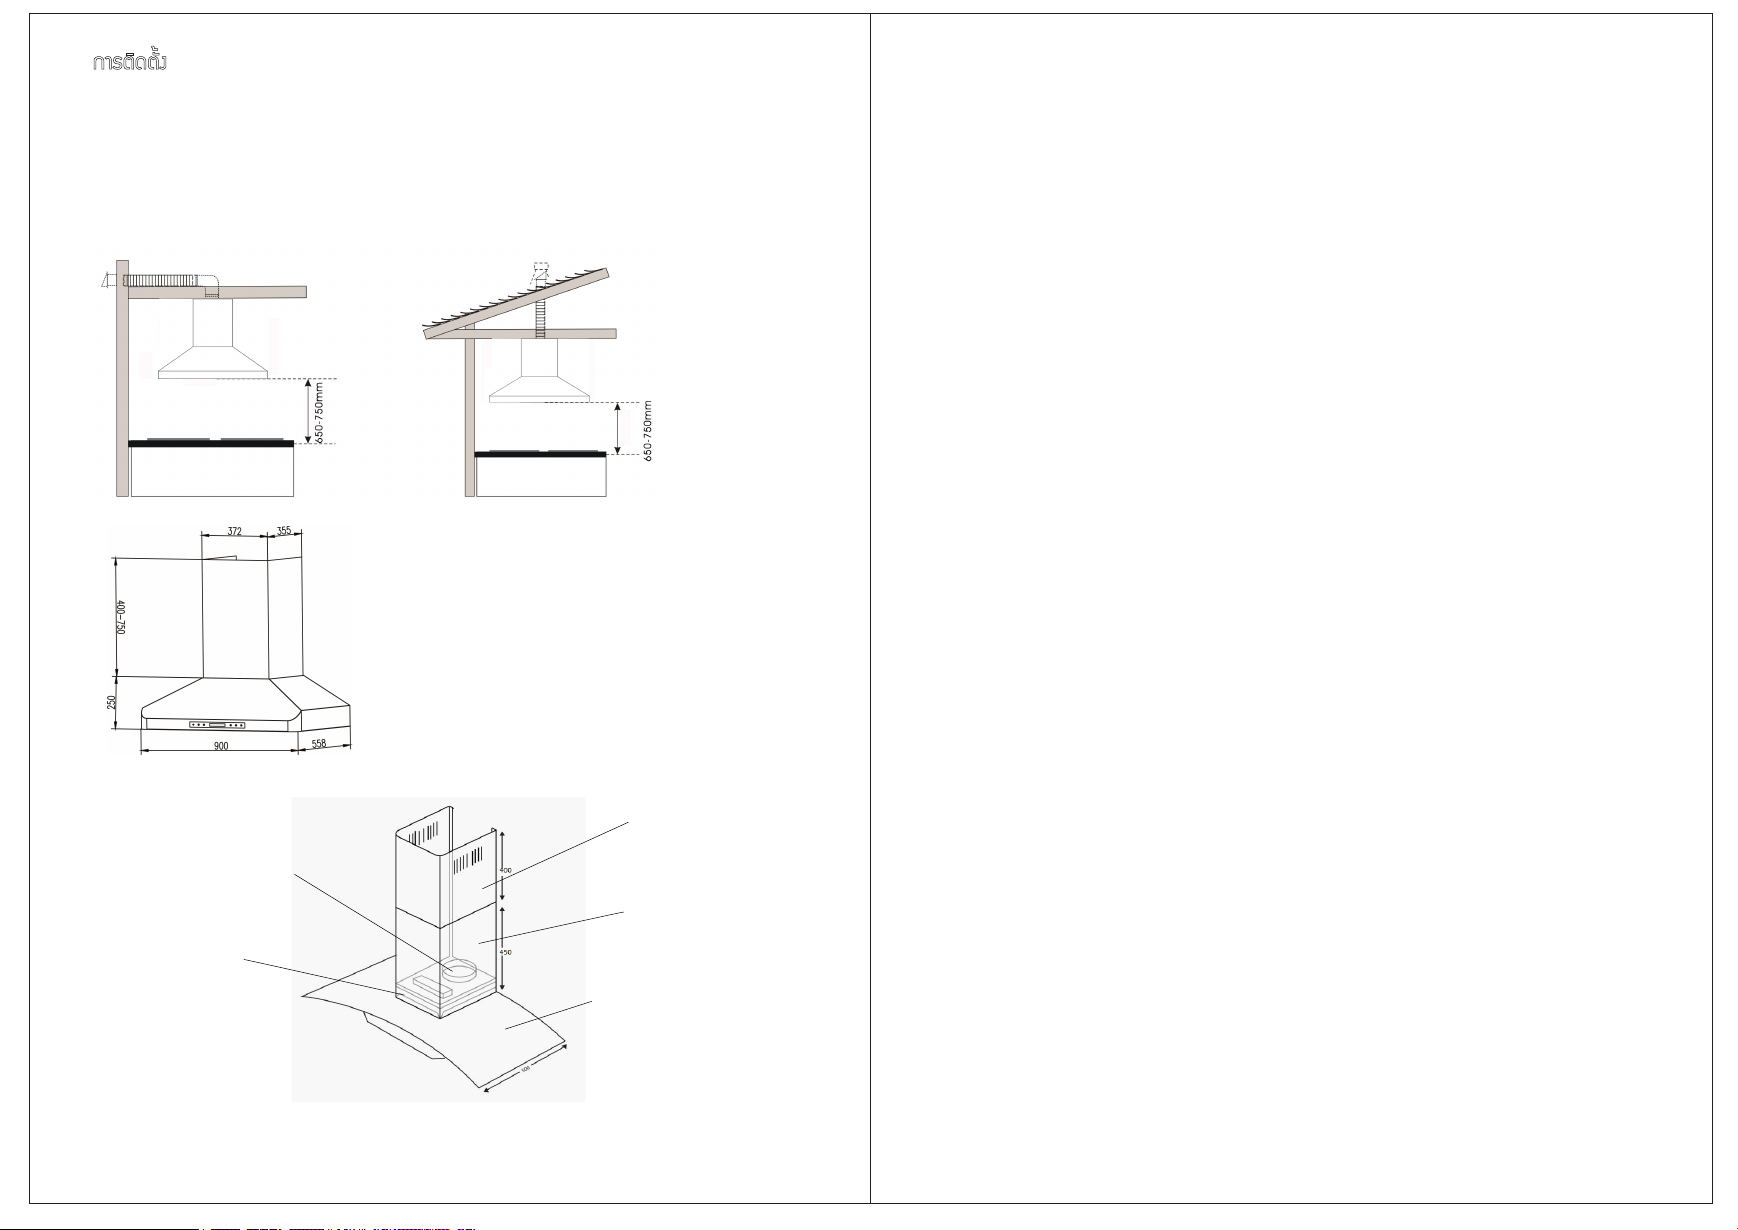
à¤Ã×่ͧ´Ù´¤ÇѹÊÒÁÒöµÔ´µÑ้§ä´Œ¡Ñºà¾´Ò¹ª¹Ô´µ‹Ò§æ
2) ÇÔ¸Õ¡ÒõԴµÑ้§
¡ÒõԴµÑ้§
1) ÃкºÃкÒÂÍÒ¡ÒÈ
¡ÒõԴµÑ้§à¤Ã×่ͧ´Ù´¤Çѹ ¨Ó໚¹µŒÍ§ÁÕ¡ÒõԴµÑ้§ÃкºÃкÒÂÍÒ¡ÒÈ â´ÂµÔ´µÑ้§µÔ´¡Ñº¼¹Ñ§
áÅÐÃкÒµ‹ÍÍÍ¡ÊÙ‹ÀÒ¹͡¼‹Ò¹·‹Í ¤Çѹ·Õ่à¡Ô´¨Ò¡¡ÒûÃСͺÍÒËÒÃã¹ËŒÍ§¤ÃÑǨж١´Ù´
ࢌÒä»ã¹à¤Ã×่ͧ´Ù´¤Çѹ áÅзӤÇÒÁÊÐÍÒ´â´ÂµÑÇ¡Ãͧ´ŒÒ¹ã¹ ¨Ò¡¹Ñ้¹¤Çѹ´Ñ§¡Å‹ÒǨж١´Ù´
ÍÍ¡ÊÙ‹ÀÒ¹͡ ¨Ö§¨Ó໚¹µŒÍ§ÁÕ¡ÒÃ㪌½Ò»´ª‹Í§ÃкÒÂÍÒ¡ÒÈ ½Ò»´ª‹Í§ÃкÒÂÍÒ¡ÒȹÕ้¨ÐµÔ´µÑ้§
·Õ่¼¹Ñ§´ŒÒ¹¹Í¡ à¾×่Í»‡Í§¡Ñ¹ÍÒ¡ÒÈáÅФÇѹäËÅŒ͹¡ÅѺࢌҴŒÒ¹ã¹
Air chamber outlet
Motor casing
Upper chimney flue
Lower chimney flue
Range hood glass casing
* ˹‹ÇÂÇѴ໚¹Ë¹‹Ç ÁÔÅÅÔàÁµÃ
* ¨Ò¡ÃÙ»à¤Ã×่ͧ´Ù´¤Çѹ´ŒÒ¹º¹ ÍҨᵡµ‹Ò§¨Ò¡ÊÔ¹¤ŒÒ¨ÃÔ§µÒÁᵋÅÐÃØ‹¹
3) ¤Óá¹Ð¹Ó¡ÒõԴµÑ้§
¡‹Í¹¡ÒõԴµÑ้§à¤Ã×่ͧ´Ù´¤Çѹ ¼ÙŒãªŒ¤ÇÃÍ‹Ò¹¤Ù‹Á×ÍÍ‹ҧÅÐàÍÕ´áÅзӤÇÒÁࢌÒã¨ã¹¼ÅÔµÀѳ±
¡‹Í¹¡ÒõԴµÑ้§ à¾×่Í¡ÒõԴµÑ้§áÅСÒÃ㪌§Ò¹Í‹ҧ¶Ù¡ÇÔ¸Õ áÅÐà¾×่ÍËÅÕ¡àÅÕ่§¡ÒÃà¡Ô´¡ÒúҴà¨็ºËÃ×Í
¤ÇÒÁàÊÕÂËÒÂÃÐËÇ‹Ò§¡ÒÃ㪌§Ò¹ÊÔ¹¤ŒÒ áÅÐà¾×่Í»‡Í§¡Ñ¹¡ÒÃà¡Ô´¡ÒÃÅØ¡äËÁŒ¨Ò¡¡ÒÃ㪌§Ò¹ËÃ×Í¡ÒõԴµÑ้§
¼Ô´ÇÔ¸Õ ¤Ç÷ӡÒõԴµÑ้§à¤Ã×่ͧ´Ù´¤ÇѹµÒÁ¤Óá¹Ð¹Ó㹤ًÁ×ÍáÅÐÁҵðҹ¤ÇÒÁ»ÅÍ´ÀÑÂã¹·ŒÍ§¶Ô่¹¹Ñ้¹æ
4) ÃкºÃкÒÂÍÒ¡ÒÈ
1. äÁ‹µ‹Í·‹ÍÃкÒÂÍÒ¡ÒÈä»·Õ่·Õ่ÁÕÍÒ¡ÒÈ»´ ¤Çõ‹Í·‹Íã¹·Õ่·Õ่ÁÕ¡ÒÃÃкÒÂÍÒ¡ÒÈ áÅж‹ÒÂà·ä´Œ´Õ
2. ·‹ÍÃкÒÂÍÒ¡ÒȤÇÃÊÐÍÒ´áÅÐäÁ‹ÁÕ¤ÃÒºËÃ×ÍàÈÉÍÒËÒõԴ½˜§
à¾×่Í»ÃÐÊÔ·¸ÔÀÒ¾¡ÒÃÃкÒÂÍÒ¡ÒÈÊÙ§ÊØ´
3. ÃÐÂÐË‹Ò§ÃÐËÇ‹Ò§à¤Ã×่ͧ´Ù´¤Çѹ¡ÑºàµÒ ¤ÇÃÍÂÙ‹·Õ่ 65-75 ૹµÔàÁµÃ
·Ñ้§¹Õ้¢Ö้¹ÍÂÙ‹¡ÑºÅѡɳТͧàµÒáÅСÒÃ㪌§Ò¹
4. µÃǨÊͺÃÐËÇ‹Ò§¡ÒõԴµÑ้§Ç‹ÒÃÐÂСÒõԴµÑ้§à¤Ã×่ͧ´Ù´¤ÇѹàËÁÒÐÊÁËÃ×ÍäÁ‹
ËÒ¡µÔ´µÑ้§à¤Ã×่ͧ´Ù´¤Çѹã¡ÅŒ¡ÑºàµÒÁÒ¡à¡Ô¹ä» ÍÒ¨·ÓãËŒà¡Ô´¤ÇÒÁàÊÕÂËÒ¡ѺµÑÇà¤Ã×่ͧ䴌
ËÃ×ÍËÒ¡µÔ´µÑ้§Ë‹Ò§à¡Ô¹ä» ÍÒ¨·ÓãËŒ»ÃÐÊÔ·¸ÔÀÒ¾¡ÒôٴŴŧ
5. ·‹ÍÃкÒÂÍÒ¡ÒÈ áÅЪ‹Í§ÅÁÍÍ¡¤ÇÃÁÕ¢¹Ò´·Õ่¾Í´Õ¡Ñ¹
6. äÁ‹¤ÇÃ⤌§§Í·‹Íµ‹ÍÁÒ¡¡Ç‹Ò 90 ͧÈÒ à¡Ô¹ 2 ª‹Ç§ à¹×่ͧ¨Ò¡ÍҨ໚¹¡ÒÃÅ´»ÃÐÊÔ·¸ÔÀÒ¾
¡ÒÃÃкÒÂÍÒ¡ÒÈä´Œ
7. ·‹ÍÃкÒÂÍÒ¡ÒȤÇÃÁÕ¤ÇÒÁÂÒÇäÁ‹µ่Ó¡Ç‹Ò 24 ¹Ô้Ç ã¹ÃÐËÇ‹Ò§¨Ø´§Í·‹Í¢ŒÍáááÅТŒÍ·Õ่Êͧ
à¾×่ÍãËŒÁÕ¡ÒÃÃкÒÂÍÒ¡ÒÈáÅФÇѹ ໚¹ä»Í‹ҧÁÕ»ÃÐÊÔ·¸ÔÀÒ¾
8. ãËŒÃдѺ¤ÇÒÁÂÒǢͧ·‹Í äÁ‹ÂÒǨ¹à¡Ô¹ä» à¾×่Í»ÃÐÊÔ·¸ÔÀÒ¾¡ÒÃÃкÒÂÍÒ¡ÒÈä´Œ´Õ
9. µÃǨÊͺNjÒÃкº¢Í§·‹ÍÃкÒÂÍÒ¡ÒȷءʋǹäÁ‹ÁÕÃÙÃÑ่Çã´æ ËÒ¡äÁ‹ÁÑ่¹ã¨¤ÇÃ㪌෻
ËÃ×Í«ÔÅÔ⤹·ÑºÍÕ¡¤ÃÑ้§
10. 㪌«ÔÅÔ⤹ ËÃ×ͻٹ»´·Ñ่Ǽ¹Ñ§´ŒÒ¹¹Í¡Ãͺ淋ÍÃкÒÂÍÒ¡ÒÈ
11. ËÒ¡·‹ÍÃкÒÂÍÒ¡ÒȨÓ໚¹µŒÍ§µÔ´µÑ้§ã¹ÅѡɳСÒÃ⤌§§Í µÃǨÊͺãËŒÁÕÃÐÂÐË‹Ò§·Õ่àËÁÒÐÊÁ
¨Ò¡µÑÇ¡Ãͧ
12. ËÒ¡·‹ÍÃкÒÂÍÒ¡Òȵ‹ÍµÃ§à¢ŒÒÊÙ‹ª‹Í§ÍÒ¡ÒȢͧµÑÇÍÒ¤Òà ¤ÇûÃѺ·‹ÍÃкÒÂÍÒ¡ÒȵÒÁ·ÔÈ·Ò§
¡ÒÃäËÅàÇÕ¹¢Í§ÍÒ¡ÒÈãËŒàËÁÒÐÊÁ
3 4

5) ¡ÒõԴµÑ้§Ãкºä¿¿‡Ò
1. à¤Ã×่ͧ´Ù´¤Çѹ¤ÇÃä´ŒÃѺ¡ÒõԴµÑ้§â´Âª‹Ò§¼ÙŒªÓ¹ÒÞ¡Òà áÅÐÁÕ»ÃÐʺ¡Òó
à¾×่ͤÇÒÁ»ÅÍ´ÀÑÂ㹡ÒÃ㪌§Ò¹à¤Ã×่ͧ´Ù´¤Çѹ
2. ¡Ò÷ӡÒõԴµÑ้§à¤Ã×่ͧ´Ù´¤Çѹ ¤ÇõÃǨÊÍºÇ‹Ò ¢³Ð·Õ่·Ó¡ÒõԴµÑ้§
äÁ‹ä´ŒÁÕ¡Òõ‹Í¡ÃÐáÊä¿à¢ŒÒ¡Ñºà¤Ã×่ͧ
3. äÁ‹¤Çõ‹Íà¤Ã×่ͧ´Ù´¤Çѹ¡Ñº»ÅÑ๊¡¾‹Ç§ «Ö่§Áռŵ‹Í¤ÇÒÁ»ÅÍ´ÀÑÂ㹡ÒÃ㪌§Ò¹
4.µÃǨÊͺNjҡÃÐáÊä¿·Õ่µ‹ÍࢌҡѺà¤Ã×่ͧ´Ù´¤Çѹ¹Ñ้¹àËÁÒÐÊÁáÅÐÊÒÁÒöÃͧÃѺ¡ÑºÃØ‹¹ÊÔ¹¤ŒÒ
à¤Ã×่ͧ´Ù´¤Çѹ·Õ่µÔ´µÑ้§ËÃ×ÍäÁ‹
5. à¤Ã×่ͧ´Ù´¤Çѹ¤ÇÃ㪌»ÅÑ๊¡ 3 ¢ÒËÃ×ÍÁÕ¡ÒõԴµÑ้§ÊÒ´Թ ·Õ่àËÁÒÐÊÁ¡Ñº¡ÓÅѧä¿ã¹·ŒÍ§¶Ô่¹¹Ñ้¹æ
6. µÔ´µÑ้§ÊÒ´Թà¾×่ͤÇÒÁ»ÅÍ´ÀÑÂ㹡ÒÃ㪌§Ò¹
6. ¢Ñ้¹µÍ¹¡ÒõԴµÑ้§
1. ¤ÇõÃǨÊͺáÅÐÇÑ´ÃÐÂÐË‹Ò§¢Í§¾×้¹·Õ่㹡ÒõԴµÑ้§à¤Ã×่ͧ´Ù´¤Çѹ¡ÑºàµÒ à¾×่ÍãËŒ¼ÙŒãªŒÊдǡ
㹡ÒûÃСͺÍÒËÒà áÅÐÊÒÁÒö㪌§Ò¹à¤Ã×่ͧ´Ù´¤Çѹ䴌Êдǡ
2. µÃǨÊͺ¼¹Ñ§·Õ่¨ÐµÔ´µÑ้§à¤Ã×่ͧ´Ù´¤ÇѹNjÒá¢็§áçà¾Õ§¾Í㹡ÒõԴµÑ้§à¤Ã×่ͧ´Ù´¤ÇѹËÃ×ÍäÁ‹
3. ¡Ó˹´¨Ø´ÊÓËÃѺà¨ÒÐÃÙÂÖ´
4. ¤ÇÃÍØ´ÃÍ·Õ่¼¹Ñ§´ŒÒ¹¹Í¡ ËÅѧ¡ÒõԴµÑ้§·‹ÍÃкÒÂÍÒ¡ÒÈ
5. ¶Í´ÊÒÂ俢ͧà¤Ã×่ͧ´Ù´¤ÇѹÍÍ¡ à´Ô¹ÊÒÂ俺¹¼¹Ñ§·Õ่¨ÐÂÖ´µÑÇà¤Ã×่ͧãËŒÊÒÂä¿Ë‹Ò§¨Ò¡à¾´Ò¹
ËÃ×ͼ¹Ñ§»ÃÐÁÒ³ 12 ¹Ô้Ç äÁ‹à»´à¤Ã×่ͧËÃ×ÍàÊÕº»ÅÑ๊¡¡‹Í¹·Õ่¨Ð·Ó¡ÒõԴµÑ้§ÊÒÂä¿àÊÃ็¨ÊÔ้¹
6. µÔ´µÑ้§¡ÃШ¡à¤Ã×่ͧ´Ù´¤Çѹ´ŒÇ¤ÇÒÁÃÐÁÑ´ÃÐÇѧ ¤ÇöʹµÑÇ¡ÃШ¡ÍÍ¡¨Ò¡µÑÇà¤Ã×่ͧ
¡‹Í¹·Ó¡ÒõԴµÑ้§µÑÇà¤Ã×่ͧ´Ù´¤Çѹ áÅÐäÁ‹ÇÒ§¢Í§·Õ่ÁÕ¹้Ó˹ѡ·ÑºÅ§º¹µÑÇ¡ÃШ¡
7. ÇÑ´áÅлÃÐÁÒ³¡ÒÃÃÐÂÐË‹Ò§¢Í§à¤Ã×่ͧ´Ù´¤Çѹ à¾×่Í¡ÒÃ㪌§Ò¹ãËŒàËÁÒÐÊÁ¡ÑºàµÒª¹Ô´µ‹Ò§æ
8. µÃǨÊͺá¹ÇµÔ´µÑ้§¢Í§à¤Ã×่ͧ´Ù´¤ÇѹãËŒµÑ้§µÃ§ äÁ‹àÍÕ§
9. ÇÑ´ÃÐÂзÕ่àËÁÒÐÊÁ·Õ่¨ÐÂÖ´à¤Ã×่ͧ´Ù´¤Çѹ ¡Ó˹´¨Ø´·Õ่àËÁÒÐÊÁ ¨Ò¡¹Ñ้¹à¨ÒÐÃÙµÒÁ·Õ่ÇÑ´äÇŒ
10. ¤ÇÃà¨ÒÐÃÙº¹¼¹Ñ§´ŒÇÂÍØ»¡Ã³·Õ่¤Ù‹Á×Íá¹Ð¹Ó
- µÔ´µÑ้§º¹¼¹Ñ§ËÔ¹ : ¤ÇõԴµÑ้§µÑÇÃͧÃѺ¹้Ó˹ѡ´ŒÒ¹ËÅѧ¼¹Ñ§ à¾×่ÍÃͧÃѺ¹้Ó˹ѡ䴌´ÕÂÔ่§¢Ö้¹
- µÔ´µÑ้§º¹¼¹Ñ§¤Í¹¡ÃÕµ : ÊÒÁÒöà¨ÒÐâ´ÂÍØ»¡Ã³·Õ่¡Ó˹´ã¹¤Ù‹Á×Í
- µÔ´µÑ้§º¹¼¹Ñ§äÁŒ : ¤ÇÃ㪌¹็͵¤ÇÒÁÂÒÇÍ‹ҧ¹ŒÍ 4 ¹Ô้Ç
11. ÇҧἋ¹áººµÑÇÂÖ´µÔ´¡Ñº¼¹Ñ§ áÅШѴãËŒµÓá˹‹§Ãٵç¡ÑºµÑÇÂÖ´ 䢹็͵ÂÖ´µÔ´µÒÁÃÙ»ÀÒ¾´ŒÒ¹Å‹Ò§
àÇŒ¹ÃÐÂÐË‹Ò§ÃÐËÇ‹Ò§¼¹Ñ§¡ÑºµÑÇÂÖ´»ÃÐÁÒ³ 1/16 ¹Ô้Ç
Fasten mounting bracket
Slide up and secure
Upper chimney flue to
Hold in position and
Secure lower chimney flue
to range hood
ÇÔ¸Õ¡ÒÃ㪌§Ò¹á¼§¤Çº¤ØÁ
receiver Timer Light Minus Plus Power
¡Ò÷ӧҹ¢Í§»Ø†Á¤Çº¤ØÁ
Power : à¾×่Íà»´-»´ ¡ÒÃ㪌§Ò¹à¤Ã×่ͧ´Ù´¤Çѹ
Plus : à¾×่Íà¾Ô่ÁÃдѺ¤ÇÒÁáç㺾Ѵ ËÃ×Í µÑ้§ÃÐÂЪÑ่ÇâÁ§¡Ò÷ӧҹ
Minus : à¾×่ÍÅ´ÃдѺ¤ÇÒÁáç㺾Ѵ ËÃ×Í µÑ้§ÃÐÂйҷաÒ÷ӧҹ
Light : à¾×่Íà»´-»´ä¿à¤Ã×่ͧ´Ù´¤Çѹ
Timer : à¾×่͵Ñ้§àÇÅÒ¡Ò÷ӧҹ
àÁ×่Í·Ó¡ÒÃàÊÕº»ÅÑ๊¡à¤Ã×่ͧ´Ù´¤ÇѹáÅÐà»´à¤Ã×่ͧáÅŒÇ à¤Ã×่ͧ´Ù´¤Çѹ¨ÐࢌÒÊÙ‹âËÁ´Êáµ¹ºÒÂ
¾ÃŒÍÁÊÓËÃѺ¡ÒÃ㪌§Ò¹ ¼ÙŒãªŒÊÒÁÒö¡´»Ø†Áà»´à¾×่Í¡ÒÃ㪌§Ò¹ÁÍàµÍà ËÃ×ÍËÅÍ´ä¿ä´Œ
¡ÒõÑ้§¤‹Ò˹‹Ç§àÇÅÒ : ·‹Ò¹ÊÒÁÒöµÑ้§¤‹Ò˹‹Ç§àÇÅÒ â´Â¢³Ð·Õ่໴㪌§Ò¹ ãËŒ¡´»Ø†ÁµÑ้§àÇÅÒ¤ŒÒ§äÇŒ 1 ¹Ò·Õ
à¾×่͵Ñ้§¤‹ÒÊÓËÃѺ 1-15 ¹Ò·Õ à¤Ã×่ͧ¨ÐàÃÔ่Á·Ó§Ò¹ã¹àÇÅÒ»ÃÐÁÒ³ 5 ÇÔ¹Ò·ÕáÅШÐËÂØ´¡Ò÷ӧҹàͧÍѵâ¹ÁѵÔ
àÁ×่ͤúÃÐÂÐàÇÅÒ·Õ่µÑ้§äÇŒ â´Â¨ÐáÊ´§¼ÅàÇÅÒ·Õ่˹ŒÒ¨Í ËÒ¡¼ÙŒãªŒäÁ‹µŒÍ§¡ÒÃ㪌âËÁ´¡ÒõÑ้§àÇÅÒ
˹ŒÒ¨Í¨ÐáÊ´§àÇÅÒ»¡µÔ
¿˜§¤ªÑ่¹ä¿Ê‹Í§ÊÇ‹Ò§ : ¼ÙŒãªŒÊÒÁÒö໴¡ÒÃ㪌§Ò¹ÃкºÊ‹Í§ÊNjҧ䴌â´Â¡´·Õ่»Ø†Áä¿Ê‹Í§ÊÇ‹Ò§
¡´ 1 ¤ÃÑ้§à¾×่Í·Ó¡ÒÃà»´áÅС´«้ÓÍÕ¡¤ÃÑ้§à¾×่Í»´ ·Ñ้§¹Õ้¿˜§¤ªÑ่¹ä¿Ê‹Í§ÊÇ‹Ò§¹Õ้ÊÒÁÒö㪌§Ò¹â´ÂäÁ‹ÁÕ¼Å
µ‹Í¿˜§¤ªÑ่¹¡Ò÷ӧҹÍ×่¹æ ËÃ×Í໚¹¡ÒûÃѺÃдѺ¡Ò÷ӧҹ¢Í§¿˜§¤Í×่¹ã´æ
¿˜§¤ªÑ่¹¤ÇÒÁáç¾Ñ´ÅÁ : ÃдѺ¤ÇÒÁáçÁÕ·Ñ้§ËÁ´ 3 ÃдѺ â´Â¼ÙŒãªŒÊÒÁÒö¡´·Õ่»Ø†Á + ËÃ×Í –
à¾×่ÍàÅ×Í¡ÃдѺ¤ÇÒÁáç¢Í§¾Ñ´ÅÁä´Œ
¤Óá¹Ð¹Ó : ¡ÒõÑ้§¤‹ÒÃкºä¿Ê‹Í§ÊÇ‹Ò§ ÊÒÁÒöµÑ้§¤‹Ò¡ÒÃ㪌§Ò¹â´Â¨ÐäÁ‹Áռŵ‹Í¿˜§¤ªÑ่¹¡Ò÷ӧҹ
ã¹ÃкºÍ×่¹æ áÅШÓ໚¹µŒÍ§·Ó¡ÒÃà»´ ËÃ×Í »´Ãкºä¿¹Õ้·Õ่˹ŒÒ¨Íàͧ෋ҹÑ้¹
12. ¤Ó¹Ç³¤ÇÒÁÊÙ§¢Í§·‹ÍáÅСÐÃÐÂÐÍÕ¡»ÃÐÁÒ³ 6 ¹Ô้Ç àª×่ÍÁµ‹Íʋǹ»ÅÒ¢ͧ·‹ÍࢌҡѺà¤Ã×่ͧ´Ù´¤Çѹ
áÅлÅÒ´ŒÒ¹º¹à¢ŒÒ¡Ñºª‹Í§ÃкÒ µÃǨÊͺNjÒã¹ÃÐËÇ‹Ò§¢Ñ้¹µÍ¹¡ÒõԴµÑ้§¹Õ้
äÁ‹ä´ŒÁÕ¡ÒÃàª×่ÍÁµ‹Í¡ÃÐáÊä¿ã´æ
13. ÇÒ§µÓá˹‹§»Å‹Í§ä¿·Ñ้§º¹áÅÐÅ‹Ò§
14. ãÊ‹·Õ่Ãͧ¹้ÓÁѹáÅеÑÇ¡ÃͧࢌҡѺµÑÇà¤Ã×่ͧ´Ù´¤Çѹ
15. ·´Êͺ¡ÒÃ㪌§Ò¹à¤Ã×่ͧ´Ù´¤ÇѹËÅѧ¡ÒõԴµÑ้§
5 6

¡ÒäǺ¤ØÁ¡Ò÷ӧҹ´ŒÇÂÃÕâÁ·
1. à«็¹à«ÍâͧÃÕâÁ·¤Í¹â·ÃÅ ÃѺÊÑÞÞÒ³ÍÔ¹¿ÃÒàô (IR) â´ÂÃÐÂÐË‹Ò§·Õ่àËÁÒÐÊÁ
㹡ÒÃ㪌ÍÂÙ‹·Õ่»ÃÐÁÒ³ 5 àÁµÃ¨Ò¡µÑÇà¤Ã×่ͧ´Ù´¤Çѹ â´ÂÃÐÂСÒÃÃѺʋ§ÊÑÞÞÒ³
ÍҨᵡµ‹Ò§¡Ñ¹ä»¢Ö้¹ÍÂÙ‹¡ÑºÍسËÀÙÁÔ áÅÐÊÀҾẵàµÍÃÕ่¢Í§ÃÕâÁ·
2. ¡ÒÃà»´-»´Ãкºä¿Ê‹Í§ÊÇ‹Ò§ áÅСÒõÑ้§àÇÅÒ»´ ¨ÐäÁ‹ÊÒÁÒö㪌ÃÕâÁ·
㹡ÒÃÊÑ่§¡ÒÃä´Œ ¼ÙŒãªŒ¨Ó໚¹µŒÍ§ÊÑ่§¡Ò÷Õ่µÑÇà¤Ã×่ͧ෋ҹÑ้¹
3. à¤Ã×่ͧ´Ù´¤Çѹ¨Ð¨´¨Ó¡ÒõÑ้§¤‹Òà´ÔÁ·Õ่¼ÙŒãªŒµÑ้§¤‹Òµ‹Ò§æäÇŒ ઋ¹ ä¿Ê‹Í§ÊÇ‹Ò§ ¡ÒõÑ้§àÇÅÒ
áÅÐÃдѺáç´Ù´ «Ö่§àÁ×่Í໴㪌§Ò¹ÍÕ¡¤ÃÑ้§ à¤Ã×่ͧ¨Ð·Ó§Ò¹µÒÁ¿˜§¤ªÑ่¹µ‹Ò§æ·Õ่à¤ÂµÑ้§¤‹ÒäÇŒ
¡Ò÷ӤÇÒÁÊÐÍÒ´áÅСÒúÓÃاÃÑ¡ÉÒ
äÁ‹¤Ç÷ӡÒúÓÃاÃÑ¡ÉÒ ËÃ×Í·Ó¤ÇÒÁÊÐÍÒ´ã´æ â´Â·Õ่ÂѧäÁ‹ä´Œ·Ó¡Òöʹ»ÅÑ๊¡ä¿
»´¡Ò÷ӧҹ¢Í§à¤Ã×่ͧ´Ù´¤Çѹ ¼ÙŒãªŒ¤ÇõŒÍ§µÃǨ·Ø¡¤ÃÑ้§Ç‹Òä´Œ´Ö§»ÅÑ๊¡áÅл´à¤Ã×่ͧàÃÕºÌÍ´ÕáÅŒÇ
¡‹Í¹·Ó¤ÇÒÁÊÐÍÒ´ËÃ×ͺÓÃاÃÑ¡ÉÒã´æ
¡Ò÷ӤÇÒÁÊÐÍÒ´à¤Ã×่ͧ´Ù´¤Çѹ.
1. ·Ó¤ÇÒÁÊÐÍÒ´µÑÇà¤Ã×่ͧÍ‹ҧÊÁ่ÓàÊÁÍ´ŒÇ¹้ÓʺًÍØ‹¹æ ËÃ×ͼŒÒ¹Ô่Áæ
2. äÁ‹¤ÇÃ㪌¹้ÓÂÒ·Õ่໚¹¡Ã´ ¹้ÓÂÒ¿Í¡ÊաѺ¼ÔÇÊáµ¹àÅÊ à¹×่ͧ¨Ò¡¹้ÓÂÒ·Õ่໚¹ÊÒÃà¤ÁÕàËÅ‹Ò¹Õ้
໚¹ÍѹµÃÒµ‹Í¾×้¹¼ÔÇÇÑÊ´Ø
3. ÊÓËÃѺà¤Ã×่ͧ´Ù´¤Çѹ·Õ่·Ó¨Ò¡Êáµ¹àÅÊ ÍҨ㪌¹้ÓÂÒ·Ó¤ÇÒÁÊÐÍÒ´Êáµ¹àÅʶÙàºÒæ
ÃÐÇѧäÁ‹ãËŒ¹้ÓÂÒ«ÖÁࢌÒä»ã¹Ê‹Ç¹»Ø†Á¤Çº¤ØÁ áÅÐäÁ‹¤Ç÷Ô้§¹้ÓÂÒ·Ó¤ÇÒÁÊÐÍÒ´äÇŒº¹à¤Ã×่ͧ¹Ò¹à¡Ô¹ä»
à¹×่ͧ¨Ò¡ÍÒ¨¡‹ÍãËŒà¡Ô´ÍѹµÃÒµ‹Í¾×้¹¼ÔÇà¤Ã×่ͧ´Ù´¤Çѹ䴌 ¤ÇÃ㪌¼ŒÒ¹Ø‹Áæàª็´ãËŒáËŒ§
4. ÊÒÁÒö㪌¹้ÓÂҢѴÊáµ¹àÅʢѴàºÒæ à¾×่Íà¾Ô่Á¤ÇÒÁà§Ò§ÒÁãËŒµÑÇà¤Ã×่ͧ
5. äÁ‹¤ÇûŋÍÂãËŒÁÕ¤ÃÒº½˜§á¹‹¹ ÊÐÊÁº¹à¤Ã×่ͧ໚¹àÇÅÒ¹Ò¹ à¾ÃÒÐÍÒ¨·ÓãËŒÂÒ¡
µ‹Í¡Ò÷ӤÇÒÁÊÐÍÒ´ã¹ÀÒÂËÅѧ
6. äÁ‹¤ÇÃ㪌á»Ã§¢Ñ´º¹¼ÔÇÊáµ¹àÅÊ à¾ÃÒÐÍÒ¨·ÓãËŒ¾×้¹¼ÔÇ໚¹ÃÍÂä´Œ
«Ö่§ÃͶÅÍ¡¹Õ้¨Ð·ÓãËŒà¡Ô´Ê¹ÔÁä´Œã¹Í¹Ò¤µ
7. äÁ‹¤ÇÃ㪌¡Ã´à¡Å×Í ¹้ÓÂÒ¿Í¡ÊաѺ¼ÔÇÊáµ¹àÅÊ à¹×่ͧ¨Ò¡¹้ÓÂÒ·Õ่໚¹ÊÒÃà¤ÁÕàËÅ‹Ò¹Õ้
໚¹ÍѹµÃÒµ‹Í¾×้¹¼ÔÇÇÑÊ´Ø
8. äÁ‹¤ÇÃ㪌¹้ÓÂÒÊÓËÃѺÊáµ¹àÅÊ ·Ó¤ÇÒÁÊÐÍÒ´º¹á¼§¤Çº¤ØÁ à¹×่ͧ¨Ò¡¨Ð·ÓãËŒÊÕ¶Ù¡¡Ñ´¡Ã‹Í¹ä´Œ
¡Ò÷ӤÇÒÁÊÐÍÒ´µÑÇ¿ÅàµÍáÃͧ´Ñ¡¨Ñºä͹้ÓÁѹ
¤Óá¹Ð¹Ó : ¤ÇÃÊÇÁ¶Ø§Á×Í·Ø¡¤ÃÑ้§¢³Ð·Ó¤ÇÒÁÊÐÍÒ´
1. Ἃ¹µÐá¡Ã§´Ñ¡¨Ñºä͹้ÓÁѹ¹Õ้ä´ŒÃѺ¡ÒõԴµÑ้§ áÅж١Í͡ẺÁÒà¾×่Í¡ÃͧàÈÉ ËÃ×ͤÃÒº¹้ÓÁѹ
·Õ่à¡Ô´¨Ò¡¡ÒûÃاÍÒËÒà «Ö่§äÁ‹¨Ó໚¹µŒÍ§à»ÅÕ่¹µÑÇ¡ÃͧËÒ¡äÁ‹ÁÕªÓÃØ´àÊÕÂËÒÂ
ᵋ¤Çöʹ¹ÓÁÒ·Ó¤ÇÒÁÊÐÍÒ´Í‹ҧÊÁ่ÓàÊÁÍ «Ö่§¡ÒöʹÍÍ¡ÁÒà¾×่ÍŌҧ·Ó¤ÇÒÁÊÐÍÒ´
¡็ÊÒÁÒö·Óä´Œâ´Â§‹Ò áÅÐäÁ‹µŒÍ§ÍÒÈÑÂà¤Ã×่ͧÁ×Í㹡Òöʹ ËÃ×Í»ÃСͺࢌҷÕ่à´ÔÁ
2. ¡Ò÷ӤÇÒÁÊÐÍҴἋ¹¡Ãͧ á¹Ð¹ÓãËŒ·Ó¤ÇÒÁÊÐÍÒ´ËÅѧ¡ÒÃ㪌§Ò¹¤Ãº 20 ªÑ่ÇâÁ§
ËÃ×ͨзӺ‹ÍÂÁÒ¡ËÃ×͹ŒÍ¢Ö้¹ÍÂÙ‹¡Ñº¡ÒÃ㪌§Ò¹ ઋ¹ËÒ¡ÁÕ¡Ò÷ÓÍÒËÒÃ˹ѡ 㪌¹้ÓÁѹÁÒ¡
ઋ¹ ¼Ñ´ ËÃ×Í·Í´ ¡็¤Ç÷ӤÇÒÁÊÐÍÒ´º‹Í¡Njһ¡µÔ
3. 㹡Ò÷ӤÇÒÁÊÐÍҴἋ¹¡Ãͧ ÊÒÁÒö·Óä´Œâ´Â¹Ó¼ŒÒªØº¹้ÓʺًÍØ‹¹æ ºÔ´ãËŒËÁÒ´
áÅÐàª็´Å§º¹¾×้¹¼ÔÇ ËÃ×Í㪌á»Ã§áÅй้ÓÊºÙ‹Í‹Í¹æ ¢Ñ´àºÒæ
4. ËÅѧ¡Ò÷ӤÇÒÁÊÐÍҴἋ¹¡ÃͧàÊÃ็¨áÅŒÇ µÑ้§·Ô้§äÇŒÃͨ¹áËŒ§ áÅлÃСͺ¡ÅѺࢌҵÓá˹‹§à´ÔÁ
¡‹Í¹àÃÔ่Á໴㪌§Ò¹à¤Ã×่ͧ
5. ËҡἋ¹¡ÃͧªÓÃØ´àÊÕÂËÒ ¤ÇõԴµ‹ÍºÃÔÉÑ·¼ÙŒ¨Ñ´¨Ó˹‹Ò à¾×่Í·Ó¡ÒÃà»ÅÕ่¹Ἃ¹¡ÃͧãËÁ‹µ‹Íä»
6. äÁ‹¤ÇÃ㪌ÊÒÃà¤ÁÕ àª‹¹ ÊÒâѴà§Ò ¢Õ้¼Ö้§ ËÃ×͹้ÓÂҡѹʹÔÁ ·Ó¤ÇÒÁÊÐÍҴἋ¹¡Ãͧ
à¾ÃÒÐÍÒ¨·ÓãËŒà¡Ô´¡ÒÃËÅØ´ÅÍ¡¢Í§ÊÕä´Œ
7. ¡ÒùÓἋ¹¡ÃͧࢌÒä»·Ó¤ÇÒÁÊÐÍÒ´ã¹à¤Ã×่ͧŌҧ¨Ò¹ ÍÒ¨·ÓãËŒà¡Ô´¡ÒáѴ¡Ã‹Í¹¢Í§ÊÕä´Œ
¢ŒÍ¤ÇÃÃÐÇѧ
ËҡἋ¹¡ÃͧäÁ‹ÊÐÍÒ´ ÁÕ¤ÃҺʡ»Ã¡ ËÃ×ͤÃÒº¹้ÓÁѹµÔ´ÍÂÙ‹ ÍҨ໚¹ÊÒà˵ØãËŒà¡Ô´»ÃСÒÂä¿
¢³Ð㪌§Ò¹ä´Œ¢³Ðà¤Ã×่ͧ·Ó§Ò¹
1. ¤ÇûÃСͺËÃ×͵ԴµÑ้§á¼‹¹¡Ãͧ㹵Óá˹‹§·Õ่¶Ù¡µŒÍ§¡‹Í¹¡ÒÃ㪌§Ò¹·Ø¡¤ÃÑ้§
à¹×่ͧ¨Ò¡ËÒ¡ÁÕ¡ÒÃà»´·Ô้§äÇŒ ËÃ×ÍäÁ‹ÁÕἋ¹¡Ãͧ»´à¤Ã×่ͧ ÍÒ¨·ÓãËŒà¡Ô´ÍѹµÃÒÂá¡‹¼ÙŒãªŒ§Ò¹ä´Œ
2. ËŒÒÁ¹ÓÊÒà ËÃ×ÍÊÔ่§¢Í§·Õ่¡‹Í¹ãËŒà¡Ô´»ÃСÒÂä¿ä´Œ ࢌÒä»ã¡ÅŒª‹Í§ÁÍàµÍÃ
3. äÁ‹¤ÇÃ໴㪌§Ò¹àµÒä¿áÅÐà¤Ã×่ͧ´Ù´¤Çѹâ´ÂäÁ‹ÁÕ¼ÙŒ´ÙáÅ à¾ÃÒÐËÒ¡¤ÇÒÁÌ͹¨Ò¡¡Ò÷ÓÍÒËÒÃ
¶ŒÒ໚¹¹้ÓÁÑ¹à¡‹Ò ¨ÐÂÔ่§·ÓãËŒà¡Ô´¡ÒûзØä¿ä´Œ§‹ÒÂÂÔ่§¢Ö้¹
4. ¡ÒûÃاÍÒËÒÃâ´Â㪌ÃдѺà»ÅÇä¿·Õ่ÊÙ§à¡Ô¹ä» ¨Ð·ÓãËŒà¡Ô´ÍѹµÃÒµ‹Íà¤Ã×่ͧ´Ù´¤Çѹ䴌
¡ÒúÓÃاÃÑ¡ÉÒÁÍàµÍÃ
äÁ‹¤ÇÃ໴㪌§Ò¹à¤Ã×่ͧ´Ù´¤Çѹ¢³Ð·Õ่äÁ‹ä´Œ»ÃСͺËÃ×͵ԴµÑ้§á¼‹¹¡Ãͧ ¡ÒöʹÁÍàµÍÃ
ÍÍ¡ÁÒ·Ó¤ÇÒÁÊÐÍÒ´¤Ç÷Óâ´Âª‹Ò§¼ÙŒªÓ¹ÒÞ¡ÒÃáÅФÇÃÍ‹Ò¹¢Ñ้¹µÍ¹áÅФًÁ×ÍÍ‹ҧÅÐàÍÕ´
¡‹Í¹·Ó¡ÒöʹªÔ้¹Ê‹Ç¹µ‹Ò§æ ·Ñ้§¹Õ้¼ÙŒãªŒäÁ‹¤ÇöʹÁÍàµÍÃÍÍ¡ÁÒ·Ó¤ÇÒÁÊÐÍÒ´àͧ
¤ÇõԴµ‹Íª‹Ò§¼ÙŒªÓ¹ÒÞ¡ÒèҡÈٹºÃÔ¡ÒÃÅÙ¡¤ŒÒ໚¹¼ÙŒ´Óà¹Ô¹¡ÒÃ
7 8
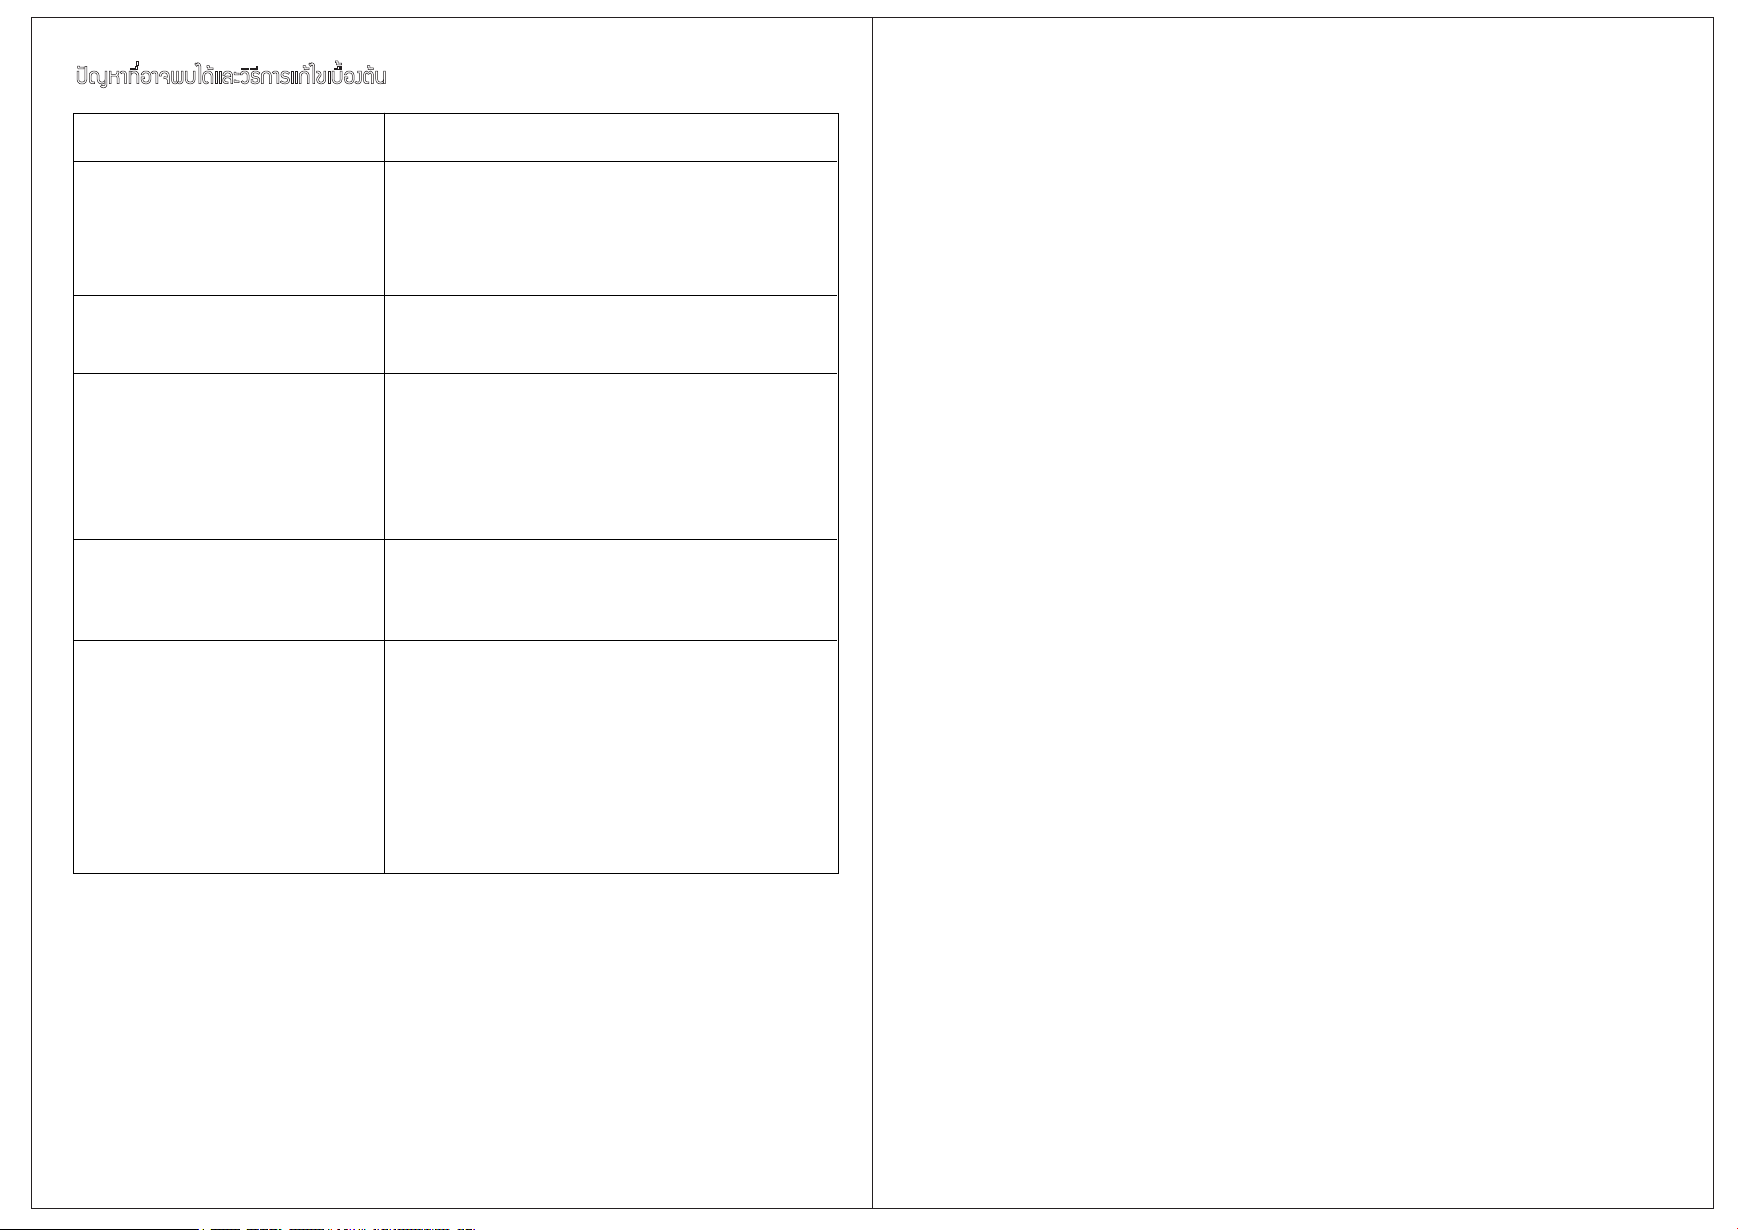
»˜ÞËÒ·Õ่ÍÒ¨¾ºä´ŒáÅÐÇÔ¸Õ¡ÒÃá¡Œä¢àº×้ͧµŒ¹
»˜ÞËÒ á¹Ç·Ò§á¡Œä¢
- à¤Ã×่ͧ´Ù´¤ÇѹäÁ‹·Ó§Ò¹
ËÃ×ÍËÅÍ´ä¿äÁ‹Ê‹Í§ÊÇ‹Ò§
- µÃǨàª็¤Ç‹ÒÁÕ¡ÒÃàª×่ÍÁµ‹ÍÊÒÂä¿
áÅÐà»´ÊÇÔµ«¡ÃÐáÊä¿áÅŒÇËÃ×ÍäÁ‹
- µÃǨàª็¤Ç‹ÒÊÒÂä¿ÍÂÙ‹ã¹ÊÀÒ¾´Õ áÅÐäÁ‹ËÅØ´ËÅÇÁ
- à»ÅÕ่¹ËÅÍ´ä¿ ËÒ¡ËÅÍ´ä¿äÁ‹Ê‹Í§ÊÇ‹Ò§
- à¤Ã×่ͧ´Ù´¤ÇѹÁÕÍÒ¡ÒÃÊÑ่¹àÁ×่Í໴㪌§Ò¹ ÍҨ໚¹»˜ÞËÒ·Õ่à¡Ô´¨Ò¡¡ÒõԴµÑ้§
¤ÇûÃÖ¡ÉÒª‹Ò§¼ÙŒàªÕ่ÂǪÒÞà¾×่Í·Ó¡ÒõԴµÑ้§ãËÁ‹
- à¤Ã×่ͧ´Ù´¤Çѹ·Ó§Ò¹äÁ‹»¡µÔ - ·‹ÍÃкÒÂÍÒ¡ÒȵŒÍ§ÁÕ¢¹Ò´àÊŒ¹¼‹ÒÈٹ¡ÅÒ§ 7 ¹Ô้Ç
- ·‹ÍÃкÒÂÍÒ¡ÒȵŒÍ§äÁ‹ÂÒǨ¹à¡Ô¹ä»
ËÃ×ÍÁÕ¡ÒôѴ⤌§ÁÒ¡à¡Ô¹ 2 ¨Ø´
- àª็¤µÑÇàª×่ÍÁ»Å‹Í§áÅз‹Í´Ù´ÍÒ¡ÒÈÇ‹ÒµÔ´µÑ้§á¹‹¹Ê¹Ô·´ÕËÃ×ÍäÁ‹
- ͌ҧÍÔ§¢ŒÍÁÙÅ à¾Ô่ÁàµÔÁàÃ×่ͧ¡ÒõԴµÑ้§·‹Íµ‹Í áÅÐÃкÒÂÍÒ¡ÒÈ
- ÁÕä¿Ê‹Í§ÊÇ‹Ò§ ᵋÁÍàµÍÃäÁ‹·Ó§Ò¹ - à¤Ã×่ͧ´Ù´¤ÇѹÍҨ䴌ÃѺ¡ÒáÃзº¡ÃÐà·×͹ÃÐËÇ‹Ò§¢¹Ê‹§
¡ÃسҵԴµ‹Í½†ÒºÃÔ¡ÒÃËÅѧ¡ÒâÒ¢ͧºÃÔÉÑ·¼ÙŒ¨Ñ´¨Ó˹‹ÒÂ
- à¤Ã×่ͧ´Ù´¤ÇѹäÁ‹ÊÒÁÒö´Ù´¤Çѹ
䴌͋ҧÁÕ»ÃÐÊÔ·¸ÔÀÒ¾
- µÃǨÊͺãˌṋã¨Ç‹Ò ÃÐÂÐË‹Ò§¢Í§¡ÒõԴµÑ้§
໚¹ä»µÒÁ·Õ่ÃкØänj㹤ًÁ×Í¡ÒõԴµÑ้§
- µÃǨÊͺãˌṋã¨Ç‹Ò¤ÇÒÁÂÒÇ·‹ÍáÅСÒÃ⤌§
໚¹ä»µÒÁ·Õ่ÃкØänj㹤ًÁ×͵ԴµÑ้§
- µÃǨÊͺãˌṋã¨Ç‹ÒäÁ‹ÁÕÃÙÃÑ่Ǣͧ·‹Í ËÃ×͵ÒÁ¨Ø´àª×่ÍÁµ‹Íµ‹Ò§æ
- à»´¤ÇÒÁáçÃдѺÊÙ§ÊØ´ àÁ×่ÍÁÕ¡ÒûÃاÍÒËÒÃ˹ѡ
·Õ่ÁÕ¤ÇѹáÅСÅÔ่¹áç
ËÒ¡¼ÙŒãªŒ¾º»˜ÞËÒÊÔ¹¤ŒÒ·Õ่à¡Ô´¢Ö้¹¹Í¡à˹×ͨҡ·Õ่¡Å‹ÒÇ¢ŒÒ§µŒ¹ ¡ÃسҵԴµ‹Í½†ÒºÃÔ¡ÒÃËÅѧ¡ÒâÒÂ
¢Í§ºÃÔÉÑ·¼ÙŒ¨Ñ´¨Ó˹‹Ò à¾×่ÍãËŒª‹Ò§à¢ŒÒä»´Óà¹Ô¹¡ÒõÃǨÊͺáÅÐᡌ䢵‹Íä»
9
Product characters :
1. Advance shape and strong sense of the times: streamline, luxurious, elegant
and fashionable contour design.
2. Big suction power, which can eliminate the oil smoke thoroughly,
the unitized tensile gas-collection hood fits with the exhaust fume collecting area
for kitchen in better manner. It introduces the twin air-intake centrifugal blower fan
with very large air exhaust amount, which can eliminate the smoke more thoroughly.
3. Low noise level: the lower fan is designed elaborately with ball bearing motor
and multi-blade centrifugal wheel according to the aerodynamic principle.
This can run stably and quitely.
4. Easy to clean: the high quality stainless steel shield of the glass faceplate
can be cleaned easily. The removable baffle type stainless steel filter is easy
to remove or install, no need any extra tools.
5. The oil channel is introduced with particular multi oil channel design which doesn’t
accumulate oil, drip oil or impregnate oil.
Attentions :
1. The wall to fix the cooker hood should be strong with certain strength,
which can support the weight of the product.
2. Keep away from the wires laid in the wall when installing the bores
to avoid electric shock.
3. The wind from the cooker hood can’t be discharged into the hot flue that used
to discharge the smoke of coal gas or other fuel.
4. Keep good ventilation of the room space when using the cooker hood
with the cooking utensils that consumes coal gas and other fuel together.
5. Don’t expose the cooker hood directly with fire or it will be damaged or fired.
6. Please turn off the cooker hood at once when the oil in the boiler is on fire.
Check whether the power lead is damaged before using again, if you are not sure
about it; please contact our service centre for assistant.
7. Clean out the greasy stain on the wind wheel and airflow to ensure the smoke
exhaust effect. Empty the oil cup regularly to avoid excess oil overflow.
8. Be particularly careful when cleaning the wind wheel. Don’t hit or remove
the clump weight to avoid damage to its dynamic balancing and cause the product
to vibrate and increase the noise.
9. Clean the cooker hood with the detergent, such as neutral detergent, prescribed
in the instruction. Don’t clean it with gasoline or other volatile flammable solvent
or it may cause the cooker hood on fire.
10. The damaged power lead of the cooker hood must be replaced
with the special power lead provided by us.
11. Turned off the power plug before replacing the light bulb. Turn on the cooker hood
to ensure the power supply is cut off. The power of the bulb replace must be
lower than 2W to avoid damaging the oil and smoke exhauster f
or overheating and ignition.
12. Don’t touch the shade of the light directly after long time use to avoid the burning
of your hands.
13. Turned off the power plug before maintenance. Turn on the range hood switch
to ensure the power supply is cut off then put on protective gloves for cleaning.
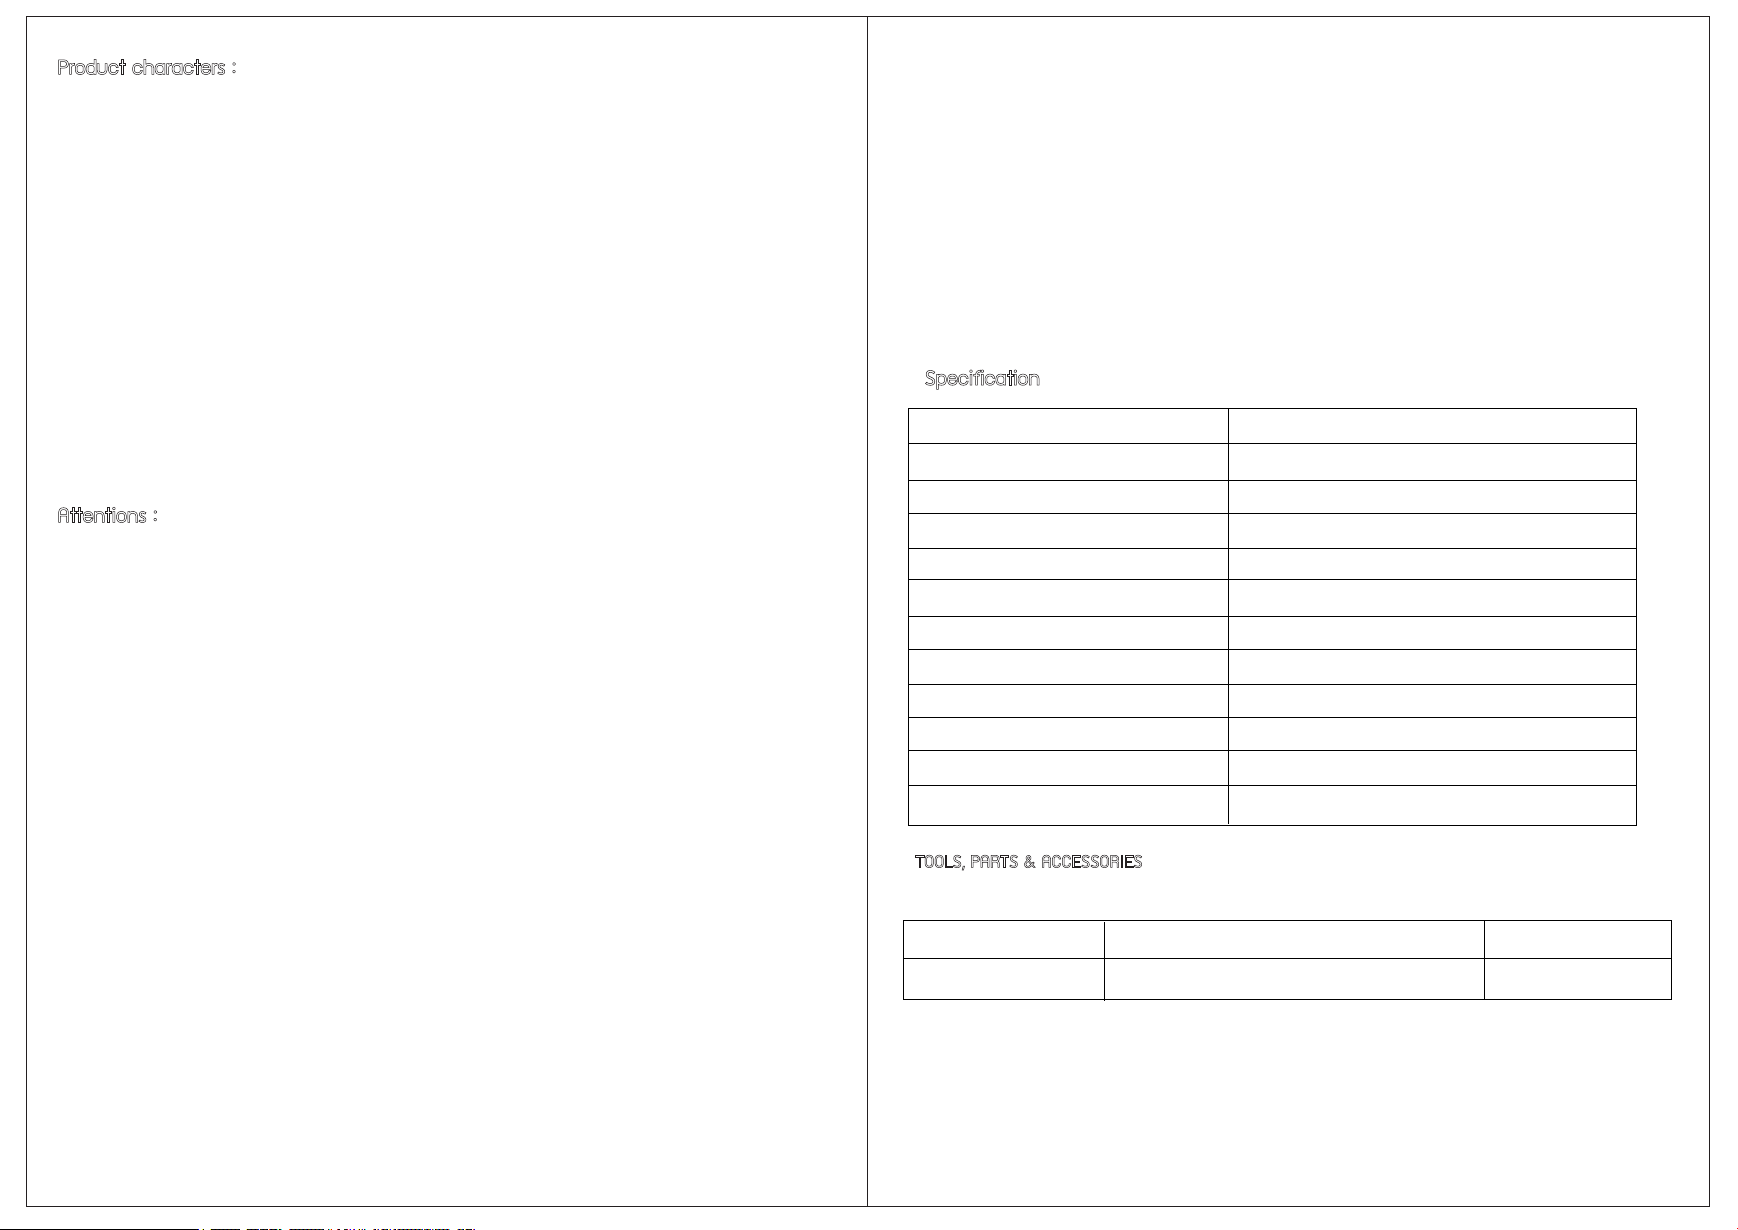
Specification
Model
Air quantity (Max.) 1800m3/Hr
Power supply 220~240V/50Hz
Product Dimension W900 x D558 x H650-1000 (mm)
General Input Power 238W*1
Noise Level (dB) ≤65
Control panel Sensor touch & remote control
Levels Of Speed Control 3 Levels
Motor Type Metal
Fan Type Sirocco
Lamp LED light
Filtration Type Washable baffle type stainless steel filter
TNP HD ZEUS 1
TOOLS, PARTS & ACCESSORIES
Tools needed
1. Pencil or marker 2. Utility knife 3. Measuring tape 4. Spirit level
5. Powered screwdriver 6. Flat blade screwdriver 7. Phillips screwdriver 8. Protective gloves
11 12
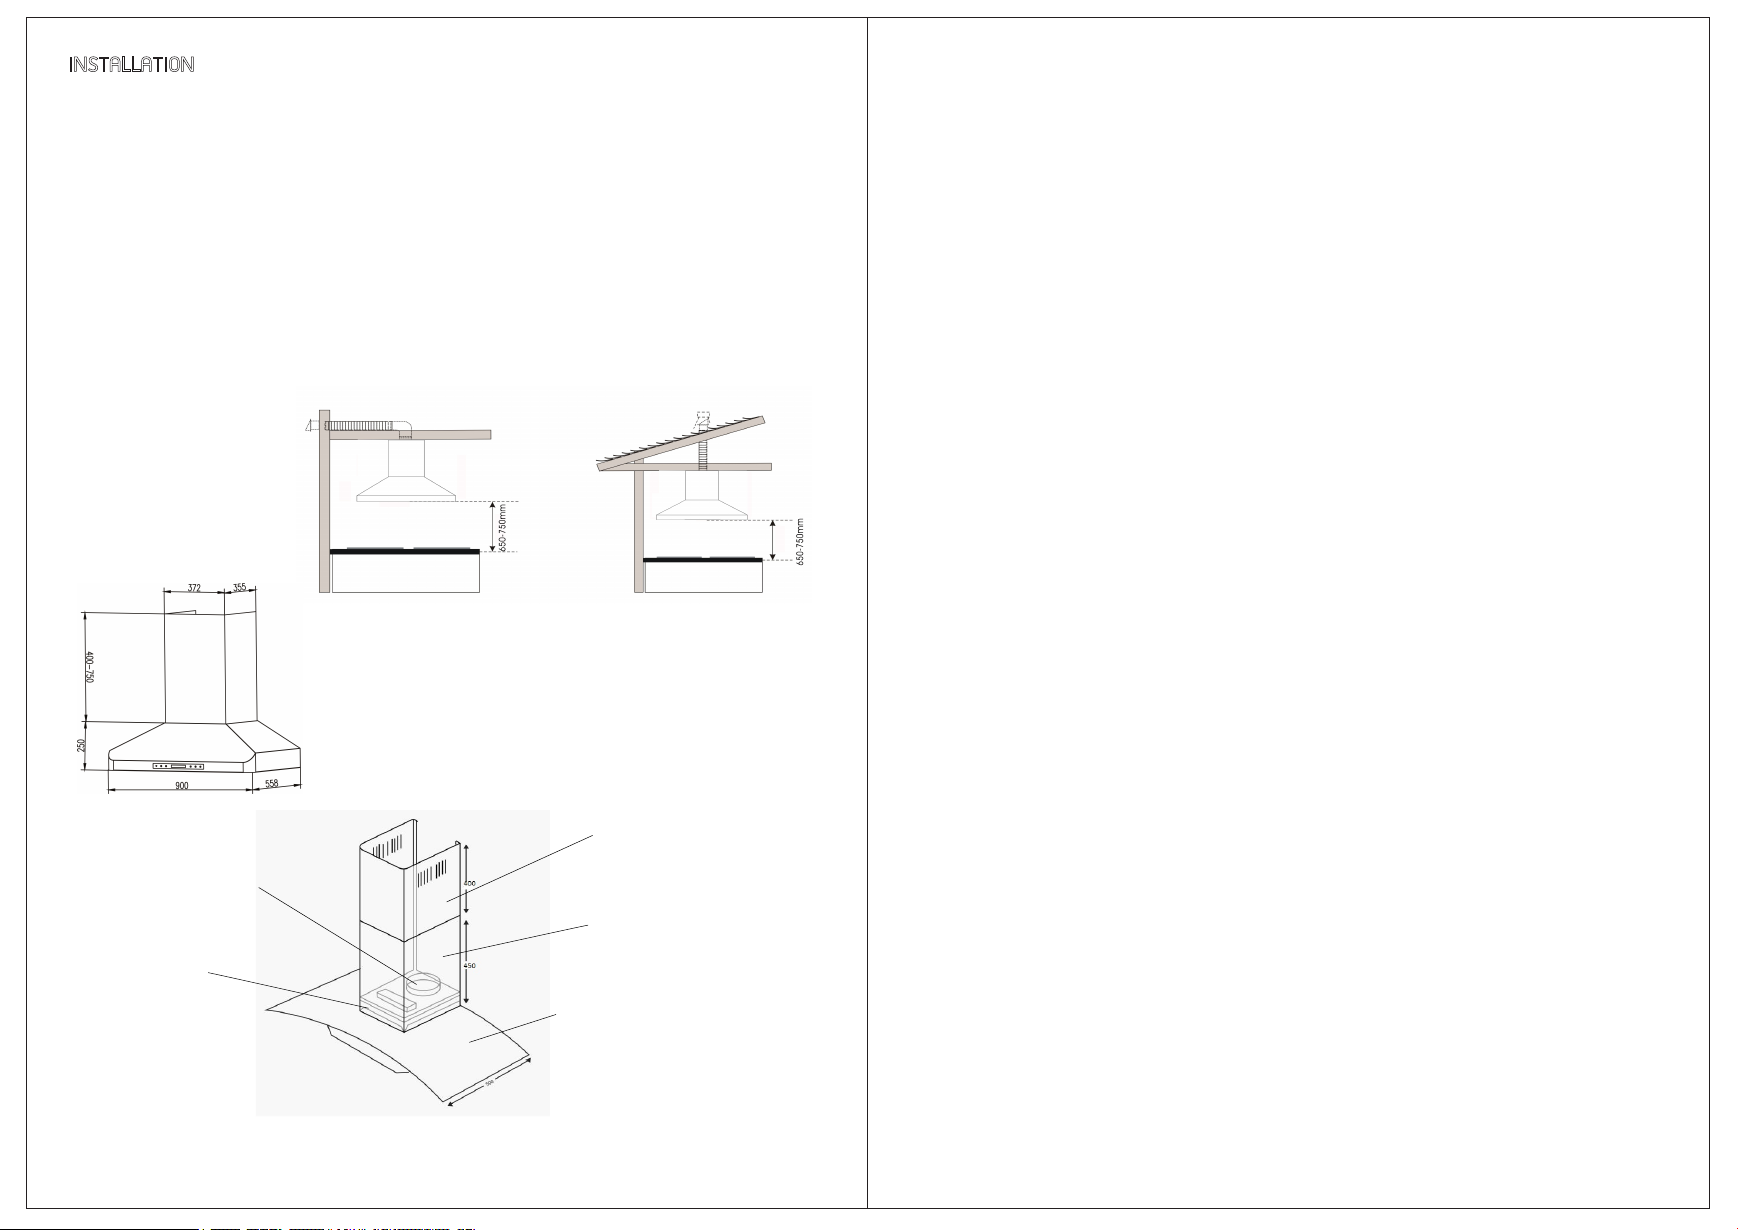
INSTALLATION
1) Exhaust Ventilation
Under this vented installation, the cooker hood’s air outlet will be connected
to the wall and reach the outdoor through a ducting. The cooking fumes and air
in the kitchen will draw into the cooker hood and cleaned by the grease filters
and then directed outside. The anti-backflow vent cap is needed for
this operation mode. The anti-backflow vent cap will be fixed at the end
of the ducting which is outside the kitchen at the opening on the wall. This vent cap
is to block the vented fumes and air flow back into the ducting and the vent cap
will be closed once the cooker hood turns off. Diagrams below are some examples
of exhaust ventilation
(The cooker hood can be installed in different ceiling type)
Air chamber outlet
Motor casing
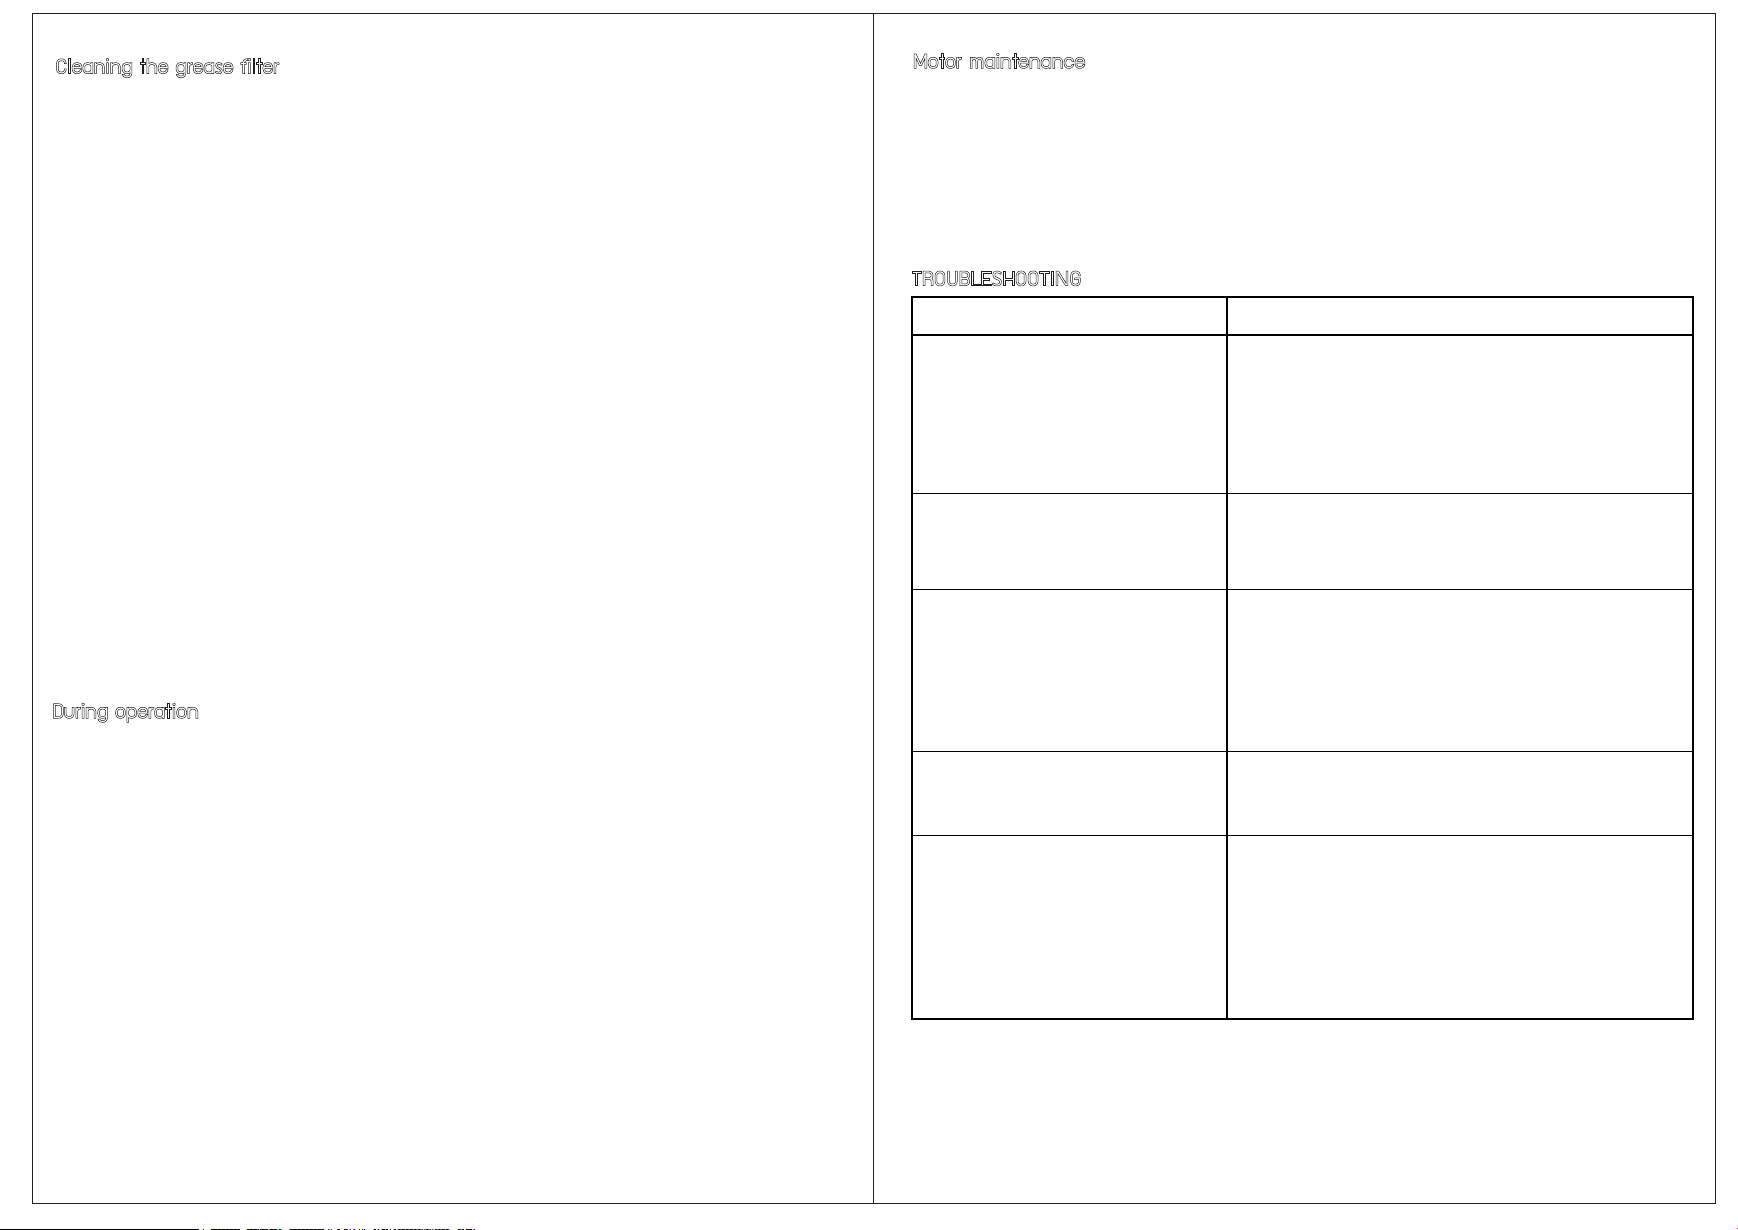
Upper chimney flue
Lower chimney flue
Range hood glass casing
* The measurement is measured in mm.
* The above displayed cooker hood figure maybe varied from the actual product
2) Installation Instruction
3) Installation Notes
Before installation, it is very important and needed to read and understand
the stated safety notes, instructions and related information in this manual.
This is to ensure the appliance could be installed appropriately and the user would
use it in a proper method in order to avoid any unnecessary injury and damages.
To avoid the risk of fumes suffocation, the cooker hood should be installed according
to the stated instructions and notes in this manual. Next, the range hood has to install
in accordance to the local building guides and regulations therefore please seek
approval from the building management or inspector if necessary before installation.
4) Venting requirements
1. Do not vent the cooking fumes and air into attic, ceiling and any enclosed area.
2. Make sure the ducting is clean inside for efficient ventilation.
3. The recommended distance between the top surface of cooking hob
and the bottom part of the cooker hood is between 650mm to 750mm (can be
adjusted according to different cooking way).
4. Make sure the mounting height is appropriate as the range hood could be
badly damage and in fire hazard if the range hood mounted too low.
If the range hood mounted too high, its performance and efficiency will be decreased.
5. Both the size of the ducting and the size of air chamber outlet should be consistent.
6. Do not make the ducting turns 90oC more than 2 times as each turn will reduce
the airflow efficiency.
7. Make sure the ducting has a length of at least of 24 inches (61cm) before a 90 C
turn and between 2 different 90oC turn in the same ducting. This is to allow the
drawn in fumes and air have enough room to push through the ducting smoothly.
8. Minimize the length of the adopted ducting and the 90oC bents so the range hood
could work at its best. Always make sure the total ducting does not go beyond
9. Please ensure the vent system is completely sealed, if not please use the silver tape
or duct tape to seal it to ensure proper ventilation.
10. Use silicon, plaster and etc. to seal the exterior wall opening or roof opening
around the cap.
11. If turns are needed in the installation, please make sure make it as far as possible
from the air chamber outlet.
12. If the ducting is directed into a central vent flue of a building or house,
the ducting outlet must be adjusted to the flow direction of the vent flue.
13 14
5) Electrical requirements
1. The electrical work should be carried out by a suitably qualified and authorise
professional in strict accordance with the current local and national safety regulations.
2. Make sure the appliance is not connected to the power supply
while during the installation.
3. Do not connect the appliance to the extension lead of a power socket
as this will not guarantee safety of using this appliance.
4. Check the power supply of the house and make sure it is match with the appliance.
The connection data is listed on data plate on the cooker hood.
5. Install this appliance with a proper 3 pins plug that match local and national safety
standard and make sure the power is easily accessible after the appliance
has been completely built in.
6. Make sure the cooker hood is properly grounded.
6) Installation steps
1. Please take note of the user who use this range hood most often and make sure
there is enough space to cook comfortably under the range hood and able
to reach the control panel easily at the same time.
2. As this appliance is heavy, please make sure that the supporting or framework being
used is stable and secured enough in the wall.
3. Mark the locations of the support mounting bracket holes, ducting cut out (if used)
and power supply cable cut out on the ceiling and then use drill and saber saw or
other tools to cut the openings for power supply cable and ducting.
4. Please seal the exterior wall or roof openings under the exhaust
ventilation installation.
5. Turn off the main electrical supply, prepare and run the wires through ceiling or wall.
Leave approximately about 12 inches of electrical cord hanging from the ceiling.
Do not restore power until the wiring is complete.
6. For glass cooker hood, please handle it with extra care and remove
the glass before installation if possible. Do not put excessive pressure onto the glass.
7. Measure the distance between cook top and the bottom of cooker hood
and make sure the right distance between the cook top and the bottom
of range hood for different hobs.
8. Make sure the range hood is level horizontally and not tilted. Mark the locations of it.
9. Place the mounting bracket directly above the range hood, level it, and mark
the locations of the mounting bracket holes on the wall.
.
10. Place aside all equipments and locate marked regions and then drill holes.
Attach the range hood to the wall using anchors recommended for your type of wall:
- Sheet rock wall: Attach range hood to stud blockings if possible. If stud blockings
are not available, it is required to build a supporting structure behind the sheet rock
for best weight support.
- Concrete wall: Use designated screws (not provided).
- Wood wall: Use at least 4 inches long wood screws (not provided).
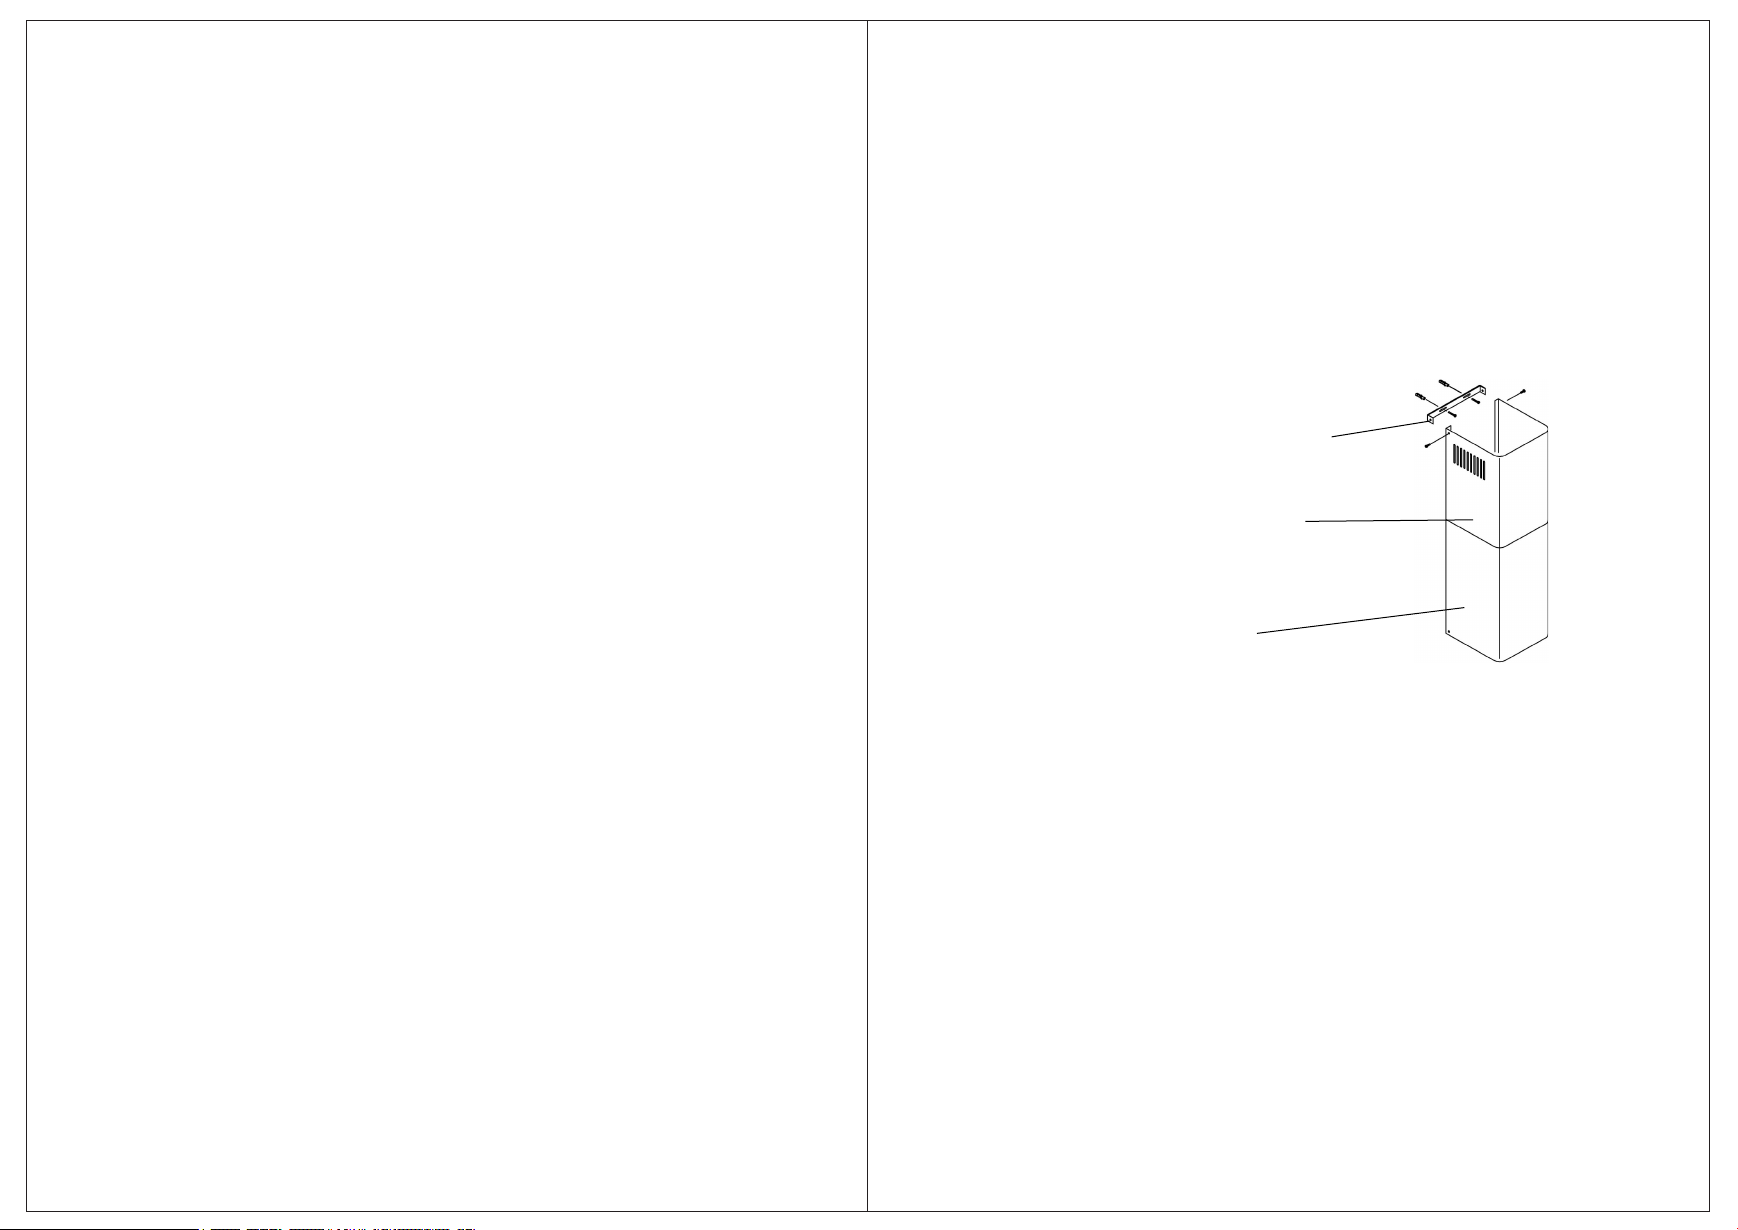
11. Place the mounting bracket (or air diverter) against the wall and align the holes
from mounting bracket (or air diverter) with holes from type A anchors,
fasten two type B screws through the holes onto the anchors as shown
in below picture. Leave approximately 1/16 inches of gap between the wall
and the mounting bracket (or air diverter)
Fasten mounting bracket
Slide up and secure
Upper chimney flue to
Hold in position and
Secure lower chimney flue
to range hood
* The displayed figures maybe varied from the actual product.
12. Calculate the height of the ducting and extend approximately 6 inches
longer than required, connect the lower end of the ducting to the range hood
and the upper end to the outlet (or air diverter). Make sure the main electrical
supply remains disconnected then connect power plug to the electrical cord
or wall socket.
13. Have one person carefully position both upper and lower chimneys
on the cooker hood as to allow another installer slide the sides of the chimney flues
into the 1/16 inches gap. Fasten both chimneys flues with four type C screws.
14. Install the oil cup back to its place and place the baffle filters under the cooker hood.
15. The user may check the operation and performance of the cooker hood
after the above stated installation steps are done.
15 16
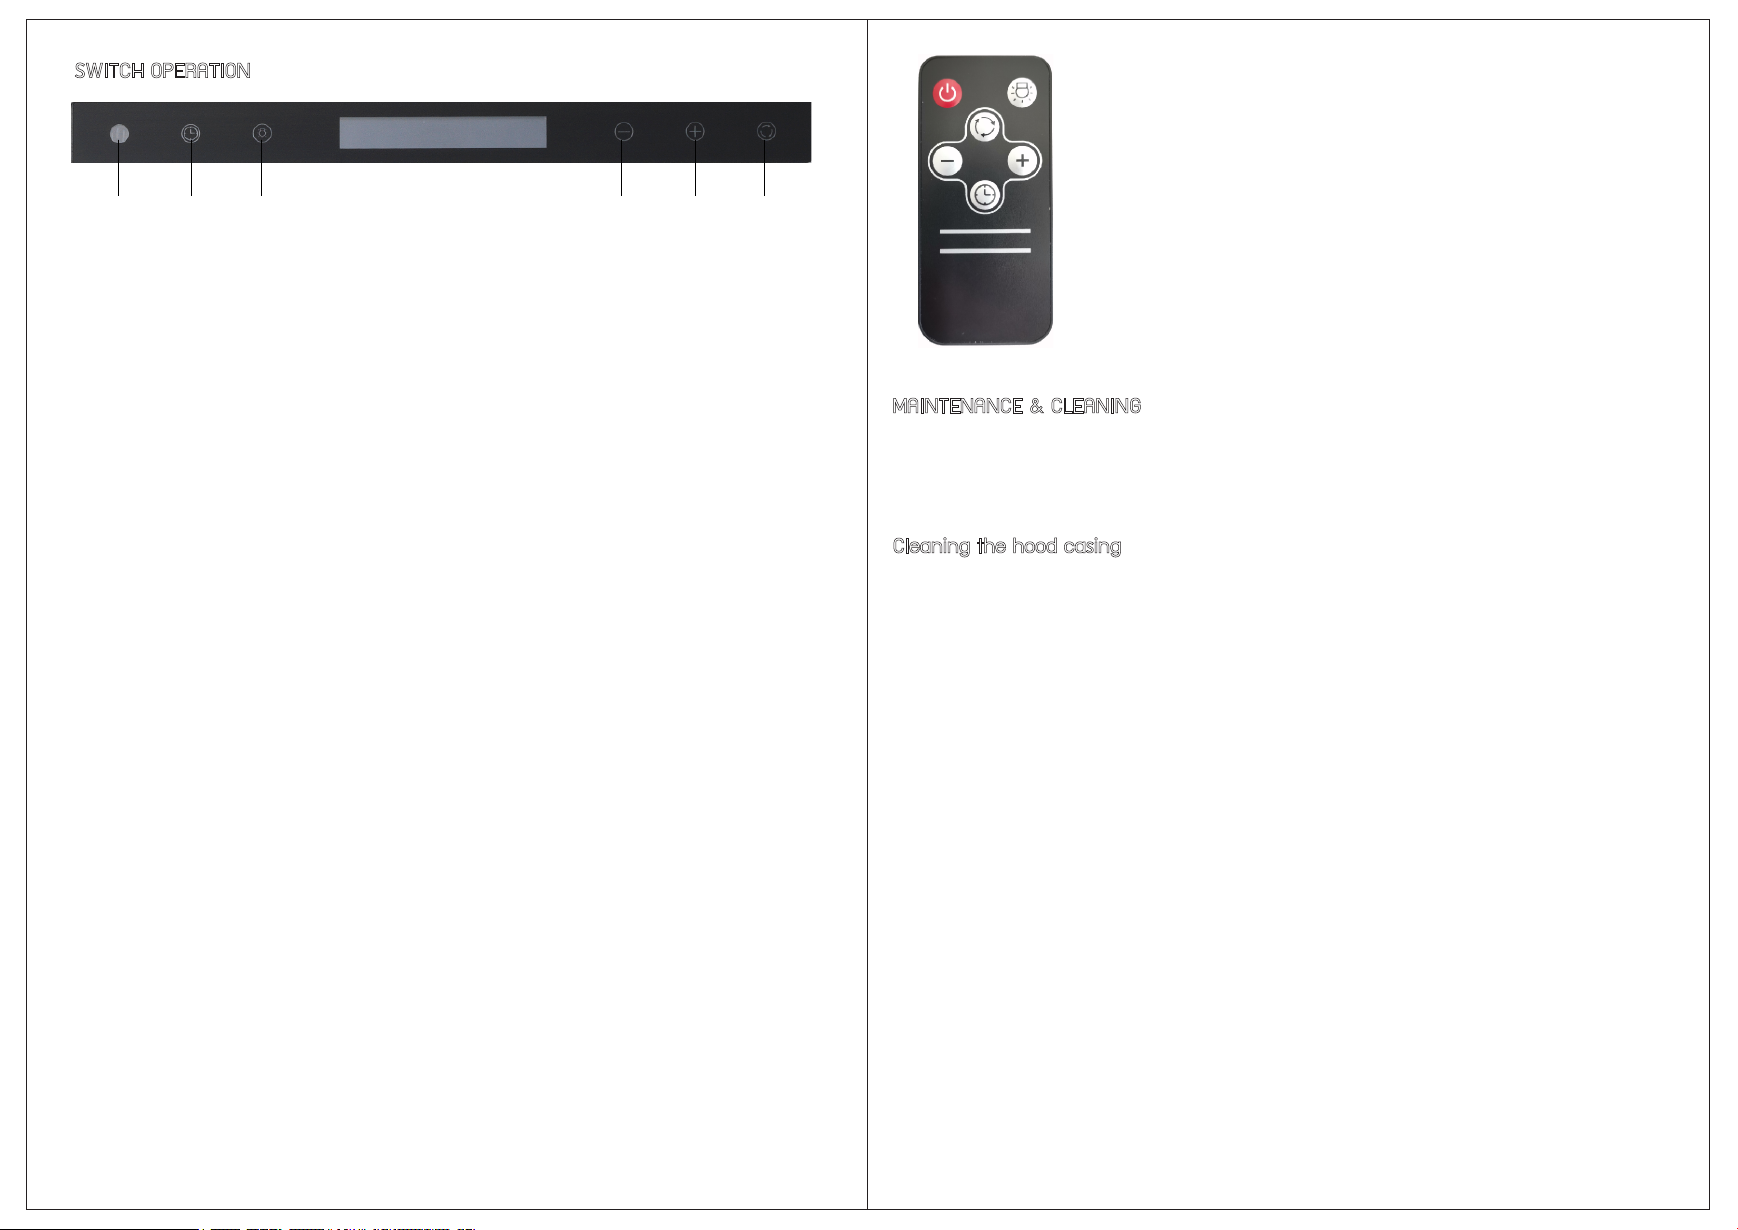
SWITCH OPERATION
receiver Timer Light Minus Plus Power
Button functions
Power : To turn on/ off the cooker hood
Plus : To increase the fan speed or deration of delay-off or set the time of hour
Minus : To decrease the fan speed or deration of delay-off or set the time of minute
Light : To turn on/ off the LED light
Timer : Delay-off timer set
Standby mode: Once the cooker hood is connected firmly to the power socket
and turned on, the cooker hood will enter into standby mode. You can press the
power key for the start of the motor or light key for Lamp working .
Delay-off timer :Press the Timer button for about 1 second to turn on the delay-off timer.
The cooker hood is set for 1-15 minutes delay-offer timer. After the user press
the timer button, the delay-off timer will start activates in about 5 seconds.
Once the cooker hood reaches the 15minutes, the cooker hood
will be turned off automatically.
When use Timer , the Digital screen will show the delay-off timer.
If user do not use the timer , the screen will show the Normal time.
Light: The user can turn on the cooker hood illumination through pressing
on the 'Light' button. Press once to turn it on and once more to turn it off.
The light function is independent from other function which will not be affected
by other functions or adjustment.
Fan speed setting: The cooker hood is operated at 3 fan speed setting.
The user may adjust the fan speed setting through pressing on Minus or Plus button
to have different speeds.
Note: Light settings are independent from other settings (including delay-off)
and lights have to be manually turned on or off.
1. Remote control sensor receives infrared(IR) signal
from the remote control.
The maximum distance for IR data transmission is 5m
and requires line of sight.
The transmission distance may vary depanding on temperature
and remote control battery condition.
2. Light settings are independent from other setting
(including power-off delay) and lights have to be manually
turned on or off.
3. The system saves user configurations, settings such as light ,
timers and blower(motor) speed will returned on.
MAINTENANCE & CLEANING
Do not start any maintenance and cleaning work unless the appliance is disconnected
from the power supply. Make sure the power is turned off and the plug
is withdrawn out from it completely.
Cleaning the hood casing
1. Clean the hood casing periodically with warm soapy water and clean cotton cloth.
2. Do not use corrosive or abrasive detergent and steel wool or scoring pads,
which will scratch and damage the stainless steel surface. For heavier soil,
please use only the mild degreaser with warm water to clean it.
3. For stainless steel hood, user may use stainless steel cleaner to clean the surface
of the hood. Please avoid the cleaning solution penetrate into the control panel.
Do not leave the cleaner on the hood too long as this may damage to the surface.
Use soft towel to wipe off the cleaning solution, gently rub off any stubborn spots.
Use clean and dry soft towel to dry the hood.
4. The user may buff up the stainless steel hood with stainless steel polish after cleaning.
5. Do not allow stains and dirt to accumulate on the hood casing.
6. Do not use ordinary steel wool or steel brushes as it may scratch off and damage
the surface. These scratches and damaged parts may cause rusting in long run.
7. Do not allow salt solutions, disinfectants, bleaches, or cleaning compounds to stick
on the stainless steel surface. Many of these compounds contain chemicals,
which may be harmful to the casing. To clean these compounds, rinse it with water
and wipe it dry with a clean soft cloth.
8. Do not use stainless steel cleaner on the control panel as it may spoil the surface
of it or discolour it.
17 18
Cleaning the grease filter
(please wear the protective gloves before clean the baffle filter)
1. The grease filters fitted by the factory are intended to filter out residue and grease
from cooking. It need not be replaced on a regular basis but are required
to be kept clean frequently and its easy disassembles without any tools needed.
2. The filters are recommended to be cleaned after every 20 hours of cooking
(maybe varied according to different cooking habits and frequency).
If the cooking habit is very heavy which involve a lot of deep frying and stir frying
with lots of oil, the filter has to be cleaned more often than the recommended basis.
3. To clean the filters, the user could soak it with warm soapy water for sometime
and then rinse it with clean water. The user could softly brush the filter
with soapy water and clean cloth as well and then rinse it clean water.
4. After rinse off the soapy solution, the user has to dry the filters before they could place
back to the cooker hood. The filters have to place back before it start operates again.
5. The damaged filter has to replace immediately, the filter could be purchase
from our authorised dealers.
6. Do not use abrasive detergent, powder cleaner, oven cleaner, cream cleaner
and any other corrosive cleaning agent that will damage or discolour the filters.
7. Depend on the cleaning detergent used; to clean the filters in a dishwasher
can cause permanent discolour to the filters. However, the filters could still be used
as the structure is not damage.
Caution: A saturated and unclean filter could result in fire hazard.
During operation
1. Always leave the filters or safety grills in place. Without these components,
the operating fan could catch the hair, fingers, loose clothing and other small
and light particles.
2. Never dispose cigarette ashes, ignitable substances, or any foreign objects
into the operating fans.
3. Never leave the cooking unattended. When frying, oil in the pan can easily overheat
and catch fire. The risk of self combustion is higher if the oil
has been used several times.
4. Never cook with flare ups or flames in the cookware under the range hood.
Handle the deep-fryers well during use as the overheated oil may be flammable.
Motor maintenance
Do not turn on the range hood when the grease filters are removed.
Never disassemble parts to clean without proper instructions. Disassembly
is recommended to be performed by qualified personnel only. The qualified technician
needs to read and understand all the instructions and warnings in this manual
for cleaning and maintenance. Customer should not clean the motor but arrange
an authorised professional to clean and service the motor.
TROUBLESHOOTING
Problems Guidance
The range hood or the light bulb
does not work.
Make sure the power supply is well connected
and turned on.
Make sure the wires are in good condition
and well connected.
Change a new bulb to see whether it is working or not.
The range hood starts vibrate
after it turned on.
The range hood maybe not well installed, please check
it with the installer and reinstall the cooker hood
if necessary.
The range hood performs badly. Make sure the ducting is of 7 inches diameter.
Make sure the ducting is not too long
or have more than 2 bents.
Make sure the vent cap is not lock tight.
Refer to the exhaust ventilation for more guides.
The light is working but the fan
is not spinning at all.
The cooker hood may be damaged during transportation,
please contact us or the authorized dealers.
The range hood is not venting out
the cooking fumes efficiently.
Make sure the installation distance falls between
the recommended distances.
Make sure the length and bents of the ducting
do not go beyond the recommended levels.
Make sure the ducting work is well sealed.
Turn the fan speed to higher setting for heavy cooking.
In the event that the user cannot corrected any of the stated or not stated technical
problems, please do not hesitate to contact us or your nearest dealers
for further services or consultations.
19 20

Table of contents
Other Tecnogas Ventilation Hood manuals


Popular Ventilation Hood manuals by other brands

Air King
Air King Professional Series operating manual

Range Master
Range Master RMG1H60SG instruction manual

Air King
Air King RANGE HOODS IBIZA SERIES Specifications

Range Master
Range Master RMHDT110SS User's guide & installation instructions

VentAHood
VentAHood RM1000 Owner and maintenance guide

Air King
Air King DQ Series operating manual

V-ZUG
V-ZUG AiroClearWall V4000 operating instructions

Lumberjack
Lumberjack BDE1100 Safety and operating manual

Airuno
Airuno Combiflow 800 Installation & user's instructions

VentAHood
VentAHood K250 ARS installation instructions

System air
System air MONOLIT EC User instructions

Turboair
Turboair TT14 LX/GRX/F/60 Instruction on mounting and use


