Ted Baker TWO-HAND Series User manual


3

3
Ted Baker is manufactured using the
highest quality materials and craftsman-
ship. The incorporation of both traditional
and forward thinking design philosophies
result in a unique and modern product.

45
LIMITED LIFETIME WARRANTY
Thank you for choosing a Ted Baker precision timepiece.
This Ted Baker Watch is warranted to you, the owner, for
your lifetime against all defects in material or workmanship.
Limited lifetime warranty will be honored only by Service
Center in the United States, Canada, Caribbean as well as
Authorized Duty Free and Military Dealers. Service centers
located in other parts of the world will only provide warranty
service for the rst 2 years. However, the warranty does not
apply to normal wear and tear or abuse and excludes battery,
case, crystal, strap, malfunction and deterioration resulting
from accident, negligence and tampering. Ted Baker Watches
are water-resistant. Special gasket and crown protectors have
been used in the creation of these time pieces to ensure their
resistance to water. In the event of a defect or malfunction, it
will be repaired or replaced at our option. PLEASE DO NOT
SEND CASH. No additional charge will be made unless ad-
ditional servicing is necessary for reasons beyond our control
such as accident, misuse, neglect or replacement of parts not
warranted such as battery, case, crystal, and strap. In this event,
please see Watch Repair section in the back of this booklet.

45
BATTERY LIFE
The battery in your Ted Baker Watch should last approxi-
mately 2 years. When the battery expires, replace it as soon
as possible to prevent any malfunction. For battery replace-
ment, we recommend that you contact an authorized Ted
Baker Dealer. The battery type is found on the caseback.
WATER RESISTANCE
•Before using the watch in or near water, be sure that crown
is pushed in completely.
• If the watch is underwater or wet, do not use pushers,
rotating bezels or crowns.
• If the watch becomes wet, wipe it dry as soon as possible.
• If the watch comes in contact with salt water, rinse case
and bracelet immediately and thoroughly under tap water
and wipe dry with a soft cloth.
• Do not take your watch into a Hot Tub or Sauna. Extreme
heat and pressure may cause your watch to lose its water
resistance.
• Water resistance is not permanent. In the course of time, as
your case becomes worn, the water resistance of the watch
may decrease.
For additional languages please visit our customer service
website at www.genevawatchgroup.com.
WATER RESISTANCE SUITABLE ATMOSPHERE
Washing Hands, Showering
Light Swimming
Most Water Sports–But Not
Deep Water Diving
50 Meters
100 Meters
30 Meters / Or Watch Simply
Marked Water Resistance
GENERAL INFORMATION
6
7
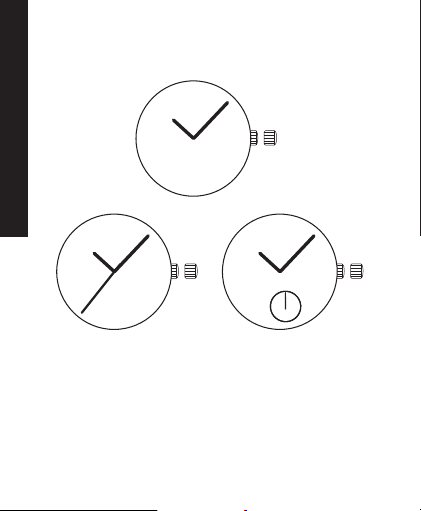
TWO-HAND / THREE-HAND MODELS
TO SET THE TIME:
1. Pull the crown out to the rst click position B.
2. Turn the crown to set the time.
3.Push the crown back to position A.
TIME / DATE
1
1
AB AB
AB
1.Second Hand
6
7
TIME / DATE
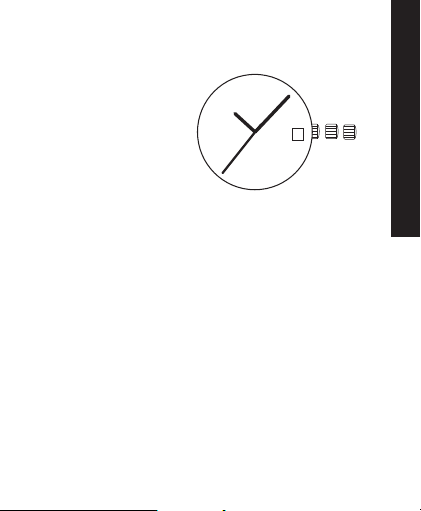
THREE-HAND MODELS WITH BIG DATE
1. Calendar
2. Second Hand
TO SET THE TIME:
1.Pull the crown out to the second click position C.
2. Turn the crown to set the time.
3.Push the crown back to position A.
TO SET THE DATE:
1. Pull the crown out to the rst click position B.
2. Turn the crown counter-clockwise to set the date.
3.Push the crown back to position A.
NOTE: Do not set the date between 9:00 P.M. and 1:00 A.M.
Otherwise, the date may not change properly on
the following day. If it is necessary to set the date
during that time period, rst change the time to any
time outside it, then set the date and then reset to the
correct time.
BAC
2
1

8
9
ONE-EYE MODELS
1. Hour Hand
2. Minute Hand
3. Second Hand
4. Date Hand
TO SET THE TIME:
1.Pull the crown out to the second click position C.
2. Turn the crown to set the time.
3.Push the crown back to position A.
TO SET THE DATE:
1. Pull the crown out to the rst click position B.
2. Turn the crown counter-clockwise to set the date.
3.Push the crown back to position A.
NOTE: Do not set the date between 9:00 P.M. and 1:00 A.M.
Otherwise, the date may not change properly on
the following day. If it is necessary to set the date
during that time period, rst change the time to any
time outside it, then set the date and then reset to the
correct time.
MULTI-FUNCTION
1
2
3
4
BAC

8
9
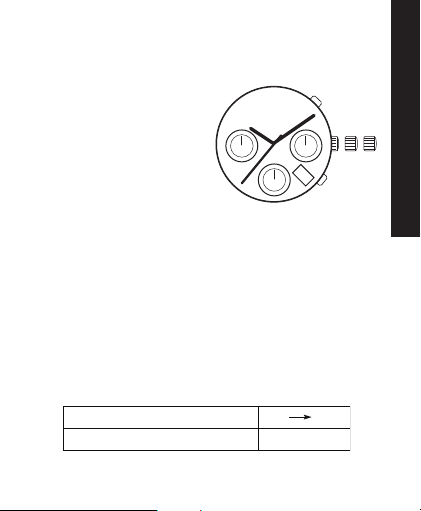
MULTI-FUNCTION
TWO-EYE MULTI-FUNCTION MODELS
1. Second Hand
2. Day Hand
3. Date Hand
1. Second Hand
2. Date Hand
3. 24 Hour Hand
TO SET THE DAY (OF THE WEEK):
1.Pull the crown out to the second click position C.
2. Turn the crown clockwise to set the day.
3.Push the crown back to position A.
NOTE: The Day Hand will move together with the Hour
Hand and Minute Hand. Keep turning the crown
until the desired day has been reached.
AB C
1
32
AB C
13
2

10
11
MULTI-FUNCTION
TO SET THE TIME:
1.Pull the crown out to the second click position C.
2. Turn the crown to set the time.
3.Push the crown back to position A.
NOTE: The 24 Hour Hand will also be set during time
setting.
TO SET THE DATE:
1. Pull the crown out to the rst click position B.
2. Turn the crown counter-clockwise to set the date.
3.Push the crown back to position A.
NOTE: Do not set the date between 9:00 P.M. and 1:00 A.M.
Otherwise, the date may not change properly on
the following day. If it is necessary to set the date
during that time period, rst change the time to any
time outside it, then set the date and then reset to the
correct time.

10
11
THREE-EYE MULTI-FUNCTION MODELS
1. Hour Hand
2. Minute Hand
3. Second Hand
4. Date Hand
5. Day Hand
6. 24 Hour Hand
TO SET THE DAY (OF THE WEEK):
1. Pull crown out to second click position C.
2. Turn crown clockwise to set day.
3. Push crown back to position A.
NOTE: The Day Hand will move together with the Hour
Hand and Minute Hand. Keep turning the crown
until the desired day has been reached.
TO SET THE TIME:
1. Pull crown out to second click position C.
2. Turn crown to set time.
3. Push crown back to position A.
NOTE: The 24 Hour Hand will also be set during time
setting.
MULTI-FUNTION
(6P29)

12
13
TO SET THE DATE:
1. Pull crown out to rst click position B.
2. Turn crown counter-clockwise to set date.
3. Push crown back to position A.
NOTE: Do not set the date between 9:00 P.M. and 1:00
A.M. Otherwise, the date may not change properly
on the following day. If it is necessary to set the
date during that time period, rst change the time to
any time outside it, then set the date and then reset
to the correct time.
MULTI-FUNTION
12
13
CHRONOGRAPH
THREE-EYE CHRONOGRAPH MODELS
1. Hour Hand
2. Minute Hand
3. Second Hand or
Chronograph 1/20
Second Hand
4. 24 Hour Hand
5. Chronograph Minute Hand
6. Chronograph Second Hand
7. Calendar
S1 – Chronograph start/stop button
S2 – Chronograph reset button
TO ADJUST THE CHRONOGRAPH HANDS
POSITION:
Before setting the time, check if the Chronograph 1/20
Second Hand (for certain models only), Chronograph
Second Hand and Chronograph Minute Hand are at the zero
position.
If the chronograph is in use, press the button in the fol-
lowing order to reset it, and then check if the chronograph
hands have returned to zero position.
AB C
4
6
54
3
1
2
7
If the chronograph is counting: S1 S2
S2
If the chronograph is stopped:
S1
S2

14
15
CHRONOGRAPH
In case one or several chronograph hands are not at the zero
position due to certain reasons (e.g. following a battery
change), that needs to be adjusted.
1. Pull the crown out to the second click position C.
2. Press the S1 button to set the Chronograph Second Hand.
Holding down the button will allow quick advance.
3. Press the S2 button to set the Chronograph 1/20 Second
Hand (for certain models only). Holding down the button
will allow quick advance.
4. Push the crown back to position A.
TO SET THE TIME:
1. Pull the crown out to the second click position C.
2. Turn the crown to set the time.
3. Push the crown back to position A.
NOTE: The 24 Hour Hand will also be set during time
setting.
TO SET THE DATE:
1. Pull the crown out to the rst click position B.
2. Turn the crown counter-clockwise to set the date.
3. Push the crown back to position A.
NOTE: Do not set the date between 9:00 P.M. and 1:00 A.M.
Otherwise, the date may not change properly on
the following day. If it is necessary to set the date
during that time period, rst change the time to any
time outside it, then set the date and then reset to the
correct time.

14
15
TO USE THE CHRONOGRAPH
(STOPWATCH):
Press the S2 button to switch the watch to chronograph
mode,
1. Press the S1 button to start counting.
2. To stop counting, press the S1 button once. Press the S1
button again to resume from where it left off.
3. To reset to zero, press the S1 button to stop counting and
then press the S2 button.
NOTE: For certain models, the chronograph is able to
measure and display time in 1/20 second units up to
maximum of 1 hour. The retrograde Chronograph
1/20 Second Hand keeps counting continuously
for 60 seconds after starting, and then stops at zero
position. When the S1 button is pressed to stop the
chronograph, the Chronograph 1/20 Second Hand
will quickly advance to display the measured time.
CHRONOGRAPH

16
17
THREE-EYE CHRONOGRAPH MODELS
1. Hour Hand
2. Minute Hand
3. Second Hand
4. 24 Hour Hand
5. Chronograph Second Hand
6. Chronograph Minute Hand
S1 – Chronograph start/stop button
S2 – Chronograph reset button
TO ADJUST THE CHRONOGRAPH HANDS
POSITION:
Before setting the time, check if the Chronograph Second
Hand and Chronograph Minute Hand are at the zero posi-
tion.
If the chronograph is in use, press the button in the fol-
lowing order to reset it, and then check if the chronograph
hands have returned to zero position.
In case one or several chronograph hands are not at the zero
position due to certain reasons (e.g. following a battery
change), that needs to be adjusted.
CHRONOGRAPH
If the chronograph is counting: S1 S2
S2
If the chronograph is stopped:
AB
4
45 6
1
2
3
S1
S2

16
17
CHRONOGRAPH
1. Pull the crown out to the rst click position B.
2. Press the S1 button to set the Chronograph Second Hand
and Chronograph Minute Hand (mechanically coupled).
Holding down the button will allow quick advance.
3. Push the crown back to position A.
TO SET THE TIME:
1. Pull the crown out to the rst click position B.
2. Turn the crown to set the time.
3. Push the crown back to position A.
NOTE: The 24 Hour Hand will also be set during time
setting.
TO USE THE CHRONOGRAPH
(STOPWATCH):
For the measurement of elapsed time,
1. Press the S1 button to start counting.
2. To stop counting, press the S1 button once. Press the S1
button again to resume from where it left off.
3. To reset to zero, press the S1 button to stop counting and
then press the S2 button.
NOTE: The chronograph is able to measure and display
time in 1 second unit up to maximum of 29 minutes
59 seconds. The chronograph will stop automatically
after running continuously for 30 minutes.

18
19
WATCH REPAIR AND SERVICE
Contact the International Service Center for your country
listed at the back of this booklet.

66
Warranty Certicate
Date of Purchase
__________________________________________
Model Number
__________________________________________
Authorized Dealer Information
__________________________________________

INTERNATIONAL SERVICE CENTERS
Argentina WATCH LAND S.A. Bme. Mitre 1617-8th Floor
+5411 4373 0100 1037 Buenos Aires, Argentina
Australia SEIVERS AUSTRALIA PTY LTD Level 11, 343 Little Collins Street,
+61 3 9600 4984 Melbourne Vic, Australia
Austria D. ZAFIR HANDELSFIRMA Porzellangasse 27,
IMPORT – EXPORT A-1090 Wien, Austria
+431 317 8224
Croatia CORDIS D.O.O. Malesnica 16
+385 1 37 33 357 10000 Zagreb, Croatia
Czech WOW LASO OSTRAVA Masarykovo nam. 15.
Republic +420 775 560 150 728 53 Ostrava
France ETS CHARRAUD 82, Rue du 14 Juillet
+33 556 841084 33400 Talence, France
Greece TIMEPIECE 72, Pentelis, Haladrin,
+30 210 6828362 Atheens, Greece
Hong Kong ECON MARKETING (HK) LTD. Unit 404, 4/F., Nan Fung
+ 852 2735 9980 Commercial Centre,
19 Lam Lok Street,
Kowloon Bay, Hong Kong
Hungary WDL SERVICE KFT. Millenium Center 1/F.,
+361 341 1042 Váci utca 19-21.
H-1052 Budapest, Hungary
This manual suits for next models
4
Table of contents


