teenage engineering CM-15 User manual

condenser microphone
user guide
CM 15
CM–15 introduction field system care
before getting started, make sure to
carefully read these instructions. see
the section at the end on warnings
and warranty for more information.
CM–15 is a highly technical and
delicate product. make sure to learn
how to properly operate, care for
and store your device, and take time
to register your unit here:
teenage.engineering/register
the latest version of this guide:
teenage.engineering/guides/cm-15
field system began as an idea to
create a series of products that
function as part of a whole. with
aluminum casings and nylon bag
accessories; every item is designed
with portability, compatibility and
durability in mind. as usual, we aim
to pack in as much technology into
as little space as possible, getting the
most out of every device. more than
just an engineering challenge, field
system is driven by a desire to rethink
the way we approach music making.
CM–15 is an ultra-portable studio
grade condenser microphone. with
more features than meets the eye,
it's a most diverse audio device, both
in and outside the studio. this guide
is written to take you on a tour of
CM–15 for you to discover its full
functionality. the latest manual can
be found online.
- have a pleasant field trip!
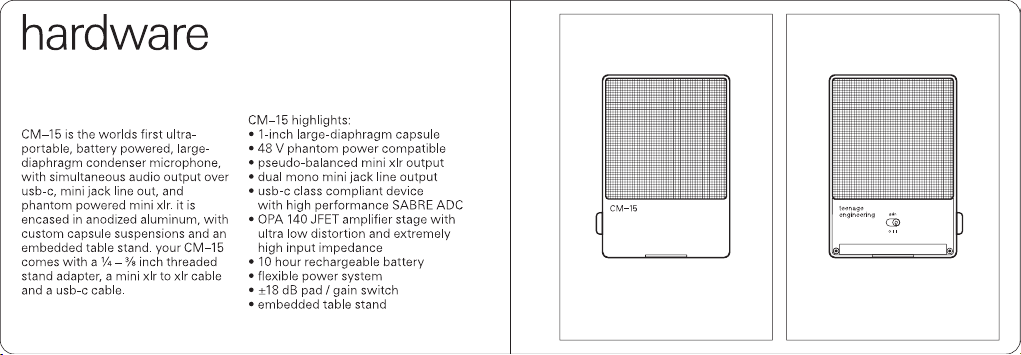
hardware
CM–15 highlights:
• 1-inch large-diaphragm capsule
• 48 V phantom power compatible
• pseudo-balanced mini xlr output
• dual mono mini jack line output
• usb-c class compliant device
with high performance SABRE ADC
• OPA 140 JFET amplifier stage with
ultra low distortion and extremely
high input impedance
• 10 hour rechargeable battery
• flexible power system
• ±18 dB pad / gain switch
• embedded table stand
CM–15 is the worlds first ultra-
portable, battery powered, large-
diaphragm condenser microphone,
with simultaneous audio output over
usb-c, mini jack line out, and
phantom powered mini xlr. it is
encased in anodized aluminum, with
custom capsule suspensions and an
embedded table stand. your CM–15
comes with a ¼ – ⅜ inch threaded
stand adapter, a mini xlr to xlr cable
and a usb-c cable.
firmware
update
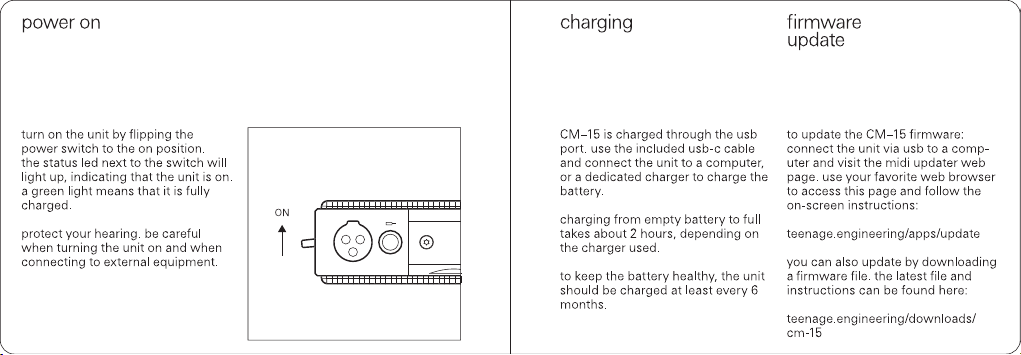
power on charging
turn on the unit by flipping the
power switch to the on position.
the status led next to the switch will
light up, indicating that the unit is on.
a green light means that it is fully
charged.
protect your hearing. be careful
when turning the unit on and when
connecting to external equipment.
to update the CM–15 firmware:
connect the unit via usb to a comp-
uter and visit the midi updater web
page. use your favorite web browser
to access this page and follow the
on-screen instructions:
teenage.engineering/apps/update
you can also update by downloading
a firmware file. the latest file and
instructions can be found here:
teenage.engineering/downloads/
cm-15
ON
CM–15 is charged through the usb
port. use the included usb-c cable
and connect the unit to a computer,
or a dedicated charger to charge the
battery.
charging from empty battery to full
takes about 2 hours, depending on
the charger used.
to keep the battery healthy, the unit
should be charged at least every 6
months.

powering status led
CM–15 has flexible power options
that makes it useful in many dierent
scenarios. it can be powered by three
dierent sources, one at a time or
simultaneously, and it automatically
handles the power priority.
the internal battery is only charged
from the usb-c port. phantom power
cannot charge the battery.
CM–15 can be powered by:
• 48 V phantom power
• usb type c
• internal battery
note: CM–15 handles all power
switching automatically.
green
solid:
the power is on
and the battery is
charged.
pulsating:
the battery is
fully charged.
solid:
the power is on
and the battery
is getting low.
pulsating:
the battery is
charging.
flashing:
low battery!
time to charge.
note: the full
battery life is
approximately
10 hours.
orange red

built-in stand tripod adapter
your CM–15 also comes with a
standard ¼" and ⅜" adapter, making
it universally compatible with
standard microphone stands and
tripods. it fits perfectly with the
tripod mini accessory (sold
separately).
mount the adapter by first loosening
the thumbscrew. place it on the
center, bottom side of the mic, and
tighten until properly mounted.
fix the adapter on the tripod by
simply screwing it on clockwise.
CM–15 has a built-in table stand
that can be used to rest and angle
the microphone on a surface.
for the best possible recording
quality, make sure to avoid any
unwanted surface vibrations
when recording this way.

outputs outputs
CM–15 field mic features three audio
outputs that can be used individually
or in any simultaneous combination.
the three outputs are located on the
bottom of the unit: the mini xlr, 3.5
mm mini jack and usb-c. this means
there are two analog outputs, each
with its own advantage for use.
the usb-c port can be used as a
digital audio interface, as well as for
firmware updates and for charging
the internal battery. mini
jack
mini
xlr usb-c

connections
mini xlr
the compact size mini xlr output
gives you the highest quality
recordings and is intended to be
used with your recording console,
preamp or audio interface. use the
included mini xlr to xlr cable, and
apply 48 volt phantom power.
the power consumption is around
3 mA. in phantom-power operation
the status led is green.
usb-cmini jack
CM–15 is a usb class compliant
audio device. when connecting it to
a usb host device, such as a laptop
or OP–1 field, it will show up as a
1-input audio interface, as long as
the unit is turned on.
when connected while turned o,
the device is only charging the
battery and it won't show up as an
interface.
the available audio rates are:
• 44.1 kHz
• 48 kHz
• 88.2 kHz
• 96 kHz
when in usb mode, an additional
±12 dB digital gain is applicable from
the usb interface settings in your
computer.
the mini jack output is meant to be
used in portable battery powered
scenarios, such as with TX–6, OB–4
or a camera mic input.
it is a line level output and it features
a dual mono signal, meaning the
signal is identical for both tip and
ring. use a stereo cable for stereo
inputs, or a stereo to dual mono
splitter for mono inputs.
note: do not apply phantom power
to the mini jack.

start pad / gain switch guide conventions
0 db −18 dB +18 dB
gain set to −18 dB
gain set to 0
gain set to +18 dB
current power
source
the pad / gain
switch has three
settings: −18 dB,
0 dB and +18 dB.
move the switch
to the far right
position to apply
+18 dB gain.
move the switch
to the far left
position to pad
−18 dB.
CM–15 is designed to be easy to use.
use the tripod adapter or the built in
stand to set it up, connect any cable
needed for your application and you
are ready to record.
the only setting on the microphone
itself is the pad / gain switch. adjust
it based on the sound source. move
the switch left to pad −18 dB, and
right to gain +18 dB. this is analog
gain that applies to all the outputs,
without SNR degradation. additional
±12 dB are available digitally in usb
mode.
these following icons are shown in the
scenario section, as a recommended
setting for each individual set-up.
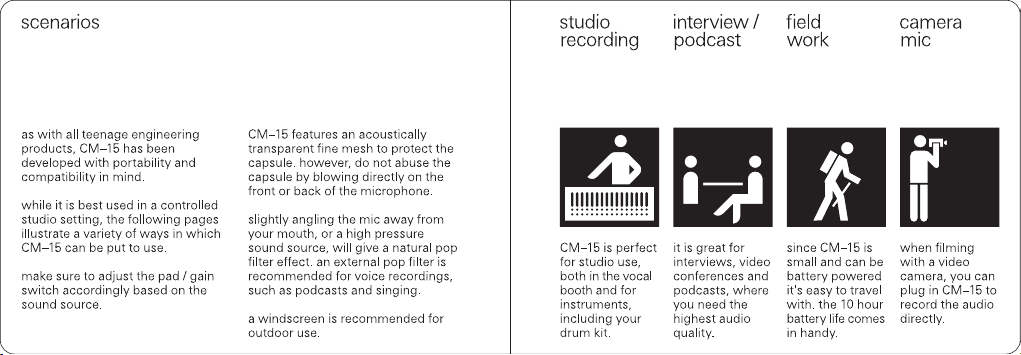
scenarios interview /
podcast field
work
studio
recording camera
mic
CM–15 is perfect
for studio use,
both in the vocal
booth and for
instruments,
including your
drum kit.
it is great for
interviews, video
conferences and
podcasts, where
you need the
highest audio
quality.
since CM–15 is
small and can be
battery powered
it's easy to travel
with. the 10 hour
battery life comes
in handy.
when filming
with a video
camera, you can
plug in CM–15 to
record the audio
directly.
as with all teenage engineering
products, CM–15 has been
developed with portability and
compatibility in mind.
while it is best used in a controlled
studio setting, the following pages
illustrate a variety of ways in which
CM–15 can be put to use.
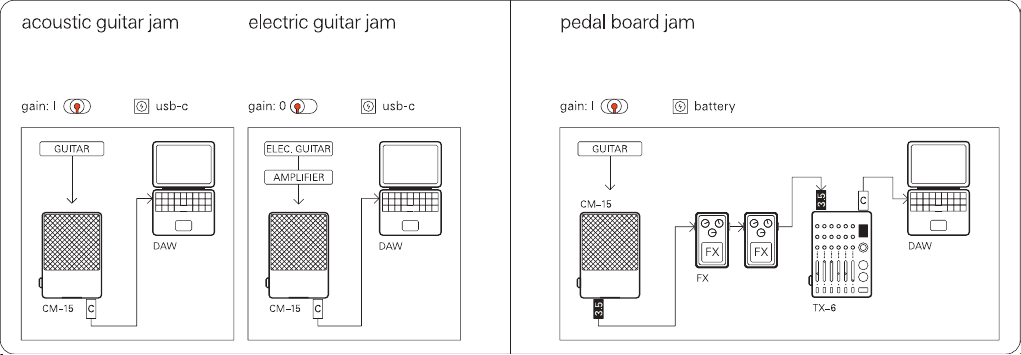
make sure to adjust the pad / gain
switch accordingly based on the
sound source.
CM–15 features an acoustically
transparent fine mesh to protect the
capsule. however, do not abuse the
capsule by blowing directly on the
front or back of the microphone.
slightly angling the mic away from
your mouth, or a high pressure
sound source, will give a natural pop
filter eect. an external pop filter is
recommended for voice recordings,
such as podcasts and singing.
a windscreen is recommended for
outdoor use.
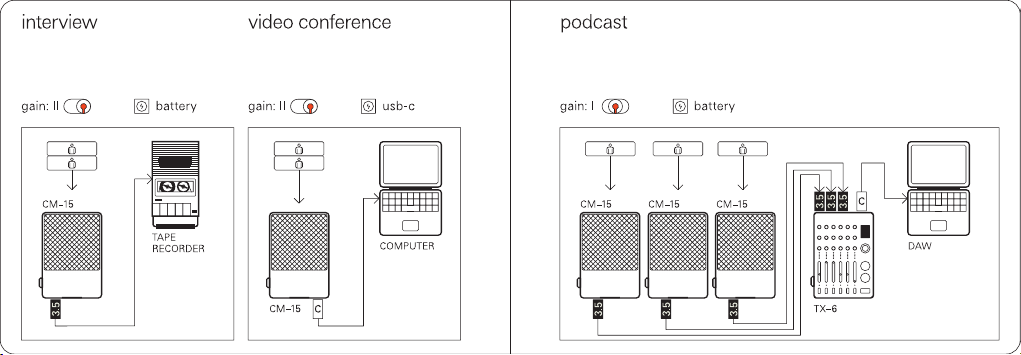
battery usb-cgain: II
C
interview video conference
TAPE
RECORDER
gain: II battery
podcast
gain: I
DAWCOMPUTER
CM–15 TX–6
3.5
3.5
3.5
C
3.5
3.5
3.5
3.5
CM–15CM–15 CM–15 CM–15
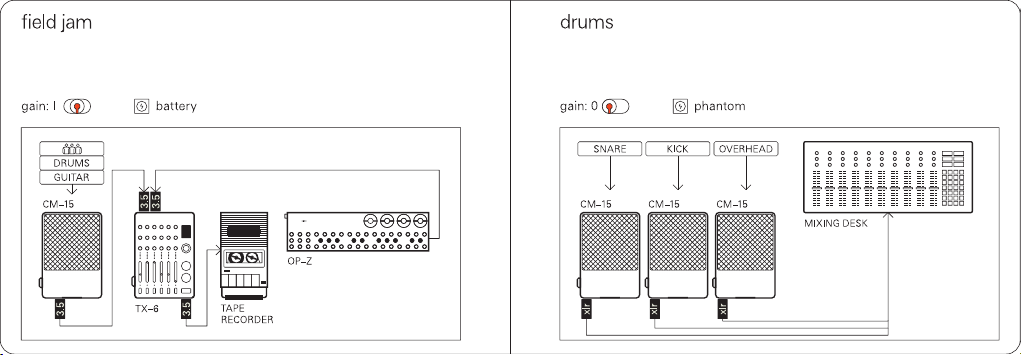
phantomgain: I
xlr
xlr
xlr
drumsfield jam
MIXING DESK
TX–6
OP–Z
3.5
OVERHEADSNARE KICK
3.5
3.5
GUITAR
DRUMS
CM–15 CM–15 CM–15 CM–15
3.5
battery gain: 0
TAPE
RECORDER
battery
usb-cgain: I usb-c gain: I
C C
C
acoustic guitar jam electric guitar jam pedal board jam
CM–15CM–15 TX–6
3.5
DAW
GUITAR
FX
3.5
AMPLIFIER
DAW
ELEC. GUITARGUITAR
DAW
gain: 0
CM–15

C
battery
usb-c
gain: I gain: 0
choir camera
solo vocals
CM–15 C
CM–15
DAW
mobile recording
CAMERA
3.5
CM–15
C
C
gain: IIusb-c usb-cgain: I
M–1
CM–15
DAW

C
gain: I
gain: I usb-c
parallel monitoring
field mix
TX–6
CM–15
CM–15
battery
megaphone
3.5
OB–4
C
usb-c
gain: I
xlr
xlr
TX–6
CM–15
OP–1 FIELD
3.5
3.5
CAUDIO
INTERFACE

to get the most out of your CM–15
mic, we have developed a stand:
tripod mini.
tripod mini measures 184 mm in
height, unfolded, with the adapter
mounted, and 146 mm when
standing. the mic is easily mounted
with the included adapter. the
adapter helps you tilt the unit in the
angle you prefer, 90° frontwards and
110° backwards. the angle makes it
possible for the mic to be mounted
on a boom arm or to tilt it to better
record overheads.
+110°
−90°
0°
adjust the angle by rotating the
center screw on the tripod. tighten
or loosen the mount with the thumb
screw on the adapter.
mounting
options
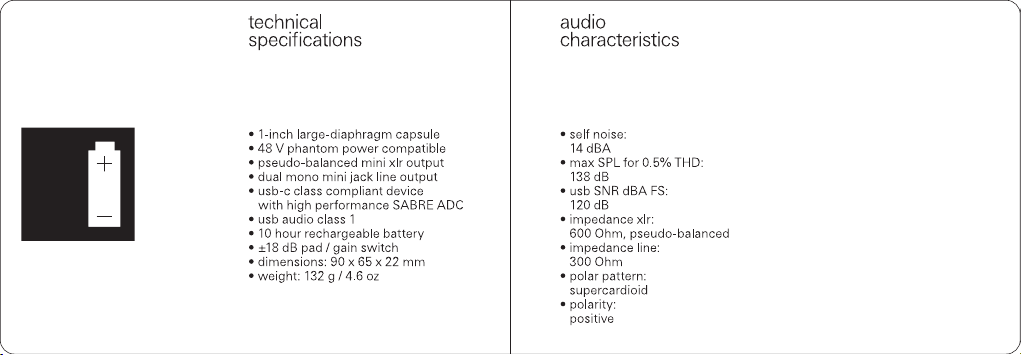
technical
specifications audio
characteristics
• self noise:
14 dBA
• max SPL for 0.5% THD:
138 dB
• usb SNR dBA FS:
120 dB
• impedance xlr:
600 Ohm, pseudo-balanced
• impedance line:
300 Ohm
• polar pattern:
supercardioid
• polarity:
positive
• 1-inch large-diaphragm capsule
• 48 V phantom power compatible
• pseudo-balanced mini xlr output
• dual mono mini jack line output
• usb-c class compliant device
with high performance SABRE ADC
• usb audio class 1
• 10 hour rechargeable battery
• ±18 dB pad / gain switch
• dimensions: 90 x 65 x 22 mm
• weight: 132 g / 4.6 oz
handling
ambient working temperature:
0−50°C (32−122°F)
ambient storage temperature:
0−30°C (32−86°F)
handle with care. do not drop, throw
or shake the unit. clean the shell of
the unit with a microfibre cloth.
to keep the battery healthy, the unit
should be charged at least every 6
months. if not used for a long time,
it may not charge again.
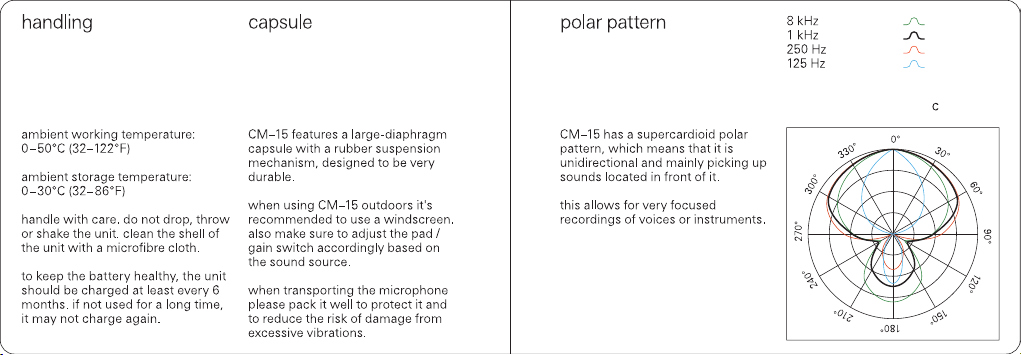
polar patterncapsule
CM–15 has a supercardioid polar
pattern, which means that it is
unidirectional and mainly picking up
sounds located in front of it.
this allows for very focused
recordings of voices or instruments.
CM–15 features a large-diaphragm
capsule with a rubber suspension
mechanism, designed to be very
durable.
when using CM–15 outdoors it's
recommended to use a windscreen.
also make sure to adjust the pad /
gain switch accordingly based on
the sound source.
when transporting the microphone
please pack it well to protect it and
to reduce the risk of damage from
excessive vibrations.
8 kHz
1 kHz
250 Hz
125 Hz
C

frequency
response
50 cm distance
30 cm distance
20
10
0
−10
−20
20 50 100 200 500
frequency (Hz)
magnituge (dB)
1k 2k 5k 10k 20k
frequency
response
CM–15 has the flattest frequency
response at a distance of 50 cm.
there will be a bass increase if used
at a closer distance, and a bass
decrease if used further away.
experiment with placing the
microphone at dierent locations to
get the desired result for your
recording session.

cable
pin out
xlr:
plug mini xlr:
socket line
1
2
3
1: ground (shield)
2: positive (hot)
3: negative (cold)
this is the pin out for the included xlr
to mini xlr cable, as well as for the
standard 3.5 mm trs line cable.
1: ground (shield)
2: positive (hot)
3: negative (cold)
the signal is
duplicated on
both tip (1) and
ring (2). sleeve
(3) is ground.
1
2
3
1 2
3
Table of contents


