teenage engineering OP-1 User manual

portable synthesizer
user guide
OP–
1

to begin, we’d like to say thank you
for choosing OP–1 field, and also for
contributing to the OP–1 legacy. we
launched the original back in 2011,
so what better way to honor the tool
that made us than by giving it some
tlc. by adapting to the latest
technology, updating the design
and evolving with the needs of our
operators, OP–1 field is the natural
continuation of its predecessor and
the beginning of a new era.
thank you!
OP–1 field introduction

field system care
field system began as an idea to
create a series of products that
function as part of a whole. with
aluminum casings and nylon bag
accessories; every item is designed
with portability, compatibility and
durability in mind. as usual, we aim to
pack in as much technology into as
little space as possible, getting the
most out of every device. more than
just an engineering challenge, field
system is driven by a desire to rethink
the way we approach music making.
before getting started, make sure to
carefully read these instructions. see
the section at the end on warnings
and warranty for more information.
OP–1 field is a highly technical and
delicate product. make sure to learn
how to properly operate, care for
and store your device. take the time
to register your unit here:
teenage.engineering/register
the latest version of this manual:
teenage.engineering/guides/op-1

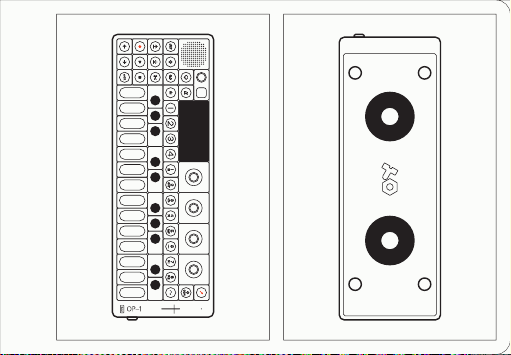
OP–1 field is a precision tool, made
in natural anodized aluminum, with
encoders in the color palette of blue,
ochre, gray and orange to keep
things playful. the low profile
keyboard is durable and responsive
so it’s easy on the fingers. the
display is a custom made color lcd,
mounted directly onto the keyboard.
the soft velcro rings on the bottom
side mean the unit can be attached
securely to a surface, case or stand.
connectivity includes a usb type c
port and line in and out sockets, as
well as bluetooth le and fm radio.
hardware
OP–1 field highlights:
• ultra portable synthesizer
• usb-c audio interface
• host and device for audio and midi
• 4-track 32-bit stereo tape recorder
• multiple tapes
• stereo sampler
• stereo drum machine
• 7 sequencers
• 3 band equalizer
• 8 stereo eects
• built-in speaker
• fm radio receiver and transmitter
• accelerometer and gyroscope
• midi over bluetooth le
• 24 hour rechargeable battery
left sideoverview
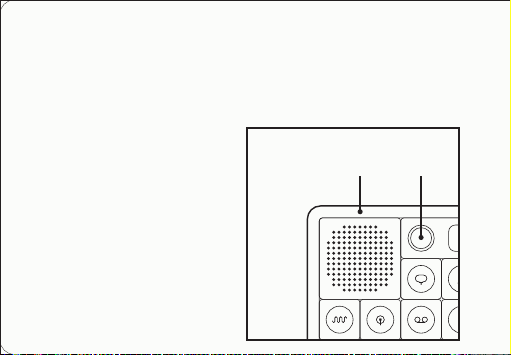
the top left side holds the internal
speaker and the main volume knob.
on the right you can find a 3.5 mm
audio output jack, used for
connecting a pair of headphones, a
mixer or your speakers. next, the 3.5
mm audio input jack is used when
recording or processing any external
line-level audio, such as another
synthesizer. then, a usb-c port for
audio / midi / charging and data, a
charging led and the power switch.
on the top right you can find the built-in
microphone and the level meter.
volume
knob
internal
speaker
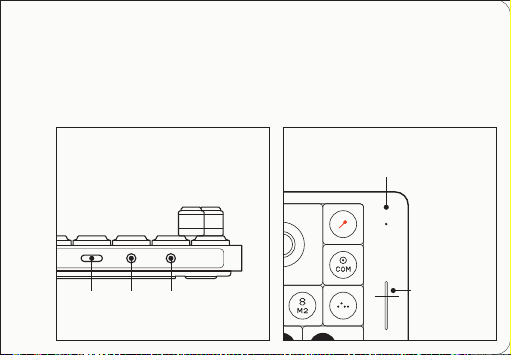
right side
internal
microphone
level meter /
charging
indicator
usb
caudio
in audio
out

power on
to power on your unit, flip the power
switch located on the right side of
the device to the up position. the
display will show the logo and the
currently installed firmware version
and then arrive at the tape screen.
to power o, flip the switch to the
down position.
data is stored automatically, so you
don’t have to worry about saving.
the next time you power on your
OP–1 field, everything will still be
there, exactly as you left it.
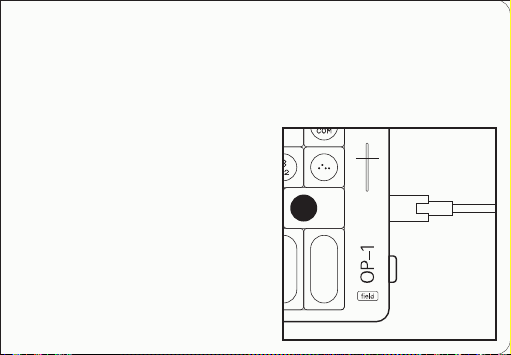
charging
OP–1 field is charged through the
usb-c port located on the right side
of the unit. the first thing you should
do is connect it to a computer or a
usb charger. keep it connected until
the battery is fully charged, indicated
by the charging led on the right side
and the level meter. to check battery
level, hold the help key (speech
bubble). the leds will light up to
indicate the level. to keep the battery
healthy, the unit should be charged
at least every 6 months.
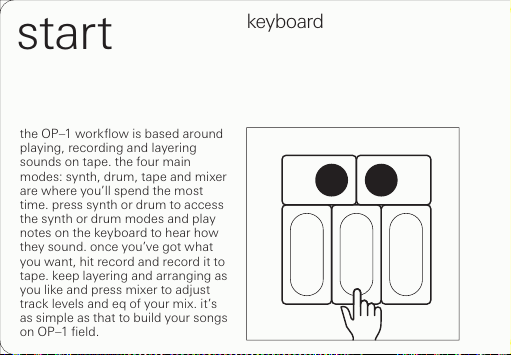
the OP–1 workflow is based around
playing, recording and layering
sounds on tape. the four main
modes: synth, drum, tape and mixer
are where you’ll spend the most
time. press synth or drum to access
the synth or drum modes and play
notes on the keyboard to hear how
they sound. once you’ve got what
you want, hit record and record it to
tape. keep layering and arranging as
you like and press mixer to adjust
track levels and eq of your mix. it’s
as simple as that to build your songs
on OP–1 field.
keyboard
start
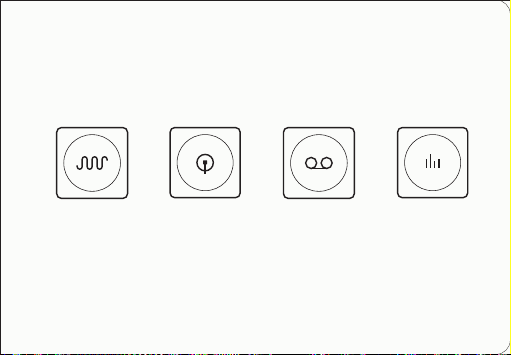
in synth mode
you use the keys
on the keyboard
to play notes.
OP–1 field has
several original
synth engines,
each with its
own character.
drum mode
works similarly
to synth mode,
except the keys
are used for
playing drum
and percussion
sounds, laid out
as drum kits.
tape is the heart
of OP–1, where
you record and
layer sounds.
OP–1 field has
four stereo
tracks per tape
and can hold
multiple tapes.
the mixer is
where you
control levels
and panning for
each of the four
tracks, as well
as the main eq,
eects and drive.
synth drum tape mixer

shift help user guide
use shift with
other keys or
encoders for
secondary
functions, such
as fine-tuning a
parameter and
for menu access.
the help button
will guide you
throughout the
interface. use it
in combination
with any other
key to see more
information on
that topic.
when pressing help you’ll see a
quick help overlay, explaining the
most basic relevant information per
screen.
in addition to the help overlays, you
can also press and hold shift and
then press help to access the built-in
user guide. here you’ll find a quick
start tutorial, as well as more
detailed guide information. use the
track keys T1-T4, as well as the
encoders to navigate through the
sections of the guide.
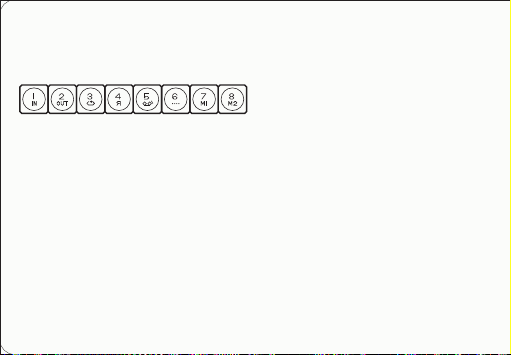
track keys T1-T4
press T1 while in
synth or drum
mode to show
the ‘synthesis
engine’. in tape
and mixer you’ll
access ‘track 1’
and the main
‘mixer’ screen.
T2 holds the
‘envelope’ in
synth and drum
modes, ‘track 2’
in tape and the
main ‘equalizer’
while in mixer
mode.
T3 is where you
access ‘FX’ for
both synth and
drum modes. in
tape, ‘track 3’
and ‘main FX’
can be found in
mixer mode.
finally T4, which
will show the
‘lfo’ screen in
synth and drum
modes and
‘track 4’ of tape,
while ‘master
out’ in mixer
mode.

sometimes you will need to press
keys in sequence, sometimes in
combination. these illustrations and
texts will help you to follow along in
the guide.
to press a key, you tap it and then
release. to hold a key, you press it
and keep it pressed down. the
encoders and most keys have
dierent functions depending on
the context, as described earlier.
guide conventions
hold one key
and press the
second key.
press one key at
the time.
sometimes gray
keys are shown
for context but
not active.
+

the four color coded encoders are
related to the graphical interface on
the display. by turning an encoder,
you control the parameter with the
corresponding color. an encoder can
have multiple functions. using an
encoder in combination with the
shift key usually allows for fine
tuning, and tapping an encoder
usually means ‘confirm’, ‘return to
default’ or access to even more
extensive features. try it out and
see what happens!
encoder commands
rotate blue
rotate ochre
rotate gray
rotate orange
rotate blue
rotate ochre
rotate gray
rotate orange
shifted shifted
tap blue
tap ochre
tap gray
tap orange
tap blue
tap ochre
tap gray
tap orange
+ +
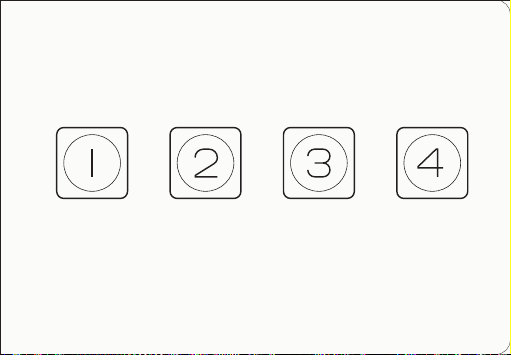
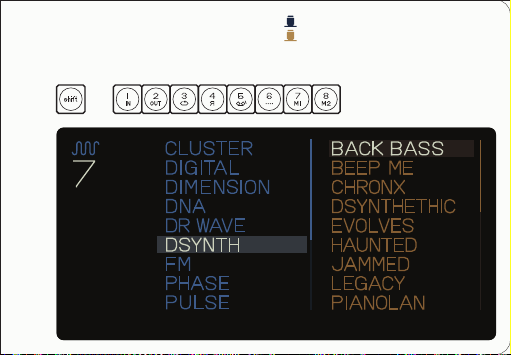
preset sounds
to load a dierent preset to any of
these slots, press shift + any key
from 1 to 8. this will reveal a list of all
available engines, as well as the
presets per engine. select a preset
by turning the blue encoder for
engine type and ochre encoder for
preset choices.
note: the dierence between
changing just an engine (shift + T1)
and a preset (shift + 1-8) is that the
later changes all four module
settings T1-T4.
in synth and drum mode, the sound
selection keys 1-8 are your eight
instant access preset keys.
press any key from 1 to 8 while in
synth or drum mode, to access the
dierent sounds or drum kits stored
to these preset slots. a preset
consists of all four modules:
• T1 engine
• T2 envelope
• T3 FX
• T4 lfo
changing presets engine
preset
+

synth mode
OP–1 field has several original
synthesis engines, each with its own
characteristics. to enter synthesizer
mode, or synth mode, press the
synth key - the key with the wave
symbol on it. when in synth mode,
the synth engine’s visual representa-
tion module is located under T1,
which is the first screen that will be
shown when you change or select a
sound. a sound preset consists of
four modules (T1–T4) and the
synthesis engine is the first one (T1).
to change the synth engine press
shift + T1. this opens a synthesis
browser screen, with a list of
possible synthesis engine choices.
rotate the blue encoder to scroll
through the list.
press T1 or tap the blue encoder to
confirm your choice.
what follows is an overview of all the
synth engines and parameters,
adjustable using the encoders.

BLE
OP–1 FIELD BLE MIDI
CONTROLLER
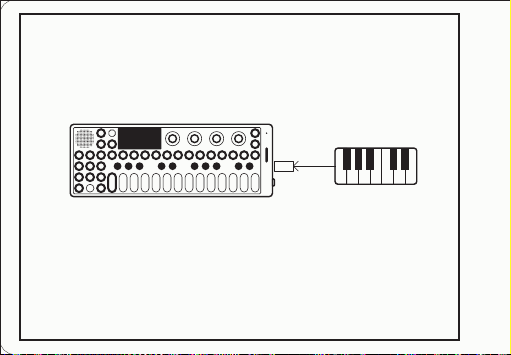
OP–1 FIELD MIDI
KEYBOARD
C
Other manuals for OP-1
2
Table of contents
Other teenage engineering Synthesizer manuals

teenage engineering
teenage engineering PO-32 tonic User manual

teenage engineering
teenage engineering PO-28 robot User manual

teenage engineering
teenage engineering OP–Z User manual

teenage engineering
teenage engineering 400 User manual

teenage engineering
teenage engineering OP-Z User manual

teenage engineering
teenage engineering OP-1 User manual

teenage engineering
teenage engineering OP-Z1 User manual

teenage engineering
teenage engineering OP-1 User manual

teenage engineering
teenage engineering 170 User manual


