teenage engineering 170 User manual
06.01.22, 11:10
170 guide - teenage engineering
https://teenage.engineering/guides/po-modular/170
1/15
1
7
0
pocket
operator
modular
user guide
ガイド
V
.
2
.
0
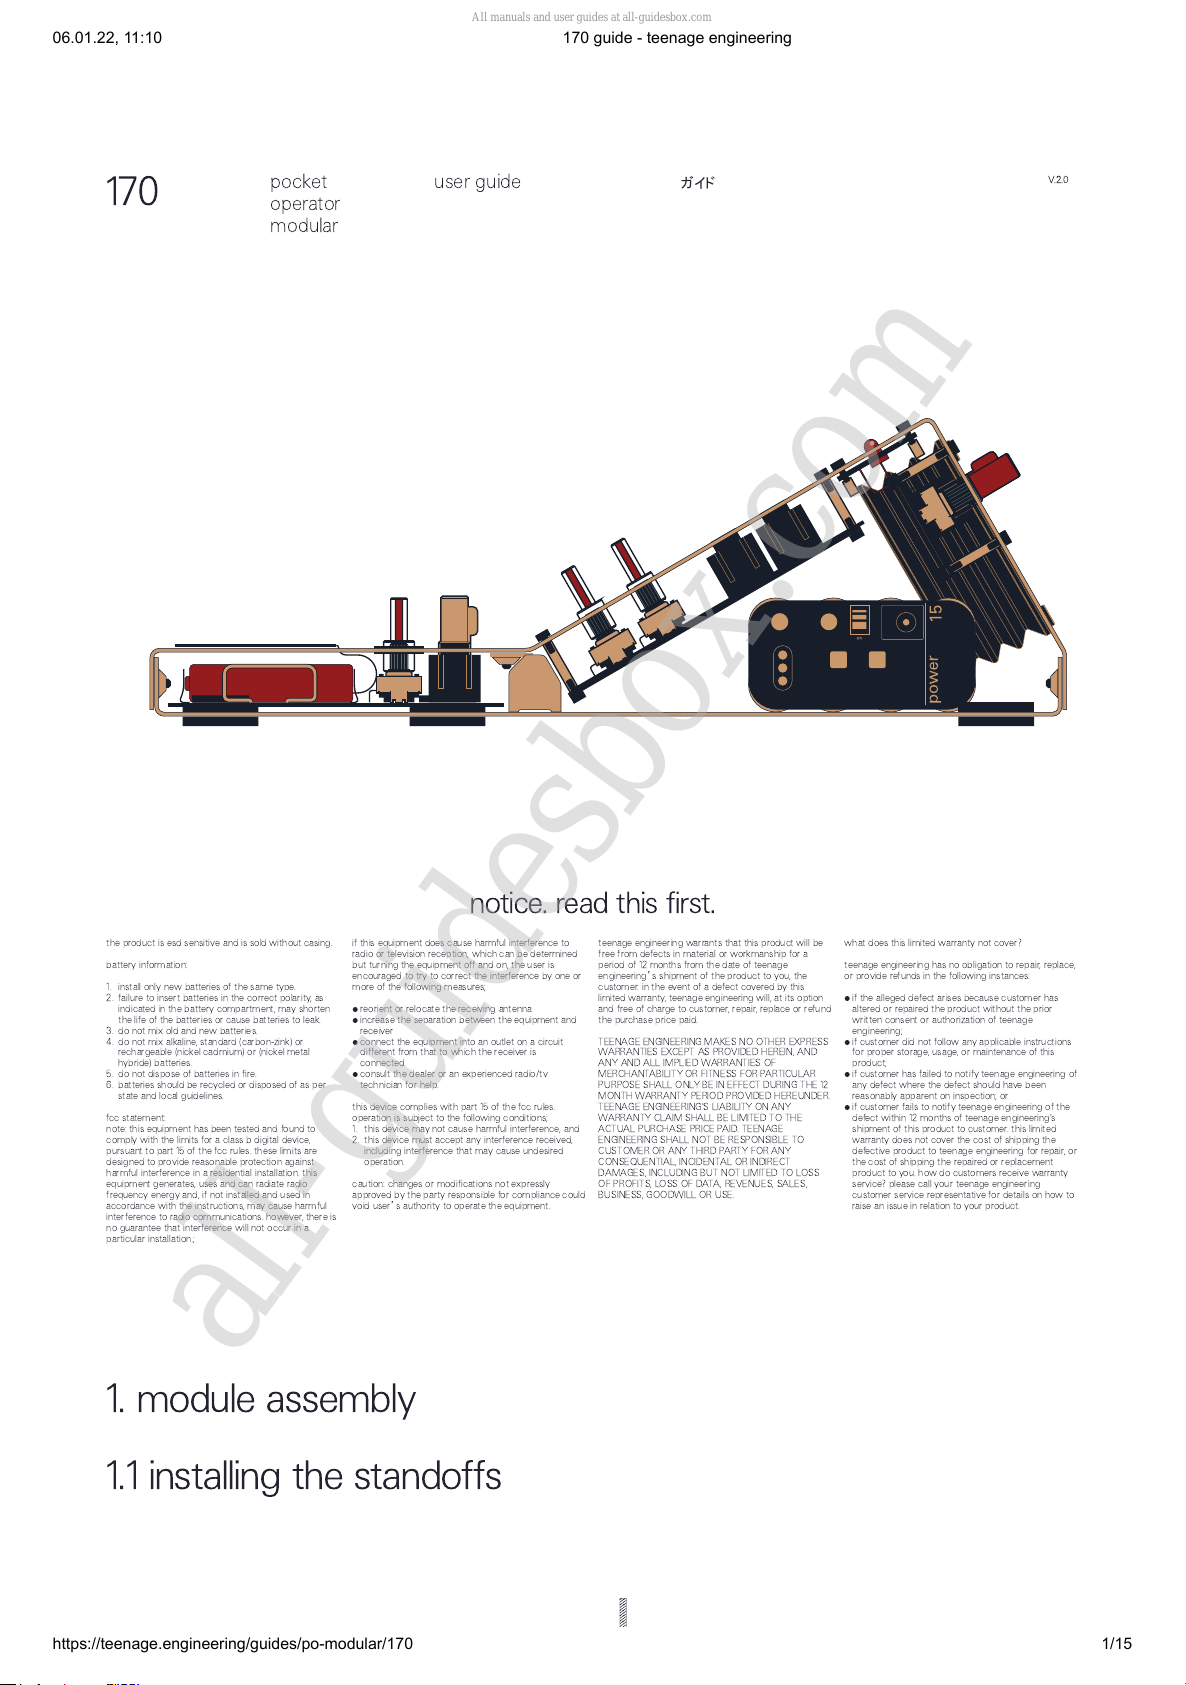
notice
.
read
this
first
.
the product is esd sensitive and is sold without casing.
battery information:
install only new batteries of the same type.1. failure to insert batteries in the correct polarity, as
indicated in the battery compartment, may shorten
the life of the batteries or cause batteries to leak.
2.
do not mix old and new batteries.3. do not mix alkaline, standard (carbon-zink) or
rechargeable (nickel cadmium) or (nickel metal
hybride) batteries.
4.
do not dispose of batteries in fire.5. batteries should be recycled or disposed of as per
state and local guidelines.
6.
fcc statement:
note: this equipment has been tested and found to
comply with the limits for a class b digital device,
pursuant to part 15 of the fcc rules. these limits are
designed to provide reasonable protection against
harmful interference in a residential installation. this
equipment generates, uses and can radiate radio
frequency energy and, if not installed and used in
accordance with the instructions, may cause harmful
interference to radio communications. however, there is
no guarantee that interference will not occur in a
particular installation.;
if this equipment does cause harmful interference to
radio or television reception, which can be determined
but turning the equipment off and on, the user is
encouraged to try to correct the interference by one or
more of the following measures;
reorient or relocate the receiving antenna•increase the separation between the equipment and
receiver
•
connect the equipment into an outlet on a circuit
different from that to which the receiver is
connected.
•
consult the dealer or an experienced radio/tv
technician for help.
•
this device complies with part 15 of the fcc rules.
operation is subject to the following conditions;
this device may not cause harmful interference, and1. this device must accept any interference received,
including interference that may cause undesired
operation.
2.
caution: changes or modifications not expressly
approved by the party responsible for compliance could
void user
’
s authority to operate the equipment.
teenage engineering warrants that this product will be
free from defects in material or workmanship for a
period of 12 months from the date of teenage
engineering
’
s shipment of the product to you, the
customer. in the event of a defect covered by this
limited warranty, teenage engineering will, at its option
and free of charge to customer, repair, replace or refund
the purchase price paid.
TEENAGE ENGINEERING MAKES NO OTHER EXPRESS
WARRANTIES EXCEPT AS PROVIDED HEREIN, AND
ANY AND ALL IMPLIED WARRANTIES OF
MERCHANTABILITY OR FITNESS FOR PARTICULAR
PURPOSE SHALL ONLY BE IN EFFECT DURING THE 12
MONTH WARRANTY PERIOD PROVIDED HEREUNDER.
TEENAGE ENGINEERING'S LIABILITY ON ANY
WARRANTY CLAIM SHALL BE LIMITED TO THE
ACTUAL PURCHASE PRICE PAID. TEENAGE
ENGINEERING SHALL NOT BE RESPONSIBLE TO
CUSTOMER OR ANY THIRD PARTY FOR ANY
CONSEQUENTIAL, INCIDENTAL OR INDIRECT
DAMAGES, INCLUDING BUT NOT LIMITED TO LOSS
OF PROFITS, LOSS OF DATA, REVENUES, SALES,
BUSINESS, GOODWILL OR USE.
what does this limited warranty not cover?
teenage engineering has no obligation to repair, replace,
or provide refunds in the following instances:
if the alleged defect arises because customer has
altered or repaired the product without the prior
written consent or authorization of teenage
engineering;
•
if customer did not follow any applicable instructions
for proper storage, usage, or maintenance of this
product;
•
if customer has failed to notify teenage engineering of
any defect where the defect should have been
reasonably apparent on inspection; or
•
if customer fails to notify teenage engineering of the
defect within 12 months of teenage engineering's
shipment of this product to customer. this limited
warranty does not cover the cost of shipping the
defective product to teenage engineering for repair, or
the cost of shipping the repaired or replacement
product to you. how do customers receive warranty
service? please call your teenage engineering
customer service representative for details on how to
raise an issue in relation to your product.
•
1
.
module
assembly
1
.
1
installing
the
standoffs
All manuals and user guides at all-guidesbox.com
all-guidesbox.com

06.01.22, 11:10
170 guide - teenage engineering
https://teenage.engineering/guides/po-modular/170
2/15
before connecting the modules first
add the standoffs to the back of the
faceplate to make installation easier.
start from the bottom and continue
up, leaving the keyboard until last.
to attach the standoffs, place the
screws through the holes from the
outside and using a pair of needle
nose pliers, hold the standoffs firmly
at the back while screwing.
now repeat this procedure for all
module holes leaving only the power
distro without standoffs.
note
:
be careful not to over tighten!
1
.
2
power
distro
the power distro attaches to the frame differently than the other modules.
first cut the standoffs from the psu in half using a pair of pliers or wire
cutters. then place the screws through the holes and place the power distro
on the back, on top of the pre-attached protective sticker cover.
finally attach the shorter standoffs to
the top of the frame to fasten the
power distro. make sure it is seated
flush to the back of the faceplate.
1
.
3
installing
the
modules
and
keyboard
keyboard 16
place the front plate face down. tip:
put a soft surface such as a towel
beneath. it is easier to attach the
modules before bending the chassis.
place the modules on top of the
standoffs and ensure the jacks are
correctly aligned with the holes.
screw the modules to the standoffs.
ensure the screws on the faceplate
are not rotating. be careful not to over
tighten. once screwed in place, plug in
the cables to the power sockets.
All manuals and user guides at all-guidesbox.com

06.01.22, 11:10
170 guide - teenage engineering
https://teenage.engineering/guides/po-modular/170
3/15
designed and
engineered by
teenage engineering
pocket
operator™
modular
keyboard 16
1
.
4
speaker
assembly
1
.5
psu
™
snap
!
the speaker module pcb comes with
a part that is not needed. firmly and carefully break off the
square part. take care when installing
the speaker as the cable connecting
the speaker unit to the pcb needs to
fit nicely.
the psu holds 8 x AA batteries. with
high quality rechargeable batteries
you can expect up to about 5 hour
battery life. it is recommended to use
apower adapterwhenever possible.
1
.6
keyboard
assembly
the keyboard attaches via a ribbon
cable to the keyboard pcb. fold it
firmly.
to attach the keyboard first feed the
ribbon cable through the faceplate
slot.
once the cable is fed through you can
remove the sticky tape backing and
carefully attach the keyboard to the
top faceplate.
keyboard 16
All manuals and user guides at all-guidesbox.com

06.01.22, 11:10
170 guide - teenage engineering
https://teenage.engineering/guides/po-modular/170
4/15
after assembling all modules and
before attaching plate a to b, push the
ribbon cable firmly into the ribbon
cable slot on the keyboard pcb. take
care to ensure proper alignment and
orientation.
connect the power adapter cable to
the power distro board using the
supplied cable, to allow power from
one source. this way there
once the ribbon cable is installed you
screw the two sections together.
2
.
basics
2
.
1
types
of
signals
in modular synthesis there are two
types of signals. audio signals and
control voltages (cv). audio signals are
for sounds and cv is for controlling
things. these two different signals will
be used to connect the different
modules together.
this is how sounds and patterns are
created in a modular system. the
beauty of modular is that you can
pretty much connect anything to
anything, creating all kinds of
relationships and interesting sounds,
that all dynamically interact with each
other.
that said you should generally avoid
connecting outputs to outputs or
inputs to inputs.
pro-tip: you can use audio signals as
cv for some very interesting results
and some cv modules such as the lfo
can run at audio rates.
2
.
1
.
1
audio
signals
in a modular synthesizer it is usually the job of the
oscillators to make the sounds that are processed by the
rest of the system. the 170 includes one square wave
oscillator.
lets hear the sound of this oscillator through the 170's
built-in speaker. first let's make sure the volume of the
speaker module is turned down. locate the volume knob
on the speaker module and turn it to about mid way.
warning
: never connect headphones directly to the
outputs of the 170. you can damage your ears and your
headphones if you do this, so be very careful.
All manuals and user guides at all-guidesbox.com

06.01.22, 11:10
170 guide - teenage engineering
https://teenage.engineering/guides/po-modular/170
5/15
to hear the sound of the oscillator we need to connect it
to the speaker. to do this take a yellow cable and connect
it to any of the three jacks labeled output on the top of
the square oscillator. any of these jacks are fine as all
three will output the same signal. take the other end of
the cable and plug it into the jack on the speaker called
right.
now we can slowly increase the volume of the speaker
by turning the volume knob.
if you do not hear a sound it may be that your oscillator
tuning is too high or too low. turn the tune knob to alter
the pitch of the oscillator so that it is in the audible range.
also turn the pwm level all the way to the left.
2
.
1
.
2
control
voltages
control voltages are used to control different parts of the
modular system. for example in the last example we
manually altered the pitch of the oscillator but in this
example we will use a control voltage to alter the pitch
for us.
continuing from the last patch: set up a control voltage to
control the pitch of our oscillator.
use the triangle wave from the lfo. locate the lfo module
and plug a cable into either of the triangle outputs.
tip: set the rate to its slowest setting by turning the rate
knob all the way to the left.
plug the other end of the cable into the input labeled
control on the square oscillator.
All manuals and user guides at all-guidesbox.com
06.01.22, 11:10
170 guide - teenage engineering
https://teenage.engineering/guides/po-modular/170
6/15
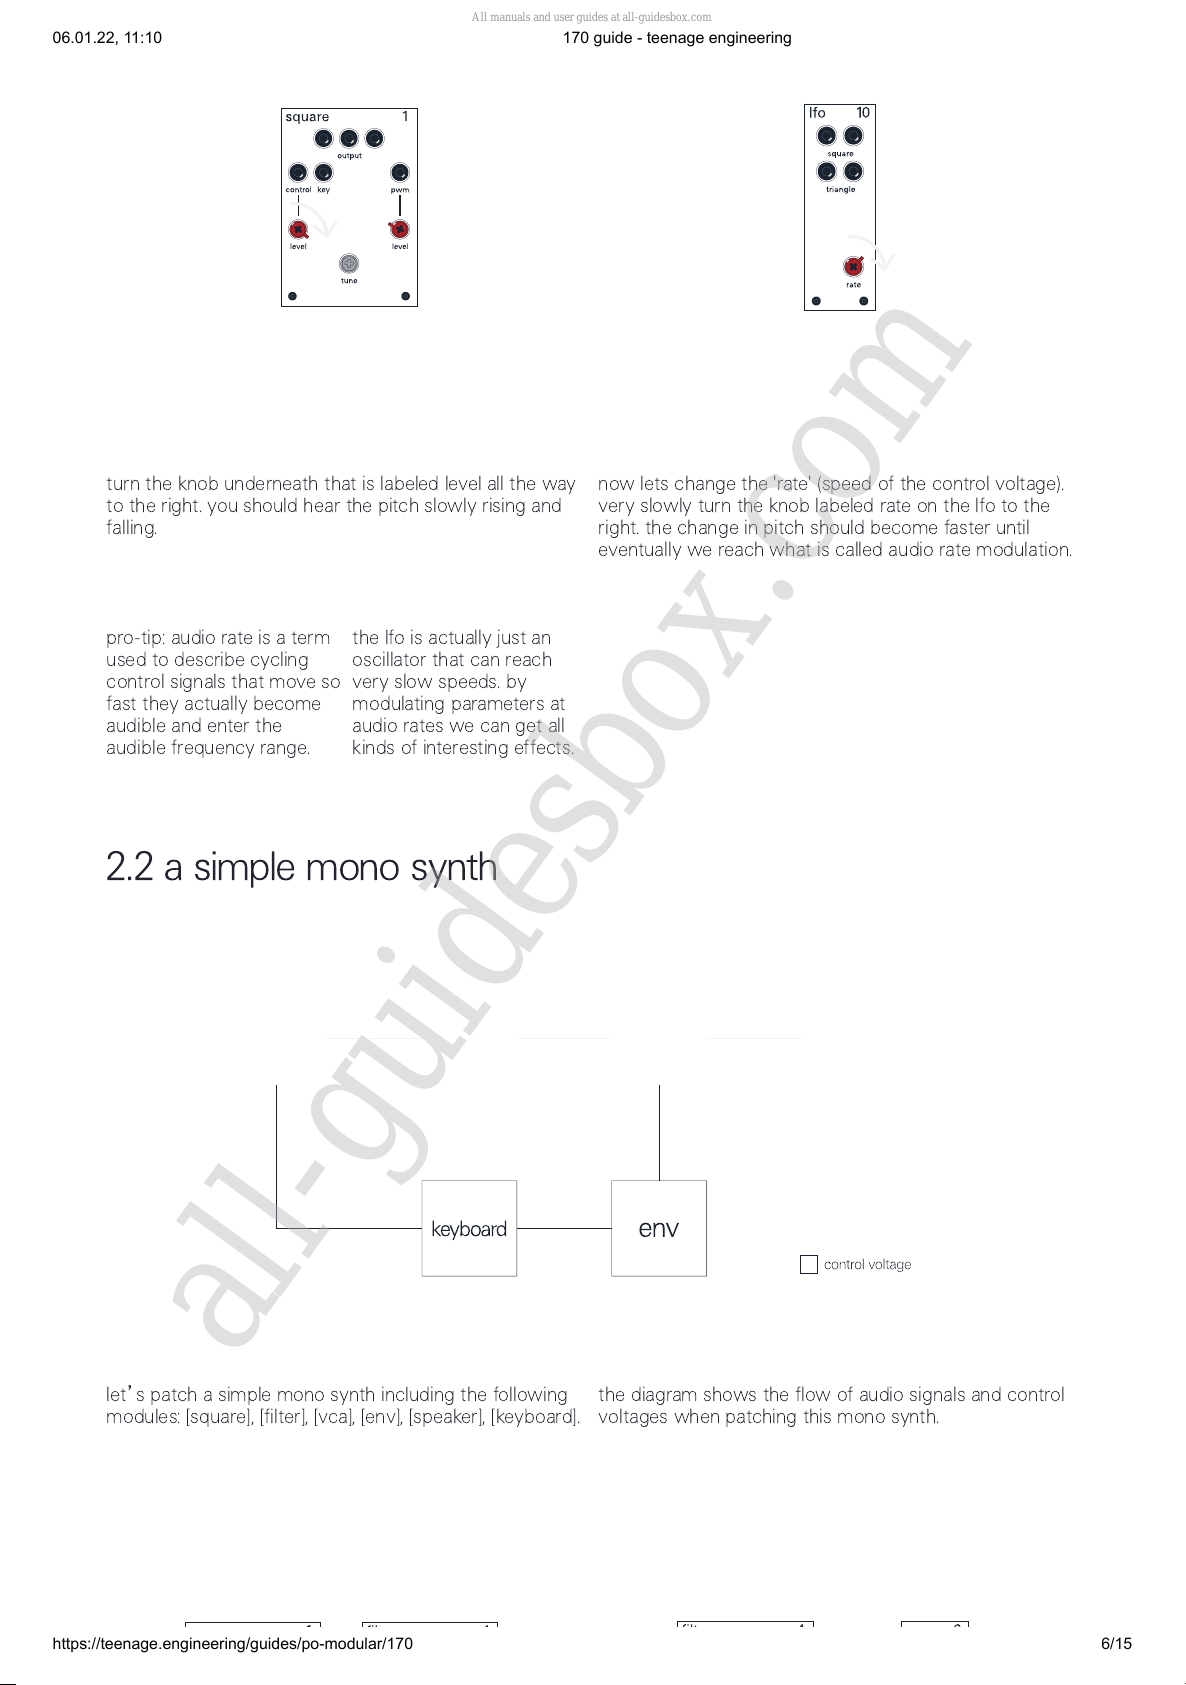
turn the knob underneath that is labeled level all the way
to the right. you should hear the pitch slowly rising and
falling.
now lets change the 'rate' (speed of the control voltage).
very slowly turn the knob labeled rate on the lfo to the
right. the change in pitch should become faster until
eventually we reach what is called audio rate modulation.
pro-tip: audio rate is a term
used to describe cycling
control signals that move so
fast they actually become
audible and enter the
audible frequency range.
the lfo is actually just an
oscillator that can reach
very slow speeds. by
modulating parameters at
audio rates we can get all
kinds of interesting effects.
2
.
2
a
simple
mono
synth
let
’
s patch a simple mono synth including the following
modules: [square], [filter], [vca], [env], [speaker], [keyboard]. the diagram shows the flow of audio signals and control
voltages when patching this mono synth.
All manuals and user guides at all-guidesbox.com
all-guidesbox.com

06.01.22, 11:10
170 guide - teenage engineering
https://teenage.engineering/guides/po-modular/170
7/15
first step is to connect the sound source [square] to the
filter. connect a patch cable to any of the [square]
outputs. connect the other end to the jack labeled input
on the [filter]. this will pass the audio generated from the
oscillator to the filter. now open the filter all the way by
turning the frequency knob all the way to the right.
next: take the filter output and connect to the input on
the vca. then connect the output of the vca to the left
speaker input. turn up both the level and the gain on the
vca. you should hear a constant note. if you don't, adjust
the tuning of the saw oscillator or check that you opened
the filter by moving frequency all the way to the right.
note
:
the vca or voltage controlled amplifier will control
the volume of the signal. it is possible to do that manually
using the level and gain knobs. this patch uses the
envelope for this.
now connect the envelope output to the control input on
the vca. this will let the envelope signal control the
volume of the sound. the envelope has to be triggered to
know when a note is sounded. we can do this from the
keyboard which we will also use to set the note.
next connect the cv1 out to the key input of the square
oscillator. this will let the keyboard control the pitch of our
oscillator.
All manuals and user guides at all-guidesbox.com
06.01.22, 11:10
170 guide - teenage engineering
https://teenage.engineering/guides/po-modular/170
8/15
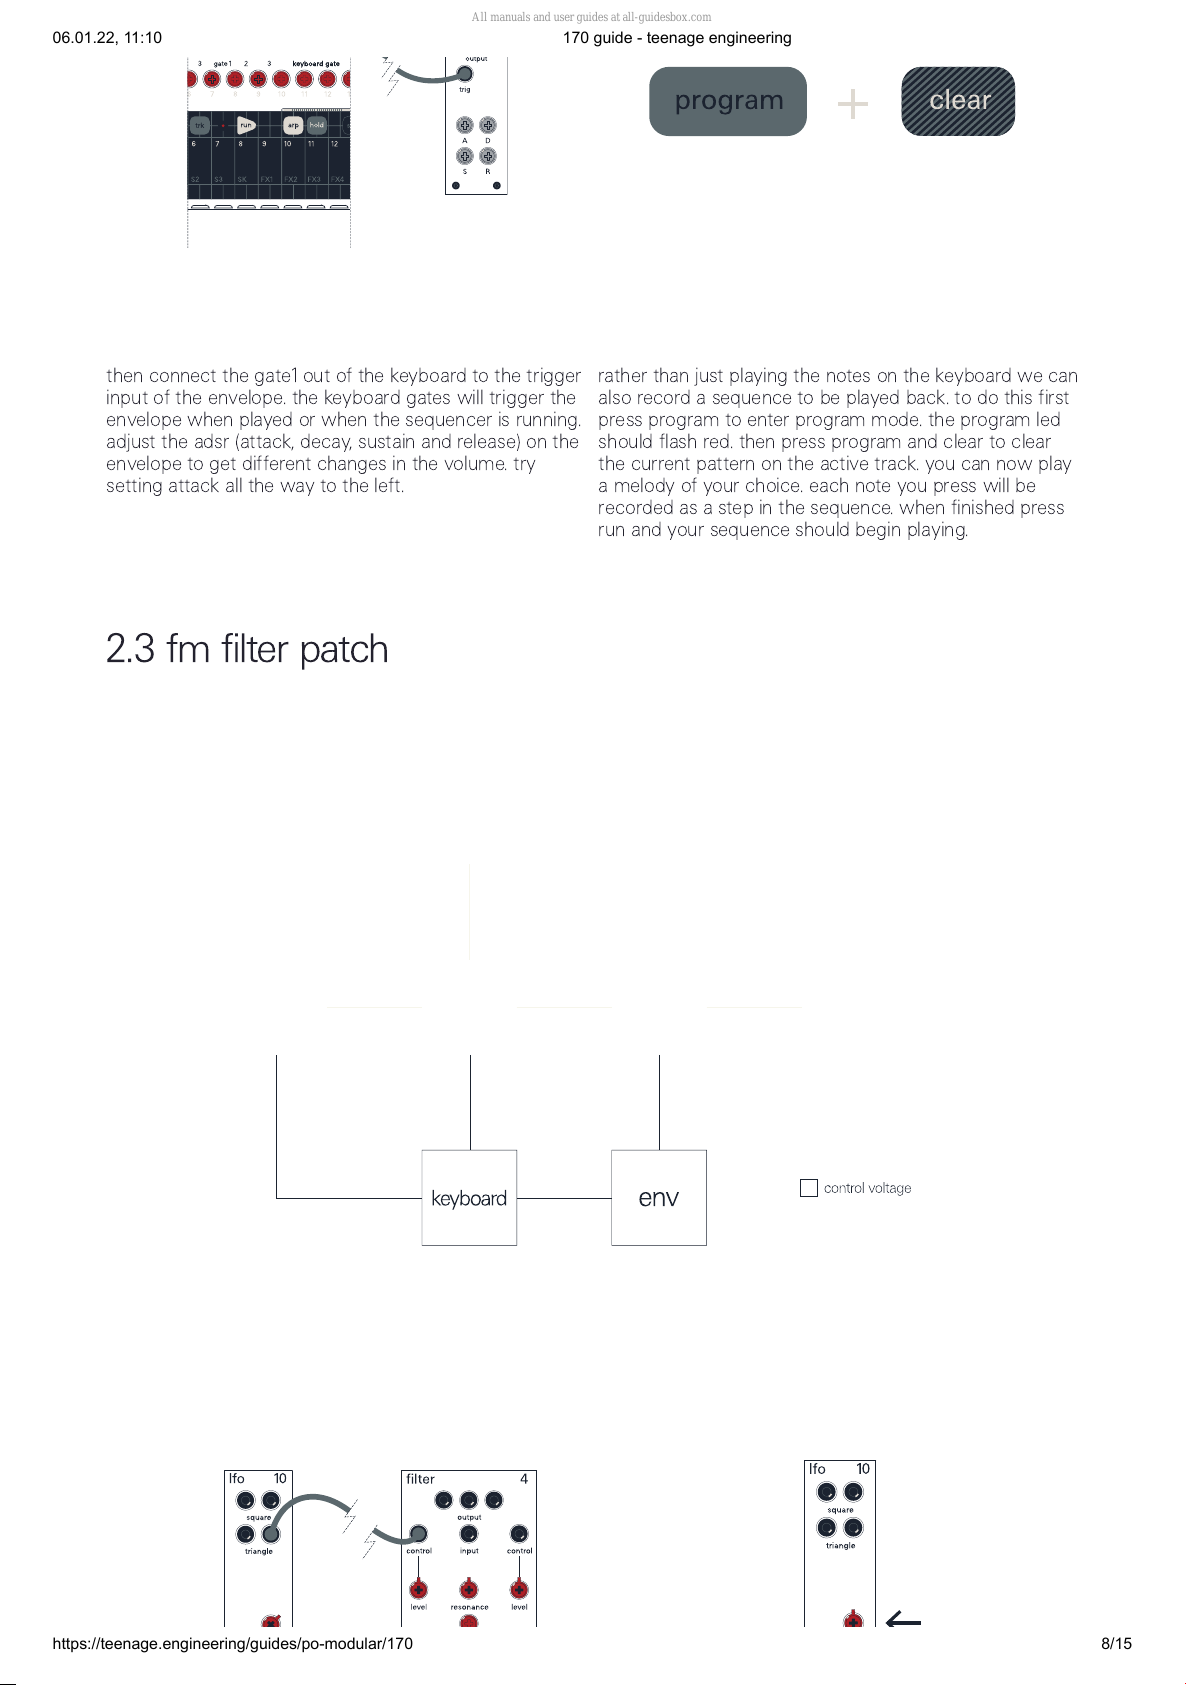
then connect the gate1 out of the keyboard to the trigger
input of the envelope. the keyboard gates will trigger the
envelope when played or when the sequencer is running.
adjust the adsr (attack, decay, sustain and release) on the
envelope to get different changes in the volume. try
setting attack all the way to the left.
rather than just playing the notes on the keyboard we can
also record a sequence to be played back. to do this first
press program to enter program mode. the program led
should flash red. then press program and clear to clear
the current pattern on the active track. you can now play
a melody of your choice. each note you press will be
recorded as a step in the sequence. when finished press
run and your sequence should begin playing.
2
.
3
fm
filter
patch
All manuals and user guides at all-guidesbox.com

06.01.22, 11:10
170 guide - teenage engineering
https://teenage.engineering/guides/po-modular/170
9/15
we can expand upon the patch in the previous example
using both the keyboard and the lfo. first connect the lfo
triangle output into the left control input on the filter.
set the rate of the lfo to around 12 o'clock for audio rate
modulation.
next take the T2 cv 2 out of the keyboard and connect it
to the control input on the right hand side of the filter
module.
select track two on the on the keyboard by holding track
and pressing T2.
adjust the first four knobs (1-4) to four random values. now ensure the keyboard sequencer is not running and
press program. notice the left led light up.
All manuals and user guides at all-guidesbox.com

06.01.22, 11:10
170 guide - teenage engineering
https://teenage.engineering/guides/po-modular/170
10/15
press key 1, 2, 3 and then 4. press program again to
confirm your sequence. notice the left led turn off. now press run and adjust the control levels on both filter
control inputs. the lfo will produce filter fm while the T2
cv 2 output will provide four steps of filter adjust for a
rhythmic filter pattern.
3
.
connections
3
.
1
oplab
module 3
.
2
effect
pedals 3
.
3
modular
using the oplab module it is possible
to control the 170 from the OP-Z. to
fully use the oplab module, you will
need two splitters cables (y cables).
the stereo cables provided with the
170 also work but will only give
access to the basic features of the
ZM-1 module.
when connecting to effects pedals it
is very important to be careful with
signal levels. it is possible to damage
your pedal by running the audio
through at full volume. always start
with the volume at minimum and
slowly raise it to the correct level.
it is possible to integrate 170 with
other modular systems and semi
modular synths.
why not try connecting in some extra
envelopes from your external
system?
3
.
4
midi
devices 3
.5
pocket
operators
All manuals and user guides at all-guidesbox.com

06.01.22, 11:10
170 guide - teenage engineering
https://teenage.engineering/guides/po-modular/170
11/15
the 170 can control midi compliant
devices via the trs midi jack located
on the right hand side of the module.
to connect to a midi device, a midi
adapter cable is required and can be
purchased here. for further details on
midi connectivity please see this page
the 170 has a pocket operator sync
out jack located on the right side of
the keyboard module. this can be
used to sync pocket operators to the
170.
4
.
notes
of
caution
unlike most other audio equipment, modular synthesizers output audio and
control voltage at much higher level (voltage) than other studio equipment.
for this reason we recommend the following precautions and practices.
+
-
do not connect headphones directly
to the 170. you can damage your
headphones or much worse, your
ears. always protect your hearing.
do not plug outputs of the 170 directly
into equipment that is not designed to
handle the larger voltage. for example,
pocket operators, effects pedals etc.
please consult the manufacturer of
the product in question if you are not
sure.
it is generally advised that you avoid
connecting inputs to inputs or
outputs to outputs. doing so can put
unnecessary strain on the system and
over time may eventually lead to
damage.
5.
module
specs
5.
1
square
square is a square wave oscillator that can be
used both as an audio signal and as an lfo, to
control, trigger and modulate other sources.
pro-tip: with pwm set to above 50% no sound
is heard. this can be great when modulated to
create interesting rhythmic effects.
All manuals and user guides at all-guidesbox.com
all-guidesbox.com
06.01.22, 11:10
170 guide - teenage engineering
https://teenage.engineering/guides/po-modular/170
12/15
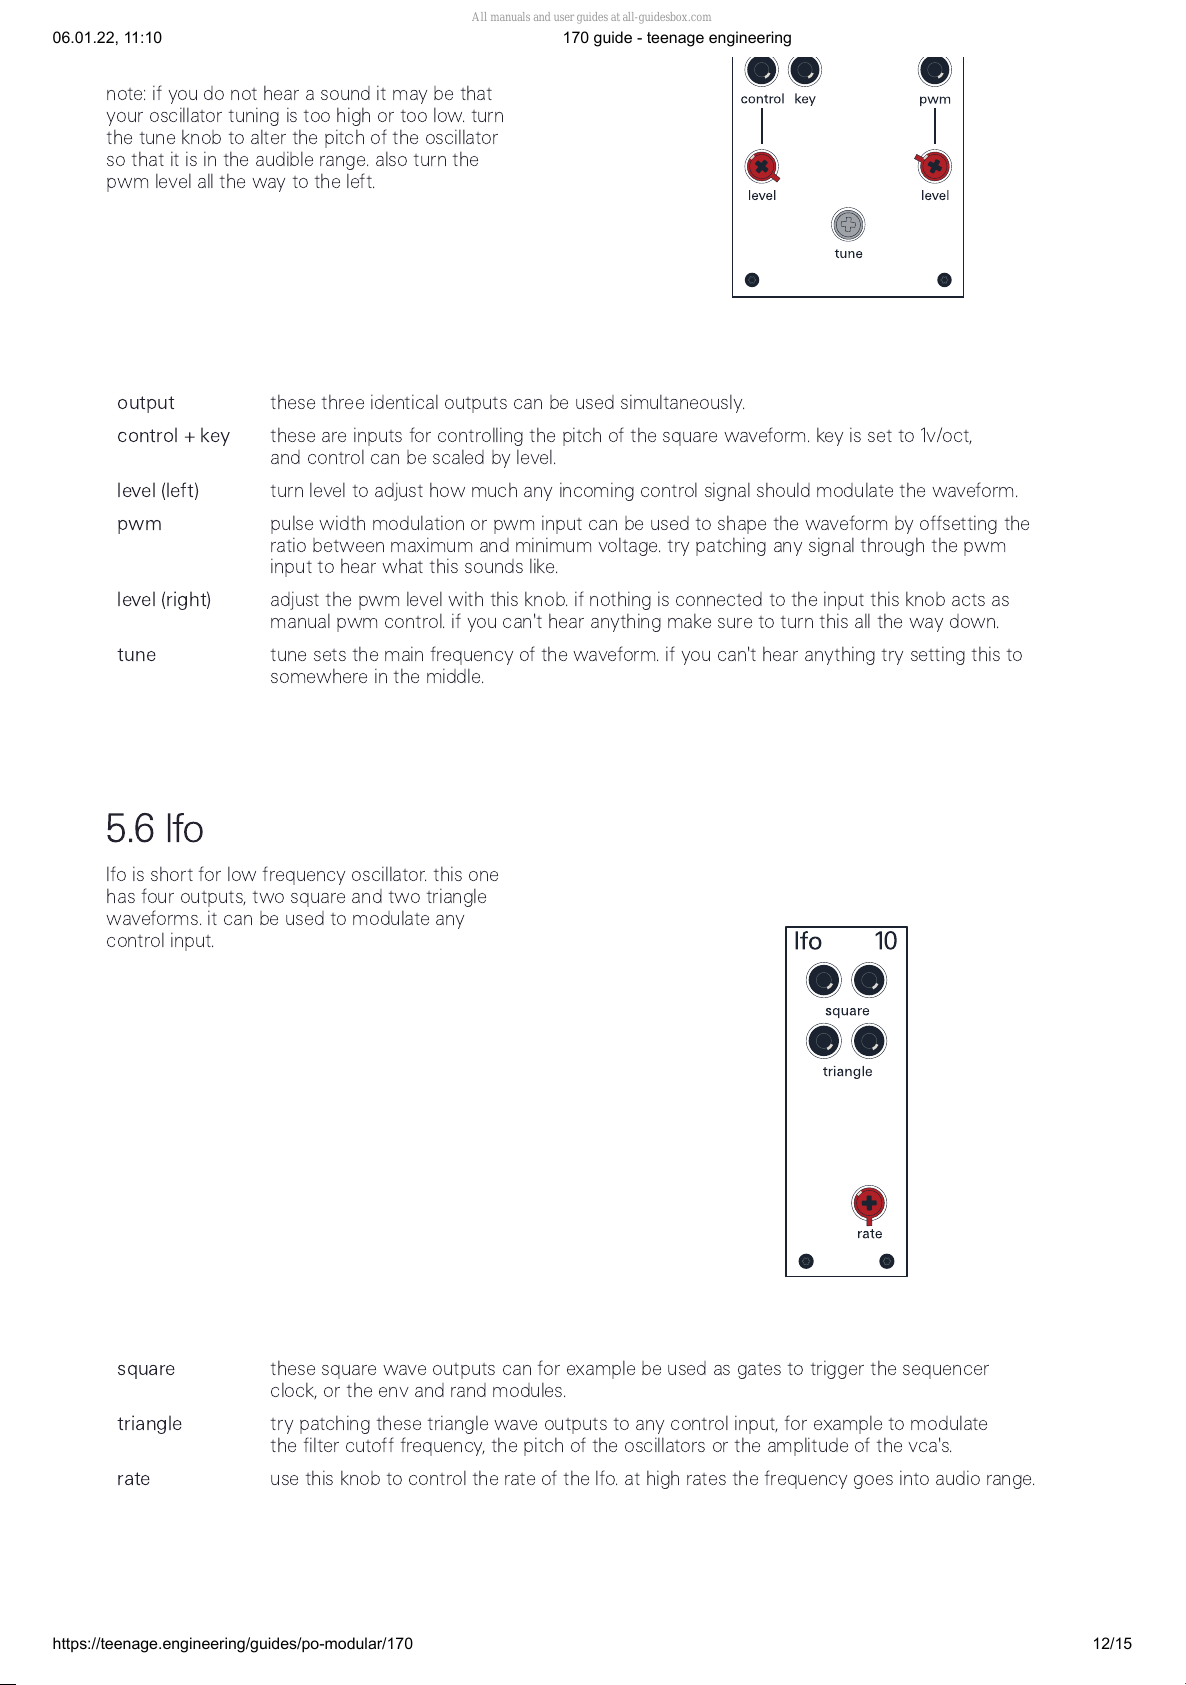
note: if you do not hear a sound it may be that
your oscillator tuning is too high or too low. turn
the tune knob to alter the pitch of the oscillator
so that it is in the audible range. also turn the
pwm level all the way to the left.
output
these three identical outputs can be used simultaneously.
control
+
key
these are inputs for controlling the pitch of the square waveform. key is set to 1v/oct,
and control can be scaled by level.
level
(
left
)
turn level to adjust how much any incoming control signal should modulate the waveform.
pwm
pulse width modulation or pwm input can be used to shape the waveform by offsetting the
ratio between maximum and minimum voltage. try patching any signal through the pwm
input to hear what this sounds like.
level
(
right
)
adjust the pwm level with this knob. if nothing is connected to the input this knob acts as
manual pwm control. if you can't hear anything make sure to turn this all the way down.
tune
tune sets the main frequency of the waveform. if you can't hear anything try setting this to
somewhere in the middle.
5.6
lfo
lfo is short for low frequency oscillator. this one
has four outputs, two square and two triangle
waveforms. it can be used to modulate any
control input.
square
these square wave outputs can for example be used as gates to trigger the sequencer
clock, or the env and rand modules.
triangle
try patching these triangle wave outputs to any control input, for example to modulate
the filter cutoff frequency, the pitch of the oscillators or the amplitude of the vca's.
rate
use this knob to control the rate of the lfo. at high rates the frequency goes into audio range.
All manuals and user guides at all-guidesbox.com

06.01.22, 11:10
170 guide - teenage engineering
https://teenage.engineering/guides/po-modular/170
13/15
5.7
env
env is short for envelope. adsr stands for attack,
decay, sustain and release, and when triggered
it is a control source for shaping a sound over
time.
output
this outputs the control signal used to shape the sound. try patching this to any control
input. these two identical outputs can be used simultaneously.
trig
patch a control signal into this input to trigger the envelope. you can for instance use
one of the sequencer outputs or any clock or gate signal.
A
attack time.
D
decay time.
S
sustain level. this is the level at which sustained notes will be held.
R
release time.
5.8
vca
vca is short for voltage-controlled amplifier.
patch any signal through this module to
modulate its amplitude, such as changing the
volume of a sound.
output
whatever is patched into in gets modulated by control, and then back out through here.
these two identical outputs can be used simultaneously.
in
this is the main input for the vca. patch whatever audio signal you want to modulate into here.
control
this is the input for the modulating control signal. try patching the output of an env into here.
All manuals and user guides at all-guidesbox.com

06.01.22, 11:10
170 guide - teenage engineering
https://teenage.engineering/guides/po-modular/170
14/15
gain
this knob adjusts depth of the control signal.
level
this knob adjusts level of the input signal.
5.
10
filter
filter is a resonant low pass filter that allows
you to shape a signal by filtering out high
frequencies.
output
these three identical outputs can be used simultaneously.
control
(
left
+
right
)
these are inputs for controlling the cutoff frequency of the filter.
input
this is the input for the filter. patch whatever audio signal you want to filter into here.
level
(
left
+
right
)
turn level to adjust how much the incoming control signal should modulate the cutoff
frequency.
resonance
this controls the resonance of the filter. turn this up to emphasize the frequencies around the
cut off point to get a sharper thinner sound. keep turning it up and the filter will start to self-
oscillate.
frequency
this controls the main cutoff frequency of the filter. turn it down to only let low frequencies
pass through. if you don't hear anything try turning this all the way up.
5.
12
speaker
speaker is a dual input speaker module allowing
you to to hear what your patch sounds like.
All manuals and user guides at all-guidesbox.com

06.01.22, 11:10
170 guide - teenage engineering
https://teenage.engineering/guides/po-modular/170
15/15
left
left input.
right
right input.
out
stereo output.
volume
this is the volume control for the speaker module and for the output. turn it clockwise to turn
the volume up and counterclockwise to turn it down. the control is reversed on the first
production units. in that case treat it the opposite way. note: when using the speaker or the
output always be careful with your ears and equipment.
5.
13
keyboard
the keyboard is a versatile 4 track polyrhythmic
sequencer with midi out and pocket operator
sync out. for details on the keyboard module
please take a look at this guide
All manuals and user guides at all-guidesbox.com
Other manuals for 170
1
Other teenage engineering Synthesizer manuals

teenage engineering
teenage engineering OP-1 User manual

teenage engineering
teenage engineering 400 User manual

teenage engineering
teenage engineering PO-28 robot User manual

teenage engineering
teenage engineering OP–Z User manual

teenage engineering
teenage engineering OP-1 User manual

teenage engineering
teenage engineering PO-32 tonic User manual

teenage engineering
teenage engineering OP-1 User manual

teenage engineering
teenage engineering OP-Z1 User manual

teenage engineering
teenage engineering OP-Z User manual


