teenage engineering OP-1 User manual

OP
-
1
portable
synthesizer user guide
ガイド
v.2.2
thank you for choosing the OP-1 portable synthesizer.
this device is precision made to last many years and
designed to be practical, intuitive and to give you hours
of creative pleasure.
to get the most out of your new OP-1, be sure to read this
operator
’
s manual carefully. for even deeper
understanding and the latest pro tips, please visit the OP-1
community website operator-1.com.
user
guide
click on the section you
want to read more about
1
1.1
1.2
1.3
2
3
3.1
3.2
4
4.1
4.2
4.3
5
5.1
5.2
5.3
5.4
5.5
5.6
5.7
5.8
5.9
6
6.1
6.2
6.3
6.4
6.5
6.6
6.7
7
hardware overview
power on/off
charging the battery
in and out-puts
layout
musical keyboard
playing a sound
octave shift
main modes
the four main modes
using shift + any main mode
main mode screen examples
synthesizer mode
introduction
synthesizer engines
envelope
playmode
synthesizer effect
synthesizer LFO
change sound
saving a sound
sound file structure
drum mode
introduction
drum sampler engine
laying out a drum kit
dynamic envelope
importing your own sounds
using OP-1
’
s standard layout
D-box drum engine
sequencers
9
9.1
9.2
9.3
9.4
9.5
9.6
10
10.1
10.2
10.3
10.4
10.5
10.6
10.7
10.8
11
11.1
11.2
11.3
12
12.1
12.2
12.3
12.4
12.5
13
13.1
13.2
13.3
13.4
13.5
13.6
the mixer
introduction
sound path
mixer
EQ
master effect
master out
tempo
introduction
setting the tempo/tap tempo
using the metronome
free mode
beat match
sync mode
PO sync
1/16 sync
help
the help button
tools
battery level
recording external sources
using the mic/input key
mic/input key in synth mode
mic/input key in tape mode
sampling using the built in microphone
creating a drum kit from fm radio waves
song rendering and connectivity
album
com
OP-1 mode
ctrl mode
disk mode
opt(option) mode

7.1
7.2
7.3
7.4
7.5
7.6
7.7
7.8
7.9
7.10
7.11
7.12
7.13
7.14
8
8.1
8.2
8.3
8.4
8.5
8.6
8.7
8.8
8.9
8.10
8.11
8.12
8.13
8.14
8.15
introduction
selecting a sequencer type
endless sequencer
endless functionality
pattern sequencer
pattern functionality
tombola sequencer
tombola functionality
finger sequencer
finger functionality
sketch sequencer
sketch functionality
arpeggio sequencer
arpeggio functionality
tape mode
introduction
record to tape
overdubbing
rewind and fast forward
jump to the start/end of tape
reverse playback
recording level
tape editing
advanced lift
changing tape speed
advanced recording techniques
tape tricks
erasing tape
backing up your tape
bars/bar markers
13.7
13.8
13.9
13.10
14
14.1
14.2
14.3
14.4
14.5
15
15.1
15.2
15.3
15.4
15.5
15.6
15.7
15.8
15.9
15.10
16
16.1
16.2
16.3
16.4
17
17.1
17.2
17.3
sequencing external equipment
controlling ableton live
ableton live key assignments
controlling propellerhead reason
shift key
using shift
change a single module
shift + main mode keys
shift + arrow keys
shift + encoders
LFO reference
LFO modes introduction
element LFO mode
random LFO mode
tremolo LFO mode
value LFO mode
MIDI LFO mode
crank LFO mode
bend LFO mode
additional symbols used in LFO mode
free LFO
exercises
recreating sounds
starting out
helicopter sound
singing birds sound
reference
synth engines
effects reference
sequencer reference
what
'
s
in
the
box
check that the following items are
included when you open the box
OP-1 unit. transparent overlay.
OP-1 comes with a
transparent overlay for
quick reference of the
keyboard layout. keep this
for future reference.
rubber band.
you may use the paperfoam
box in which your OP-1
came delivered as a
temporary storage box. use
the rubber bands to seal
the box.
USB cable.
OP-1 uses a standard USB
to mini USB cable for
charging the OP-1 and for
transferring data between
your OP-1 and your
computer. if you want to
use an external power
adapter instead of a
computer for charging the
battery, make sure you are
using a 5V USB standard
charger. a dedicated
charger works more
efficiently and will charge
the battery faster.
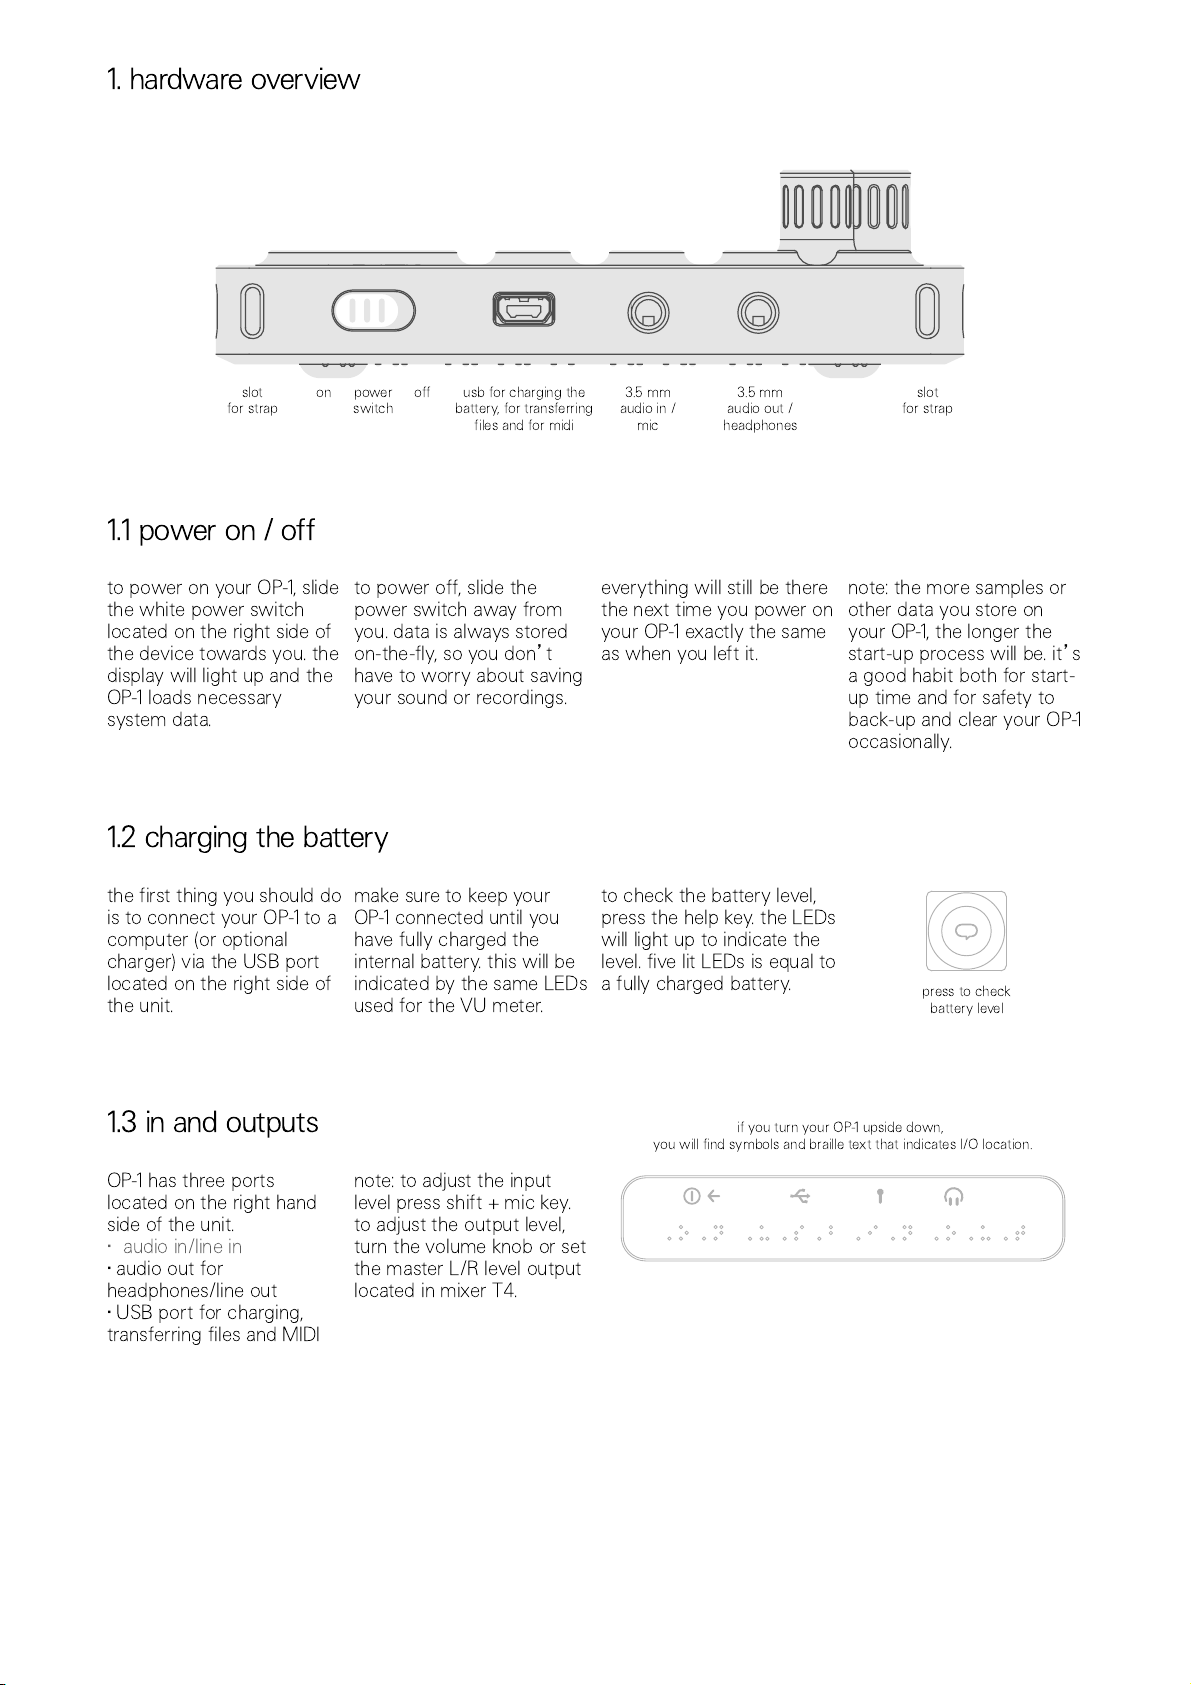
slot
for strap on power
switch off usb for charging the
battery, for transferring
files and for midi
3.5 mm
audio in /
mic
3.5 mm
audio out /
headphones
slot
for strap
1
.
1
power
on
/
off
to power on your OP-1, slide
the white power switch
located on the right side of
the device towards you. the
display will light up and the
OP-1 loads necessary
system data.
to power off, slide the
power switch away from
you. data is always stored
on-the-fly, so you don
’
t
have to worry about saving
your sound or recordings.
everything will still be there
the next time you power on
your OP-1 exactly the same
as when you left it.
note: the more samples or
other data you store on
your OP-1, the longer the
start-up process will be. it
’
s
a good habit both for start-
up time and for safety to
back-up and clear your OP-1
occasionally.
1
.2
charging
the
battery
the first thing you should do
is to connect your OP-1 to a
computer (or optional
charger) via the USB port
located on the right side of
the unit.
make sure to keep your
OP-1 connected until you
have fully charged the
internal battery. this will be
indicated by the same LEDs
used for the VU meter.
to check the battery level,
press the help key. the LEDs
will light up to indicate the
level. five lit LEDs is equal to
a fully charged battery. press to check
battery level
1
.3
in
and
outputs
OP-1 has three ports
located on the right hand
side of the unit.
audio in/line in
•
•
audio out for
headphones/line out
•
USB port for charging,
transferring files and MIDI
note: to adjust the input
level press shift + mic key.
to adjust the output level,
turn the volume knob or set
the master L/R level output
located in mixer T4.
if you turn your OP-1 upside down,
you will find symbols and braille text that indicates I/O location.
1
.
hardware
overview

2.
layout
1. speaker
2. volume
3. help
4. tempo
5. main modes
6. tape edits
7. tape transport
8. rewind/forward, octave
shift +/-, step forward/back
9. shift
10. display
11. T1-T4
12. color coded encoders
13. mic/input
14. album/com
15. sound 1-8
16. sequencer
17. musical keyboard
18. built-in microphone
19. VU/battery indicator
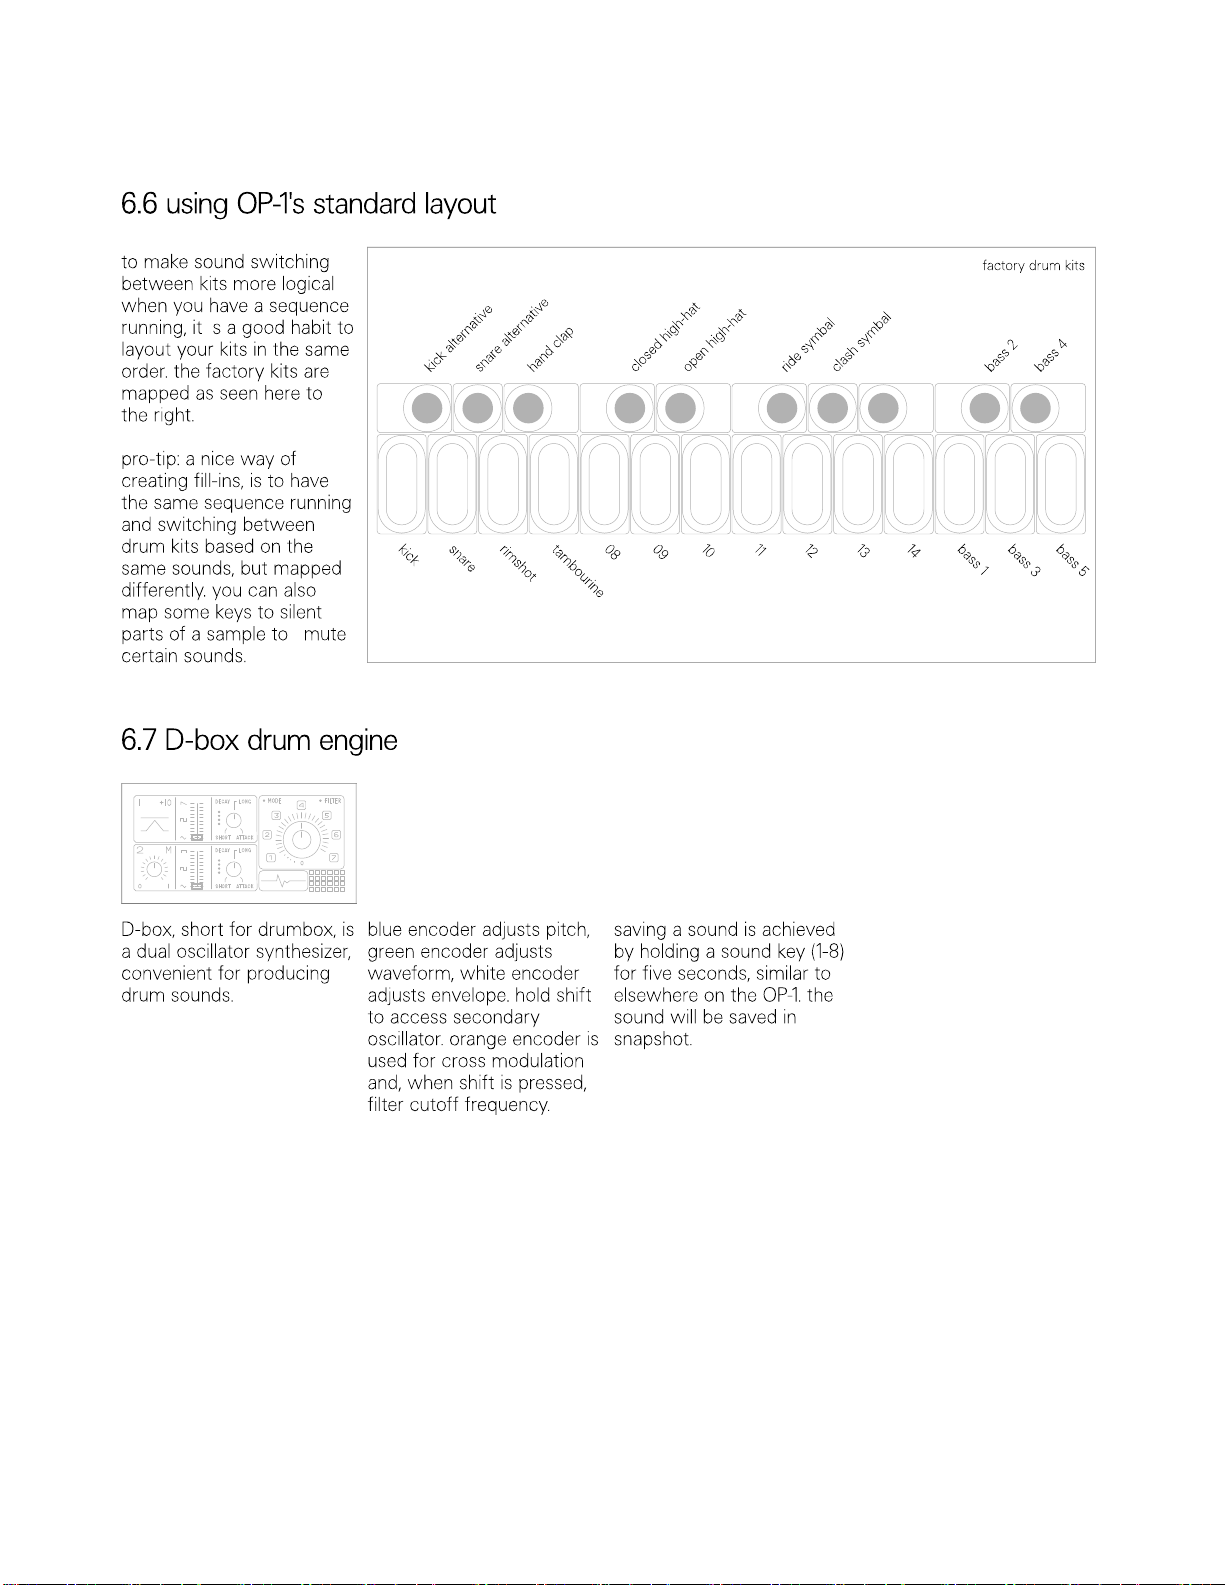
the layout of the OP-1 is
divided into different groups
for easy reading and
intuitive workflow.
turn the volume knob to set
the master volume. the four color encoders
are related to the graphical
interface on the display.
a green graphical element
or text hints that the green
encoder will change its
value or position.
on the right side of your
OP-1 you find the built in
microphone and VU /
battery LEDs.

3.
musical
keyboard
3.
1
playing
a
sound
press any key on the
musical keyboard and you
should instantly hear a
sound.
if it is silent, turn up the
master volume located next
to the speaker,
or press the
synthesizer or drum key.
pro-tip: press and hold the
help key while playing the
musical keyboard to let your
OP-1 display the current
note.
help key
3.2
octave
shift
use the arrow keys to
transpose octave while in
synthesizer or drum mode.
note: before you start
creating your first
masterpiece, read this
manual carefully to avoid
deleting or over-recording
your work.


’
–•
–•
–•
–•

–•
–•
–•
–•
–•
–•
–•
–•
–•
–•
–•
–•
–•

–•
–•
–•
–•
–•
–•
–•
’
•
•
•
•
– –
‘


’
–•
–•
–•
–•

•
•
•
•
•
•
•
•
’
“ ”
7.
sequencers
7.
1
sequencers
introduction
OP-1 comes with four
original sequencers that let
you arrange notes in
different ways. both
synthesizer and drum mode
have their own dedicated
sequencer memory and can
have separate types active,
even though only one can
be played at a time.
the big difference between
the tape and a sequencer is
that tape produces a pure
audio recording, while a
sequencer stores note data.
one of the reasons for using
a sequencer is that you
may change or alter the
sound but continue playing
the same stored notes.
7.2
selecting
a
sequencer
type
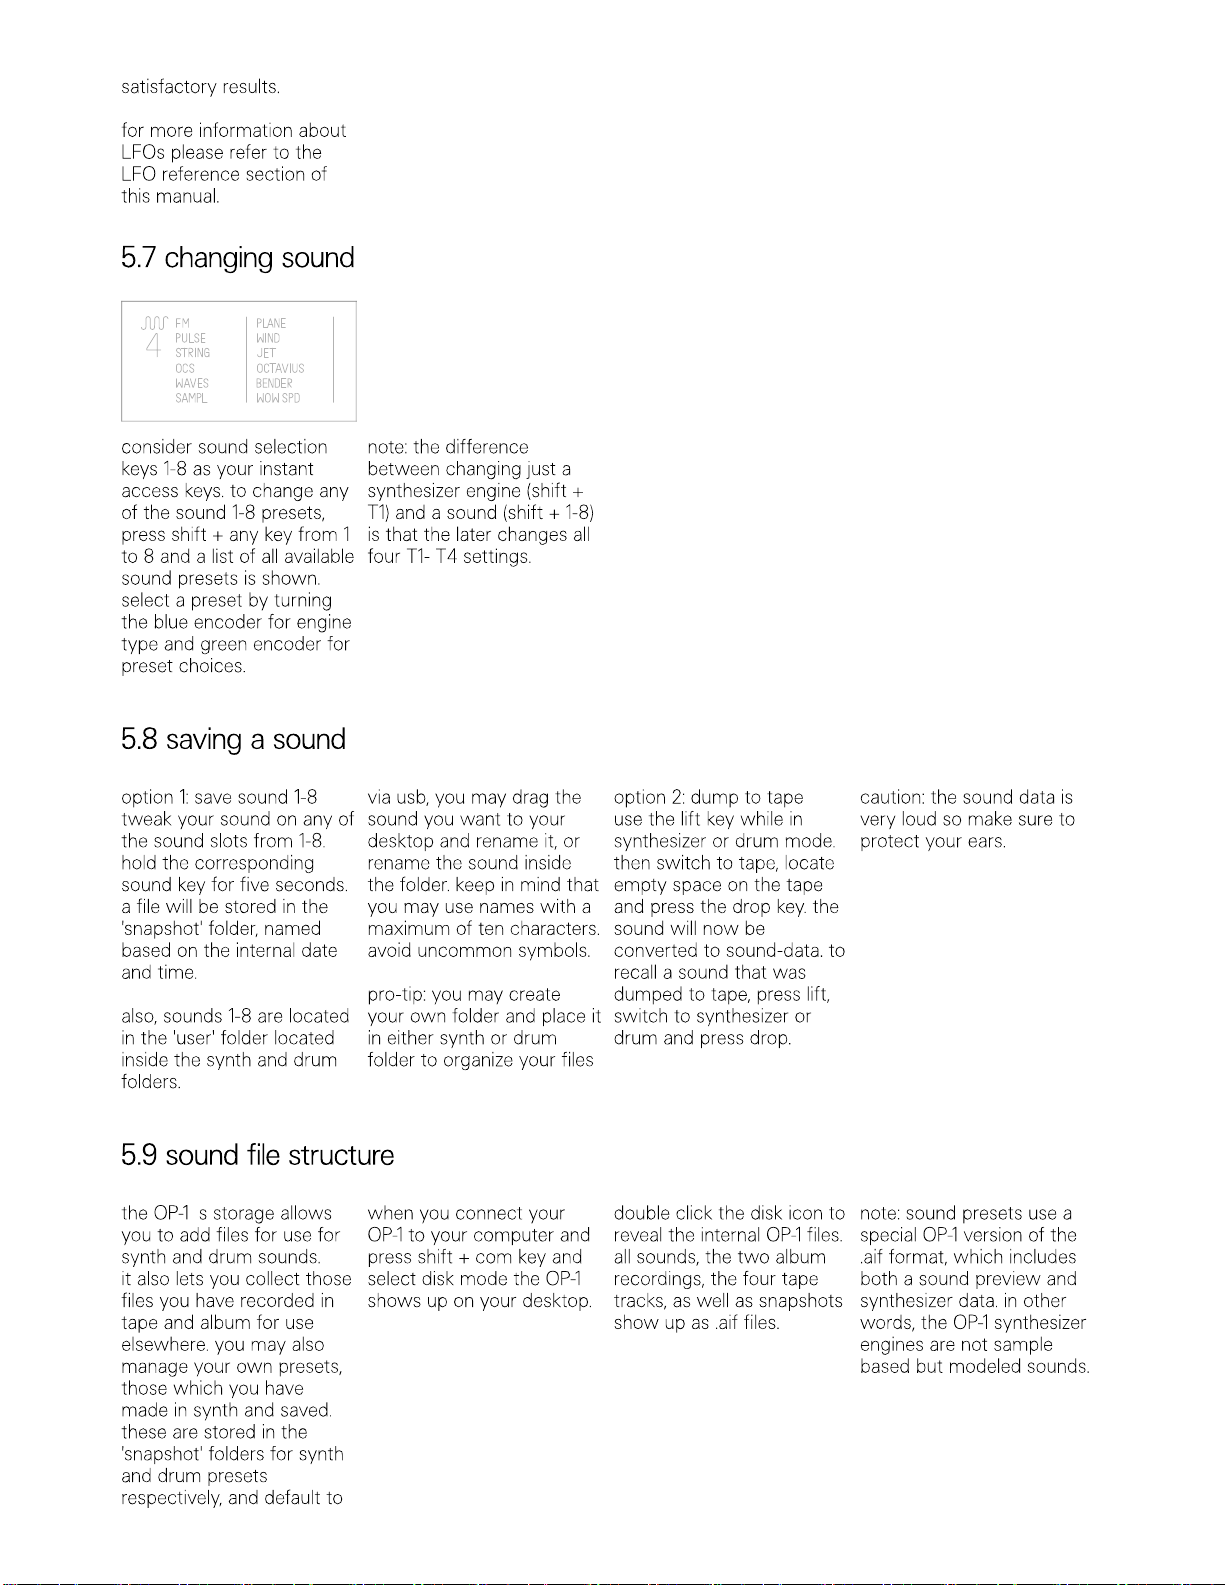
to select sequencer type
press shift + the sequencer
key to enter the sequencer
browser screen. turn the
blue encoder to make your
selection, then press the
sequencer key again to exit.
7.3
endless
sequencer

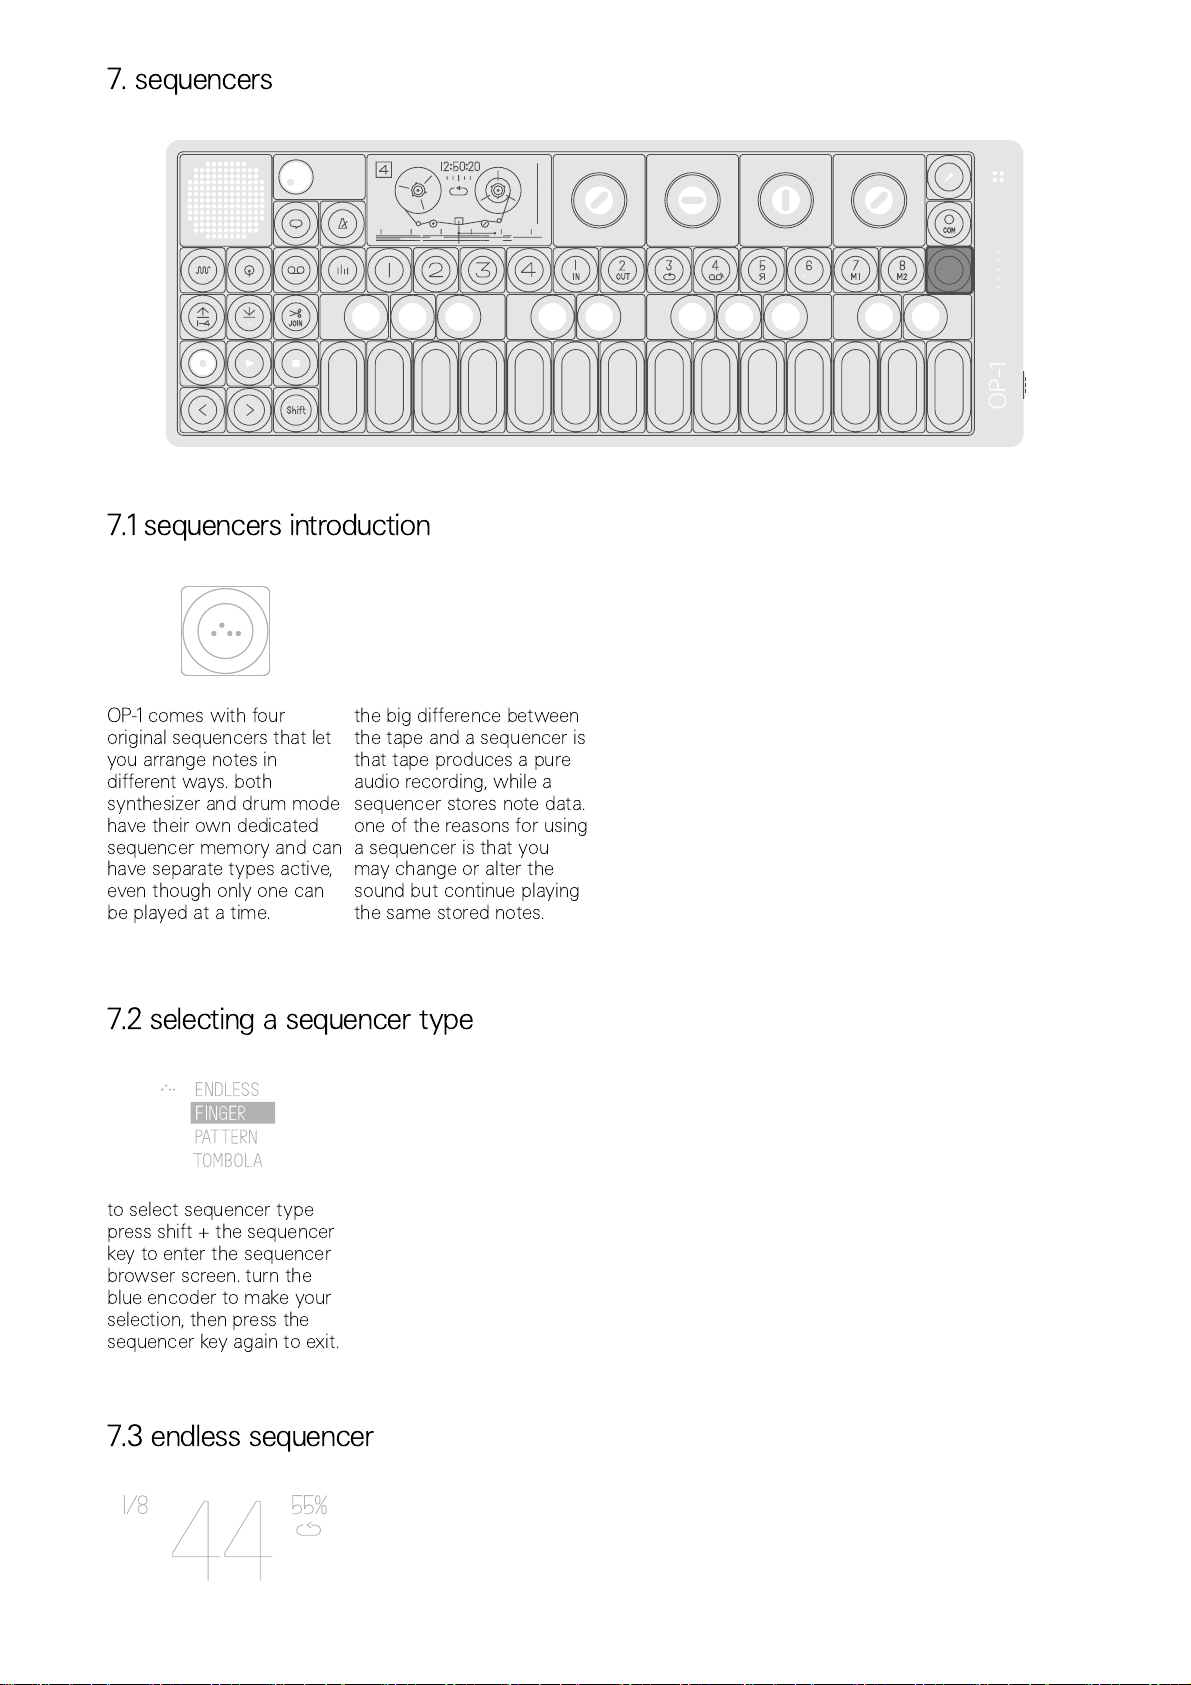
endless is a very effective
way to get sequencing
done quickly.
just hold shift + press any
key on the musical
keyboard to store a note.
it automatically moves one
step forward when you
release the key. hold shift
until you are done.
then release shift and press
any key on the musical
keyboard to play your
sequence.
the maximum number of
notes that can be stored
is 128.
7.4
endless
sequencer
functionality
insert notes.
to insert a note, press shift
+ any key on the musical
keyboard. keep holding
down shift until you are
done with all notes you
want to insert.
insert long notes.
press shift + any key on the
musical keyboard. continue
to hold the keys while
pressing the forward arrow
key (>).
insert space.
press shift + the forward
arrow key (>).
delete last note.
press shift + the rewind
arrow key (<).
c
play a sequence.
to play a sequence just
press any key on the
musical keyboard. the pitch
of the played notes will
change depending on what
key you press. this is called
key transposition.
to play the original pitch of
the notes play the c key on
the musical keyboard.
play and hold a sequence.
turn the orange encoder
until hold lights up.
change playback direction
of a sequence.
you have three different
options for how you want
the notes to be played back.
forward, reverse or random.
change direction by holding
shift and turn the orange
encoder.
set time signature.
time signature is basically a
way to define how many
notes (beats) that will be
played in one bar. this is
related to the master tempo
that you set in tempo and
to the bars in tape mode. if
you set 1/16, one bar in tape
will be 16 notes or beats.
change time signature by
turning the blue encoder.
swing.
swing is a way to slightly
alter the timing of notes
played in a sequence. to
add swing turn the green
encoder. no swing is a 50%
setting.
note: remember to check if
you have applied swing
when you record multiple
layers of sequenced
material to tape if you want
them to be in absolute sync.
apply a pattern to your
sequence.
the endless sequencer has
a function which lets you
add a pattern to your
sequence. turn the white
encoder to apply a pattern.
a single dot means there
’
s
no pattern applied. (turn the
white encoder counter
clockwise all the way until
only a single dot is shown)
rotate a pattern.
by holding shift + turning
the white encoder, you can
rotate the dots within the
pattern.
crank mode.
shift + blue encoder
activates crank mode,
which gives you manual,
music-box style playback
control.
note: in endless, you may
use the arrow keys to
change octave in playback
mode.
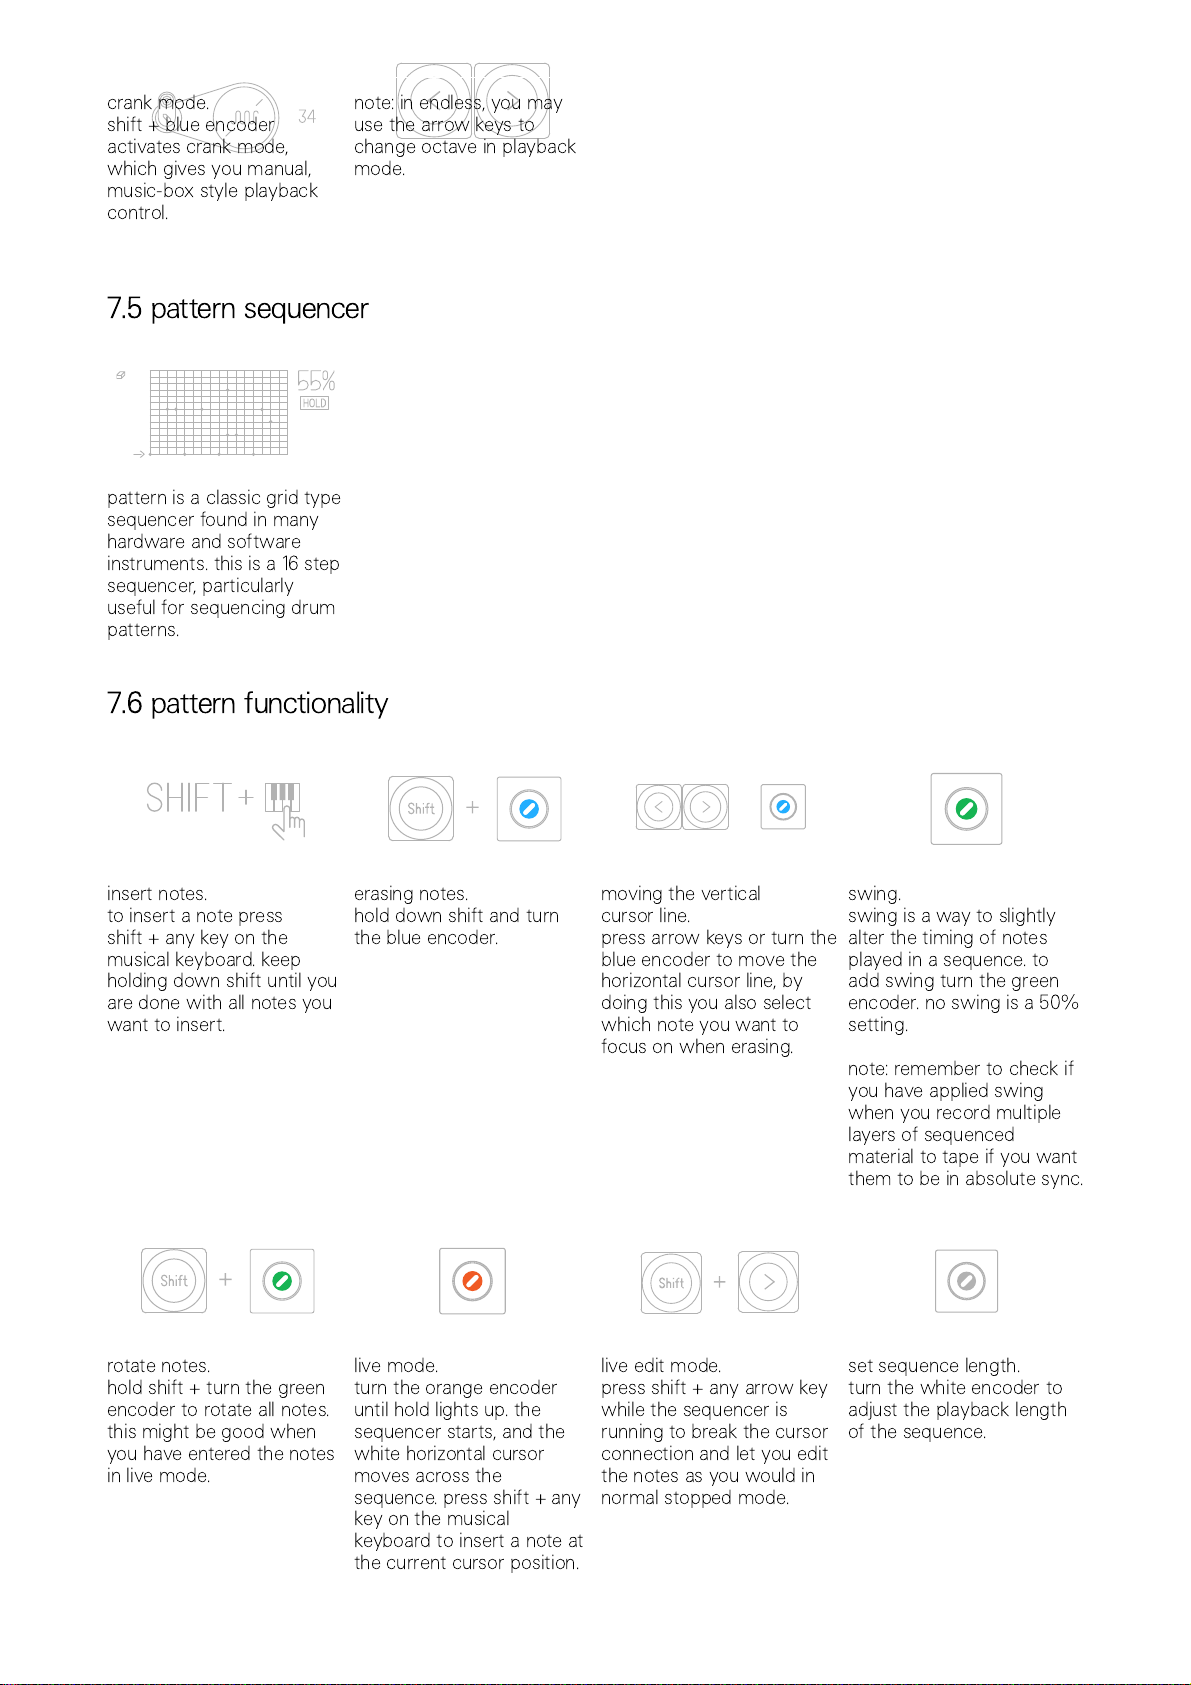
7.5
pattern
sequencer
pattern is a classic grid type
sequencer found in many
hardware and software
instruments. this is a 16 step
sequencer, particularly
useful for sequencing drum
patterns.
7.6
pattern
functionality
insert notes.
to insert a note press
shift + any key on the
musical keyboard. keep
holding down shift until you
are done with all notes you
want to insert.
erasing notes.
hold down shift and turn
the blue encoder.
moving the vertical
cursor line.
press arrow keys or turn the
blue encoder to move the
horizontal cursor line, by
doing this you also select
which note you want to
focus on when erasing.
swing.
swing is a way to slightly
alter the timing of notes
played in a sequence. to
add swing turn the green
encoder. no swing is a 50%
setting.
note: remember to check if
you have applied swing
when you record multiple
layers of sequenced
material to tape if you want
them to be in absolute sync.
rotate notes.
hold shift + turn the green
encoder to rotate all notes.
this might be good when
you have entered the notes
in live mode.
live mode.
turn the orange encoder
until hold lights up. the
sequencer starts, and the
white horizontal cursor
moves across the
sequence. press shift + any
key on the musical
keyboard to insert a note at
the current cursor position.
live edit mode.
press shift + any arrow key
while the sequencer is
running to break the cursor
connection and let you edit
the notes as you would in
normal stopped mode.
set sequence length.
turn the white encoder to
adjust the playback length
of the sequence.

move section.
if you hold shift + turn the
white encoder you may
move the played back
section around within the
sequence. great for fill-ins!
play and hold a sequence.
turn the orange encoder
until hold lights up.
note: to key transpose a
pattern sequence, switch to
synthesizer, drum, tape or
mixer mode and press any
key on the musical
keyboard. to play the
original pitch of the
sequenced notes, play the c
key on the musical
keyboard.
change playback direction
of a sequence.
you have three different
options for how you want
the notes to be played back.
forward, reverse or cycle.
change direction by holding
shift and turn the orange
encoder.
7.7
tombola
sequencer
use tombola when you
want to create a random
sequence. just throw a
couple of notes into the
tombola and then set the
gravity, mass and spinning
speed. the harder/faster a
note bounces the louder
the sound will play.
7.8
tombola
functionality
drop notes into tombola.
play any key on the musical
keyboard to drop a note
into the tombola.
adjust bounciness.
turn the orange encoder to
adjust the bounciness of
the notes. the harder a note
hits the wall of the the
tombola the louder it will
play. this is measured in
amount of mass.
adjust heaviness.
this is measured in amount
of gravity. turn the green
encoder to set the gravity.
releasing notes.
turn the white encoder to
open the tombola and
release the notes.
tombola speed.
turn the blue encoder to
adjust the speed and the
direction of rotation of the
tombola.
crank mode.
engage crank using shift +
blue encoder. you may now
spin the tombola by hand,
just using blue.

pro-tip: keep the tombola
open and set a high rotation
speed. this creates a
random type of echo effect.
7.9
finger
sequencer
the finger sequencer lets
you play two sequences in
combination with one
another.
finger works the same in
synth and drum modes
(animations differ).
each white key on the
musical keyboard
represents a pattern. each
pattern is visualized as the
top middle, checkered rows.
each checked row may be
filled with either synth notes
or drum triggers.
you will recognize notes
and trigs as the small white
crosses. the green dot
represent the pattern
’
s
swing setting.
7.
10
finger
functionality
when finger is activated for
synth, two keyboard players
appear.
when used with drum, there
are two gorillas. each sequence, activated
by pushing a white key on
the musical keyboard, is
populated by crosses by
default. press and hold a
key on the musical
keyboard to commence
playback.
depending on which
playback mode you are
using (chosen using
shift+orange encoder),
pushing a second key on
the musical keyboard will
now either layer a second
pattern (join), play when you
release the previous one
(replace), or play fill ins (fill
in). using the orange
encoder allows you to turn
hold playback mode on for
finger.
insert notes.
to insert a note press shift +
any key on the musical
keyboard.
moving the cursor and
erasing notes.
blue encoder moves the
box cursor inside the
sequence. hold down shift
and turn the blue encoder
to erase while moving the
cursor.
set sequence length.
white encoder adjusts the
length of a pattern.
swing.
to add swing turn the green
encoder. no swing is a 50%
setting.
note: remember to check if
you have applied swing
when you record multiple
layers of sequenced
material to tape if you want
them to be in absolute sync.
7.
11
sketch
sequencer
Other manuals for OP-1
2
Other teenage engineering Synthesizer manuals

teenage engineering
teenage engineering OP-1 User manual

teenage engineering
teenage engineering OP-1 User manual

teenage engineering
teenage engineering OP-Z User manual

teenage engineering
teenage engineering PO-32 tonic User manual

teenage engineering
teenage engineering OP-Z1 User manual

teenage engineering
teenage engineering 400 User manual

teenage engineering
teenage engineering PO-28 robot User manual

teenage engineering
teenage engineering 170 User manual

teenage engineering
teenage engineering OP–Z User manual


