TEKNIX FFH1860X User manual

INSTRUCTION MANUAL
FRIDGE FREEZER
FFH1860X

Contents
Thank you for choosing TEKNIX. We are sure you will find your new refrigerator a
pleasure to use. However, before you use the appliance, we recommend that
you carefully read the instructions, which provide details about installing and
using the product. Please keep this manual for future reference.
Safety and warning information ..................................................................................................................... 01
Installing your new appliance............................................................................................................................ 13
Reversing the door..................................................................................................................................................... 15
Description of the appliance.............................................................................................................................. 19
Display control............................................................................................................................................................. 20
Using your appliance............................................................................................................................................... 22
Cleaning and care.................................................................................................................................................... 24
Helpful hints and tips............................................................................................................................................... 26
Troubleshooting.......................................................................................................................................................... 27
Disposal of the appliance.................................................................................................................................... 31
Product Dimension.................................................................................................................................................... 34

For your safety and correct usage before installing and first
using the appliance, read this user manual carefully,
including its hints and warnings. To avoid unnecessary
mistakes and accidents, it is important to make sure that all
people using the appliance are thoroughly familiar with it
operation and safety features. Save these instructions and
be sure that they remain with the appliance if it is moved or
sold, so that anyone using it throughout its life, will be
properly informed on its usage and safety notices. For the
safety of life and property, keep the precautions of these
user's instructions as the manufacturer is not responsible for
damages caused by omission.
01
Safety and warning information
According to EN standard
This appliance can be used by children aged from 8
years and above and persons with reduced physical,
sensory or mental capabilities or lack of experience
and knowledge if they have been given supervision or
instruction concerning use of the appliance in a safe
way and understand the hazards involved. Children
shall not play with the appliance. Cleaning and user
maintenance shall not be made by children without
supervision.
Safety for children and others who are vulnerable people

According to IEC standard
This appliance is not intended for use by persons
(including children) with reduced physical, sensory or
mental capabilities, or lack of experience and
knowledge, unless they have been given supervision or
instruction concerning use of the appliance by a
person responsible for their safety.
Keep all packaging away from children as there is risk
of suffocation.
If you are discarding the appliance, pull the plug out of
the socket, cut the connection cable (as close to the
appliance as you can) and remove the door to prevent
children playing from suffering an electric shock or
from closing themselves inside it.
If this appliance, featuring a magnetic door seals, is to
replace an older appliance having a spring lock (latch)
on the door or lid, be sure to make the spring lock
unusable before you discard the old appliance. This will
prevent it from becoming a death trap for a child.
Safety for children and others who are vulnerable people
02
Safety and warning information

WARNING
This appliance is intended to be used in household and
similar applications such as 1.staff kitchen areas in
shops, offices and other working environments; 2.farm
houses and by clients in hotels, motels and other
residential type environments;
WARNING
Fill with potable water only.
WARNING
Do not store explosive substances such as aerosol cans
with a flammable propellant in this appliance.
WARNING
If the supply cord is damaged, it must be replaced by
the manufacturer, its service agent or similarly qualified
persons in order to avoid a hazard.
WARNING
Keep ventilation openings, in the appliance enclosure
or in the built-in structure, clear of obstruction.
General safety
03
Safety and warning information
3. bed and breakfast type environments;
4. catering and similar non-retail applications.
WARNING
Do not use mechanical devices or other means to
accelerate the defrosting process, other than those
recommended by the manufacturer.
WARNING
Do not damage the refrigerant circuit.
WARNING
Do not use electrical appliances inside the food storage
compartments of the appliance, unless they are of the
type recommended by the manufacturer.
WARNING
The refrigerant and insulation blowing gas are
flammable. When disposing of the appliance, do so
only at an authorized waste disposal centre. Do not
expose to flame.
WARNING
When positioning the appliance, ensure the supply
cord is not trapped or damaged.
General safety
04
Safety and warning information
WARNING
The illuminating lamps must not be replaced by the
user! If the illuminating lamps is damaged, contact
professional engineer for assistance. This warning is
only for refrigerators that contain illuminating lamps.
Replacing the illuminating lamps
WARNING
Do not locate multiple portable socket-outlets or
portable power supplies at the rear of the appliance.
05
Safety and warning information
General safety
The refrigerant isobutene (R600a) is contained within
the refrigerant circuit of the appliance, a natural gas
with a high level of environmental compatibility, which
is nevertheless flammable. During transportation and
installation of the appliance, ensure that none of the
components of the refrigerant circuit becomes
damaged. The refrigerant (R600a) is flammable.
Refrigerant
WARNING
Refrigerators contain refrigerant and gases in the
insulation. Refrigerant and gases must be disposed of
professionally as they may cause eye injuries or
ignition. Ensure that tubing of the refrigerant circuit is
not damage prior to proper disposal.
WARNING
Risk of fire / flammable materials If the refrigerant
circuit should be damaged:
1. Avoid opening flames and sources of ignition.
2. Thoroughly ventilate the room in which the appliance
is situated.
It is dangerous to alter the specifications or modify
this product in any way. Any damage to the cord
may cause a short circuit, fire, and/or electric shock.
Refrigerant
06
Safety and warning information

1. The power cord must not be lengthened.
2. Make sure that the power plug is not crushed or
damaged. A crushed or damaged power plug may
overheat and cause a fire.
3. Make sure that you can access the main plug of the
appliance.
4. Do not pull the main cable.
5. If the power plug socket is loose, do not insert the
power plug. There is a risk of electric shock or fire.
6. You must not operate the appliance without the
interior lighting lamp cover.
7. The fridge is only applied with power supply of single
phase alternating current of 220~240V/50Hz. If
fluctuation of voltage in the district of user is so large
that the voltage exceeds the above scope, for safety
sake, be sure to apply A.C. Automatic voltage regulator
of more than 350W to the fridge. The fridge must
employ a special power socket instead of common
one with other electric appliances. Its plug must
match the socket with ground wire.
Electrical safety
07
Safety and warning information

08
Safety and warning information
Do not store flammable gas or liquids in the appliance,
There is a risk of an explosion.
Do not operate any electrical appliances in the
appliance (e.g. electric ice cream makers, mixers etc.).
When unplugging always pull the plug from the mains
socket, do not pull on the cable.
Do not place hot items near the plastic components of
this appliance.
This refrigerating appliance is not intended to be used as
a built-in appliance.
Do not place food products directly against the air outlet
on the rear wall.
Store pre-packed frozen food in accordance with the
frozen food manufacture’s instructions.
The appliances manufactures storage recommendations
should be strictly adhered to. Refer to relevant instructions
for storage.
Do not place carbonated or fizzy drinks in the freezer
compartment as it creates pressure on the container,
which may cause it to explode, resulting in damage to
the appliance.
Daily use

Do not place food products directly against the air outlet
on the rear wall.
Store pre-packed frozen food in accordance with the
frozen food manufacturer's instructions.
The appliances manufacturers storage
recommendations should be strictly adhered to. Refer to
relevant instructions for storage.
Do not place carbonated or fizzy drinks in the freezer
compartment as it creates pressure on the
container, which may cause it to explode, resulting in
damage to the appliance.
Frozen food can cause frost burns if consumed straight
from the freezer compartment.
Do not place the appliance in direct sunlight.
Keep burning candles, lamps and other items with naked
flames away from the appliance so that do not set the
appliance on fire.
The appliance is intended for keeping food stuff and/or
beverages in normal household as explained in this
instruction booklet. The appliance is heavy. Care should
be taken when moving it.
Do not remove nor touch items from the freezer
compartment if your hands are damp/wet, as this could
cause skin abrasions or frost/freezer burns.
Never use the base, drawers, doors etc. to stand on or as
supports.
09
Safety and warning information

Frozen food must not be refrozen once it has been thawed
out.
Do not consume ice popsicles or ice cubes straight from
the freezer as this can cause freezer burn to the mouth
and lips. ,
To avoid items falling and causing injury or damage to the
appliance, do not overload the door racks or put too much
food in the crisper drawers.
10
Safety and warning information
Before maintenance, switch off the appliance and
disconnect the mains plug from the mains socket.
Do not clean the appliance with metal objects, steam
cleaner, ethereal oils, organic solvents or abrasive
cleansers.
Do not use sharp objects to remove frost from the
appliance. Use a plastic scraper.
Caution! Care and cleaning

For electrical connection carefully, follow the instructions
given in this manual. Unpack the appliance and check if
there are damages on it.
Do not connect the appliance if it is damaged. Report
possible damages immediately to the place you bought it.
In this case retain packing.
It is advisable to wait at least four hours before connecting
the appliance to allow the oil to flow back in the
compressor.
Adequate air circulation should be around the appliance,
lacking this leads to overheating. To achieve sufficient
ventilation, follow the instructions relevant to installation.
Wherever possible the back of the product should not be
too close to a wall to avoid touching or catching warm
parts (compressor, condenser) to prevent the risk of fire,
follow the instructions relevant to installation.
The appliance must not be locate close to radiators or
cookers.
Make sure that the mains plug is accessible after the
installation of the appliance.
Installation Important
11
Safety and warning information

Any electrical work required to do the servicing of the
appliance should be carried out by qualified electrician or
competent person.
This product must be serviced by an authorized Service
Center, and only genuine spare parts must be used.
1. If the appliance is Frost Free.
2. If the appliance contains freezer compartment.
Service
Children aged from 3 to 8 years are allowed to load and
unload refrigerating appliances. (This clause applies
only to the EU region.)
Note
12
Safety and warning information

Installing your new appliance
Before using the appliance for the first
time, you should be aware of the
following tips.
In order to improve efficiency of
the cooling system and save
energy, it is necessary to maintain
good ventilation around the
appliance for the dissipation of
heat. For this reason, sufficient
clear space should be available
around the refrigerator.
Suggest:
It is advisable for there to be 50-
70mm of space from the back to
the wall, at least 100mm from its
top, at least 100mm from its side to
the wall and a clear space upfront
to allow the door to open 115°.
Please refer to the diagrams
below.
Ventilation of appliance
Climateclass Ambient temperature
SN +10°C to +32°C
N +16°C to +32°C
ST +16°C to +38°C
Stand your appliance in a dry place to
avoid high moisture damage. Keep the
appliance out of direct sunlight, rain or
frost. Stand the appliance away from
heat sources such as stoves, fires or
heaters.
This appliance performs well in the
climate class from SN to ST. It may
not work properly if being left at a
temperature above or below the
indicated range for a long period.
Note
13
50-70mm
100mm
100mm
831
717
115

For sufficient leveling and air
circulating in the lower rear section of
the appliance, the bottom feet may
need to be adjusted. Please use a
suitable spanner.
To allow the doors to self-close, tilt
back the top backwards at about
15mm or 0.5 by turning the adjustable
feet.
Whenever you want to move the
appliance, remember to turn the feet
back up, so that the appliance can
roll freely. Reinstall the appliance
when relocating.
Leveling of appliance
14
Installing your new appliance
The side at which the door opens can be
changed, from the right side (as supplied)
to the left side, if the installation site
requires.
Warning!
When reversing the door, the appliance
must not be connected to the mains.
Ensure that the plug is removed from the
mains socket.
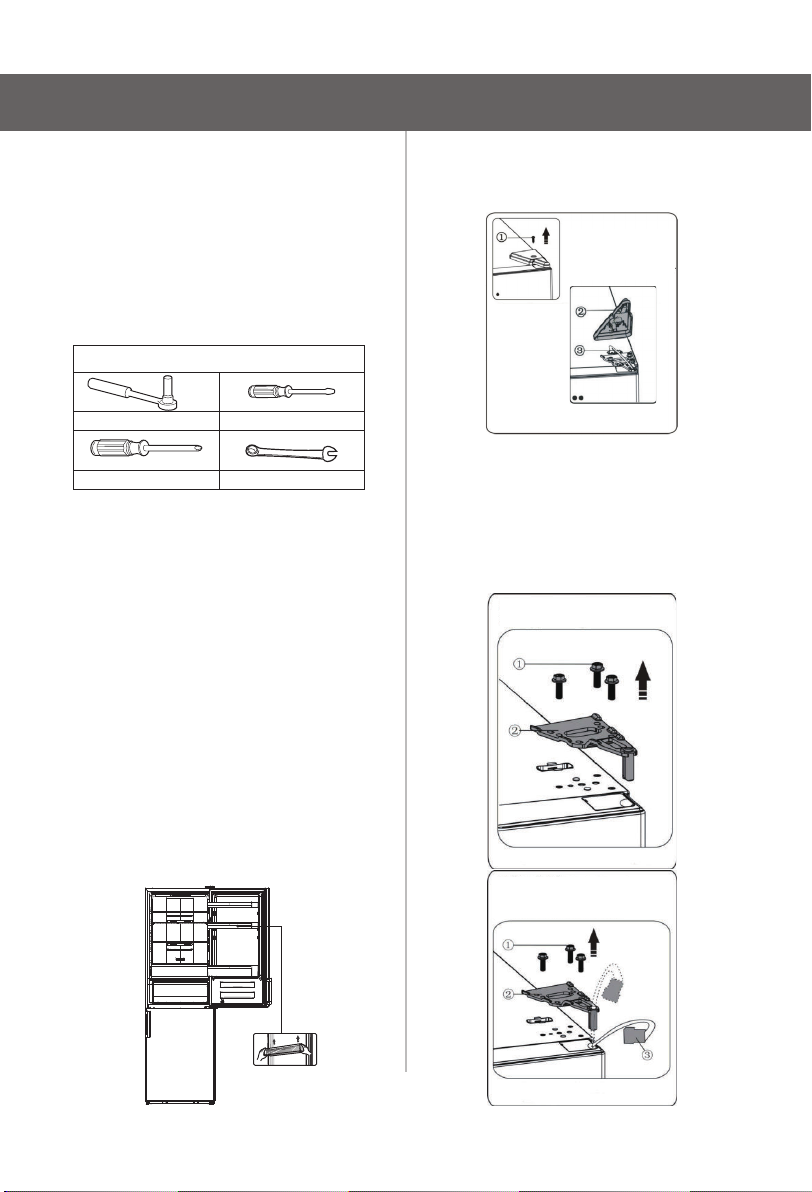
Tools you will need:
When required, tilt the refrigerator back
in order to gain access to the base, you
should rest the appliance on soft foam
packaging or similar material to avoid
damaging the backboard of the
refrigerator. To reverse the door, the
following steps are generally
recommended. Different models may
correspond to different pictures. Models
will be written in the picture. If some
parts are not shown in the picture,
please ignore the relevant description.
1. Stand the refrigerator upright. Open
the upper door to take out all door racks
(to avoid racks damaged) and then
close the door.
Not provided
8mm socket wrench Thin-blade screwdriver
8mm wrench
Cross-shaped screwdriver
Door racks
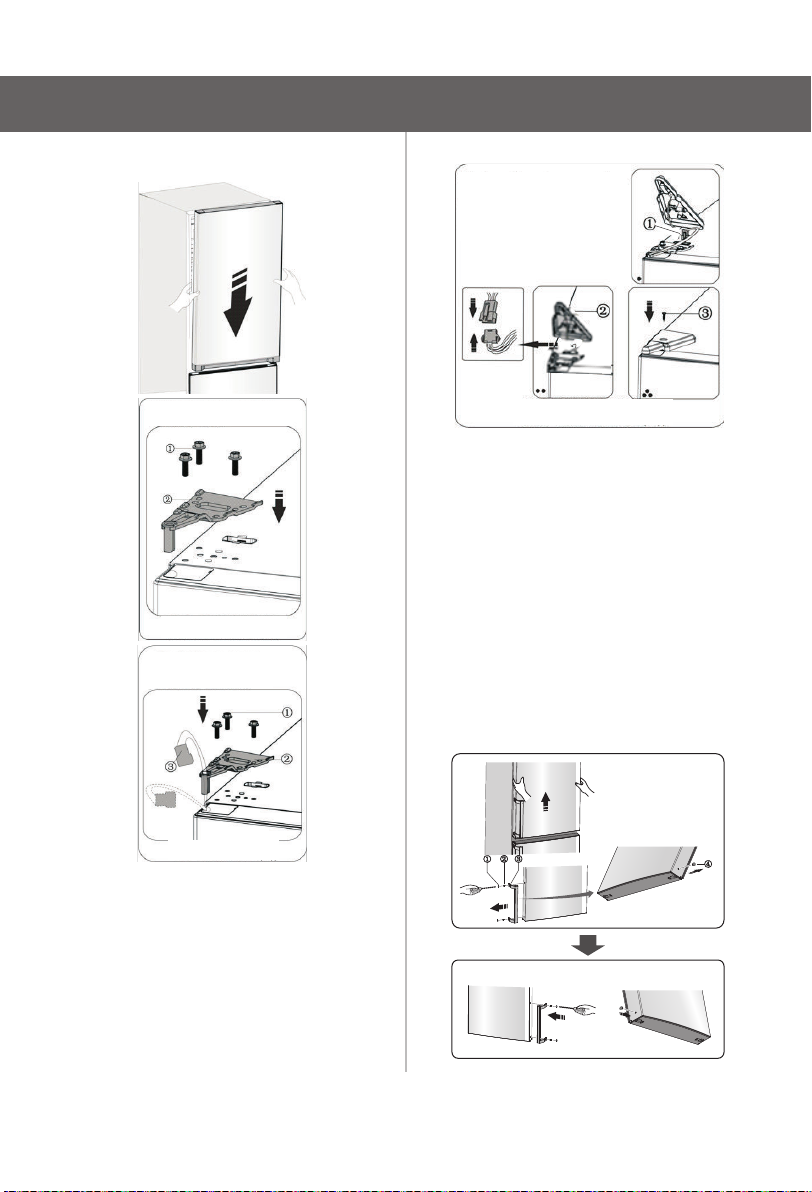
MODEL WITHOUT DISPLAY
3.Remove screws 1 and hinge 2. When the
refrigerator with display on door, you
need to pass connector 3 through the
hole of hinge 2. (Please hold upper door
by hand when installing).
·Special flange screws
·Upper hinge
MODEL WITH DISPLAY
① Special flange screws
② Upper hinge
③ Electrical connector
Installing your new appliance
Reversing the door
2. Remove part 1, loose part 2 from
the top right side of refrigerator.
Self-tapping screws
Upper hinge cover
15

5.When the refrigerator with a display on
door, take screw hole cover (right) from
plastic bag and install it onto the top
right side of refrigerator body. Then
remove screw hole cover (left) from the
top left side of appliance and put it into
plastic bag.
When the refrigerator without a display
on door, pull out screw hole cover from
the left side up rightly, and fix it on the
right side.
8. Loose screws used to fix the middle
hinge and remove middle hinge. Then
remove the lower door.
①orner cover left
Electrical connector left
Corner cover right
Electrical connector right
( )
②( )
③( )
④( )
C
MODEL WITH DISPLAY
MODEL WITH DISPLAY
Screw hole cover Screw hole cover
MODEL WITHOUT DISPLAY
Reversing the door
4. Remove the upper door from the
middle hinge by carefully lifting the
door straight up. Then place the
upper door on a smooth surface with
its upper cover upwards.
6. For the refrigerator is with a display on
door, remove part 1 from the top left side
of upper cover and
take out part 2. Then remove part 3 and
put part 4 into the top right side of upper
cover. Refer to above operation, install
part 3 and part 4 on to the top left side of
upper
cover. Install part 1 of the top right side of
upper cover.
7. Loose screw 3 and take down part 2
and part 1, Install replacement door
stopper-left 4 provided (in the plastic
bag) and part 2 (stop block) to the left
side with screw 3. Keep part 1 with the
appliance for future reference.
16

10. Change screw hole covers on
middle cover plate from left to right
(as shown in figure below).
11. Tip the refrigerator backwards,
remove part 2.
14. Slot the lower door onto the bottom
hinge pin and hold in position. Turn the
middle hinge by 180°, change the
washer on the axis to the lower side,
adjust the middle hinge to the
appropriate position and then install it
ensuring the lower door in secured
place.
15. Move the upper door to an
appropriate position, and then fix part
2 by screws 1. Before fix part 2, pass
connector 3 through hinge 2 refer to
step 3. (Please hold upper door by
hand when installing.)
Lower hinge part (left)
①Lower hinge part (right)
Adjustable bottom feet part
Adjustable bottom feet part
Self-tapping screws
Adjustable bottom feet part
②
③
④
⑤
①
②
③
④
⑤
Note: washer may
stick to lower door. Washer
Reversing the door
9. Place the lower door on a smooth
surface with its panel upwards. Loose
screw 3 and take down part 2 and part 1,
Install replacement door stopper-left 4
provided (in the plastic bag) and part 2
(stop block) to the left side with screw 3 .
Keep part 1 with the appliance for future
reference.
12. Remove part 3 from the lower hinge
pin, loose out the lower hinge pin,
change it to the reverse hole site, and
then tighten into position, then install
part 3 on the lower hinge pin.
13. Replace the items remount instep 11,
change part to left, and then fix them
with screws 4. Install part 2 at last.
17
②Special screws
③Handle
①Handle covers
④Screw hole cover
①Special flange screws
②Upper hinge
MODEL WITHOUT DISPLAY
①Special flange screws
Upper hinge
Electrical connector
②
③
①
②
③-
electrical connector
upper hinge cover
self tapping screw
Reversing the door
MODEL WITH DISPLAY
16. Connect electrical connector 1 as
shown in the picture, then fix part 2 by
screw 3, refer to step 2.
MODEL WITH DISPLAY
17. Open the upper door, mount door
racks and then close it.
Note:
lf your appliance has handle, you have
to reverse handle by following
instructions below.
Remove the upper door and place it on
a smooth surface with its panel
upwards. Lever part 1 and part 4, then
loose screws 2, as shown in the picture.
Change handle 3 to the right side , then
install screws 2, part 1 and part 4 in turn .
18
Table of contents
Other TEKNIX Freezer manuals

TEKNIX
TEKNIX BITK503FF User manual

TEKNIX
TEKNIX THSBS17784X User manual

TEKNIX
TEKNIX FF237FFW User manual

TEKNIX
TEKNIX FF1860W User manual

TEKNIX
TEKNIX CF102W User manual

TEKNIX
TEKNIX UC55F2W User manual

TEKNIX
TEKNIX T55F2W User manual

TEKNIX
TEKNIX BITH50FF User manual

TEKNIX
TEKNIX BITKTFFZ2 User manual

TEKNIX
TEKNIX THSBS1791INX User manual


Popular Freezer manuals by other brands


Frigidaire
Frigidaire FKFU13M2HW - 12.5 cu. Ft. Manual Defrost Upright... Product dimensions

True
True TD-50-18-LT Specifications

Guzzanti
Guzzanti GZ 145 instruction manual

SPX Cooling Technologies
SPX Cooling Technologies Recold JT Series brochure

Electrolux
Electrolux Air-O-Chill 726859 Brochure & specs

Blaupunkt
Blaupunkt 5FG2 Series Instructions for use