TEKNIX FF237FFW User manual
Installation and Operating Instructions
MODELS: FF237FFW – FF237FFB & FF237FFS
55cm FROST FREE COMBI FRIDGE FREEZER
(White model shown)
Please read these instructions carefully before attempting to install or use this appliance.
It is advisable to keep these instructions in a safe place for future reference.
N.B. Should your appliance require attention, our service agents will not be able to book
a service call without your unique serial number which can be found on the last page of
this manual.

1
Introduction
Thank you for choosing this TEKNIX appliance. It has been
designed to give years of trouble-free use provided it is installed and
maintained correctly.
Please read these instructions carefully before installing or using your
appliance. It is advisable to keep your purchase and installation receipts
with these instructions in a safe place for future reference. Included is
some important safety information in addition to guidelines and
recommendations that will enable you to take full advantage of all the
functions available.
This quality appliance has been tested and certified to meet all applicable
UK electrical and safety standards.
This appliance must be installed and connected in accordance with
current regulations by a qualified electrician.
After unpacking the appliance ensure that there is no visible damage.
If the appliance has been damaged during transit, do not use it, contact
your retailer immediately.

2
Your 1 year Manufacturer's guarantee
THIS DOES NOT AFFECT YOUR STATUTORY RIGHTS.
Your new Teknix appliance carries a free guarantee which protects you against the cost of
repairs during the first 12 months from date of purchase provided that:
Any claim is accompanied by evidence of the model reference, model serial number and
proof of purchase, such as a Sales Receipt, showing that the appliance was purchased
within the 12 months prior to the date of claim.
What is not covered under the Guarantee:
Any appliance not correctly installed and operated in accordance with the
manufacturer's instructions.
Any appliance that is used for anything other than domestic purposes.
Any defect caused by accident, misuse, unauthorized modification or inexpert repair.
Cost of Call-out where a fault cannot be found with the appliance.
Cost of Call-out for work covering routine maintenance, such as, but not exclusively,
cleaning of filters or defrosting.
Cost of Call-out for work required to correct the alignment of doors following door
reversal procedures carried out by you.
Use of the appliance by anyone other than the Householder.
Use in any commercial environment.
Consumable items, such as, but not exclusively, fuses in plugs, bulbs and breakable
items which require routine replacement.
Repair costs incurred that have not
been authorised by Repairtech and/or carried out
by a non-approved Repairtech engineer.
YOUR GUARANTEE IS VALID ONLY IN THE UK.
To Register your Appliance simply complete the card in your appliance pack and return it with a
stamp affixed or Alternatively you can Register online at www.repairtechuk.com
SERVICE HELP-LINE
Should your appliance develop a fault, please call the
Repairtech Service Helpline on:
01527-888133
Please remember to have all your product details available, including the model number, serial
number, date of purchase and your retailer’s details before registering a fault.
Your service call cannot progress without this information.
3
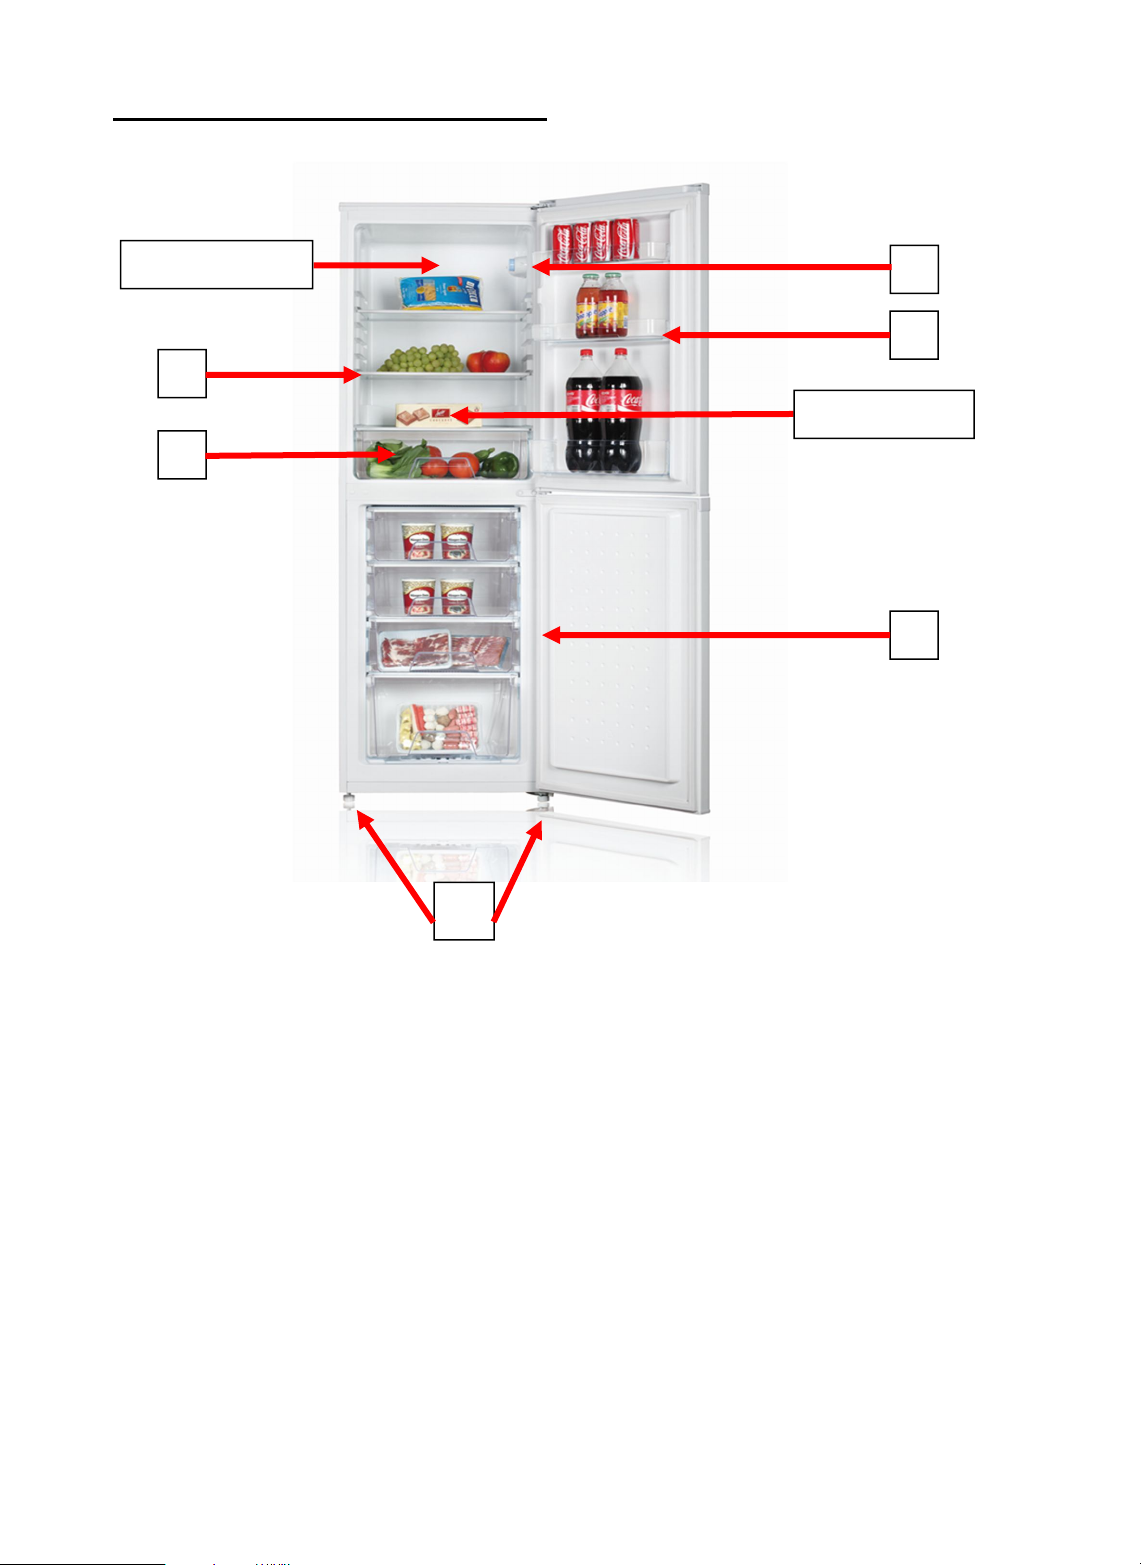
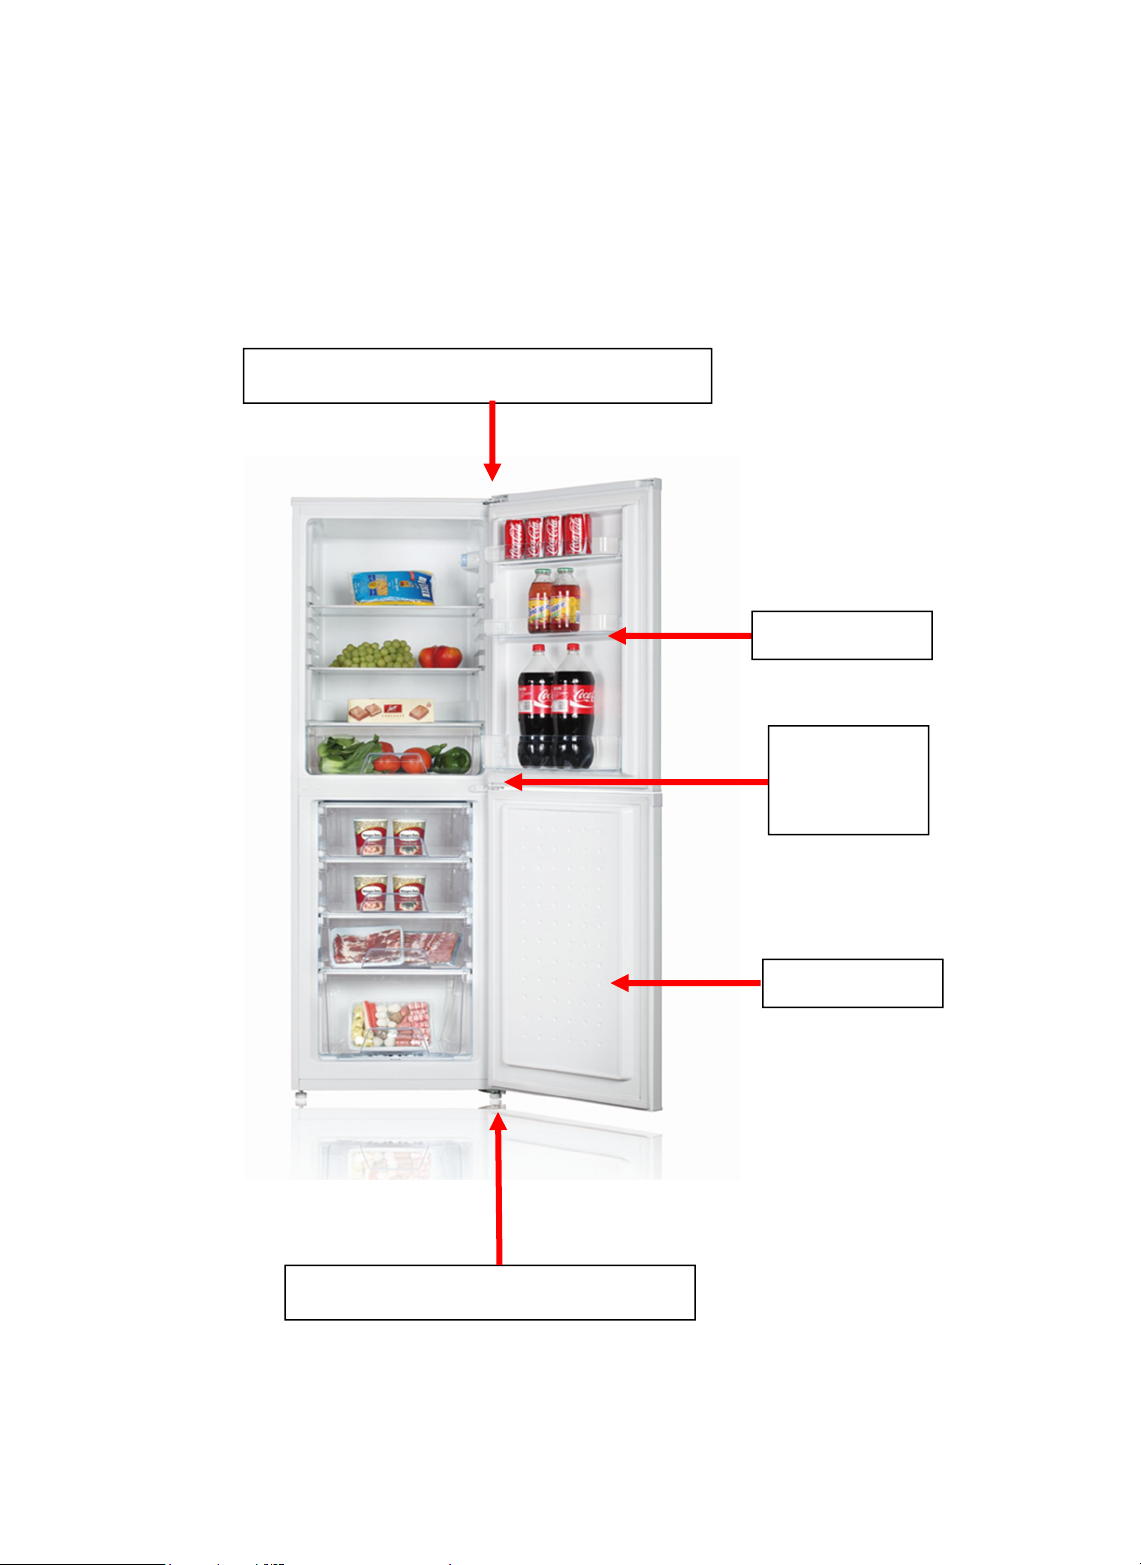
Description of the Appliance
1. Freezer Compartment
2. Thermostat Control & Interior Light
3. Interior Glass Shelves (x 2)
4. Door Storage – Specific Areas for Bottles & Dairy Products
5. Salad Crisper Box with Glass Shelf
6. Two Levelling Feet
Please note that your appliance may be supplied with the doors left or
right hand hinged. To reverse the doors please refer to section 4.6.
(Picture shown for indicative purposes only, model supplied may differ).
1.
2.
3.
4.
5.
6.
Warmest zone
Coldest zone

4
CONTENTS:
Section 1. Installation
Section 2. Safety Advice
Section 3. Operating the Appliance
Section 4. Maintenance

5
Section 1. Installation
IMPORTANT! This appliance must be left to stand in an upright position for at
least 4 hours before being switched on for the first time.
This appliance has been designed for Domestic Use Only.
Remove all packaging and securing tape from the appliance.
Wash the interior of the appliance with luke warm water containing a small
amount of bicarbonate soda (5ml to 0.5 litres of water).
Position the appliance in a dry atmosphere and out of direct sunlight.
Do not position next to a cooker or other sources of heat, i.e. radiator.
This appliance should not be sited in a cold atmosphere, i.e. garage or
shed. Doing so may cause the freezer unit to underfreeze.
If positioned next to another fridge or freezer, leave a minimum gap of 2cm
between the appliances in order to avoid condensation.
A clearance of 50mm should be left above the appliance. If this cannot be
achieved you should ensure a clearance of 25mm is maintained on each side of
the appliance.
Fit the plastic wall spacers to the condenser on the rear of the appliance, this will
ensure an air gap between the appliance and the wall.
Do not place or store heavy items on the top of this appliance.
Ensure that the appliance is positioned on a firm flat floor.
This appliance must be level. Adjust the level by screwing the adjustable feet up
or down (use your fingers or a suitable spanner).
Ensure that the appliance is upright and both feet are in firm contact with the floor
so that the cabinet is stable.
Connect the plug to an adjacent 13amp socket outlet and ensure that the
appliance is not standing on the supply cable.

6
Section 2. Safety Advice
Please read this booklet thoroughly before installing and switching on the
appliance. The manufacturer accepts no responsibility for incorrect installation
and usage.
If this appliance is to replace an old refrigerator with a lock, as a safety measure
break or remove the lock and/or door before disposal.
Your old appliances contain insulation gases and refrigerant that must be
disposed of correctly. Please ensure that the refrigerant circuit is not damaged
before the appliance is taken away for correct disposal in line with current
legislation. If there is any doubt contact your Local Authority for instructions.
This appliance may contain the refrigerant isobutene (R600a). This is a natural gas
with a high level of environmental compatibility; however, caution is required as
isobutene is a flammable gas. It is essential to ensure that refrigerant tubes are not
damaged during transportation and the installation of the appliance. In the event
that the refrigerant circuit is damaged, avoid naked flames or sources of ignition and
ventilate the room in which the appliance is situated.
Do not damage the refrigerant circuit.
The appliance is not intended for use by persons (including children) with
reduced physical, sensory or mental capabilities, or lack of experience
and knowledge, unless they have been given supervision or instruction
concerning the use of the appliance by a person responsible for their
safety. Children should be supervised to ensure that they do not play with
the appliance.
If using an adaptor, this must be used in accordance with the manufacturers
instructions and ensure that the electrical circuit is not overloaded as this could
cause overheating.
Do not twist or bend the cables, and keep them away from hot surfaces.
Do not plug ın or unplug this appliance with wet hands.
Following installation make sure that the power cable is not trapped underneath
the appliance.
Ensure the appliance is left in an upright position for at least 4 hours before you
switch it on.
If the power supply cord is damaged, it must be replaced by the
manufacturer, it’s service agent or similarly qualified persons in order to
avoid a hazard.

7
Section 3. Operating the Appliance
3.1. Switching on the Appliance
Allow the appliance to stand upright for a minimum of 4 hours before you switch it
on.
Plug in the appliance and switch on at the mains supply.
Set the thermostat control to the required setting as detailed in the Temperature
Control section (3.2.).
Leave the appliance for approximately 4 hours for the correct temperature to be
reached.
3.2. Temperature Control
The temperature selector knob is located on the back wall of the refrigerator interior
(see Description of the Appliance on page 2).
Setting “0ff”: Unit Off
Setting “Min”: Unit On – Warmest Temperature
Setting “Med”: Normal Operation (adequate for most situations)
Setting “Max”: Coldest Temperature
Important!
During high ambient temperatures e.g. on hot summer days, it may be necessary to set
the thermostat to the coldest setting (position “Max”). This may cause the compressor
to run continuously in order to maintain a low temperature in the cabinet.
3.3. Storing & Freezing Food in the Freezer
This appliance has a four star freezer that is suitable for the long-term storage of frozen
food items. It can also be used for freezing and storing fresh food items.
You should always follow the storage guidelines printed on each food producers
packaging, however the following information is provided as a general guide for the
maximum storage life of frozen items:
Fresh Meat and Poultry – up to 12 months
Cooked Meats – up to 2 months
Fresh Fish – up to 6 months
Fruit and Vegetables – up to 12 months
Bread and Cakes – up to 6 months

8
3.4. Normal Operating Sounds
You may hear faint gurgling or bubbling sounds when the refrigerant is pumped to the
cooling system and through the coils or tubing at the rear of the appliance. When the
compressor is in operation you may hear a slight whirring sound or pulsating noise. The
thermostat controls the operation of the compressor, and you may hear a slight click as
it cycles in and out.
3.5. Energy Saving Advice
Do not install the appliance close to sources of heat, such as a cooker,
dishwasher or radiator.
Locate the appliance in a cool well-ventilated room and make sure that the air
vents are clear
Try to avoid keeping the doors open for a long time, warm air will enter the
cabinet and may cause a build up of ice as well as affecting the energy
consumption. Ensure there are no obstructions preventing the doors from closing
properly
Ensure that the door seals are clean and there are no tears or splits.
Keep the most perishable foods, (those with a short shelf-life, such as
cooked meats), in the coldest part of the fridge. The Salad Crisper Box is
the warmest part of your fridge and should be used for vegetables, salads and
fruits etc. (see Description of Appliance on Page 2)
Do not overload the fridge: the cooling air that circulates to keep the
fridge cold gets blocked and pockets of warm air form.
Do not put hot food into the fridge or freezer – let it cool down first.
3.6. In the Event of a Power Failure
If there is a power failure, keep the doors closed. When the power has been restored
the appliance will start to operate but it may take some time to achieve the pre-set
operating temperature. Check the condition of your stored food items and liquids.

9
Section 4. Maintenance
Before any maintenance or cleaning work is carried out, DISCONNECT the
appliance from the ELECTRICITY supply.
4.1. Internal Cleaning
Clean the interior and accessories with warm water and bicarbonate of soda (5ml to 0.5
litre of water). Rinse and dry thoroughly. Do not use detergents, abrasive powders,
highly perfumed cleaning products, wax polishes or cleaning products containing bleach
or alcohol.
4.2. External Cleaning
Wash the outer cabinet with warm soapy water. Do NOT use abrasive products. There
may be sharp edges on the underside of the product, so care should be taken when
cleaning. Once or twice a year dust the rear of the appliance and the compressor at the
back of the appliance, with a brush or vacuum cleaner, as an accumulation of dust will
affect the performance of the appliance and cause increased energy consumption.
4.3. Defrosting
This is a Frost Free appliance, so under normal operating conditions you should not
need to de-frost the fridge or freezer unit. However, if you inadvertently leave the
freezer door ajar for long periods frost may build up inside the compartment. If this
happens, please take the following action:
If ice build up in the freezer exceeds 3-5mm, empty the contents and switch off the
appliance, leave the door open and allow the ice to melt. Place the frozen foods items
in a cool-bag or wrap them in thick newspaper. Do not use sharp objects to scrape
the ice away. Clean and dry the interior, close the door and turn on the power to the
appliance. When the power has been restored the appliance will start to operate but it
may take some time to achieve the pre-set operating temperature.
4.4. When the appliance is not in use
When the appliance is not in use for long periods, remove the contents, disconnect
from the electricity supply and clean the appliance, leaving the door ajar until you wish
to use the appliance again.
4.5. Changing the Interior Light
Switch off the power supply to the appliance
Remove the plastic light cover
Remove the bulb from the light unit.
Replace the bulb with a suitable replacement (15W Max)
Refit the cover and switch the appliance back on.
10
4.6. Reversing The Doors
The door opening can be reversed from “right hand hinged” to “left hand hinged” if
required.
Warning! When reversing the door, the appliance must not be connected to the
mains. Remove the plug from the mains beforehand.
Hinge Cover & Upper Hinge Assembly
Middle
Hinge
Assembly
Lower Hinge and Foot Assembly
Fridge Door
Freezer Door

11
Remove the plastic hinge cover.
Remove the screws and upper-hinge assembly then lift and remove the freezer
door away from the middle hinge assembly. Now remove the hinge pin from the
upper hinge, turn the hinge over and refit the pin into the same hole.
Remove the screws and middle hinge assembly then lift the fridge door away
from the lower hinge assembly.
Remove the screws, lower hinge and foot assembly. Now remove the hinge pin
from the lower hinge, turn the hinge over and refit the pin into the same hole.
Remove the left foot and refit on the right-hand side.
Now fit the lower hinge and foot assembly to the left-hand side. Tighten the
screws.
Place the fridge door onto the lower hinge and then refit the middle hinge into the
pre-drilled holes on the left-hand side of the cabinet. Tighten the screws.
Now place the freezer door onto the middle hinge and then refit the upper hinge
into the pre-drilled holes on the left-hand side of the cabinet. Tighten the screws.
Ensure that both doors are correctly aligned and that they seal correctly. If the
doors require further alignment, slacken off the screws, re-align the doors then
tighten the screws.
Now refit the top hinge cover.

12
4.7. What to do if something goes wrong
There is no power to the appliance:
Check there is not a power cut
Check there is power to the electric socket/appliance
Check the fuse in the plug (Must be 13 amp)
Check that the thermostat has been set to position 1 or above (see section 3.2.)
The compressor runs continuously:
Are the doors closed correctly?
Have large quantities of food recently been added to the appliance? – if yes,
allow the interior temperature to recover
Have the appliance doors been opened frequently? – if yes, allow the interior
temperature to recover
Check that the Thermostat Control has not been set to maximum
There is excessive frost/ice build up:
Ensure that the doors have been closed correctly
Ensure that the door seals are clean and sealing correctly
Check that the Thermostat Control has not been set to maximum
The appliance is making a noise:
Refer to Normal Operating Sounds, section 3.4
Ensure that the appliance has been installed correctly (see section 1).
YOUR GUARANTEE IS VALID ONLY IN THE UK.
To Register your Appliance simply complete the card in your appliance pack and return it with a stamp
affixed or Alternatively you can Register online at www.repairtechuk.com
SERVICE HELP-LINE
Should your appliance develop a fault, please call the
Repairtech Service Helpline on:
01527-888133
Please remember to have all your product details available, including the model number, serial number,
date of purchase and your retailer’s details before registering a fault.
Your service call cannot progress without this information.

13
Insurance
!
Any warranty provided with this product
does
not
cover
loss
of
!
fridge/
freezer content
.
Any claim for loss, damage, costs or expenses of an indirect or consequential nature
including any economic loss or damage to foodstuffs or any other goods is excluded.
We recommend that you inspect your fridge/freezer regularly to check that it is working
correctly, losses can result from deterioration following breakdown or accidental failure
of the appliance, fuses, plugs or public electricity supply, these can be covered by your
standard home insurance or might require extra cover. Check with your insurance
provider.
Important Note:
This
appliance is
marked
according
to
the
European
directive
2002/96/EC
on
Waste
Electrical and
Electronic
Equipment
(WEEE).
By
ensuring
this
product
is
disposed
of
correctly,
you
will
help prevent
potential
negative
consequences
for
the
environment
and
human
health,
which
could otherwise
be
caused
by
inappropriate
waste
handling
of
this
product.
The
symbol
on
the
product,
or
on
the
documents
accompanying
the
product,
the
Crossed
Out Wheelie
Bin,
indicates
that
this
appliance may
not
be
treated
as
household
waste. Instead
it
shall
be
handed
over
to
the
applicable
collection
point
for
the
recycling
of
electrical
and electronic
equipment.
Disposal
must
be
carried
out
in
accordance
with
local
environmental
regulations
for
waste
disposal.
For
more
detailed
information
about
treatment,
recovery
and
recycling
of
this product,
please
contact
your
local
authority,
your
household
waste
disposal
service
or
the
retailer
where
you purchased
the
product.
We
continuously
try
to
improve
our
products
for
the
benefit
of
our
customers.
For
this
reason
we
reserve
the
right
to
make
changes
to
any
product
at
any
time,
without
notice
Issue: 03/04-08-2014
This manual suits for next models
2
Other TEKNIX Freezer manuals

TEKNIX
TEKNIX FFH1860X User manual

TEKNIX
TEKNIX CF102W User manual

TEKNIX
TEKNIX BITK503FF User manual

TEKNIX
TEKNIX BITKTFFZ2 User manual

TEKNIX
TEKNIX T60FNF2W User manual

TEKNIX
TEKNIX FFH1825WW User manual

TEKNIX
TEKNIX THSBS17784X User manual

TEKNIX
TEKNIX T55F2W User manual

TEKNIX
TEKNIX UC55F2W User manual

TEKNIX
TEKNIX FF1860W User manual


Popular Freezer manuals by other brands


Caple
Caple RI7305 instruction manual

Tricity Bendix
Tricity Bendix TB 17 TF Operating & installation instructions

Frigidaire
Frigidaire FFU17G9H Factory parts catalog

Whitlenge
Whitlenge CALYPSO 9 Mk 2 Installation & operation instructions

BOMANN
BOMANN GS 7243 instruction manual

Electrolux
Electrolux EFC152NPAW instruction manual


