TeleAdapt RoomCast TA2400 Operator's manual

TeleAdapt Roomcast Installation Guide
TeleAdapt Roomcast TA-2400
Installation and Configuration Guide
Copyright 2016 TeleAdapt Ltd
Revision 2.1 - May 20181 30

TeleAdapt Roomcast Installation Guide
Revision 2.1 - May 20182 30

TeleAdapt Roomcast Installation Guide
Contents
Products Covered By This Guide
Important Safety Instructions
Approval Information
What Is Included In The Box
Preparation For Installation
Installation
Setup Wizard and Cloning
Admin Mode
Common Configurations
Bluetooth Audio and Guest HDMI Passthrough
Pairing Roomcast Remotes
Troubleshooting
Warranty
Legal
Contact Detail!
Revision 2.1 - May 20183 30

TeleAdapt Roomcast Installation Guide
Revision
Date
Changes
1.0
10th November 2016
Initial issue
1.1
31st May 21017
Updated Approval Information. Changed RoomCast to
Roomcast.
1.2
13th July 2017
Additional Approval Information
1.3
28th December 2017
Dial pairing instructions updated
2.0
9th May 2018
Setup wizard, cloning, wireless client and IPTV added.
Additional configuration, feature and troubleshooting
information.
2.1
29th May 2018
Static passcodes added.
Revision 2.1 - May 20184 30
TeleAdapt Roomcast Installation Guide
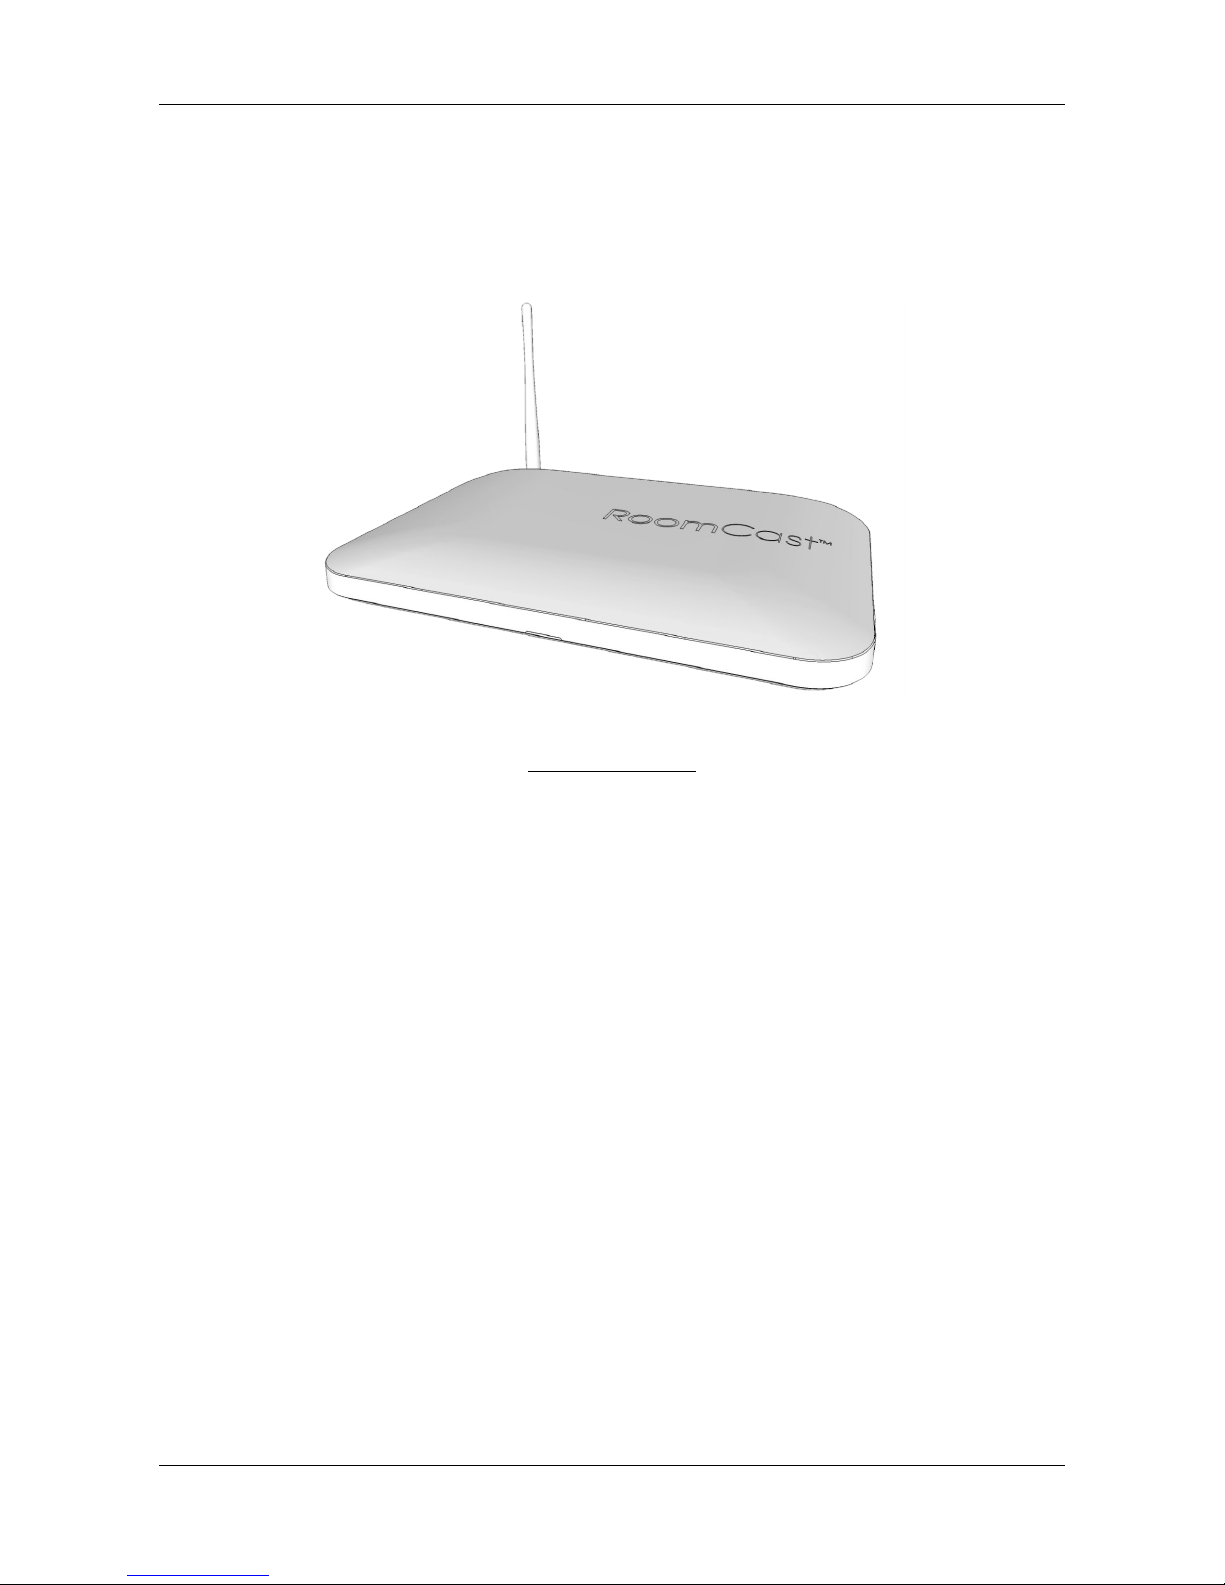
Products Covered By This Guide
This guide covers the TeleAdapt Roomcast, TA-2400. Roomcast brings video and audio streaming to hotel
guest rooms and is based on Google Chromecast technology.
TA-2400 - Roomcast
Revision 2.1 - May 20185 30

TeleAdapt Roomcast Installation Guide
Important Safety Instructions
Read these instructions carefully before attempting any installation. Follow all instructions and
heed all warnings. These instructions should be kept for future reference.
This equipment must be installed in strict accordance with these instructions.
This equipment is designed for indoor use only.
Only use with attachments and accessories as specified by the manufacturer.
The mains plug used to disconnect this equipment from its power source must be readily
accessible at all times.
Ensure the power cord is uncoiled before installation.
Protect the power cord from being walked on or pinched particularly at plugs, convenience
receptacles and the point where they exit from the equipment.
Clean only with a dry cloth.
Refer all servicing to qualified service personnel. Servicing is required when the equipment has
been damaged in any way, for example if the power supply plug or cord is damaged, liquid has
been spilled or objects have fallen into the equipment, the equipment has been exposed to rain
or moisture, does not operate normally or has been dropped or damaged.
Unplug this equipment during lightning storms or when unused for long periods of time.
Do NOT install or use this equipment near water.
Do NOT expose this apparatus to rain or moisture.
Do NOT expose to dripping or splashing. No objects filled with liquid such as vases shall be
placed on the equipment.
Do NOT install near any heat sources such as radiators, convection heaters or other apparatus
such as amplifiers that produce heat.
Revision 2.1 - May 20186 30

TeleAdapt Roomcast Installation Guide
Approval Information
EMC Directive 2014/30/EU
•EN 55022:2010+AC:2011
•EN 55024:2010
•EN 55032:2012+AC:2013
•EN 61000-3-2:2014; EN 61000-3-3:2013
•IEC 61000-4-2 ed2.0 (2008-12);IEC 61000-4-3 ed3.2 Consol. with am1&2 (2010-04) IEC 61000-4-4 ed3.0
(2012-04);IEC 61000-4-5 ed3.0 (2014-05);IEC 61000-4-6 ed4.0 (2013-10) IEC 61000-4-8 ed2.0
(2009-09);IEC 61000-4-11 ed2.0 (2004-03)
RE Directive 2014/53/EU
•ETSI EN 301 489-1 V2.2.0 Draft (2017-03)
•ETSI EN 301 489-17 V3.2.0 Draft (2017-03)
•ETSI EN 300 328 (V2.1.1: 2016)
FCC
•FCC CFR 47 SUBPARTS 15B, 15C
Safety
•UL 60950-1 and CSA C22.2 No. 60950-1-07
•EN 60950
Energy Efficiency
•Level VI!
Revision 2.1 - May 20187 30
TeleAdapt Roomcast Installation Guide
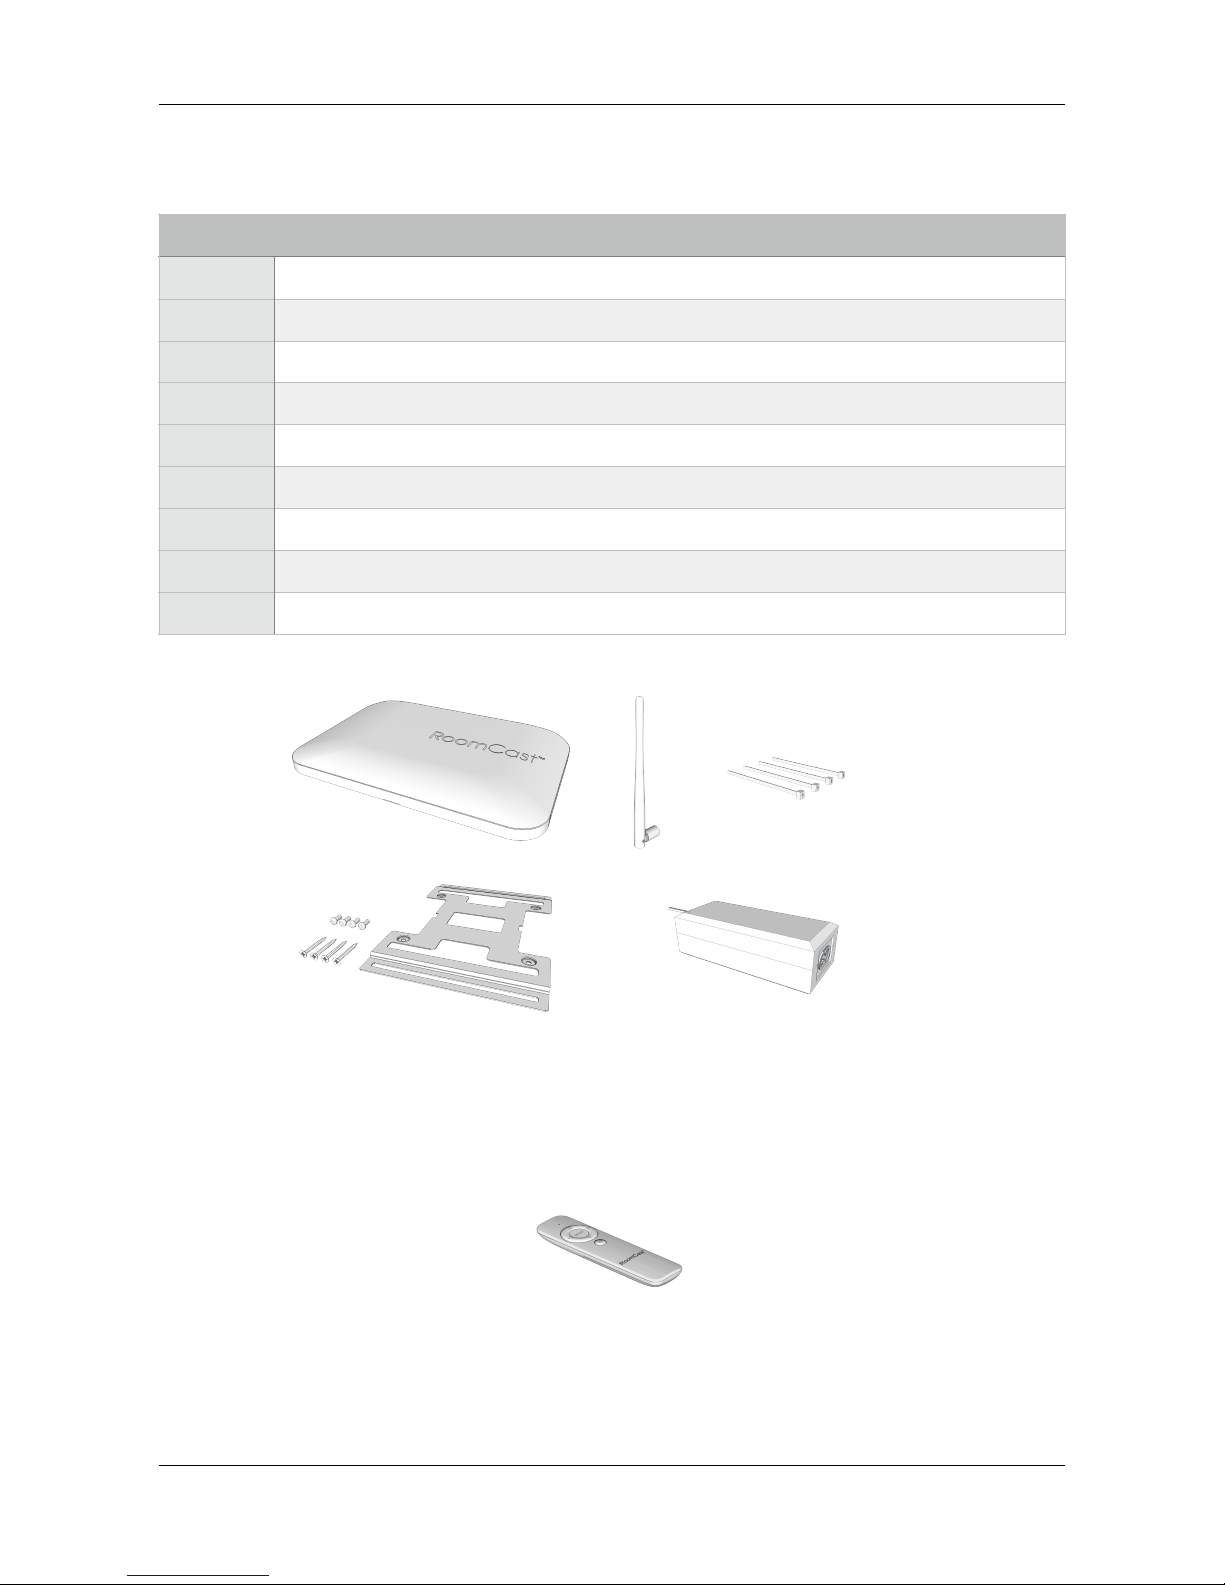
What Is Included In The Box
Depending upon the version of Roomcast ordered there may also be a push-button remote included in the
box. A push-button remote is recommended for installation, these can be supplied separately if required.!
Quantity
Item
1
Roomcast main unit
1
Antenna
1
Wall/under-desk bracket
4
M4 x 5mm screws
4
25mm wood screws
1
PSU
4
Cable ties
1
Velcro adhesive strip
1
Installation guide
Revision 2.1 - May 20188 30
TeleAdapt Roomcast Installation Guide
In addition you will also need :
-an IEC C7 mains cable for your country,
-an HDMI cable,
-an Ethernet cable.
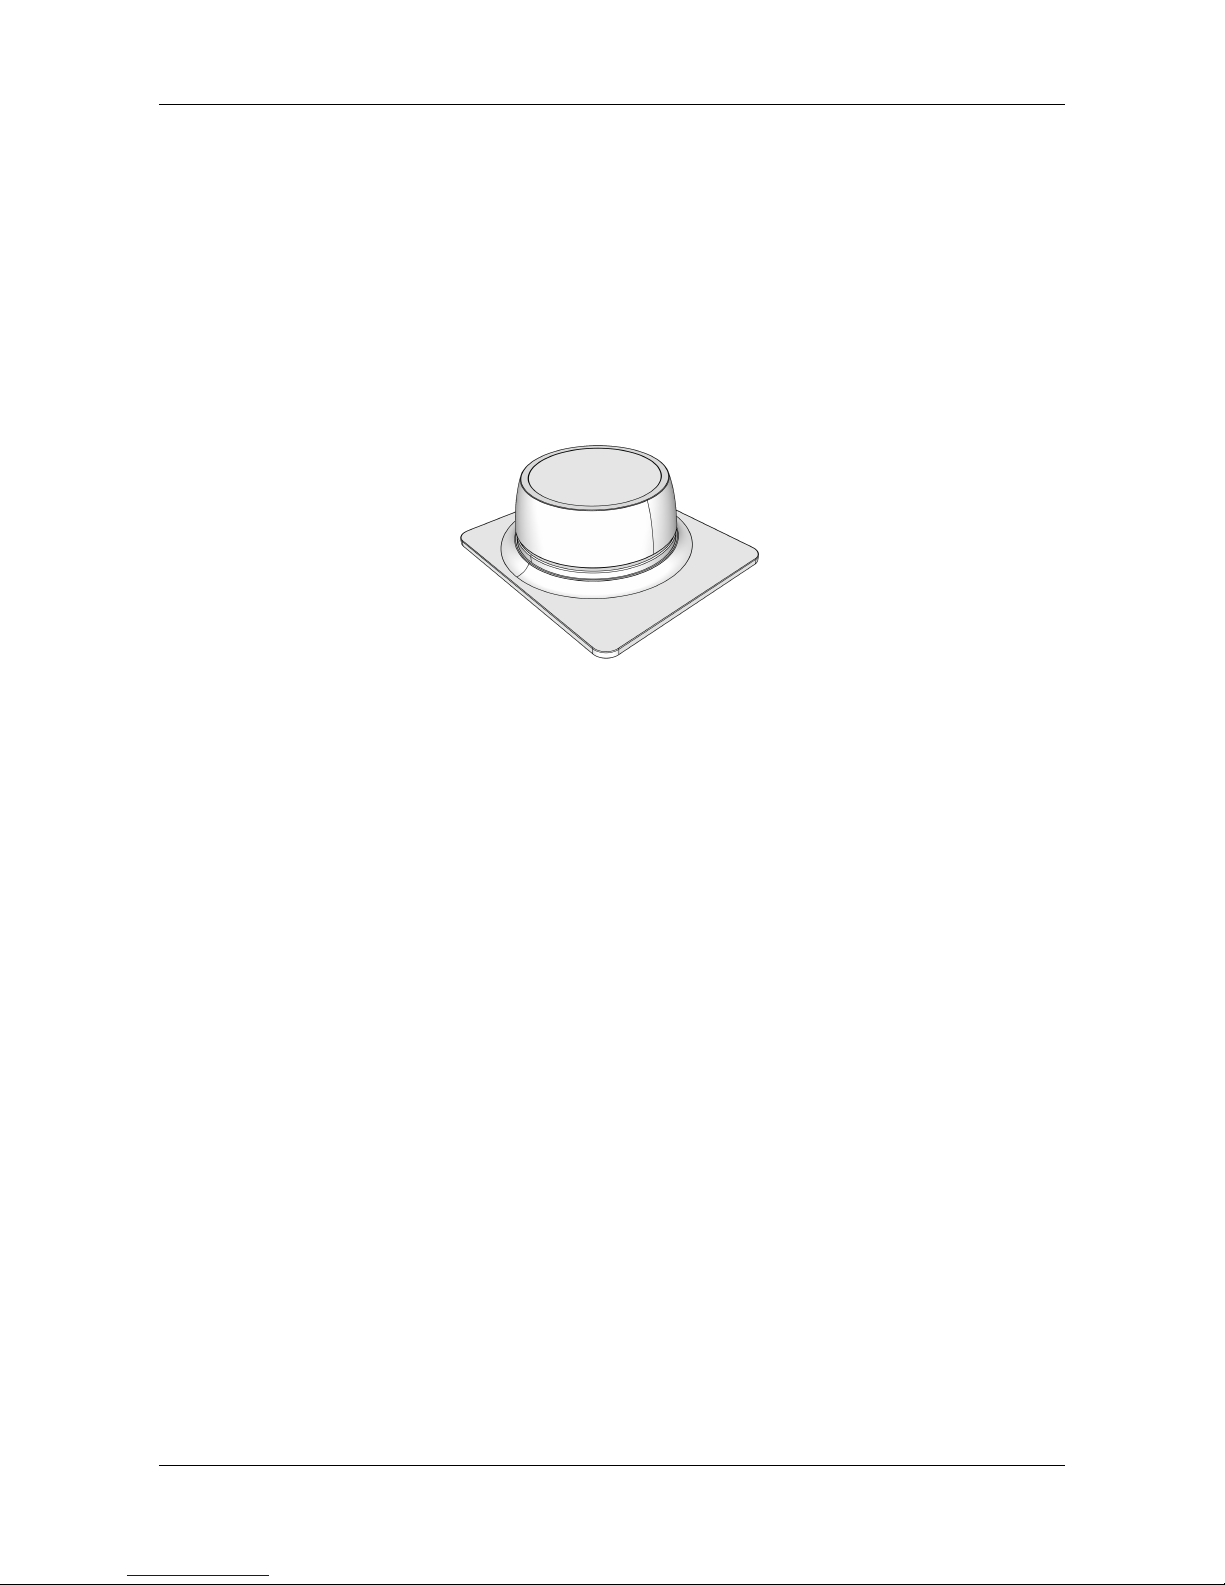
For an improved guest experience there is also an optional Roomcast Dial which can be placed in the
room :
-Roomcast Dial (TA-2402).
Revision 2.1 - May 20189 30
TeleAdapt Roomcast Installation Guide
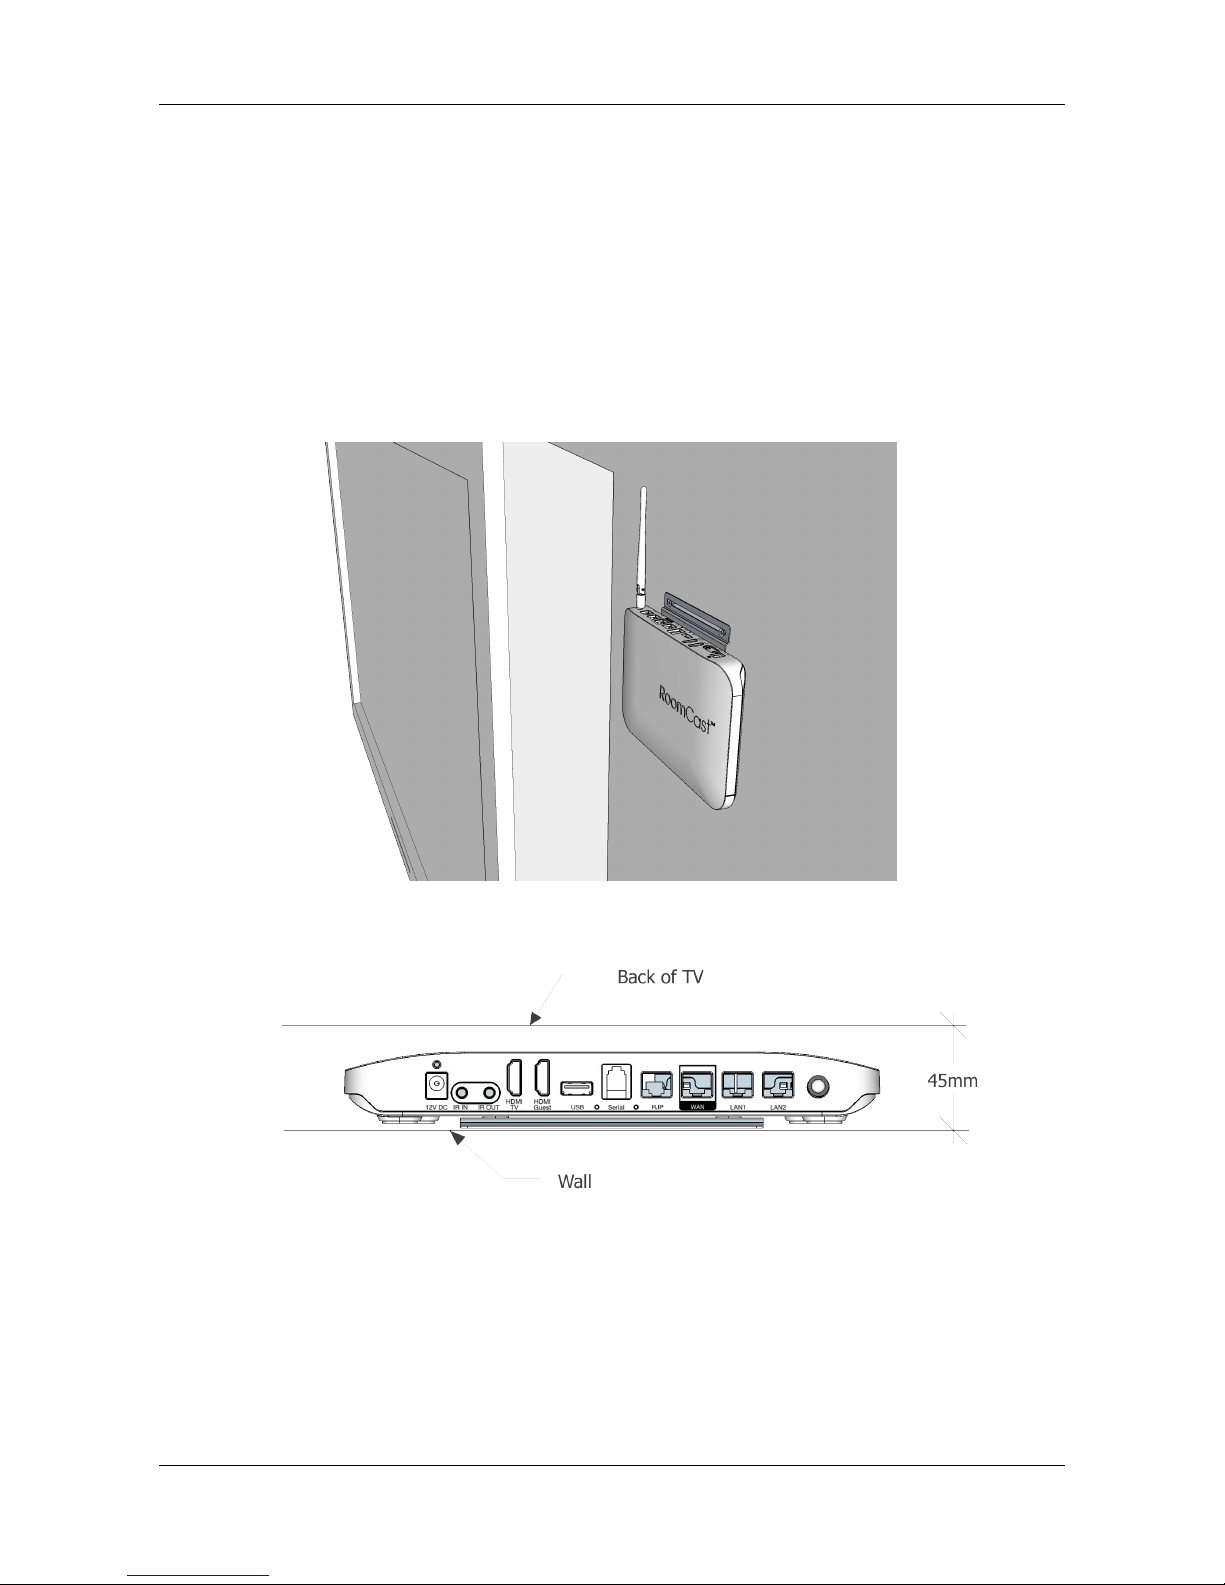
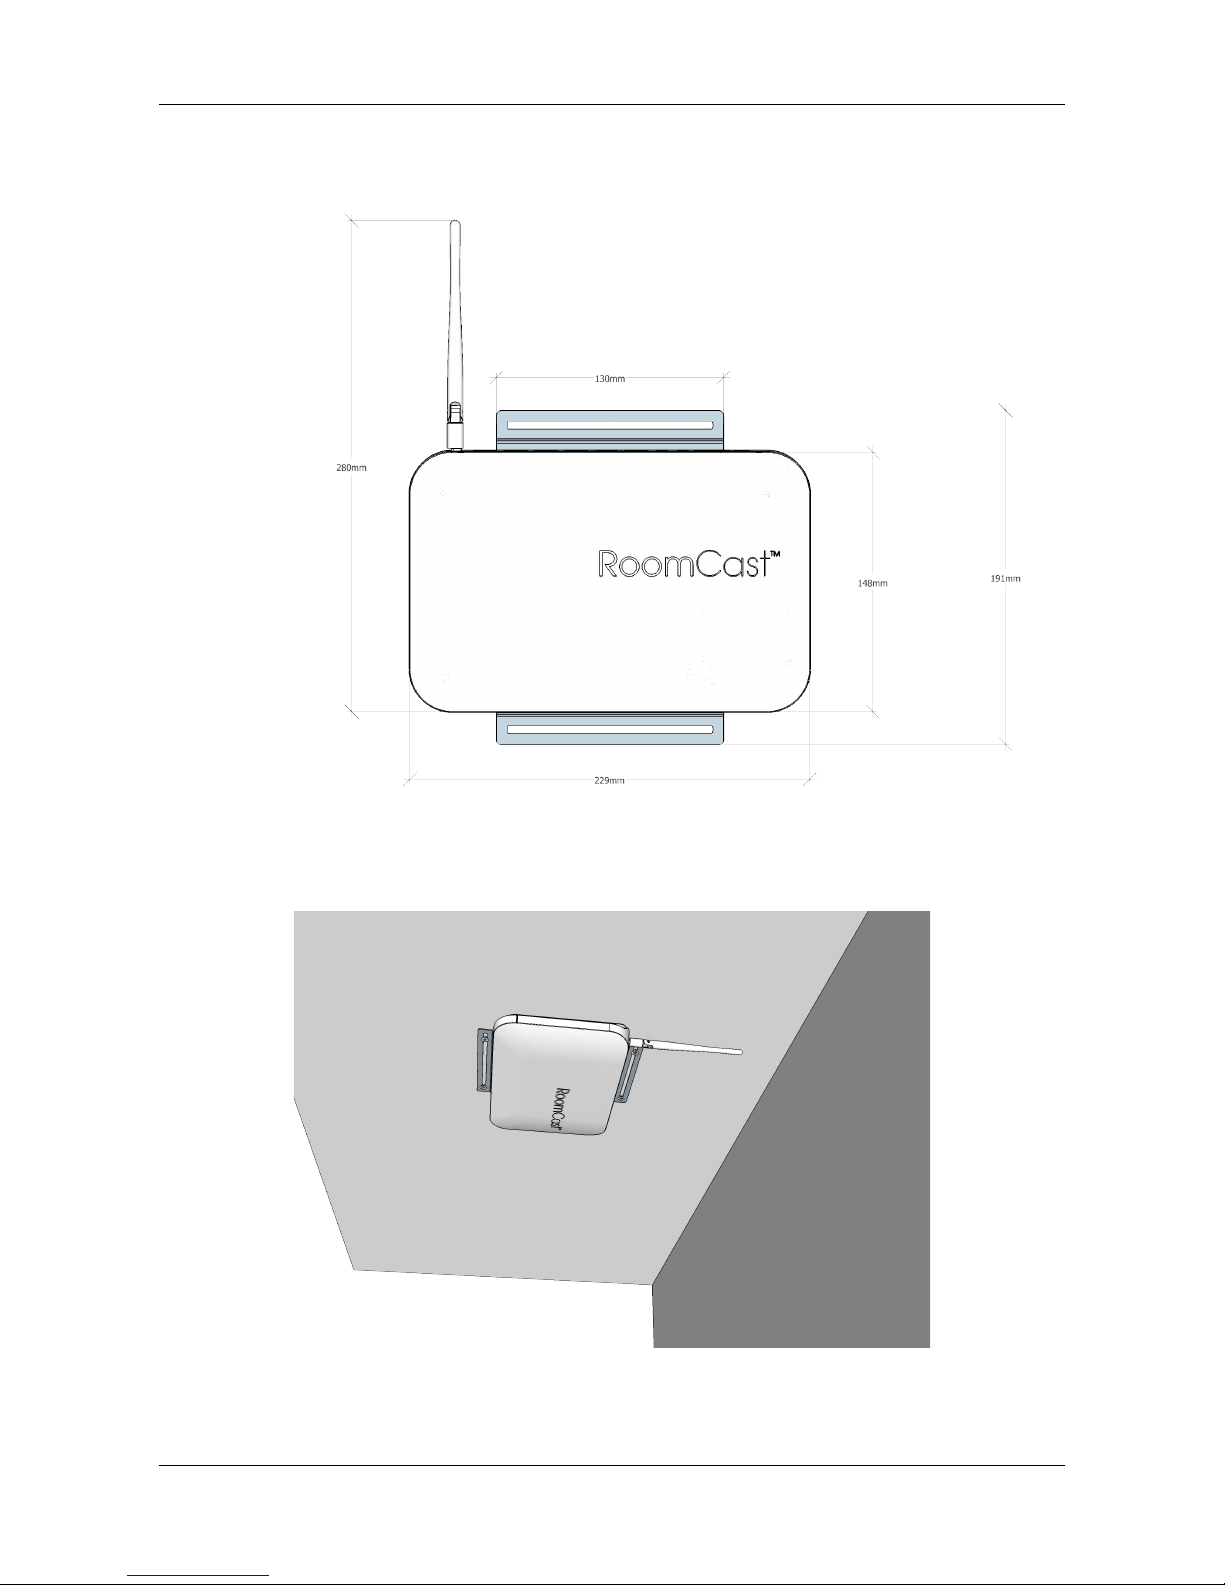
Preparation For Installation
Location
Roomcast can be installed in a range of locations. Typically it would be installed either behind the TV or
under a desk.
If installing behind the TV ensure there is at least 45mm (1.75”) clearance between the wall and the rear of
the TV.!
Revision 2.1 - May 201810 30
TeleAdapt Roomcast Installation Guide
!
Revision 2.1 - May 201811 30

TeleAdapt Roomcast Installation Guide
Services
Roomcast requires :
-a mains outlet,
-an HDMI input on the TV,
-an Ethernet connection with Internet access .
1
If you want to utilise the guest HDMI passthrough feature then you will also need :
-an additional HDMI cable connected to a guest accessible HDMI socket.
Tools
You will need :
-a crosshead screwdriver to attach the bracket to the Roomcast and to attach the bracket to the wall or
under the desk,
-cutters to trim the cable ties.
Additional tools may be required if you need to drill holes in the wall/desk or if you need to remove the TV
from the wall.
Remote
The supplied push-button remote should be pre-paired with the Roomcast. If for any reason this is not the
case or if you have a dial remote then see separate pairing instructions in the Additional Information
section of this guide.
Other connectivity options may be available, please contact TeleAdapt for further information.
1
Revision 2.1 - May 201812 30
TeleAdapt Roomcast Installation Guide
Installation
Before starting the installation make sure you have read and understood the “Important Safety
instructions”.
Step 1
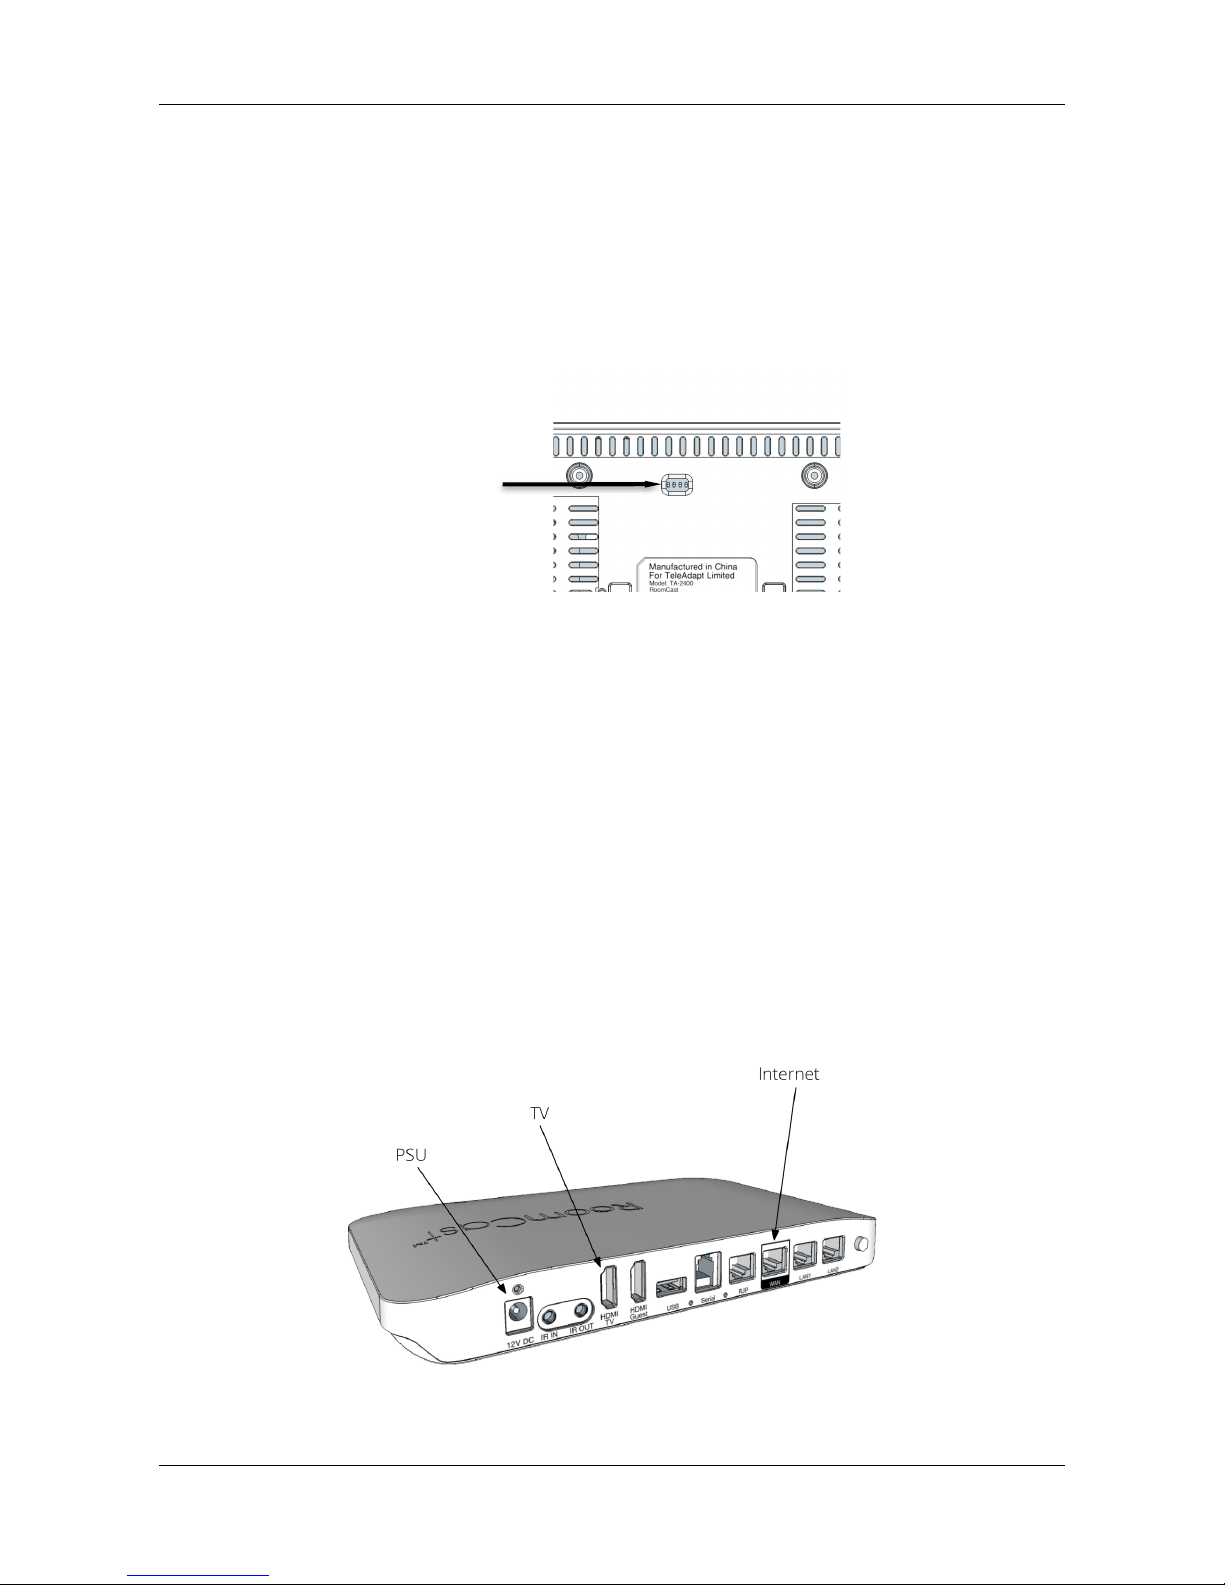
Set the DIP switches. Only SW1 is read by Roomcast.
Step 2
Attach the bracket to the main unit with the 4 M3 screws.
Step 3
Carefully mount bracket and main unit on wall or under the desk using the wood screws provided. You only
need 2 screws to hang the wall mount, however for under-desk use all 4 screws.
Step 4
Locate the power supply using the Velcro adhesive strip.
Step 5
Attach Internet (WAN), TV (HDMI TV) and PSU (12V DC) to the Roomcast.
Revision 2.1 - May 201813 30
SW1 OFF = LED’s disabled
SW1 ON = LED’s enabled

TeleAdapt Roomcast Installation Guide
Step 6
If guest HDMI passthrough is required attach the additional cable from the guest accessible HDMI outlet to
the HDMI Guest port of Roomcast.
Step 7
Tidy up and secure cables with the supplied cable ties.
Step 8
Attach the antenna to the main unit and adjust.
Step 9
Apply mains power to the PSU.
Revision 2.1 - May 201814 30

TeleAdapt Roomcast Installation Guide
Setup Wizard and Cloning
This feature is available in Roomcast software release 4.10 and above only. For earlier software revisions
configuration is via the Admin Mode interface, see the following section for further details.
The Roomcast Setup Wizard is designed to minimise the time taken to install Roomcast. The Setup Wizard
runs only once, on initial startup.
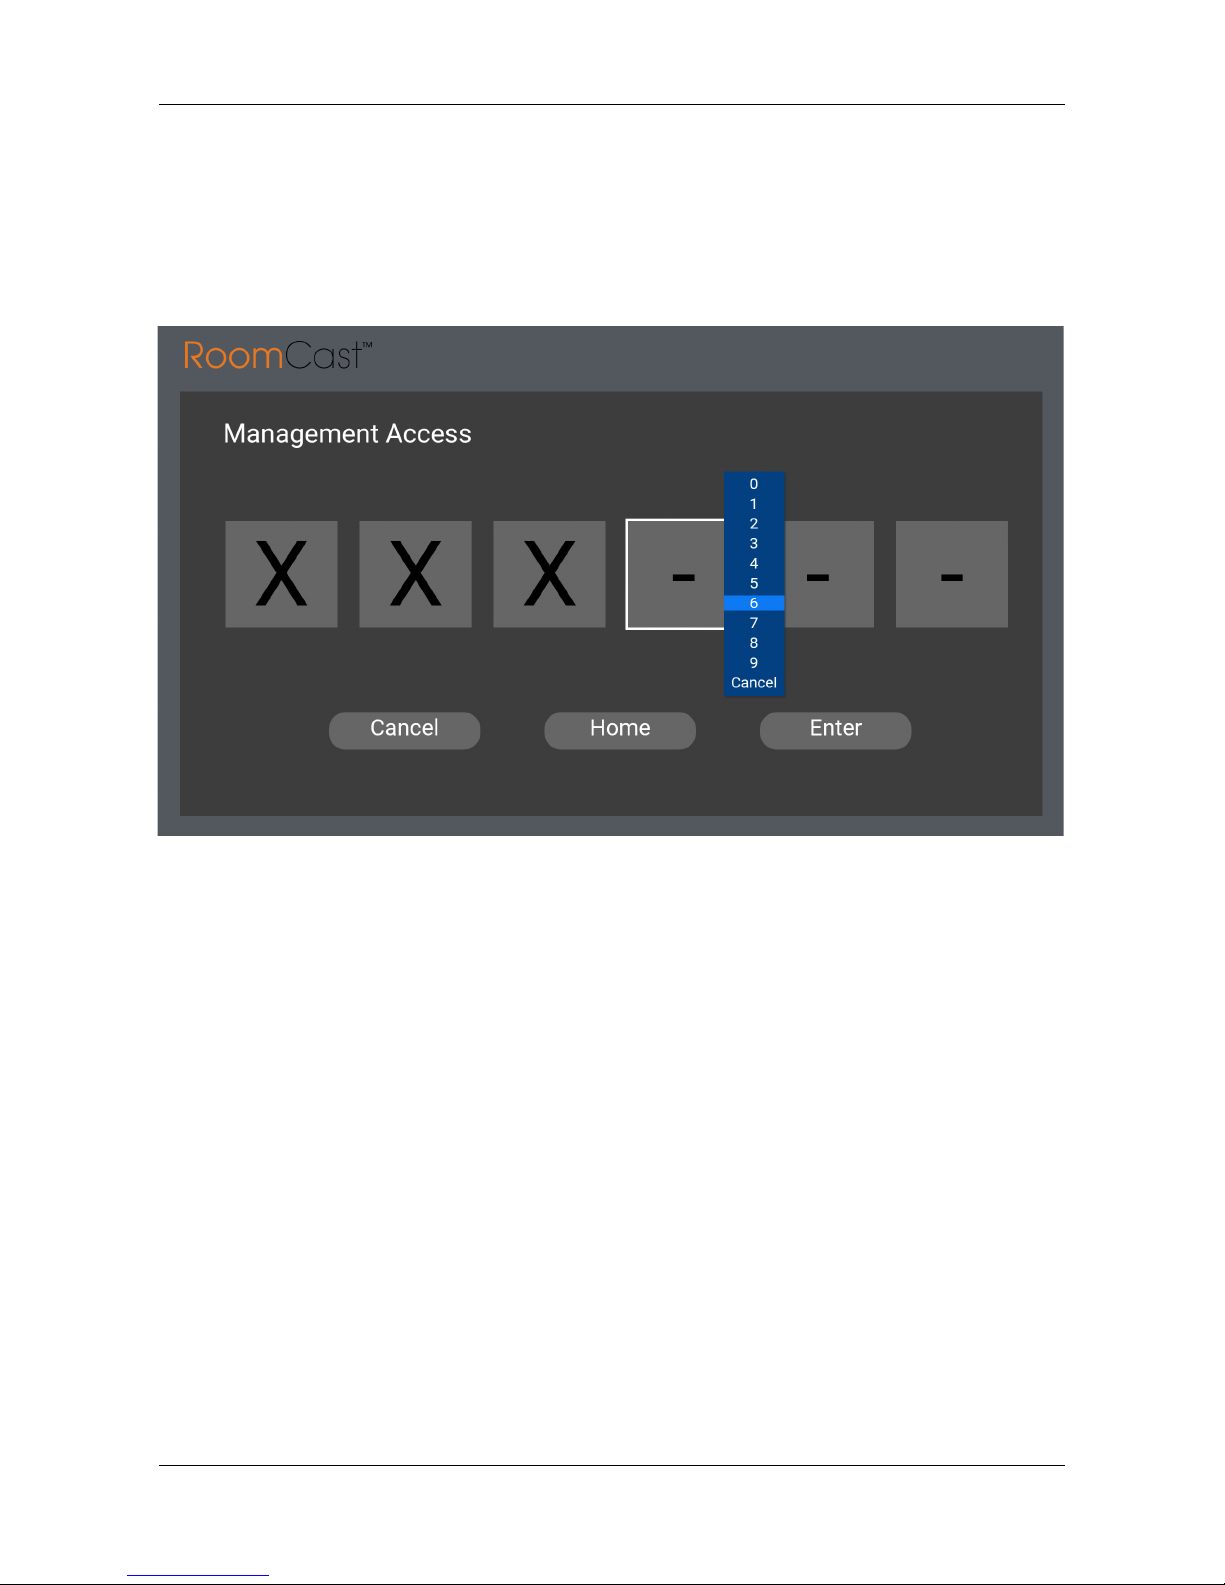
You will be prompted for a system ID. If you have not been given a system ID then use the default which is
“999998”. If you have been given a system ID then you should also have a PIN code, you will need to enter
both system ID and PIN to proceed.
The Setup Wizard steps through the key configuration parameters for Roomcast. In a typical installation
many of these parameters will be constant across multiple units, these parameters can be pre-defined in a
clone file called “RC_Configuration.json” which is placed on a USB drive that the setup wizard reads. Setup
Wizard only prompts for parameters not specified in the “RC_Configuration.json” file.
Before the Setup Wizard applies any changes it will show a summary configuration and ask for
confirmation. The settings are then applied and Roomcast will display the initial Guest UI.
Clone file - RC_Configuration.json
To simplify generation of the RC_Configuration.json clone file, use a web browser and enter the URL http://
rc.teleadapt.com/custom/config. Set the default values you require using the web form, any parameters you
leave unspecified will be omitted from the generated file and the Setup Wizard will prompt you for missing
settings when it runs. Use of RC_Configuration.json is not mandatory, however it is recommended to use it
to set parameters that are constant across a large number of rooms.
If for any reason you need to manually edit the RC_Configuration.json file then you must use a plain text
editor like UltraEdit, BBEdit or Atom. Using a rich text editor or word processing software will corrupt the
file.
The name/value pairs used in RC_Configuration.json are also case sensitive and only certain well defined
values are allowed. For this reason the web tool is recommended.
An example RC_Configuration.json file is shown below:
{
"time_zone":"Chicago",
"topology":"in_room_pan",
"wan_ip_assign":"dynamic",
"auto_update":"enabled",
"auto_update_time": "23:00",
"room_prefix":"RM",
"idle_timeout":"3mins",
"checkout_time":"13:00",
"method":"HDMI-CEC"
}
Contact TeleAdapt for further information.!
Revision 2.1 - May 201815 30

TeleAdapt Roomcast Installation Guide
Static Passcodes - RC_Passcodes.json
By default Roomcast will generate WiFi passcodes dynamically. From Roomcast software revision 4.20
however it is also possible for passcodes to be statically assigned to rooms, that is each room has a unique
passcode, but that passcode never changes for that room.
To assign static passcodes, ensure the RC_Configuration.json file specifies “passcode_type” as “static” and
“passcode_file” as “true”. The file “RC_Passcodes.json” is used to assign passcodes to rooms and should be
created using a plain text editor like UltraEdit, BBEdit or Atom. Using a rich text editor or word processing
software will not produce a file in the correct format.
An example RC_Passcodes.json file is shown below:
{
"passcode_array": [
["1001", "Raleigh21"],
["1002", "Fresno18"],
["1003", "Bicycle33"],
["1004", "Charger56"],
["1005", "Yellow43"]
]
}
Passcodes should be at least 8 characters long but no longer than 32 characters, you can use special
characters. However it is recommended to use passcodes that don’t exceed 12 characters, for simplicity
use familiar words with a numeric element.
The Setup Wizard will use the room number you enter to assign the appropriate passcode to the unit.
If “passcode_type” is set as “static” and “passcode_file” is set as “false”, then Setup Wizard will prompt you to
enter the passcode instead.
Running the setup wizard
1. If you plan to use an RC_Configuration.json clone file or the RC_Passcodes.json file then you will need a
USB drive with a folder named “Roomcast” in the root directory. It is recommended to use a separate
USB drive to the one used to install the UI update file to avoid being prompted to apply the UI update
twice.
a. Copy the previously generated RC_Configuration.json file and/or RC_Passcode.json file to the
‘Roomcast” folder on the USB drive, there should be no other files in this folder.
b. Ensure Roomcast is powered offand insert the USB drive in the USB socket on the rear of
RoomCast.
2. Power on Roomcast and after a while you see the setup wizard start screen, press “Select” on the
Roomcast remote to start the setup wizard.
3. Once you press ‘Select’ on the Roomcast remote you will be asked for a system ID. If you are not
assigned a unique system ID then the default of 999998 should be used.
4. If you have been assigned a unique system ID then you should also have been given a PIN code. Enter
the unique system ID and PIN code.
Revision 2.1 - May 201816 30

TeleAdapt Roomcast Installation Guide
5. If a valid configuration file is found on a USB drive, then the default settings will be displayed. Select
“Yes” to continue if these settings are correct.
6. The Setup Wizard will now request you set any parameters it does not already have values for.
Revision 2.1 - May 201817 30

TeleAdapt Roomcast Installation Guide
7. On completion you will again be shown a summary configuration.
8. If the configuration is correct select “Apply Changes”, you will be asked to confirm application of the
configuration. Select “Yes” to proceed.
9. The settings will be applied. If you have made any network settings changes you will see a screen saying
“Network Setting” - this process can take a minute or so.
Revision 2.1 - May 201818 30

TeleAdapt Roomcast Installation Guide
10. Remove the USB drive if used.
Forcing the setup wizard to run
If for any reason you need to re-run the Setup Wizard it will be necessary to reset the Setup Wizard has-run
flag. To do this go to the feedback screens and select “Whatever”. Now press the down arrow key on the
Roomcast remote 10 times. You will see a message that the Setup Wizard is reset. Re-power the Roomcast
and the Setup Wizard will be run.!
Revision 2.1 - May 201819 30
TeleAdapt Roomcast Installation Guide
Admin Mode
If you are unable to use the Setup Wizard or for other configuration tasks then use Admin mode. To access
Admin mode go About/Feedback and select feedback level “Struggled” twice within 20 seconds. You will be
presented with a screen requesting a PIN code. The default PIN code for Admin access is 843646.
Revision 2.1 - May 201820 30
Other manuals for RoomCast TA2400
1
Table of contents


