Opticum HD X405 COMBO User manual

1

2
Safety Precaution
This STB has been designed and manufactured to satisfy the
international safety standards. Please read the following safety
precautions carefully before operating this receiver.
Before operating, please check the units operating voltage is 90~250V
AC 50/60Hz.
Do not overload a wall outlet, extension cord or adapter, neither use
damaged power cord or touch it with wet hand as this may result in
electric shock.
The receiver shall not be exposed to dripping or splashing water, and
that no objects filled with liquids, such as base, shall be placed on the
apparatus.
Keep the slots on top of the receiver uncover to allow sufficient airflow
to the unit. Do not put the receiver on soft furnishings or carpets. Do
not expose the receiver to direct light or do not place it near a heater or
in humid conditions. Do not stack other electronic equipments on top of
the receiver.
Plug out the receiver from the wall outlet before cleaning. Clean the
receiver by a soft cloth or mild solution of washing-up liquid (no
solvents).
Disconnect the receiver from the mains when you connect it to satellite
LNB or disconnect it from LNB. Failure would possibly cause damage
to the LNB.
Put the receiver indoor in order to avoid lightening, raining or sunlight.
Do not remove the cover, to reduce the risk of electric shock. Contact
qualified and licensed service personnel to repair the receiver, or
contact your dealer.

3
Content
I. Reference..................................................................................................5
1.1 General Features ............................................................................5
1.2 Accessories.....................................................................................5
II.Product Overview.....................................................................................5
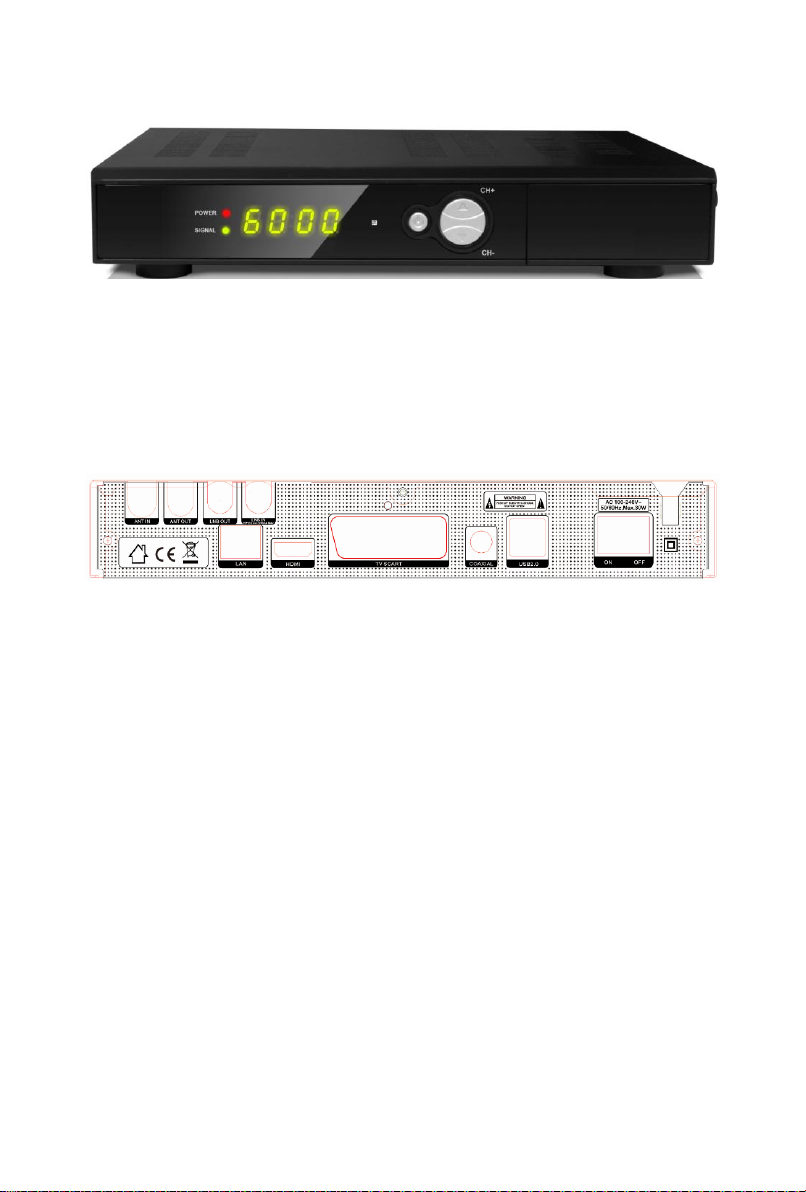
2.1.Front Panel.....................................................................................5
2.2 Rear Panel......................................................................................6
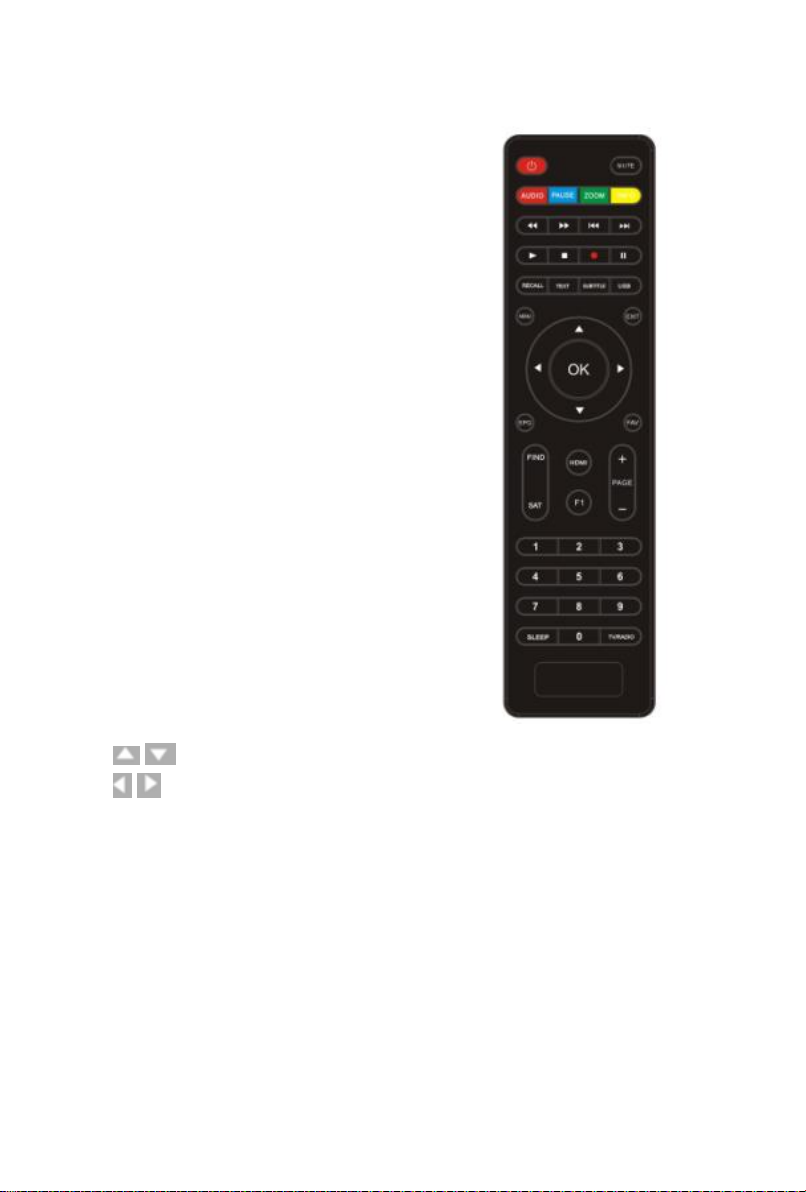
2.3 Remote Control Unit (RCU)..........................................................6
III. Installation..............................................................................................8
3.1 Powering On ..................................................................................8
3.2 Antenna Setting for Satellite ..........................................................8
3.3 Antenna Setting for Motor .............................................................9
3.4 Search Channels from Terrestrial.................................................10
IV. Basic Operation....................................................................................10
4.1 Audio............................................................................................10
4.2 EPG..............................................................................................10
4.3 Subtitle.........................................................................................10
4.4 Teletext.........................................................................................11
4.5 Timer............................................................................................11
4.6 Sleep.............................................................................................12
V. Channel Manager...................................................................................12
5.1 Edit Channels...............................................................................12
5.2 Edit Favorite.................................................................................12
5.3 Sort Channels...............................................................................13
5.4 Delete Satellite channels..............................................................13
5.5 Factory Default ............................................................................13
VI. Channel List.........................................................................................13
6.1 OK List.........................................................................................13
6.2 Favorite List.................................................................................14
VII. Preferences .........................................................................................14

4
7.1 System Setting .............................................................................14
7.2 OSD Setting.................................................................................15
7.3AV Setting....................................................................................15
7.4 Video Settings..............................................................................15
7.5 Parental control ........................................................................16
7.6 About STB ...........................................................................................16
VIII. USB Control......................................................................................16
8.1 Play Files......................................................................................16
8.1.1 Music.................................................................................16
8.1.2 Picture...............................................................................16
8.1.3 Movie................................................................................17
8.1.4 Play List ............................................................................17
8.2 Recording and Timeshift..............................................................17
8.2.1 Recording..........................................................................17
8.2.2 Timeshift ...........................................................................18
IX. Network...............................................................................................18
9.1Network Settings...........................................................................18
9.2 Network Application....................................................................18
X. Additional Information..........................................................................18
10.1 Trouble Shooting........................................................................18

5
I. Reference
1.1 General Features
DVB-S/DVB-S2+DVB-T2 Satellite Compliant (MPEG-II/ MPEG-IV/ H.264)
SCPC & MCPC receivable from Ku and C band satellites
Universal, Single, Single S & C Band Wideband LNB
Sensitive Tuner with Loop-Through
DiSEqC1.0/1.1/1.2/1.3 (USALS)
Blind search supported
Auto DiSEqC Search
PAL/NTSC/SECAM Conversion
True full Color (32 bits) on screen display (OSD)
Storing memory: 100 satellite, 4000 transponders and 10000 channels
8 favorite groups and parental lock supported
Multi-language menu supported
Multi-language audio supported
Multi-language DVB Subtitle output
7 days Electronic Program Guide (EPG)
Teletext output through VBI and OSD
Multi-Picture supported
USB 2.0 Interface
1.2 Accessories
Users manual/Remote Control Unit/Batteries/HDMI Cable/Adapter
II.Product Overview
2.1.Front Panel

6
1.Power LED:Power LED
2.Signal LED: Signal LED
3.Power button:Switch between operation and standby modes .
4.CH-/CH+ button:Change programme.
2.2 Rear Panel
1. ANTANNA IN: Connect a terrestrial antenna cable.
2. ANTANNA OUT: Connect another receiver.
3. LNB IN: Connect the satellite antenna cable.
4. LNB OUT: Connect another receiver.
5.LAN:Connect to the internet using an Ethernet cable.
6.HDMI:Connect to the TV using an HDMI cable.
7.TV SCART:Connect to the TV using SCART cable.
8. COAXIAL: Digital Audio output.
9.USB 2.0:One USB Host Port.
10.ON/OFF:Power on / off.
2.3 Remote Control Unit (RCU)
You can control this receiver by this remote controller with full function.
1. POWER: Switch between operation and standby modes.
2. MUTE: Mute audio.
3. AUDIO: Display the audio list.
4. PAUSE: Freeze the picture.

7
5. ZOOM: Picture zooming function.
6. INFO: Display the programme
information.
7.◄◄:Fast rewind.
8.►►: Fast forward.
9. I◄◄: Previous.
10. ►►I: Next.
11. ►: Play.
12. ■ : stop.
13.●: Record.
14. I I: Pause/Time shift.
15. RECALL: Show the previous viewed
channels list. Or switch to the previous
viewed channel.
16.TEXT:Display the teletext.
17.SUBTITLE: Display the subtitle
language list.
18.USB:Enter USB menu.
19. MENU: Activate main menu or exit to
live channel.
20. EXIT: Exit current menu step by step.
21./ :Change programme.
22./ :Change volume.
23. OK: Confirm the selected operation or display the channel list while
watching a programme.
24. EPG: Display the programme guide.
25. FAV: Display favorite channel list you set before.
26. FIND: Quickly find channels.
27. SAT: Show the scanned satellite list.
28.HDMI:Switch HDMI Mode
29.F1: Accessorial function.

8
30. Page+/-: Page up/down on menu.
31. NUMERIC KEY (0~9): Enter a TV/radio channel number, menu
option number.
32.Sleep:Set sleep timer.
33. TV/RADIO: Switch between TV and RADIO.
III. Installation
You should install the receiver when powering on your product for the
first time after purchase.
Tip: The default password is 0000. If you have forgotten your password,
please contact your local product distributor.
3.1 Powering On
1.Connect the power cord of the product to a wall outlet.
2.Ensure the ON/OFF switch at the rear of the product is switched to
ON.
3.Power on by pressing the POWER button on the remote control or the
STANDBY button at the front of the product.
3.2 Antenna Setting for Satellite
Antenna Setting allows you to
configure the antenna setting
parameters. Menu->INSTALLATION
-> Antenna Setting
In this menu, while the cursor is
highlight the Satellite option, press
the OK button can display the help
menu to Select, Add, Delete, Move
or Rename the satellite. While the
cursor is highlight the Transponder option, press the OK button can

9
display the help menu to Select, Add, Delete or edit the transponder.
3.3 Antenna Setting for Motor
Menu->INSTALLATION ->Motor Mode->DiSEqC1.2&USALS
Move the cursor to Motor Mode, Select DiSEqC 1.2 or USALS using
the VOL+/VOL- button.
DiSEqC 1.2: General motor antenna using DiSEqC 1.2.
USALS: Motor antenna using USALS.
1. Position auto: Press the VOL+/VOL- button, the motor will drive
automatically until it gets the signal.
2. Continuously move: The motor can drive only when you hold on
pressing the VOL+/VOL- button.
3.Move steps: Input the number to set the driving step and press the
VOL+/VOL- button, the motor will drive several steps.
4. Limit set: You can set the maximum motor limit for both East and
West to prevent damage to the antenna. When you set Disable the
Motor limit setting is released.
5. Command Type:
A). Save Position: Save current position of Motor.
B). Go to Position: Drive Motor to the position which you saved
previous.
C). Go to Reference: Drive Motor to zero point.
D). Go to XX: Drive
Motor according to USALS
Setup
Menu->Installation->Motor
Mode
If you set the Motor Mode to
USALS, you need set the
longitude and the latitude in

10
USALS Setup.
3.4 Search Channels from Terrestrial
1. Auto search:Menu->Installation ->Terrestrial->Auto search
It will go to search automatically and save the found channels when the search
is completed.
2. Manual Search: Menu->Installation ->Terrestrial->Manual search
Highlight the transponder and press the OK button. Press the BLUE button to
start search.
3.Area configuration:Menu->Installation ->Terrestrial->Area configuration
You can select different countries to search.
Tip: You can select multi transponders to search at the same time. And you can execute Delete,
Add or Edit PID functions according to the help information.
IV. Basic Operation
4.1 Audio
You can select the language you prefer in Audio if the current
programme is available in multiple audio languages.
1. Press the AUDIO button.
2. Press the OK button to select the audio language you prefer.
3. Select audio direction (Left, Right, Stereo) using the VOL+/VOL-
button.
4. Press the EXIT button to close.
4.2 EPG
You can view the EPG information of all channels in time and date
order.
1. Press the EPG button.
2. Press the RED button to switch EPG mode between Weekly EPG
and Daily EPG.
4.3 Subtitle
You can select the language for the subtitle if the programme provides

11
subtitle information.
1. Press the SUB button and press the VOL+/VOL- change to the
subtitle mode.
2. Select the required subtitle language and press the OK button.
The subtitle will be displayed in the selected language at the bottom of
the screen.
4.4 Teletext
You can view the teletext information of this programme.
1. Press the TXT button.
2. Press the CH+/CH- button to page up or page down.
3. Press the NUMERIC(0-9) buttons can go to the designated page
directly.
4. Press the color button
can back to the previous
page.
5. Press the VOL+/VOL-
button to change the
sub-page of this page.
4.5 Timer
You can set 32 timer events.
It will record or play the
program automatically according to the timer event list that you set.
1.Go to Menu->TIMER ADJUST->Event Timer.
2. Press the GREEN button to setup a timer, and press the OK button
to save the timer after setup.
Source: Switch TV and radio.
Channel: Press the VOL+/VOL- button to display the channel list and
press the OK button to select the channel.
Date: Input the date of the timer.

12
Start: Input the start time of the timer.
Stop: Input the stop time of the timer.
Repeat: Select the repeat times of the timer. (one time/every day/one
week/from Monday to Friday/from Saturday to Sunday).
Record: To set if you want to record the timer.
STB Off: Set YES, the receiver will go to standby mode after the timer,
set NO it won’t be standby.
3. In Event Timer menu, highlight one event, press the RED button will
cancel this timer and press the YELLOW button can go to edit this
timer.
4.6 Sleep
You can set the automatic turn off time.
1. Go to Menu->TIMER ADJUST->Sleep Timer.
2. Press the OK button and then press the VOL+/VOL- button to select
the option or input the number at “ -- Min”option.
3. Press the OK button to save.
V. Channel Manager
5.1 Edit Channels
Menu->CHANNEL MANAGER ->Edit Channels
In this menu, press the CH+/- button can change the channel, press the
VOL+/- button can change the function, and automatic play the
highlighted channel.
Edit Channels enables you to delete, rename, move or lock/unlock the
channels in the channel list conveniently.
5.2 Edit Favorite
Menu->CHANNEL MANAGER->Edit Favorite
In this menu, press the CH+/- button can change programme, press the

13
VOL+/- button can change the favorite group , and press the OK button
can set favor.
5.3 Sort Channels
You can sort the channels list.
Menu->CHANNEL MANAGER->Sort Channels
Highlight the option you want and press the OK button to sort the
channel list.
Note: The Original Channel List is back to the channel list you sort it
first time.
5.4 Delete Satellite channels
You can delete all channels of one satellite.
Menu-> CHANNEL MANAGER ->Delete Satellite Channels
1. Highlight the satellite you want to delete.
2. Press the OK button.
3. Select Yes will execute it.
5.5 Factory Default
You can restore the product to the factory default and you can also
setup it according to the wizard.
1. Menu->CHANNEL MANAGER->Factory Default
2. Input the password.
3. Highlight the option you want and press the OK button to execute
it.
VI. Channel List
This chapter will help you manipulate the channel list.
6.1 OK List

14
1) Press the OK button to enter the channel list while watching a
programme.
2) Press the RED button to display the satellite list.
3) Press the GREEN button to find the programme.
4) Press the YELLOW button can help you quickly find the channel
according to the alphabet.
5) Press the BLUE button to edit the programme.
6.2 Favorite List
If you have set several favorite lists, press the FAV button can enter
the all channels list first then press the VOL+/VOL- button to enter the
favorite list.
VII. Preferences
7.1 System Setting
Menu->SYSTEM SETTINGS->System
1. Menu Language: Set the menu language.
2. Audio1: Set the preferred audio language.
3. EPG Language:Set the preferred EPG language.
4. Auto Channel Selection: If
you set On, in the channel list
when you highlight the channel, it
will play automatically. If you set
Off, in the channel list when you
highlight the channel, you should
press the OK button to play it.
5. Recall List: If you set On,
when you press the RECALL
button, it will display the channel list you watched previous. If you set
Off, when you press the RECALL button, it will directly back to the

15
channel you watched last time.
6. Volume Pre Channel: If you set On, you can set different volume
for each channel. If you set Off, all channels can only have one
volume.
7. Change Channel Option: If you select Freeze, when you switch
channels, it will display the last frame of the previous channel. If you
select Blank, when you switch channels it will display blank screen.
8. LCN:If you set On, the channel list will sort with LCN.If you set
Off ,the channel list will sort commonly.
9. Front Panel Light:Set the brightness of front panel.
7.2 OSD Setting
Menu->SYSTEM SETTINGS->OSD
1. OSD Transparency: Set the transparency of all menus.
2. TXT Transparency: Set the transparency of teletext.
3. Time Out: Set the display time of the programme information.
4. Default: factory default .
7.3 AV Setting
Menu->SYSTEM SETTINGS->AV Setting
1. TV Screen Format: Set the display format according to the
screen ratio.
2. HDMI Mode: Set the HDMI output mode.
3. HDMI Resolution: Set the HD format between 1080p, 1080i, 720p, 576i
or 576p.
4. TV System: Set the TV system mode.
5. SPDIF Mode: Set the audio mode to PCM or DIGITAL.
6. Scart Output: Set the Scart CVBS or RGB.
7. Default: factory default
7.4 Video Settings

16
Menu->SYSTEM SETTINGS->Video Settings
You can setup the screen brightness、contrast、saturation、hue in this
menu.
7.5 Parental control
Menu->System Settings->Parental Control
Parental Control allows you to set limits for each programme or
change your previous password. You can also lock the changes you
have made using Installation Lock, Edit Channel Lock and System
Lock.
7.6 About STB
MENU->SYSTEM SETTINGS->About STB
Display the software and other information of the receiver.
VIII. USB Control
You can play many kinds of media files, record programme and
playback it and you can do various operations when using USB HDD or
USB disk.
Note: It supports FAT, FAT32, NTFS format USB disk or USB HDD.
8.1 Play Files
1. Go to Menu-> EXPANSION->USB Menu
2. Press the VOL+/VOL- to select the file type.
3. Press the CH+/CH- to change the folder or file and press the OK
button to open the folder or play the file.
8.1.1 Music
It supports *.mp3 ,*.mp2,*flac,*.m4a, *.ra,*.wav,*.aac and *.wma
format music files.
8.1.2 Picture
It supports *.bmp, *.tif, *.png*.jpg and *.gif format photos.

17
8.1.3 Movie
It supports *.3GP, *.AVI,*.MKV, *.MP4, *.MOV, *.MPG, *.TS,
*.divx,*.M2TS, *.DAT, *.VOB, *.FLV format movie files.
8.1.4 Play List
You can play the movie/photo/music files in the Play List.
1) In the USB Menu highlight a movie/ Photo/music file and press
the FAV button to mark it, then press the BLUE button to enter the Play
List menu, you will see the files marked included in play list.
2) In the movie/
Photo/music Play List,
press FAV key to add the
all available files to the
Play List. (Just according
to the help information)
3) In the movie/
Photo/music Play List,
highlight the
movie/photo/music file
and press the Red button
to mark it, then move it to
the destination press OK to confirm, then you can move the marked file
to destination.
4) Press the GREEN button set the Play Mode.
5) Press the BLUE button to delete all files from Play list.
8.2 Recording and Timeshift
8.2.1 Recording
You can watch another channel from the same TP while recording.
Start Recording
1) You can press the ●button to start recording while watching
programme.
2) If you have set the timer, it will start recording automatically

18
according to the start time of the timer.
Stop Recording
1) You can press the ■button to stop recording.
2) If you have set the timer, it will stop recording automatically
according to the stop time of the timer.
3) If the free space on the USB HDD or USB disk is insufficient,
recording will stop.
8.2.2 Timeshift
Timeshift allows you to pause a live broadcast and return to it later and
continue where you left off.
Press the || button to start timeshift. While it is in timeshift mode, press
the button can play the programme, press the || button can pause or
play the programme, press the /button can fast rewind or fast
forward, press the ■button to stop timeshift.
IX. Network
9.1Network Settings
Menu-->Network Setting->Network Settings
In this menu, you can change link type to choose Wifi, cable LAN or
3G,and you will see the IP Situation.
9.2 Network Application
Enter Menu->EXPANSION->Network Application, it shows that many
network applications.
Network application includes Youtube/Forecast/Google
Map/Youtube/Stock View/RSS/N32 Game/NetPhoto/DLNA/Online
Video.
X. Additional Information
10.1 Trouble Shooting

19
Before contacting your local service center, please read the tips below
carefully. If the problem persists after completing the following
procedure, please contact your local product distributor or service
center for further instructions.
1. No message displayed on the front display (The product will
not switch on)
•Check the main power cable and make sure it is plugged into a
suitable power outlet.
•Check that the mains supply is switched on.
•Connect the power cable to a different power outlet.
•Check that the power switch is on at the rear of the product. (where
applicable)
2. No picture
•Make sure that the product is powered on and in operation mode.
(Press the STANDBY button)
•Make sure that the AV/HDMI cable is firmly connected to the TV.
•Make sure that the antenna cable is properly connected to the
product.
•Be sure to activate channel search.
•Check the brightness level of the TV.
•Check if the channel is currently on air. Contact the broadcaster to
ensure that the channel is running.
3. Poor picture/sound quality
•Make sure there is no mobile phone or microwave oven near the
product.
•[Satellite] Check that your dish alignment is correct.
•[Satellite] Change the satellite dish for a larger one as this will
increase the signal levels received.
•[Satellite] Replace the LNB with a lower noise factor in cases where
the noise

20
factor is too high.
•[Satellite] Replace the LNB with a new one in case it is damaged or
out of order.
•[Satellite] Check the signal levels and adjust your antenna if the level
is too low. The signal level may be affected by weather conditions.
4. No or poor sound
•Check that your AV/HDMI cable is connected correctly.
•Check the volume levels of your TV set and the product.
•Check if the product or TV is on mute.
•Check audio type or soundtrack option.
5. Remote control does not operate
•To control the product, the top end of the remote control should point
directly towards the receiving part of the product.
•Remove and reinsert the batteries in the remote control.
•Replace the batteries in the remote control for a new set.
6. Cannot connect network
•Make sure the network of your family is good.
• Make sure the Wi-Fi can work on other device.
• Input the Wi-Fi password again.
• Get auto IP again.
• Restart the receiver again.
Table of contents