Telemax TXDPF5.6 User manual

1
User Manual
TXDPF5.6
5.6 in Digital Picture Frame

1. Product IntroductIon:
Congratulations on your purchase of the Telemax digital picture
frame. With its high-quality image resolution this easy to use and
versatile digital picture frame is perfect for displaying your favorite
photos and videos, and playing your favorite MP3’s.
2. Package contents:
Before using the digital picture frame, be sure to check all the
accessories contained in the package. The digital picture frame comes
with the following items:
A. Digital picture frame unit
B. AC adapter
C. User Manual
3. Features
• Displaypicturesandvideoswithoutacomputer
• ListentoMP3audiowhiledisplayingphotos
• Simpleoperation,insertthememorycardintothepictureframeto
view pictures and videos, or listen to MP3’s
• TFT-LCDdisplaywithhighresolution,wideviewingangleandrich
colour.
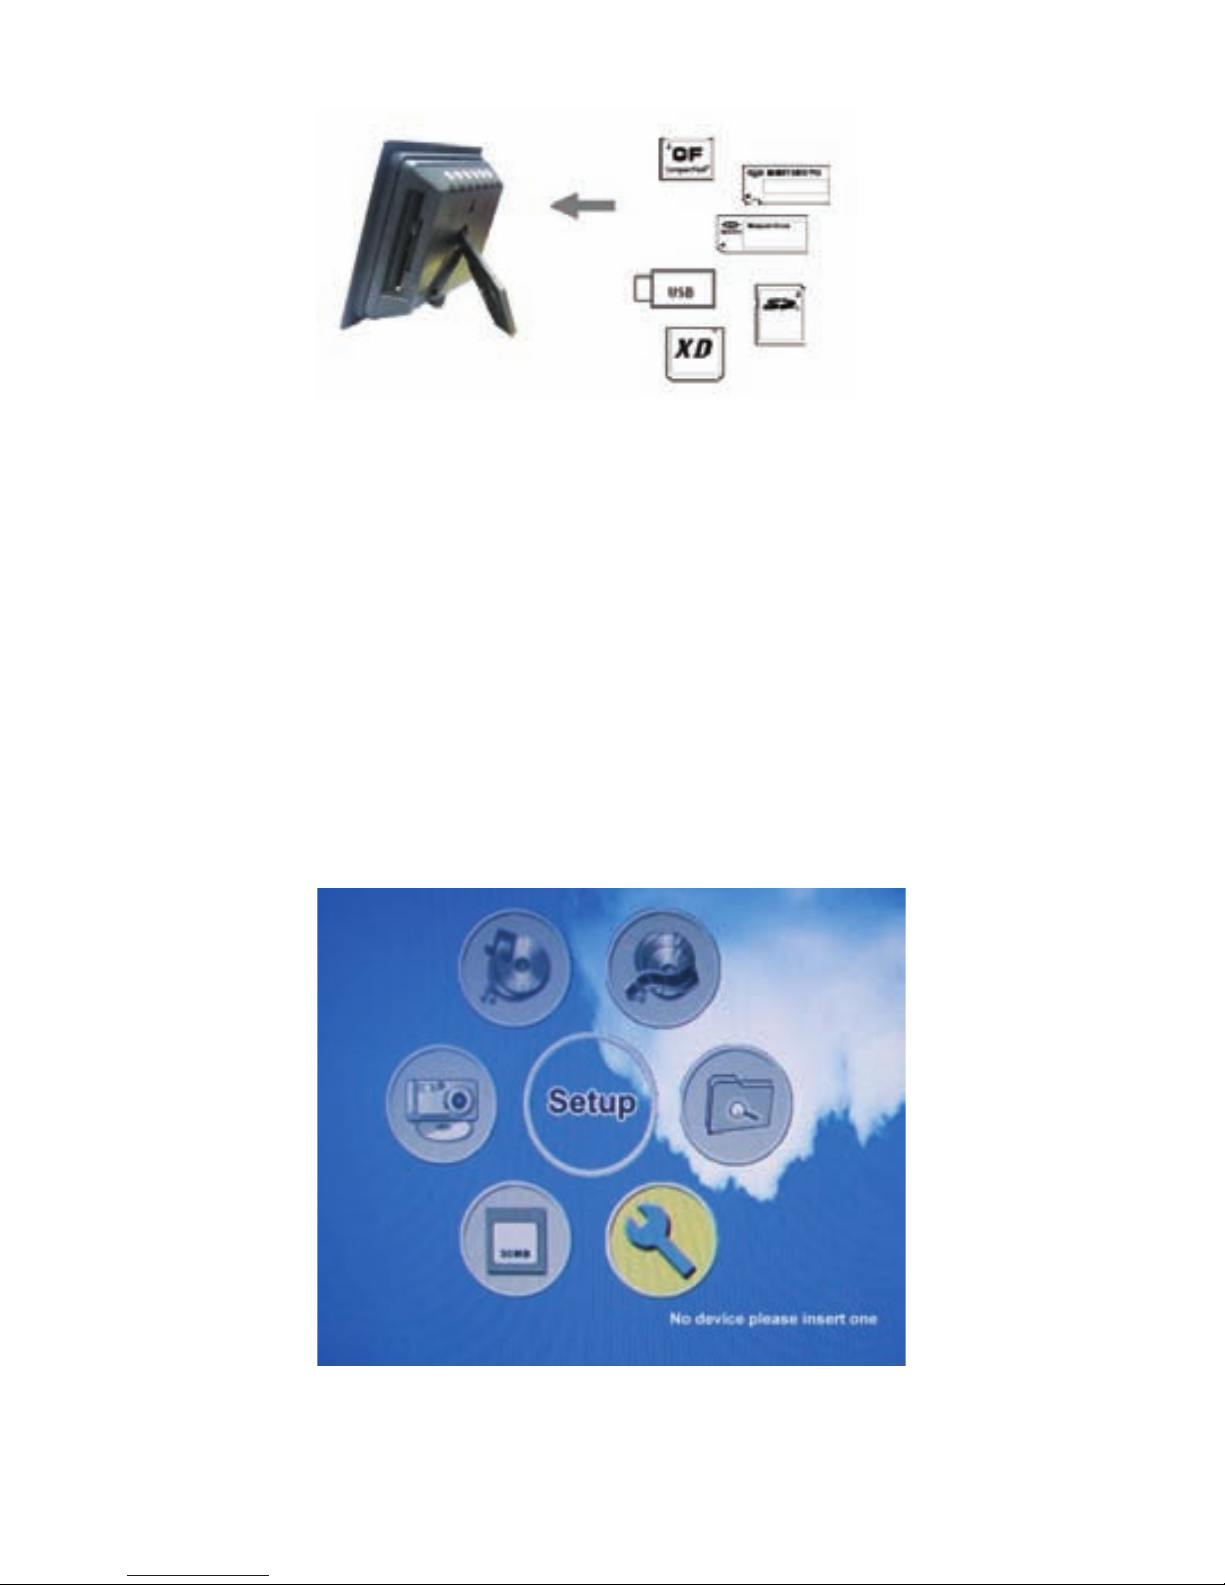
• Supports:CF(CompactFlash),MS(MemoryStick),SD(SecureDigital),
MMC(MultiMediaCard),XD(xDPictureCard)andUSBthumbdrive
4. settIng uP the dIgItal PIcture Frame
A. Open the package and remove the protective foam. Remove the
protective sleeve from the unit.
B. Plug in the AC adapter into power outlet. Plug the other end into
the unit.
C. After the content is stored on the target ash media card, insert
the media card into the appropriate port on the digital picture
frame.
22

3
D. Turn the power to the “On” position via the On/O switch. The
power switch is on the right side of the digital picture frame.
E. As default, the rst le on the card will be displayed rst. The play
sequence is automatically sorted by the le name alphabetically,
regardless of le type. Therefore, in default mode, the unit may
play an MP3, followed by a second MP3 or an image or video
depending on the le name.
5. system setuP
Once the digital picture frame is powered on, the following menu will
appear. If there is a media card inserted, it will be indicated on the
screen.
3

5.1 multIPle cards In system
If you’ve inserted more than one media card, the “Multiple Cards
Present” screen will appear. Use the Up and Down navigation buttons
to move through the selections and press Enter to select. If only one
media card is present, this will not appear.
MultipleCardsPresentScreen
6. setuP maIn Page
TheSetupMainPageappearswhenSETUP is selected from the Home
Menu screen and is shown below. Use the Up and Down navigation
buttons to select menu and press Enter to conrm selection.
SetupMenu–MainPage
4

5
6.1 Photo setuP Page
ThePhotoSetupfunctionsareillustratedinthefollowingsection.
Orientation
TheOrientationSetupScreenisshownbelow.PressRight to
highlight the menu, select AUTO or MANUAL and press Enter to
conrm selection.
OrientationSetupScreen
SelectingAUTO will display the photo in the orientation specied by
theorientationbitcontainedwithinthephotole.(Factorydefault
mode)
SelectingMANUAL will ignore the orientation bit specication.
Main Page
SelectMAIN PAGEtoreturntotheSetupMainPagescreen.
6.2 slIdeshow setuP Page
TheSlideshowSetupisillustratedinthefollowingsections.
5

Slideshow Mode
TheSlideshowModeSetupScreenisshownbelow.PressRight
navigation button to highlight the menu, select AUTO or MANUAL
and press Enter to conrm selection.
SlideshowSetupScreen
SelectingMANUAL will allow full control of the photo slideshow
timing to the user.
SelectingAUTO will initiate the photo slideshow after a full screen
photodisplayhasstarted.SeeSection 3 for how to display photo in
full screen.
Interval Time
TheIntervalTimeSetupScreen is shown below. Press Right
navigation button to highlight the menu, select time and press Enter
to conrm selection.
6

7
IntervalTimeSetupScreen
Selecting1 SECOND will display the photo for 1 second before
switching to another photo, during a photo show.
Selecting3, 5, or 10 SECONDS will display a photo for 3, 5, or 10
seconds before switching to another photo, during a photo show.
(Factorydefaultis3seconds)
Transition Setup
TheTransitionSetupScreenisshownbelow.PressRight navigation
button to highlight the menu, select mode and press Enter to conrm
selection.
TransitionSetupScreen
7

SelectingFULL SCREENwilldisplaythefullphotoatonce.Selecting
the other modes will display the photo using the transition chosen.
The photo transition choices are:
1. FullScreen(atonce)
2. Top-to-Bottom(roll)
3. Bottom-to-Top(roll)
4. Top/Bottom-to-Center(roll)
5. Center-to-Top/Bottom(roll)
6. Blind Top-to-Bottom
7. Left-to-Right(roll)
8. Right-to-Left(roll)
9. Left/Right-to-Center(roll)
10.Center-to-Left/Right(roll)
11.Implode(corners-to-center)
12.BlindLeft-to-Right
13.Cross-Fade(photofadesintonextphoto)
14.Random(fromthe12transitionmodesabove)
Auto Start Setup
TheAutoStartSetupScreenisshownbelow.PressRight navigation button
to highlight the menu, select mode and press Enter to conrm selection.
AutoStartSetupScreen
8

9
SelectingPHOTO+MUSIC will start, after a short delay, the automatic
playback of a photo with music show. The les play sequentially in
analphabeticalorderbasedonthelenames(nothumbnailspage
display).BothMusicandPhotolesmustbepresentinorderforthe
Photo+MusicAutoStartfunctiontooccur.
SelectingPHOTO+VIDEO will start, after a short delay, the automatic
playback of a photo and video show. The les play sequentially in
analphabeticalorderbasedonthelenames(nothumbnailspage
display).Photosdisplaywithoutmusicandthevideoclipsplaywith
the sound tracks associated with them.
SelectingOFF disables automatic playback after turning the frame’s
poweron(Factorydefaultmode).
Information Row
TheInformationRowSetupScreenisshownbelow.PressRight
navigation button to highlight the menu, select ON or OFF and press
Enter to conrm selection.
InformationRowSetupScreen
SelectingON will enable the Information Row to be displayed.
SelectingOFF will disable the Information Row.
The Information Row can still be toggled on or o during Photo
SlideshowusingtheINFORMATION action button at the bottom
9

of the screen. The Information Row contains data on the thumbnail
currently displayed as shown below.
OSD Language
TheOSD(OnScreenDisplay)LanguageSetupScreenisshownbelow.
Press Right navigation button to highlight the menu, select OSD
Language and press Enter to conrm selection.
OSDLanguageSetupScreen
SelectingENGLISHwilldisplaytheOSDinEnglish.
(Factorydefaultmode)
SelectingFRANCAISwilldisplaytheOSDinFrench.
SelectingDEUTSCHwilldisplaytheOSDinGerman.
SelectingITALIANwilldisplaytheOSDinItalian.
SelectingESPANOLwilldisplaytheOSDinSpanish.
10
File
Name
Thumbnail # /
Total #
File
Size
CurrentlySelected
Memory Card
Date of
File

11
Help Row
TheHelpRowSetupScreenisshownbelow.PressRight navigation
button to highlight the menu, select ON or OFF and press Enter to
conrm selection.
HelpRowSetupScreen
SelectingONwillenabletheHelpRowtobedisplayed.(Factory
defaultsetting)
SelectingOFF will disable the Help Row.
HelpRowinThumbnailsScreen
11
Action Buttons
Help Row

12
Setup Values
TheFactoryDefaultSetupScreenisshownbelow.PressRight
navigation button to highlight the menu, select DEFAULT and press
Enter to conrm selection.
DefaultSetupScreen
7. dIgItal Photo dIsPlay
The digital photo display is initiated when the PHOTO option is
selectedfromthemainFunctionSelectscreen.
Inthedigitalphotodisplaymode,thePhotoThumbnailsScreen
will appear. All the photos found in the card will be displayed in
continuous pages of photo thumbnails.
If the card has more than one folder and you desire to view the
photos by folder, go to Section 10,”FileLibraryBrowsing”for
instructions on how to access individual folders.

13
PhotoThumbnailsScreen
Use navigation buttons to select the picture for display, while the
picture is highlighted, press ENTER to conrm. The pictures will play
from the selected picture in a loop.
• Intheprocessofplaying,pressENTER to make the following
menu appear, the “Return” button will be highlighted.
• PresstheNEXT action button for the next photo.

14
• PressthePREVIOUS action button for the previous photo.
• PressthePLAY/PAUSE actionbuttontostartthePhotoShow.
Once in photo show, press PLAY/PAUSE button to pause or resume
thePhotoShow.
• PresstheROTATE action button to change the rotation of
the display of a photo. This function is not available when in Music
Slideshow.
• PressZOOM button and the following menu appears. Press
zoommode ,thepicturewillexpandin2X,3Xand4Xsize.
Whenthepicturehasbeenexpandedto4X,pressENTER and
picturewillreturntooriginalsize.
• PressPan Mode button to scroll through the expanded
picture, using the directional buttons to move around the picture.
• PresstheINFORMATION action button to view, the
properties of the photo displayed on screen.

15
• PresstheRETURN action button to return to the Photo
ThumbnailsScreen.
• WhenthePhotoThumbnailScreenisdisplayedyoucanpress
the REPEAT action button to set a new repeat mode of your
choice, dierent from the settings in the SETUP menu.
• WhenthePhotoThumbnailScreenisdisplayedyoucanpress
the MUSIC+PHOTO SLIDE SHOW action button to initiate a
MusicPhotoSlideshow.AfterseveralsecondstheActionButton
Row disappears - pressing the UP key restores the action buttons.
Music les must be present in order to play music; otherwise, only
aPhotoShowwillbeshown.
• Whileplayingmusic,pressSHIFT rst, then use UP or DOWN
buttons to change volume.
• WhenaMusicPhotoSlideShowhasbeenstartedinthisway,the
Action Button Row shown below is displayed. The PLAY/PAUSE
and INFORMATION action buttons operate as in other modes.

16
• PresstheRETURN action button to return to the Photo Thumbnails
Screen.
8. dIgItal musIc Playback
MusicLibraryScreen
Use the navigation buttons to move through the music les. The
highlighted music starts to play automatically. Use the LEFT button to
access the action buttons at the bottom of the screen. Then use the
LEFT and RIGHT action buttons to jump to the previous or next page
of thumbnails if required.
• PresstheLEFT button to stop the music playback and return to the
MusicLibraryScreen.PresstheENTER button to play a highlighted
music selection. Pressing ENTER while music is playing causes the
selected le to start over at the beginning.
• PressingtheREPEAT action button will cause the selected music
le to repeat one time. Pressing the REPEAT button again will
cause the selected music le to repeat indenitely and pressing
the REPEAT button one more time will terminate the Repeat mode.

17
• PresstheMUSIC PHOTO SLIDE SHOW action button to initiate
theMusicSlideshow.Photolesmustbepresentinordertohave
photos; otherwise, only music les will be played.
• Onceintheslideshow,pressthePLAY/PAUSE action button to
pause or resume the music photo slide show.
• PresstheINFORMATION action button to view, the properties of
the photo displayed on screen.
• PresstheRETURNactionbuttontoreturntotheMusicLibrary
Screen.
9. dIgItal VIdeo Playback
The digital video playback is initiated when the VIDEO option is
selectedfromtheMainFunctionSelectscreen.
Inthedigitalvideoplaybackmode,theVideoThumbnailsScreen
will appear. All the videos found in the card will be displayed in
continuous pages of video thumbnails. If the card has more than one
folder and you desire to view the videos by folder, go to Section 10
“FileLibraryBrowsing”forinstructionsonhowtoaccessindividual
folders.

18
VideoThumbnailsScreen
Use the navigation buttons to move through the thumbnails in the
thumbnail page. Highlight either the rst or the last thumbnail and
use the LEFT or RIGHTbutton(asindicatedbythetextonthebottom
ofthescreen)toaccesstheactionbuttons.Thenusethe and
action buttons at the bottom of the screen to jump to the
previous or next page of thumbnails.
• PresstheREPEAT action button to cause the selected video to
repeat endlessly. Press the REPEAT action button again to turn o
the Repeat mode.
• PresstheENTER action button to display the highlighted
thumbnail in full-screen. After several seconds the Action Button
Row disappears - pressing the ENTER key restores the action

19
buttons. Press the RETURN action button to return to the Video
ThumbnailsScreen.
• PressthePLAY/PAUSEactionbuttontostartthePhotoShow.Once
in photo show, press PLAY/PAUSE button to pause or resume the
PhotoShow.
• PresstheNEXT action button for the next photo.
• PressthePREVIOUS action button for the previous photo.
• PresstheFAST FORWARD action button to cause the video
tofastforwardat2Xspeed.PressingtheFAST FORWARD action
buttonagaincausesthevideotogoat4Xspeed.PressingFAST
FORWARD once more cause the video to play at the normal speed.
• PresstheFAST BACKWARD(rewind) action button to
causethevideotofastbackwardat2Xspeed.PressingtheFAST
BACKWARD action button again causes the video to go backward
at4Xspeed.PressingFAST BACKWARD once more cause the video
to play at the normal speed.

20
• PresstheINFORMATION actionbuttontoview,byOSD,the
properties of the photo displayed on screen.
• PresstheRETURN action button to return to the Video
ThumbnailsScreen.
10. FIle lIbrary browsIng
TheFileLibraryBrowsingfunctionisinitiatedbyselectingFILE from
the Home Page screen. All contents of a device/card can be accessed
using this function.
TheFileLibraryScreenwillappearshowingthecontentsofthe
currently selected memory card.
FileLibraryScreen
Table of contents