Telford CORNER DESK User manual

TELFORD CORNER DESK ASSEMBLY INSTRUCTIONS
Thank you for purchasing the Telford Corner Desk.
Please read the instructions carefully to ensure safe operation of this product
PO No:
Version 1 - 201026
Page 1of 12
Tools Required
1 Hour
Set Up
Size:
Colour:
Finish:
118 x 39.6 x 76.5 cm (WDH)
Dark Oak/Black or Light Oak/Grey or Concrete/Black
Foil or Melamine
PLEASE READ this sheet prior to assembly to familiarise yourself with the various stages of construction.
Carefully open the pack supplied and check the contents against the parts and fittings check list. Do not
destroy any of the packaging until you are certain that you have all the necessary parts for the assembly.
CAUTION: there are small components used in the construction of this unit. These loose items should be
kept away from young children whilst assembling your unit to avoid the danger of choking.

TELFORD CORNER DESK ASSEMBLY INSTRUCTIONS
IMPORTANT - READ CAREFULLY - RETAIN THESE INSTRUCTIONS FOR
FUTURE REFERENCE.
INFORMATION
Version 1 - 201026
Page 2of 12
This product is designed to hold 15 Kg in total, spread evenly over the whole unit.
Do not exceed this weight.
We recommend that this unit is assembled in the room intended for use.
When you are ready to start, make sure that you have the right tools, plenty of space and a
clean, dry area for assembly.
Unwrap all packaging materials and place the components on top of the carton box or on a
clean floor to prevent them from scratching.
Check the pack and make sure you have all the parts listed.
Ensure that this product is fully assembled as illustrated before use.
Check all screws or bolts are tightened and inspect regularly
Tools not included unless specified in parts list.
CARE INFORMATION
To clean, wipe with a damp cloth.
Never use scourers, abrasives or chemical cleaners.
Do not use solvent based cleaners or detergents as they can bleach or damage the product.
WARNINGS
This product should only be used on a firm and level floor.
Keep small parts out of reach of children.
Make sure the legs are always in contact with the floor.
DO NOT
DO NOT
DO NOT
DO NOT
DO NOT
use power tools to construct this product.
tighten screws until parts are assembled or as advised in this guide.
over tighten screws or bolts.
use this product if parts are missing, damaged or worn.
sit or stand on the product.
The desk is free standing and stable but we supply wall connection brackets to stop the
product tipping over in extreme circumstances. If you have young children in the home it is
better that the desk is fixed safely to a wall to prevent any potential accidents - please refer to
Step 9.
N.B. When drilling the wall to fix the anti-tilt bracket, always make sure the area to be drilled is
free from hidden electrical wiring or gas / water pipes .
Carefully assess the suitability of the wall to ensure that the fastening device will withstand
the load and forces generated. Walls can be quite different in construction so fixings are not
supplied - choose the most suitable fixing for your wall type - if in doubt consult an expert.

TELFORD CORNER DESK ASSEMBLY INSTRUCTIONS
Version 1 - 201026
Page 3of 12
Parts and Fittings Checklist
Please check the pack contents before assembling the product. If any components are missing,
please contact your retailer.
The fittings pack contains small items that should be kept away from children.

TELFORD CORNER DESK ASSEMBLY INSTRUCTIONS
All parts are packed in one carton
Size: 1180 x 396 x 15 mm
Carton No: 1/1
Description: Base Panel
Qty: 1
Carton No: 1/1
Carton No: 1/1
4
5
Qty: 1
Qty: 2
Size:1180 x 396 x 15 mm
Size: 300 x 100 x 15 mm
123
Description: Top Panel
Description: Centre Upright
Description: Side Panel
Qty: 2
Size: 478 x 100 x 15 mm
Carton No: 1/1
Description: Front Cross Bar
Qty: 1
Size: 932 x 80x 20 mm
Carton No: 1/1
Size: 320 x 98 x 15 mm
Carton No: 1/1
Description: LH Drawer Side
Qty: 1
Carton No: 1/1
Carton No: 1/1
10 11
Qty: 1
Qty: 1
Size:448 x 98 x 15 mm
Size: 424 x 313 x 3 mm
789
Description: Drawer Front
Description: Drawer Base
12
Description: Metal Leg Frame
Qty: 2
Size: 633 x 470 x 20 mm
Carton No: 1/1
Description: RH Drawer Side
Qty: 1
Size: 320 x 98 x 15 mm
Carton No: 1/1
Description: Drawer End
Qty: 1
Size: 416 x 95 x 15 mm
Carton No: 1/1
6
Version 1 - 201026
Page 4of 12
Description: Rear Cross Bar
Qty: 1
Size: 525 x 80x 20 mm
Carton No: 1/1
TELFORD CORNER DESK ASSEMBLY INSTRUCTIONS
4
C
E
Screw for Fitting
Drawer Sides
4x35mm
14A
14
16
B
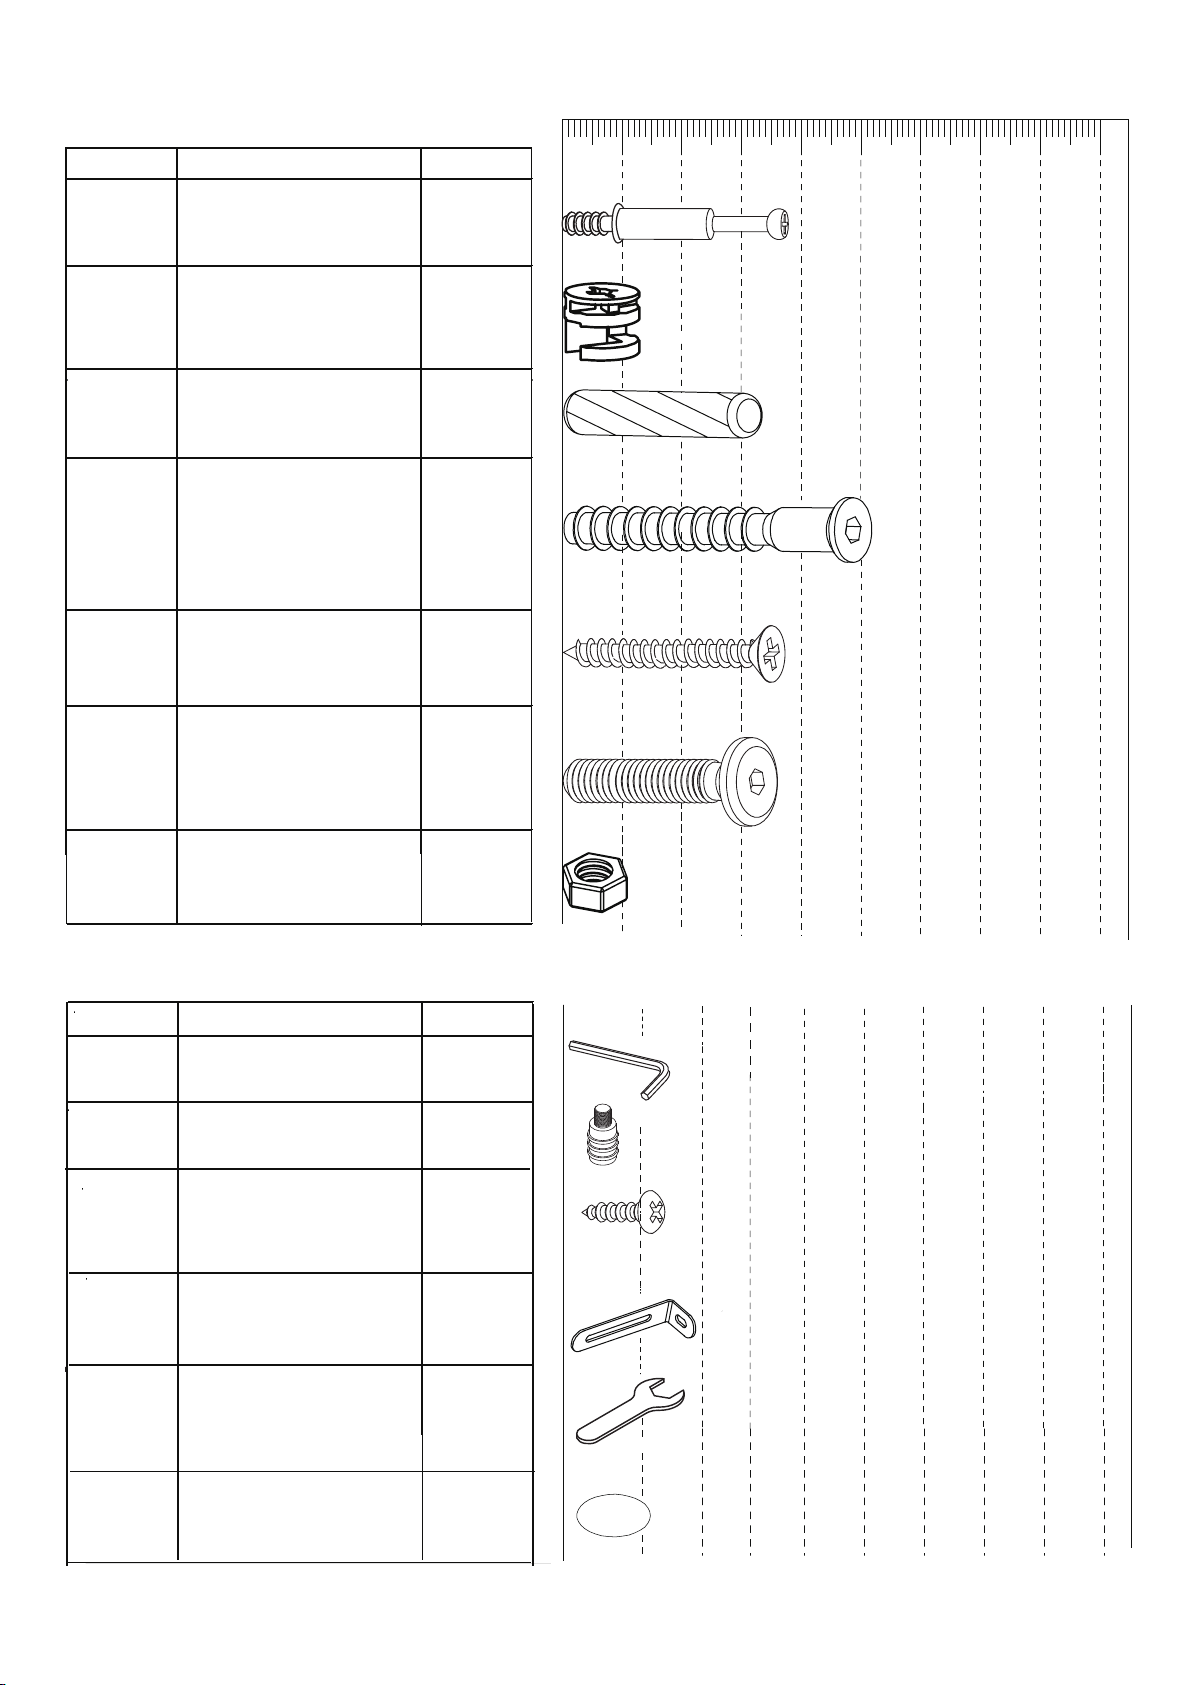
Item QuantityCode
Fittings (to scale)
Cam Lock
10 20 30 40 50 60 70 80
Cam Bolt
(38mm overall)
10
D
Bolt for Fitting Metal
Legs and Cross Bar
to Base Panel
M6x28mm
14G
8P Nut for M6 bolt
Dowel 8x30mm
Carcass Screw for
Fitting Centre Upright
and Side Panels to
Base Panel
M7x50mm
Version 1 - 201026
Page 5of 15
Fittings (not to scale)
QuantityCode Item
Allen Key - M6 Bolt 1
J
2
Drawer StopK
1
Spanner for M6 Nut
N
10
Cam cover sticker
Q
L
Screw for Fitting
Anti-tilt Bracket
4x12mm
Anti-tilt Bracket
M
2
2

TELFORD CORNER DESK ASSEMBLY INSTRUCTIONS
Version 1 - 201026
Page 6of 12
B
Tighten
FLUSH
CARCASS SCREW
General Hints & Tips
A28mm
A
A
Stop when
level
Fittings required
For this step:
Tools required
STEP 1
A x10
Ax10
Cx4
Cx4
x2
x2
C x16

TELFORD CORNER DESK ASSEMBLY INSTRUCTIONS
Version 1 - 201026
Page 7of 12
Fittings required
Fittings required
For this step:
Tools required
STEP 2
STEP 3
For this step:
Tools required
B x6
B x4
Q x6
Bx6
Qx6
Bx4

TELFORD CORNER DESK ASSEMBLY INSTRUCTIONS
Version 1 - 201026
Page 8of 12
Fittings required
Fittings required
For this step:
Tools required
STEP 4
STEP 5
For this step:
Tools required
D x10
J
Dx10
J
J
G
P
P x8
N
N
G x8
Gx8
Px8

TELFORD CORNER DESK ASSEMBLY INSTRUCTIONS
Version 1 - 201026
Page 9of 12
Fittings required
For this step:
Tools required
STEP 6
Ax4
Bx4
Qx4
Ex4
7
7
8
9
11
10
A x4
B x4
E x4
Q x4

TELFORD CORNER DESK ASSEMBLY INSTRUCTIONS
Version 1 - 201026
Page 10 of 12
Fittings required
Fittings required
For this step:
Tools required
STEP 7
STEP 8
For this step:
Tools required
K
K x2
J
GGx6
J
G x6

TELFORD CORNER DESK ASSEMBLY INSTRUCTIONS
For this step:
Tools
recommended
STEP 9
Version 1 - 201026
Page 11 of 12
L
Screw for Fitting
Anti-tilt Bracket
4x12mm
Anti-tilt Bracket
M
2
2
WE RECOMMEND FIXING THIS DESK TO THE WALL
CONSTRUCTION OF WALLS CAN BE VERY DIFFERENT SO FITTINGS ARE NOT SUPPLIED.
PLEASE CHOOSE SUITABLE FIXINGS TO SUIT THE YOUR HOME.
IF IN DOUBT CONSULT AN EXPERT
Loosen screw (L) a little. Holding desk firmly against the wall, push
bracket (M) so the long leg touches the face of the wall.
Use your screw/fixing to fix bracket to wall.
Make sure bracket is touching wall evenly, then tighten screw (L).
Warning: Always ensure the area to
be drilled is free from hidden electrical wires, water and gas pipes.
In the final position the desk is to be fixed, first place it
against the wall.
Carefully mark the wall with a sharp pencil, dead-centre
of the hole in the long leg of the metal anti-tilt bracket (M).
Carefully mark the
hole position.
Drill the
hole in the wall.
Choose a suitable
wall fixing.
M
L
M
L

TELFORD CORNER DESK ASSEMBLY INSTRUCTIONS
Version 1 - 201026
Page 12 of 12
Assembly Completed
Your Corner Desk is now completely assembled.
Periodically check to ensure that the components are in their proper position, free from damage.
Also, make sure the connectors are tight and secure.
Keep instructions for future reference
Table of contents
Popular Indoor Furnishing manuals by other brands

Regency
Regency LWMS3015 Assembly instructions

Furniture of America
Furniture of America CM7751C Assembly instructions

Safavieh Furniture
Safavieh Furniture Estella CNS5731 manual

PLACES OF STYLE
PLACES OF STYLE Ovalfuss Assembly instruction

Trasman
Trasman 1138 Bo1 Assembly manual

Costway
Costway JV10856 manual


