Telia F1 User manual

Trådløst
bredbånd
Telia F1 Router User Guide

Telia F1 Router User Guide
Dear customer,
Thank you for choosing the fast and high-quality Telia Trådløst Bredbånd. We wish you a pleasant
experience and productive work!
This guide will help you to connect to the Internet and to the router for self-administration via web
browser.

TERMS AND ABBREVIATIONS
IP
Internet protocol
LAN
Local Area Network - (local) computer network
OS
Operating System
RAM
Random Access Memory
SSID
Service Set Identifier - the name of the wireless network
TCP
Transmission Control Protocol
UTP
Unshielded Twisted Pair - unshielded twisted pair (Ethernet network cable)
WAN
Wide Area Network - in this case the TELIA Internet Network
WiFi
Wireless fidelity –wireless technology
WLAN
Wireless LAN is a wireless computer network
WPA
WiFi protected Access - Wi-Fi Protected Access, the latest variant of WPA3, the most common
being WPA2.

Contents
1 ROUTER..................................................................................................................................................4
2 EQUIPMENT PORTS AND LAMPS...........................................................................................................5
2.1 Router ports................................................................................................................................5
2.2 Router LEDs and buttons............................................................................................................6
3 WIRELESS COMMUNICATION................................................................................................................7
3.1 Connect to WiFi with QR code....................................................................................................8
4 CONFIGURE THE ROUTER USING A BROWSER......................................................................................8
5 RESTORE FACTORY SETTINGS............................................................................................................. 11
6 CHANGE WIRELESS SETTINGS............................................................................................................. 11
7 LAN IP / SUBNET CHANGE, DHCP SERVER MANAGEMENT, IP RESERVATION.................................... 13
7.1 Disabling the DHCP Server....................................................................................................... 13
7.2 Changing the LAN subnet ........................................................................................................ 13
7.3 Static IP address binding on a LAN DHCP server ..................................................................... 14
8 COMPUTERS CONNECTED TO THE INTERNAL NETWORK .................................................................. 15
9 PORT FORWARD CONFIGURATION .................................................................................................... 15
10 UPNP CONFIGURATION.................................................................................................................... 15
11 ROUTER AND NETWORK DIAGNOSTICS ........................................................................................... 16
11.1 DLNA on / off ......................................................................................................................... 16
12 PARENTAL CONTROLS ...................................................................................................................... 16

1ROUTER
The Telia F1 Router (hereinafter referred to as the Router) is a device designed to provide Internet
services.
Telia F1
Features Description
WAN
For Fixed wireless access
LAN
3x 1GE and 1x 2.5GE
USB
Not in use for Trådløst Bredbånd
IP telephony (SIP)
There is no
WiFi
2.4 GHz IEEE 802.11b / g / n / ax 4x4
5 GHz IEEE 802.11a / n / ac / ax 4x4
Functions
IPv4, DHCP server / relay / client, DNS, NAT / PAT, firewall, WiFi6
Limitations
It is not possible to configure static IP address
Printer server / sharing feature is not supported.

2EQUIPMENT PORTS AND LAMPS
2.1 Router ports
No.
Description
A
Not in use for Trådløst Bredbånd
B
1-4 (four) yellow LAN ports for PC, etc. Physical speed of ports 1-3 of 1Gb/s, 4 port physical
speed up to 2.5Gb/s
C
WAN for Fixed wireless access
D
el. adapter socket
E
on / off button
F
Reset button to restore the factory settings
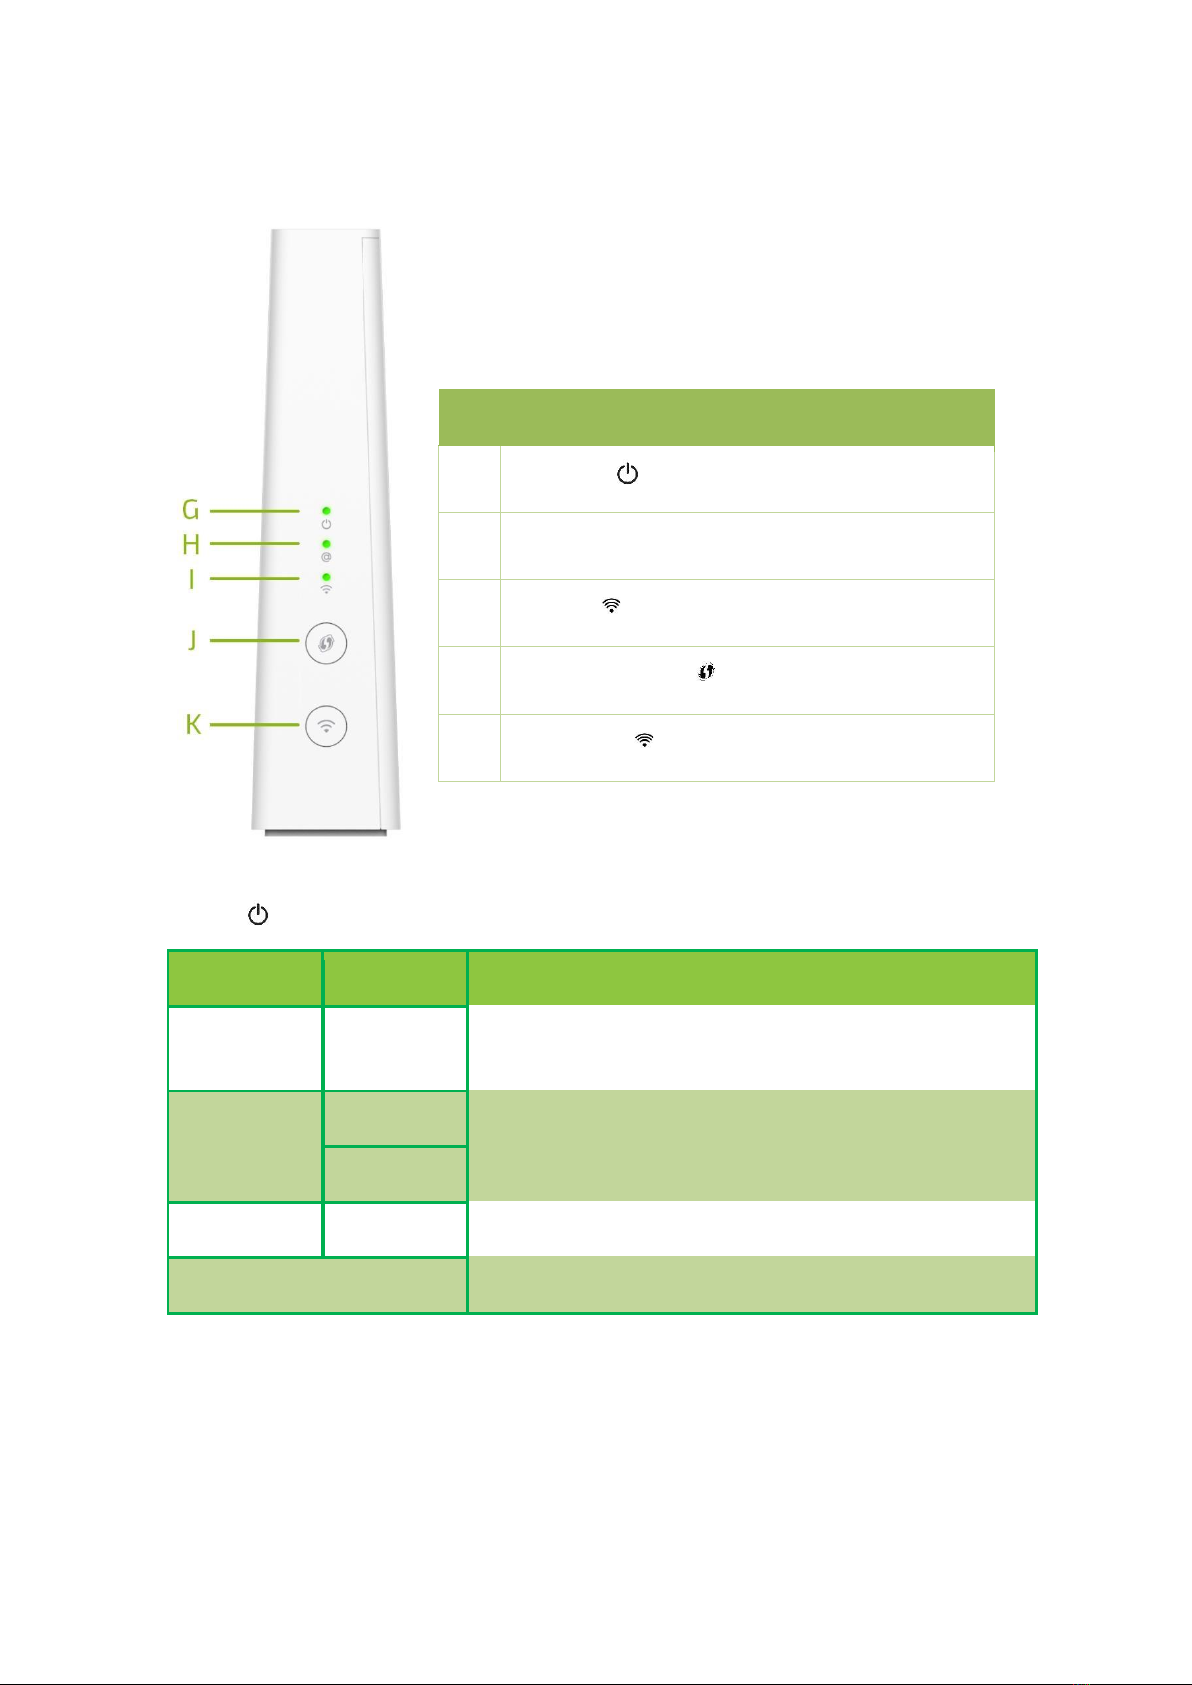
2.2 Router LEDs and buttons
Status LED ( ):
Color
Condition
Meaning
Green
Solid
Power is on and there is a physical connection to the
Ethernet WAN port
Orange
Solid
The router system is loading
Blinking
The router is in software change mode
Red
Solid
System power-up test (self test) in progress
Off
The router is turned off / no power
No.
Description
G
Status LED ( )
H
Internet LED (@)
I
WiFi LED ( )
J
WPS pairing button ( )
K
WiFi .button ( )

Internet LED (@):
Color
Condition
Meaning
Green
Solid
Internet is working, no data is being sent/received.
Blinking
The Internet is working and data is being sent/received.
Red
Solid
No internet connection
Off
Router is off or Internet is provided in Bridge mode
WiFi LED ( ):
Color
Condition
Meaning
Green
Solid
WiFi connection is enabled, working in WPA mode, but no
data is being sent/received
Blinking
Wi-Fi is on, WPA is running, and data is being sent/received
Orange
Blinking
WPS pairing in progress
Red
Solid
WiFi is working but it is open / insecure, no data is being
sent/received
Blinking
WiFi is working but it is open / insecure, data is being
sent/received
Off
WiFi is off
Press and hold for 5 seconds to turn on (off) the WiFi connection. hold the button, release to check if
the WiFi LED is on (off).
3WIRELESS COMMUNICATION
The device is provided to customers with a fully configured and securely encrypted wireless port. The
wireless channel is protected by a WPA-WPA2 password, which you can find by reading the sticker on
the body of the device:
•Wifi-name- the name of your home wireless network.
•Wifi password- password to connect to your home wireless network.
•Wifi QR code- connecting a smartphone (or tablet) to a wireless connection by scanning a QR
code.

The router has two wireless access points:
The 5 GHz access point provides extremely high transmission speeds, is less sensitive to interference,
and allows IEEE 802.11a/n/ac/ax wireless devices to be connected.
The 2.4 GHz access point allows you to connect IEEE 802.11b/g/n/ax wireless devices. Use this access
point for wireless devices that do not support 5 GHz.
NOTE The wireless connection can be turned on and off with the WiFi button on the front of the
router ( ). Pressing and holding the button for 5 sec. turn off the wireless connection by repeatedly
holding for 5 sec. you will reconnect.
3.1 Connect to WiFi with QR code
Wifi QR code- you can scan it on your smartphone (or tablet) with the built-in QR code reader in the
WiFi connection area. This feature only works on Android devices.
To use wireless, make sure your computer has a wireless adapter installed and turned on (most
laptops have built-in wireless adapters). If you do not have such an adapter in your computer, you
will need to purchase and install it before using the wireless connection. For instructions on installing
and configuring the wireless adapter, see the instructions for the adapter you purchased.
Note. For more information on wireless speeds and factors, see Appendix 2, "Factors Affecting WiFi
Speed".
4CONFIGURE THE ROUTER USING A BROWSER
If you want, you can change the router settings (for example, the wireless settings). Follow these
steps:
❶Launch your web browser and go to enter the address http://192.168.1.1 and press the
Enter key. The router's WEB interface opens.
❷Leave in the first box User, and enter the password in the second and click Sign In. The router
will check your account and reload the page.
Note: The login password is written on the back of the router's label as the "Web admin password."

❸You can now change the settings to suit your needs.
•When connected, the initial WEB page of the router will open.
Selecting the Advanced interface gives you more control.
When connecting for the first time, the following options will be offered:
•If you want to change the WEB admin password now, select "Now".
•If you want to defer changing your password to a later time, select "Remind me later";
•If you do not want to change your password and do not want reminders, select "Do not
remind me again".

Note: The factory password (Web admin password) is unique to each device and is not displayed
elsewhere on the router sticker, so the password cannot be changed.
In the initial window we see the following cards:
•System Info- provides information about the router (Global Information), system date / time
(Time Management), router administration tools - Restart / Reset / Semi-Reset
(Configuration)
•Broadband- the current connection status is displayed
•Internet Access- provides information about the received Internet settings, its status and the
possibility to update the DHCP IP address (Release and Renew)
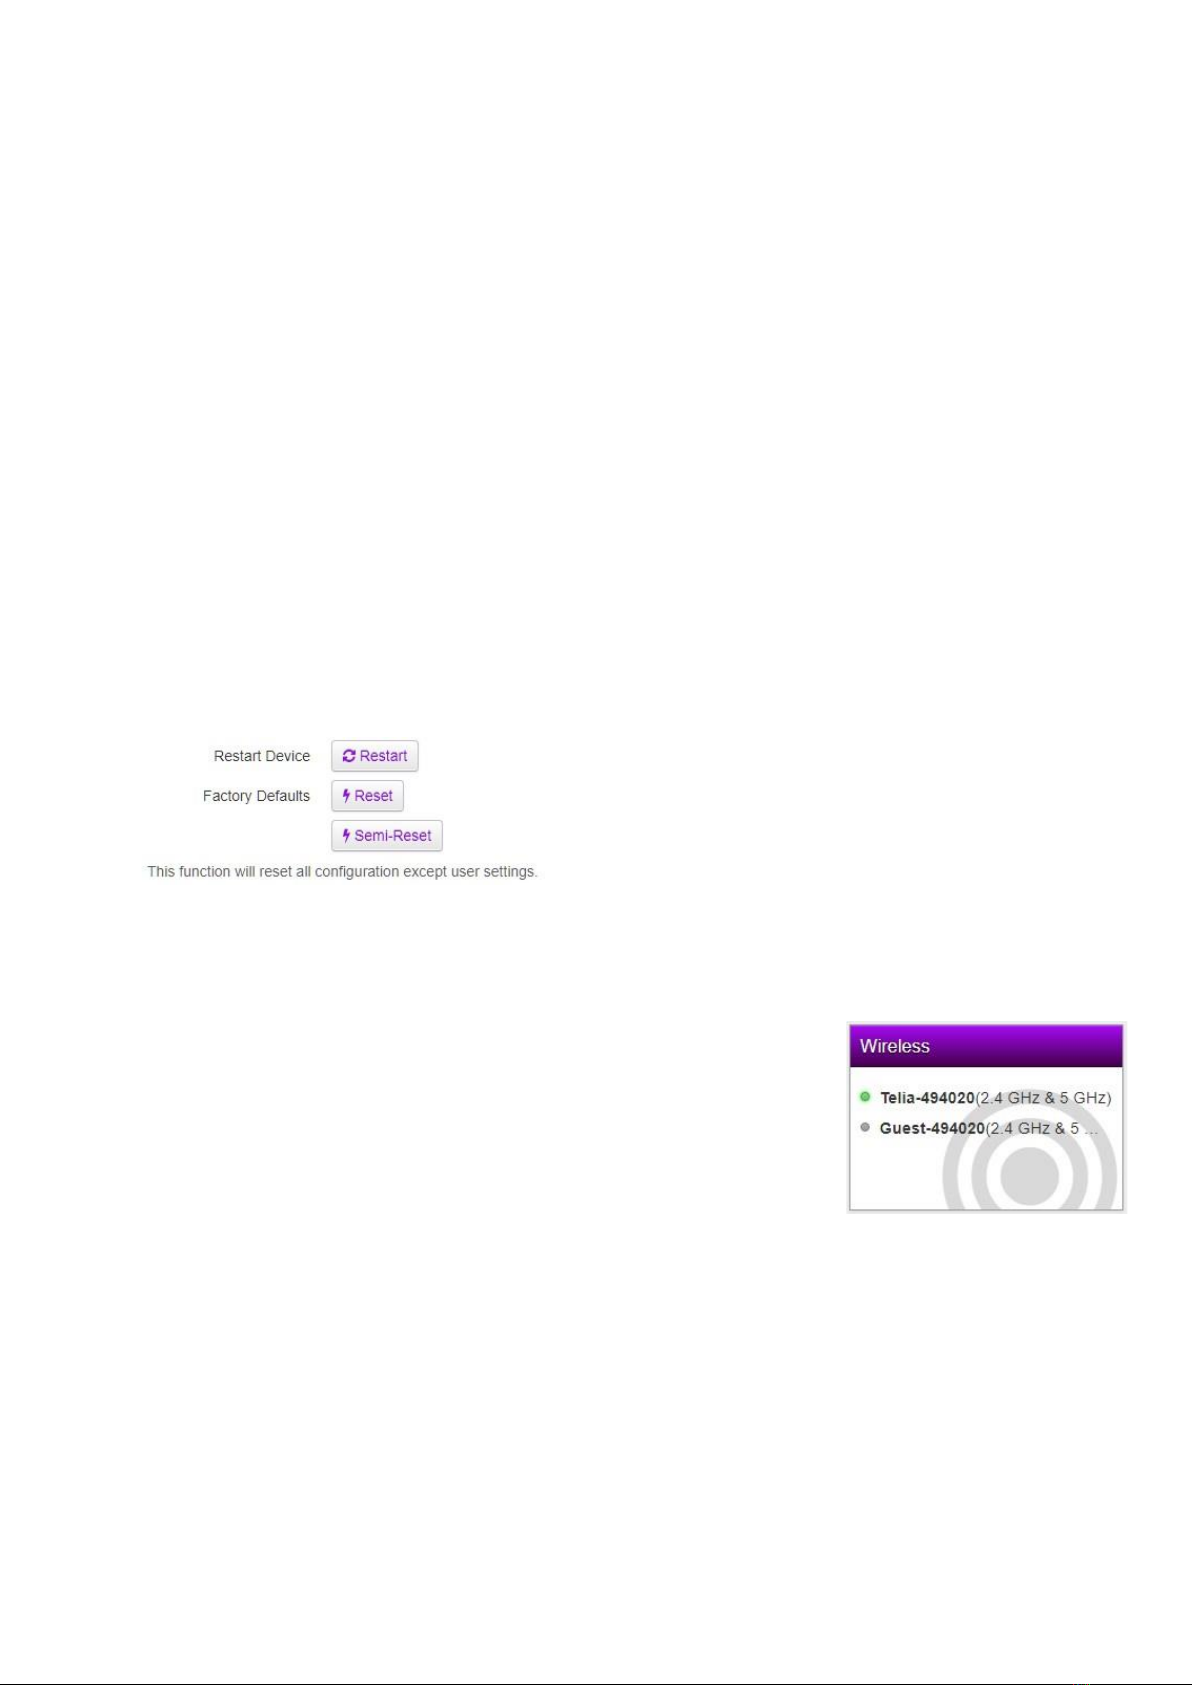
•Wireless- provides wireless connection information and the ability to change settings:
network name (SSID), WiFi password and many other connection settings, as well as enable /
disable Guest WiFi
•Local Network- Possibility to change lan and guest configuration: IP address / subnet and
shared IP address ranges. If necessary, disable the DHCP server. Static IP-MAC address
associations (Add new static lease) can also be described
•Devices - provides a list of all devices connected to the local network
•WAN Services –Not in use for Trådløst Bredbånd
•Firewall - there are options: change the firewall level, enable / disable ping
•Diagnostics - ability to perform router and network diagnostics
•Sharing –Not in use for Trådløst Bredbånd
•Parental Controls - Ability to block / allow WEB pages (Parental Control), restrict LAN
devices' access to the Internet on certain days and hours of the week in 15 minute
increments (Access Control)
•VPN Server –Not in use for Trådløst bredbånd
•DMZ –Not in use for Trådløst Bredbånd
•ETH Linespeed - to control the physical speed of WAN and LAN ports (Auto / 100 Mb/s)
5RESTORE FACTORY SETTINGS
This feature is on the System Info tab in the Configuration section.
6CHANGE WIRELESS SETTINGS
Note. If you were able to connect successfully over the wireless connection
and the connection is working properly, we recommend that you do not
change the settings. Settings should only be changed if necessary.
Click the Wireless tab to view and / or change WiFi settings
On the left side of the window, select the area you want to view / change; In
the configuration window you can control:
a) Radio
b) AP
c) WPS
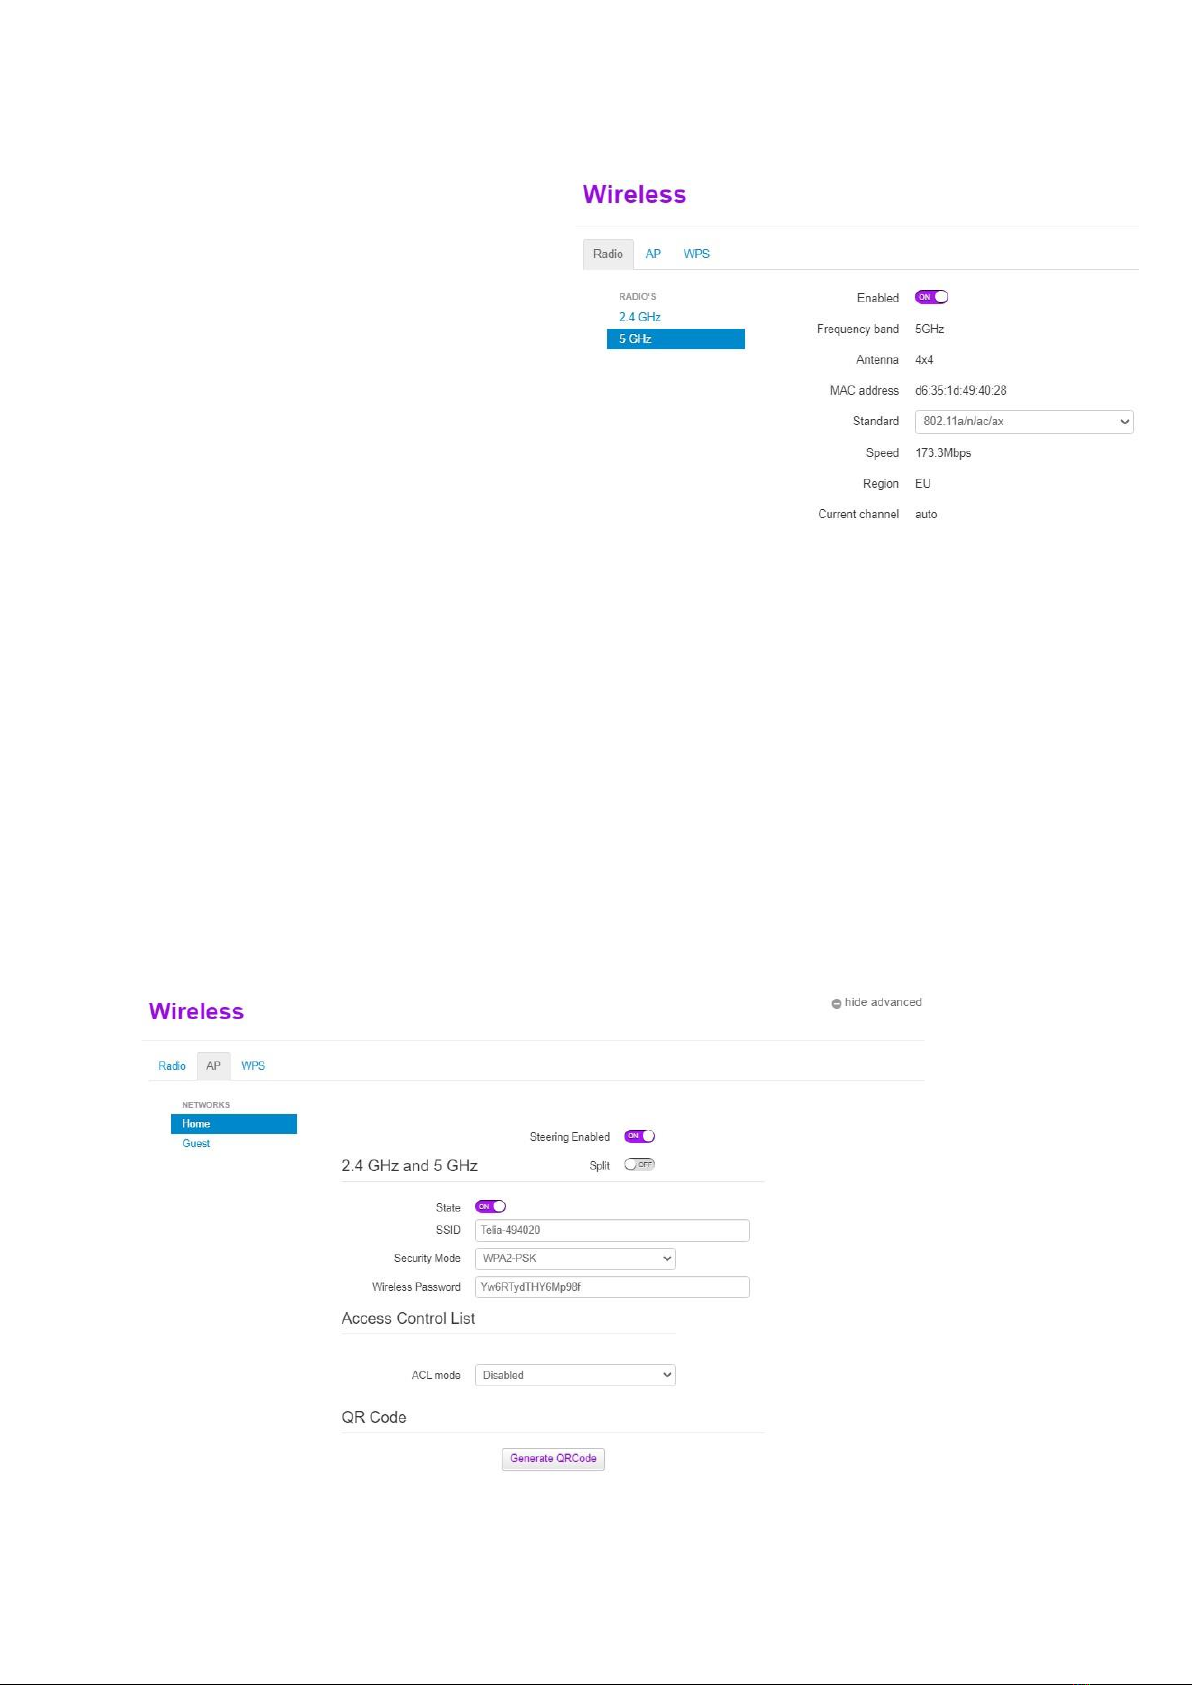
In the radio section you can view a number of parameters, some of which you can change:
•disable / enable 2.4 GHz or 5 GHz radio
module (Enable: ON / OFF)
•Choose what standards the radio module
will work with (Standard)
2.4GHz has two choices of 802.11b/g/n or
802.11b/g/n/ax
5Ghz also has 2 options for 802.11a/n/ac
or 802.11a/n/ac/ax
In the AP section you can:
-separate frequencies / networks (Split: ON)
-turn the wireless connection on and off (State: ON / OFF)
-change wireless network name (SSID name)
-change the security level (Security Mode: WPA2-PSK / WPA2-WPA3-PSK). WPA3 is more
secure, but older WiFi devices don't work with WPA3, leaving WPA2 compliant.
-change password - (Wireless Password)
Note. We suggest choosing a password of at least 12 characters, a combination of uppercase and
lowercase letters and numbers, and it is also advisable to use other characters (@, #, $,%, ^, & etc.)
that are difficult for others to guess. This will allow you to have a sufficiently secure network.
If you have changed the SSID and / or WiFi password, you can also generate a QR code here, which
will make it easier for you to connect to WiFi with Android devices (Generate QRCode).

In the WPS section you can:
initiate WPS pairing by pressing the button
•If you want to entertain your guests via Wi-Fi but do not want their WiFi devices to access your
LAN, activate the Guest access point:
a. in the AP section, select Guest under Home
b. then click at the top / right of the window
c. State change to ON
d. if you want to change the network name (SSID) and / or password
e. and, by generating a QR code right here, you will be able to "feed" the guest on the
Internet.
f. Remember to save the configuration by clicking the Save button.
7LAN IP / SUBNET CHANGE, DHCP SERVER MANAGEMENT, IP
RESERVATION
In the main menu, click on the name Local Network. In the additional window that will appear, you
will be able to change and configure the following functions:
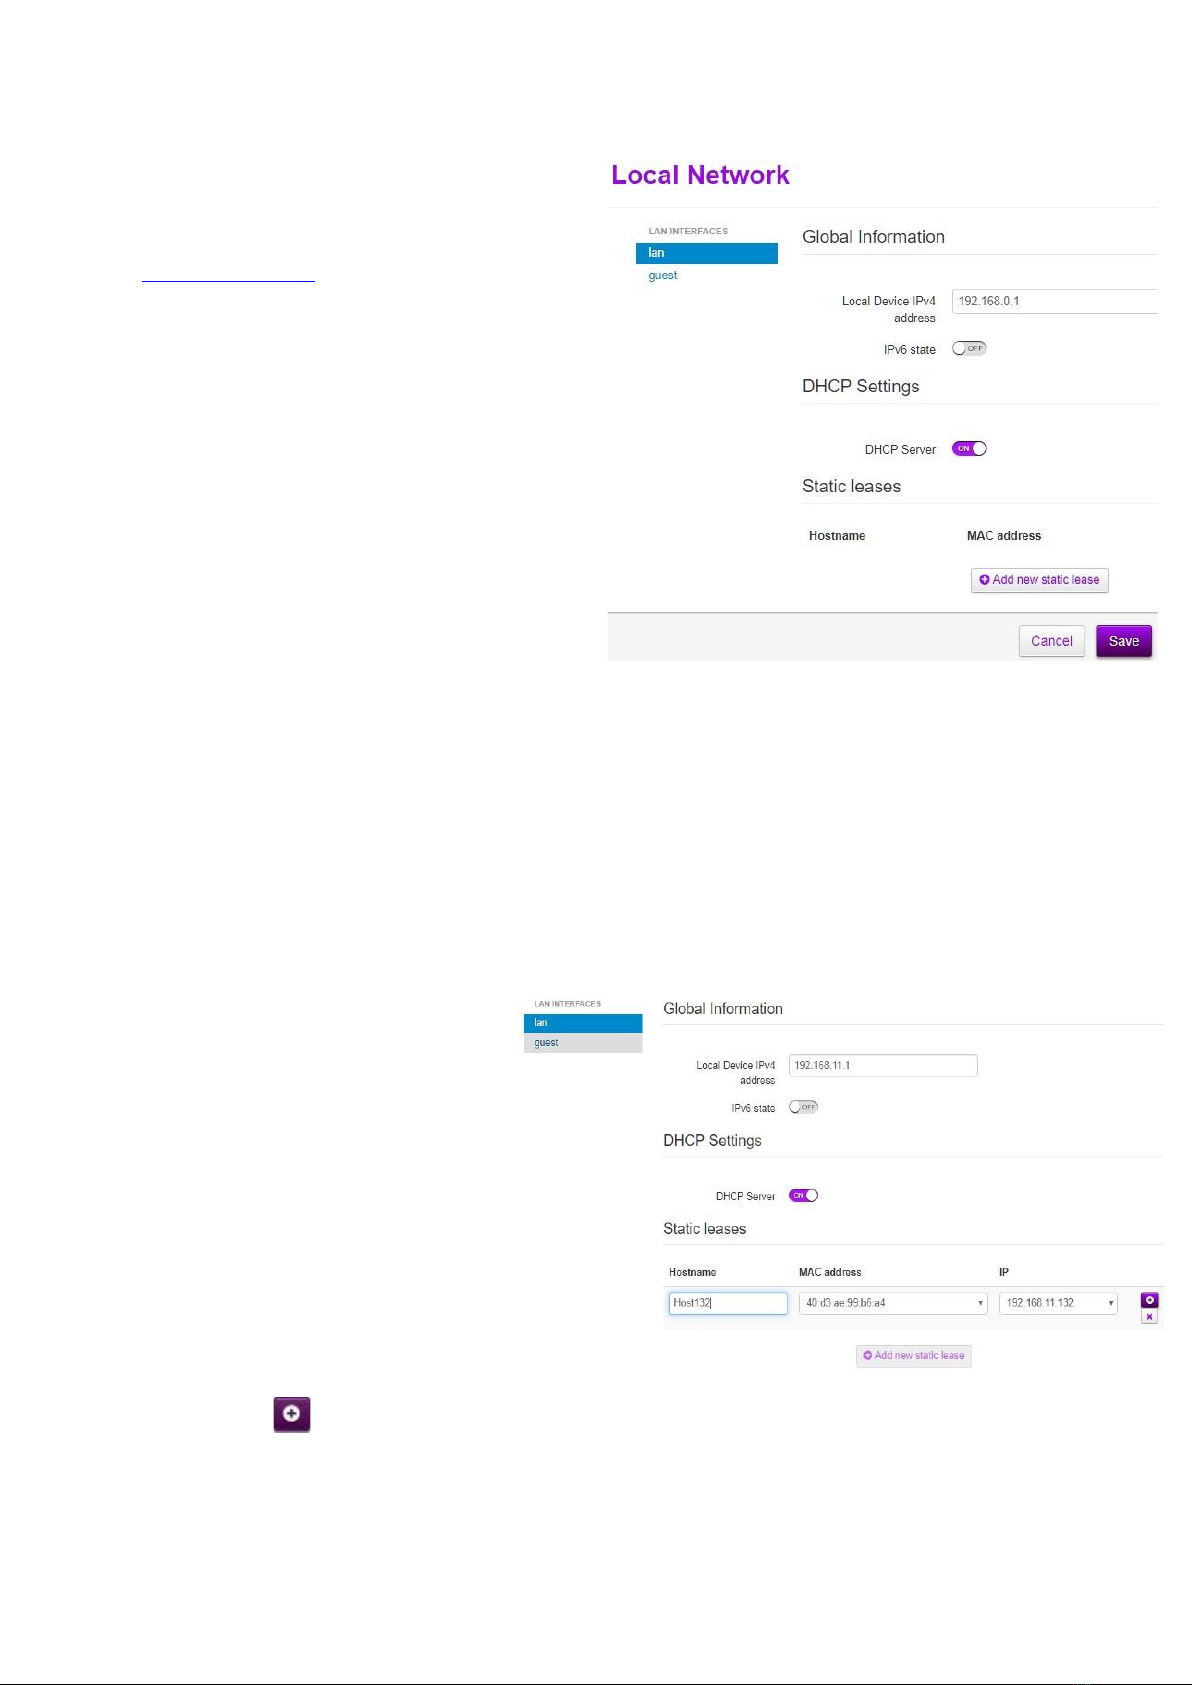
7.1 Disabling the DHCP Server
The server can be turned off at DHCP Settings by changing the DHCP Server ON => OFF.
7.2 Changing the LAN subnet
To change the internal network subnet (for example, to 192.168.0.x), you need to do the following:
•In the Local Device IPv4 address field, enter the required device IP address (for example,
192.168.0.1).
Note. If you change the IP address of the Router
(to eg 192.168.0.1), you will lose control of the
WEB. To continue managing / configuring the
Router, you must log in with a new IP address (e.g.
http://192.168.0.1), and update the connection to
the Router so that the computer obtains an IP
address from the subnet again.
If you have disabled the local DHCP server, you
must configure your network connection with a
static IP address. If the subnet remains unchanged
(192.168.1.x), configure the network adapter's IP
address to 192.168.1.10 (or another free IP
address that does not conflict with the IP address
of the client and / or Router). If you have changed
the LAN subnet (for example, to 192.168.0.x),
configure the IP address to 192.168.0.10 (or
another free IP address).
•If you want to change the modes of IP addresses shared by computers, click show advanced.
On the DHCP Pool LAN, you can enter the start address and end address of the IP field and
change the Lease time of the dynamic IP address as required.
•After entering the desired settings, save the changes with the Save button.
7.3 Static IP address binding on a LAN DHCP server
•Static leases area, click the Add new static lease button. Additional configuration fields for the
static IP address will then appear.
•Enter: the name of the equipment -
Hostname; physical address of the
equipment - MAC address; desired
IP address - IP.
Note. If you do not know the MAC
address of the device, and the device is
connected during configuration, then
the MAC address field makes it easy to
find it by name, currently assigned IP
address, or by part of the MAC address.
•After entering the information in
the appropriate fields, save the
configuration with
the button
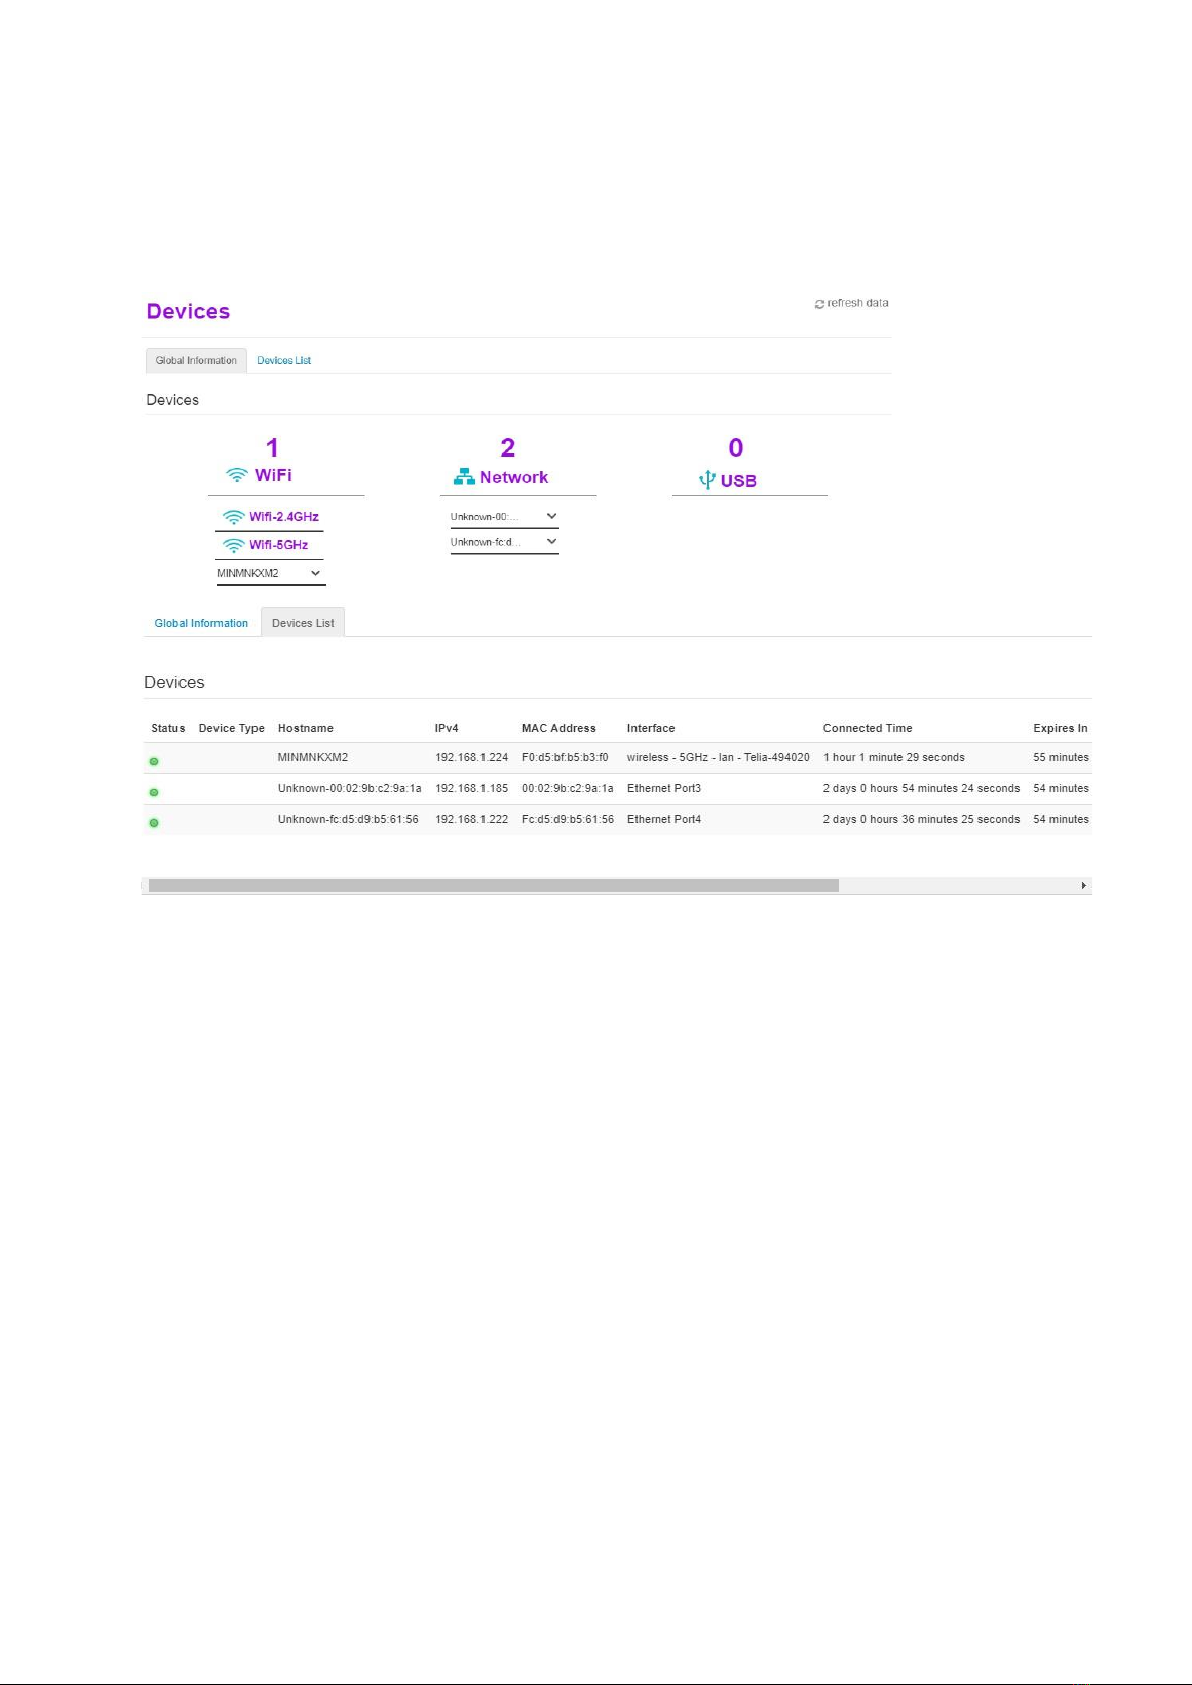
8COMPUTERS CONNECTED TO THE INTERNAL NETWORK
In the main window, click the name Devices. An additional window will open showing the
information of all devices connected to your network in two sections: Global Information or Devices
List
The grouped information is more visual, but let’s use a list for more detailed data. If something
doesn't fit in the window, let's scroll for it.
9PORT FORWARD CONFIGURATION
This function is not supported on Trådløst Bredbånd!
10 UPNP CONFIGURATION
This function is not supported on Trådløst Bredbånd?
Note. Telia F1 in factory configuration UPnP and NAT-PMP settings are off

11 ROUTER AND NETWORK DIAGNOSTICS
•In the main window, click on the name Diagnostics
•In the additional window that appears, you will find three sections:
oPing & Traceroute- you will be able to take Ping and Traceroute tests
oConnection- automatic communication check is performed
oNetwork- statistics for each slot are displayed
oIgmpproxy- IP multicast information is displayed
11.1 DLNA on / off
To turn off the DLNA feature, find DLNA Enabled on the Sharing tab
and change the status from ON to OFF.
Conversely, to enable the DLNA function, change DLNA Enabled from OFF to ON.
12 PARENTAL CONTROLS
To restrict Internet access to LAN devices, go to the Parental Controls tab.
In this card you can:
•Block unwanted websites.
a. Parental Control, In the Site Blocking area, the page blocking function must be
enabled, i.e. change the parameter Enabled from OFF to ON;
b. Then you need to enter the sites you want to block:
i. Click the Add New Site button
ii. enter the site
iii. Device select Single to block the site for one LAN device, then select the
MAC Address of that device from the list, leave All to block the site for all
LAN devices
iv. After entering the data, press the button
Note. If blocking webpages didn't work for your computer or other device, try disconnecting it and
reconnecting it to your home or network wired or wireless connection.
•Restrict Internet access to LAN devices on certain days / hours of the week.
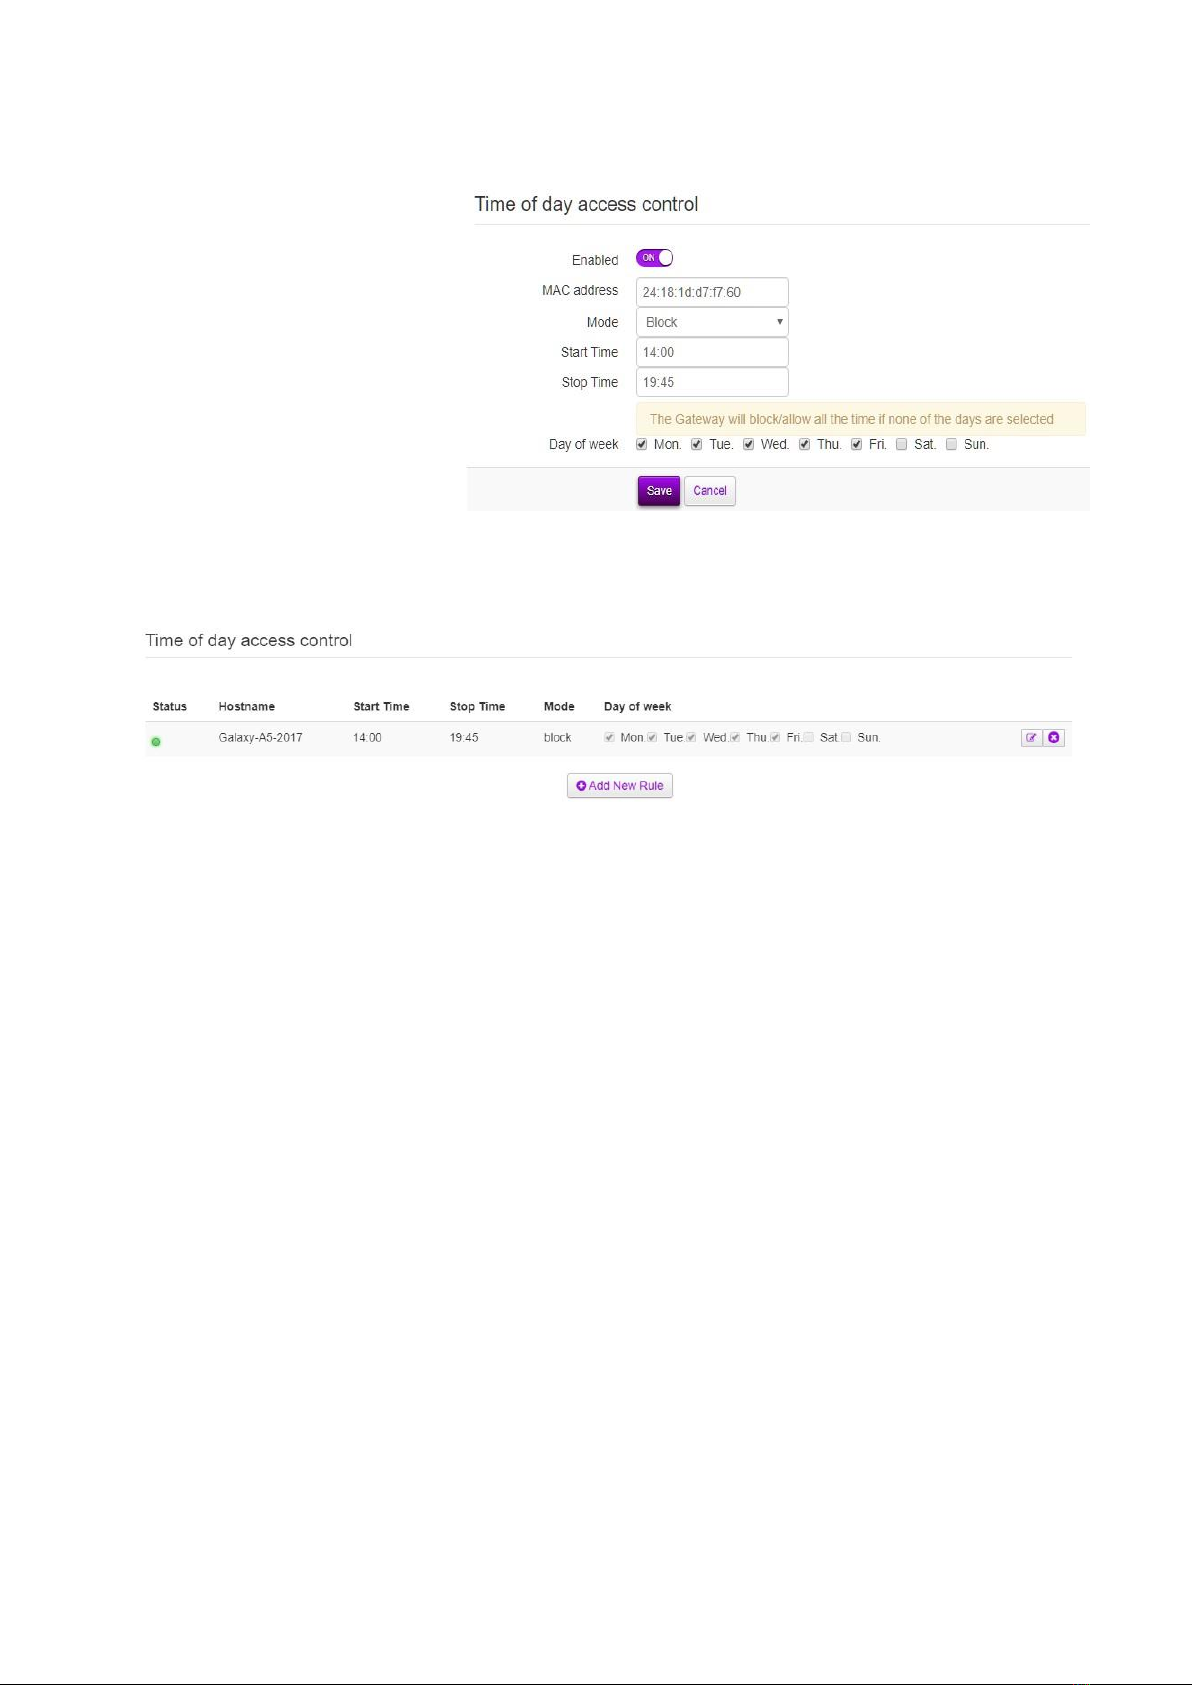
a. Time of Day Access Control In the area, click the Add New Rule button
b. Configure the limited
days and hours of the
week for the selected
LAN device (MAC
address), select Block
in Mode
c. Save with the Save
button.
We will get the following result:
Table of contents
Other Telia Network Router manuals

Popular Network Router manuals by other brands

Dangerous Music
Dangerous Music ST Setup guide

TP-Link
TP-Link TL-WR802N Quick installation guide

Allied Telesis
Allied Telesis SwitchBlade AT-AR440S manual

Cisco
Cisco ASR-920-12SZ-A Hardware installation guide

MikroTik
MikroTik RB911G-5HPnD Quick setup guide and warranty information

Paradyne
Paradyne Hotwire 6351 installation instructions


