Telmann TEL5FL User guide

0020
5
0
5
862
AUTOMATIC DRUM
WASHING MACHINE
INSTRUCTIONS FOR
INSTALLATION AND
OPERATION
TEL5FL


WIRING CIRCIUT TEL5FL
I4=ON/OFF
L Line
N Neutral
TM Timer motor
SL Line LED
RR Heating element
SO Door LED
MR Thermal lock
EVF/EVP/EVC Water electrovalve
P1 1- level pressure switch
P2 2- level pressure switch
PS Drain pump
I5=ECONOMIC WASH I6=850/500
I 4
20 1
F U NC T IO N INT R O DU C T IO N. .. .. . .. .. .. .. .. .. . .. .. .. .. . . .2-3
INS TALLATION....... .................................4-6
CL OS E UP.................................. ...........7-9
US ING INS T R UC T IONS ... ..... ..... ..... .. . .. .. ... .. ... .10-14
MAINTE NANCE ................................. ........15
S O L U T IO N T O P R O B L E MS . .. .. .. .. . .. . . .. .. .. . .. .. .16-17
AT TA C HE D C HA R T:
.......................
...................................
.....................................
........................
..................................
......................
................................18
WAR NING....................................................................................19
WIR ING C IR C UIT.........................................................................20
G U IDE F O R S E L E C T ING P R O G R A MME
10

2
FUNCTI
O
N INTR
O
DUCTI
O
N
FUNCTION COMPARING TABLE
FUNCTION
MODEL
Washing capacity
Power switch
ON/OFF
5kg
18
850r/min
850X520X595mm
225W
2300W
530W
66kg
HXDXW
Weight
Power(Spin)
Power(Wash)
Power(Heating)
Door-locking device
Stainless steel tub
Rinse
Spin speed
Economic button
Speed button
Cold wash button
Adjustable thermostat( ~MAX)
Wool
Synthetic
Cotton
Programmes
TEL5FL
19
Warning:
1. If the supply cord is damaged, it must be replaced, these are
available from an authorised service agent.
2. The appliance must be placed so that the plug is accessible.
4. The appliance is not intended for use by young children or infirm
persons without supervision. Young children should be supervised
to ensure that they do not play with the appliance,
3. The appliance is to be connected to the water mains using new
hose-sets, old hose-sets should not be reused.
5. When installing the washing machine, unpack it and remove
the metal board. Then tilt the washing machine to remove the
foam materials. Unscrew the four feet and place the metal
board on the bottom of the washing machine. Fix the metal
board to the four feet.
6. If washing machine is supplied from a cord extension set or
electrical portable outlet device, no cord extension set or electric
portable outlet device should be positioned so it is not subject to
splashing or ingress of moisture.
ensure carpet
does not obstruct the opening in the bases.

Guide for selecting programme
18
Position
Program
knob
Detergent
for prewash
Detergent
for wash
cycle
Type of fabric and degree of
dirtiness
1
2
3
4
5
6
7
8
9
10
11
12
13
14
15
16
17
18
Cotton cycle
Synthetic cycle
Wool cycle
Softener
Description of wash cycle
Prewash -wash cycle -rinses and extended final spin
Rinses with automatic introduction of
softener, and extended final spin
Rinses with automatic introduction of
softener, and extended final spin
Rinses with automatic introduction of
softener, and extended final spin
Rinses with automatic introduction of
softener, and extended final spin
Rinses with automatic introduction of
softener, and extended final spin
Rinses with automatic introduction of
softener, and extended final spin
Wash cycle -rinses and extended final spin
Draining and extended final rinse
Heavily soiled white laundry
White and fast colours
White and fast colours soiled
Delicate colours
Delicate colours
Delicate colours
Rinses
Rinses
Rinses
Softeners
Softeners
Softeners
Spin cycle
Spin cycle
Spin cycle
3
FUNCTI
O
N INTR
O
DUCTI
O
N
European andAsia Aesthetic design, elegant and beautiful.
Three types of wash: rinse, beat and rain effect.
Changeable washing function: cold wash and hot wash,No soak.
Three types of laundry: cotton, synthetic and wool, with 18 cycles.
Alarge washing capacity: 5 kg.
Stainless steel tub and drum; painted cabinet with three layers of
cataphresis, phosphorus and paint.
Rinse with anti-crease system, care for clothes.
Super anti-shock design.
Self-lock device for the door.
Characteristics of TEL5FL

Remove the package and check that the machine is
undamaged.
If you have any doubts, do not use the machine and call on a
qualified technician. Keep all packing parts (plastic bag,
foam rubber, screws etc.) out of the reach of children since
they could be dangerous.
The inside of the washing machine which
consists of a floating unit, is fixed with screws and tabs at the
back of the cabinet (Fig.1) during transport. Before starting
the machine remember to release the floating unit by
removing the above screws and take down the reinforcing
iron piece. To prevent water spray from entering the machine,
remember to close the holes left open by the screws with the
plastic caps provided in the packet containing the owner's
manual. And rescrew the holes where the iron piece is taken
down with the former two screws.Attention:keep the packing
screws and plastic caps in a safe place for later use. It is
important for the machine to be perfectly level (the angle of
inclination on the work surface must not be more than 2
degrees). For this reason the machine is fitted with
adjustable feet used for levelling the machine before use
(Fig.2). In the case of flooring with carpeting, remember to
check that the ventilation in the support area is not plugged.
Important:
Fig.1
Unpacking
levelling and
positioning
4
Installation
Fig.2
Solution to Problems
17
Check that:
the transit bolts have been removed (see
installation manual);
the machine is level;
the washing load is according to the instructions
given in this booklet.
The machine
vibrates too
much when
spinning
The machine
stops operating
before finishing
Check that:
there is a sudden power failure or water stop.
the machine is in the normal state of rinse.

Solution to Problems
16
Even though your washing machine has been carefully
designed and constructed, something could still go a miss
with your machine. Before rushing to phone one of our
service centres, however, please check that the operations
listed below have been carried out. In many cases you will
save time, money and bother. Our statistics show that many
of the calls received by our service centres could have been
avoided with just a little more attention.
Check that:
the plug is pushed right into the mains socket;
the "ON/OFF" button has been pressed.
the door is closed tightly:
Check that:
the tap is open and properly connected to the inlet
pipe;
the inlet pipe is not bent.
Check that:
the drain pipe is placed at least 80 cm/32 inches
above ground level.
Check that:
the drain pipe is not blocked;
the drain pipe is not connected at a height more than
1 metre/40 inches above ground level.
Check that:
the detergent being used is meant for automatic
machines and not for washing by hand;
that the amount used is that shown in this manual
and not more.
The washing
machine
won't start
The washing
machine won't
fill with water
The machine
fills and drains
continuously
The machine
will not drain
drain the water
There is too
much foam in
the tub
Connect the plug to a socket provided with efficient earthing.
Or use the spare earthing wire supplied together with the
machine and the earthing terminal located on the left-upper
corner of the back of your machine (Warning: this appliance
must be earthed as a safety measure according to the law).
Make sure that the voltage and frequency available
correspond with the values stated on the data plate located at
the back of the machine and that the electric system is
dimensioned to withstand the maximum current shown on the
data plate. If the socket the machine is connected to does not
correspond with the plug, replace the plug with a suitable one
and avoid using adaptors or shunts since they could cause
overheating and burn out.The spare eathing wire is
absolutely not allowed to be connected to water
pipe,heating pipe or other kinds of pipes.
5
Installation
Electric
connection
Connection
of tap and
Loading
Hose
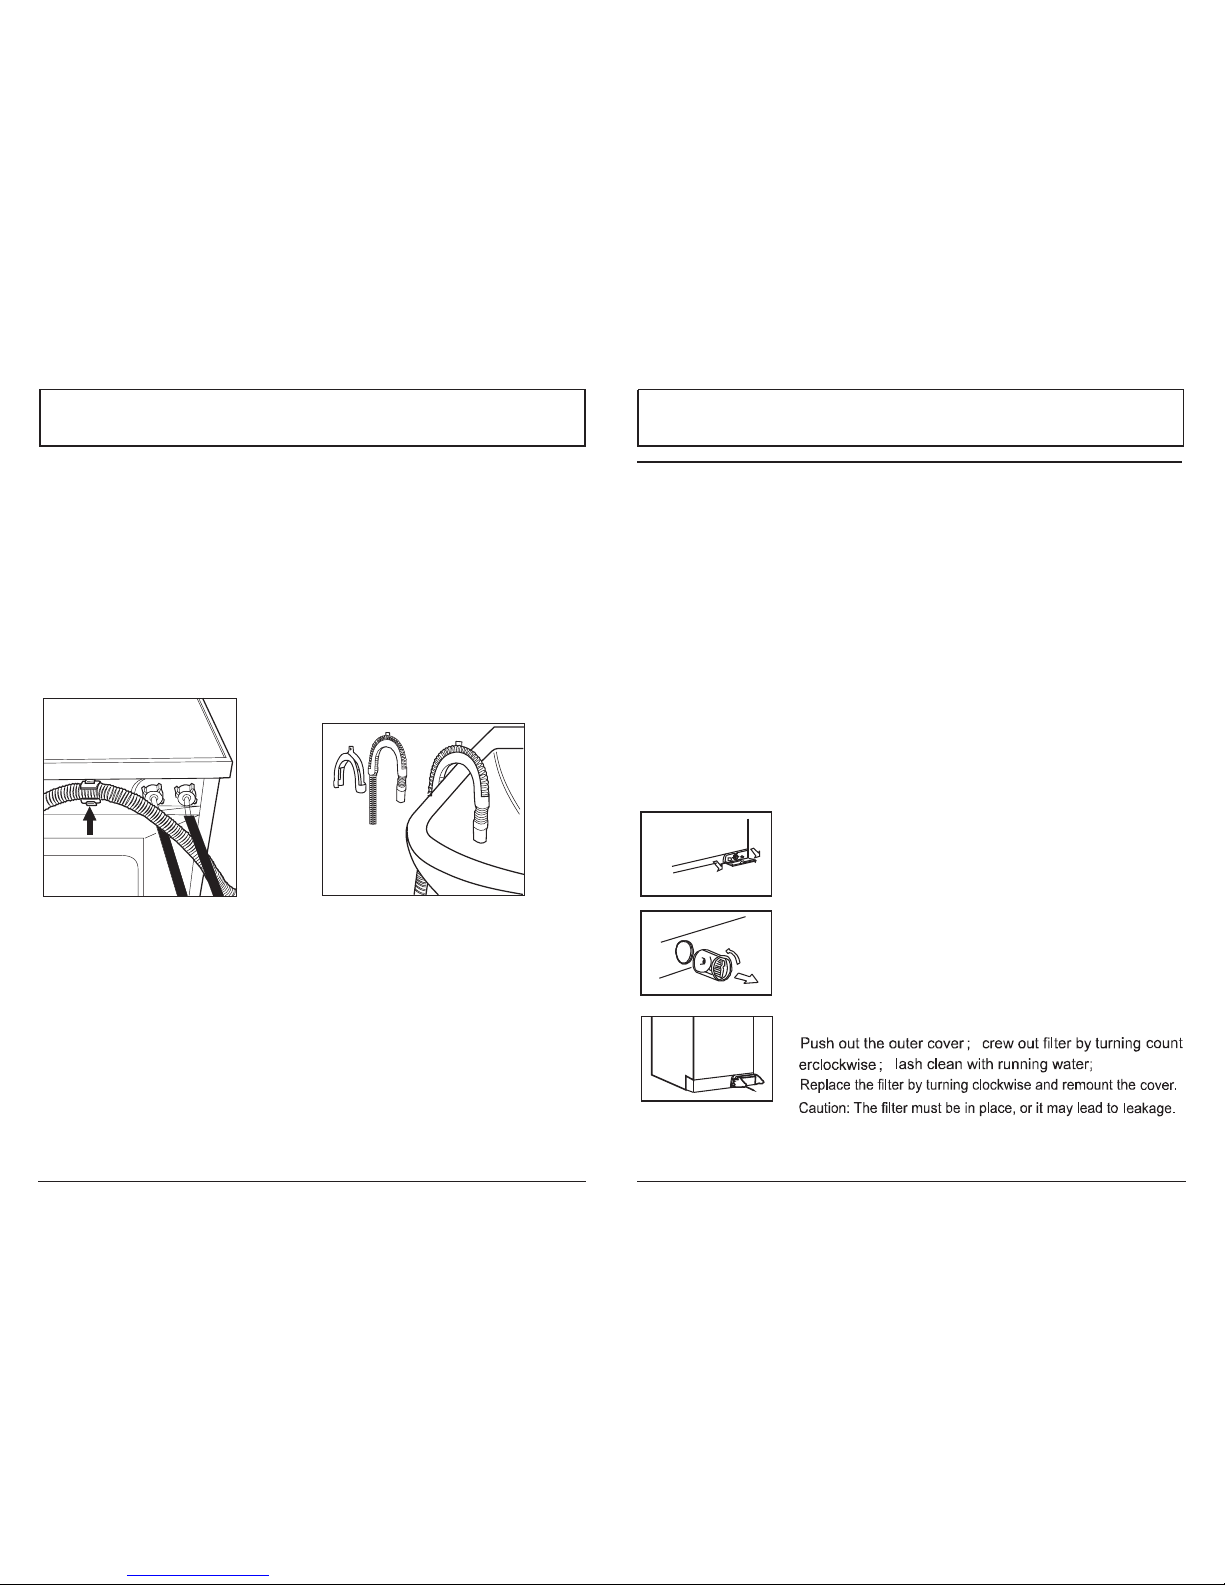
Connect the inlet hose to a cold water tap with a 3/4 gas
threaded opening, and fit the filter and the rubber gasket
supplied with the washing machine. Check that it is tightly
screwed to the tap (Fig. 3).
If the water piping is new or has not been used for a long time,
before making the connection, let the water run until it is clear
and free from impurities.
This step is necessary to ensure that the incoming water
does not clog and possibly damage the machine.
Fig. 3

6
Installation
Connect the drain hose to a drain duct (with internal
diameter of at least 4 cm.) or place it for drainage into
a sink or a tub, ensuring that there are no kinks or
bends. The free end must be at a height of between
80 and 100 cm. Should it be necessary to fix the end
of the hose at a height of less than 80 cm from the
floor, the hose must be fixed in the appropriate hook
on the upper part of the back panel (Fig.4) or use the
supplied support to fix the drain hose.(Fig.5)
C onnection of
the Drain Hos e
Fig.4 Fig.5
Insert stainless steel screen washers into end of each
supply hose and attach that end of supply hose to
your 3/4" water tap spigot.Be sure that you match up
cold water to "C" and hot to "H".Note:Home Centers
also have"Y" connectors and "Couplings" which
enable you to connect the machine to your sinks
faucet.
C onnecting
WaterS upply
Maintenance: five simple
precautions for this machine
15
Your machine is designed to last without complicated
maintenance.
All the same, we would ask you to take care of a few small
matters. If you follow these four simple rules, we are sure
that the washing machine will stay as your faithful friend
and helper for a long, long time.
1. Ensure that your machine was installed according to
the installation manual that comes with this booklet.
2. Avoid at all costs using solvents either to clean the
machine, or to do the wash. when clean the machine,
cut off the power.
3. Clean the detergent dispenser every so often. This is
very simple and should be done with water. Your
machine has an extractable dispenser to make it even
easier. Just pull it upwards and out.
4. If it is long time no use, you'd better cut off the power,
switch off the tap, and open the door to avoid
unpleasant smell.
5. Your washer is equipped with a self-cleaning pump. It
is therefore not necessary to carry out cleaning and
maintenance operations.
(see Fig.8)
Fig.8
s
f
-

Using instructions:Your machine
offers the best results when...
14
You can now start washing. We would advise you, especially
the first few times, to check that the programme that you
have set is really the one you want and that the fabric
selection is correct.
If you want to start the cycle immediately, press the ON/OFF
button D.
At the end of the chosen cycle, the machine will stop
automatically.
Press the ON/OFF button D to switch off the power (light C
will turn off).
The cycle is
started
The wash is
finished
Close up
7
Cotton Synthetic wool
1 prewash
2 intense
3 normal
4 delicate
6 softening
5 rinse
14 normal
15 delicate
16 rinse
17 softening
18 spin
8 intense
9 normal
10 delicate
12 softening
11 rinse
13 spin
7 spin
MAX
80
60
70
40
50
30
123
4
5
6
7
8
9
10
11
12
13
13
14
15
16
16
17
18
18
TEL5FL
DOOR LOCK
ECONOMY

8
Close up
AProgramme selector Knob.
By turning this dial (clockwise only) you can select
from eighteen wash programmes the one most
suited for your washing.
1~7 cotton cycle
8~13 synthetic cycle
14~18 wool cycle
B Programme selector Knob.
With this dial you can set the wash temperature
that you desire.For synthetic and wool, the
thermostat works below 60 and 40 respectively.
When the dial is located at " ", a cold wash is
available
CPower Light
This light indicates whether the electricity is on or
off. The light comes on when button D is pressed
and goes off when button D is not pressed.
DON/OFF Button
ON/OFF button. Supplies electrical power to the
machine.
12
3
4
5
6
7
8
9
10
11
12
13
14
15
16 1718
MAX
80
60
70
40
50
30
Using instructions:Your machine
offers the best results when...
1
3
The following table will guide you:
When using concentrated detergents, remember to keep to the
manufacturer's instructions using only the measuring cups
supplied with the packet.
Use more detergent in the case of very hard water ( more than
21.F), but remember to maintain the proportion between the
prewash and wash cycles.
The liquid detergents currently available on the market may be
used with the washing machine. Use compartment 2 for very
dense liquid detergents. Follow the manufacturer's
instructions when using liquid detergents sold with the ball
detergent dispenser. Place the ball dispenser in the tub of
washing machine together with the laundry.
The prewash cycle may not be used with liquid detergents.
For soft and fluffy laundry always a softener in the final rinsing
cycle.
Bleach is ideal for removing stains (e.g.tea, coffee, fruit, red
wine ) on resistant fabrics like cotton, hemp and linen provided
the wash care label indicates that the garment may be
bleached.
Place the bleach in compartment C before you start the
machine without exceeding the maximum level. your machine
will load the bleach automatically when necessary .when
necessary.
Liquid detergent
Note "A"
Note "C"
Never place bleach in the other compartments.
Laundry
Normally
soiled
1/2 measuring
cup
Softeners
(see note '3)
1 and 1/2
measuring
cups
Compart.3
Compart.1
prewash
Compart.2
wash

The 3 compartments marked 1, 2, 3 (Fig.7) should be
used as follows:
1 Pre-wash detergent
2 Wash detergent
3 Conditioner, starch, scents
The detergent
has been put
in properly
Remember that it is important to use the right amount of
soap powder or liquid for the type of laundry you are washing;
the amount of detergent you use depends on a number of
factors:
Water hardness; if the water in your area has a
high calcium content, we recommend using a
anti-limestone additive.
Degree of dirtiness; increase the amount of
soap powder used in the case of heavily soiled
laundry.
Iaundry load; the smaller the load the less soap
powder you will need to use.
Fig.7
Using instructions:Your machine
offers the best results when...
12 9
Close up
E Economic Wash Button.
It reduces water and power consumption when rinsing
if the machine does not have a full load.
(Less than 3kg)
F Speed Button.
Push the button down, to reduce spin speed from
850r/min to 500r/min during strong washing mode and
medium washing mode
GDetergent Dispenser.
The detergent dispenser is divided into 3 compart-
ments marked 1,2,3:(See Fig.6)
1 Pre-wash detergent
2 Wash detergent
3 Softeners, conditioners, perfumes
Fig.6
H Door Lock Button
The button is used to open the door, but we must
remember that only when the washer doesn't work,we
can open the door. After the washing program
finish,after 3 minutes, when the self-lock meter turn off,
we can open the door.

Using instructions:Your machine
offers the best results when...
10
In order to get the excellent results that you would expect
from your washing machine, it is important to load the washer
correctly. You should therefore choose the quantity of each
type of fabric that you want to wash. This table will help:
Colour fast fabrics maximum load 5 kgs/11 lbs
Delicate fabrics maximum load 2 kgs/2.5 lbs
Woollens maximum load 1 kg/2.2 lbs
Mixed fabrics maximum load 2.5 kgs/5.5 lbs
The weight
is right
Divide the laundry by fabric and degree of soiling loaded
making the loads as uniform as possible.
Pull the handle out to open the door.
Place the laundry in the machine remembering to arrange
uniformly.
L aundry has
been loaded
correctly
11
Using instructions:Your machine
offers the best results when...
A perfect wash depends above all on choosing the most
suitable programme. We would therefore advise you to
divide up your washing into separate loads of more or
less the same types of fabric. This will make it easier to
select the best programme.
Hints on choosing the programme are shown in the table
on pages of this manual.
Once you have selected a programme, just turn dial
A clockwise until the chosen programme lines up with
the indicator line on the facia panel.
The correc t
programme has
been c hos en
Anti-c reas e When your machine is washing synthetic fabrics or
woollens, the wash cycle stops before the last spin cycle,
with the laundry soaked in water in order to prevent the
formation of creases due to spinning. Complete the
wash cycle with a spin cycle or simply drain the water
from the washing machine without spinning.
For the spin cycle, turn the selector knob A clockwise by
one step.
To drain, set the selector knob A on drain programme in
both cases, before turning the knob A remember to
switch OFF the ON/OFF button D.
Table of contents
Other Telmann Washer manuals