tennat S30 X4 Training manual

IB 9006790 (07--2010) 1
INSTRUCTION BULLETIN
No. 9006790
Machine: S30 X4
Published: 07--2010
Rev. 00
NOTE: DO NOT DISCARD the Parts List from the Instruction Bulletin. Place the
Parts List in the appropriate place in the machine manual for future
reference. Retaining the Parts List will make it easier to reorder
individual parts and will save the cost of ordering an entire kit.
NOTE: Numbers in parenthesis ( ) are reference numbers for parts listed in Bill of Materials.
Installation instructions for kit number 9006789
SYNOPSIS:
This kit contains the parts needed to replace the rear right side hydraulic tubes on S30 X4 machines.
Please follow step-by-step instructions.
SPECIAL TOOLS / CONSIDERATIONS: NONE
(Estimated time to complete: 2 hours)
When assembling / disassembling hydraulic components:
1. Thoroughly clean outside of hydraulic components before disconnecting hydraulic hoses or fittings to
prevent contaminants from entering system.
2. Flush hoses and fittings with air, solvent, or hydraulic fluid and cap disconnected hoses or open ports
to prevent contaminants from entering system.
3. Mark hydraulic hoses with locations of where they are attached. Markings make it easier to reconnect
hoses to proper locations.
4. Discard all hydraulic fluid drained from the system. Use only new approved hydraulic fluid to replenish
hydraulic reservoir. Hydraulic fluid is potentially dangerous to the environment. Obey all federal, state,
and local laws/regulations governing the disposal of environmentally hazardous materials when
disposing hydraulic fluid.
PREPARATION:
1. Park the machine on a clean level surface,
turn off the machine, remove the key, and set
the parking brake.
FOR SAFETY: Before leaving or servicing
machine, stop on level surface, set parking
brake, turn off machine, and remove key.
2. Place a chock block in front of the left and
right front tires.
3. Jack up the left rear end of the machine and
position jack stands underneath the machine
for additional support. Refer to the
MAINTENANCE section of the Operators
Manual for additional information.
FOR SAFETY: When servicing machine, block
machine tires before jacking machine up. Use
a hoist or jack that will support the weight of
the machine. Jack machine up at designated
locations only. Support machine with jack
stands.
4. Remove the right rear tire from the machine.
Set the tire and lug nuts aside.
IB 9006790 (07--2010)2
INSTALLATION:
1. Remove both existing rear wheel guards from
the right drive support housing. Set the
mounting hardware aside. Discard both wheel
guards Refer to Fig. 1.
Remove and
discard right
rear guard
Set all
hardwareaside
Remove and
discard left
rear guard Right drive
supporthousing
FIG. 1
2. Remove the 2--hole tube clamp from the
hydraulic tubes attached to the right wheel
drive motor. Set the clamp and mounting
hardware aside. Refer to Fig. 2.
Remove and set
aside 2--hole tube
clamp and hardware
FIG. 2
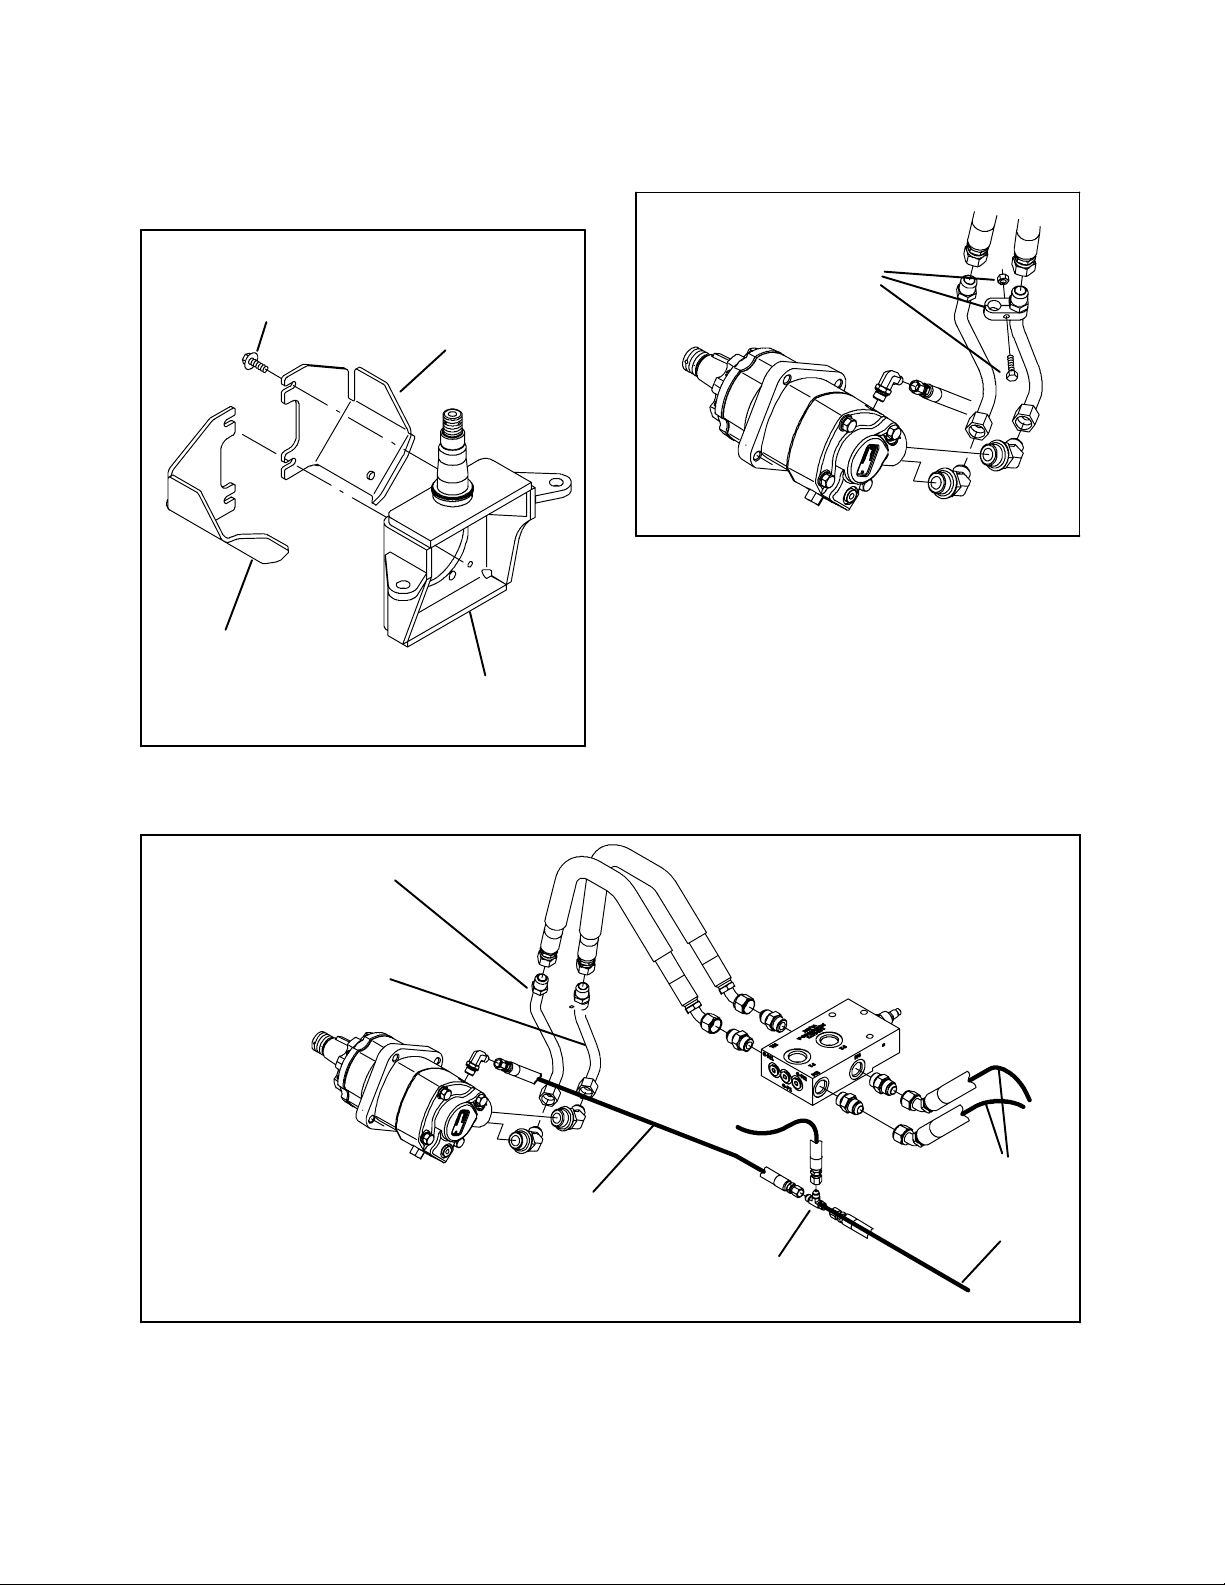
3. Remove both hydraulic tubes from the right
wheel drive motor. Discard the hydraulic
tubes. Refer to Fig. 3.
4. Disconnect the 46” hydraulic hose from the
t--fitting and the right wheel drive motor.
Discard the hose. Refer to Fig. 3.
5. Connect the 51” hydraulic hose (4) to the
t--fitting. Refer to Fig. 3.
To left
wheel drive
motor
Right wheel
drive motor
Flow divider
valve
Remove and discard
right outer hydraulic
motor tube
Remove and discard
right outer hydraulic
motor tube
Remove and discard
46” hydraulic hose.
Replace with 51”
hydraulic hose (4) T--fitting
FIG. 3

IB 9006790 (07--2010) 3
6. Route the 51” hydraulic hose (4) to the right
wheel drive motor and connect the hose to
the motor. Refer to Fig. 4.
7. Install the 2--hole tube clamp onto the
hydraulic tube (2). Refer to Fig. 4.
8. Install the new hydraulic tube (2) onto the
hydraulic motor and connect the hose from
flow divider valve port M3 to the hydraulic
tube. Refer to Fig. 4.
9. Install the hydraulic tube (1) onto the machine
and connect the hose from flow divider valve
port M1 to the hydraulic tube. Refer to Fig. 4.
10. Position the 2--hole tube clamp onto the
hydraulic tube (1) and secure the clamp onto
both tubes. Refer to Fig. 4.
11. Remove the hex nut and washer holding the
hydraulic cylinder assembly to the right drive
support housing, slide the tube support
bracket (5) onto the hex screw, and reinstall
the hex nut and washer. Refer to Fig. 4.
12. Insert the hydraulic hoses attached to the
hydraulic tube (1) and hydraulic tube (2) into
the cable clamp (7). Refer to Fig. 4.
13. Use the hex screw (8), spacer (6), flat washer
(9), and hex nut (10) to install the cable clamp
(7) onto the tube support bracket (5) and
secure the hoses. Refer to Fig. 4.
5
6
7
8
9
10
Remove hex nut and
flat washer to install
tube support bracket
Connected to
hydraulic cylinder
Right drive
support
housing
1
2
2--hole tube clamp
Install hydraulic tube (1)
and hydraulic tube (2)
onto hydraulic motor
Install tube support bracket
(5) onto right drive support
housing
4
Hose from flow
divider valve M3
Hose from flow
divider valve M1
FIG. 4

IB 9006790 (07--2010)4
14. Use saved hex screws to install the right rear
guard (3) onto the right drive support housing.
Refer to Fig. 5.
15. Reinstall the right rear tire onto the machine.
16. Remove the jack stands from underneath the
machine and lower the machine to the floor.
17. Check the hydraulic fluid level. If necessary,
add hydraulic fluid to the system.
18. Start and test the machine. Observe the
replaced hydraulic components and hose
connections for leaks.
3
Right drive
support housing
Saved hex
screws
FIG. 5
Bill of Materials for Wheel Kit, RH, Replmt (4X) -- 9006789
Ref.
Tennant
Part No. Description Qty.
o9006789 )Wheel Kit, RH, Replmt (4X) 1
Y1 1047806 Tube, Hyd, Right Outside 1
Y2 1047720 Tube, Hyd, Right Inside 1
Y3 1047929 Guard, Rear, RH (4--Wheel) 1
Y4 367113 Hose, Hyd, Med04, JF04Str/JF04Str, 051.0 1
Y51048061 )Bracket, Support, Tube 1
Y6 1048084 Spacer, 0.35B, 1.50D, 0.25L, PL 1
Y7 09570 Clamp, Cable, Stl, 0.9X1.8X0.62W, 1 Hole 1
Y8 39277 Screw, Hex, M8 X 1.25 X 25, 8.8 1
Y9 32491 Washer, Flat, 0.31, Std 1
Y10 07791 )Nut, Hex, Flng, M8 X 1.25 1
TENNANT COMPANY
P. O. Box 1452
Minneapolis, MN 55440-1452
Popular Blower manuals by other brands

Lithium Earthwise
Lithium Earthwise LB20024 Operator's manual

EINHELL
EINHELL GE-CL 36 Li E Original operating instructions

EINHELL
EINHELL VENTURRO 18/210 operating instructions

Troy-Bilt
Troy-Bilt 657 Operator's manual

Weed Eater
Weed Eater VS2000BV instruction manual

KRAUSMANN
KRAUSMANN U37020-00 Operation manual


