Tennessee Stone and Design RELIC User manual

RELIC CHARCOAL GRILL MOUNT OWNER’S MANUAL
READ THE FOLLOWING INSTRUCTIONS CAREFULLY AND BE SURE YOUR WEBER GRILL AND RELIC CHARCOAL
GRILL MOUNT ARE PROPERLY INSTALLED, ASSEMBLED AND CARED FOR. IF YOU HAVE ANY QUESTIONS OR
CONCERNS IN REGARDS COOKING WITH YOUR CHARCOAL GRILL PLEASE REFERENCE YOUR CHARCOAL
GRILL INSTRUCTIONS. IF YOU HAVE ANY QUESTIONS OR CONCERNS REGARDING THE ASSEMBLY OR
OPERATION OF YOUR RELIC CHARCOAL GRILL MOUNT, CONTACT US AT or[email protected]
SAFETY INSTRUCTIONS ……………………………………………………………………………………………………………………………………………………………………………………….. 2
PARTS LIST ……………………………………..………………………………………………………………………………………………………………………………………………………………………………….. 4
SPECIFICATIONS……………….……………………………………………………………………….…………..……………………...………………………………………………………………….…...…... 5
CUSTOM TABLE PREPARATION …………………………………………….………………………………………………………………………………………………………..……………. 6
INSTALL INSTRUCTIONS ……………………………………………………………………………………………………………………………………………………………………………………... 8
BEFORE YOU COOK ………………………..……………………………………………………………………………………………………………………………………………………………………….…. 11
MAINTENANCE ……………...…………………………………………………………………………………………..……………………………………………………………………….………………………….. 12
TABLE OF CONTENTS

SAFETY INSTRUCTIONS
READ CAREFULLY BEFORE ASSEMBLING AND USING YOUR CHARCOAL GRILL MOUNT. YOU MUST
FOLLOW ALL INSTRUCTIONS THAT ARE PROVIDED WITHIN THIS OWNER’S MANUAL TO ENSURE ALL
SAFETY PRECAUTIONS ARE KNOWN AND APPLIED.
GENERAL PRECAUTIONS OF OUTDOOR COOKING
All outdoor cooking with live fire is dangerous. This product does not reduce the hazards normally associated with
outdoor cooking with wood or charcoal BE SURE TO READ AND FOLLOW ALL INSTRUCTIONS PROVIDED BY
YOUR CHARCOAL GRILL MANUFACTURER. Safety tips for charcoal grilling include but are not limited to:.
- Charcoal grills are for OUTDOOR USE ONLY
- Never operate a charcoal grill inside or in an enclosed space
- Never leave a charcoal grill or other live fire unattended
- When using a charcoal grill have proper fire extinguisher readily available
- Never place a charcoal grill (or the Relic Charcoal Grill Mount or your custom table) in a place where it can
be knocked over
- Always obey any burn bans or limitations on outdoor cooking within your state/county
- Do not place your charcoal grill and ring mount in heavily dry/treed areas (brush fires could occur),
especially if it is windy
- Always refer to the instructions that came with your charcoal grill before using your grill with your Relic
Charcoal Grill Mount
CHARCOAL COOKING:
CONSTRUCTION AND ASSEMBLY:
When installing the Relic Grill Mount in a permanent enclosure we recommend the use of only fire
rated and heat proof materials, such as metal or masonry. Only consider utilizing wood or other
combustible materials as part of a wood structure if you are a licensed builder and know what you are
doing. Always follow local building codes.
FOR FREE-STANDING AND MOBILE TABLES:
FOR PERMANENT INSTALLATIONS:
We also recommend the use of only fire rated and heat proof materials, such as metal or masonry
when installing the Relic Grill Mount in a table. Any table which utilizes wood has a risk of
combustion under certain scenarios, and should never be left attended. Always check your wood
table for damage or degradation. The instructions herein assumed you are a trained craftsman,
familiar with tools, construction methods, safety precautions of both building and constructing safe
structures, and operating a charcoal grill safely.
All construction projects are dangerous. Only attempt a construction project if your are trained and
experienced with the building materials and tools necessary. Always follow all safety instructions and
customary precautions for the tools and building materials you choose. Always wear proper safety
gear when building your table or enclosure.
Generally, the Relic Charcoal Grill Mount may be mounted in either a permanent enclosure (such as
an outdoor kitchen or patio island) or it may be mounted in a free-standing or mobile table (such as a
wood table with wheels).
.
CONSTRUCTION HAZARDS
2

DISCLAIMER AND LIMITATION OF LIABILITY
RISKS WHEN USING YOUR RELIC CHARCOAL GRILL MOUNT:
The Relic Charcoal Grill Mount requires regular maintenance and care. Do not use your Relic Charcoal Grill Mount if it
is if damaged for any reason. Inspect your product according to this manual before using each time to look for cracks
or breaks in the stone, as well as tears or frays in the gasket. Gaskets require regular maintenance and may
eventually need repair or replacement. Using damaged products can result in health related problems associated
with ingesting, inhaling, or coming into contact with foreign materials.
INSPECTION AND MAINTENANCE
RISK OF SKIN BURN
The Relic Charcoal Grill Mount will become hot while cooking. Do not touch or set objects directly onto ring mount.
Take extreme caution during and after cooking with temperatures of product. Do not attempt to move the product
until it has cooled to room temperature.
`
SAFETY INSTRUCTIONS CONT.
Cooking with live fire and performing construction activities are inherently dangerous. The instructions
provided herein, even when followed, may not cover all hazards of outdoor cooking or the constructions
steps explained herein.
Tennessee Stone and Design, and its owner, BT CONCEPTS, LLC is not responsible and shall be held
harmless from any failures by you, the owner, in any craftsmanship, design, engineering or other activities
related to the building, operation or use of any table or structure built to house your Relic Grill Mount.
Use of the Relic Charcoal Grill Mount with any charcoal grill can cause burns, and can burn or degrade
materials, including wood and masonry, causing fire or other health hazards or potential for loss of
property, life, or other losses. USE THIS PRODUCT AT YOUR OWN RISK.
3

4
PARTS LIST
A. RELIC CHARCOAL GRILL
MOUNT WITH GASKET (1)
C. *TEMPERATURE
RESISTANT HEAT-SKIRT (8)
B. *TOP SHIM PADS (8)
MATERIALS INCLUDED WITH PURCHASE:
MATERIALS NEEDED, SOLD SEPARATELY
(NECESSARY FOR CORRECT INSTALLATION)
A. HIGH TEMPERATURE (>500f)
ENAMEL PAINT (engine paint or
exhaust paint)
B. HAND DRIVER OR
POWER DRILL
C. TEMPERATURE RADAR
GUN (optional but
recommended)
D. HAND MITER BOX /
POWER MITER SAW
D. WOOD OR STEEL STOCK (8 or 6 each)
Furniture grade hardwood
(hickory, oak, locust)
Min: 1” x 3”
Steel tube (12 gauge)
Min: 1” x 1”
Max: 2” x 4”*
* Exceeding 4” in height can
prevent airflow necessary for
cooling
For Wood:
For Steel:
OR
D. *HEAT-SKIRT INSTALL
SCREWS (32)
Supports:
Max: none
D. HACK SAW / CHOP SAW / SAWZALL
*Included with wooden table/counter option
x 32
* Do NOT utilize wood material for support stocks if you do
not have these parts.
“or (insert 4 piece)”

SPECIFICATIONS
WEIGHT: 16 lbs
STONE MATERIAL: Advanced reinforced refractory
GASKET MATERIAL: Fire-resistant ceramic coated fabric + high temp. silicone
MAXIMUM TEMPERATURE: 600 F
DIMENSIONS:
5
Single Piece Ring
Gasket Stone

SPECIFICATIONS
6
Quarter Piece Ring
Bumper Location
Cross Section

ATTENTION
7
DO NOT INSTALL THE RELIC CHARCOAL GRILL MOUNT TO SIT DIRECTLY ON TOP OF THE WOODEN TABLE.
THIS IS INCORRECT INSTALLATION THAT CAN CREATE HAZARDOUS CONDITIONS AND POTENTIALLY
DAMAGE THE RELIC CHARCOAL GRILL MOUNT.

CUSTOM TABLE PREPARATION
These instructions will provide you with the measurements and steps necessary for you or your builder to construct a wood, steel, or masonry structure to
house your outdoor 22” Charcoal grill and your Relic Charcoal Grill Mount. The Relic Charcoal Grill Mount is designed to provide support as well as
insulation between your Weber Charcoal Grill and your enclosure or custom table. Still, specific steps and precautions must be taken with all installations,
and especially with wood or other combustible building materials, in order to ensure your safety.
NOTE TO INSTALLER: Leave these instructions with the consumer for future reference; grill must be installed in accordance with local building codes
SPECIFICATIONS FOR GRILL ENCLOSURE
Steel, hardwood, or other masonry material of your choice can be
used for cabinet and kettle grill ring cutout construction. For wood
tables, we recommend hardwood only. Softwoods like pine, spruce,
or cedar have lower heat tolerance and can easily combust at
relatively low temperatures. If using wood, all interior facing wood
must be properly cleaned and sealed with fire resistant paint.
Table Top Opening: 25 ¾”
The mount itself is 25 ½’’ across. The hole size above will
give a ⅛” clearance between your Relic Charcoal Grill
Mount and your countertop/custom table, which is
recommended. You may use a slightly smaller hole, but
do not use a gap less than 1/16’’.
All tables or enclosures require support stocks to be
installed under the circular cutout to hold-up the
Relic Charcoal Grill Mount. The support stock can be
steel, wood, or other masonry materials. Wood must
be sealed with fire resistant paint and MUST have
heat skirt and top shim pads (included with wooden
table/counter option). We recommend 8 support
points. Please see page 8 for detailed stock building
diagram and guide.
GENERAL GUIDELINES (applies to all designs):
CRITICAL DIMENSIONS
ADDITIONAL INSULATION (FOR WOOD TABLES)
Distance between supports: 23 1/4”
This is the distance, at the closest point, between the stocks.
(We will leave the trigonometry to you for now to decide how
long to cut each stock).
8

ALWAYS use screw fasteners to join the parts of your
table. Most wood glues cannot withstand high
temperatures.
GENERAL TABLE DESIGN GUIDELINES
ONLY use hardwoods for table construction. Softwoods can
degrade at relatively low temperatures.. Use water resistant
woods (locust, teak) or use an outdoor sealer.
ALWAYS paint all wood surfaces in heat zones (within 6
inches of the charcoal grill and in the area below the
grill) with high temperature resistant paint.
ALWAYS Install heat skirt and heat pads (included with
wooden table/counter option) on wood support stocks
NEVER FULLY ENCLOSE a wood table. This will store excessive
heat and may cause the wood to weaken or combust.
ALWAYS utilize an “open” design in the area directly beneath
and beside your charcoal grill. This provides necessary air
circulation and cooling.
ALWAYS check the temperatures of your table using a contact
laser thermometer. No wood surfaces should ever exceed 300
ºF. Do not use your table if any wood surface reaches 300 ºF or
greater.
If using a wood floor to your table, we recommend the use of a
grill mat, available at most hardware stores.
Requirements of Wood Tables
Heat Zone (yellow box):
Below are some general recommendations and guidelines for building a safer BBQ structure that utilizes wood stocks and/or
materials. NOTICE: All tables or structures which house a charcoal grill, no matter how well designed, are at risk of fire or heat
degradation. You or any person you hire to construct your table or enclosure are fully responsible for ensuring overall safety,
structural integrity, and heat-proofing of said table or enclosure. TNSD is not responsible for errors or risks introduced in the
design, construction or engineering of your table or enclosure..
Requirements for All Tables and Installations
ALWAYS make sure your Relic Charcoal Grill Mount is
supported equally by at least 6, and preferably 8 equally
spaced support points.
ALWAYS install shims (not included) or adjust the
placement of your support stocks as necessary to
ensure a level surface and equal support.
FOR MASONRY ENCLOSURES:
We recommend the use of high temperatures masonry
(firebrick and fire mortar) for areas in close proximity or
that come in contact with the Relic Charcoal Grill Mount.
All masonry materials, including fire masonry, include
the risk of “spalling” (exploding) due to built up steam.
Always make sure you slowly bring any masonry up to
temperature slowly to prevent spalling.
:
9

STEP 1: CUT & INSTALL YOUR SUPPORT STOCKS
FOR STEEL SUPPORTS
FOR WOOD SUPPORTS
After you have chosen your general table design, the first step to installing the Relic Charcoal Grill
Mount is to build and install support stocks. Support stocks that are made of wood REQUIRE heat
skirt and pad (included in the wooden table/counter option) installation (Step 2) and are REQUIRED
to be coated with a high temperature paint..
1c. Clean and paint wood stocks with heat
resistant paint
1a. Miter cut steel support stocks
1d. Attach support stocks using proper wood
screws (DO NOT GLUE)
8 - point structure example
Miter Cut edges at 39.50`
1b. Either weld or create bolting mechanism for
constructing octagon support stock structure
OR
DO NOT GLUE
+
1a. Select a proper wood stock and
heat-resistant paint*
1b. Miter cut edges for constructing 8 - point
support structure (octagon). Hexagon support
structure may be used as well. Do NOT utilize
less than 6 support points.
10
STEP 2 (skip if using steel): INSTALL HEAT SKIRT AND SHIMS
The heat skirt and shims provide additional insulation for a wood support stock system. The heat
skirt and pads will be installed by drilling screws directly into wood support stocks. The heat pad will
lay in between the heat skirt and support stock.
The steps below are REQUIRED for all support systems utilizing ANY wood materials. Follow
directions depicted below for installation:
DO NOT SKIP THIS STEP (for wood tables)
1. Place the top shim pads (Part B) on
the top face of one of your wood
support stocks. Repeat for each
support stock.
2. Using a drill or hand driver, install the
screws through one of the heat skirts
(Part C) and into the wood support
stock. Repeat for each support stock.
11

STEP 3: INSTALL GRILL MOUNT AND GRILL - Single Piece
(see next page for 4 piece install variation)
1. After installing the top shim pads on each of your support stocks, lower your Relic Charcoal
Grill Mount evenly onto the shim pads, as shown here:
2. Check for any rocking motion and check for any gaps by placing a small thin gauge (such as
a metal ruler) under the contact points. If any of the contact points are not touching the
Relic Grill Mount, try rotating the mount to achieve a better fit. If this doesn’t work, add
additional shim material to any low support stock until it makes firm contact with the shim
pad (which makes contact with the Grill Mount) when it is placed.
3. Lower your charcoal grill down into your table. Be careful to keep your grill level as you
lower it into the mount. Adjust your grill as necessary to ensure it is level. Press gently on
your grill to ensure it is seated well against the gasket.
12

13
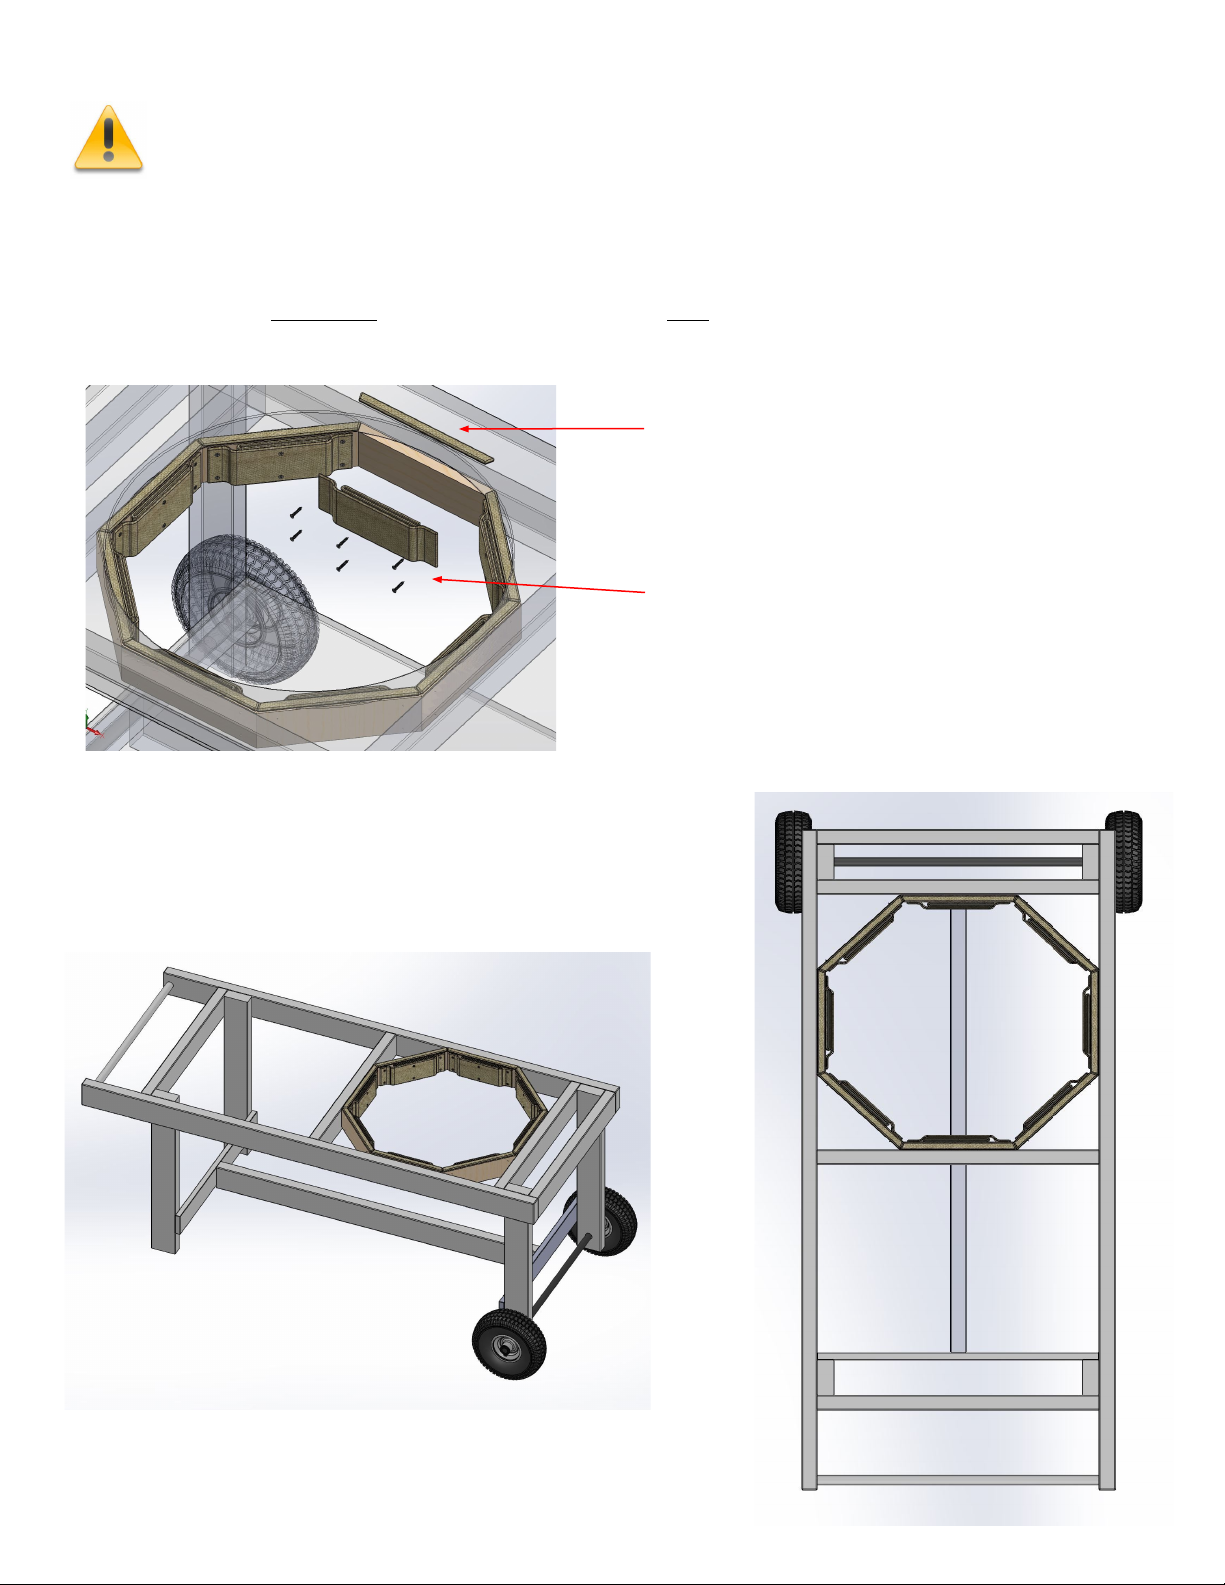
4 Piece Install
The 4 Piece Grill Mount is installed exactly as the single piece except for 2 slight
variances: 1. The addition of a silicone bumper used to create the air gap between Grill
Mount and counter and 2. The Grill Mount is installed one piece at a time. Please follow
the steps below to install the 4 Piece Grill Mount:
- Keep an air gap between Grill Mount and counter.
- Silicone bumper must protrude same distance to ensure even
spacing and pressure on Grill Mount
- Properly built support stock (see page 10) so each piece can balance without
falling off.
Add same sequence of lowering base into mount as in single piece install
1. Cut tube into 8 equal pieces
(insert actual length?)
2. Insert into pre-drilled
holes
4. Ensure equal spacing 3. Install 1 piece at a time
REQUIREMENTS:

BEFORE YOU COOK
The first time you use your Relic Grill Mount in your new table, you must carefully check to ensure that the materials
you have used to build your table are operating within their necessary heat tolerances based on your unique design
and cooking approach.
To do this, start with a small amount of charcoal, and check the temperatures of your support stocks and surrounding
materials (using a laser thermometer) to ensure that the type and amount of charcoal used do not expose the
materials to an unsafe level of heat. Also note that temperatures, wind conditions, and other factors may vary the
temperatures seen by the materials, and you should perform this step whenever conditions change in order to
understand the safe operating conditions of your grill for your unique table, choice and placement of charcoal, and
environmental conditions.
Hardwood surfaces should never exceed 300 ºF. If any part of your wood structure exceeds 300 ºF the wood may
degrade over time which will significantly increase the chance of mechanical failure and/or combustion.
NEVER use your Relic Grill Mount such that the temperatures of your building materials exceed their safe limits.
ALWAYS avoid using large amounts of charcoal, particularly when placing your pile on the side slope of your
charcoal grill.
Note, placement of the charcoal can impact the temperatures experienced by your Relic Grill Mount and the
surrounding support stocks and building materials. We recommend the use of a starting chimney placed in the
middle of your charcoal grill. We do not recommend building a side fire on your grill, as this can increase the
heat in the areas around your grill, particularly just prior to “knocking down” your pile of coals.
GENERAL PRECAUTIONS OF OUTDOOR COOKING
THE FIRST TIME YOU USE YOUR RELIC GRILL MOUNT
All outdoor cooking with live fire is dangerous. This product does not reduce the hazards normally associated with
outdoor cooking with wood or charcoal BE SURE TO READ AND FOLLOW ALL INSTRUCTIONS PROVIDED BY YOUR
CHARCOAL GRILL MANUFACTURER. Safety tips for charcoal grilling include but are not limited to:.
- Charcoal grills are for OUTDOOR USE ONLY.
- Never operate a charcoal grill inside or in an enclosed space
- Never leave a charcoal grill or other live fire unattended
- When using a charcoal grill have proper fire extinguisher readily available
- Never place a charcoal grill (or the Relic Charcoal Grill Mount or your custom table) in a place where it can
be knocked over
- Always obey any burn bans or limitations on outdoor cooking within your state/county.
- Do not place your charcoal grill and ring mount in heavily dry/treed areas (brush fires could occur),
especially if it is windy
- Always refer to the instructions that came with your charcoal grill before using your grill with your Relic
charcoal grill mount
PLACEMENT OF COALS
14

MAINTENANCE AND USE
Check that your Grill Mount is evenly supported and level
Check your grill mount to ensure that it is maintaining proper contact with the top pad shims and support
stocks at all contact points. Check for level and re-shim if necessary. Do not use with missing shims.
Contact TNSD to order replacement shims.
Check the gasket of your Relic Grill Mount for any fraying or tearing.
Never use your Relic Grill Mount if the gasket is frayed or damaged. Life expectancy for gasket
varies based on use and exposure. Small frays may be fixed using hi-temp paint and sand using a
small brush. Always wear a dust mask when working around the frayed gasket and clean up all dust
before introducing food to the area.
If using a wood table, check to make sure that all of the heat skirts and pads are in place.
DO NOT use if skirt is missing, ripped, torn, or falling off the screws. Failure to perform this step
could result in degradation of your table and/or fire hazards.
Once every 10 cookings, remove your charcoal grill and check for dirt and damage
Check your grill mount to ensure that no foreign objects or dirt have entered the space between
your grill and the gasket or grill mount. If so, clean per the directions below.
`
TRANSPORTING YOUR GRILL MOUNT
Cleaning is easy. The Relic Charcoal Grill Mount is not damaged by water or most soaps and cleaners.
Simply spray with a degreaser or kitchen cleaner and wipe clean.
To clean your gasket all you will need is a wipe with some form of soft cloth or light grit sandpaper or fine
bristle brush. Be proactive and keep grit off of your gasket. Each time you remove your grill from the ring
mount, check for loose dirt. Using a light bristle brush will also help relieve your ring mount gasket of any
soot or dirt.
There is no need to wash or clean your gasket with water. Water will not harm gasket, but it is not
necessary or recommended.
If transporting your ring mount to another location be sure to properly pack or wrap it as it can be fragile.
CLEANING YOUR GRILL MOUNT
PERFORM THE FOLLOWING STEPS EACH TIME YOU USE YOUR RELIC GRILL MOUNT:
The Relic Grill Mount is designed to give years of trouble-free service when the following maintenance is
performed:
15

WARRANTY
16

17
Table of contents


