FCC Signature 6.1 Guide
!
INSTRUCTION MANUAL & MAINTENANCE
Sare u cookin!
OUTDOORUSEONLY
READTHEOPERATINGINSTRUCTIONS
BEFOREUSINGTHEAPPLIANCE.
FCC-G-18030-61 / M61A66-SB

Contents
Warnings..........................................................................................................................3
Technical data Signature 4.1...................................................................4
Gas category..................................................................................................4
Exploded drawing .....................................................................................5
Parts list ............................................................................................................6
Assembly instructions ...............................................................................7
Regulator and hose...................................................................................18
Gas leak test ..............................................................................................19
Last Check.................................................................................................20
Lighting instructions................................................................................. 21
Warnings ......................................................................................................22
Maintenance .............................................................................................23
Grease fire ..................................................................................................24
Troubleshooting..........................................................................................25
Singapore Chili Crab ...........................................................................27
Consumer Contact.................................................................................28
2

WARNINGS
• FAILURE TO FOLLOW THE INSTRUCTIONS PROVIDED CAN
IMPLY A RISK OF SERIOUS INJURY TO PERSONNEL AND FIXED
INSTALLATIONS.
• THE BBQ IS INTENDED FOR OUTDOOR USE ONLY IN WELL-
VENTILATED AREAS. NEVER BBQ IN ENCLOSED SPACES OR
UNDER A ROOF, DUE TO THE DANGER OF THE LACK OF
OXYGEN.
• ACCESSIBLE PARTS OF THE BBQ BECOME VERY HOT DURING
USE. KEEP CHILDREN AND OTHERS WHO NEED SUPERVISION AT
A SAFE DISTANCE.
• NEVER MOVE THE BBQ WHILE IN USE OR CONNECTED TO THE
GAS BOTTLE.
• SHUT OFF THE GAS ON THE REGULATOR AFTER USE AND
DISCONNECT FROM THE GAS BOTTLE.
• MODIFICATION OF THE BBQ CAN CAUSE DANGER AND WILL
INVALIDATE THE WARRANTY.
• DO NOT PLACE THE BBQ COVER OR OTHER FLAMMABLE
MATERIAL IN THE COMPARTMENT UNDER THE BBQ WHEN IT IS
IN USE OR HOT.
• CLEAN THE BBQ REGULARLY AND THOROUGHLY.
3
Read carefully

0359-17
DESTINATIONOF
COUNTRIESTOUSE VALVESIZE GASTYPE GASCATEGORY
BE, CY, CZ, DK, EE, FI,
FR, HU, IT, LT, NL, NO,
SE, SI, SK, RO, HR, TR,
BG, IS, LU, MT
Dia 0.93 mm G (butan), G(propan) and their
mixtures, LPG 28~30 mbar I3B/P(30)
I3B/P(30): G30(Butane), G31(propane)
and mixtures of these, LPG 28-30 mbar
H: 125 cm
W: 190 cm
Technical information
Total Heat input: 24.5kW
Gas consumption: 1779 gram/hour
Gasbottle (not included): Use standard bottle approved for use in the Nordic Region.
Even though butane and propane gas can be used, we recommend propane for use in the Nordic
Region. Approved hoses and regulators are available om most outlets selling gas equipment.
NB! Gas hoses used for this product must not exceed 120 cm in length.
• ONLY THE GAS TYPE AND GAS CATEGORY LISTED IN THE RATING LABLE COUILD BE
USED ON YOUR APPLIANCE.
This product is produced according
to EUROPEAN
GASAPPLIANCE
STANDARDEN AND
EN and is CE certified.
THE APPLIANCE IS SET TO OPERATE
4
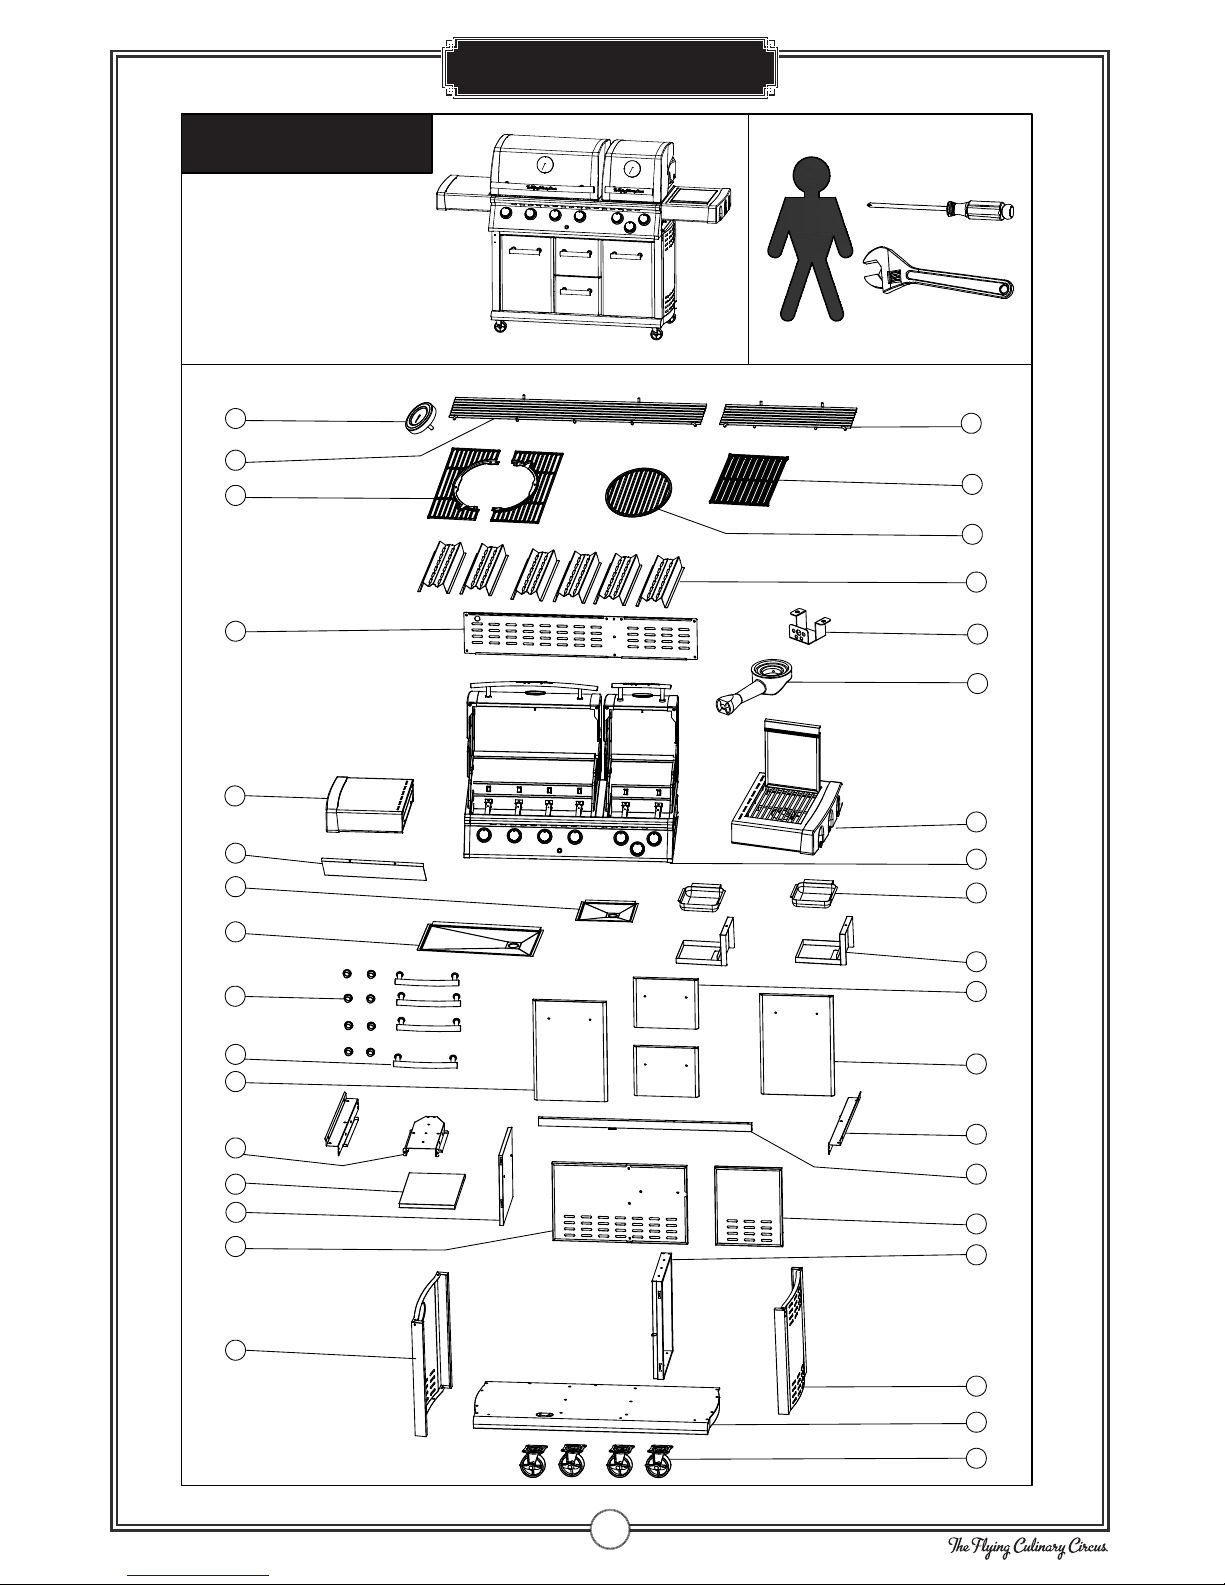
Exploded drawing
FCC-G-18030-61
3
10
1
7
11
9
6
5
14
17
12
18
2
13
19
24
20
26
25
29
27
30
33
8
16
15
21
22 23
28
35
31
4
34
32
5

CODE DESCRIPTION QTY
1LOCKABLECASTER 4
2BOTTOMPANELASSEMBLY 1
3RIGHTSIDEPANEL 1
4LEFTSIDEPANEL 1
5MIDDLEPANEL 1
6RIGHTREARPANEL 1
7LEFTREARPANEL 1
8SIDEPANELSUPPORTFORSHELF 1
9SHELF 1
10 CARTFRONTSUPPORTBEAM 1
11 GREASECUPBRACKETS 2
12 DUALGREASECUPBRACKET 1
13 RIGHTCUPBOARDDOOR 1
14 LEFTCUPBOARDDOOR 1
15 CUPBOARDHANDLE 4
16 SCREWSUPPORT 8
17 MIDDLECUPBOARDDOORS 2
18 GREASECUPASSEMBLY 2
19 GREASECUP 2
20 GREASETRAYLEFT 1
21 GREASETRAYRIGHT 1
22 SUPPORTBAR 1
23 FIREBOXASSEMBLY 1
24 SIDEBURNERSHELF 1
25 LEFTSIDETABLE 1
26 SIDEBURNER 1
27 SIDEBURNERASSEMBLY 1
28 UPPERREARPANEL 1
29 FMETAMER 6
30 ROUNDCOOKINGGRID 1
31 RIGHTCASTIRONCOOKINGGRID 2
32 LEFTCASTIRONCOOKINGGRID 1
33 RIGHTWARMINGRACK 1
34 LEFTWARMINGRACK 1
35 THERMOMETER 1
6
Parts List
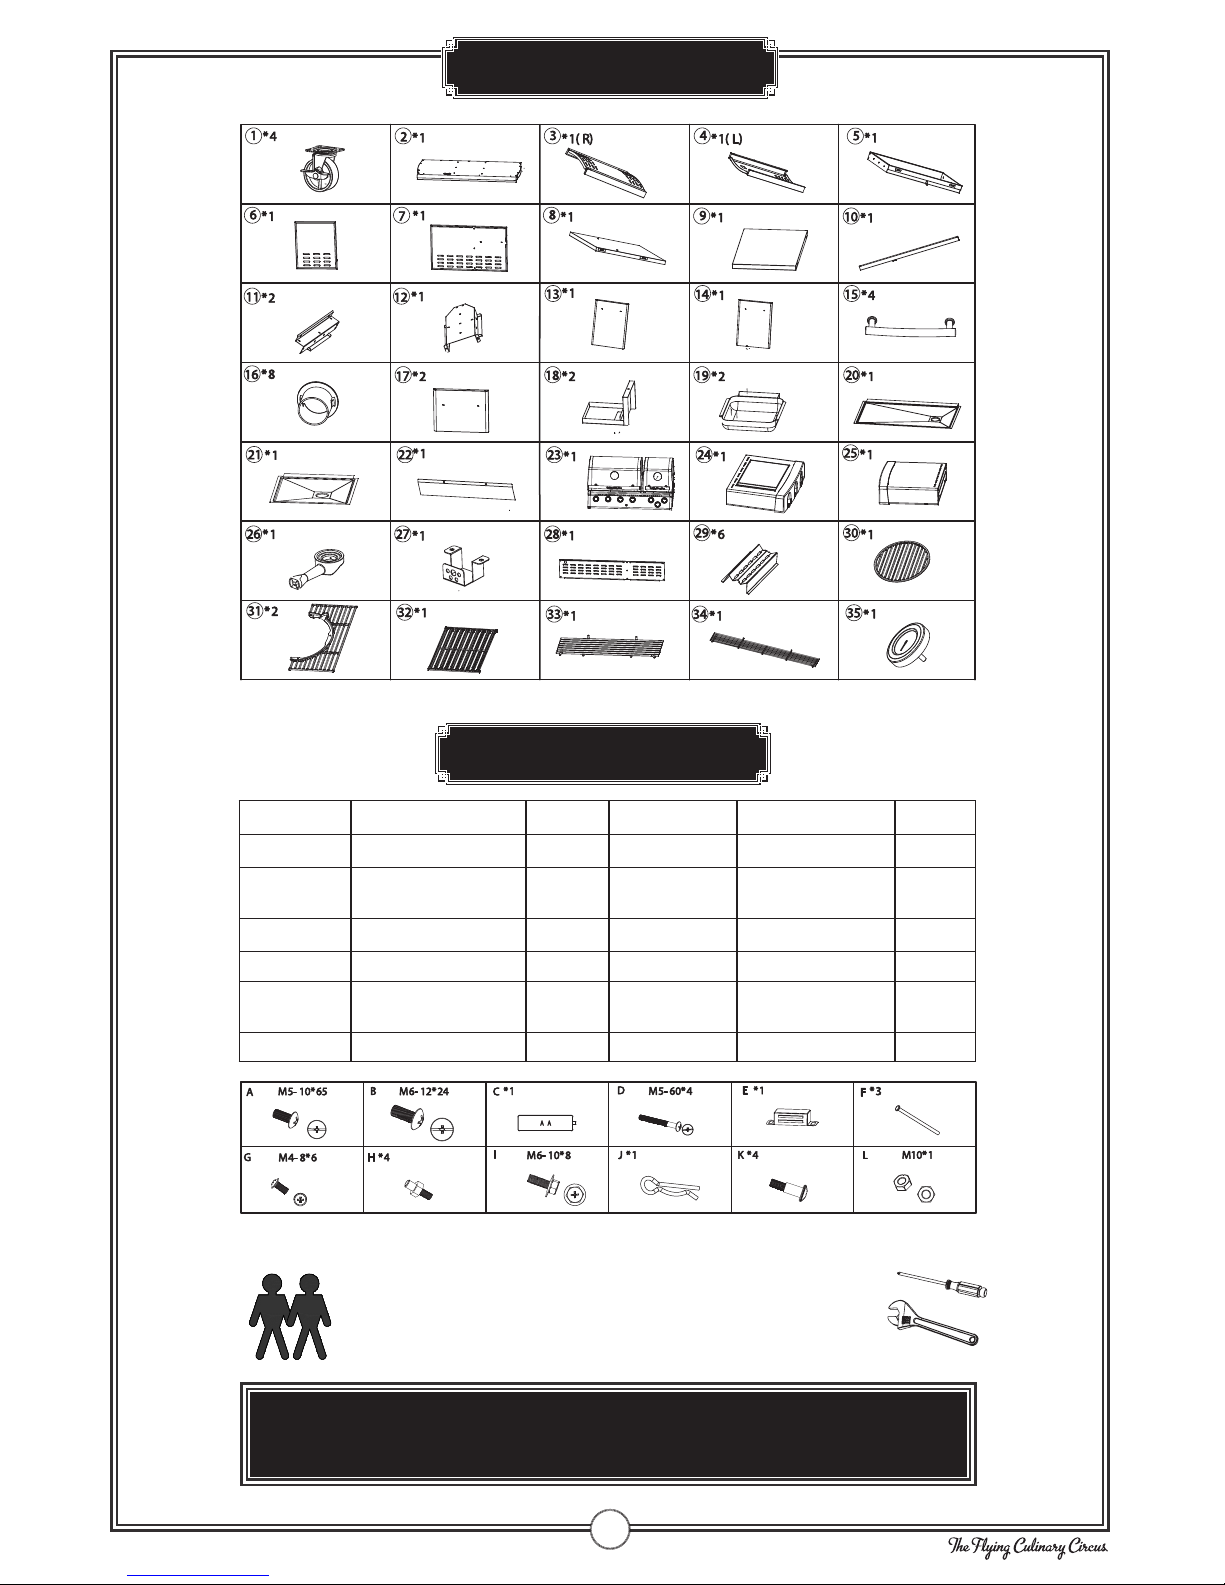
WARNING! EXERCISECAUTIONWHENUSINGELECTRICTOOLS
THEIRSTRENGTHCANDAMAGETHESCREWS.
Please follow these instructions step by step.
A screwdriver is necessary when assembling the BBQ.
The BBQ should be assembled by two persons.
CODE DESCRIPTION QTY CODE DESCRIPTION QTY
AM – 10 65 GM – 8 6
BM – 12 24 HHINGEPIN
BOTTOM 4
CAABATTERY 1 I M – 10 8
DM-60 4 J LOCKPIN 1
EDOORMAGNET 1 K SCREWFOR
SIDETABLE 4
FHINGEPINTOP 3 L M 1
Hardware
7
Parts List
8
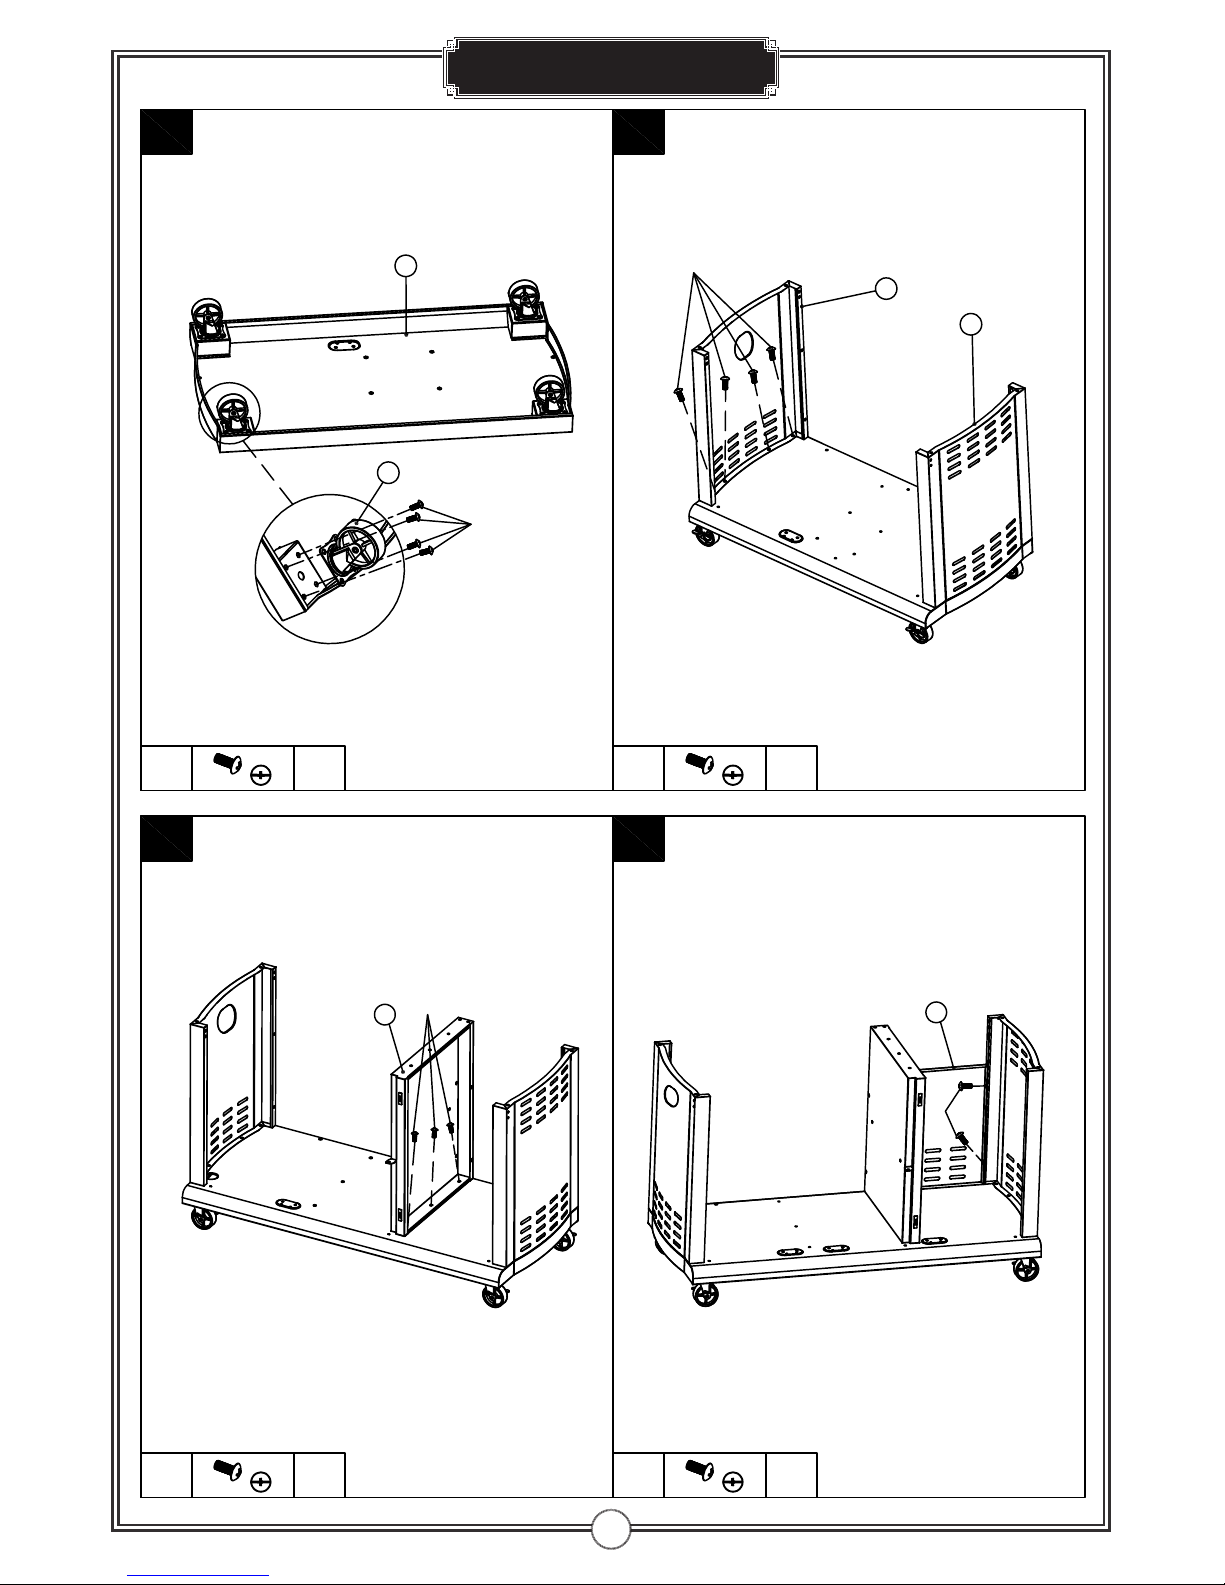
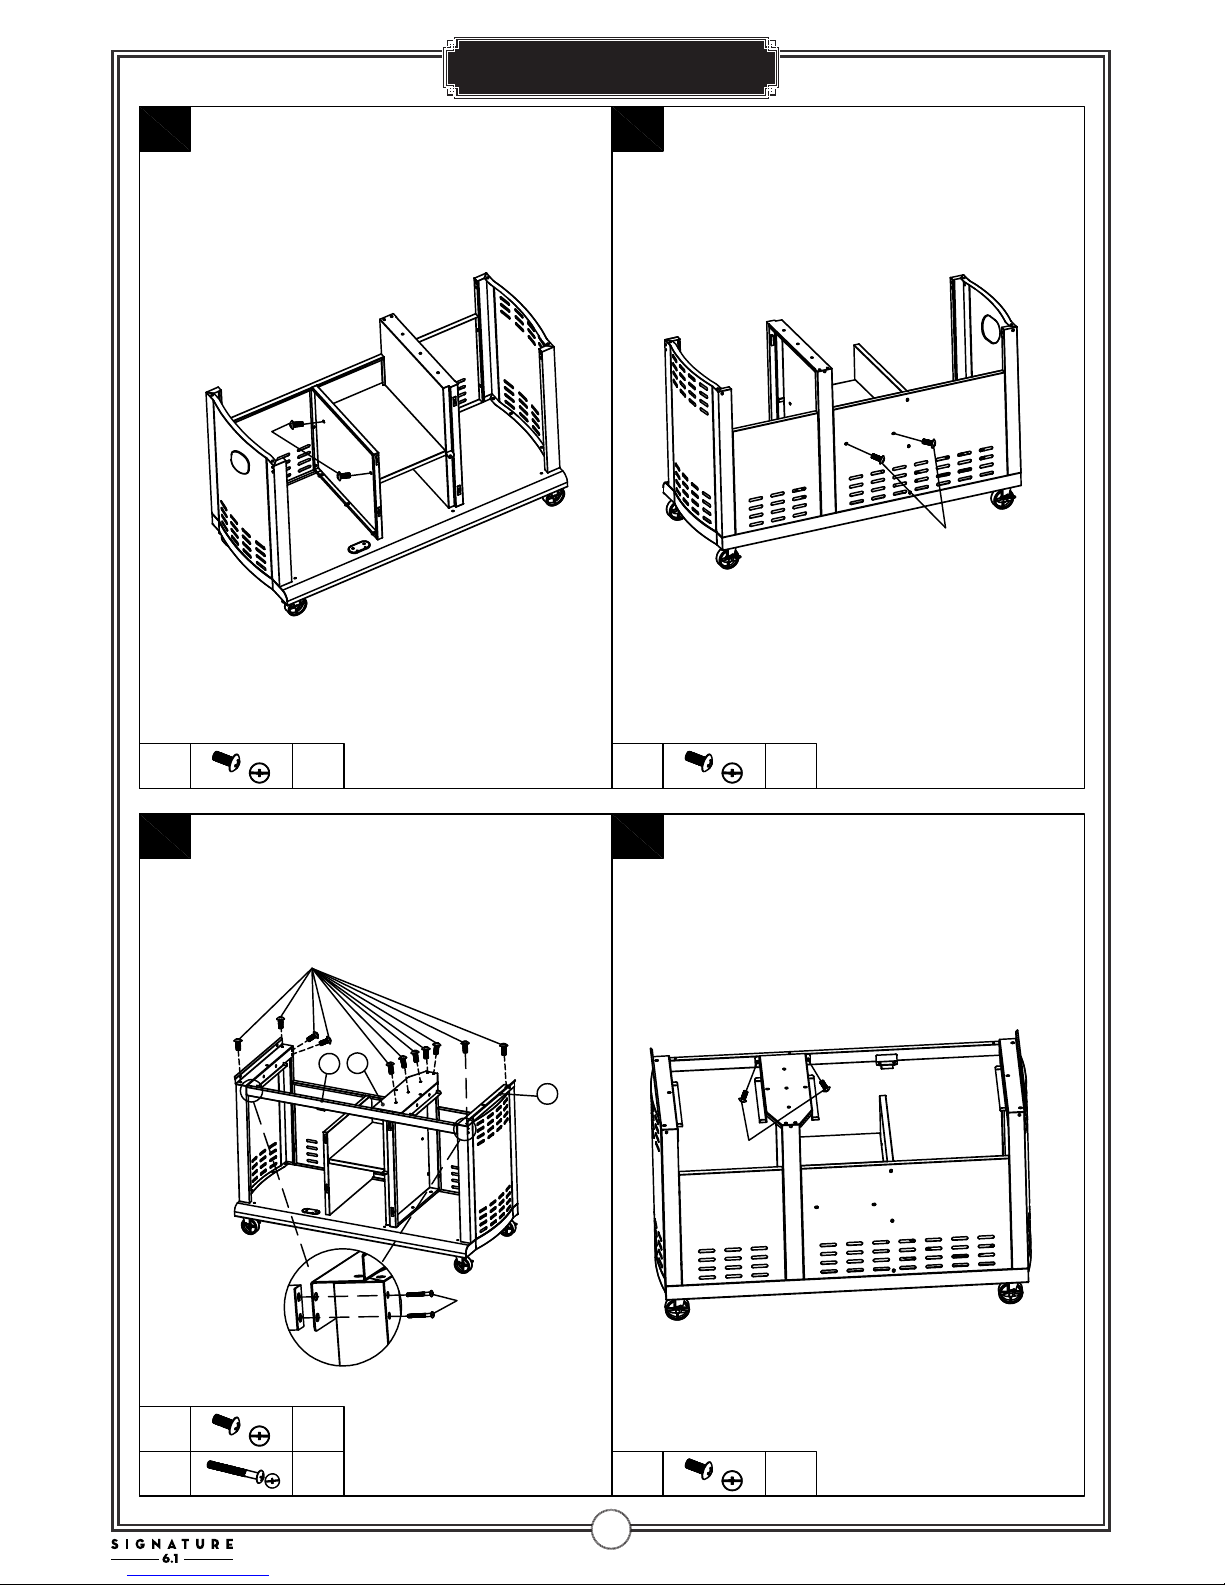
Assembly
1 2
3 4
2
A
3
B
B3PCS
8PCS16PCS BA
1
5B
4
4PCSA
A
6

9
Assembly
5 6
7 8
A 2PCS
A
A
A 3PCS
9
B
8
B 3PCS4PCSA
A
7
B
2PCSB
10
Assembly
9 10
11 12
D 4PCS
D
A
A 2PCS
A
A 2PCS
11
12
10
A 13PCS
A
A 2PCS
A

11
Assembly
H2PCS
2PCSG
13 14
15 16
1PCE
G
E
H
14
F
15
B 4PCS
B
13
16
H
B
17
H2PCS
B 4PCS
F 3PCS

12
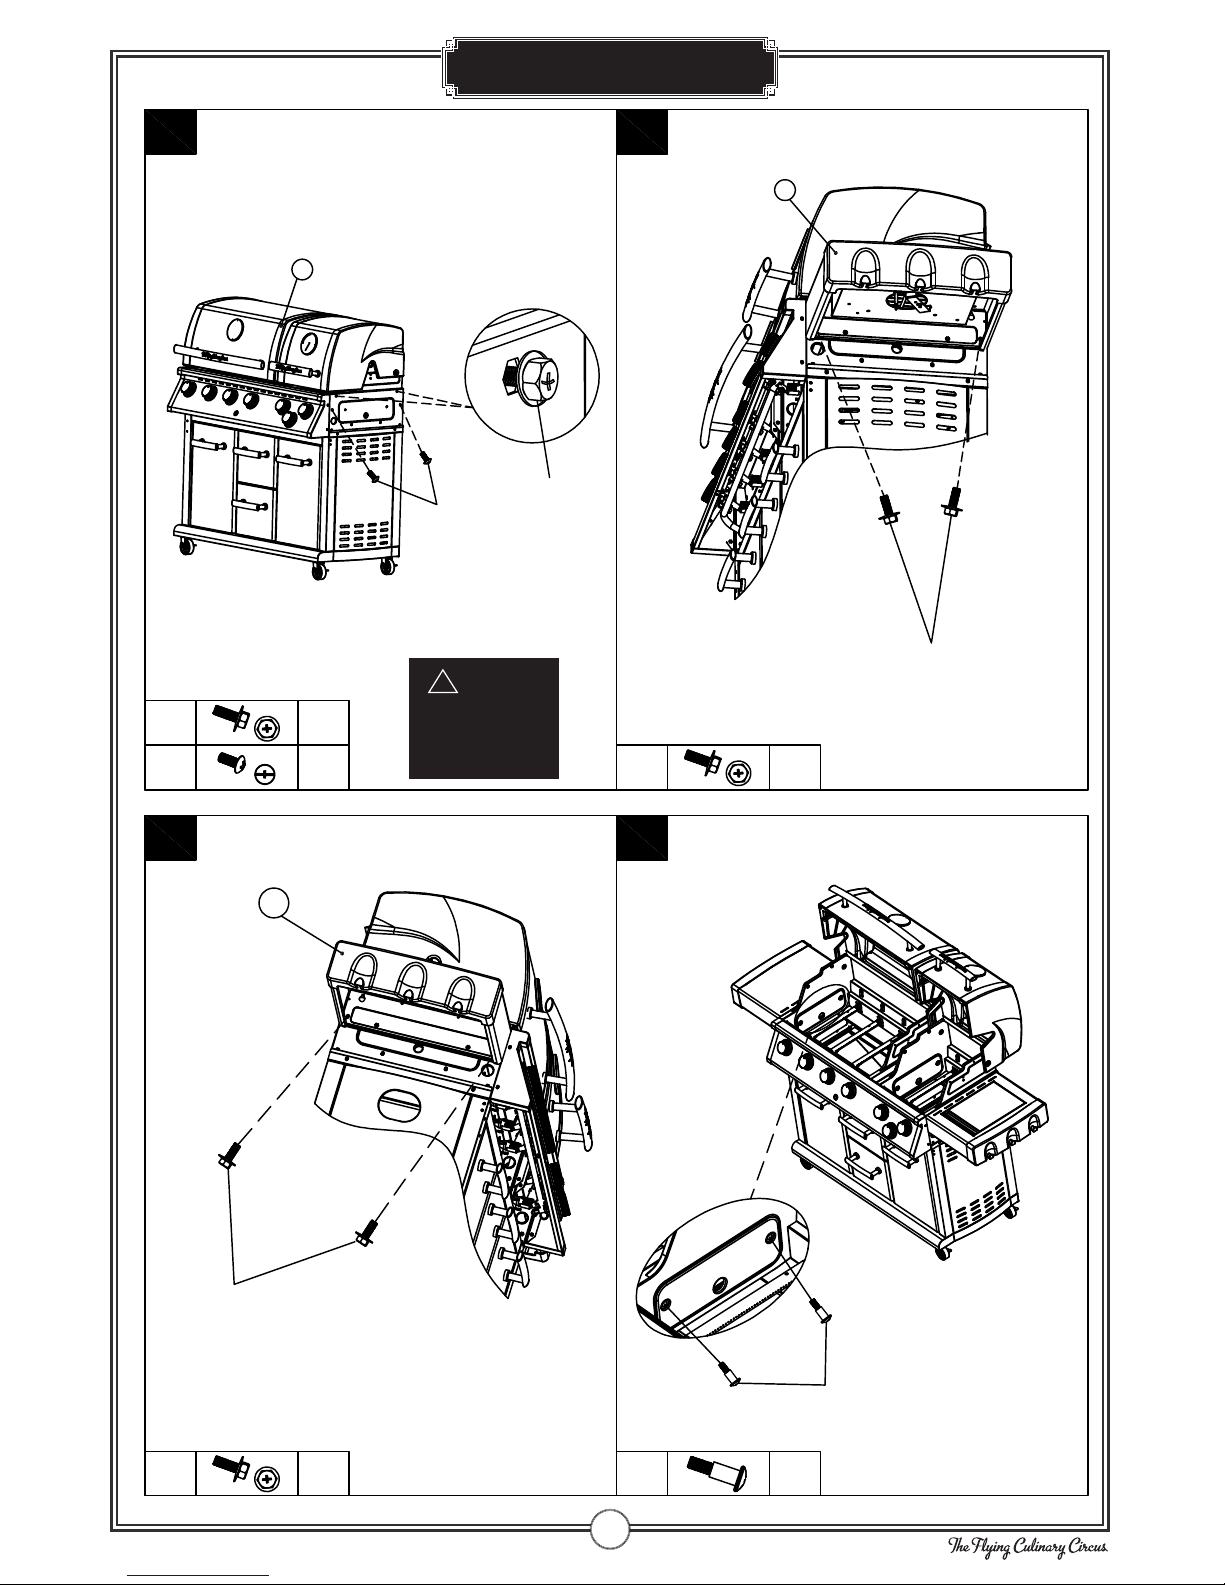
Assembly
17 18
19 20
19
A
18
20
2PCSG
G
A 6PCS
21
22
13
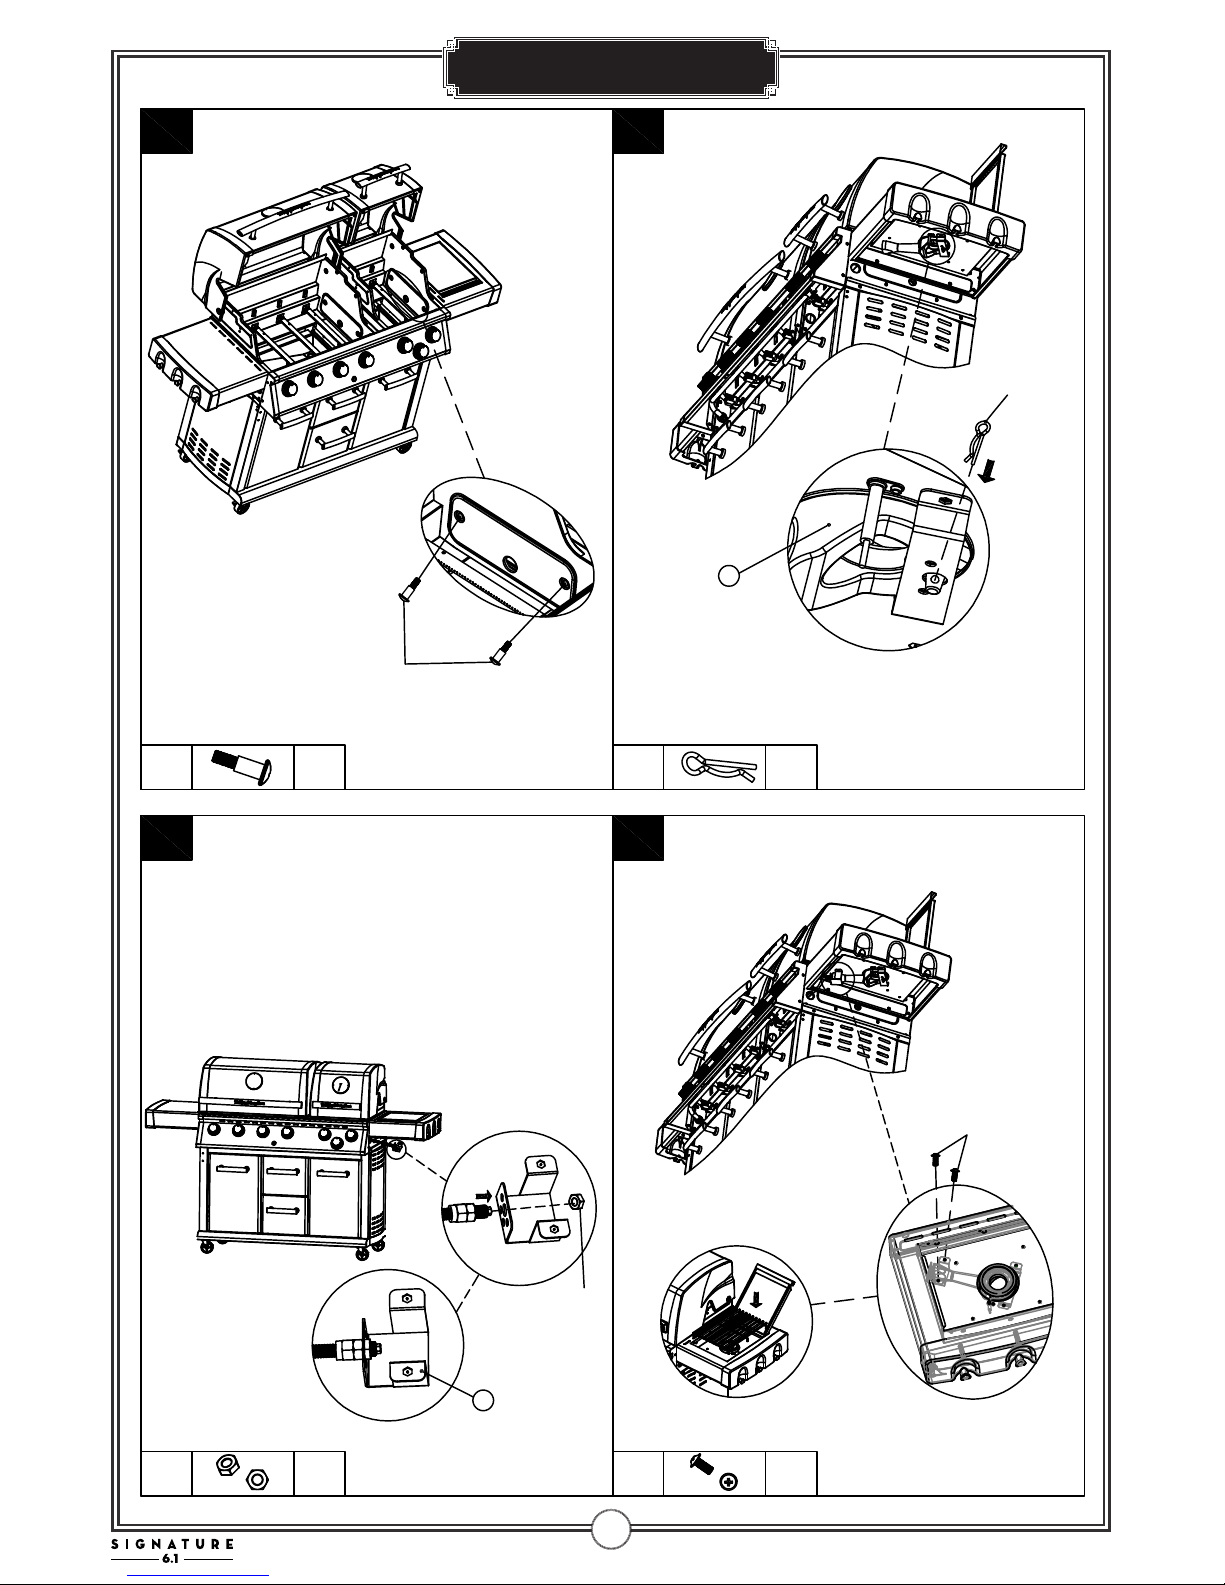
Assembly
I2PCS
2PCS4PCS IA
21 22
23 24
I
24
25
I
I
4PCSI
A
23
2PCSK
K
NOTE
TWO PERSONS IS
RECOMMENDED
WHEN LIFTING
THE STOVE BODY
!
14
Assembly
L 1PC
25 26
27 28
L
26
27
J
J 1PC
2PCSG
K
2PCSK
G

15
Assembly
29
29 30
31 32
A 7PCS
A
28
30
31

16
Assembly
32
34
1PC
A A
C
33 34
35 36
33
35
C
37
17
Assembly
NB!
ASSEMBLY IS NOW COMPLETE.
ALL JOINTS AND CONNECTIONS MUST NOW BE LEAK TESTED BEFORE USING THE BBQ.
LEAK TEST ANNUALLY, AND WHENEVER THE GAS BOTTLE IS REMOVED OR REPLACED.
HOSE
Connect the gas hose to the gas rail inlet on the le hand side of the
barbecue. Do not overtighten.
Do not use any sealing tape, paste or liquid on the connection.
Connect the regulator to the gas bottle according to your regulator
and bottle dealer’s instructions.
Gas hoses used for this product must not exceed 150 cm in length
Check the gas hose regularly for cracks, damage and decay. Never use
a damaged gas hose.
Check that the movable plastic collar on the regulator is intact and
that it has not been damaged by hot BBQ parts.
Check that the gas bottle stands on a firm, flat surface and is lower
than the connector.
Use an approved gas bottle that fits the regulator supplied. Bottles of
10 kg or above are recommended.
REGULATOR
Confirm all barbecue control knobs are in the OFF position.
We recommend propane gas for use in the Nordic Region,
but butane can also be used.Butane is not very suitable for low
temperatures.
Fit the regulator and the hose.
Follow the assembly instructions supplied with the regulator set.
18
Regulator and gas hose
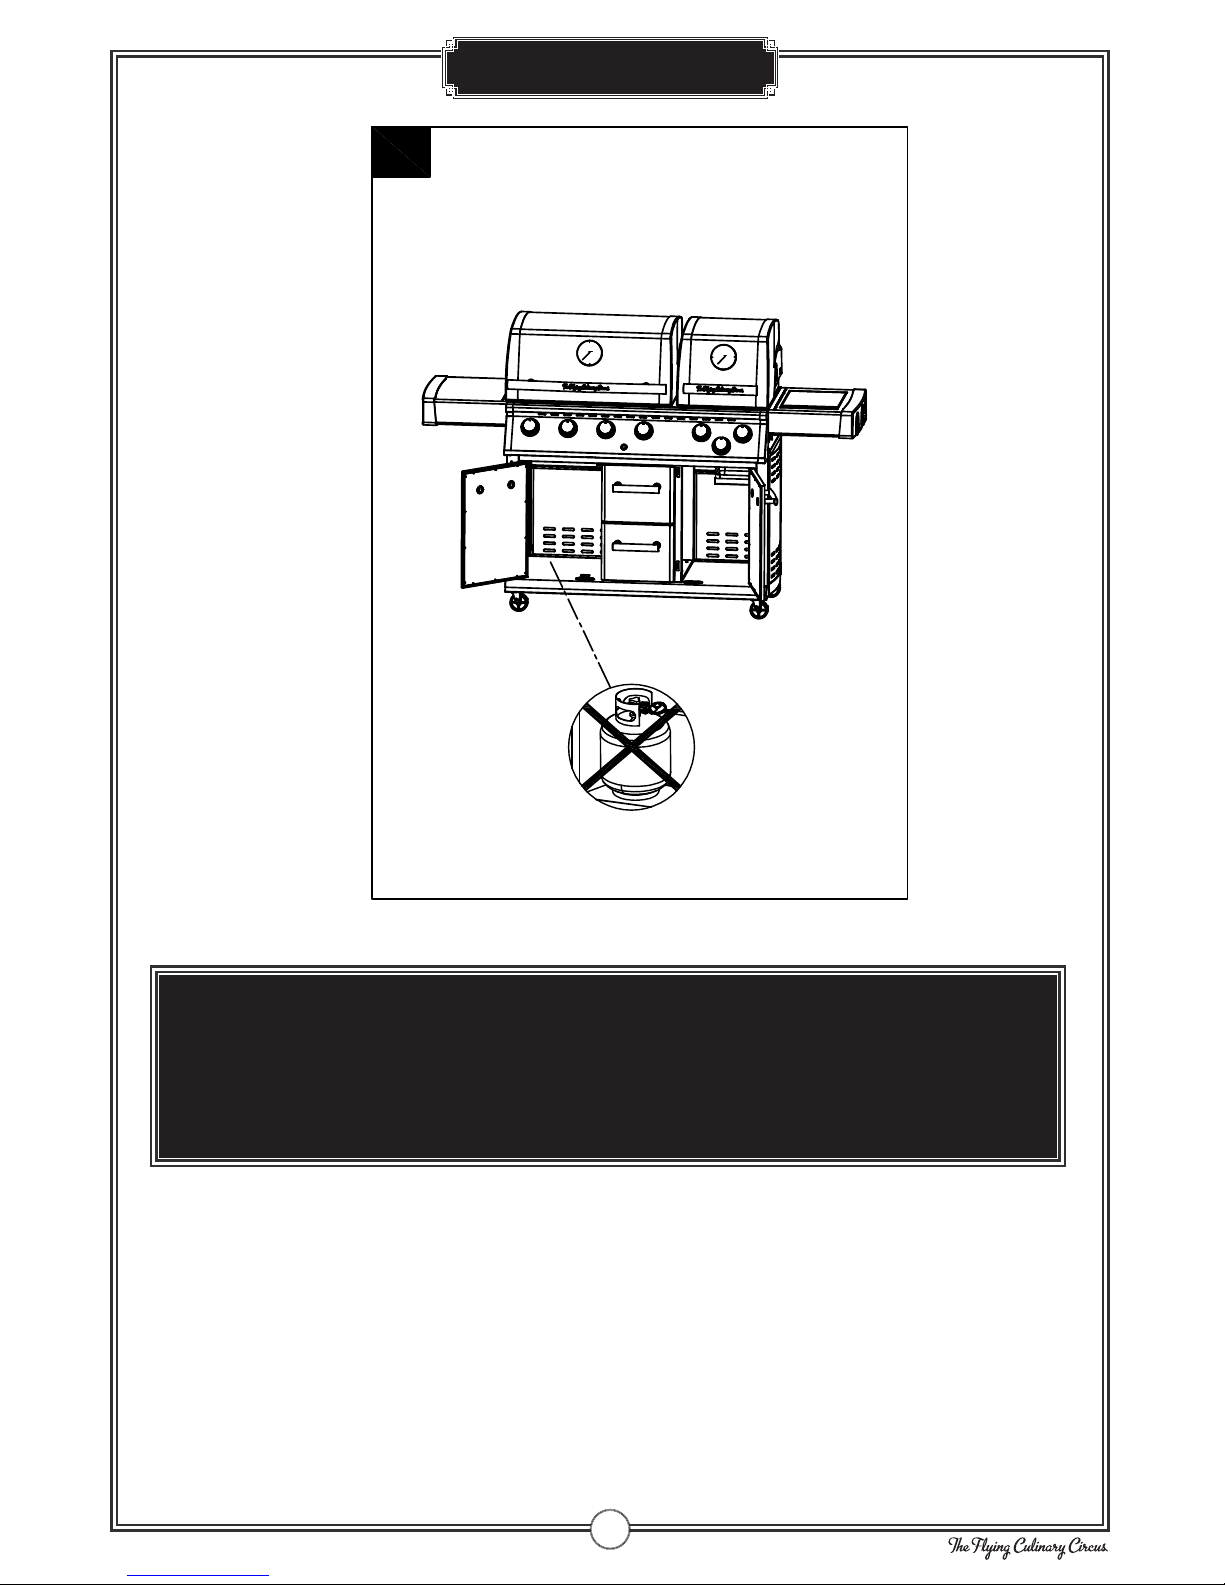
WARNING
NEVER STORE THE GAS BOTTLE UNDER THE BBQ WHEN IN USE. IF THE GAS BOTTLE IS
BEING STORED UNDER THE BBQ WHEN NOT IN USE, DISCONNECT THE REGULATOR.
NEVER MOVE THE BBQ WHILE IT IS IN USE, OR CONNECTED TO THE GAS BOTTLE.
19
Gas Leak Testing
WARNING
ALL JOINTS AND CONNECTIONS MUST NOW BE LEAK TESTED BEFORE USING THE BBQ.
LEAK TEST ANNUALLY, AND WHENEVER THE GAS BOTTLE IS REMOVED OR REPLACED.
ALWAYS PERFORM A LEAK TEST IN A WELL-VENTILATED AREA.
IFTHEREARESTILLGASLEAKSAFTERREPEATEDATTEMPTS CONTACTYOURDEALER.
IFBUBBLESAPPEAR SWITCHOFFTHEGASSUPPLYANDREPAIRTHE
PROBLEM. PERFORMANEWLEAKTEST. DONOTUSETHEBBQBEFOREYOU
ARESURETHATTHEREARENOLEAKS.
OPENTHEGASTAPONTHEREGUTORANDCAREFULLYCHECKFORBUBBLES
APPEARINGANYWHERETHELIQUIDHASBEENAPPLIED.
MAKEAMIXEDSOLUTION WATERANDLIQUID
DETERGENT / SOAP.
ENSURETHATTHEREARENONAKEDFMES HEAT
SOURCESANDCIGARETTESINTHEVICINITY WHEN
PERFORMINGALEAKTEST.
CHECKTHATTHECONTROLKNOBONTHEBBQARE
INTHE ”OFF” POSITION.
SETTHEREGUTORTOTHE ”OFF” POSITIONANDCONNECTITTOTHEGASBOTTLE.
APPLYTHELIQUIDTOALLJOINTSANDCONNECTIONSONTHEGASBOTTLE REGUTOR
THEENTIREHOSEANDALLVALVESONTHEBBQ.
!WARNING!
NEVER USE AN OPEN
FLAME TO PERFORM
A GAS LEAK TEST
Connect the gas hose to the gas rail inlet on the le
hand side of the barbecue. Do not overtighten.
Do not use any sealing tape, paste
or liquid on the connection.
Connect the regulator to the gas bottle according to
your regulator and bottle dealer’s instructions.
Gas hoses used for this product must not exceed 150
cm in length
Confirm all barbecue control knobs are in the OFF
position.
We recommend propane gas for use in the Nordic
Region, but butane can also be used.Butane is not very
suitable for low temperatures.
Fit the regulator and the hose.
Follow the assembly instructions supplied with the
regulator set
Check the gas hose regularly for cracks, damage and
decay. Never use a damaged gas hose.
Check that the movable plastic collar on the regulator
is intact and that it has not been damaged by hot BBQ
parts.
Check that the gas bottle stands on a firm, flat surface
and is lower than the connector.
Use an approved gas bottle that fits the regulator
supplied.
CONNECTING GAS

LOCATION
Ensure that the BBQ is placed at least 150cm in all directions om house walls, trees,
plants and other flammable materials or liquids when in use.
Do not place the BBQ under a roof or overhang
Ensure the BBQ is placed where there is plenty of ventilation.
Do not BBQ below normal ground level.
FINAL CHECK
Check that the control knobs
work normally.
Check that the gas hose is ee of
cracks and damage (it should always
be done before using the BBQ)
Check that the gas bottle and
hose do not come into contact with
hot objects.
GOOD ADVICE
A CLEAN BBQ WORKS BETTER, causes
less smoke and will last longer.
PREHEAT THE BBQ for 10 minutes at full
power prior to placing food on the BBQ. This
gives a better result, and cuts BBQing time.
20
Final Check
This manual suits for next models
1
Table of contents
Other FCC Grill manuals


