Tenovis Integral Blue Voice L User manual

Services
Internet
Call / Contact Center
CTI / CRM
Messaging
Telephony
Networking
User’s guide
Integral Blue Voice L
connected to Integral Blue Link T3

Content
2
Content
Familiarize yourself with the Blue Voice L
Intregral Blue voice L ................................................................................................ 4
Important notes ......................................................................................................... 5
Overview of the Blue Voice L ................................................................................... 6
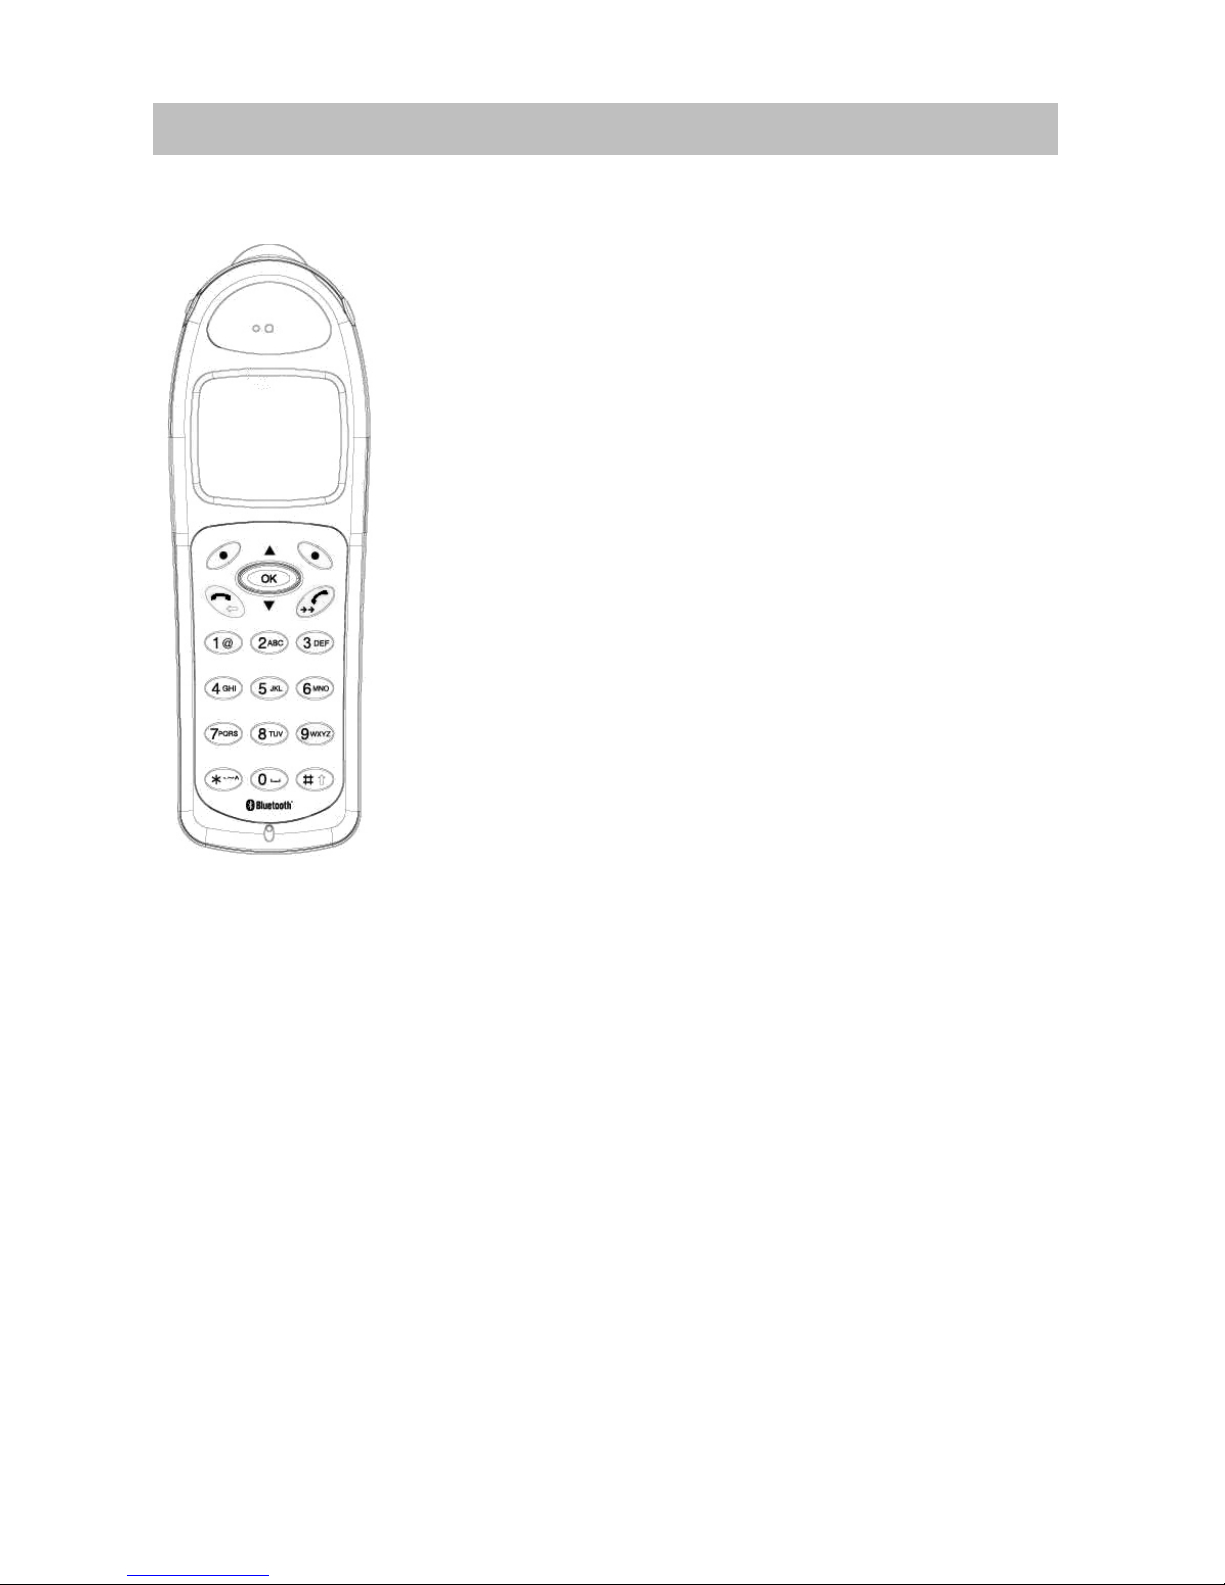
All keys at a glance ................................................................................................... 7
Commissioning
Commissioning ......................................................................................................... 8
Positioning of the charger ......................................................................................... 9
Charging the battery ............................................................................................... 10
Connect the Blue Voice L to your T3 telephone (bonding) ..................................... 11
Basic rules of operation
Switching the telephone on and off ........................................................................ 14
The display ............................................................................................................. 15
Functions in the menu ............................................................................................ 18
Entering text ........................................................................................................... 19
Locking the keypad ................................................................................................. 22
Charge level of the battery ..................................................................................... 23
Telephoning
Making calls ............................................................................................................ 24
Answering calls ....................................................................................................... 25
Establishing several connections ........................................................................... 26
Making calls in Intercom mode ............................................................................... 28
Making calls with ease
Phone book ............................................................................................................ 30
Call list .................................................................................................................... 35
Redial ..................................................................................................................... 38
Using the headset ................................................................................................... 39
Settings
Acoustic settings ..................................................................................................... 40
Setting the date and time ........................................................................................ 44
Entering your own call number and name .............................................................. 45
Selecting the display language ............................................................................... 46
Further system settings .......................................................................................... 47
Consult the manual as required
Menu overview ....................................................................................................... 49
Meaning of symbols ................................................................................................ 51
Table of characters ................................................................................................. 52

3
Content
Using MSN ..............................................................................................................54
Information about the Integral Blue Link T3 ............................................................55
Playing DMove ........................................................................................................56
FAQ – Frequently asked questions .........................................................................57
Abbreviations used ..................................................................................................58
Conformity ...............................................................................................................59
Specifications ..........................................................................................................60

Intregral Blue voice L
4
Familiarize yourself with the Blue Voice L
Intregral Blue voice L
Blue Voice L is a cordless handset. The Blue Voice L
can communicate with Tenovis Integral T3 Comfort/
Classic system telephones by using the Bluetooth inter-
face and the Bluetooth Cordless Telephony Profile.
The telephones must be fitted with the appropriate
Integral Blue Link T3. (A direct connection between two
Blue Voice L handsets without involving a Blue Link is
possible in Intercom mode (
→
page 28).)
•Blue Voice L is an independent second device
attached to your telephone connection. It either rings
together with the T3 telephone (no MSN set up
(
→
page 54)) or has its own call number.
•All basic telephone features can be used with
Blue Voice L.
•It is possible to make a telephone call outdoors at a
remove of up to 100 metres from the T3 telephone.
Inside a building, it is possible to make a telephone
call from the adjoining two or three rooms, depending
on the layout of the building.
Commissioning (
→
page 8)
Basic rules of operation (
→
page 14)
Telephoning (
→
page 24)
Making calls with ease (
→
page 30)
Settings (
→
page 40)
Consult the manual as required (
→
page 49)

5
Familiarize yourself with the Blue Voice L
Important notes
Important notes
Where you may use Blue Voice L
The Blue Voice L is suitable for use in the office, outdoors or in a dusty environment.
It complies with the IP 65 protection class and is hoseproof and dustproof.
Do not leave the telephone in direct sunlight. Doing so could cause damage to the
telephone, thus making it inoperable.
Operating the battery
Your Blue Voice L comes fitted with a Li-ion battery.
•Charge the battery completely the first time you use it.
•Insert the Blue Voice L into the charger repeatedly during the first week of use.
The new battery attains its full capacity after it has been charged, used and charged
again a few times.
Tenovis is not liable for damage which occurs due to inappropriate handling of the
battery.
Repairs
The device may only be opened or repaired by qualified technicians. Do not open the
telephone yourself. Doing so could cause damage to the telephone, thus making it
inoperable.
Maíntenance
Please clean your telephone with a soft, lint-free cloth. If required the cloth can be
moistened with a mild household or plastic cleanser or disinfectant. Do not clean with
scrubbing cleansers or solvents.
Disposal
Do not throw defective irreparable telephones into the dustbin! Take it to your dealer
where it can be disposed of in an environmentally responsible fashon.
Efficient use of the handset
Your Blue Voice L comes fitted with an antenna. The antenna projects into the casing
projection on the upper rear side of the device.
Do not cover up the antenna unnecessarily. Particularly when making a call.
This reduces the signal range, the connection quality and the talk time, as your
device must then operate at a higher transmission power.
It is recommended to switch your Blue Voice L off if you intend to have it away from
the charger for a long period of time. When switched off, Blue Voice L remains on
standby for up to 10 days before the battery is finally flat.

Overview of the Blue Voice L
6
Familiarize yourself with the Blue Voice L
Overview of the Blue Voice L
1 Socket for headset
2 Display
3 Right softkey
4 Selector
5 Lift the receiver / redial key
6 Digit keys
7 Hash key / switchover between lower case and upper case letters key
8 Microphone
9 0 / empty space key
10 Star / special character mode key
11 Button 1
12 Hang up receiver / back key
13 Left softkey
14 Speaker loudspeaker
15 Antenna

7
Familiarize yourself with the Blue Voice L
All keys at a glance
Many keys have two functions. According to the status of Blue Voice L, the appropri-
ate function is active.
i
Note
It normally does not matter if a key is pressed quickly or held down for a longer
period. Longer pressing is only necessary for the use of some special functions.
Left softkey Function depends on status
Second function (press and hold down
key): Switch off
Right softkey Function depends on status
Second function (press and hold down
key): Switch on
Lift the receiver Dials the call number entered
Second function: Redial
Hang up Ends call
Second function: Cancel / back to last
menu displayed
... Digit keys with letters For dialling call numbers and entering
text
Second function (press and hold down
key): Direct entry into phone book
Button 1 Digit / special characters
Second function (press and hold down
key): Direct entry into phone book
Star button For special function
Second function: Calls up the menu for
the entry of special characters
Hash key For special function
Second function: Switching between
upper case and lower case letters
Selector Pressing the key strongly: Opens a
selected menu item or confirms an input.
Press the rocker switch up or down:
Moves the highlight in the display accord-
ingly. If a scroll bar is shown, the display
scrolls up or down.

Commissioning
8
Commissioning
Commissioning
Commissioning
Only a few more steps are necessary before you can make calls with your
Blue Voice L:
1. Connect the charger (
→
page 9).
2. Charge the battery (
→
page 10).
3. Connect the Blue Voice L to your T3 telephone (bonding) (
→
page 11).
i
If necessary, have an auditor or service engineer check the protocol settings for your
telephone:
•The VN2 protocol must be set up on your T3 telephone (Setting in auditor menu).
•The connection of your T3 telephone must be set to ETSI (PBX setting).
•Further configuration notes can be found in the service manual for Integral T3 tele-
phones.

9
Commissioning
Positioning of the charger
Place the charger on a solid, even surface, for example, on a table. Choose a loca-
tion that is protected from direct sunlight and dampness.
•Plug the small plug of the connecting cord into the back of the charger.
•Plug the plug-in power supply into a socket.
The charger is ready for operation.
i
Note
•You may only use the charger with the standard 6.4 V 620 mA plug-in power sup-
ply, reference number 4.999.070.859.
•The plug-in power supply must be accessible and close to the charger. In case of
danger it has to be unplugged from the socket.
•You are therefore advised to use an antiskid surface for your charger, in particular
with new furniture or furniture that has been refreshed using varnish preservation
agents. Varnishes or varnish preservation agents may contain substances that
soften the feet of the device, thus leaving unsightly stains on the surface of your
furniture. Tenovis cannot assume liability for damage of this kind.

Charging the battery
10
Commissioning
Charg ing the batte ry
Simply place the Blue Voice L into the charger. It may be switched on or off. It will
remain in the same condition during charging. You will hear a confirmation tone if
Blue Voice L is switched on.
The battery symbol with three arrows shown here is displayed until the battery is
completely charged.
i
Note
•You can leave the handset in the charger permanently, if you wish. The battery will
be loaded until it is full and then loaded no more - it cannot be ’overloaded’.
•When the battery is being charged, it will become slightly warm. This is perfectly
normal.
•If the battery is completely flat (for example, if the Blue Voice L has not been
charged for many weeks), you should leave the battery in the charger for at least
30 minutes before switching on and using Blue Voice L.

11
Commissioning
Connect the Blue Voice L to your T3 telephone (bonding)
Before you can make calls with your Blue Voice L, a communication connection
(bonding) between the Blue Voice L and the T3 telephone must be set up.
This procedure need only be carried out once. After ending a connection, the Blue-
tooth connection will be automatically re-established.
First you should prepare your T3 telephone for connection (bonding) (
→
page 12),
then you should connect (bond) your Blue Voice L (
→
page 13).
i
Note
•Using the T3 telephone, you can easily deactivate and reactivate a coupling
(bonding) to the Bluetooth device.
•You can only couple (bond) Blue Voice L, when the applications "Use Bluetooth
headset" and "Use Bluetooth handsfree" are switched off.

Connect the Blue Voice L to your T3 telephone (bonding)
12
Commissioning
Making the T3 telephone recognisable for other Bluetooth devices
Your T3 telephone with Blue Link must make itself recognisable in order to be recog-
nised by Blue Voice L:
Press the "Menu" function key.
Scroll through to Settings and confirm the selection.
Scroll through to the corresponding menu item, e.g., Blue Link port 1
(if the Blue Link is plugged into port 1), and confirm the selection.
Scroll through to the desired application, e.g. Use Blue Voice L (off),
and confirm the selection.
Scroll through to the on menu item and confirm the selection.
Scroll through to the Bonded phone detected menu item and confirm the
selection.
The T3 telephone with Blue Link is recognisable for about three minutes ("Start
bond" info message, then hourglass in the "Setup bond" window).
Restart the Coupling on Blue Voice L (
→
page 13).

13
Commissioning
Connect the Blue Voice L to your T3 telephone (bonding)
Connecting (bonding)
Your T3 telephone with Blue Link must already be in "Discovery mode".
Blue Voice L is switched off.
Press the right softkey for a long period.
Blue Voice L starts up. The display shows No device or changes between Search
devices and No device.
Press the "Search all" left softkey.
The display first shows Search for available devices. The search can last
approximately one minute. The device available or a list of all devices available will
then be displayed.
Select the Tenovis T3 device if necessary.
Confirm.
"Device details" are displayed:
Press the "Enrolment" right softkey.
... Enter the PIN from Blue Link and confirm with the "Enrolment" right
softkey.
The message Registering with Tenovis T3 successful appears and
Blue Voice L goes into idle state.
i
Note
•Only those Bluetooth devices with the CTP profile are displayed.
•If more than one "Tenovis T3" device is shown, compare the Bluetooth device
addresses of the device details. You will find this number in the Blue Link menu of
the T3 telephone under "Address/Name".
It is easier to select the correct telephone when you have entered a meaningful
name on the T3 telephone for the Blue Link. Refer to the operating instructions for
Blue Link if necessary.
•If the system search was not successful, you can try again using the "Retry" soft-
key. Ensure that the T3 telephone is in Discovery mode.
•The Blue Link PIN as set in the factory is "0000".

Switching the telephone on and off
14
Basic rules of operation
Switching the telephone on and off
Switching on the telephone
The telephone is switched off.
Press the right softkey for a long period.
You will be automatically connected with the last T3 telephone upon which you were
last online.
Switching off the telephone
The telephone is idle.
Press the left softkey for a long period.
i
Note
•If your Blue Voice L cannot re-establish the last connection, the display alternates
between showing Search devices and No device.
Approach closer to your T3 telephone. Check whether your T3 telephone is func-
tioning correctly.
•You can also switch off your Blue Voice L by using the menu.

15
Basic rules of operation
The display
The display
In the idle state, the display uses symbols to show important settings and informa-
tion.
You can access settings by using various menus. Menus (
→
page 17) are always
constructed in the same manner.
When you are using Blue Voice L, the display is highlighted in blue. This lighting is
automatically switched off after ten seconds in order to save electricity.
Idle display
1Symbols (
→
page 51)
2The date and time (
→
page 44)
3Username (
→
page 45)
4Call number (
→
page 45)
5Battery display (
→
page 16)
6Field strength display (
→
page 16)
7Right softkey (
→
page 18), current function
8Left softkey (
→
page 18), current function

The display
16
Basic rules of operation
Battery display
The degree to which the symbol is ’full’ indicates the charge status of the battery.
Five levels are displayed:
Field strength display
The field strength display on the left hand side of the display shows the radio link to
Blue Link is. The number of radio waves (maximum of five) indicates how good the
link is. Even the presence of a single radio wave still indicates a sufficiently good
radio link.
Chrg disp. Remaining charge
100%
75%
50%
25%
0%
The battery is being charged.

17
Basic rules of operation
The display
Layout of menus in the display
1Menu name Name of the menu or
designation of the setting which can be adjusted
here.
2Scroll bar Only appears when not all menu entries can be
displayed at the same time. It serves as an indi-
cation that further menu entries will follow.
Disappears after a few seconds.
3Selected menu item Select: Press the selector up or down.
Invoking the selected menu item: Press the
selector.
4Menu items List with all setting possibilities in this menu
5Current function of right
softkey
"End": Back to idle state
6Current function of left
softkey
"Back": Back to the previous menu

Functions in the menu
18
Basic rules of operation
Functions in the menu
Many functions and settings of your Blue Voice L can be accessed using the display
contents (menu). The menu is set out in such a way that most of the menu items lead
to submenus.
Selecting functions
Call up the menu using the right softkey.
Press either the selector either up or down to select the desired menu
item, e.g. Settings.
Call up the menu item by using the selector.
Calling up higher-ranked menu levels
Use the left softkey to a access higher-ranked menu level or to exit the main
menu.
Submenus
Submenus are operated in exactly the same way as the main menu.
Using softkeys
The functions of softkeys change according to the situation. The function is always
shown in the display directly above the key, e.g., Menu or Cut off.
The right softkey is used, for example, for switching on, for calling up menus or
when confirming a setting.
The left softkey is used, for example, to exit a menu item or to cancel.
Cancelling or exiting an action
Press the Hang up key. This action is cancelled without saving.
Pressing and holding down a key: Return to idle display.

19
Basic rules of operation
Entering text
Entering text
The numeric keys can also be used to enter letters and symbols, e.g., for names in
the phone book. The letters are printed on the digit keys. Your telephone switches
automatically to entry of letters and numbers when this is necessary.
You may select special characters by using a Special character dialogue
(
→
page 20). An overview of all symbols that may be entered by using numeric keys
and the Special character dialogue may be found in the Table of characters
(
→
page 52).
You may change all text, symbols and call numbers entered.
Changing text and call numbers
Text and call numbers may be changed in the same way as on a normal mobile
phone.
Moving the cursor
should be pressed briefly.
The cursor moves one step to the left or to the right.
Deleting a character or digit
should be pressed briefly.
The character left of the cursor is deleted.
Deleting a line
should be held down.
All characters left of the cursor up as far as the next empty space are deleted.
Entering a character or digit
Newly entered characters are entered at the position of the cursor.
i
When setting the date or time, you may delete the digits one-by-one starting from the
left, you may delete all digits together or you may overwrite individual digits.

Entering text
20
Basic rules of operation
Entering special characters
Blue Voice L is in text input mode (e.g., when entering a name):
should be pressed briefly.
An overview of all special characters available is displayed.
Using the left and right softkeys and the selector (up or
down), select the character desired.
Confirm your selection.
The character is added next to the last character entered.
Cancelling the entry of a special character
Press the back key.
i
Note
•You can use the hash key to switch between upper and lower case, as usual.
Example: Enter the name "John":
Press the JKL button once. Jappears in the display.
Press the MNO button three times. Jo appears in the display.
Press the GHI button twice. Joh appears in the display.
Press the MNO button twice. John appears in the display.
Table of contents
Other Tenovis Cordless Telephone manuals