Tera Q8-US User manual
Ver.E01.1.01
User Manual
Model: Q8-US
Home Electric Vehicle Charger

EV Charger
Current: 32A 40A 48A
Temperature
Protection
Auto
Repair
Efficient
Charging
Protection
Level IP54
RCD Big Size
Screen
Under Voltage
Protection
Over Voltage
Protection
Short Circuit
Protection
Earth Leakage
Protection
Lightning
Protection
Over Load
Protection
01

Symbol Meaning
Symbol Meaning
"Non-recyclable" Label:
Found on the product, instruction manual, or packaging,
this label indicates that electrical and electronic
equipment, along with their accessories, must be
disposed of separately from regular household waste.
When discarded, treat these items as industrial waste
to prevent potential accidents.
Warning Sign:
This symbol highlights potential hazards.
Exercise caution to avoid personal injury that may
result from improper procedures or incorrect operation.
Actions associated with the "warning" sign should only
be undertaken when the specified conditions are fully
understood and met.
The company is dedicated to the ongoing improvement and updating of
its products. Both hardware and software may be subject to upgrades,
and the information provided is subject to change without prior notice.
02

Indicator light
Display screen
Charging plug
Appearance of AC EV Charger
Product Overview
03

Product Overview:
This product is an AC charging station primarily designed for electric vehicle
charging. The charging station consists of the main body, a wall-mounting
backplate, an optional floor-standing column, and other components, all
featuring charging protection and card-swipe functionality.
The product adheres to industrial design principles, making it easy to install
and use.
Exterior: Sleek and lightweight, with a variety of color options to suit different
application scenarios.
Protection: Boasting an IP54 protection level (waterproof and dustproof), the
charging station can withstand exposure to wind, rain, and sun.
Operation: The charger head features a one-button cover opening design,
ensuring simple and convenient plug-and-play operation.
Safety: Enhanced safety measures include multiple protections, high-quality
fireproof, waterproof, and dustproof materials.
Compatibility: With its compact size and powerful performance, the charging
station is compatible with 99% of new energy vehicles.
Quality:
The charging station uses pure, oxidation-resistant copper wiring that meets
inspection standards and provides flame retardant impact resistance.
04
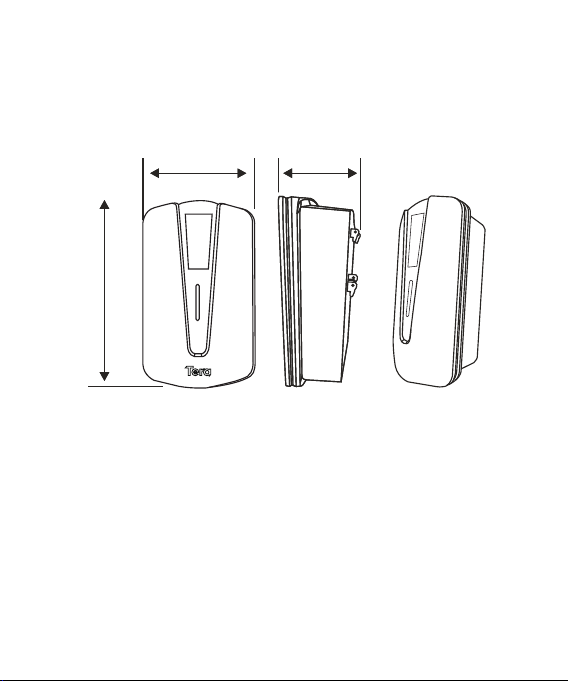
Dimensions
Size: 11.4 * 7* 3.7 inch
Measurement Unit: inch
11.4 inch
3.7 inch7 inch
05
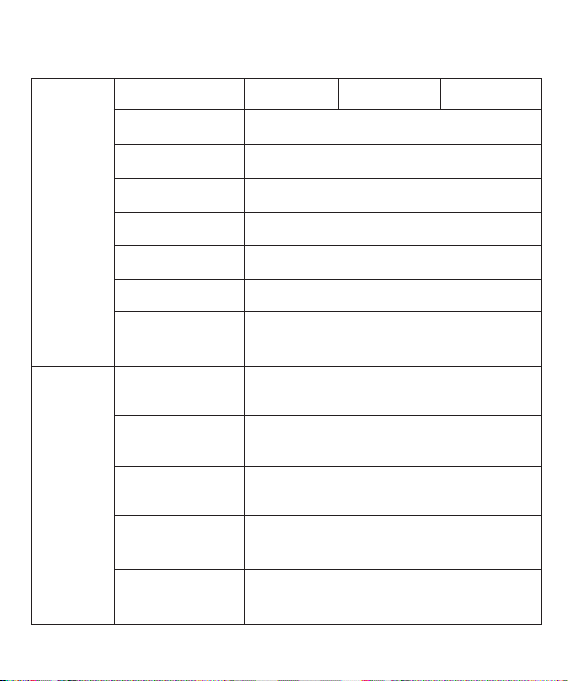
Product Parameter
Charging
Device
Rated Current
User Interface
Cable routing
Dimension
Input frequency
Output voltage
Charging
Wire length
32A 40A 48A
Display screen, Indicator light
Bottom inlet wiring, Bottom outlet wiring
290x180x95mm
≥110%
176°F
30mA AC+6mA DC
50/60Hz
Protection
Design
Over-current
protection value
Over-voltage
protection value
Under-voltage
protection value
Over-temperature
protection value
Electric leakage
protection value
06
Input voltage
270Vac for Level 2; 140Vac for Level 1
190Vac for Level 2; 90Vac for Level 1
Level 1: 100-120V; Level 2: 200-240V
Level 1: 100-120V; Level 2: 200-240V
15/20/25/30FT
Environm
ental
indicators
Work temperature
Work humidity
Work altitude
Protection Level
Cooling Model
MTBF
-5%~95% non-condensation
<2000m
IP54
50,000 hours
Natural cooling
07
-86°F~122°F
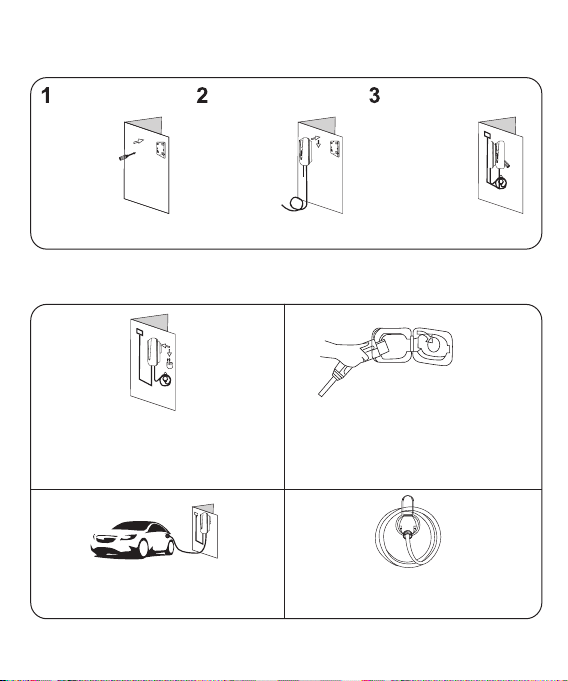
1. Ensure that the charging box is
connected to a power source.
4. The vehicle will charge
normally.
2. Connect the electric vehicle to
the charging box using the EV
charging cable.
5. Unplug the device and wrap
the cable around the hook.
Installation
Here are the usage steps:
Fix the
screws
and
mounting
plate to
the wall.
Place the
charging
station onto
the mounting
plate
attached to
the wall.
Assemble the
anti-theft
screw on the
side.
08
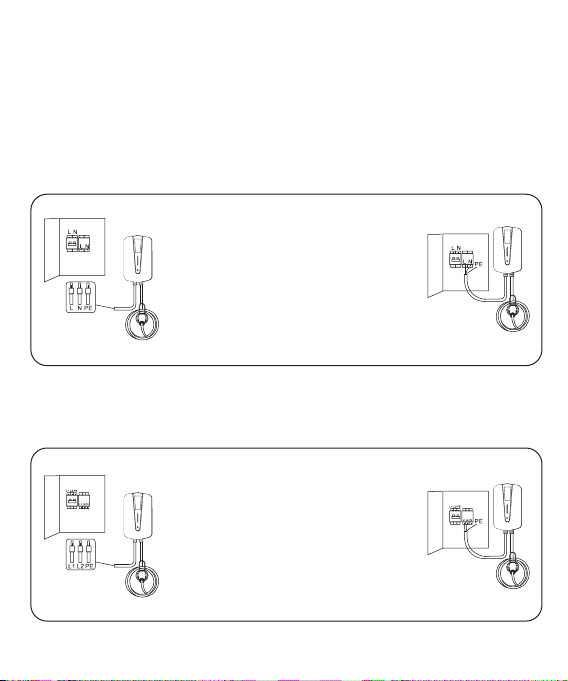
Follow these steps to wire the power for
Level 1 charging
Follow these steps to wire the power for
Level 2 charging
09
If a power distribution box is
being used, make sure to
connect the L1, L2 (Line 1 and
Line 2), and PE (Protective Earth)
ends of the input cable of the plug
to the corresponding L1, L2, and
PE ends of the circuit breaker
respectively.
If a power distribution box is
being used, make sure to
connect the L (Line), N (Neutral),
and PE (Protective Earth) ends
of the input cable of the plug to
the corresponding L, N, and PE
ends of the circuit breaker respectively.
Note:
1. Once the vehicle is fully charged, the device will automatically stop
charging.
2. Please read the instructions thoroughly before using the device.
Warning And Cautions
For use only in an environment with an RCD residual current protector.
Do not use the device when the charging cable is damaged.
For electric vehicle charging only.
The product must be properly grounded when used.
It is strictly prohibited to step on the charging cable, pull the cable,
bend the cable, or knot the cable.
Do not put your finger into the charging plug.
Do not connect the circuit by yourself without the guidance of a
professional.
Do not use when the inside of the charging plug is wet.
Do not install by yourself before reading the installation instruction.
Do not use for any purpose other than electric car charging.
SPECIAL ATTENTION: Do not attempt to disassemble the device by
yourself under any circumstances. Doing so may cause damage to the
internal precision parts.
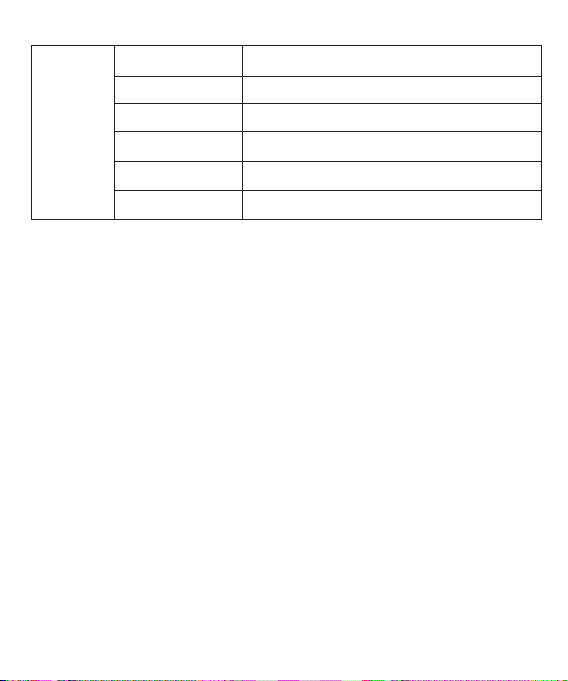
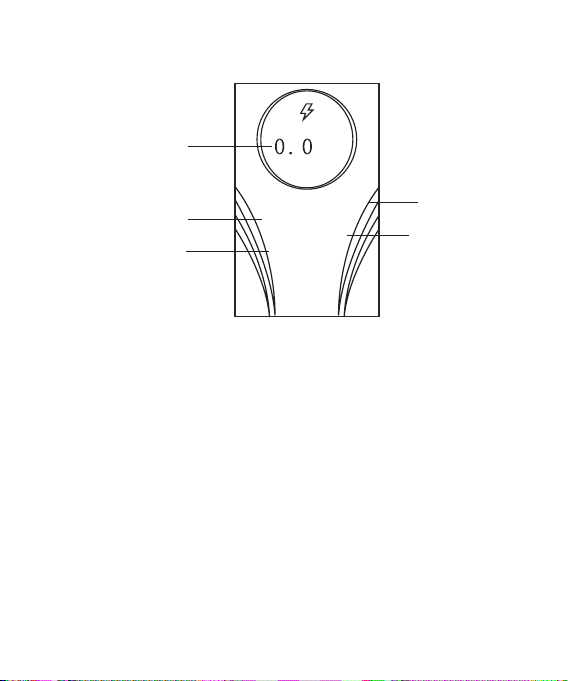
Display Screen Description
Charged Power
Charging Power
Charged
kwh
Charging Time: 00:01:13
Power: 0.0 KW
Voltage(V): 224.7
Charging Time
Charging Voltage
Current(A): 50 Charging Current
10
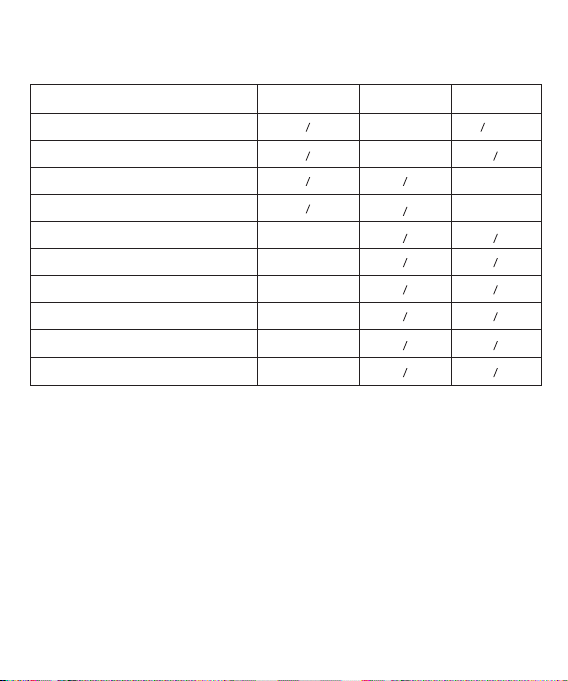
Fault Indicator Prompt
Remark:
The device flashes a certain number of times at 200ms intervals to
indicate an error, and then repeats this sequence in a continuous loop
with 1s intervals.
Working state Red Green
Stays On
Stays On
Flashing
Flashing
Flash for 1
Flash for 2
Flash for 3
Flash for 4
Flash for 5
Flash for 6
Blue
Power On (No Load)
Insert the Plug(Uncharged)
Charging Mode
Charging Completed
Leakage Protection
Over Current Protection
Ground Fault(ungrounded)
Under/Over Voltage Alarm
Relay Failure
CP/CC Error
11

Excessive
Leakage
Current
AC
Over-current
High Input
Current
Problem Causes Possible Solutions
Excessive
Leakage
Current
1. Please disconnect the leakage or
over-current protection switch on the
distribution box immediately.
2. Please check whether the AC charger
output line is damaged or has low impedance
to the ground or a short circuit.
3. Please inspect the inlet socket of the
vehicle to ensure it is in good condition.
4. Once the above issues have been
addressed, please attempt to power on the
system again. If the problem persists,
please do not hesitate to contact us for
further assistance.
1. Please immediately disconnect the
leakage/over current protection switch from
the distribution box.
2. Please check if there is a low impedance
or a short circuit between the two output
lines of the AC charger.
3. After troubleshooting the issues
mentioned above, please attempt to power
the system on again. If the problem persists,
please contact us for further assistance.
Troubleshooting
12

Ground
Fault
AC Under-
voltage
Low Input
Voltage
Ground
fault
circuit
interruption
1. Please immediately disconnect the
leakage/over current protection switch from
the distribution box.
2. Please check whether the input/output
line of the AV charger is properly grounded
or not.
3. After troubleshooting the issues
mentioned above, please attempt to power
on the system again. If the problem persists,
please contact us for further assistance.
1. If the voltage drops below 190Vac for
level 2 or 90Vac for level 1 for a brief period
of time, the charger will go into standby
mode and check the power network to
restore itself to the normal voltage range.
Once the voltage is within normal range,
the charger will automatically resume
charging.
2. If the voltage in your area/community
remains consistently low (below 190Vac for
level 2 or 90Vac for level 1) for an extended
period of time, please wait to use the
charger until the voltage recovers back to
the normal range.
13

AC Over-
voltage
High
Input
Voltage
1. Ff the voltage surpasses 270Vac for
level 2 or 140Vac for level 1 for a short
duration, the charger will enter standby
mode and conduct a power network check
to restore itself to the normal voltage range.
Once the voltage is within normal range, the
charger will automatically resume charging.
2. If the voltage in the local area or
community remains over 270Vac for
level 2 or 140Vac for level 1 for a prolonged
period, the user should refrain from using
the charger until the voltage returns to the
normal range.
Relay
Failure
CP/CC
Error
Charger
CP/CC
Connection
Error
Relay
Failure or
Adhesion
1. Please check whether the charging plug
is securely and firmly connected to the
vehicle's inlet socket.
2. If the problem persists, please do not
hesitate to contact us for further assistance.
1. Try restarting the charger and allow it to
run its internal self-diagnostic and repair
routines.
2. If the problem persists even after
restarting the charger, please do not hesitate
to contact us for further assistance.
14
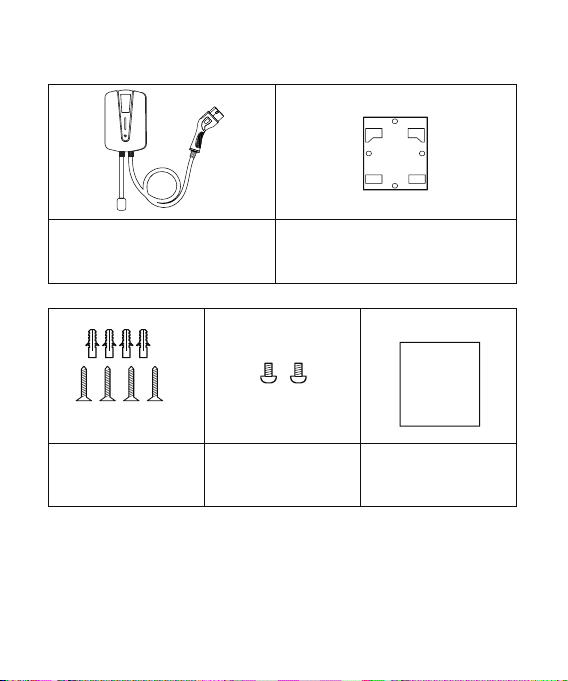
WHAT´S IN THE BOX
Charging Station x 1
Charge Handle x 1
Wall Plug x 4
Long Screw x 4 Short Screw x 2 User Manual x 1
M3*10mmM3.5*35mm
USER
MANUAL
Mounting Template x 1
15
Table of contents


