terim TERCM1200PE User manual

TERCM1200PE INSTRUCTION MANUAL
Pump Espresso Coffee Machine
Made in China
Rating: 220-240V~50/60Hz, 1150-1350W
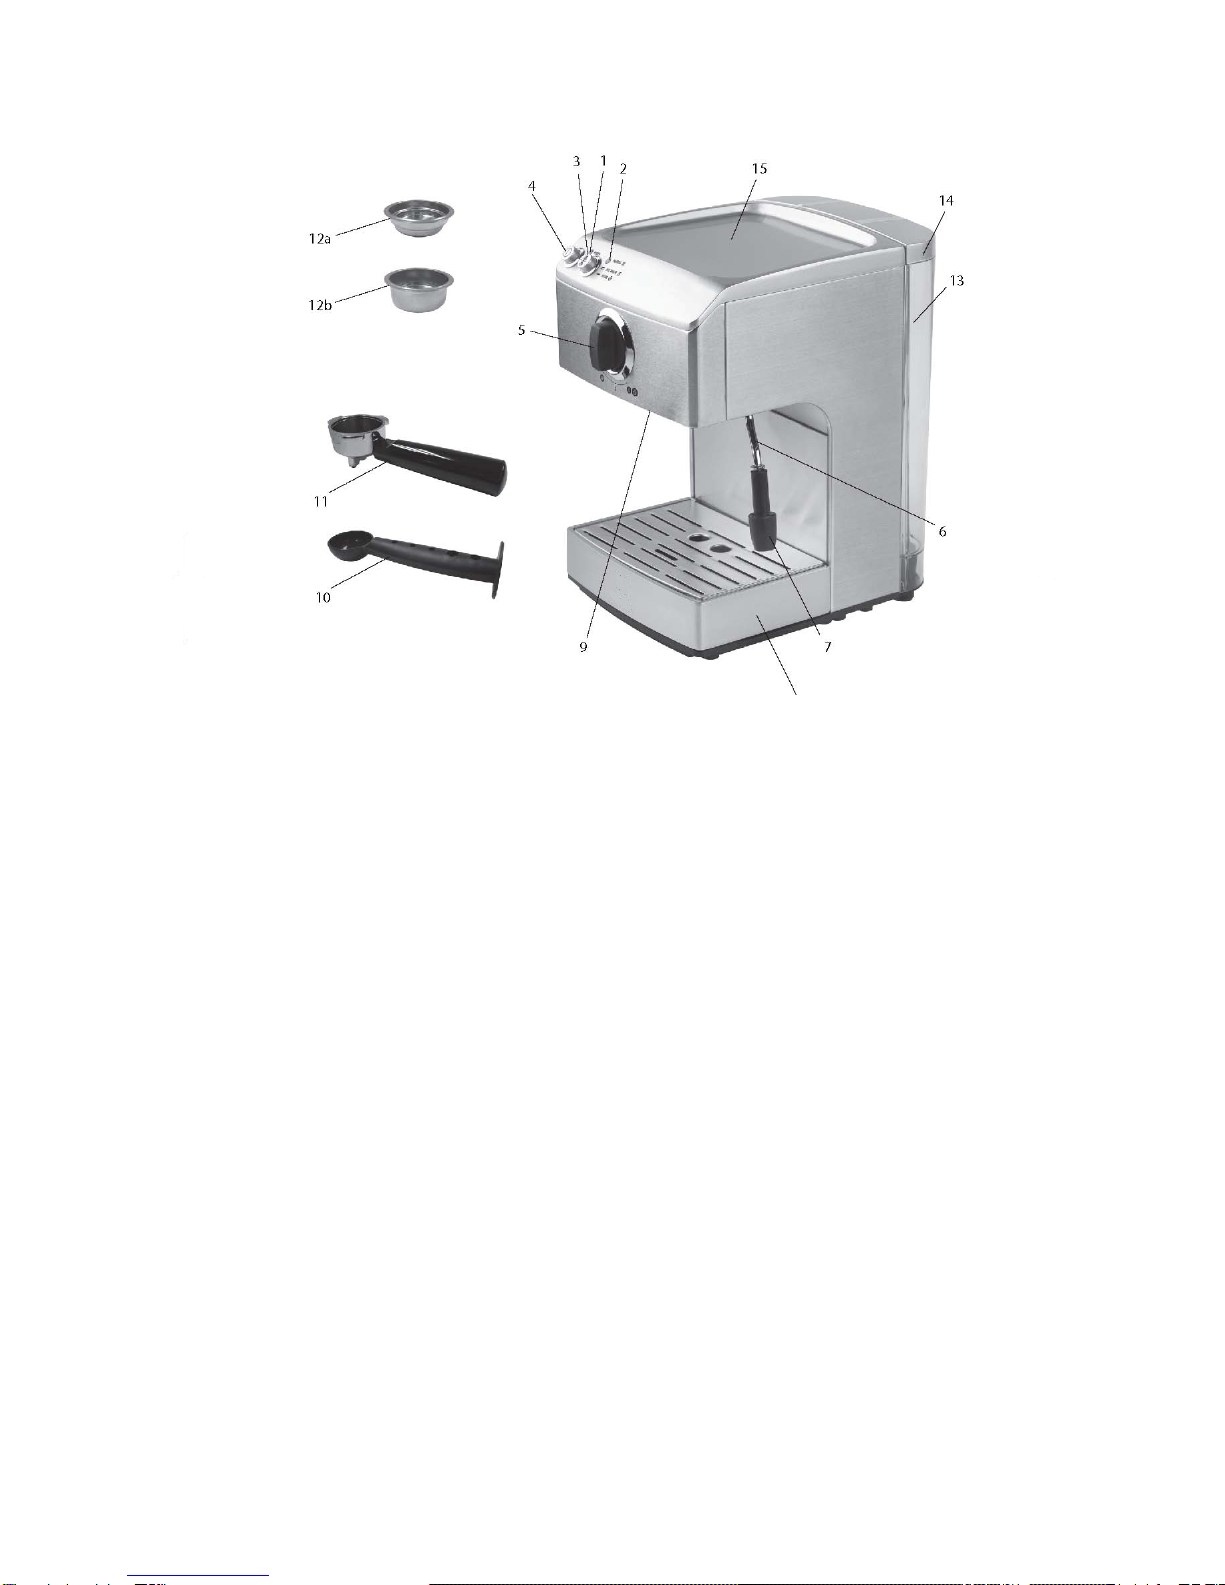
Components
1. Main indicator light 10. Measuring scoop
2. Temperature indicator light 11. Filter holder
3. Hot water/steam selector button 12. Filter sieve:
4. On/Off switch a. 1 cup
5. Operating dial for espresso / steam b. 2 cups
6. Steam tube 13. Water container
7. Steam nozzle with milk frother 14. Water container lid
8. Detachable drip tray with drainer 15. Cup-warming top
9. Boiler outlet
8

Safety Advice
When using electrical appliances, basic safety precautions should always be followed.
This includes the following:
• Read all instructions before using.
• Do not touch hot surfaces. Use the handle.
• To protect against electrical shock, do not immerse cord, plug, or product into
water or any other liquid.
• This appliance is not intended for use by persons (including children) with reduced
physical, sensory or mental capabilities, or lack of experience and knowledge,
unless they have been given supervision or instruction concerning use of the
appliance by a person responsible for their safety. Children should be supervised
to ensure that they do not play with the appliance.
• Unplug from electrical outlet when not in use and before cleaning. Allow to cool
before adding on or taking parts off.
• Do not operate any appliance with a damaged cord or plug or if the appliance
malfunctions or has been damaged in any manner. Return appliance to the
manufacturer or appointed service agent for examination, repair, or adjustment.
• Do not use outdoors.
• Do not let the electrical cord hang over the edge of a table or touch hot surfaces.
• Do not place on or near a hot gas or electrical burner, or in a heated oven.
• Extreme caution must be used when moving an appliance containing hot liquids.
• As a safety feature, this product is equipped with a grounded plug. Improper
connection of the grounding conductor may result in the risk of electric shock.
Consult a qualified electrician if you are in doubt as to whether the outlet is
properly grounded.
• A short power-supply cord is provided to reduce the risk resulting from becoming
entangled in or tripping over a longer cord.
• If an extension cord is used, the marked electrical rating of the cord set or
extension cord should be at least as great as the electrical rating of the appliance,
and the cord should be arranged so that it will not drape over the countertop or

tabletop where it can be pulled on by children or tripped over unintentionally.
• To reduce the risk of fire or electric shock, do not attempt to remove the outer
cover. There are no user-serviceable parts inside. Repair should be done only
by authorized Terim technicians.
•If the power supply cord is damaged, it should be replaced by a qualified
technician from Terim.
Operating Dial
The operating dial has three settings:
1. Dispensing steam/hot water via the steam nozzle.
2. Pump switched off/neutral position.
3. Pump switched on: dispensing espresso via the boiler outlet.
4. As soon as the operating dial is turned from its neutral position, either the steam
nozzle or boiler outlet will open, and steam or hot water will be emitted.
Before Using For The First Time
Before the appliance is used for the first time, all detachable parts must be thoroughly
cleaned as described in the section “Care and Cleaning”. Refit the drip tray and
drainer to the appliance afterwards. Clean the system by flushing with hot water.
Instruction as follows:
1. Fill the container with water.
2. Insert the filter holder with the filter sieve, but without putting any ground coffee in.
3. Place a container, e.g. a suitably sized cup, underneath the outlet openings.
4. Insert the plug into a wall outlet.
5. Set the hot water / steam selector to the hot water position (button released).
6. Use the On/Off switch to turn the appliance on, and activate the operating dial
(position )
7. Hot water is emitted from the outlets.

8. Leave the pump running until about half the water in the water container has
passed through.
9. Then switch off the pump by turning the operating dial to its neutral position.
10. Empty the cup and place it under the steam nozzle. Turn the operating dial to
position .
11. Water is now emitted through the steam nozzle.
12. Let the water pass through until the amount left in the container has reached the
‘Min.’ mark.
13. Switch off the pump by turning the operating dial to its neutral position.
14. This procedure should also be followed if the appliance has not been used for an
extended period of time.
Operation
Filling with water
• Fill only with fresh water on a daily basis; make sure that the water container is
cleaned at regular intervals. Do not switch the appliance on unless the water
container is filled.
* Lift up the water container lid and flip it back.
* Lift out the water container.
* Fill the container with (non-carbonated) cold water while observing the
‘Max’ marking on the water container.
* Once filled, replace the container in the appliance and push it down in order to
open the valve in the bottom.
* Close the lid on the water container.
• The water level must be monitored and, if necessary, the container refilled in good
time.
• If the pump have started sucking in air from the empty water container, fill the
water container first with the indicated maximum amount of water. When ‘filling’
the system afterwards, it may take a few moments before water is emitted
again.
• Deposits of dirt and lime may cause the seals in the outlet at the bottom of the

water container and those around the valves to leak. Check the seals carefully
each time the water container is inserted and, if necessary, carefully remove any
existing deposits.
Inserting/removing the filter holder
• The filter holder is fitted to the appliance by means of a bayonet type locking
socket. When attaching the filter holder, its handle must be facing to the left of the
boiler outlet (a). To lock, turn the filter holder firmly as far as possible to the right
(b), i.e. in an anti-clockwise direction.
(a) (b)
• To unlock and remove the filter holder, turn it to the left, i.e. clockwise.
• Do not remove the filter holder while the appliance is in use, since the filter holder
is under pressure. Once the brewing cycle is complete, wait around 30 seconds
before removing the filter holder.
Hot-water/steam selector button
This selector allows you to choose either hot water or steam.
• To dispense hot water, the button must be in its released position. The hot water
can now be drawn through either the boiler outlet or the steam outlet.

To dispense steam, the selector button must be pushed in. The steam can be
drawn through the steam nozzle using the valve selector control.
Preheating the cups and the filter holder
We recommend pre-heating the cups and the filter holder, as this will ensure a higher
coffee temperature.
1. Insert the appropriate filter sieve for 1 or 2 cups into the filter holder.
2. Fit the filter holder to the appliance and place one or two cups underneath the
holder.
3. As soon as the operating temperature has been reached, the temperature
indicator light will turn off.
4. Turn the operating dial to the symbol.
5. Let the cup(s) fill up to approximately 3/4, and then turn the operating dial to its
neutral position to switch off the pump.
6. Put the cup(s) aside to warm up and pour out the water just prior to making
espresso. The cups may also be placed on the warming top to pre-heat them.
Filling the filter sieve with ground coffee
• Remove the preheated filter holder.
(Caution: the filter holder is hot)
• Fill with finely ground coffee:
- 1 cup = 1 level measuring scoop
- 2 cups = 2 level measuring scoops
• Note: if the filter holder is over-filled, it will not lock properly under the boiler outlet.
2 level measuring scoops is the maximum quantity.
• Use the measuring scoop to distribute the ground coffee evenly and press it down
lightly. Any excess coffee powder on the rim of the filter holder must be removed.

Removing the used grounds
• After the brewing cycle is complete, wait approximately 30 seconds until the
operating pressure has been sufficiently reduced.
• Exercise caution when removing the filter holder, it may still contain some hot
water.
• Please note that, when preparing 2 cups of espresso, slightly more water will
remain on the espresso grounds.
To remove the coffee grounds, gently tap the side of the filter holder against a
vertical surface. Wipe the filter holder thoroughly clean afterwards.
Preparation
Espresso
• Fill the container with water.
• Insert the plug into a suitable wall outlet and use the On/Off switch to turn on the
appliance. The main indicator light and temperature indicator light will be turn on.
• Set the selector to the hot-water position (button released).
• Preheat the filter holder and the cup(s).
• Remove the filter holder, fill with ground coffee and re-attach it.
• Place the cup(s) underneath the outlets.
• When the temperature indicator light turns off, turn the operating dial to position
. The espresso is now delivered straight into the cup(s).
• Once the cup(s) are full, turn the valve selector to its neutral position to switch the
pump off.
• Wait for approximately 30 seconds before detaching the filter holder and
removing the coffee grounds.
• The espresso machine is now ready for another brewing cycle.

Dispensing hot water
• Place a cup under the steam nozzle.
• Turn the operating dial to the position.
• Once the desired quantity of hot water has been collected, turn the operating dial
to its neutral position to switch the pump off.
Dispensing Steam
This appliance is designed to dispense steam for heating up milk or other beverages
through the steam nozzle, and also for the frothing of milk when making cappuccino.
To dispense steam, push the hot water / steam selector button in. After a brief
heating period, the temperature indicator light will turn off. Steam can now be drawn
from the steam nozzle by turning the operating dial to position . To ensure
that the boiler outlet is safely covered, the filter holder and sieve should be fitted when
steam is being dispensed.
Making Cappuccino
Generally, Cappuccino is made using espresso, hot milk and milk froth in equal parts.
For Cappuccino, bigger cups must be used. The espresso must be prepared before
the steam function is used for frothing the milk.
Frothing the milk
• Fill a suitable jug with around 100 ml of cold milk (do not preheat the jug).
• Push the hot-water/steam selector button in.
• Place the jug with the milk under the milk frother.
• Turn the operating dial to the position . Steam will now be emitted from
the nozzle.
• Move the jug around with a circular motion for around 40-45 seconds, making sure

that the nozzle remains submerged while frothing is in progress.
• As soon as the milk appears to be sufficiently frothy, turn the operating dial to its
neutral position to switch the pump off. During frothing, the milk will heat up, but
must not be allowed to reach boiling point.
• Once the operating dial is in the neutral position, a slight noise will be heard. This
is due to technical processes and perfectly normal.
• Pour the hot milk into the cup containing the espresso coffee and, using a spoon,
spread the milk froth over it.
Reheating beverages
• Push the hot water / steam selector button in.
• Insert the steam nozzle into the liquid to be reheated and turn the operating dial
to the position.
• Once the liquid has reached the desired temperature, turn the operating dial back
to its neutral position.
• When steam is no longer needed, release the selector button again.
Care and Cleaning
• Before cleaning the espresso machine, ensure it is disconnected from the power
supply and has cooled down completely.
• To avoid the risk of electric shock, do not clean the appliance with water and do
not immerse it in water.
• Do not use abrasives or harsh cleaning solutions.
• Before cleaning the appliance, and also in the case of the appliance remaining
unused for an extended period of time, the remaining water in the container
should be drained completely. The water container should be thoroughly rinsed at
regular intervals.
• The steam nozzle must be cleaned immediately after the frothing process. Wiping
the nozzle with a wet cloth should suffice.

• If the steam nozzle becomes blocked, proceed as follows:
* Pull the milk frother off the steam nozzle.
* Unscrew the nozzle from the steam tube, using the measuring scoop as a
tool.
* Insert a fine pin or needle into the steam nozzle to remove the blockage.
* Screw the steam nozzle back onto the tube.
* Push the milk frother back onto the nozzle.
• All removable parts may be cleaned with warm, soapy water.
• Always empty the drip tray in good time. Tray and drainer may be cleaned with
warm, soapy water.
• The exterior housing may be wiped with a dry or slightly damp, lint-free cloth.
• The boiler outlet may be wiped with a moist cloth.
• The gasket area around the boiler outlet (at the bayonet locking socket) should be
cleaned using a brush. A hard brush is recommended.
EN
Descaling
• Depending on the water quality (lime content) in your area as well as the
frequency of use, all thermal household appliances using hot water need
descaling (i.e. removal of lime deposits) on a regular basis to warrant proper
functioning.
• For descaling, any commercially available citric- acid-based descaling agent for
coffee machines may be used.
• Pour the descaling solution into the water container.
• As described in the section “Making espresso”, (but without any ground coffee
being placed in) and, with the filter insert removed, switch the appliance on and
let it run, cup for cup, through the filtration cycles. Allow 5 minutes between each
cycle for the descaling agent to take effect.
• To clean the appliance after descaling, fill the water container twice with clean
water and let each filling run through its filtration cycles until the container is
nearly empty.

• Rinse the filter holder thoroughly with warm water.
• Do not pour descalers down enamelled sink
Disposal
Packaging materials
The packaging materials are environmentally-friendly and can be recycled. The plastic
components are identified by markings, e.g. >PE<, >PS<, etc. Please dispose the
packaging materials in the appropriate container at the community waste disposal
facilities.
Old appliance
The symbol on the product or on its packaging indicates that this product may
not be treated as household waste. Instead it shall be handed over to the applicable
collection point for the recycling of electrical and electronic equipment. By ensuring
that this product is disposed of correctly, you will help prevent potential negative
consequences for the environment and human health, which could otherwise be
caused by inappropriate handling of this product. For more detailed information about
recycling this product, please contact your household waste disposal service of the
shop where you purchased the product.

.
.
.
.
(PE)(PS)
.
.
.

.
.
.
.
/.
.().
.
.
.
.
.
..
..
:
-
.
-.
-.
-.
-.
.
..
.
.
()..
()
()
.
.
.
""()
.5
.

.
/.
.
().
/.
.
/.
()
/.
/..
30.
.
.
().
.
./.
.
().
.
..
().
100().
/.
.
().
40‐45.

.
1-/.
2-/.
3-.
4-().
5-/3/4
.
6-/.
.
.
(:).
:
-=.
-=.
:.
.
.
.
30.
:.
2.
.
.

..
.
-.
-.
-()"Max".
-
.
-.
.
.
"''.
.
.
/
().
().
()()
.
.
30.
/
.
.
..
.

:
1.
/.
2.
/.
3.
:.
4.
.
"
"..
:
1-.
2-.
3-.
4-.
5-/().
6
-/().
7-.
8-.
9-.
10-..().
11- .
12-"Min".
13-.
14-.

:
:
.
.
.
((
.
.
.
.
.
.
.
.
.
.
.
..
.
.
.
.
.
.
..
.

8
8
1.
10.
2.
11.
3./12.
a.
b.
4./13.
5./14.
6.
15.
7.
8.
9.
Table of contents
Languages:


